jd1923
-
Posts
3,256 -
Joined
-
Last visited
-
Days Won
244
Everything posted by jd1923
-
Be careful with using these ramps. The inner shackles on the Oliver leaf springs are know to flip and when I tried the ramp (one I've had for years) it flipped the leaf shackle and the suspension looked cock-eyed when rolled off the ramp. I had to tow the Oliver over a curbed entrance to a service station to get it to flip back. Wait for the LOUD BANG when it flips itself back! Just use the built-in jacks for this purpose or when changing a flat tire. There is a member here, with more experience than all of us, who says the Oliver can sit on these jacks forever. I prefer to park near level using Anderson levelers and do not like the trailer wheels to be up in the air when camping or parked for any extended period of time, but NP while you are servicing the trailer. However, if you are going to remove both tires, you can use the jacks to lift the trailer then please use jack stands for your safety. I always travel with one jack stand in the truck toolbox!
-
Wheel bearing grease is high temp, but a heat gun can burn the grease and will not solve your problem. I would use the stabilizer jacks one side at a time to relieve the pressure.
-
I believe the trick is to have enough bottles to mostly fill the space, left to right, so they hold each other up. We fill the bottom space and use the top bar for a wash cloth.
-
Are these available everywhere else, but not yet in the USA? Dometic's new FreshJet 7 with inverter compressor: https://www.dometic.com/en/outdoor/lp/freshjet-7
-
Maybe because the 30A is an older design. At least we know you and @johnwen are seeing the same thing disconnected, but until he gets a reading on the app there is no way to know if it's truly charging and how much charge it's producing. The Orion XS 12|12 50A powers up with house batteries only connected. It is Bluetooth discoverable and no VE. port, no other connections (+ input open). Our Victron SmartSolar MPPT 100/30 also powers up when connected house batteries only (and this is of the same old design, same large size of the Orion 30A with huge heat sink). All 5 Victron devices that you see in my app picture above will be on or in standby mode 24x7. So I'm of the opposite opinion. Meaning this is how it should be and I'm happy for that. Without connection to the tow vehicle, you know the device is working and it can be configured. Having more than enough available AH and wanting our Victron inverter/charger ready on 24x7, parasitic draw, who cares? Maybe everybody but me! The Victron Multiplus-II on standby takes 1A and this efficient Orion 50A charger only requires "standby current consumption < 1.5mA." I also run our exterior Courtesy Lights on 24/7 using 0.3A. Our hull sits outside, never in storage, and with solar it's always between 97-100% SOC, except when camping using large appliances. I figure with all devices on standby we use <40AH in a 24 hour period and solar recharges that everyday in 2 hours +/-.
-
That's odd. The blue light came right up on my Orion charger as soon as I reconnected the house batteries and I don't have it connected since the truck is not yet wired! Even when the Anderson coupler is disconnected the DC-DC charger is getting 12V from the house batteries which should allow it to power up. I wonder if your Orion charger is properly grounded to the Oliver negative bus and it's only getting ground through the truck. Either that or the 30A Orion works differently than other Victron products. Have you checked how many amps your getting when towing? Just hoping yours is functioning as it should. Asking @Snackchaser and @MAX Burner, does your Orion DC-DC charger power up when disconnected from the tow vehicle? (blue light on or showing in the Victron app)
-
This didn’t make sense to me originally, since my Victron solar charger does not need to be connected to be discoverable and see it on the app. I asked this before, do you see it on the app now when you park and disconnect? I just got my trailer side wiring done. No work on the truck yet, so the Anderson is obviously disconnected and I got this immediately. I have not yet logged in so it’s in an Other Devices list. We got us a Victron family of five with the new Orion added bottom of the list!

-
Below is another video on the Gree Eco-Cool. Look at the specs sheets he shows. Right at the 5:20 time the spec sheet states: Starting Current - Inverter Driven Soft Start. It does not state that on the user manual I downloaded. Can their statement about not needing a soft-start be true? The second video shows the Gree performing and during start-up does not spike and always running at 900W! Watch at 27:00 time.
-
So in the video he measured with a phone app, and who knows how accurate that is, but he measured both A/C units the same way. His numbers were 64 for the Turbro and 56 for the Gree which is a significant difference. Each time he was in the room with the Turbro the sound was apparent, and he complained of it, but not so the Gree Eco-Cool. Gree advertises High Fan 56, Med 52, and Low 43 dB which seems reasonable. The Dreiha Atmos spec sheet merely states one number at 53 dB, go figure. So many spec sheets have wrong data listed, trust but verify. The Turbro is an inverter design, but I do not believe the others are so. It appears to be a great product, technically. I wish the interior air handling was more thought through. Given its low power consumption, trim exterior design, very low exterior sound and other factors, it may be a very good product for those who live in hot/humid areas needing to run the A/C often and for those wanting to run A/C on superior battery AH and inverter capability. I can certainly see why @Derek B is interested! With some time in the market, I hope to see some positive consumer reviews.
-

To Central Texas from Central Arizona the Slow Way
jd1923 replied to jd1923's topic in Campgrounds & Parks
Haven’t heard of anything. I just checked 511 AZ app typed destination Show Low and no warnings along the route from here to there. Don’t know about New Mexico. Camping should be wide open Mar~Apr and temps are warm for the elevation. Come see us in Prescott! Have a great trip. -
The Gree Eco-Cool Spec sheet still states R410 refrigerant and all dimensions look to be identical except Gree is stating height an inch taller at 12.2" where the Atmos states 11.14". Not all spec sheets are accurate but the upper shell can be different. Gree Eco Cool Spec Sheet.pdf
-
The following should convince all that the Gree Eco Cool and the Dreiha Atmos 4.4 are the same. Gree was selling units with 410A refrigerant summer of 2024 but the manuals for BOTH products cite R32 today, 410A being phased out. Everything about these look the same today! Tosot brand might also be the same: https://www.amazon.com/TOSOT-Conditioner-Non-Ducted-Rooftop-High-Efficiency/dp/B0CDWR5RP9/?th=1 Dreiha Atmos 4.4 Manual.pdf Gree Eco Cool Manual.pdf
-
Thanks @Derek B this is interesting and I loved the fact that this YouTuber also had the Gree to compare. My understanding is the Gree and Atmos units are manufactured in the same plant, or at least the same design and build. However, the Gree runs on 410A refrigerant and the Atmos runs on the newer R32 making it more energy efficient. @Ronbrink Ron, please confirm. Does the Gree in the video look to be very close to your Atmos? It could have a different interior plenum. We had discussions about this back when Mike @rideadeuce decided on his Atmos installation. Geoff, you may have the noise level, dB number wrong for the Turbro unit. All I know is what was compared in the video, but watching last night I remember him measuring the Turbro at 64 dB and the Gree at 54-56 dB (which is a huge difference). He made a point of the Turbro being noisy inside (very quiet outside due to the inverter compressor) because the cold air is forced strongly down on the flimsy plastic interior cover, no internal ducting as in the Atmos/Gree. I watched another of his videos. He liked them both but mentioned interior quietness of the Gree a good 8 times! He had me sold on the Turbro until this part. Given Gree and Atmos are similar with the Atmos being a step up on refrigerant used, I'm still in the Atmos camp. He found it to be the quietest, and I heard how quiet the Atmos is in Ron's Oliver. To me interior noise is my #1 criteria. Not working over 109F is certainly another issue, though we do not want to ever be camping when it's so hot. He also measured the Turbro using less energy (watts) than the Gree, but that the Gree was much more efficient (and obviously quieter) than the Dometic! It may take another design cycle or two for Turbro to improve their interior air handler. If a slight improvement in noise level is OK to you, this unit sure seems to perform well. Certainly better for the idea of running air while on inverter. Thanks again, Derek!
-
Epoc Lithium "Keep-It-Simple" Upgrade Advice
jd1923 replied to tallmandan's topic in Ollie Modifications
OTT and most Oliver owners have gone with a Blue Sea Systems. Given you will switch the ground, I would get the black one. This ON/OFF switch is rated 300A: https://www.amazon.com/Blue-Sea-Systems-6008-Selector/dp/B00558LSJE/?th=1 Given your switch will just sit on top of the outside battery, I would tape it down to the top with some 3M VHB 4950 tape. Given you're thinking the two 300AH Epoch Essentials, your picture shows two good jumper cables that should fit like I mounted mine. One of the two shorty cables can be used to go from the negative battery post to your cut-off switch. This should add a good 6" to the main negative cable which in my installation is the furthest out. Yes, get bolts long enough, but just long enough. There is less than 3/4" of thread in the batteries. You need enough threads to hold well but not too much to bottom out the bolt where it would not hold the cables tight. Two included bolts may fit where you would have just one cable bolted down. Two should be about 1/2" longer to hold the main cable, the jumper cable and two of the thinner 6 AWG cables. The manual calls for M10 bolts (metric) torqued to 35 Nm (25 lb-ft). I used a short 13mm box-end wrench, short so not to over-do it and got each "good-n-tight" by hand. I would buy today and not wait until the last day. Remember, we're here to help. Take the plunge! Since last summer, I have been extremely happy with ours. 🤣 -
Thanks Bill, good temporary solution. Our final solution is when we (my son) gets up on the roof and heaves the bee-ach to the pavement so we can install a new A/C! 🤣 Do some of you guys really get somebody to buy these units used?
-
Epoc Lithium "Keep-It-Simple" Upgrade Advice
jd1923 replied to tallmandan's topic in Ollie Modifications
Thanks Derek, good find! Looking closer, I believe I see three lugs below the nut. If this is what Derek had then it's likely the case. Therefore, no hydraulic crimper tool required. -
Epoc Lithium "Keep-It-Simple" Upgrade Advice
jd1923 replied to tallmandan's topic in Ollie Modifications
Sherry, is your battery the style he showed in the video? He showed the one with Victron Comms, the more expensive battery, not the Epoch Essentials. Mike @rideadeuce installed two Epoch 460s with Victron Comms, wonder if he has seen any issues. I remember updating firmware on ALL of my Victron products but not the 300AH Epoch Essentials. Just wired up, loaded the app to view stats, nothing else. Go figure firmware screwing up hardware in the state of technology today. If there is ever a firmware on my Epochs, I'll just say NO like I do on my iPhone until I have to, many versions later. -
Epoc Lithium "Keep-It-Simple" Upgrade Advice
jd1923 replied to tallmandan's topic in Ollie Modifications
I have solar and everything else, but when I did my installation I cleaned up the OEM installation. They had secondary 6 AWG cables from the solar charger and to the internal 12V DC system and I got them out of the battery bay and attached them to internal +/- buses. Yes, you could stack them up but you have another issue. It appears your main 4/0 cables have lead automotive post-style terminals. You will need to change these to 5/16" eyelet style lugs, something like this: https://www.amazon.com/SELTERM-Marine-Terminal-Battery-Eyelets/dp/B073FD8ZDR/ This work will require a hydraulic crimper and you would either need to do this yourself or tow your Oliver to a local trailer shop or battery store. You could likely make the two 300s work. Disconnect all the wire ties and remove everything holding the main cables down and measure how far they come towards the battery door. If you do that, I'll measure mine to verify if it would work for you. I have a 2x4s behind the batteries and another in-between and without these the batteries would be 3" closer to the inside wall. Your main cables come from the right (rear) side wall so the way I have mine should work for you. Yes, one 460AH battery, posts positioned in the rear would work but everything would be crammed in the rear and with the tray full out you would have to reach in above the battery with a wrench to connect the cables. They will not be exposed with the tray full open. The Epoch Essentials 460AH weighs 84 LBS and that was another reason I preferred the two 300s, because I could just barely lift one at a time. You got me on the trailer harness wire. Our hull does not have that crazy junction box under the bath vanity. I would look for the + bus I showed you before or disconnect it at the plug as @Derek B mentioned. -
Epoc Lithium "Keep-It-Simple" Upgrade Advice
jd1923 replied to tallmandan's topic in Ollie Modifications
For those considering this sale, the 15% offer ends Tuesday 3/18! This is the distributor I went with vs. purchasing from Epoch direct. They have the 15% OFF listed for Epoch (see pic). When I ordered from them, it included free shipping and no sales tax was charged (like saving another 8.65%). Cannot be sure if this is still true. They are a Colorado company, so @tallmandan also living in CO would likely be taxed, but buying from a local company is also a good thing. Looks like everybody is pushing you to buy two 300s! You should be happy with your decision either way! 😂
-
They cycle separately but the interior fan is always running when powered on, compressor fan only running when the compressor is running (though likely runs for a period after for cooling). When observing @Ronbrink's Atmos at the Texas Rally, it was just after noon and about 80F. Ron and Brooxie were outside in the shade with the A/C OFF. They had not yet run the A/C that day. Ron, Ken @mountainoliver and I went inside. Ron turned on the Atmos and we talked for 20 minutes or so, hearing every word said with a very light fan sound in the background. Just a faint sound so that it was not apparent the fan was running. In this short time the inside became quite comfortable and according to a humidistat that Ron had (do trust Ron for all the required gadgets), humidity dropped by 11% while the temp broke under 70F. One thing all these YouTube guys get wrong with sound testing is the valid comparison is dBs produced on LOW fan, not high. I'm generally not sleeping with any fan on. But if we need cooling at night the fan will certainly be on low. If you're concerned about dBs, you would run the fan on low. What is the low-to-low fan noise comparison? The Dometic Penguin II is LOUD regardless of fan position and on our unit, the difference between high or low fan is negligible. Comparing low to low fan, on my ears no dB phone app, the Dometic is 3 to 4x louder than the Atmos on low fan. I just emailed Kevin at SDG with questions about availability and the SoftStart. I hope to order ours early April and get it installed by May. Will not have summer temps but on sunny afternoons I will run amperage tests (on inverter) and sound tests, before and after, the best I can. I'll start a new mod thread when I do.
-
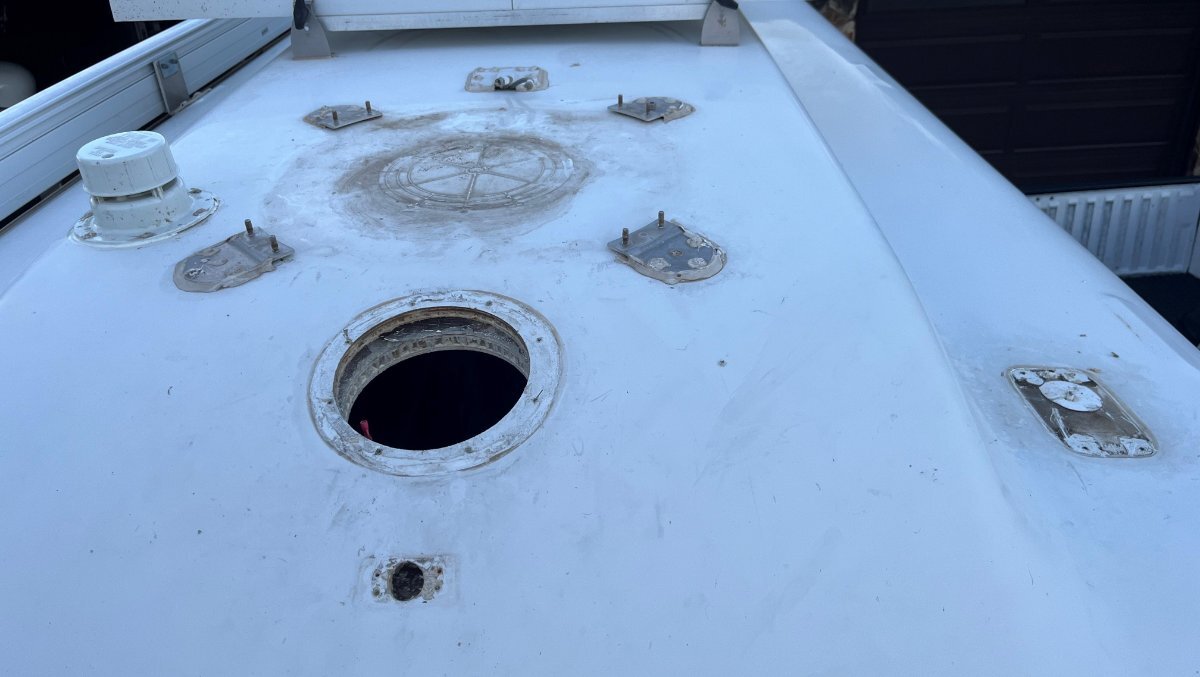
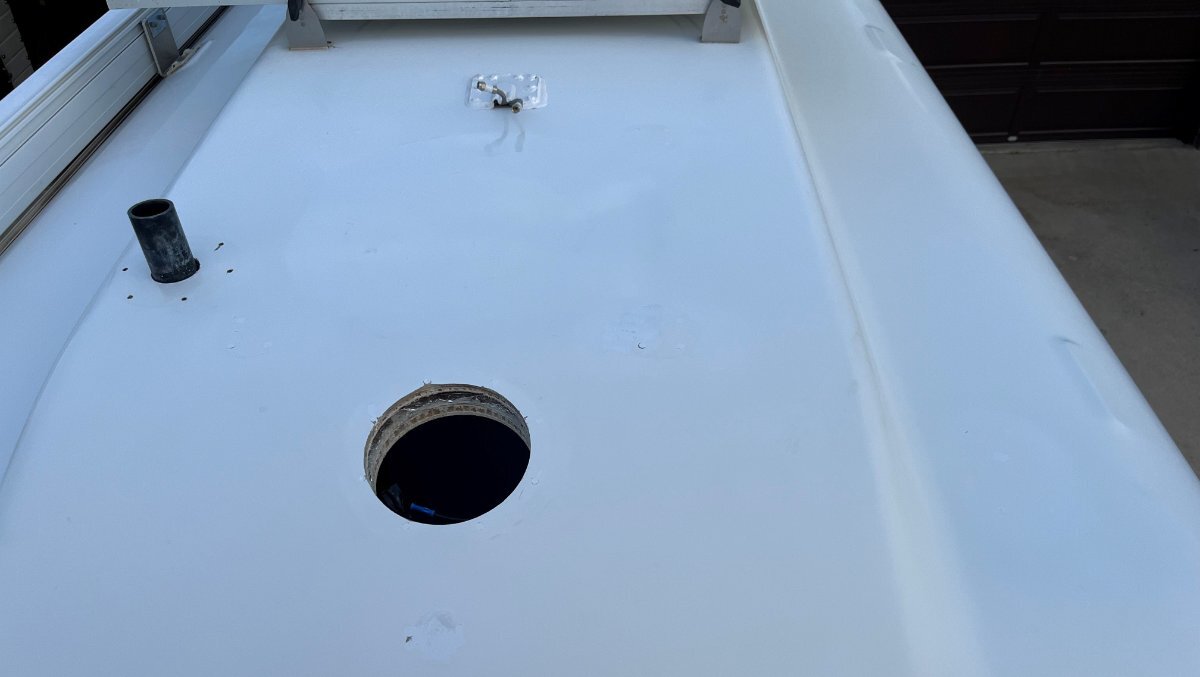
Better not to have these blemishes at all in the side of your hull. OTT has been installing these cheap ports, each requiring 5 drill holes in the side of the hulls. If you use these ports, just drill a single 1/4” hole for the wires, and use 3M VHB 4950 on the entire base, skip the 4 screws. I’m glad these were not installed in our 10-year-old hull. Our rooftop was another story. Reuse them or fill them and don’t drill new ones, if at all possible. Should your hull look like this? Or would you prefer it to look like it is now after MANY HOURS of detailed fiberglass repair? There are better methods of installation! 🤣
-
I would repurpose whenever possible vs. drilling new holes in your hull. When adding suitcase solar, instead of adding a new Zamp or SAE port, I repurposed the cable TV port since it was something we would never use. If you do add another outlet, I suggest not drilling the four 1/8" holes. Just use VHB tape or a sealant. It took more work to finish the fiberglass than to build and run the wire harness! 🤣
-
So I recently made this purchase and it did not fit too well (without modification). There was extra depth adjustable to fit around width of the truck tires but the step was sitting too high even at its lowest setting. I noticed that you could get another 2" drop if you removed the screw with the rubber stop. I drilled a hole in the vertical to remount the stop in the lower position. If you do this, be careful as drilling in the exact correct location is difficult. I also removed the Clevis pins on the top portion in favor of bolts with a flat-rounded screw head on the tire side. On the lower Clevis pins I substituted real cotter pins so that nothing will fall off during travel. We'll likely have this always mounted on our RR truck tire at campsites. Chris & I will be able to easily reach to the center of the truck bed. I will also use this on the front tires when working maintenance under the hood. Another nice feature as compared to a milk crate step is that when parked on a hillside you can rotate this step to be level with gravity. A great inexpensive addition! Thanks again, Stephanie and Dudley!
-
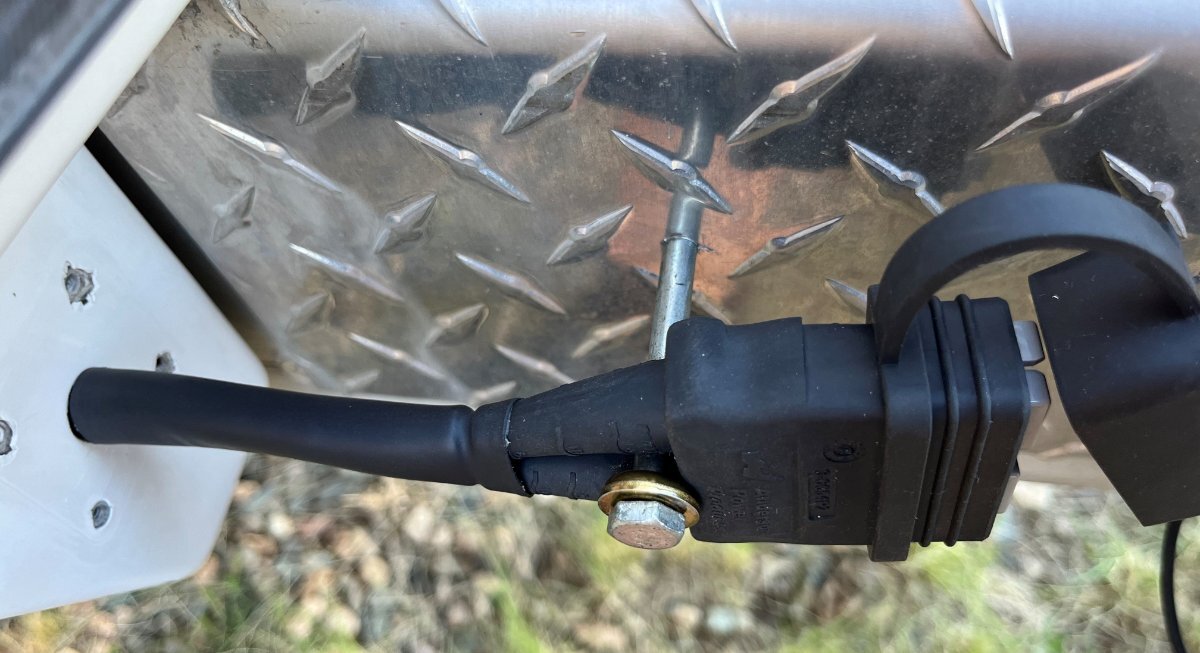
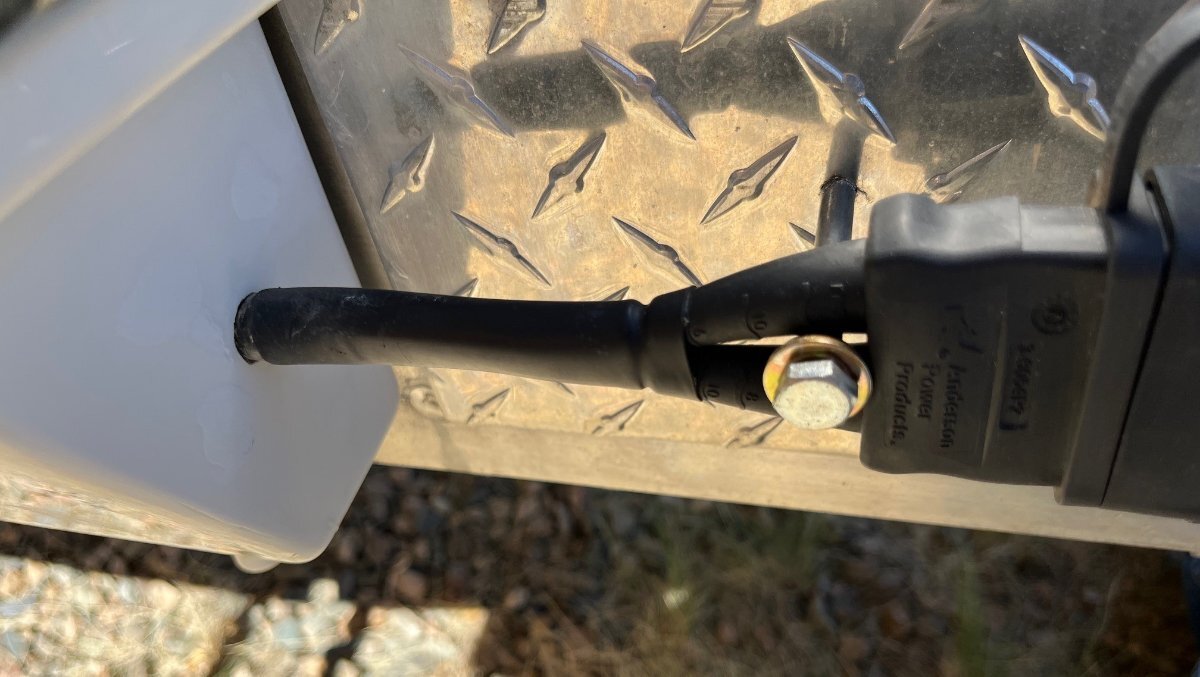
This could be a very good idea for my application. Could I have both connected? Both the 12V+ from starter battery and 12V+ from tow harness to power the Pepwave router/Starlink system? Or would this require a relay that would disconnect 12V+ from the starter battery when 12V+ is connected at the trailer harness. I'm thinking such relay would be required. If so and you could suggest a viable relay it would be greatly appreciated! Thanks again Geoff, for sharing your knowledge.
-
Thanks @Snackchaser, I was watching one of the videos that @rich.dev supplied, and I ran across this video. Rich and this guy, Everlanders on YouTube, went with the larger dish. He explains (play at 4:40) that aiming the Starlink dish is no longer necessary with more satellites in service. Though Goeff mentioned the "typical problem with the Mini is "partial" obstructed view." I can see that and thanks again, Goeff and Rich. Maybe I can flat mount the larger less expensive Dish if they offer the $50 service on that hardware. It would be pretty big on the roof of our pickup truck but doable. Already, so many people ask me, "What's that up on your truck?" So many questions and recently many good answers! I will be contemplating all the options for a while longer...