jd1923
-
Posts
3,646 -
Joined
-
Last visited
-
Days Won
281
Everything posted by jd1923
-
The Victron Multiplus II and many other capable inverter models have a built-in ATS. The 2KW Xantrex OTT originally installed in our hull had an external ATS and remote power switch. These are two different worlds. True for those not connected to shore power, without rooftop solar and/or who store long-term indoors. If not, as in my case the solar produces 10x parasitic draw on a daily basis. In fact, I can be 60% SOC on 600Ah LiFePO4 batteries, running exterior courtesy lights and in a few days SOC is 100%. Even in winter sun in AZ, and yes as you wrote in our "home area." However, I truly recommend those who have full inverter/charger capability, 3KW with built-in ATS, Xantrex or Victron, leave your inverters ON always when your Oliver is in use (I know some manufactures say not too, but I have trouble being told what to do without valid reason)! It protects against power outages, brown-outs, if Victron it provides power-assist and more. Heck, I've been running our A/C one hour prior to arriving at a full hook-up site and when we get there the cabin is cool and no hurry plugging in unless SOC is near 20%. Of course, you must have viable Ah capacity in LiFePO4 to do so. Use the technology that God and Mankind has provided us! It's wonderful and we finally had a wonderful 5-week trip to truly experience the amazing features, in all the upgrades I've made to our Oliver and tow vehicle! 😂
-

The new Starlink Mini Router, for what ails you!
jd1923 replied to Snackchaser's topic in Mechanical & Technical Tips
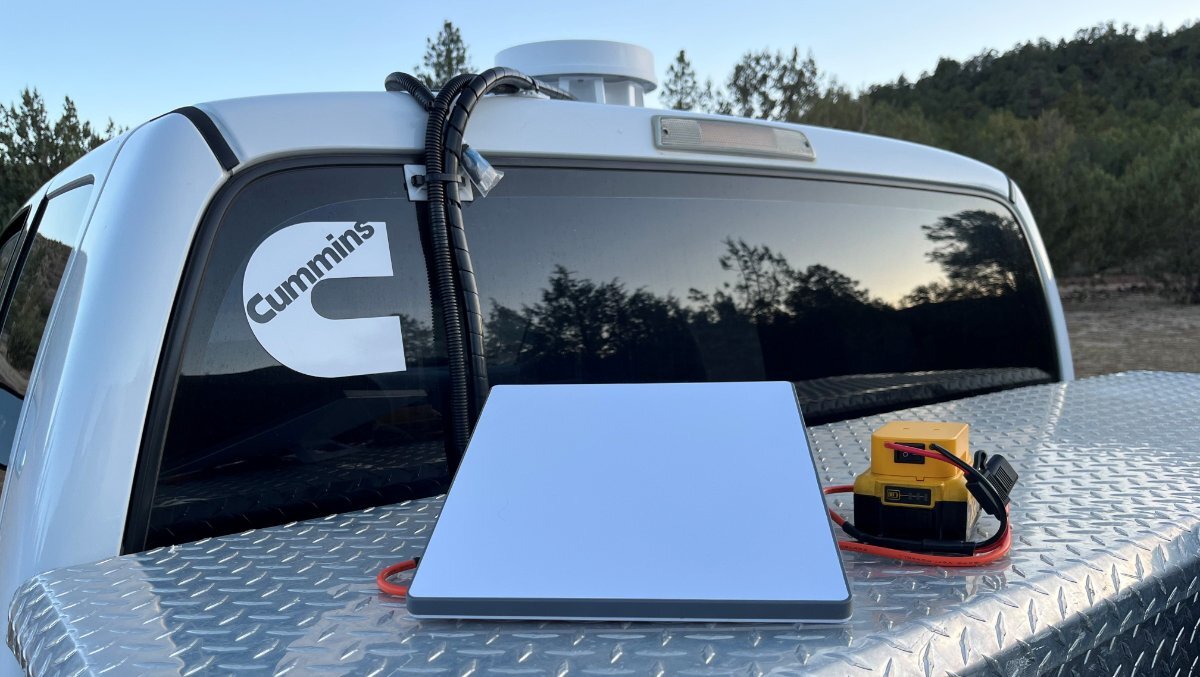
OK, now you got my attention! A cabled solution between Starlink Mini and Mini Router is not of interest to me and your test results show the true value of the Mini Router! Thank you, Geoff. I just ordered one through the app Shop menu. I also noticed the travel kit for $45 and got that as well. I did not order a cabled power solution, as of yet. I thought you had written about a 3mm male plug but could not locate that statement tonight. Would something like this work or is it another style plug? Does it also need a waterproof version like the Mini? https://www.amazon.com/ZEPFJHE-6-3mmx3-0mm-Connector-Replacement-Computer/dp/B0DKJN9L37/ Earlier when you had written your initial Starlink thread, this was all new to me and naively I thought it could be roof mounted. Immediately upon use, I realized the Mini is so particular to dish Alignment and Obstructions. So I ended up with a simple battery-powered solution (pic1) using the built-in Wi-Fi. This has worked well in the two months experience we have, but it is a pain to switch between Wi-Fi signals (Pepwave to Starlink) for TV streaming, laptop use and cell phones. Before realizing this I jumped the gun and had installed a wired solution using a Victron 12-24 DC-DC charger like you had used in a different configuration (pic 2 and if you look closely you can see the external cabling strapped down in pic1). To date this installation has been a waste and sits idle. Now shooting in the dark here... Could I use my roof-top wiring, change the power plug to the correct style for the Mini Router, connect Ethernet between the Starlink Mini Router and the WAN port of my Pepwave router? This would be so cool if possible, one Wi-Fi login and my installation would finally have purpose. I'm over my head, re whether the Ethernet port on the Mini router could be used in this manner or ONLY to connect to the Mini dish.
-
Problem with city water connection
jd1923 replied to Ospreybob's topic in Mechanical & Technical Tips
Ours work as designed after 10 years. Not an easy campsite install unless you’re very small. My size, I can’t reach them and that’s why the job is still on my to-do list! 🤣 -
It really depends. Geoff really explained every facet nicely and fully in detail. Everybody should read his post a few times! When we had the OTT installed 2KW Xantrex, when OFF shore power you had to turn the inverter on to run anything 120VAC, but not the air. You wanted it off most of the time if you're running on LA or AGM batteries, when not needing AC appliances/outlets so you would not loose SOC%. With a 3KW inverter installed, generally all AC circuits run through the inverter including the A/C. This is also how I installed our Victron Multiplus 2. I see no reason to ever turn off our inverter, so we don't. In fact since I installed it a year ago it has been on 24x7x365 unless it's on high amp charge when I'm trying to get to sleep and it's making some noise under my bed. Then I turn it OFF via the Bluetooth app and turn it back ON when I wake. With ample Ah LiFePO4 batteries and rooftop solar and the fact that our hull sits outdoors and does not get winterized nor go in storage, our Victron MP2 in ALWAYS powered on ready to use anytime.
-
There is a question that I do not believe has been verified. Tosot a year ago was using R-134a refrigerant. Are they now using the more efficient R-32? Anybody getting one should know this ahead of ordering. Ron can confirm, but I'm pretty sure his and other Atmos use R-32 refrigerant.
-
Problem with city water connection
jd1923 replied to Ospreybob's topic in Mechanical & Technical Tips
Yep, still on my list to remove both check valves and water restrictors, clean up the check valves and reinstall on both lines. Toss the restrictors and then add a true external water pressure regulator. If I run on City Water it’s always slower (less GPM) than the new variable speed water pump I installed. I have recently noticed that I can run on City Water and turn the water pump on to get a good volume of water when needed. -
On Campendium you had to read the fine print to know that “Elk Ridge Campground” was actually Ridgway SP. We noticed the park sign as we drove in. Yes Mike, it is a beautiful location! I chose this place, without knowing better, because it was not on a lake! This place is rustic with only a half dozen decent RV sites. Looked like the SP had many more sites, more the usual setup. Most of the lake sites we’ve stayed had many mosquitoes where we’ve been chased in early at night! We sat out last night without those nasty creatures. Perhaps I’ve gotten used to the dry climate of AZ, preferring mountain views over lakefront locations. I know most people feel the other way, like my sister who has to live on the coast. She could not survive out where we live! 🤣
-
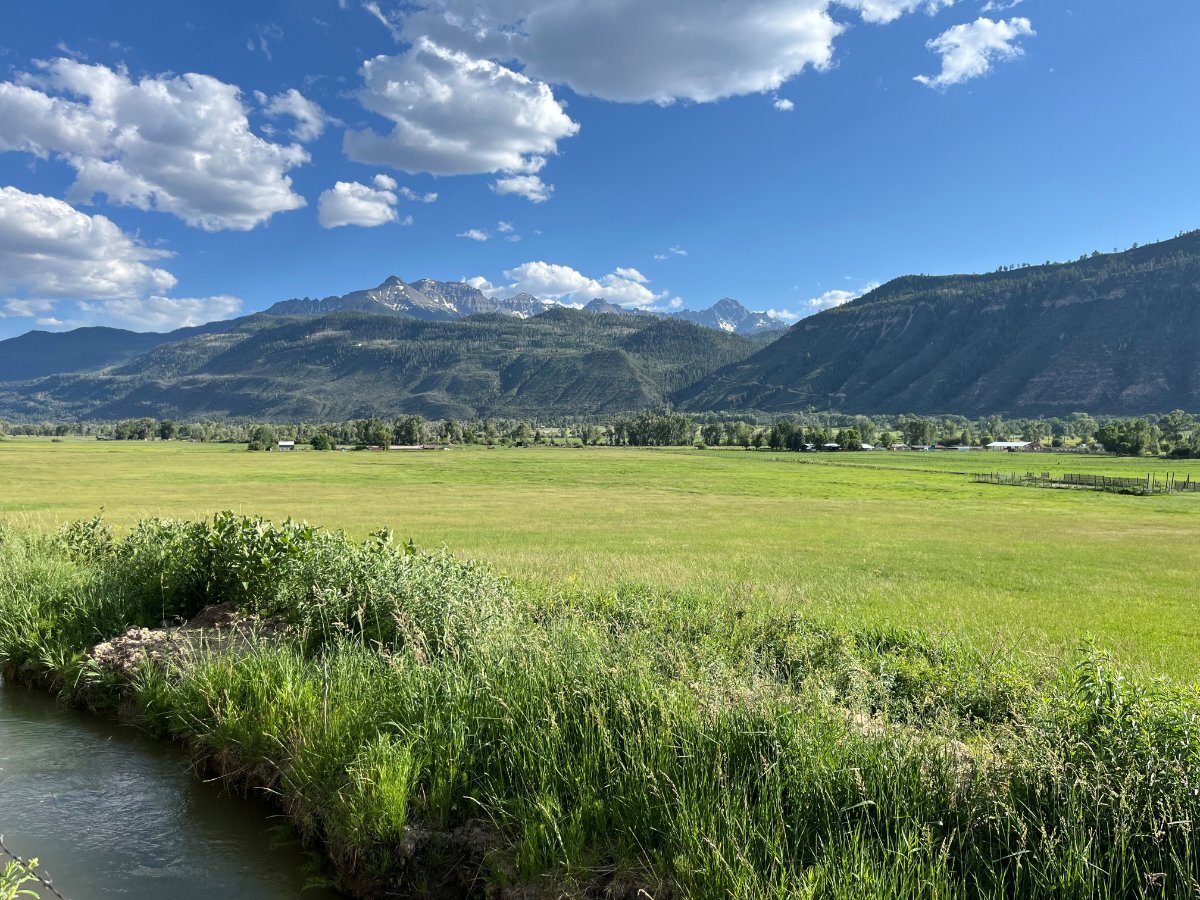
BaseCamp550 - just S of Ridgway CO, 8 miles N of Ouray, our view from the back of campsite #17 looking southeast. The tallest peak on the right is Mt Sneffels, one magnificent Colorado 14er, simply amazing! 😂 Certainly our best campsite in 5 weeks travel. An older RV park from the 70s. Though I have a leaf-blower, if I had my weed-whacker I'd clean up this site a bit. The view makes up for it and we have a triple-wide spot between a cabin, their front facing away, and the laundry which makes it private, not having RVs left and right. It's just so nice!
- 975 replies
-
- 13
-

-
New axles may not fit all older sub-frames
jd1923 replied to Wayfinder's topic in Mechanical & Technical Tips
Wow, it's been almost a year, right?! Chris in another thread, I wrote that I just placed a special order with Alcan Spring for Dexter D52 50.00 axles. They are an authorized Dexter distributor. Soon I should get confirmation and a part number for the correct axles for our hulls. If you are going to install yourself or in your home town, you could do the same given it works out for me. But perhaps you'd be going to back Hohenwald which is out of the question for me. Let us know what OTT says now and I will post here when I hear something. -
After spending well over three grand on axles, springs and other parts. And after my recent experience, I'm wondering, does our hull truly need a new suspension? (I'm just kidding 🤣, but you're not going to believe this!) We camped on the Yampa River valley, near Craig CO. We had used most of the water in our fresh tank the 2 days before, so when we setup camp I connected hose from our TV 35-gal aux tank to the Oliver boondocking port to fill the FWT. Afterwards I put everything away, but forgot to cap the hose port. The next morning we drove down to Alcan Spring in Grand Junction. A 3-hour 140 mile trip, starting with 40 minutes of dirt, then CO Highway 13 south where we dropped 2500 ft in elevation, then on I-70W and it was the usual windy day in the West. After I worked with the staff at Alcan, I walked back to our rig to grab a personal check for payment. As I walked behind the Oliver, I froze in awe, OMG, are you kidding me? The cap was exactly where and how I placed it the night before. There is no logic, no physics nor engineering science to explain this, but believe me, it's the God's honest truth! This just goes to show that Oliver Travel Trailers are rock-solid driving down the highway! 😂
- 922 replies
-
- 13
-

-
-

-

-
Dexter Axle Upgrade Options - To EZ or NevR Lube Design
jd1923 replied to Geronimo John's topic in General Discussion
I love my old truck and have put my heart and soul into rebuilding it. It drives and tows great, but as we’re camped in Ouray Colorado, no way in the world we’re descending the Million Dollar highway when we leave here. The other route back home through Cortez CO, driving past Telluride will be enough for our rig! (BTW it’s amazing here, see the Where’s Ollie thread soon for our campsite pic)! The torque, the gearing and braking of modern HD diesel trucks are amazing! Something I should have considered sooner. I will be giving this some hard thought this summer while we’re home! Thank you for this reminder, my friend Patriot! We’ll be home for by The 4th of July. A salute to you, Mike and the other Oliver Vets during our Nations 249th! 😂 -
Dexter Axle Upgrade Options - To EZ or NevR Lube Design
jd1923 replied to Geronimo John's topic in General Discussion
You’re welcome, glad it helped! I wasn’t mixing up proper names, but online names @GlacierGirl and @Galway Girl! I should have known better, since I’ve read many of Craig’s posts! Best wishes, JD -
Dexter Axle Upgrade Options - To EZ or NevR Lube Design
jd1923 replied to Geronimo John's topic in General Discussion
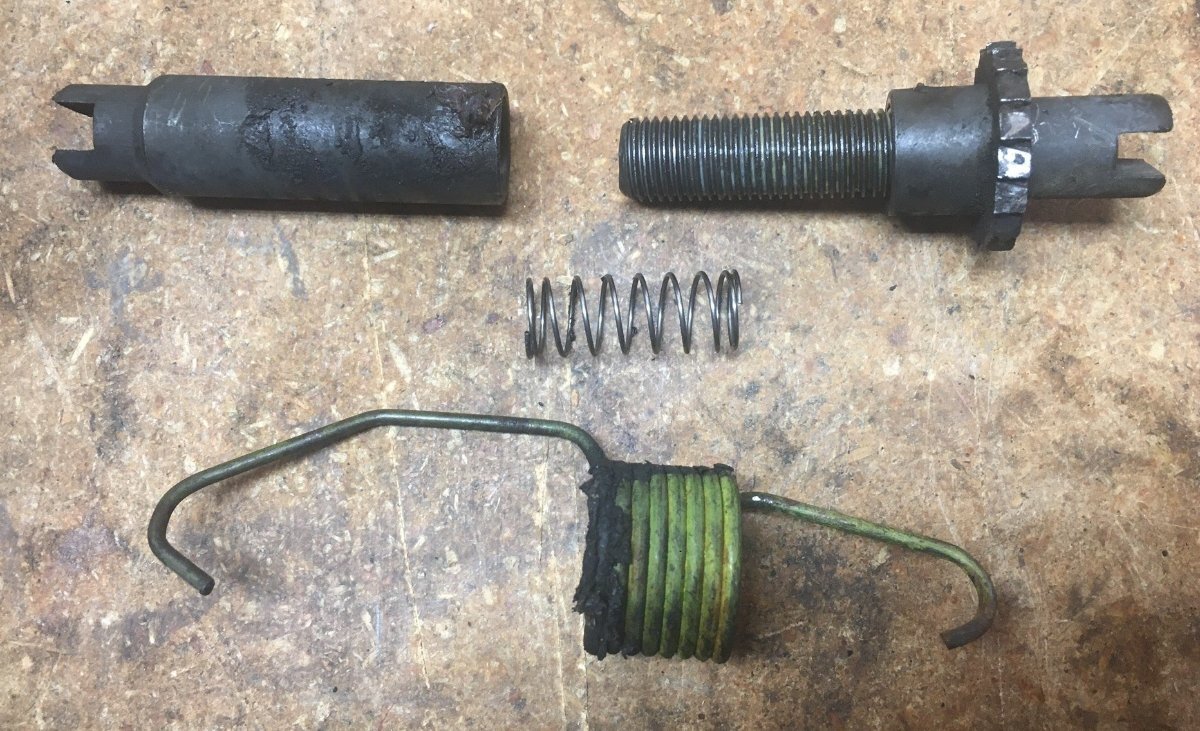
Barb & Mark, I remember you had shoes that disintegrated and the shop mechanic said it could be the self-adjusters. I had trouble seeing how that is possible and instead figured it must have been faulty materials or a spring or shoe holding clip or something was missing or not installed correctly at the factory. John E Davies, when he was an Oliver owner and Forum member, claimed that the self-adjusters could over-adjust and he changed his brake assemblies to be manual adjust. I would hate to have to manually adjust shoes, after how many miles? again and again! I just cannot see how the self-adjust mechanisms can get overly tight. If somebody can explain the mechanics behind this claim, please let us know. In my experience, including the maintenance I worked just prior to our current trip, they were loose, slightly on the fronts, more so on the rears. I tightened each so that I just barely hear the shoes rubbing the drum while spinning the tire. If somehow the self-adjusters were to mechanically lock up the brakes, you would first have to remove the rubber plug on the back of the brake backing plate. Then with two thin screwdrivers, use one to hold the adjuster plate up and another to move the gear in the opposite direction to loosen it. In automotive service sometimes you need to do this when brakes are so worn that you cannot remove physically remove the drum. In this case, the shoes down to bare metal have ground into the drum creating a lip in the drum. If this occurs in a trailer you would merely unbolt the entire brake assembly and replace it, they're relatively cheap. What happened to us recently is I just heard rubber screeching while coasting to a stoplight after braking and after releasing the brake pedal. The gain on the controller was too high or something. I let my foot off the brake and the brake magnet did not release for about 3-4 seconds. It then freed up and has not occurred again. When traveling in the mountains I have the gain set higher and this happened in the city at slower speeds. Too much gain can cause your brakes to lock up, but I'm not sure why they did not release after I let my foot off the brake pedal. Not sure if this answered your question or not. This was a short one-time occurrence for me. JD
-
Two little Ollies in a sea of 5th-wheels and Class-As!
-
Dexter Axle Upgrade Options - To EZ or NevR Lube Design
jd1923 replied to Geronimo John's topic in General Discussion
GJ, didn’t you rule out option B in your previous post? Now I understand why we remembered disc brakes are no-go for Olivers with 3500 LB axles. Too bad OTT installed 3500s on some of hulls. Yes, just over $2K plus tax and delivery. But this and another $1K for HD springs and parts and I will be happy with a completely over-engineered suspension, carefree for several years! -
Dexter Axle Upgrade Options - To EZ or NevR Lube Design
jd1923 replied to Geronimo John's topic in General Discussion
We stand corrected. Question is, is it a good idea, and would you truly want to? Disc brakes cool better, but will a 10” disc brake system stop better than a 12” drum? Absolutely not IMHO. They will stop some better that the 10” drums, so your adding more stress to the weaker 3500 lb. axles, smaller bearings, etc. Also, you’d end up spending near $2K adding disc brakes, so why not spend $2K for new axles, Nev-R Lube bearings, new brakes, everything new and 5200 LB HD! That makes better sense! -
Dexter Axle Upgrade Options - To EZ or NevR Lube Design
jd1923 replied to Geronimo John's topic in General Discussion
I'm in agreement with @mountainoliver and @Patriot and will add more detail from my point of view, in the order of your questions: 1) This is likely my biggest reason. Having 12" brakes over the 10" on 3500 lb. axles is huge in size of the contact area of the shoes. I have always felt they are not enough on mountain downhills. The self-adjusters don't full adjust/tighten up especially on the rear axle. I had one of 4 brakes lock up the other day, thought there was a kid in a sports car, burning rubber behind me from the sound. No, it was just one brake on the Oliver. 2) The brake drum bolt pattern must match the wheel choice, independent of the axle. However, it is industry standard that 5-bolt patterns are used on 3500 axles and 6-bolt on 5200s. OTT has over-engineered everything but the axle, the weak link. I have a dual-axle 12 ft flatbed trailer at home that we use for OHVs. It has the same two 3500 axles, 5-bolt 15" wheels with ST tires and it weighs only 1100 lbs When load with our SxS, a dirt bike and gear, adding about 2400 for 3500 lbs. total, half the 7K limit. Rock solid for that use. As Ken stated above, The Oliver is at the limit of 7K in axles, most of us carrying 6400+ lbs. and the Oliver is tall, not truly top heavy but the top can in certain conditions sway back and forth quite a bit. Consider your precious cargo and what Ken said to me last night, "no more worries." 3) I also understand, they do not manufacturer disc brakes for 3500 trailer. Besides wheel bolt patterns, 3500 lb. axles have a 4-bolt pattern, axle to braking plate and 5-bolt on the 5200 lb. axles. The connection, axle to brake plate, to wheel is 25% stronger. 4) An axle can fail/ bend in extreme circumstances, but more often the smaller bearings and brakes on lighter axles failed. You're thinking the 4-leaf design which Alcan has made available on request. They are a costume shop. They suggest the 5-leaf product which was their original design. As we've heard from their reps, "the Oliver is under-sprung." I believe this is true watching our hull waddle like a duck over irregular RR tracks, gas station driveways and DIRT ROADS, every time the suspension has to take a height change on an angle. And re the 3500 lb. axles, I would say the Oliver is under-supported. And btw, OTT has finally decided that the D52 axles are standard equipment. For those that are minimalists, and there are a few of you out there that tow with 1/2 ton trucks and always keep your Oliver curb weight under 6K lbs, the 3500 lb. axles and 4-leaf springs are certainly enough. -
Dexter Axle Upgrade Options - To EZ or NevR Lube Design
jd1923 replied to Geronimo John's topic in General Discussion
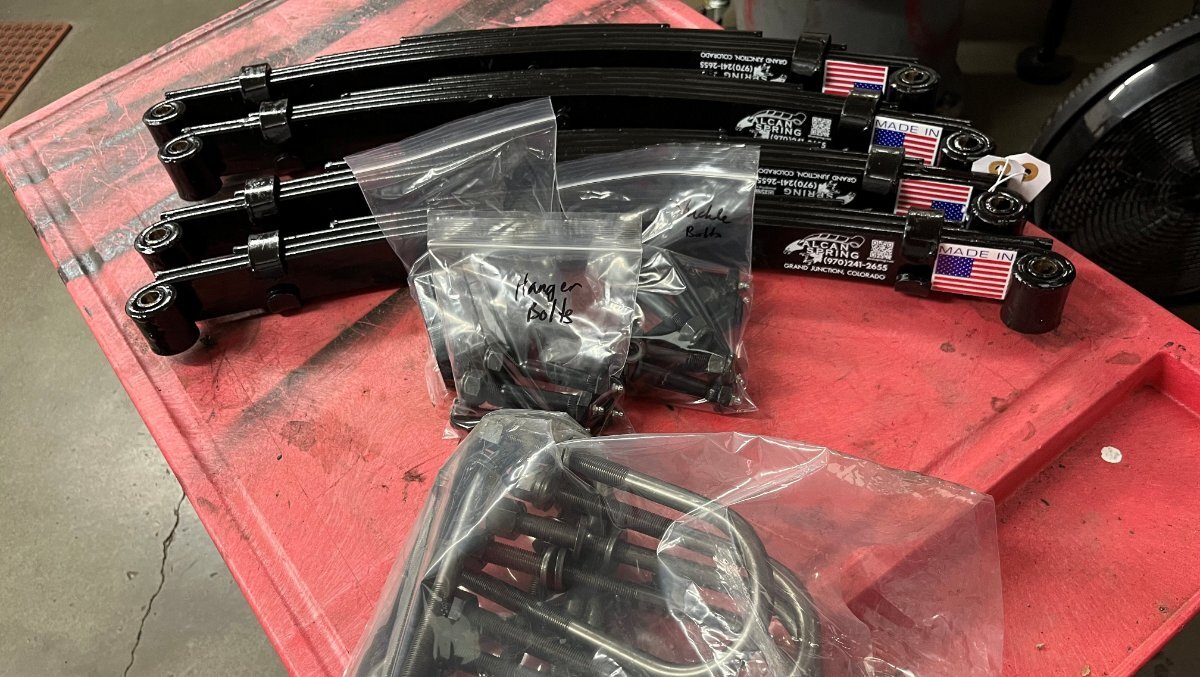
I visited Alcan Spring today in Grand Junction CO. I was impressed by their operation and service, what they were able to accomplish on a minutes notice. As a medium-sized manufacturer and automotive service company, I quickly noted their company quality, efficiency and fully capable staff (see picture of a portion of their operation). I purchased leaf springs for our Oliver, including HD shackles, new wet bolts and U-bolts (pic2). Our Oliver requires the 50.00 length axles. They measured our Oliver. For comparison they manually measured their 50.50 springs which they stock for Oliver customers. I asked them how can I go about getting the correct D52 axles for our hull. They replied that the could special order axles for me and charge me the same price as the axles they stock and buy in bulk for Oliver owners. And that's what I did. Getting my special-order axles will take 6-8 weeks and they will ship to me when ready. I was out the door in an hour. Four staff members were working together to help me. Simply put, they were awesome! I had a smile on my face, the whole way to Montrose to see our friend Ken. He was happy to see the parts, since he has a full installation scheduled soon. RE the purpose of this thread. Alcan only sells the Dexter Nev-R Lube axles. They report good reliability with these sealed bearings, not hearing of premature failures. So they do not have experience with the EZ Lube product. When asked about replacement bearings for the Nev-R Lub, they replied they would ask their Dexter rep and get me a quote. @CRM if you have a link for the correct Timken brand replacement Nev-R Lube bearings, please advise. I appreciate that @John Dorrer has posted his experience so far, and of course if/when any of us have failures, we should read it on our OTT Forum. I'll be working my installation later this summer and will start a new post documenting the job. Like I mentioned before, it will be fun getting into this! 😂
- 42 replies
-
- 14
-

-
-
-
Dexter Axle Upgrade Options - To EZ or NevR Lube Design
jd1923 replied to Geronimo John's topic in General Discussion
Excellent info! I’ll see what Alcan reps say about this. -
Dexter Axle Upgrade Options - To EZ or NevR Lube Design
jd1923 replied to Geronimo John's topic in General Discussion
Thanks, Rich! Will do after we return home in a couple weeks. -
Dexter Axle Upgrade Options - To EZ or NevR Lube Design
jd1923 replied to Geronimo John's topic in General Discussion
Is there any knowledge or do our forum members have opinions on this subject? After 26 pages of comment re leaf springs I’m disappointed not a word here! This is equally important. I read the entire 5-page link GJ provided, when he posted a few weeks ago. I could not see on that forum that they achieved consensus. Maybe somebody can show how Nev-R Lube lives up to their claim. Keep in mind it’s Dexter. Some have seen failures in 1 year, others 5 max, it cannot be never! I will be at Alcan Spring today. I will purchase their HD springs, shackles and wet bolts. I cannot have 5200 lb axles installed since I need 50” and they stock 50.5” that most later hulls need. I will ask why +/- 0.5” matters. I will ask their opinion on new EZ or Nev-R bearings a why they decided to stock kind. Maybe they can drop-ship me the correct axles. Or maybe I can get a good used set of 5200 lb axles, with tried and true conical bearings, any length and have them cut and welded to size, bolt on new bearing/brake assemblies. We’ll see. I don’t believe in annual bearing service anyway. Annual inspection yes, but when bearings are cleaned and packed correctly they will last 3-5 years with average mileage. I replaced bearings with Timken 2 years ago. I’ll open one up to see next summer and will post pics. If anybody wants to learn the correct method, let me know and I will start a new post. Most of you will prefer the claim of EZ or Nev-R when you don’t work this service yourself. I didn’t want Alcan to work my installation anyway. That would take all the fun out of it! 🤣 -
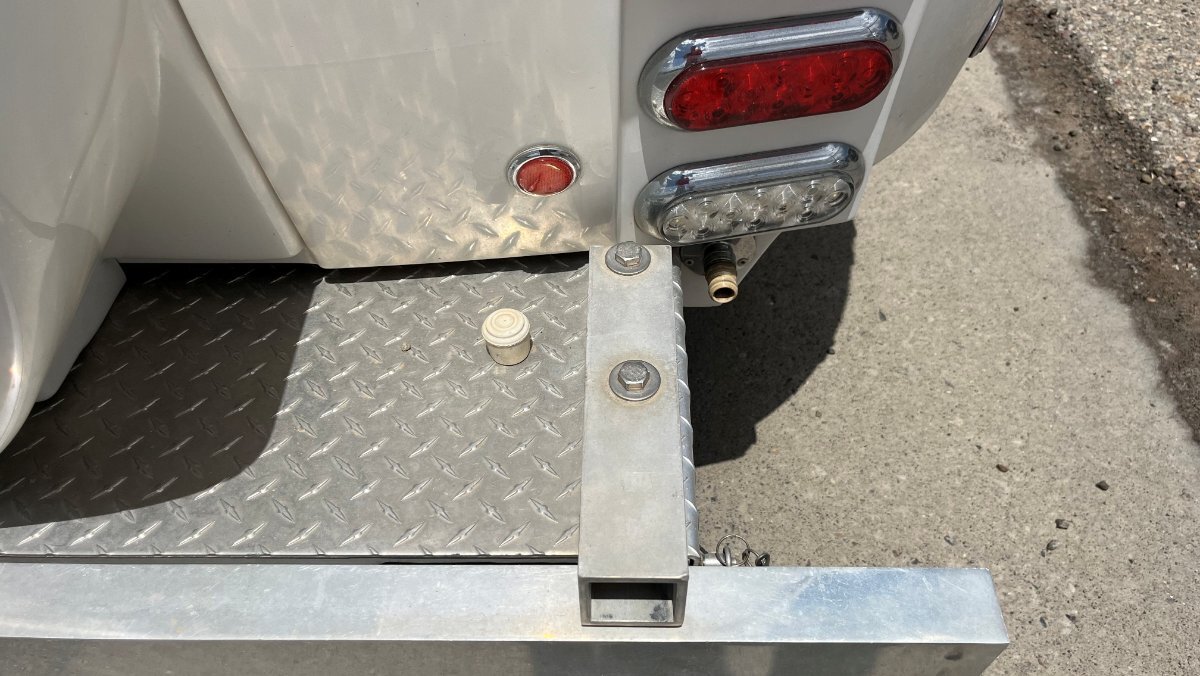
I thought I was done, but... The older hulls did not have labels for jack points. Be VERY careful if jacking up you Oliver at these locations. If your jack arm is too wide or it slips you could so easily crack the fiberglass hull there. It is surely safer to use the stabilizer jacks. To have viable jack points, OTT could have made the steel sub-frame 18-24" longer so that there was steel at the jack points. Instead, the marked jack points are on the aluminum frame. When I purchased our Oliver, it had two broken welds, two cross-members disconnected, right behind the curbside wheel. Right where the jack point label is shown in the picture above.
-
I did mention the method I use was not the official OTT position, but so many of us the Oliver stabilizer jacks for quick jobs like changing a tire. Another thing, I did not state to jack the axle. That would be wrong, as stated in the instructions @Patriot cited. They do so because someone inexperienced could use a floor jack and jack up the middle of the axle. If doing so, it would likely bend, throwing off the alignment of the wheels attached to that axle. It's good practice to put a jack stand under axles when working on a truck or trailer, period. I've been doing it for 50 years and all professional mechanics would agree. People have literally died, crushed under vehicles 100s of times since the model-T. You jack by other means and place the jack stand for safety. It has a rounded top holder that the axle fits into nicely and you place it as close to the wheel as possible. In the case of a trailer, adjacent to where it is u-bolted to the leaf springs. I promise, any axle is strong enough regardless or 3500 or 5200 lb. ratings. You can go without for a tire change, but be careful, and you certainly should for maintenance work like packing wheel bearings on a trailer. I have one jack stand and a bottle jack in my TV toolbox and if I did not already have these tools for decades, I strongly recommend the combo unit that Patriot linked. That tool must be awesome, great idea! Get one. OK, so what I found today is going to be revealing! These instructions are quoted from the 2016-OTT-Owners-Manual.pdf: Loosen the lug nuts on the tire you want to remove. Check for a stable footing under the jack and place an ABS footing pad or block of wood about 4” in height below the jack foot plate. Raise the jack until the tire clears the ground, then finish loosening and removing them. Pull off the old tire, slide the hubcap out backwards and insert it on spare. Set spare tire evenly on the lug nuts and hand tighten lug nuts. Retract jack back to travel position. Now tighten lug nuts completely. Lug nuts should be torqued to 90 ft lbs. Place the flat tire in the spare location. From at least 10 years ago, OTT knew and put in writing that you could, should use the stabilizer jacks to change a flat tire when on the road. Then they hired lawyers who got in the way of physics and the basic common sense of good mechanics. I rest my case. 😎
-
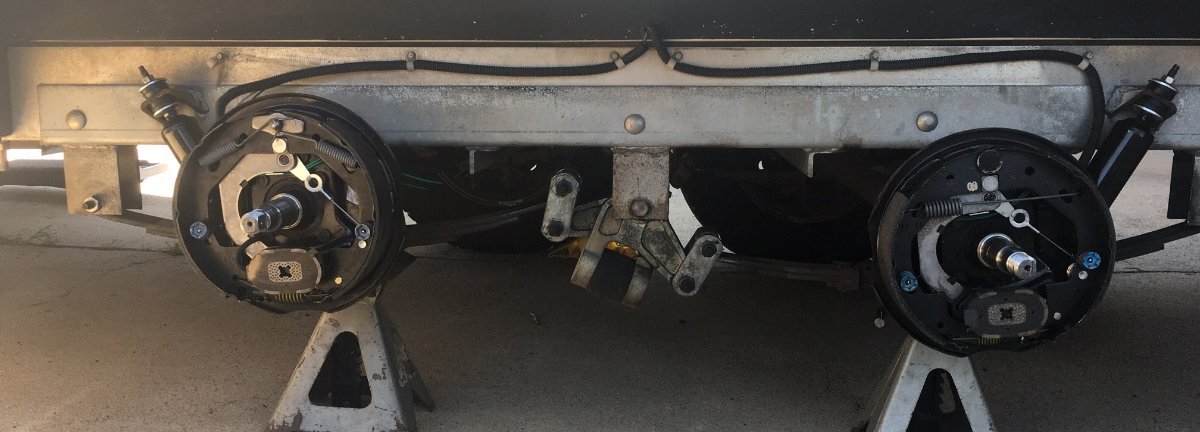
Manufacturers always recommend what limits their warranty liabilities. You can use just the stabilizer jacks for a quick tire change, but having a jack stand is a redundant safety measure. I will not get under a vehicle without it. In the picture shown above, I had it up on stands 2 days on each side to completely disassemble and rebuild everything. I wouldn’t let the weight sit on these internal stabilizer jacks for long periods of time, but some do and they would likely be fine.
-
This is not the official answer, but the easiest way to change a tire or service bearings. You will not need a jack, instead only jacks stand(s). BTW, it's extremely difficult to get any kind of jack on the steel sub-frame, so if using an external jack you would have to lift the aluminum frame which is not a good idea. Use the onboard leveler jacks to get your Oliver up on one side, wheels off the ground. Then place the jack stand(s) supporting the axles (not the frame) at the point just inside where they are u-bolted to the leaf springs. In this manner, you are not contacting the frame at all. The axles are designed to support the weight of the trailer. If you are changing one tire to fix a flat, one jack stand on that axle point is sufficient. If you are doing brake and bearing service, put stands under both axles as pictured, If you want to service all four with 4 jack stands you can then do the other side. If you tear apart all 4 brake assemblies for servicing, make sure you take good pictures before doing so.