
jd1923
-
Posts
3,843 -
Joined
-
Last visited
-
Days Won
311
Everything posted by jd1923
-
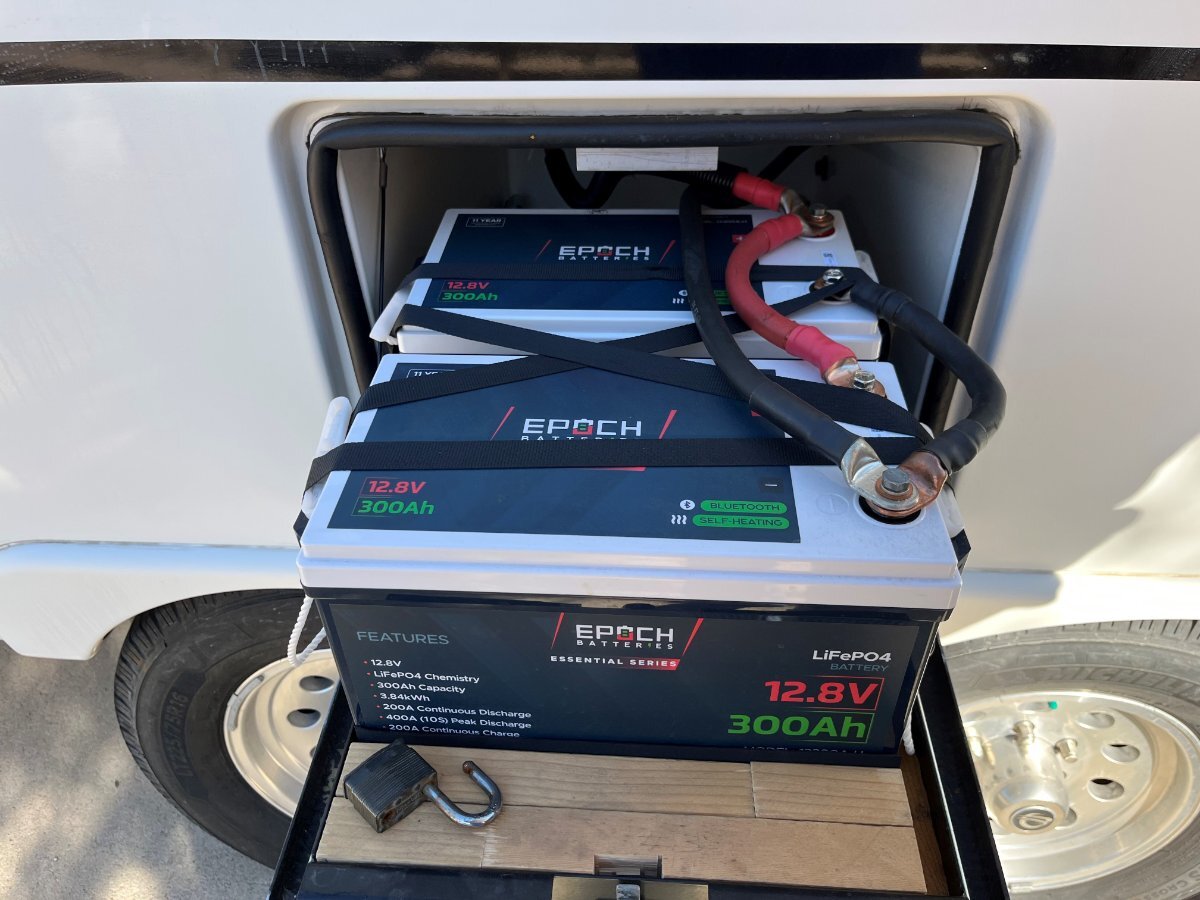
Wondering, what are the internal dimensions of the Elite I battery bay? (with and without the tray) From memory, the E2 battery tray is 14"W x 21"D and the overall space is 18"W x 24"D x 15"H. Two 220AH lead acid or AGM 6V batteries wired in series produce 220AH at 12V. Given 50% you currently have 110AH usable. Using 80% for LiFePO4, the 300AH Epoch yields 240AH. You will more than double your AH capacity. Good plan!
-
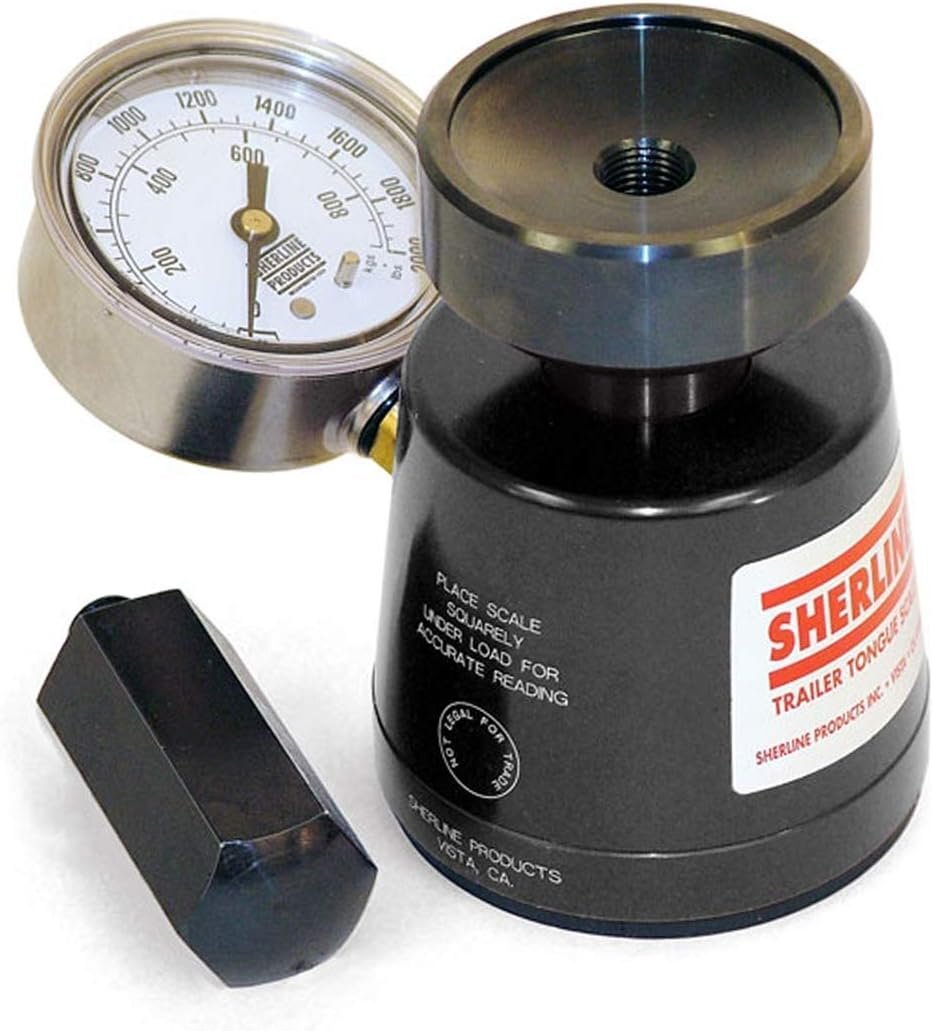
I decided to get more into the proper balance of truck and trailer and purchased the Sherline Tongue Weight Scale. Love the simple design, ease of use and Made in the USA! I also have a dual-axle flatbed trailer which hauls our side-by-side and I need to get that straight where I can strap down the UTV further up or back to get it truly balanced to pull with a 1/2 ton truck. There is an Amazon business price at $152. https://www.amazon.com/dp/B007REK28M?ref=fed_asin_title I tried it out today, though our Oliver has no water in the fresh tank, no clothes in the rear cabinets or closet and no food or other supplies in the pantry and fridge and no gallons of drinking water and various adult beverages in the floor of our Oliver closet! I will measure again next week prior to heading out to Quartzsite! After a first trip, we came home and measured 6,000 LBS for the Oliver. This was likely the average weight at the time, but after mods and more travel stuff we should be camped today closer to 6,600 GTW (will soon, but have not measured GTW recently). More or less empty today, I measured 565 LBS Tongue Weight, and being empty at say 5,800 LBS this is 9.7% tongue weight which is at the low end. My first thought is to think hard about mounting bikes or other cargo on the rear of your Oliver. Our OEM OTT 2" bike rack is removed and sitting in our shed. As mentioned, I will do this again next week when the FWT is full and we are packed to leave town! I like this little gadget!

-
Good you did, Mark! Otherwise you would have had freezing issues in the Oliver basement. No snow yet in Northern Arizona. Not even on Mt. Humphries and the Arizona Snowbowl at 12K FT! Hopefully we get deep winter snows during Feb-Mar.
-
With all the complaints I've read here with relatively newer hulls, I've wondered the same. Were the older hulls built better, or were similar issues just worked out years ago? Hard for me to tell owning a 9-year-old hull for only the last 19 months. @ScubaRx knows Oliver history better than most and he likely services his rig better than most. This is an important point he has made several times. Ours needed lots of maintenance since we purchased June 2023. And I have seen cock-eyed mechanical installations, electrical components wired wrong, and other minor items. Otherwise, everything works well as it should (except our fresh tank issue). An Atwood furnace was installed to replace a noisy Suburban (OTT Service 2018) and the window shades were replaced in 2020. With my mod the furnace runs great! And the noisy A/C, the HWH, 3-way fridge, Maxxfan, entrance door, toilet and seal, all good working for 9 years now. Many have had leaf spring failures. Ours have the correct arc with no sign of wear at the usual failure points. Just knocked on wood. @Ronbrink I always find some handy, right above my eyes! Most of the work I have done are Mods vs. Repairs. The TV worked fine, but not worth my time. The charger/inverter/solar/batteries were all fine, now they're first class. No EMS on our old hull, but now it does. Added LevelMatePRO, Ruuvi, Topeka and Victron. We had the so-called "high-end" mattresses (NOT, but now we do), new dinette cushions, and more and more! Due to the age of our hull, we have no Truma products. I would call the noise of the Dometic Penguin II a feature vs. a bug! Get the Atmos to replace it! Two Oliver owners have already and I should install ours by April.
-
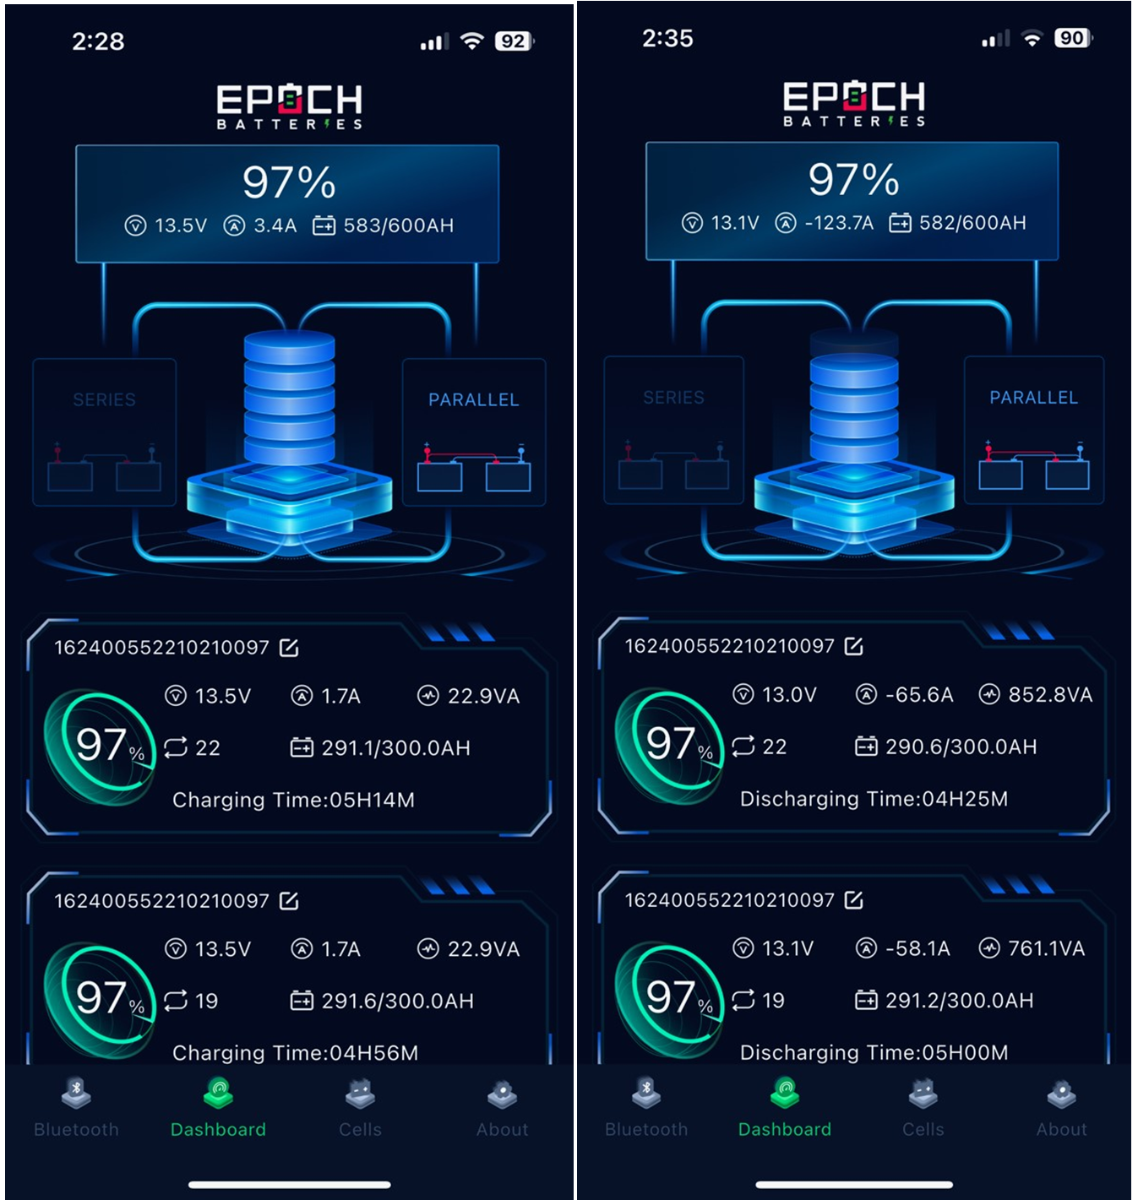
 I should have looked closer the first time at your pics. Your battery #1 could be going bad. That’s a very large SOC and voltage difference. How can such a voltage diff be possible, with 3 batteries wired in parallel? Ask the manufacturer about a testing procedure for warranty claim. Do not upset the cabling, in case of warranty claim, but I would love to know voltage readings of the three batteries individually, and with a reliable multimeter vs. an app reading.
 -
Connecting 2024 trailer Vizio tv to Furion sound system
jd1923 replied to Beth H's topic in Mechanical & Technical Tips
Not sure this should function in the way you desire. If playing a DVD through the Furrion, the HDMI out is connected to the TV for picture and the audio channels of the HDMI are played locally through the Furrion speaker outputs (try this to see if you can make it happen). When the input/source is via the TV, broadcast TV or streaming, the Furrion is likely not in the loop and audio out is pushed through the TV speakers. If your TV has output selections which include the Furrion system, this would work, but your TV likely thinks of the Furrion as an input source and NOT an audio output. On a more advanced TV with a HDMI-ARC circuit (certainly NOT this plain OTT OEM system) you could get this working (requires a high-end TV). Instead get a soundbar and connect to the audio out of your TV (connect by audio cables, HDMI, Bluetooth, or Wi-Fi). -
Wiring is fine, but who knows why OTT has three (3) runs to the batteries directly, no need for that. It's odd that on the B- side there are 2 heavy gauge wires, likely two 4/0 (not sure given the picture) and one 6 AWG and on the B- side there are one (1) heavy 4/0 and two (2) of the lighter 6 AWG cables. I would correct this. One 4/0 +/- connection goes to the inverter, another connects your MPPT SC and the 3rd my be your heater pad. On our hull we had one 4/0 cable on both +/- cables and two (2) 6 AWG cables. I removed all of the 6 AWG connections to the batteries and connected them directly to the Inverter and internal buses. Yes given the pen markings, this is OEM and correct given this fact. I tested mine today in my installation (NOT Lithionics)! Watching TV, running about 3A with the A/V system on inverter and a few cabin lights on the draw was 3A and pretty even between the two 300AH batteries at 97% SOC. I fired up our Emeril Air Fryer, requiring about 124A and the closest battery was drawing 6-8A more than the next battery. This is normal. You showed a picture at 35% SOC. In this case the difference between the two batteries should be more than when total SOC is fuller, near 90% SOC. Question is, when done, say at night not connected to the SC or shore power, do the 3 batteries read near the same SOC. If so, you're over-thinking the details, not to worry, the batteries will balance out soon enough!
-
Steve and Deb Try to Stay Warm - January 15 - February ?
jd1923 replied to Steve Morris's topic in General Discussion
High 52F and sunny today, 40F at 7PM, 29F now at 10PM, near the forecasted of 24F at sunrise as late as7AM, to start the new day! Tomorrow will be another sunny day in Arizona, high of 57F when I take my afternoon walk, sun always on my face. Another sunny day in Arizona, you can count on it! -
Come up to Prescott on your way back to northern New Mexico! It’s snowing in Galveston TX and the pan-handle of Fla! Yet a beautiful 58F, no snow at 5400 FT in N Arizona! Can’t wait to meet you in person, my virtual Oliver friend! 🤣
-
When you search, just search for ONE word at a time!
-
I believe you could tie or tape the probe touching the metal of the pressure valve just above the heater to get a good reading, or wherever you mounted yours. The difference is your sensor only reads the temp and you have to manually turn the HWH off at the time it achieves your desired temp. You must be there watching to time it right. These devices will activate 12V to the heater circuit to automatically turn it on and off. You could keep it at 104F 24x7!
-
104F is the high setting on most hot tubs. You could use an electronic thermostat switch to automatically control the heat at a set temp vs. reading the temp and having to turn it off manually. Not sure if this would be the best part, but some thing like this: https://a.co/d/0nnLInc
-
Furrion DVD/stereo remote - upgrade!
jd1923 replied to Galileo's topic in Mechanical & Technical Tips
Since upgrading our TV with soundbar and Blu-ray/DVD player, we rarely use the Furrion. The quality of the new sound is 10x the that of the Furrion and the 4 corner speakers. 🤣 I will occasionally tune in a local radio station, when home and working in the interior of the Oliver. When camping, Chris might Bluetooth connect her phone to play music. We do these tasks via the Furrion panel, as the remote sits unused in the nightstand drawer. You can also select speakers without using the remote. You have to limit the speakers when sitting in the corner dinette seat unless you're OK with one loud speaker on top of your head! If you use the Furrion system, more than we do, a better remote would be a simple upgrade. -
Some of us newbies to get the 100 patch now or soon. You may have to make a 500 or even a Millennia badge for @ScubaRx and @Mike and Carol, just to name two, and likely for many of you out there in Ollieland!
-
Steve, again congrats on your special milestone! You got me thinking, and then of course I had to count! 🤣 In 19 months, we're at only 54 nights. Still working part-time and had much maintenance and mods to do in our first year of ownership. With a week soon to Quartzsite, another 7-10 days around AZ this spring and very soon to come will be our longest trip ever to Minnesota and back, with many points between, from Memorial Day to the 4th of July! We will hit 100 before the end of this long trip, 25 months into Ollieland!
-
Yes, the best of both worlds! Stopped at the KOA in Moab spring 2023. It was a couple months before we sold the Bigfoot, to downsize to our Oliver. They would not give me a price until I gave them EVERY DETAIL of our rig, family members and pets. Just a Class C, two adults and a medium-sized dog. They wanted $130 plus taxes for a cramped site! I just laughed at the clerk, turned my back and walked out the door. We stayed across the street, with better views, more spacious sites, at a family owned place for $55.
-
It was very nice of @ScubaRx to call me yesterday, asking "where are you?" I'm looking forward to seeing all of you Diehards at the Q, Dome Rock or wherever, the first week of Feb! Have fun! 😂
-
Looks like some good reading on the Oliver Forum too! 🤣
-
My Mod post linked below - By eliminating the furnace duct under the beds, replacing torn ducting, adding an intake filter to slow intake off the floor, creating more pull through the basement, helps considerably in this. Then adding vents from cabin to closet, closet to vanity, toilet area to dinette area basement helps to circle cold air below and around the cabin back to the furnace intake. Some have added cabin vents on the streetside, though I went without those to force basement air to and around the lower rear of the Oliver, as GJ mentioned where "freezing water systems" can exist without the furnace running and good basement ventilation.
-
Two for two now, where the same cause is creating the same issue. The cause is the electric space heater, period. Your electric heaters are significantly over-heating the upper cabin. Try using an infrared gauge, and measure and compare the temps of your ceiling to that of your floor while running these heaters. You will likely measure a 20-30F difference when its cold enough outside. The electric heater is adding little to no heat in the basement, the lower cabinets, beds and seat cushions, flooring, the ENTIRE lower hull! Heat can escape the hull above in so many small orifices and the significant heat differential at ceiling creates a turbo effect, forcing this abundance of heat out in any available path. Heat loss through the fan vents, gaps in the A/C seal, the door and windows, the fridge vents, the perimeter around the sewer vent, through the upper cabinets and out everywhere OTT drilled holes for awnings, exterior lights, cameras, etc. Simple fact, the cold air coming in from below must be equal in volume to hot air escaping above. The furnace vents allow the largest opening to the basement below, path of least resistance is where it is coming into the cabin interior. The cold air from the entire basement (and exterior) is being pulled through the furnace ducts and because these ducts are under the curbside bed, it is your curbside wall and likely under that mattress where condensation is accumulating (colder surfaces). Those of us running the furnace are creating hot air below in the ducts and pulling cold air in through the intake in exchange. Just run the OEM furnace as designed and the issue that is bothering you will go away! Being frugal is good, but use your LP (prices coming down soon). Run your OEM furnace when you need to warm your cabin. The electric heater should be used for secondary or back-up heating purposes ONLY. I haven't use one and will not carry one with us. In the next few months, we will add the Atmos A/C with heat pump. The heat pump will be our backup, but we will still run the furnace as our primary heat. We much prefer an evenly heated cabin, not breathing hot air blowing in our faces.
-
Check the furnace in the basement. If cold air is blowing through the ducts, it must be blowing through the heater. There is a cover panel to see into the heater. Have you inspected the basement area around the furnace? It is worth running the furnace overnight as previously suggested. You would replace “cold air blowing” with warm air blowing. This is certain.
-
Certainly a big deal - Congratulations!
-
Be careful running any appliance requiring high amperage using an extension cord, and worse is to daisy-chain cords. If you really need to run something at a distance use one longer cord ( your issue was in the connection). Most extension cords are 14 AWG. Extension cords designed to be appliance cords are always short (6-9') and 10-12 AWG. I have a 50 FT 10 AWG extension cord which I do not bring camping but certainly would given your needs. Something like this: https://a.co/d/j6hUQN6
-
It certainly should be! The rear side of the waste valve pull handles is the basement under the streetside bed. The better quality switch was already mentioned and you could cut a simple cover plate to fit the recessed area with a rubber seal to cover the switches.
-
Not sure where cold air is coming in, but since it is the curbside check that basement area and climb under the trailer in that area. There are 3-4 LP lines that exit the hull to the frame below (Furnace and HWH are easily visible in the rear and further up are lines for gas range and a 4th if you have a LP fridge). Not sure of your hull # but in our older hull all caulk around the LP lines had moved and there was an 1/8" to 1/4" opening around the perimeter of the drilled opening. I STRONGLY RECOMMEND you store the electric heater for a while and run the furnace. It will heat up that basement area and you will not have the condensation and cold wall between the bed and window. You must have seen my mod post on this. Now that I've done this work, closing the heating duct under the bed and adding an intake filter the furnace works great now and is much quieter. Electric heaters save money with paid hookups of course but LP is cheaper than the issues you are having and perhaps more. You mentioned Florida, where it is always humid. When we travel somewhere colder, I like to know the furnace is not only keeping us warm but the hulls, the floor, and inside the basement areas to keep the plumbing above freezing. An electric heater will only keep the cabin and upper inner shell warm.