
jd1923
-
Posts
3,143 -
Joined
-
Last visited
-
Days Won
228
Everything posted by jd1923
-
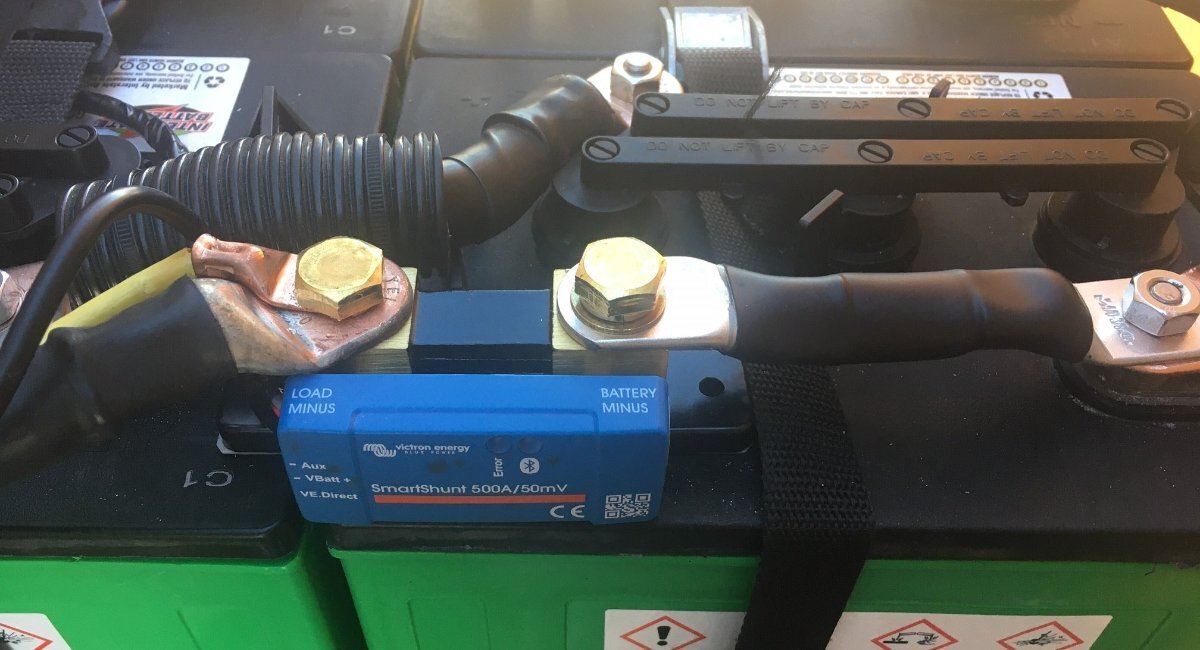
My Victron SmartShunt install is simply sitting at the negative battery terminal. Nothing gets -12V ground unless it goes through the shunt.

-
Have you seen the dude? Personally, Chris and I are not beard people, don't get the big beard thing, let alone a naming your battery company as such. Beards, tattoos, piercings, young people needing a good bath and shampoo... I'll stop there. I would say that if there is a new viable battery company, producing great product in Athens TX (not just a website, would want to know of the manufacturing facility), I would support them. I prefer the small co vs online reputation. We have driven through Athens TX, a cute East Texas town like many others, a good half dozen times traveling from Georgetown TX to UT Tyler TX for Adam's tennis tournaments during high school and college. Love all the great small towns of Texas! In East Texas they have a local burger chain named "Jucys." Hey @Jason Foster what do ya know about Jucys? Can you FedEx overnight me a 3/4 LB butter burger with fries? (make that 4 orders!) Jucys Hamburgers | Best Burger in East Texas
-
 It appears today most models are inverter/charger. Please allow us to understand your reasoning. I can see an inverter failure in an inverter/charger combo unit could keep the charger from working as well. But they should be designed to run and fail independently. Do you have other reasons. This is a good thought to consider and we're all here to learn. Also, it appears given your older hull number that your Dometic is the 13.5K unit? Good to hear it runs OK, so my limiting factor is the LA batteries that almost immediately go down to near 12V with the 1800W demand. Thanks
 -
The picture on this page, showing the Big Beard battery standing up got me thinking... You can fit four (4) of these bad boys standing up in the Oliver battery bay! (no tray of course, for the off-grid crazies out there) Big Beard Battery 12-Volt 300AH 3600 Watt Lithium Battery | Big Beard Batteries
-
Chris, the measurements shown here are for the Dakota 280AH battery. The 320AH battery is 15.06" long. Two times 280 = 560AH is not a bad number either, if the sliding tray is important to you. Given the battery comparison doc @topgun2 shared yesterday in another thread, there are other good options. The best value is Epoch, two 300AH batteries at $1,099 each, will fit in the OEM battery tray. The downside is they are likely manufactured in China, though deemed dependable. It appears Dakota and Battleborn are Made in USA. However, a 100AH BB makes no sense today, as it might have just a couple years ago. Not when you can get 300AH in one battery at a slightly larger footprint. When I upgrade to LiFePO4, I'm removing the OEM tray for sure! I want more AH to fit the 24x18" size vs. the 21x14" tray size. It also gives 3" more in height w/o the tray, so you can physically get your arms in above the batteries. The true purpose of the tray is for watering LA batteries and after a LI install you can just forget about them for years and you're not going to use the sliding tray. I'm going for ~900AH when we upgrade. Without the battery tray you can fit 3 of the Dakota 320s, three of the Epoch 300s (for way less $$$), or you can three of these. Love this new Texas company that I just learned of yesterday, at $2K per 300AH (vs. $2400 for the Dakota 320AH). Two will not fit in the tray, but 3 will fit w/o the tray! Big Beard Battery 12-Volt 300AH 3600 Watt Lithium Battery | Big Beard Batteries
-
I rotated mine last year, only because I had the wheels off to do bearings. No other reason, except for why not, but yes otherwise it's just a waste of time. Keep this a secret though! You would not want to start an argument with a trained sales associate at Discount Tires. 🤣 They might want to invalidate your warranty.
-
Ours too and it will sit back there, hopefully never needed.
-
If you want to run it via inverter, say for testing purposes, you merely have to trip the 20A breaker for the air conditioner. The KISEA will sense no shore power voltage and connect the inverter to the A/C load wiring.
-
Agreed, the way the KISEA ATS works is when shore power voltage is sensed it will use that source regardless of whether your inverter is on or not. In the past, I had often kept the inverter on. Let's say you want to keep 120V circuits on when breaking camp or changing location (keep the TV on, run the microwave, etc.). Another reason is for power backup. If you lose shore power (a black or brown-out) the inverter will seamlessly kick in and keep all your 120V appliances running! We've often parked at campsites without connecting to shore power. When A/C is not required and you have ample solar/batteries/inverter, why bother? Now that this ATS is wired, you must realize the A/C can also come on which is a very different consideration. The penguin is too much pull on a 2KW inverter. Given good AH capacity in LiFePO4 batteries and a more efficient A/C system, all should be good. If you do not want the A/C to run while on inverter, you must turn off the A/C via the thermostat or trip the breaker. I did this installation in advance, for when I upgrade batteries and A/C. Until these upgrades are implemented in our Oliver, this ATS has no true purpose. Now that I have this experience, I believe I should have waited. What if the Xantrex fails, or I decide to upgrade the inverter? If so, this was a waste of time and $84 (but a good learning experience). A modern 3KW inverter/charger would of course replace the Xantrex 2KW inverter, and the PD charger (built into the power panel, and ours is the old version, not LI capable). It would also replace the KISAE ATS. For example, the Victron 3KW inverter/charger (given a viable location can be found, since it's much larger) has a built in 50A Automatic Transfer Switch (ATS) which can easily power the 30A 120V AC panel in the Oliver. I did not realize all this just a few days ago.
-
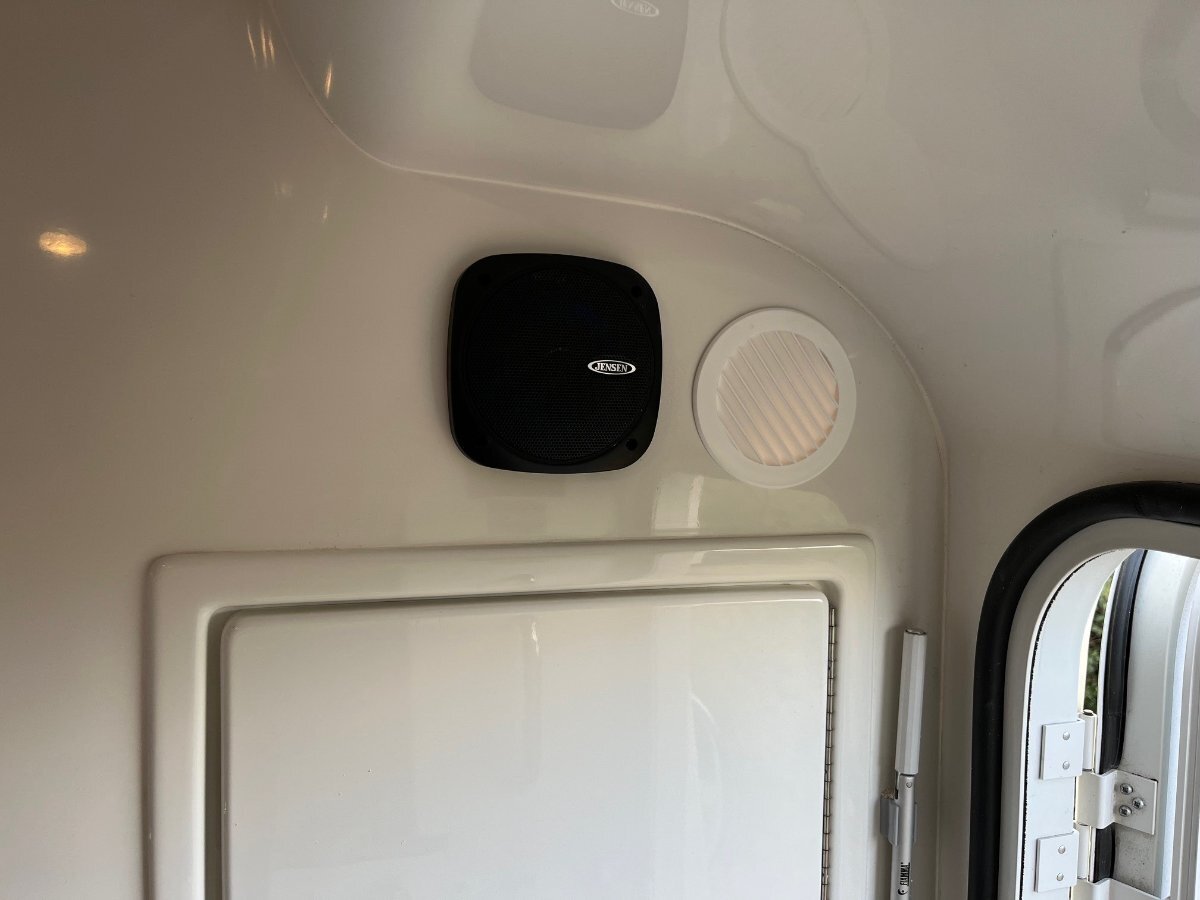
Furnace Duct Modification for Improved Air Flow and Circulation
jd1923 replied to jd1923's topic in Ollie Modifications
That's the main reason to delete the bedroom duct, given yours has the similar 3 duct arrangement. Now the main airflow comes out through the kitchen duct, aimed at the floor away from the beds, and much greater airflow into the bathroom. We had that duct "where the dog lays down" closed as much as possible, but the other ducts truly get 2x airflow when the first duct is bypassed. We've been hot too. Not East Texas hot & humid of course, but my A/C has been running afternoons so I can get this work done while I have time off work. I stay plugged into shore power during summers since our Oliver is parked outside in the Arizona sun. Set at 84 so it does not get up to high 90s inside. At elevation, we cool off at night, so it generally runs on-n-off about 6 hours a day. -
Yes, mine too. When the spare is of smaller size, you cannot work the 5-tire rotation that @MAX Burner has described. I got to tell you that tire rotation on a trailer is not all that important. Trailer tires merely follow the TV .They do not steer and have much in lateral forces. PLEASE do NOT allow the Maintenance Gods of the OTT forum strike me down in blasphemy! 🤣 I'll just run mine until they need replacing, and life is good. All y'all with strong adherence to dedicated tire rotation will get more miles on the lot. And if you tow >15.000 miles per year, it can make a small difference. My tires will wear out more quickly due to climate, vs. miles. I did rotate mine when I serviced the trailer bearings/brakes but will likely not worry again. "What me worry?" (Alfred E. Neuman)
-
Cricket noises from the lights
jd1923 replied to Going Coastal's topic in Mechanical & Technical Tips
Been puttin' of LiFePO4 for years in past RVs, mostly due to cost and China-only products being reasonable. But given I can install 900+ AH for say $3,500 OTD with Epoch, we're in this very soon. Love to afford the Made-in-USA Big Beard batteries, that you brought to our attention. Would love to scrape together $6K plus tax for these awesome batteries: Big Beard Battery 12-Volt 300AH 3600 Watt Lithium Battery | Big Beard Batteries Maybe they go on sale sooooon! -
Furnace Duct Modification for Improved Air Flow and Circulation
jd1923 replied to jd1923's topic in Ollie Modifications
This is the most straightforward, simple mod you can do to improve the operation of the Oliver (Suburban or Atwood) furnace system. Please let me know if you have any questions. After 20+ nights camping in the SW winter, we had no idea the wet bath was heated, until I read it here! Absolutely NO heated airflow into the bath until now, Thanks for reading! 😂 -
Bathroom Heat - a more direct approach!
jd1923 replied to Snackchaser's topic in Ollie Modifications
See this post for a complete installation, my simple mod: Furnace Duct Modification for Improved Air Flow and Circulation - Ollie Modifications - Oliver Owner Forums (olivertraveltrailers.com) -
Furnace Duct Modification for Improved Air Flow and Circulation
jd1923 replied to jd1923's topic in Ollie Modifications
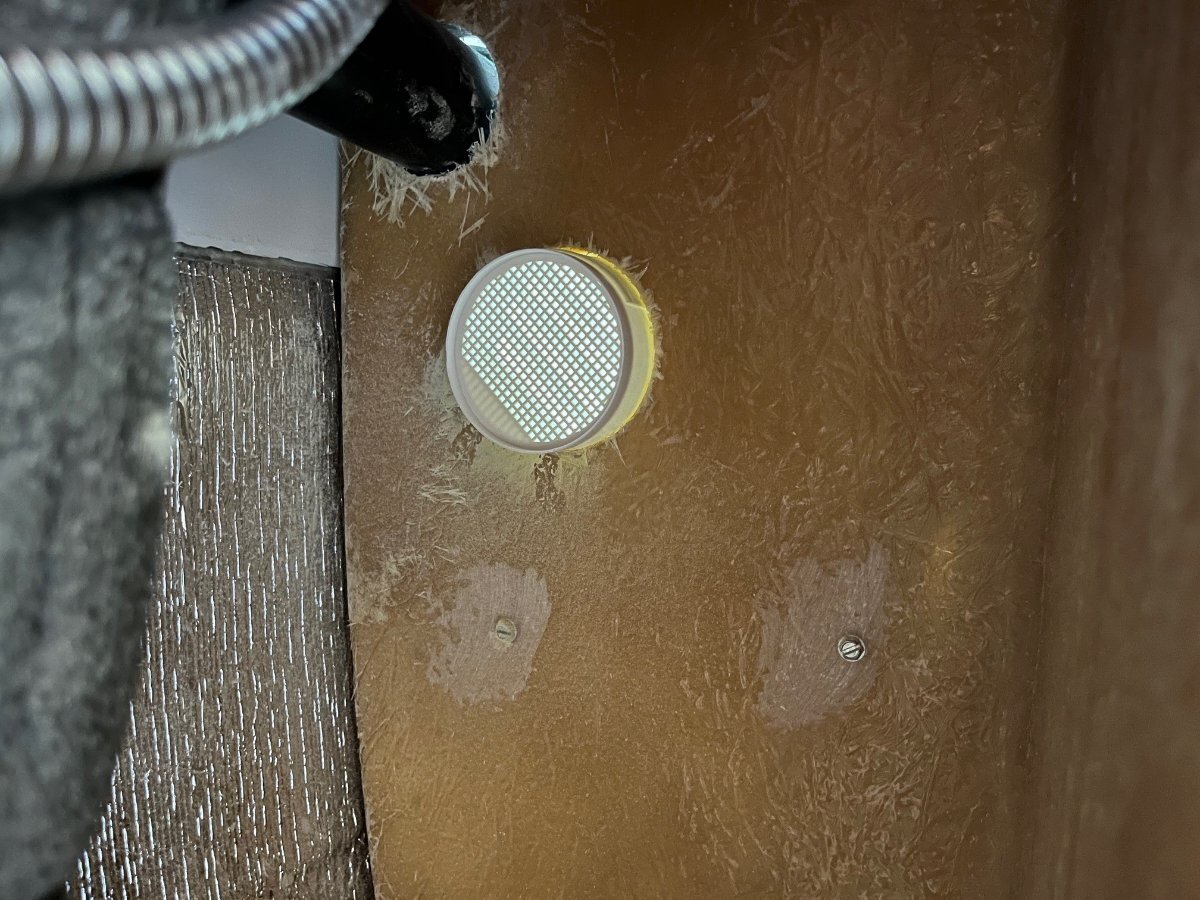
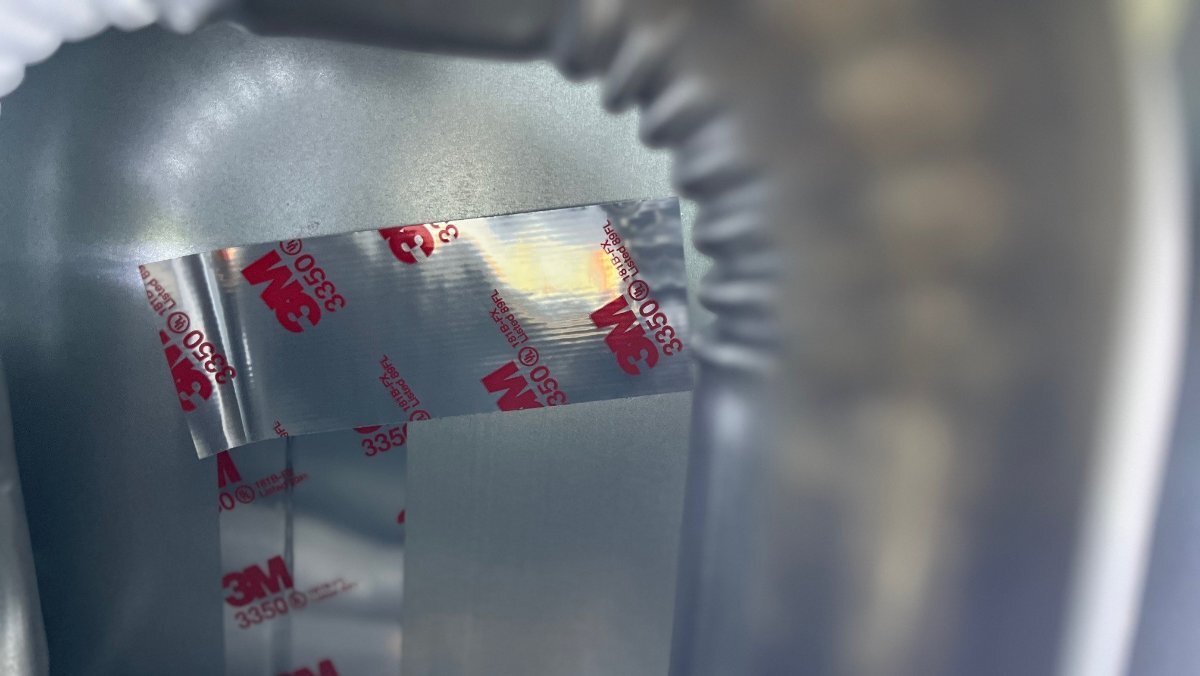
BTW, I added some white rubber tape, I had on hand, for a good seal on the return air duct, just to be anal (see first pic above). So, today I'm working @Rivernerd's suggestion next in adding vents in the closet and around the basement area. I'm NOT adding one that was suggested at the base of the dinette, since I believe that one would keep the basement return airflow from circling around and back to the furnace. I have not sealed the outlet covers yet. Wish I had circles of 3M tape but will likely go to da Depot for some kind of sealant in a tube, no hurry, suggestions? I had purchased one 4" vent suggested on another thread (installed above the closet), and then bought 3 of these, installed without the center black insert: https://www.amazon.com/dp/B077HJC5T9?psc=1&ref=product_details I'm thinking I'm done, unless I install an inverter charger in the streetside basement which may require more airflow! Almost done here, wadda ya think?
-
Furnace Duct Modification for Improved Air Flow and Circulation
jd1923 replied to jd1923's topic in Ollie Modifications
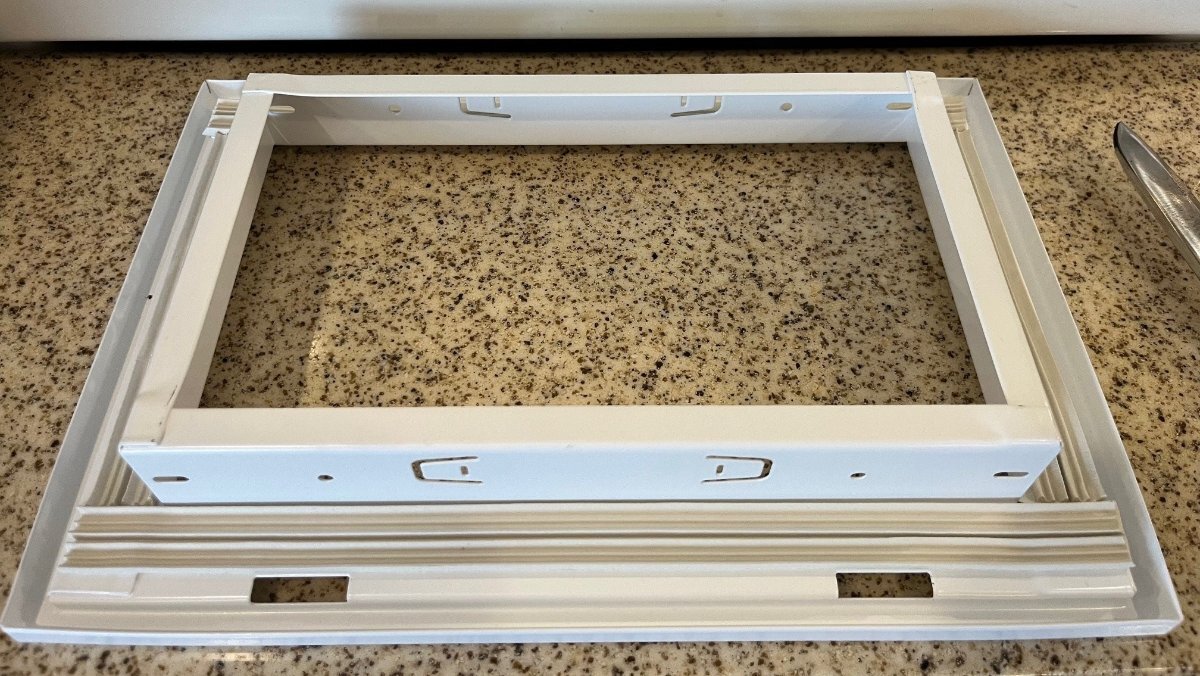
Would a household system have return air duct(s) without a filter? My next thought was to add one, to keep the camp/road dust and dog hair out of the basement furnace area. I purchased this part: 10" X 6 Steel Return Air Filter Grille for 1" Filter - Removable Face/Door - HVAC Duct Cover - Flat Stamped Face - White [Outer Dimensions: 12.5 X 7.75] - Amazon.com This is an amazing addition for just $30 plus annual filter replacement. And think about the fact that with a filter in this location is would first impede airflow here, pulling more air from the basement AND it would result in less noise (dB) when sleeping! I was hoping, yes hoping, the idealist I am 🤣, for it to be a plug-n-play install! The OEM cover has a 10x6" opening, but not exactly go figure. OTT Service, if you are reading this, do your future owners a solid by either installing such filter as standard equipment, or at least cut a true 10x6" hole (measure twice, cut once). Turns out it was actually 10" wide, but closer to 5 3/4" tall. Thank goodness for a high-end Dewalt cordless jigsaw, so smooth. Cut the opening to the proper size and cut the other imperfections. Measuring, taping and cutting was just another 20 minutes labor, NP!
-
Furnace Duct Modification for Improved Air Flow and Circulation
jd1923 replied to jd1923's topic in Ollie Modifications
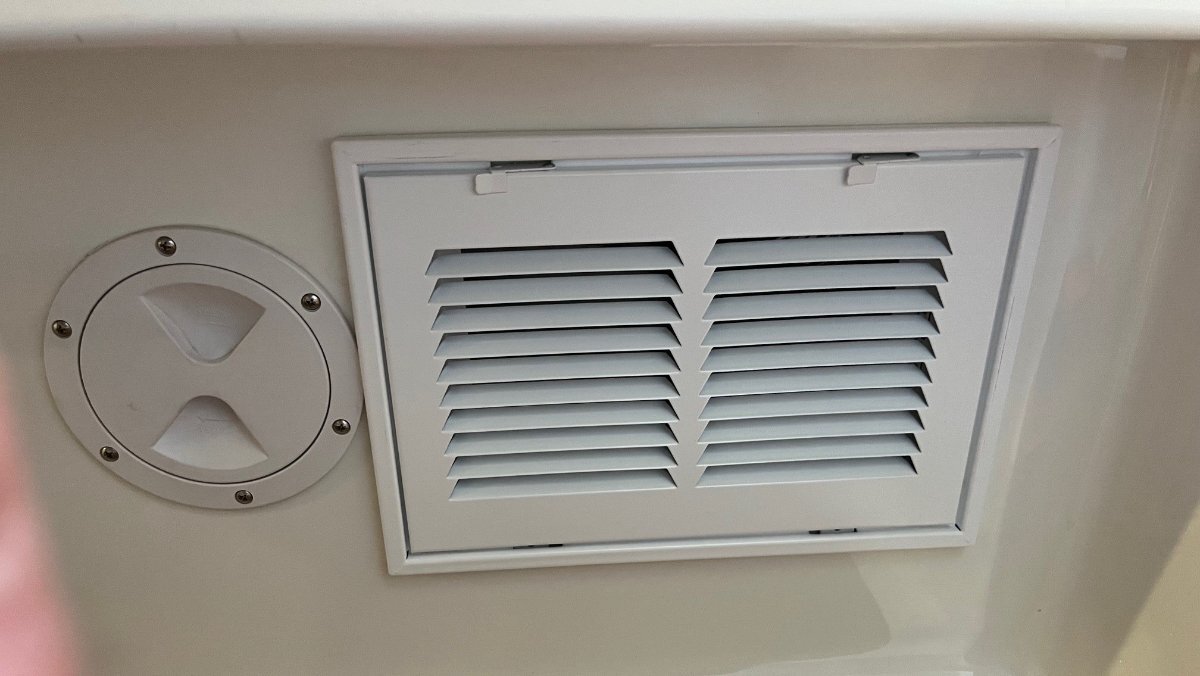
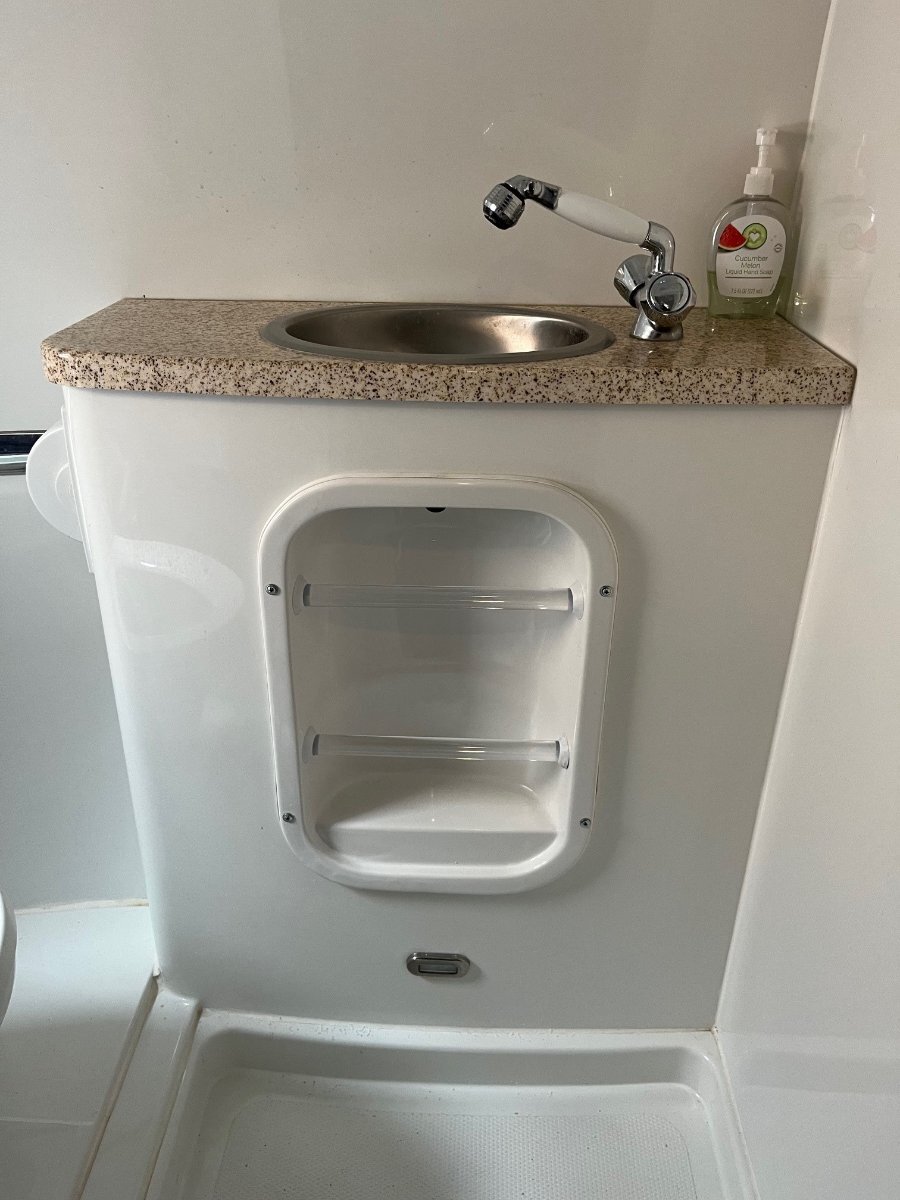
Finished up the bathroom vanity. I had a supply of 1/4" u-clips but the fiberglass is quite thick at the opening and decided that would be too much work, the placement must be extremely accurate. I merely used thin panhead wood screws with no taper. Measured with a digital caliper to drill just the right size holes. Added a SS washer so the screw head would not drag on the plastic. Thoroughly cleaned off all the old caulk and sealant. This product has just the right size opening and adequate length: uxcell U Channel Edge Trim, 6.5ft Length Rubber Guard Seal Strip Edge Protector Fit for 1.5-2.5mm Edge, (13/64" W x 5/16" H) White - Amazon.com To-dos left are the bathroom to under dinette vent and the return air filter housing. Waiting for parts...
-
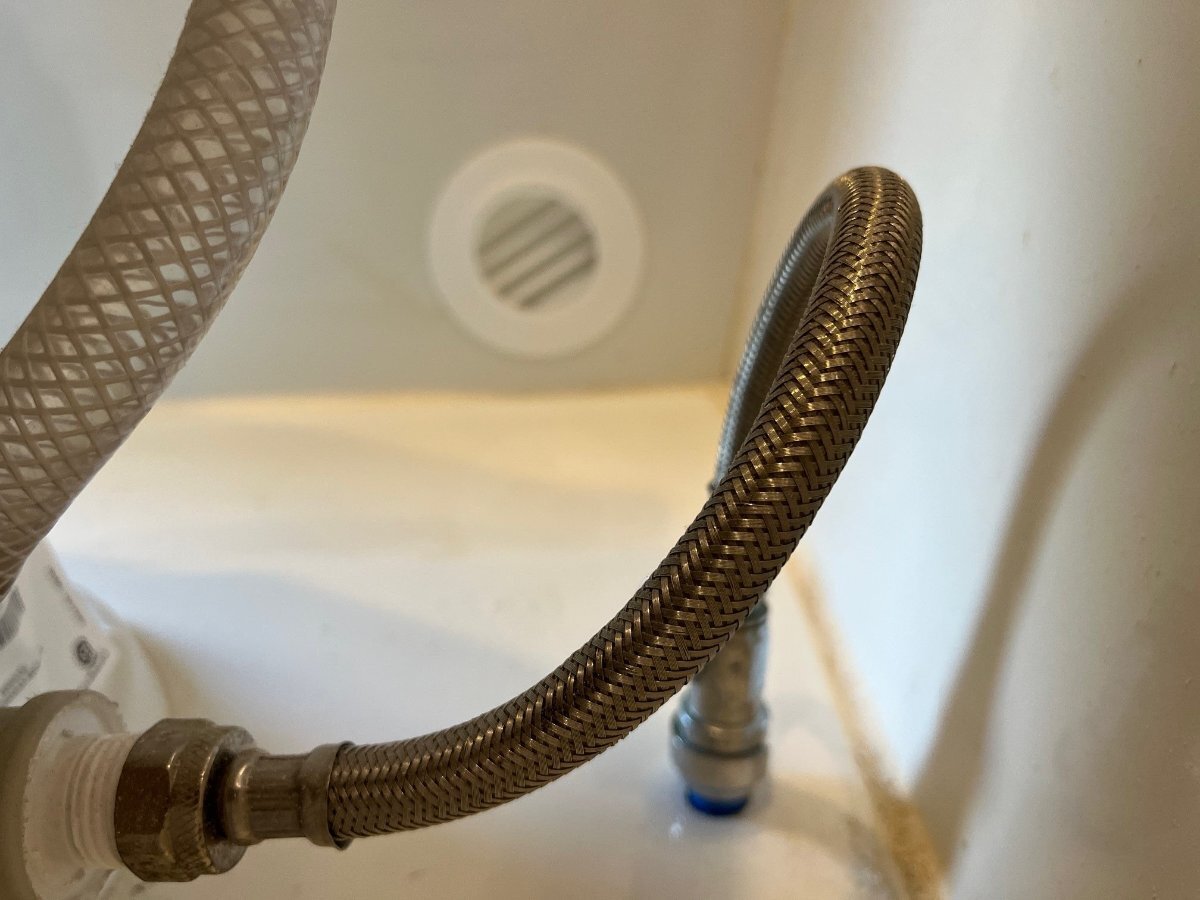
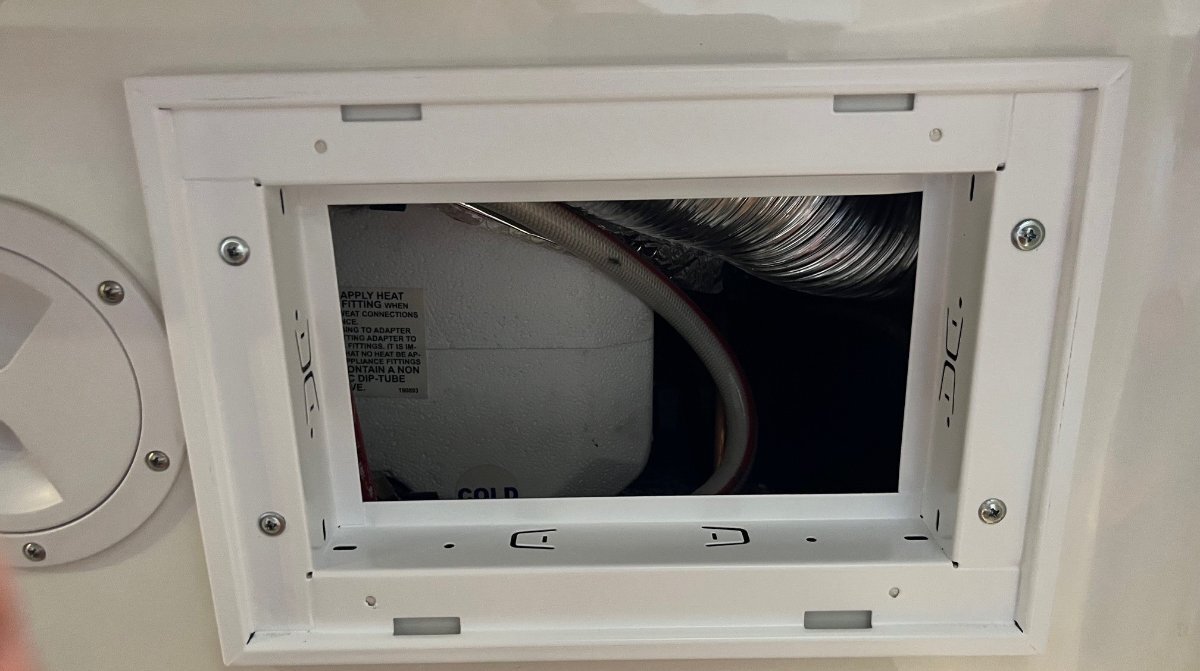
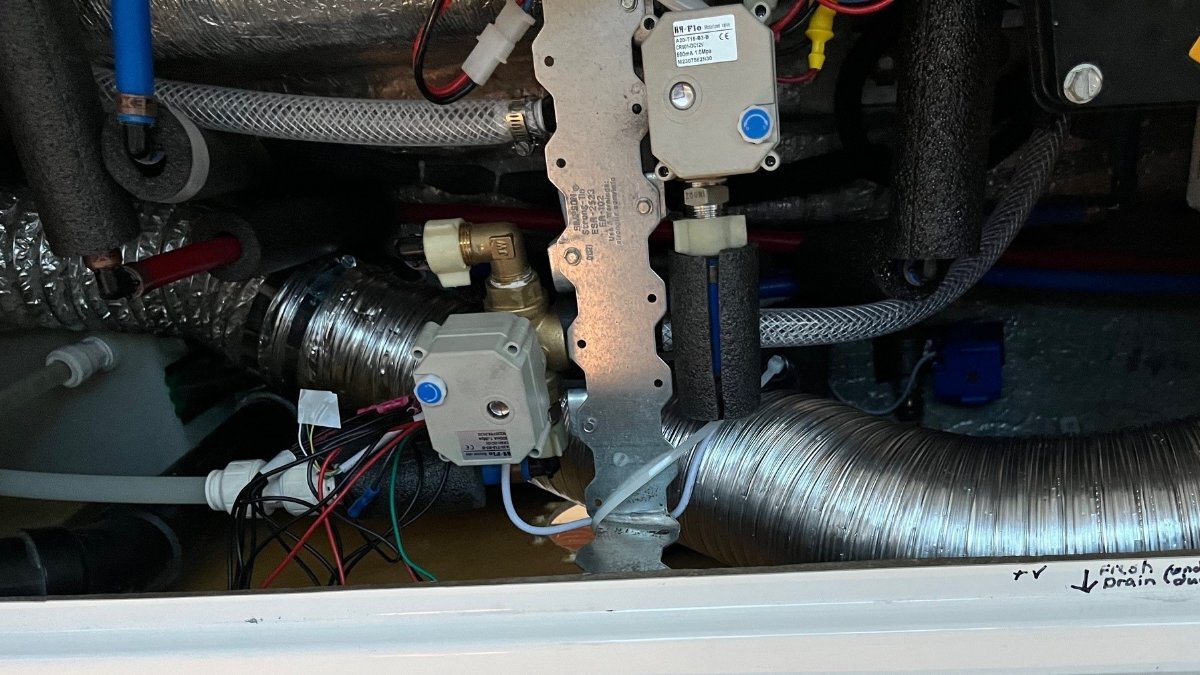
There must be a half dozen mods in this category, and I studied all I found in searching this forum. It's a shame the flexible ducting OTT uses, when upon original installation it would be so easy to plumb rigid ducting. Mine was torn everywhere in the area where you need to reach in and change the water valves. I closed the rear duct at the furnace, using 5x6" sheet metal that I got inside of the furnace housing and used 3M 3350 tape to hold it airtight inside and out. I figured why not blow air at twice the CFM in the forward direction? I replaced the first 6 ft of ducting with semi-rigid dryer vent ducting and added a 4" steel junction to connect it. Placed foil insulation above it since it is now very close to the fiberglass under the bed. I kept it straight and tall as possible for better airflow vs. the downhill and tangled mess of the original installation. Wrapped the furnace hold-down with some old automotive heater hose to keep it cushioned and quiet. I wish I could have reached all the way to the junction but would have to cut the floor of our kitchen cabinets to do so (if I ever have to replace the fridge, I will cut below and replace everything past the junction). I removed the underbed airduct completely, which is now a dummy vent, a return vent that I will place an air filter behind. The airflow at the kitchen duct is now 2-3 times the old and at the bath it has certainly doubled. I also strung up the bath vanity ducting, so it has better straight airflow, not cramped by laying down at the bottom. While in there, I foam-wrapped the PEX which had been banging on the drainpipe very loudly when in use. I will add an air filter to the return duct next (to catch dust and dog hair) and my last task will be to add the bathroom vent that @Rivernerd showed in another post (thank you!) This should really help when the bathroom door is closed as well as to vent/circle air around the basement and keep the water pipes above freezing in the rear basement. And of course, thank you @Snackchaser for your "Bathroom Heat - a more direct approach!" post that got me started in the right direction!
-
Cricket noises from the lights
jd1923 replied to Going Coastal's topic in Mechanical & Technical Tips
Am counting right, only 400 AH? Come on, @rideadeuce teased us with 920! (Yes, we all still wanna read about it.) -
Ricardo from KISEA left me a voice message. He said there should NOT be continuity across the terminals unless the input terminal shows >100VAC. That does make sense to me now. No shore power then only the inverter circuit is available through the ATS. It has a solid 120V and continuity on both sides of the ATS terminals now that it is reading voltage. It seems the ATS is working now, so I'm not sure what to do about the intermittent issue I've witnessed. Why was it not working for 24 hours. Did it somehow reset when I had shore power disconnected for 30 minutes today? Will it get stuck open again? Good thing we are not traveling soon.
-
Cricket noises from the lights
jd1923 replied to Going Coastal's topic in Mechanical & Technical Tips
When I read this yesterday, I was thinking I would have to do the same upgrade prior to adding LiFePO4 batteries. Then I realized there may be a bigger plan in my future. Many of us have this inverter: Amazon.com: Xantrex Prowatt SW2000 2000W True Sinewave Inverter Model# 806-1220 : Automotive This model is inverter only, hence the separate charger (and hulls without an inverter only have the PD charger). What if I was wanting to upgrade to a 3KW inverter at some point? Many new inverters on the market are inverter/chargers and may have superior charging performance over this upgraded PD charger. Although it may be difficult to fit an inverter/charger like one of these, under the rear dinette seat where OTT mounted the Xantrex in our hull. It would also need modification to wiring if the PD charger was to be deleted. Amazon.com: Victron Energy MultiPlus-II Pure Sine Wave Inverter Charger for 120 amp Battery, 120V, 3000VA 12-Volt : Automotive Amazon.com: Victron Energy MultiPlus Pure Sine Wave Inverter Charger for 120 amp Battery, 3000VA 12-Volt : Automotive -
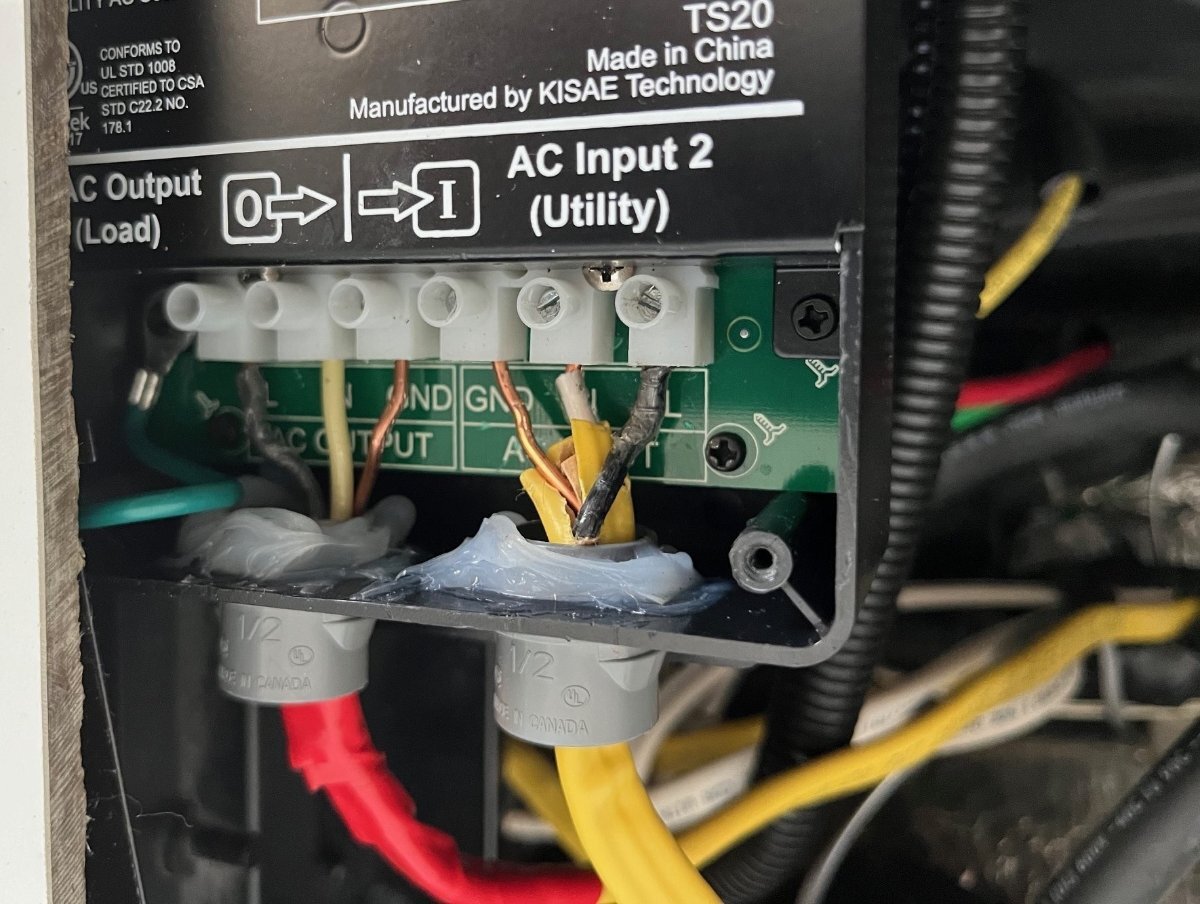
OK so this is going to get strange! I went out to test the ATS today and IMHO the testing shows a bad switch. An ATS must have a fail-safe design in that if it's unplugged, or the inverter fails, or whatever condition, the AC input line to output/load is connected, a closed pass-through connection must be the default position (should always be able to run via shore power). First, I disconnected shore power and tested for continuity left to right across the switch. The ground had continuity and both the hot/load and neutral terminals did not have continuity. I unplugged the ATS and had the same test results. Then I tested continuity from the 20A plug to the terminal leads. Again, ground to ground was good. However, the two plug posts showed continuity to BOTH hot and neutral terminals. I would think one should connect to one, not one connecting to both hot and neutral terminals. This must be wrong. Next test was to see if the new 12-2 line from the power panel (the hot through the 20A A/C breaker switch) showed continuity through the terminal screw heads. This would show the wires from the panel were connected properly at both ends. All three connections tested positively for this cable. Then I connected to shore power to see if the switch was getting nominal 120VAC. As I climbed into the Oliver the air conditioner started running! It had been connected for the last 24 hours, and it would not power on. Maybe my continuity testing reset something, but this is unacceptable quality. It had gotten up to 89 degrees inside. I'm inside the house now and my RUUVi says it has dropped 6 degrees in the last 45 minutes. I had thought that during the install, it did run once via shore power and later after running by inverter it would not. In fact, I turned the inverter off while the A/C was running and it just quit, where it should within milliseconds switch over to shore power while keeping the compressor running. The sole purpose of an ATS is to switch seamlessly in either direction. Before it had powered up, I placed a call to KISEA and left a voicemail re the continuity testing and asking for a replacement switch. Can't wait to wire another one of these!
-
Try a quality popcorn product with cooking oil in a covered pan on the stovetop or outside on the fire ring! Like D, Chris is the one for popcorn in our family. The smell of microwave popcorn reminds me of the overused microwave in the break room of a tech company, yuk! The microwave does make it easy, but ours is already in our storage shed, gone. Our air fryer had fit well under the front dinette seat. More on the install later today!
-
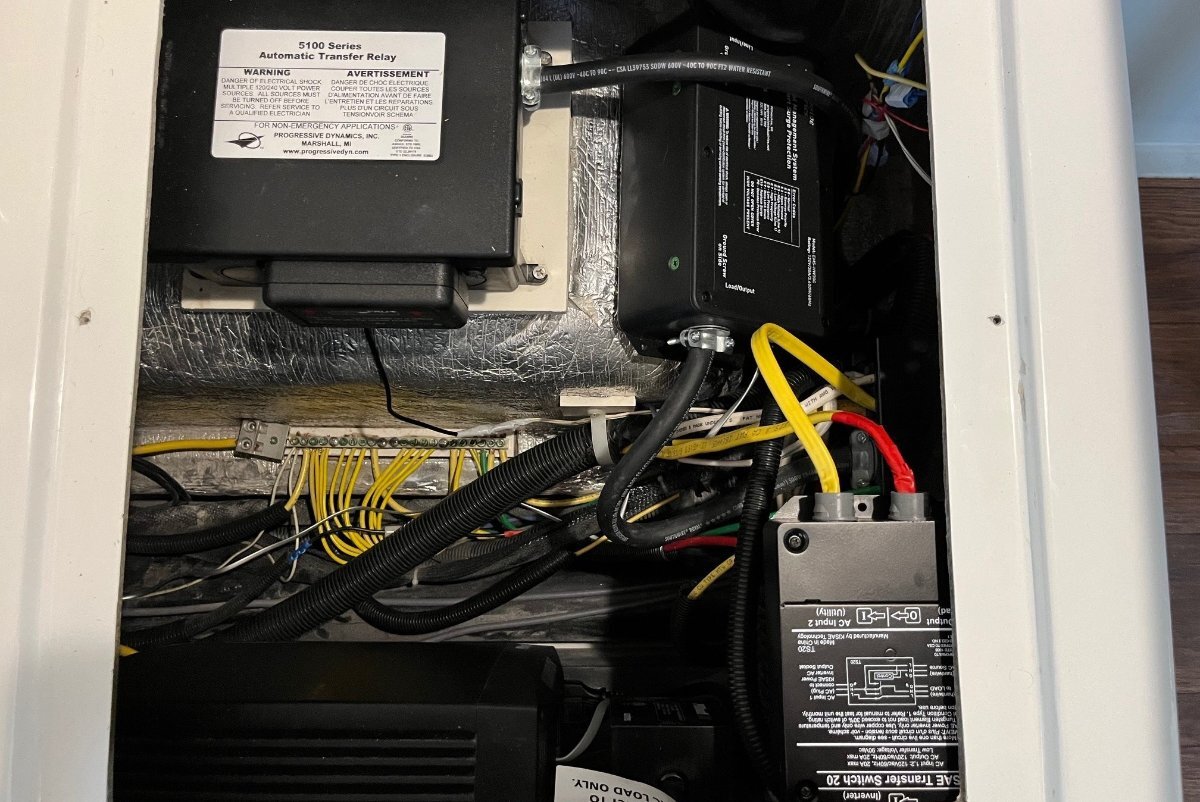
Thank you @Ronbrink and @mountainoliver, I was made aware of this solution and the KISAE ATS 20A from posts you made previously. I must have one wire on the Input side off (from the breaker panel/shore power). The output side must be fine since the A/C is running on inverter. Where I mounted my box the power cord just makes it straight down to the inverter. I'll check the wiring today. It's not a good design where you cannot physically see the wire connections and the screw dia is barely wider that the wire gauge. Changing to standard metal clamp type openings would also make the wiring easier. I'll get it today unless the ATS is defective. My 2KW Xantrex inverter got rather hot running the Penguin for <8 minutes and I don't plan to do that again. This will be for when we upgrade to a new more efficient air conditioner. My plan also includes 900 AH in Epoch LiFePO4 batteries. A final upgrade in future years would be a 3KW inverter, hopefully one with hardwired 120V terminals and built-in ATS.
-
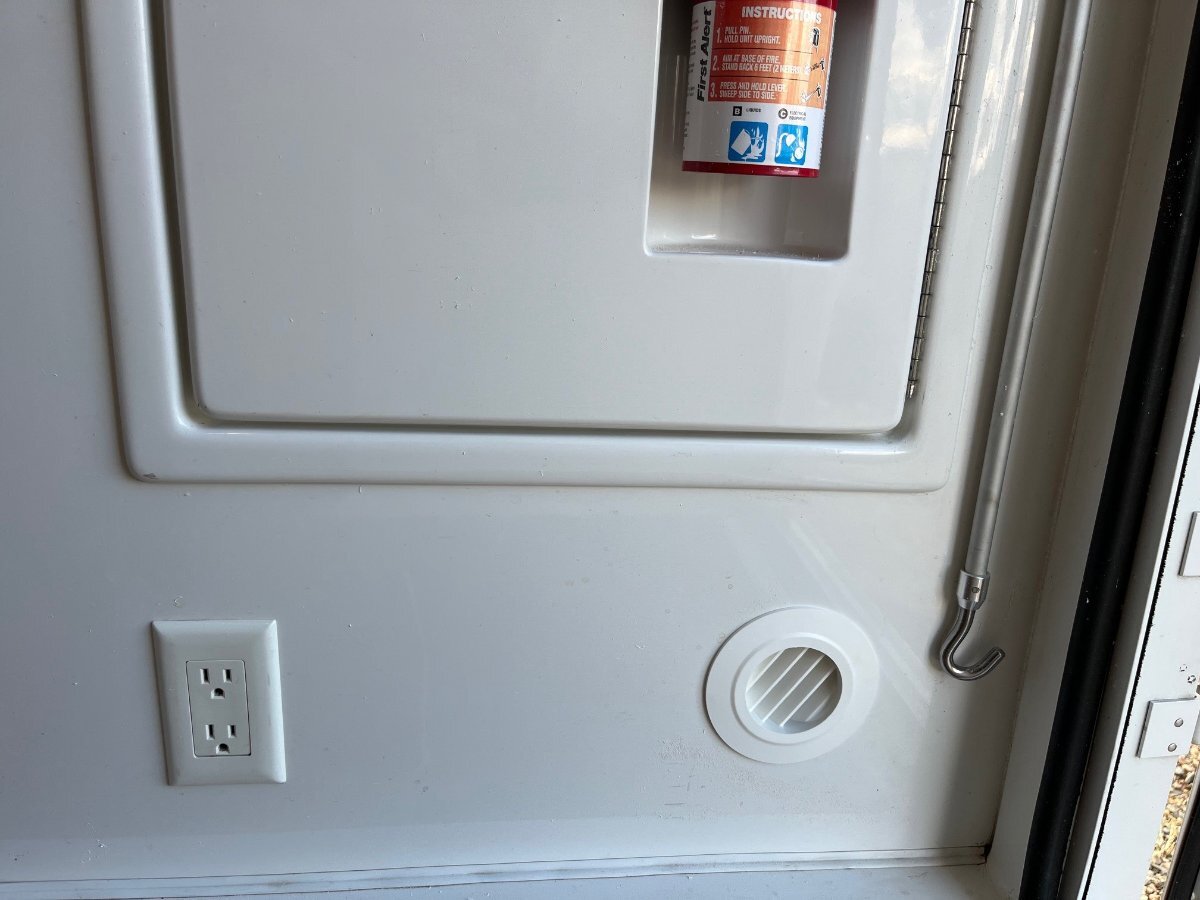
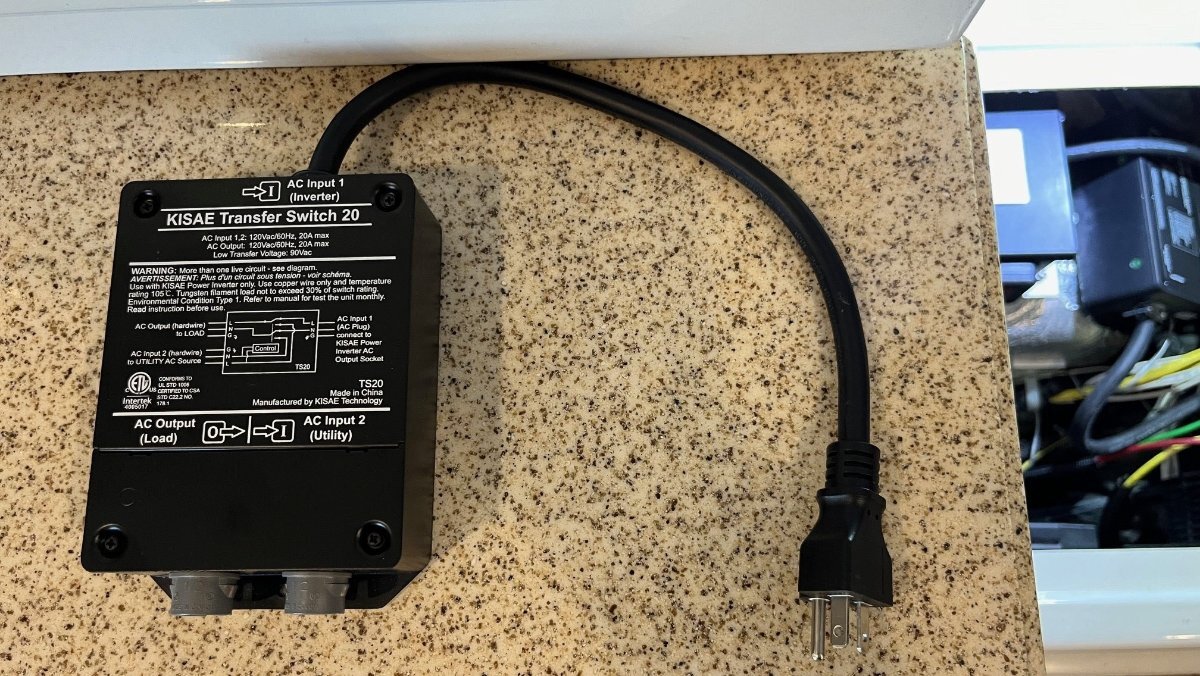
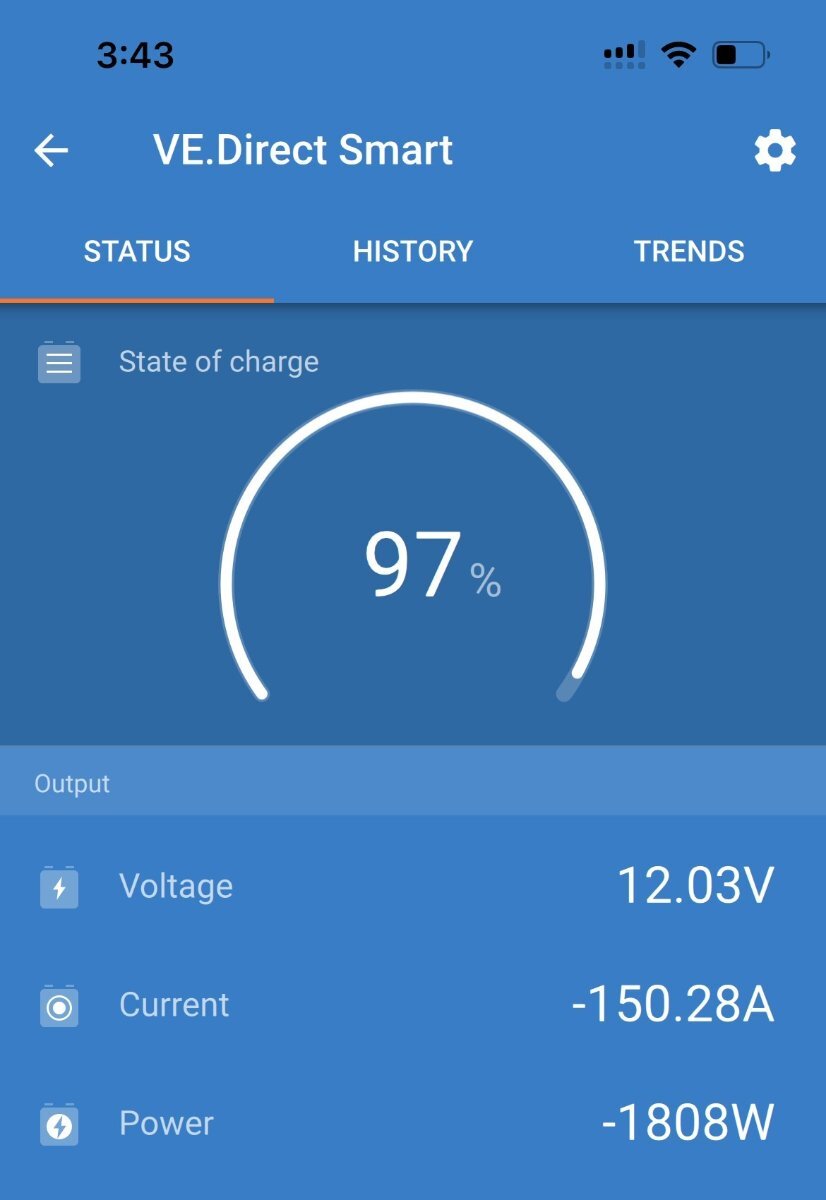
Not happy with recent purchase of a KISAE ATS 20. Could they give you another 1/2" in the terminal area? It is very difficult to wire. To tighten the terminals, you need a micro-size flathead screwdriver. Another bad, this is a 20A switch that should have standard terminals like in the 30A power panel. Some pics to follow. The first one is the OEM Xantrex ATS used to run all AC circuits less the air conditioner. Wonder if Xantrex has a 20A version of this? It must be better. Or... maybe given a likely upgrade to a modern RV A/C system needing only 10A, we then would only need a 15A ATS. The switch as installed will actually run the old Dometic Penguin II A/C running off the inverter. (See pic 4, it started at 1400W and after 5 minutes was running at 1800W.) I did see an occasional error code on the 2KW Xantrex. I still have lead acid batteries, so the error could have been running just under 12V for a second. The reading was 12.1V most of the time under this heavy amperage. You truly need LiFePO4 batteries to run the A/C off inverter. I was hoping to get this inexpensive installation done now to be ready for future HVAC and LiFePO4 upgrades. Pic 3 shows the switch in the bottom righthand corner taped to the top of the power panel (original cable in and new 12-2 cable to the panel). It will NOT run the A/C on 120V shore power, go figure. It could be a bad switch, or it could be I have an open wire on the input side that connects to the 20A A/C breaker on the panel. I hate to have to open this and wire it again. First thing to check is for continuity of the hot, neutral and ground, from the panel and left to right across the switch. I'll report on this later. Of course, while I'm doing this there is no air in the Oliver! I truly would like to find another brand inverter ATS. Please don't run out and buy one of these in a hurry.