All Activity
- Today
-
Hello to the Ollie crossing the Knik River bridge on the Glenn Hwy. in Alaska. Our son passed you southbound about 15 minutes ago.
-
This is in the beautiful US Choctaw Lake NF campground, located in central Mississippi. It is full of songbirds, lush and lovely. IMG_6035.heic
-
Sold my emotional support tent to an outfitter 🙁🙁🙁 It was painful but the funds can go toward the Alcan upgrade where is everyone? we hiked some Crested Butte and Gothic Colorado trails today and the mountain flowers are just starting to bloom, July is the big blooming season they say Crested Butte is the Saint Moritiz of Colorado

-
 Maybe JD will illuminate. It would provide access to those wires, without requiring disconnection at one end or the other, and that could be an advantage. Since I don't understand how they are connected at each end (or how to access where they are connected) I can't even guess how hard it is to .... access or replace them. Maybe it's not as hard as it seems.
 -
 I have often wondered why JD and others have used "cable loom" for the trans axle brake connection upgrade. I think a piece of 1/2 inch of CPVC (Hot Water, which is smaller in diameter than regular PVC) would work just as well, but give better stone protection. Just musings from a RoF. GJ
 -
Yes. I certainly did. And Yes it is my Oliver. And yes I love my Oliver. I'm trying to take care of her. There was a problem with the truck AND with the trailer. I wish I were an expert mechanic, but I'm not. I wish I had more space for tools, but I don't. I appreciate your posts -- they are usually very informative. I don't own the equipment, but I am trying to learn, and I lean on the forum members who have the expertise and/or experience to help me. I bought a caliper last year, but it wasn't very helpful to me trying to measure the size of that hole in the axle to figure out what size grommet I need, because the wires don't allow me to insert it fully. hahaha -- more wasted money, perhaps. Service Dept couldn't / wouldn't give me a clue. So I ordered a box of 200 grommets off Amazon that are shipping to New Mexico where I hope to make progress on this thing. Unfortunately, that is the way this issue has gone for me. If I knew a lot more about these systems, I might not have been taken advantage of by lazy or incompetent people. What's a girl to do? Learn. I'm learning.
- Yesterday
-
I have no idea what gave you the impression that I have dismissed anything. I've done my best, given no space to "work" on my Oliver (not at home and not in storage) and given no tools (very few, I should say, because ALL of them have to be stored in the truck or the trailer, as I have no garage). I take everything here to heart. Please cut me some slack. I'm trying, believe me, to end my nightmare.
-
Welcome. We have a Fort Knox hitch lock for the Bulldog coupler.
-

Trailer Separation from Tow Vehicle
John Dorrer replied to John Dorrer's topic in General Discussion
In process of getting the 2-5/16 -

Dimmer switch to replace OEM rocker
Steve and MA replied to Steve and MA's topic in Ollie Modifications
Both the rocker switch and dimmer to replace it have ground, 12v+ power supply and 12v+ load connections. The dimmer comes with a wiring diagram. The red wire on its pigtail was labeled "power", the ground wire was black and the yellow wire goes to load. The Oliver wires aren't labeled so you'll need your multimeter. In our trailer there were two red (power and load) and one yellow (ground) connected to the rocker. I had to supply crimp-on 4.8 mm spade connectors for the pigtail wires, and I used a 7/8" step drill to enlarge the hole. It was one of the easier mods I've done. -
Thank you sir and I’m definitely excited to get into the Apex! I appreciate the advice and “yes” I’ll be at the annual rally (site F-22 to make your Topgun moniker smile…).
-
-
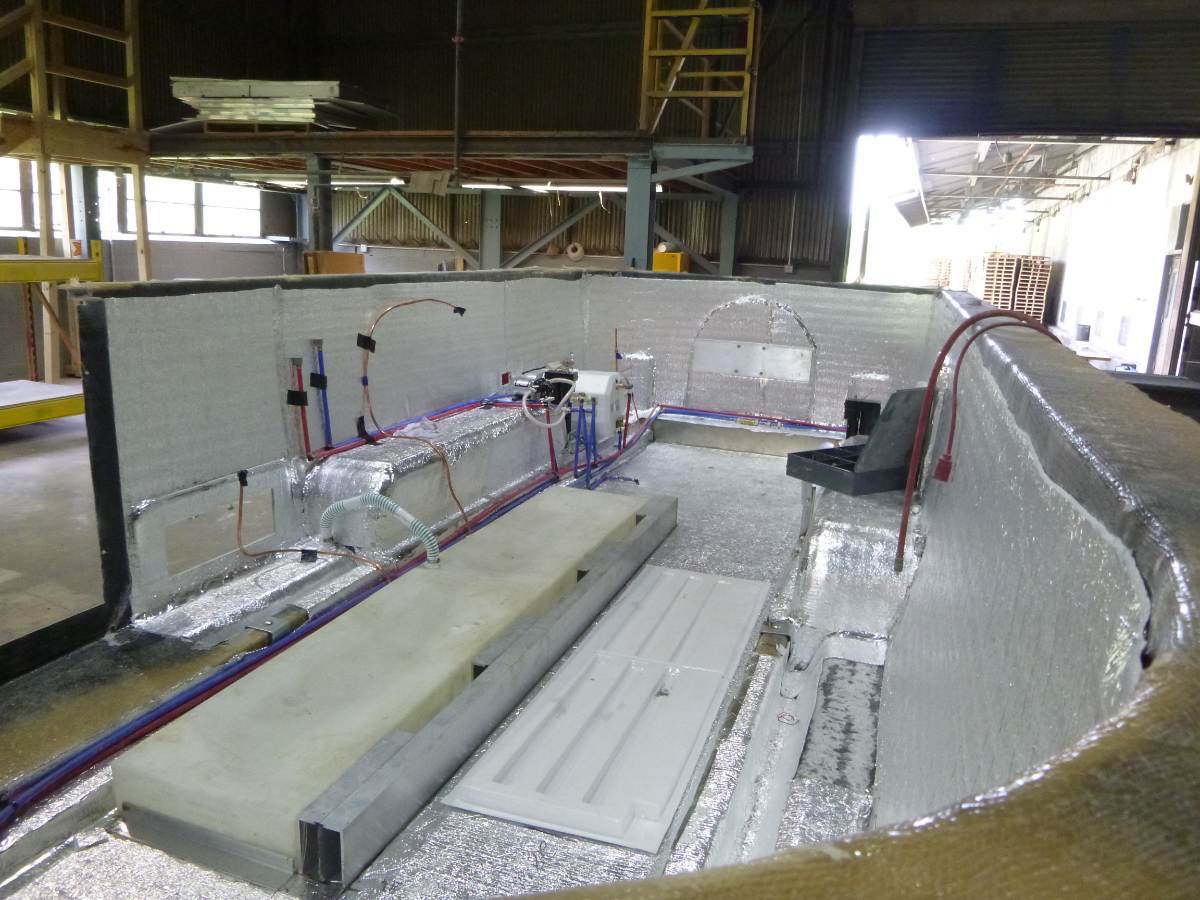
ADK - The first thing I would do is contact Oliver and ask if they can give you any information on how that original floor was constructed. Below is a pic of what I believe is under the floor that you have in your pic. Bill
-
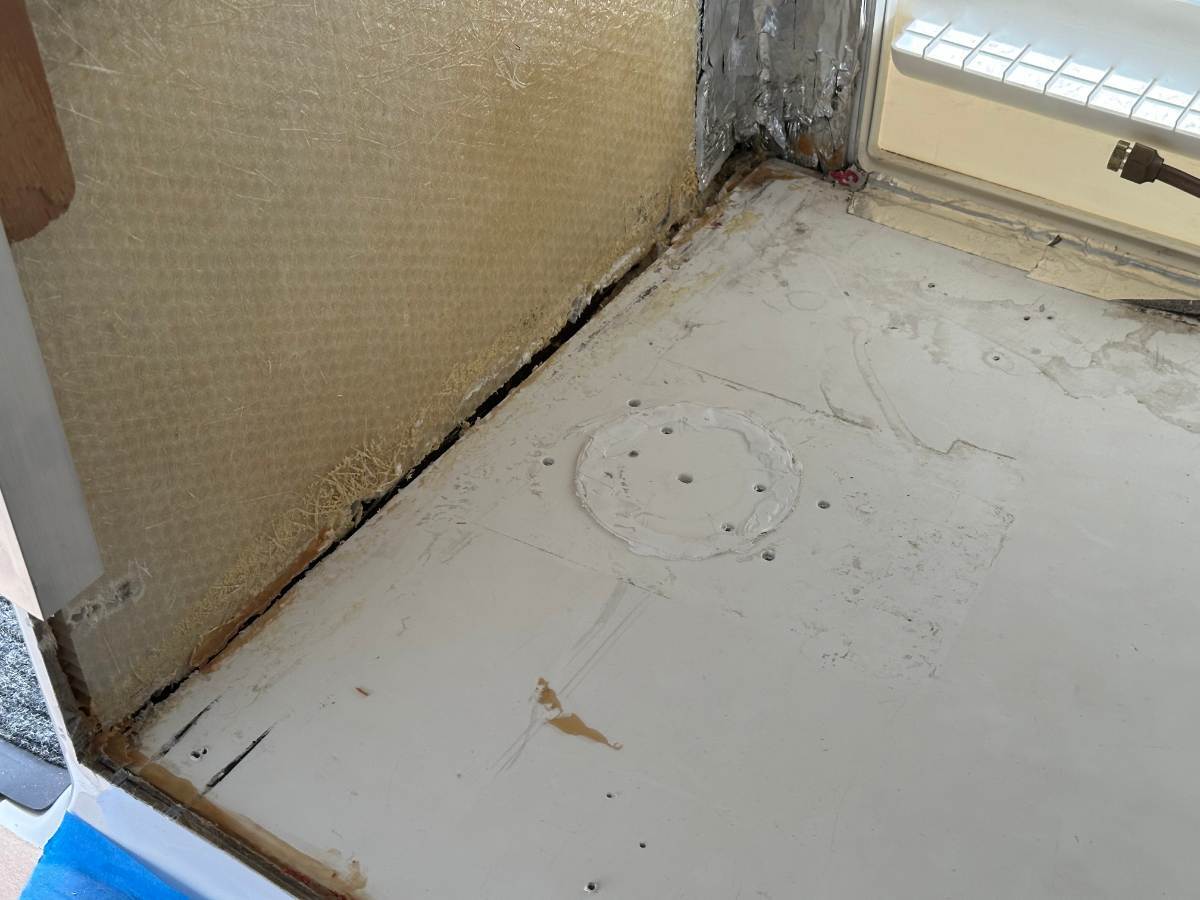
@ADKCamper, I don’t know, we still have the Dometic absorption fridge. My first thought is to drill small hole in the center of the floor carefully. Then poke a screwdriver down to see how much room you have. Then use a hole saw in the same spot so you can get a mirror down there, or maybe you have one of those endoscopic cameras. Very likely you’ll remove that bottom sheet. How was the original fridge supported? If the new fridge is designed to be floor supported, you’ll need to build a proper platform. I’d also search the Forum for keyword Nova or Kool. I remember reading a mod post on this model fridge. You also need to deal with the LP line. I’d want it terminated under the hull so no chance of leaking gas inside. The flare nuts on the T-fittings below are extremely difficult to turn without bending the copper pipe. Use two good wrenches and hopefully you can replace the T with a straight coupler. Something else to consider.
-
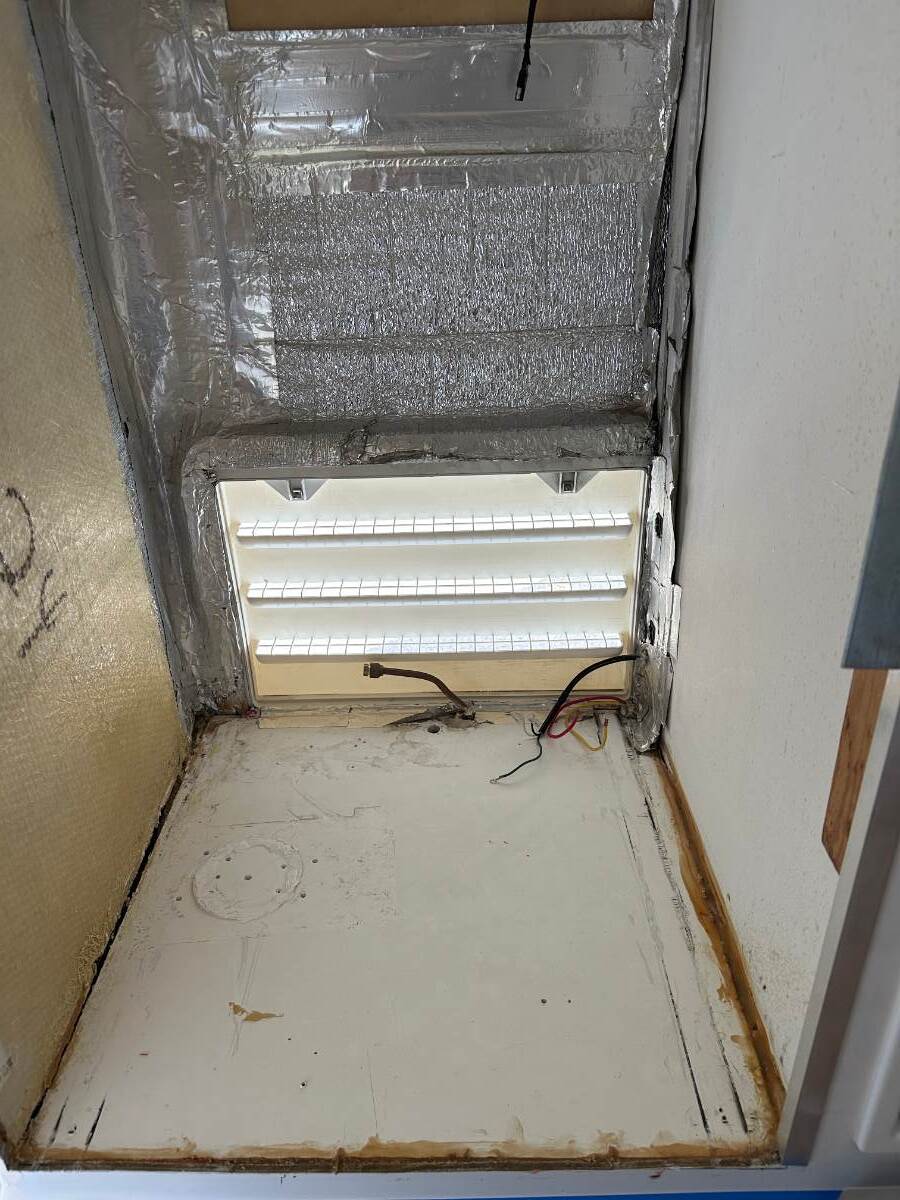
Does anyone know how the floor under the refrigerator is supported (2018 Elite I model)? I'm replacing the Dometic absorption fridge with a Nova Kool compressor fridge. The "floor" of the fridge cabinet appears somewhat unsupported... the left side will flex when I put some weight on it. The caulk/adhesive seal between the floor and the left wall has also separated; not sure if that was what supported the floor or not. I'd like to tear the old floor out and put something solid in, but have no intel on what is below to support it? I've found a few threads that discuss the cabinetry (nothing square/plumb, lots of caulk and foil tape), but only one reference to support below the floor and that looks like a custom aluminum welding job (that I'm not capable of) on a much newer model. I'm leaning towards supporting a new floor with some aluminum angle attached to the side panels, absent any good solution to beef up the existing floor...
-
You must have a newer hull (signature?). I noticed at the Texas Rally, our courtesy lights are about half the lumens as compared to newer hulls. I leave our Exterior Courtesy Lights on 24x7x365, at home and at campgrounds (unless boondocking where full dark is appropriate). They create a soft light surround and help keep critters away, especially our Arizona Pack Rats! 🤣 Love to see your dimmer install, pictures showing full vs. dimmed light. I might add a dimmer in place of our Entry Porch Lights switch.
-
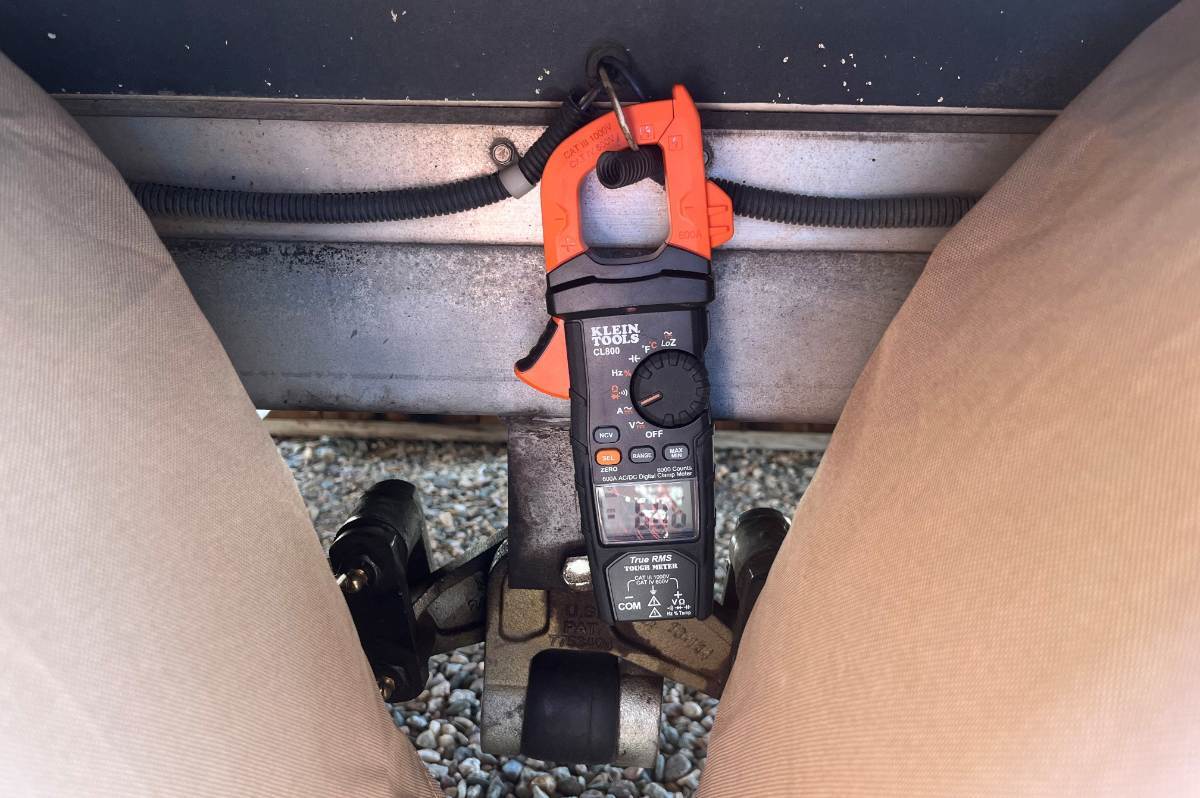
 Knowing for sure is the first step and unfortunately nobody has helped you with this. Service companies often blame the other side to be off the hook, as they charge you an hour for nothing. If your trailer is the issue, then you wasted time and money with 4 GM dealers. If tested properly, providing certainty "it's the truck" then you would be able to state this fact, not allowing them their BS. The U-Haul idea is a good one, though it seems perhaps you have dismissed the idea. There are other means, but since you are not an electrician it is a simple way for you to know whether your issue is in front of or behind the 7-pin coupler. BTW, I've known great mechanics that can rebuild engines and transmissions, work perfect brake jobs but no way in the world do they know anything about a 12VDC system other than installing a battery, and you found a dealer that wasn't even capable of doing that! Suspecting is not knowing! If you hire another tech to diagnose your Oliver wiring and this person does not test with an ammeter, then again you’re wasting more time and money! If you are drawing 6A at the two main brake power feeds, then everything downstream is working. You only get a 6A reading if the two magnets on that axle are working, pulling amperage (power from the battery) and properly grounded. If you have frayed wires touching metal, you will read 6A. Instead, it could read zero amps if the circuit is open or read way high, live wire touching ground. Either condition is dangerous when towing. It took me all of 5 minutes this morning to grab the ammeter out of my TV toolbox, walk to the edge of our property, pull the pin on the emergency brake, and connect the ammeter to run this test. Maybe the picture below will help in understanding. Of course, on our Oliver it shows 6A (6.06 actual). I run this test every time I grease the Zerks and do any suspension maintenance. I also check to find 3A at each of the four wheels, so I know the trailer brakes are balanced, working evenly. But for you, if you get 6A on both axles, it shows you do not have a wiring problem below and must be in the trailer harness wiring. I hope you try the U-Haul idea or in some way become CERTAIN in whether your issue is with truck or trailer. If it's the truck, you'e wasting a lot of time and money working on the Oliver, and vice versa. The first mechanic you hired should have determined this months ago! Without knowing you will continue to navigate blindly. If it is your Oliver, I hope you finally find a tech that understands trailer braking systems and has some competency in troubleshooting 12VDC systems. Checking a ground is not enough and btw the brake wiring in your pictures all looks pretty good to me. I'm sorry you have not found qualified help in so many attempts. Although, I understand you believe some of your service techs added value. Bottom-line it's been way too long! I worked my way through college installing auto alarms, cruise controls, auto-start, keyless entry and high-end stereo systems back in the day (70-80s) when these accessories were all aftermarket additions. It provided me with a solid understanding of automotive 12VDC systems. I've rewired EVERTHING in our Oliver for mods and to make many corrections where OTT wired things incorrectly. This post repeats a lot of what I wrote last night in my post above. I hope you take some of my advice to heart. In my shop, we'd be done with your issue in a weekend. I hope you take the proper next steps to end your living nightmare!
-
 My understanding is that the brake wires come that way from Dexter, Oliver just installs the axles as they receive them. Mike
 -
 The Pilgrims Journey joined the community
 -
At least we finally got to try the dinette as a bed. Too small for me, but Steph was able to fit. Will be good for our grandson someday.
-
Yeah I hear you on that. Likewise have also been fairly diligent about cleaning the windows as well. Doesn't matter this is a very flawed design and made somewhat worse by the fact the channels lean in the wrong direction for proper drainage. By that I mean the side of the Oliver rest at about 5-10º in the opposite direction (inward) that would allow the water to flow out of the weep holes adequately effectively backing up and filling both channels of the sliding window. With that in mind I have drilled larger weep holes in one experimental window. Two holes per weeping slit on either side. Also looking into a way of eliminating the natural water adhesion which prevents easy water flow from the channels. Pipe cleaners have not worked at all. Just this past week we ran into the same issue, new twin beds installed and no sooner than that and we received several days of rain. Mattresses and all were very wet, had to remove the entire enchilada to dry and mop up and this was after having cleaned the windows out thoroughly the day before. Because of this I am now in the process of re-engineering a better prevention system that hopefully will mitigate water intrusion to begin with. If this effort fails we will be buying other windows to install. Is it any wonder so many stick built trailers have rot issues? Its not because stick building is so inherently bad, after all most houses are made with sticks but the windows installed on the vast majority of these trailers are designed to absolutely allow water to flow into the trailers. Previously I ad considered installing window awnings on the Oliver but didn't like the idea of drilling holes into the outer shell and didn't particularly care for most of the fabrics offered with what products I found.
-
Thank you very much for the linked thread! Will read it when I get to my next destination later today. In process of breaking camp now and hitting the road. :) It's interesting that my messages never reported Trailer Disconnected (except when I unplug the 7 pin connector, of course). My messages have always come as the pair: Check Trailer Wiring AND Trailer Brakes Connected. Rewiring is sounding more and more likely to be on my plate in the near future, especially if it clears all of this up. So, I read that link in the past and I have saved both of them for re-reading later. I will add a couple of notes: Everyone associated with Chevy GM said "it's the trailer" and everyone NOT associated with Chevy GM said "it's the truck." My 'last' auto mechanic was careful to check the ground connection at the bus bar (that was one of the first things he did). It all looked okay to him, and to me (though I don't know much about electrical). I suspect the wires inside the axles are damaged, having seen the insulation rubbed near the wheels. And my mechanic said he found 'bare copper wire' which didn't make him very happy. I'm surprised, given the issues encountered, that OTT hasn't changed the way they approach this brake wiring -- and maybe they have changed it? My trailer is four years old now. Thanks to all for the help, links, comments, etc. I will be back.
-
Wow, glad you and your Ollie are OK! I can't even visualize how this can happen if the latch is locked/pinned unless the wire part that attaches from the latch to the collar is bent or broken. Do you have any pics from the topside?
-
I have a set of NEW Huskey Wheel Well Liners that specifically fit all Ford F-150 models from 2021 through 2026 EXCEPT for Raptor models. All parts and installation instructions are included. I can deliver these at the October Oliver Owner's Rally. PM me for details. Bill
-
Intermittent trailer disconnect messages have happened to a number of owners. My problem was worn wires inside the axle. Bryan @SNY SD UP in ND identified this issue first and shared his solution. Simply replacing those worn wires fixed the issue. I did go through months of troubleshooting and having my truck checked and tested at the dealer. The thread below is one of several on this topic. Trailer Brake Disconnect Message Mike


.thumb.jpg.e34bf01ef7f7d5e99ad31856d45afbeb.jpg)