All Activity
- Past hour
-

Installing Pioneer Inverter AC
Treasure Coast Vault replied to Treasure Coast Vault's topic in Ollie Modifications
I don't think the numbers will change one bit. It cools the Ollie so effortlessly there's not much load in cooling an insulated cooler! ;*)) -
Tech moving fast with beam switching. 👍🏻🇺🇸 https://www.dishytech.com/starlink-beam-switching-upgrade-improves-reliability-for-obstructed-dishes/
- Today
-

Battery and Solar Disconnect Install Questions
Galway Girl replied to Tony and Rhonda's topic in Ollie Modifications
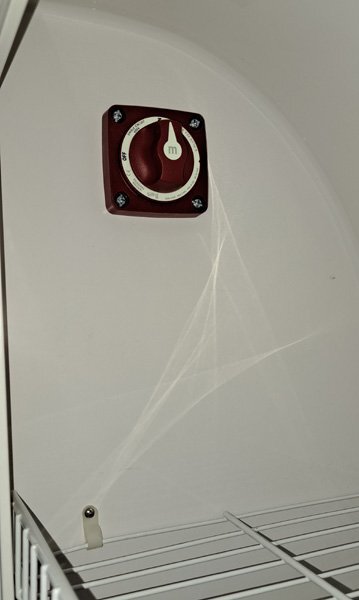
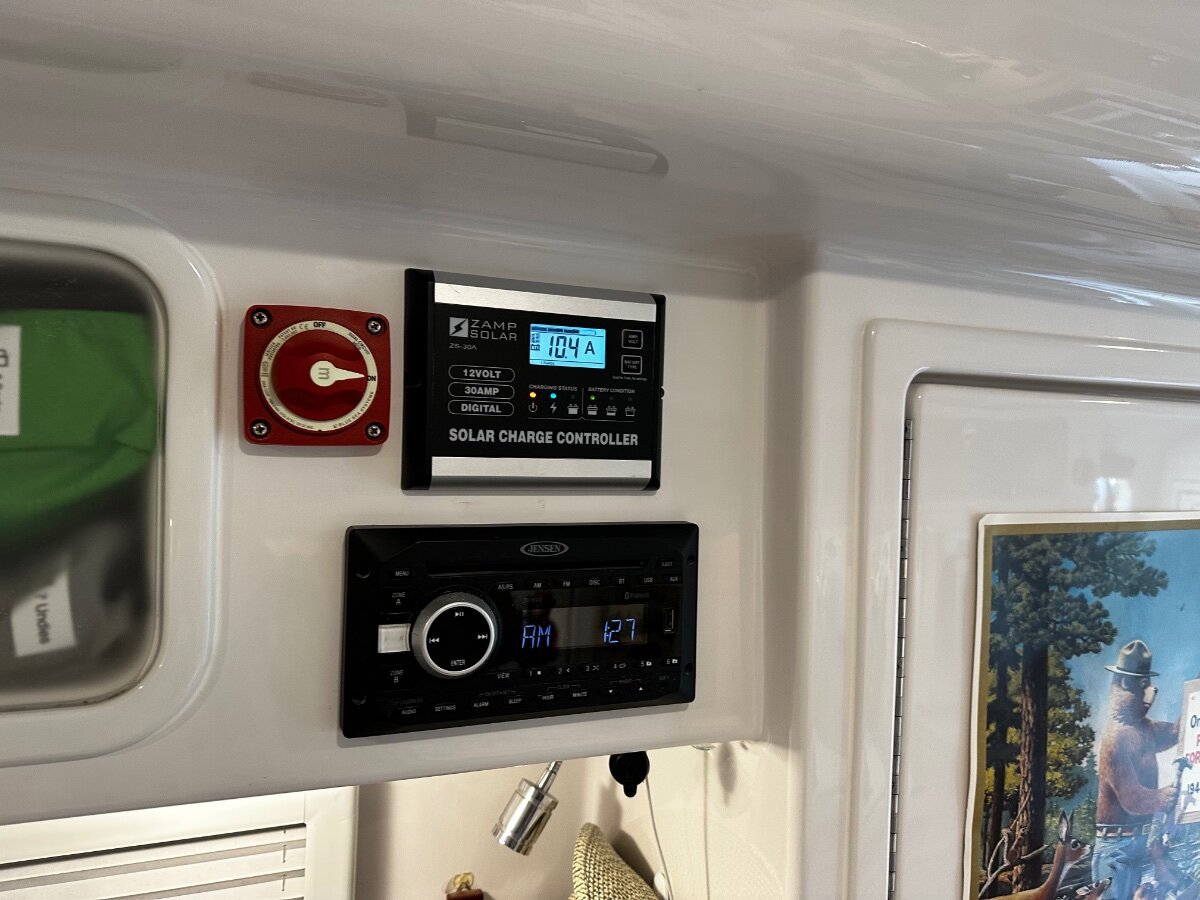
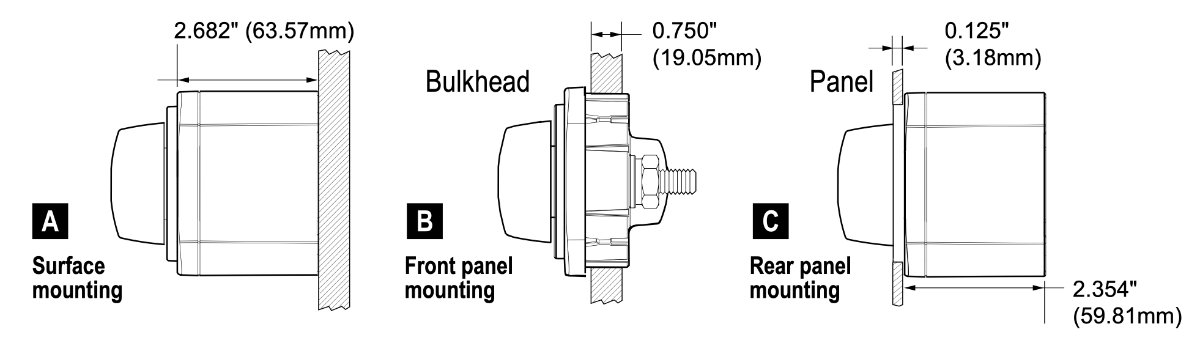
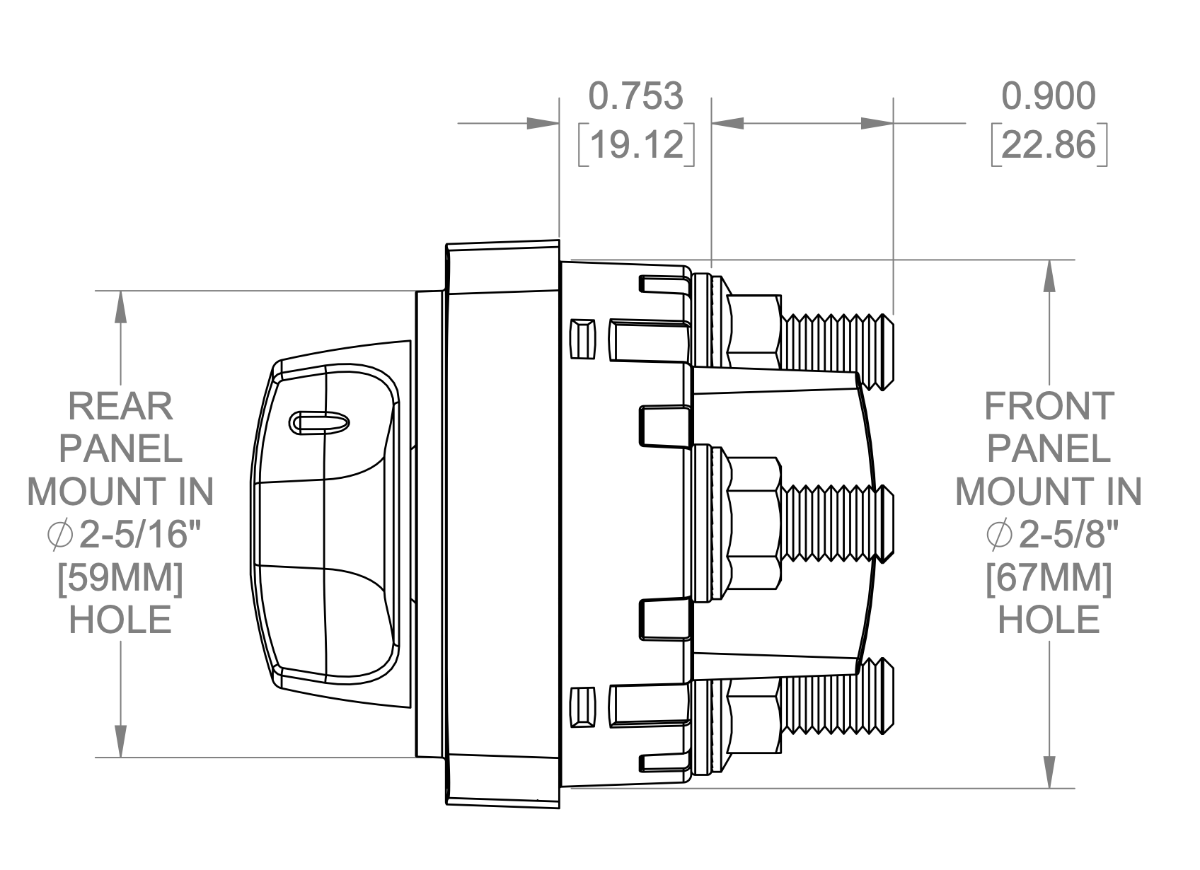
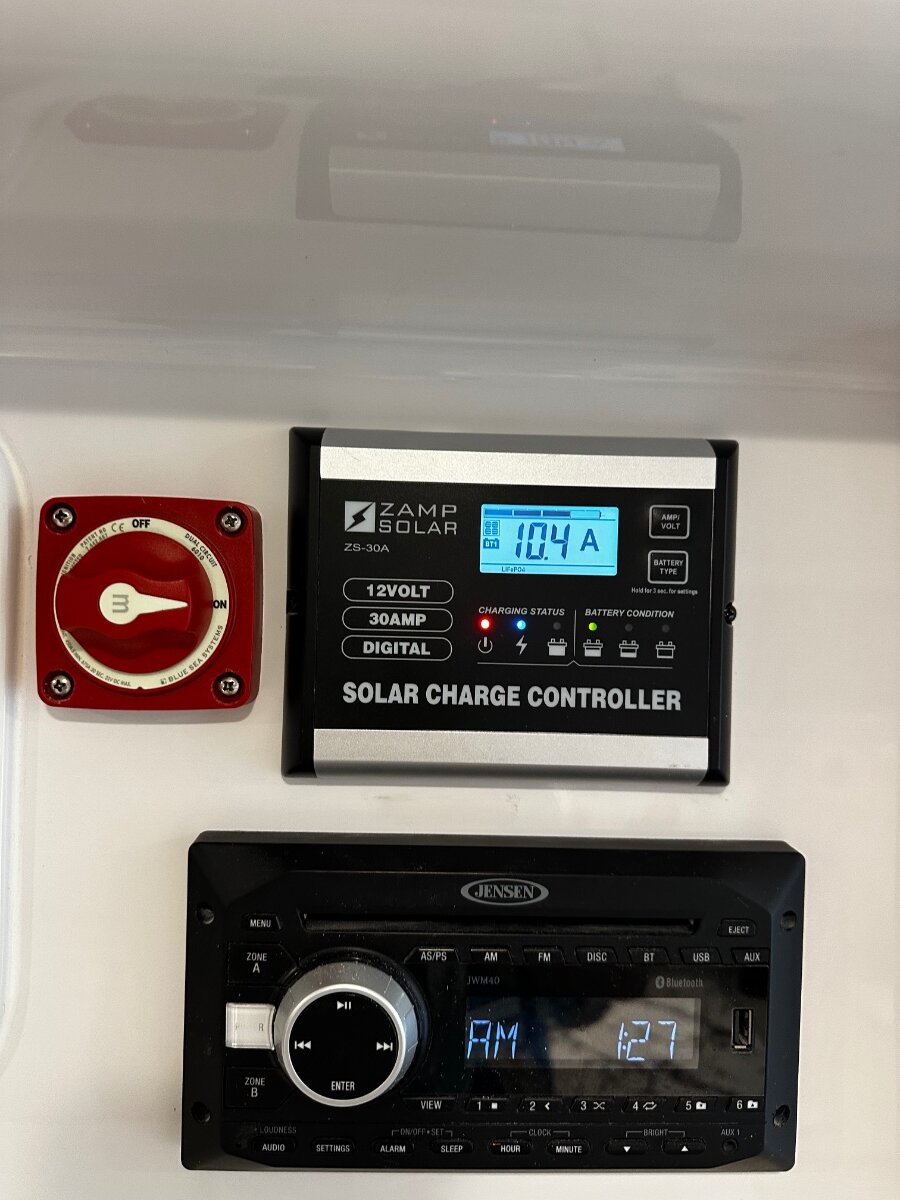
I like where you put your unit in the side of the pantry. I assume you had enough original lead wire coming from the solar panel to reach over to that wall. In hull 505 they left a ton of wire for the run after the controller down to the battery, but not an extra inch on the roof solar leads. I also just finished the installation of a Blue Sea Dual Circuit Cutoff Switch m 6010 and then read your post. Thanks for showing the pix ! Full Blog Post here: https://4-ever-hitched.com/blog-articles/f/install-a-solar-cutoff-switch?blogcategory=Electrical+Upgrades After inpecting the space I decided to mount the switch to the left side of the Zamp solar controller. A bit ugly but very visible to anyone using the trailer. I'll be adding a label just above the switch for instructions. Finished Installation Below - M 6010 Blue Seas Dual Circuit Cutoff Switch mounted as a bulkhead mounting. Here are a few "in the process" photos and the steps taken for this installation: SWITCH USED: Blue Sea Dual Circuit Cutoff Switch m 6010 WHY: The code for Solar Cutoff is that the switch must disconnect both legs of the solar panel leads. This means a dual pole (dual circuit) switch is recommended. Buy it from Amazon: Blue Sea 6010 Dual Feed Switch Mounting considerations: This switch can be mounted in 3 ways... I chose the middle - bulkhead front panel mount - for ease of installation. 6010 Blue Sea Switch Dimensions - Front Panel Mount hole saw size is 2 5/8". Installation Process: 1) Covered the solar panels with cardboard so the panels were dark with no voltage output. 2) Unplugged trailer from Shore Power and turned off the Lithionics Batteries. 3) Removed the 2 screws holding the Zamp Controller and inspected the space for positioning of the switch. 4) Decided based on my particular situation to cut off 5" of the leads coming FROM the Solar Panels. I reuse the cut portion leaving on the Zamp connectors to connect between the switch and the input side of the controller. (Note: If you have a bit more length on the input solar cable, it would be better to have about 8" of cutoff to make mounting the switch easier.) Here are the leads being prepped that will go from the output side of the switch to the input portion of the Zamp controller. The switch has 3/8" (M10) lugs, so I crimped #6 x 3/8" lugs to each of the cut wires. Heat shrink was added to each. (Note - I left the Zamp output leads mounted to the controller as they were and just checked for tightness when re-installing Zamp into mounting hole.) 5) Mounted the leads back onto the controller. Crimped the leads onto the lines coming from the solar panels. Next phase is drilling hole and mounting the switch. 6) Prepared and drilled the hole at the centerline of the controller and centered on the empty space. As I was doing a front mount of the switch I needed to use a 2 5/8" hole saw to match the engineering drawings for the switch. The bag at the bottom is to catch the shavings that come out the front as the hole is drilled. 7) Attached the input leads and output leads to the switch and tightened using a 14mm Deep Socket. 8. Mounted the switch by predrilling holes and then attached with stainless pan head #10 screws / 3/4". (Note - I drilled the holes slightly smaller than the screw so they had bite. You can also just drill holes and use stainless bolts with lock washers on the back side.) 9) Go remove the covers from the solar panels and test....voila you now have a solar cutoff switch for storage and safety while working on your electrical systems. Craig Hull 505 - Galway Girl
-
I think the highest watts draw the engineer in the Youtube video was able to see at max power was around 1100. Still far less than any of the single speed compressor units of comparable size. In our small insulated spaces I'm guessing we would be consuming around 500-700 most of the time once setpoint is met.
-

Installing Pioneer Inverter AC
Ronbrink replied to Treasure Coast Vault's topic in Ollie Modifications
I suspect the “numbers” will increase somewhat as the compressor will work harder to reach and maintain temp in ambient conditions. However, likely less than what is typically seen with conventional units. -

3500 pound versus 5200 pound axles on a LE2
John Dorrer replied to John and Debbie's topic in General Discussion
I have shared with you numerous times that 2022 LE2 's have: 1. 5200 lb. Axles 2. Nev-R-Lube axles/Hubs 3. Nev-Adjust brakes This was confirmed by Oliver. Your Hull # is 200+ after ours. Since I'm responding to this again, why are you replacing springs? The problems were with old Oliver's with the 3500 springs. You have the beefer axles and shouldn't need to replace them at this time. Unless you are planning to drive to Alaska, or drive wash board roads, and/or chemically treated roads, you shouldn't need to replace them. -
3500 pound versus 5200 pound axles on a LE2
John Dorrer replied to John and Debbie's topic in General Discussion
According to Oliver all 2022 LE2 's received 5200 lb. axles, with Nev-R-Lube axles/hubs, Nev-Adjust brakes. His trailer is 200+ Hull #'s after ours😊 -

Battery and Solar Disconnect Install Questions
Tony and Rhonda replied to Tony and Rhonda's topic in Ollie Modifications
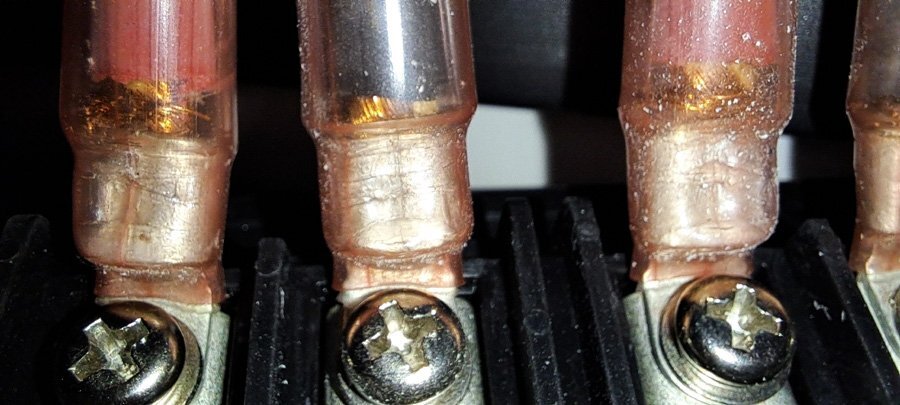
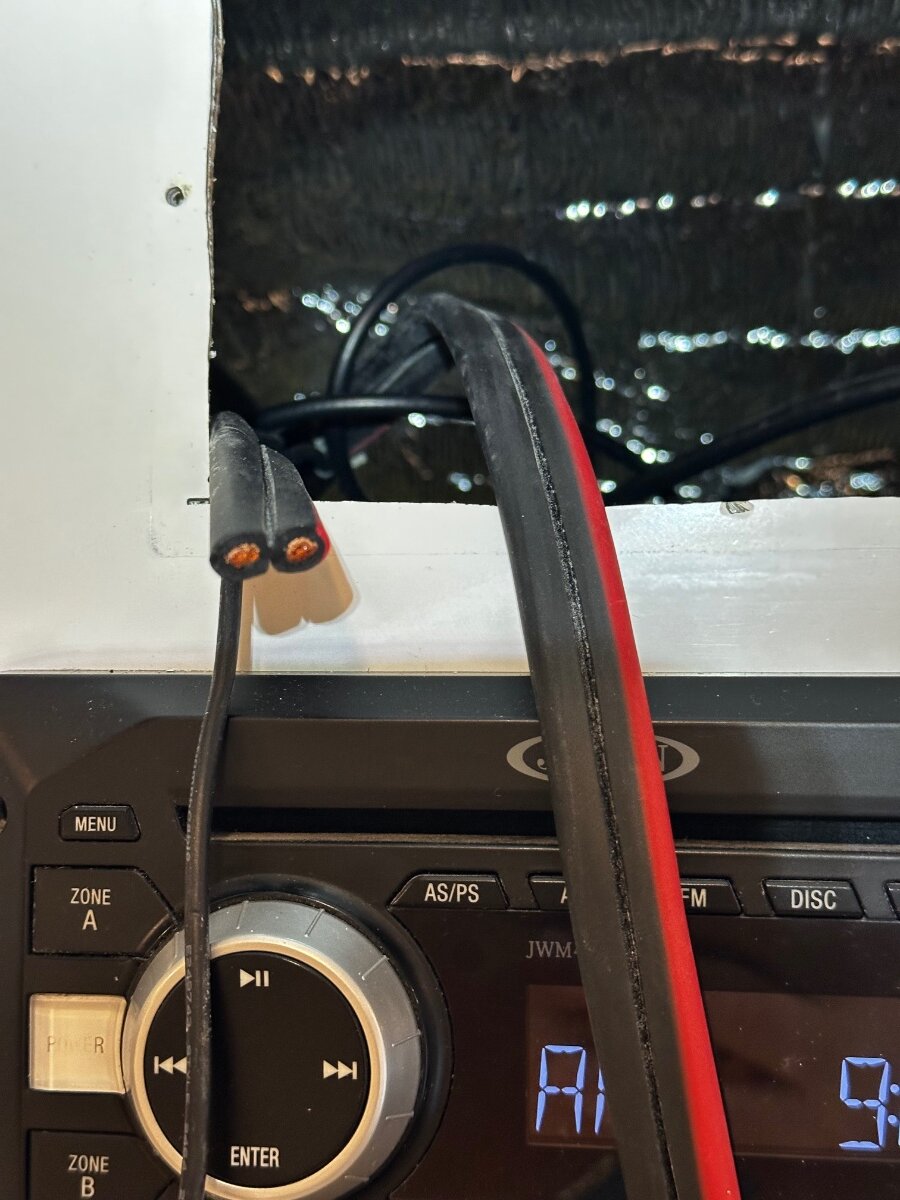
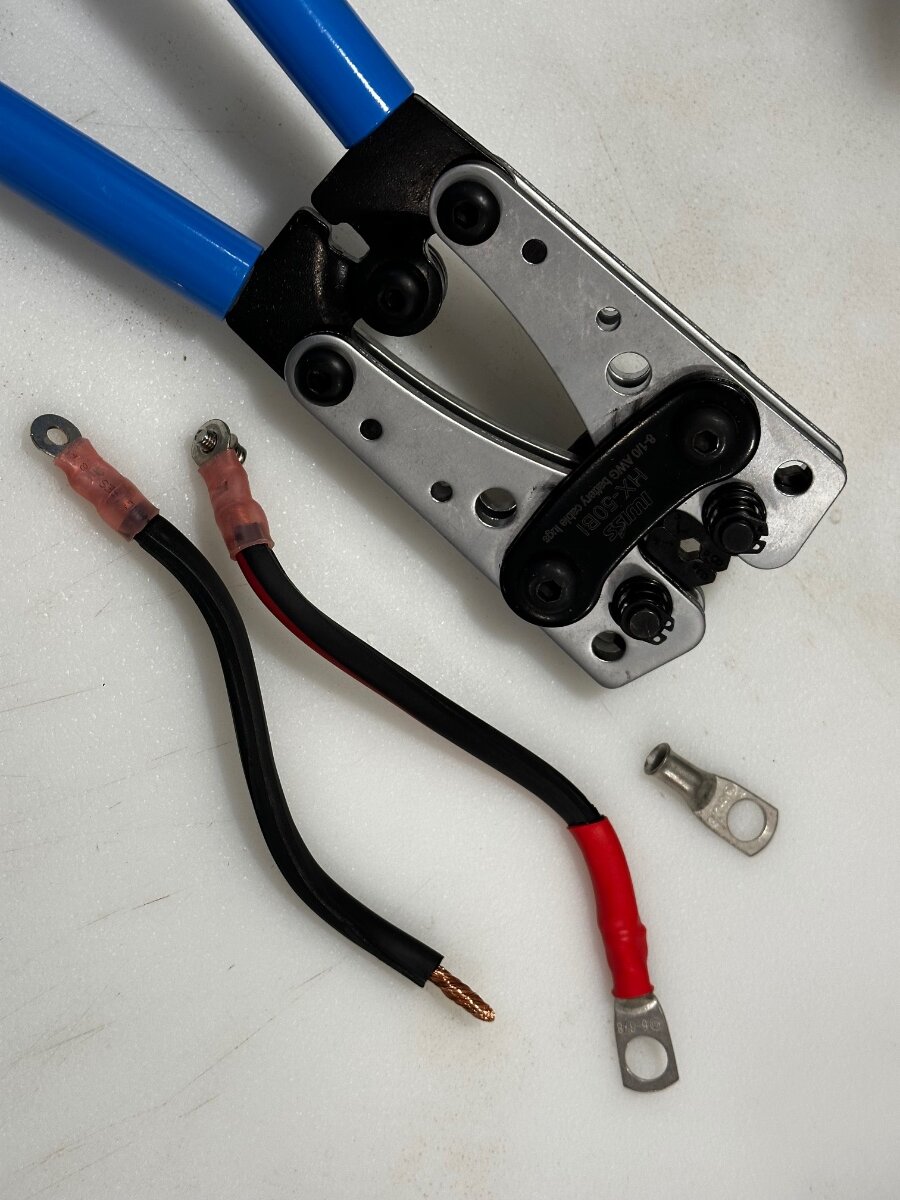
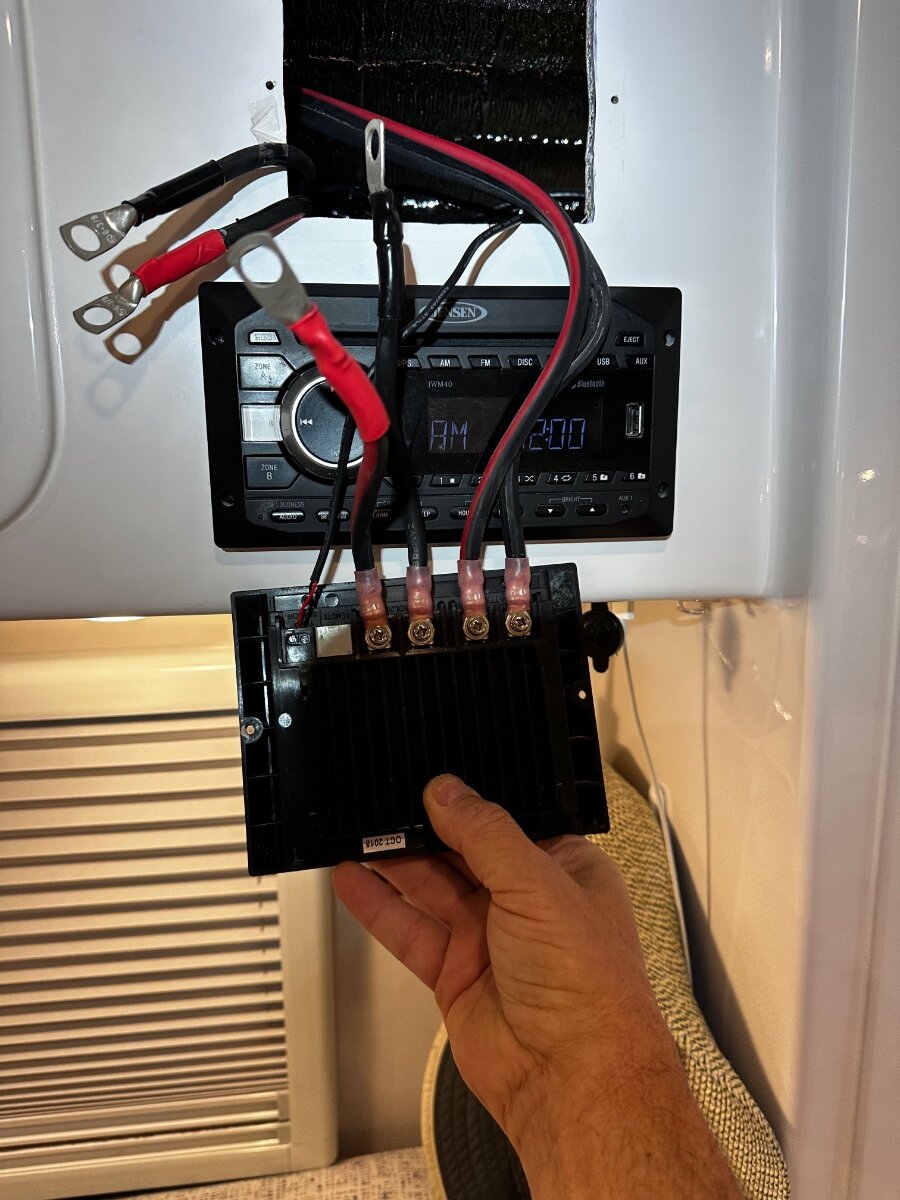
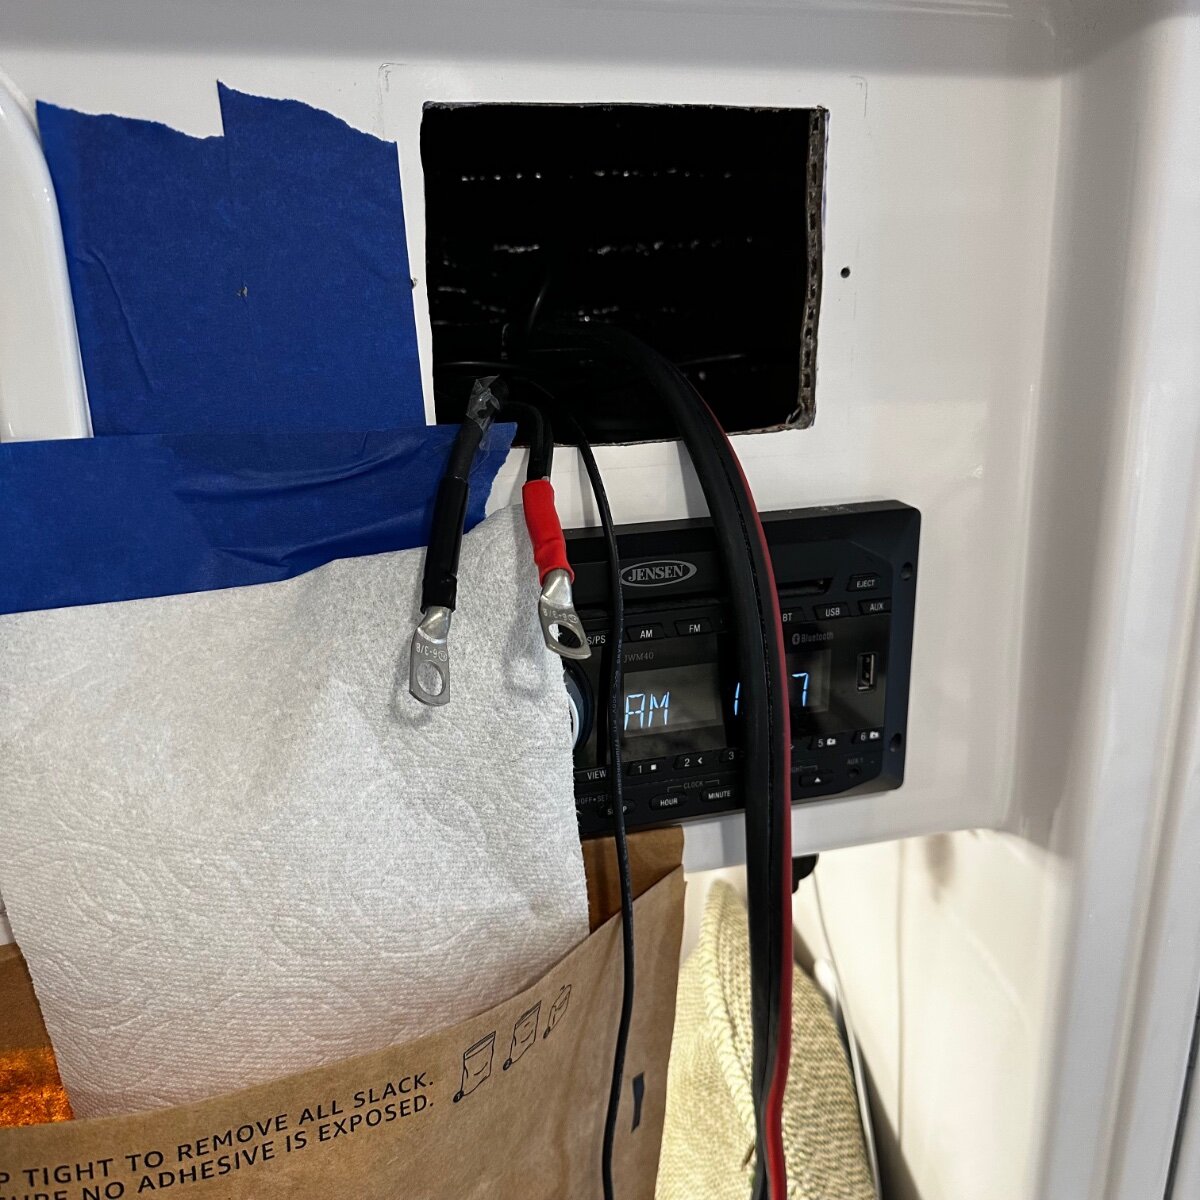
I'm happy to report progress on my solar disconnect switch. I've drilled my first hole in our Oliver. And installed the switch. Unfortunately I ran into a problem as I was making the short wire between the 3/8" ring terminal post on the BlueSea switch and the ring terminal to the back of the Zamp. I ordered 3/8", 5/16" and 1/4' ring terminals for the 6awg wire attaching to the back of the Zamp. Unfortunately it uses 3/16". They should be in today. I also noticed something that makes me a little concerned about the solar wiring safety. I'm not an electrician but this install does not look like it was done by an electrician either. If you look closely at the red (+) wire connections in the photo below, it appears at least a couple of the ring terminals used on the 6awg solar wire are under sized. It's hard to see but the "excess" wire strands are wrapped around the ring terminal and covered by heat shrink. The black (-) wire connections look OK. Not sure if this is common practice but it seems unsafe and more like a DIY rather than a professional install. I haven't removed any of these ring terminals yet but, but once I do, I'm going to cut off the heat shrink to examine this more closely
-

3500 pound versus 5200 pound axles on a LE2
jd1923 replied to John and Debbie's topic in General Discussion
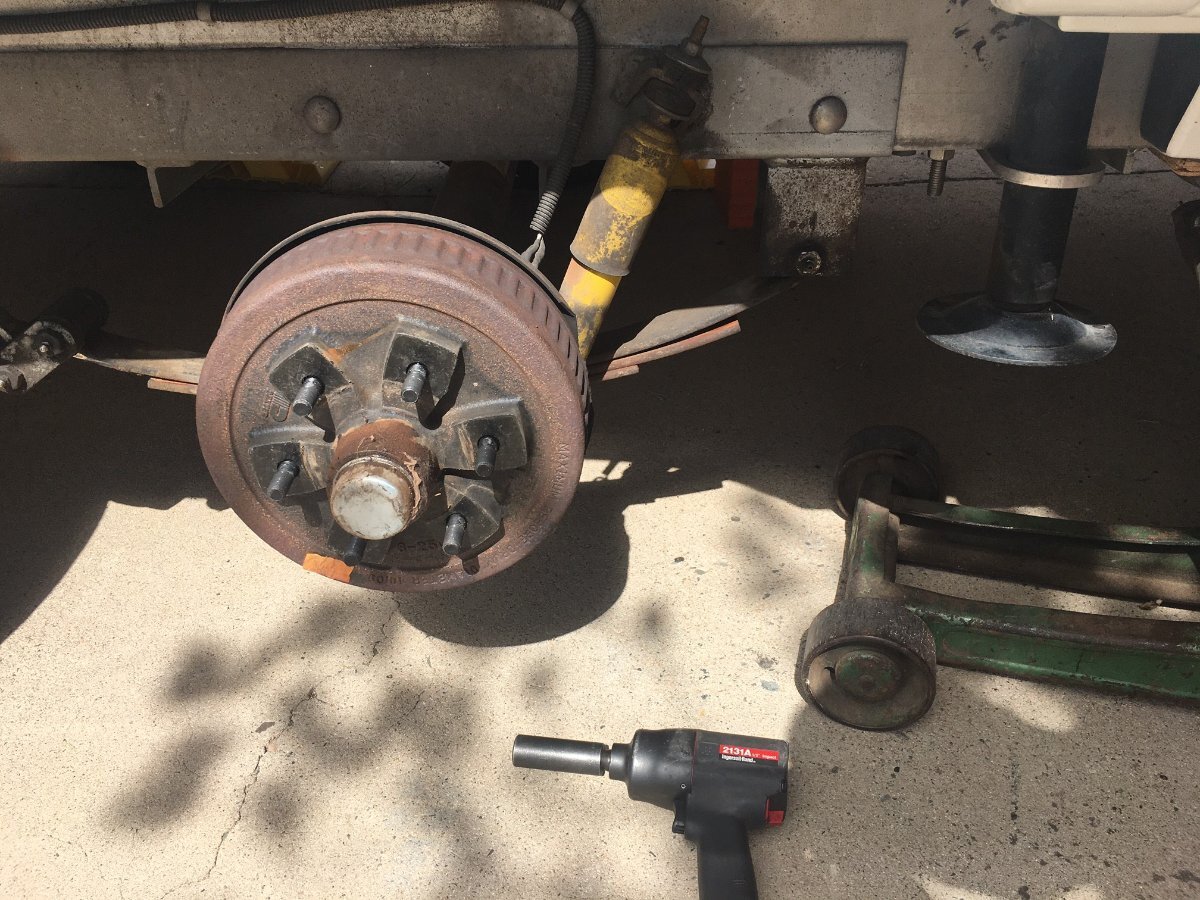
@John Dorrer had answered, YES for 2022 to 2025 Olivers. But to be sure... You should just check yours. Remove one wheel so you can see the drum. If you see the bearing cover plate like in the first picture you have the Nev-R Lube bearings. The cover plate is larger and has Nev-R Lube stamped into the cover. Second picture is the only picture I had with the drum on, just before I did a first bearing service on our older hull. It shows the old style axle with inner and outer bearings that must be packed with grease. The bearing cover is smaller without stamping. I believe if you have the EZ-Lube model, the cover plate has a Zerk fitting to add grease. EZ-Lube is not Nev-R Lube.
-
I suspect that's where it's really going to shine, especially in controlling humidity once set temp is reached.
-
Installing Pioneer Inverter AC
Ronbrink replied to Treasure Coast Vault's topic in Ollie Modifications
It will be interesting to see compiled data once your unit is tested ‘outside’ of the Vault’s climate-controlled setting, while camping in actual heat and humidity. -

3500 pound versus 5200 pound axles on a LE2
Gliddenwoods replied to John and Debbie's topic in General Discussion
The axle label includes "nev-r-adjust"......does that mean this axle does not include "nev-r-lube"? Confusing. Does the 2022 have both? -
Installing Pioneer Inverter AC
Treasure Coast Vault replied to Treasure Coast Vault's topic in Ollie Modifications
Have you used it camping? Not Yet Still getting the same numbers? Yes Is it truly quiet or how would you describe it? You can have a conversation with it running For every hour of use on a summer day, how many Ah are used in battery SOC? It only runs a few minutes every 30 minutes or longer. Mine is stored in the Vault in the AC Answers to any of these Qs would be helpful. Also, did you keep the fiberglass platform that OTT had mounted behind the 14x14" A/C opening? Yes I don't believe our hull has that add-on. I'm trying to finalize if this is the right purchase and is now the right time to buy the Turbro Greenland which is now at $1,275 plus tax. Except in warranty and perhaps temp range, the Pioneer and Greenland appear to be the same. minutes or so. Only you can make that call Sorry I can't give you more info. -
The inverter has a standby power consumption constantly while it is turned on. This is true whether you are using 110vac or not. Personally, we keep the inverter off unless we are using something like a hair dryer or the microwave. Our camping style is 90% boondocking but we use the inverter very sparingly. This is even more important since you have the AGM's and have to watch them carefully to prevent them from getting to 50% SOC.
-
I do know the GM trucks have a trailer charging line (as well as the others) that is fused under the hood.
-
I know that Oliver terminated it's agreements with all the dealers in the southeast. I believe there was at least one dealership who had not paid for the trailers that were sitting on their sales lot. I'm sure there were other reasons as well, but it was just easier for them to handle all the sales for southeastern customers through Hohenwald.
-
 Steamgauge joined the community
 -
There was one in Savannah Ga, for a while, recently I was trying to find them to get some work done. I was wondering why they no longer showed up.
- Yesterday
-
Wasn't there at least one dealer in Georgia as well? I thought Southland RV was an Oliver dealer. Doesn't appear on the dealer map any longer.
-
Installing Pioneer Inverter AC
jd1923 replied to Treasure Coast Vault's topic in Ollie Modifications
Wondering 6 weeks later, could you provide additional feedback on your new Pioneer? Have you used it camping? Still getting the same numbers? Is it truly quiet or how would you describe it? For every hour of use on a summer day, how many Ah are used in battery SOC? Answers to any of these Qs would be helpful. Also, did you keep the fiberglass platform that OTT had mounted behind the 14x14" A/C opening? I don't believe our hull has that add-on. I'm trying to finalize if this is the right purchase and is now the right time to buy the Turbro Greenland which is now at $1,275 plus tax. Except in warranty and perhaps temp range, the Pioneer and Greenland appear to be the same. -
Hurray! Another OTT person in Wisconsin! Columbia Cty for me but I service my Oli near Sheboygan. Not quite sure how to have a private chat to share info but I am open to it.
-
Thanks... This is one of my concerns.... How to know if the trailer is still safe to pull? If there are stress cracks. How can this be repaired? I think this would be beyond most RV owners' or RV Service departments' knowledge and skills to repair. I also wonder what the usable lifespan is compared to a traditional trailer.
-
Thanks... This is one of my concerns.... How to know if the trailer is still safe to pull? If there are stress cracks, how can this be repaired? I think this would be beyong most RV owners or RV Service Departments to repair.
-
Correction, it was the GFCI outlet that the inverter plugged into. I did not notice that was a GFCI plug, until I was going through Galloway Girls post again. Went back to double-check that outlet and walla! The circuit was tripped. Thanks for the help!
-
Before you do that please check the GFCI outlet on the inverter itself. You said you have the Xantrex 2000 watt inverter and if it’s like the one I used to have in our Oliver, there is a duplex GFCI outlet on the inverter with a romex cable plugged into that outlet that then feeds a CB on the panel. Your wiring may be different than mine but I hope this helps.
-
Thanks, yes I have the GFCI outlet under the dinette. I tested that when I was plugged into shore power and it tested fine, so I ruled that out. But just double-checked it now, with only the inverter on (not on shore power) and it will not trip, when I test it. I plugged back into shore power and the GFCI outlet tests and resets fine. Looks like that might be it. I'll replace it today. Thanks to all!


.thumb.jpg.e34bf01ef7f7d5e99ad31856d45afbeb.jpg)