All Activity
- Past hour
-
 OliverTheCountry joined the community
 -
You're welcome, Tony and thank you! 😂 Yes, anything to be VHB taped must be done before ceramic coating or go through the steps I've listed above. Anything new to be screwed mounted, do afterwards. I removed a lot of exterior trim to get an overall better ceramic coating job. As-is you may still need a light scuffing of the gelcoat, acetone to remove residue and rubbing alcohol to clean prior to taping. If in the future any portion of the drip rail comes lose the whole job would need to be reworked! Don't want to do all this work? Ask your detailer if they would install the roofline drip rail when you get your ceramic coating work done. Covering the individual windows is a much easier job, no scaffolding required. The roofline drip edge should eliminate streaking if you have what I have. This could be regional or climate dependent. A lot of rain in your travel climates, perhaps covering the separate windows makes more sense. It's a choice. If I remember a picture of Bill's "Twist" correctly, it has drip rails over the windows. @topgun2? The 25 ft roll I received was 2" short. My roofline installation is 15 1/2 ft long and I have 112" leftover. The main windows are 4 ft. At most you would need 52" for each window. One roll will cover all windows or do one roofline drip rail and cover 2 windows. Two rolls will cover both rooflines and all windows. I'm going to use some of what's left over to create a roofline drip rail under the OLIVER taillight in the rear. You can see all the streaking we have there in a picture in my first post above. I'll show this work soon.
- Today
-
Hello Wondering if someone could please help me to identify the right color match name or code for the white that Oliver EII has on the exterior? I have a 2020 EII Hull 612 and would like to do a bit of touch up to a few small areas on the outside with a spray gun. I'm hoping there might be a specific type of white that's used perhaps using a color chart number that I could take to a paint store and have a quart mixed up for my touch-up spray gun. Thanks Craig
-
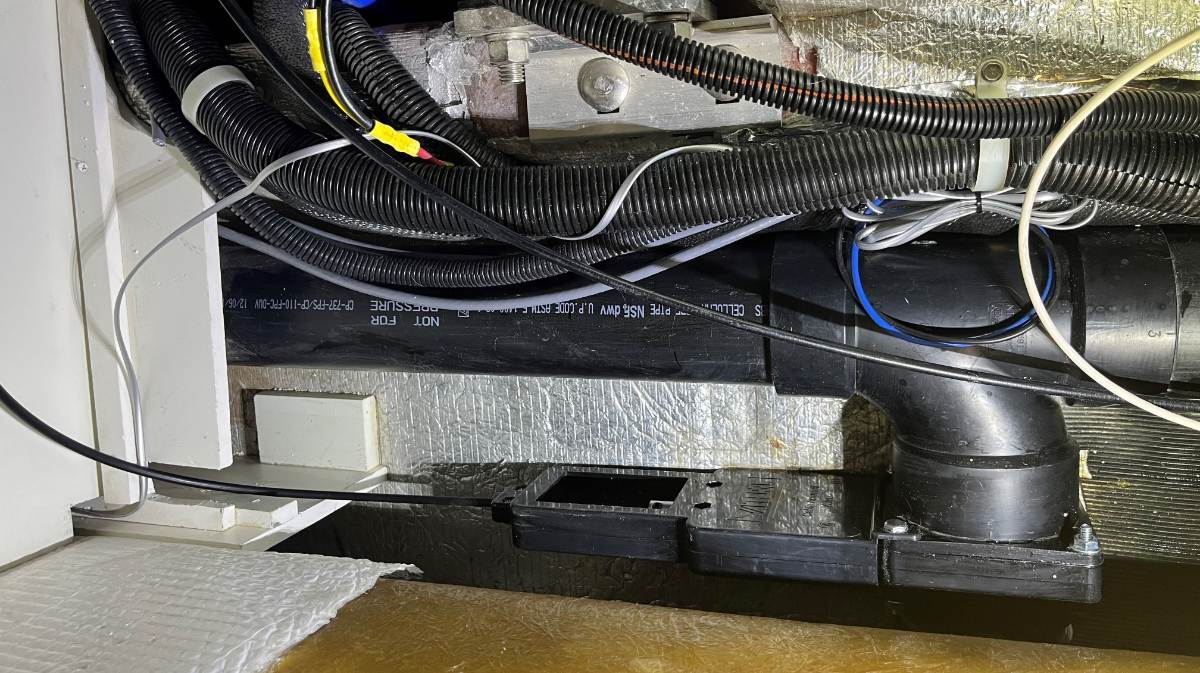
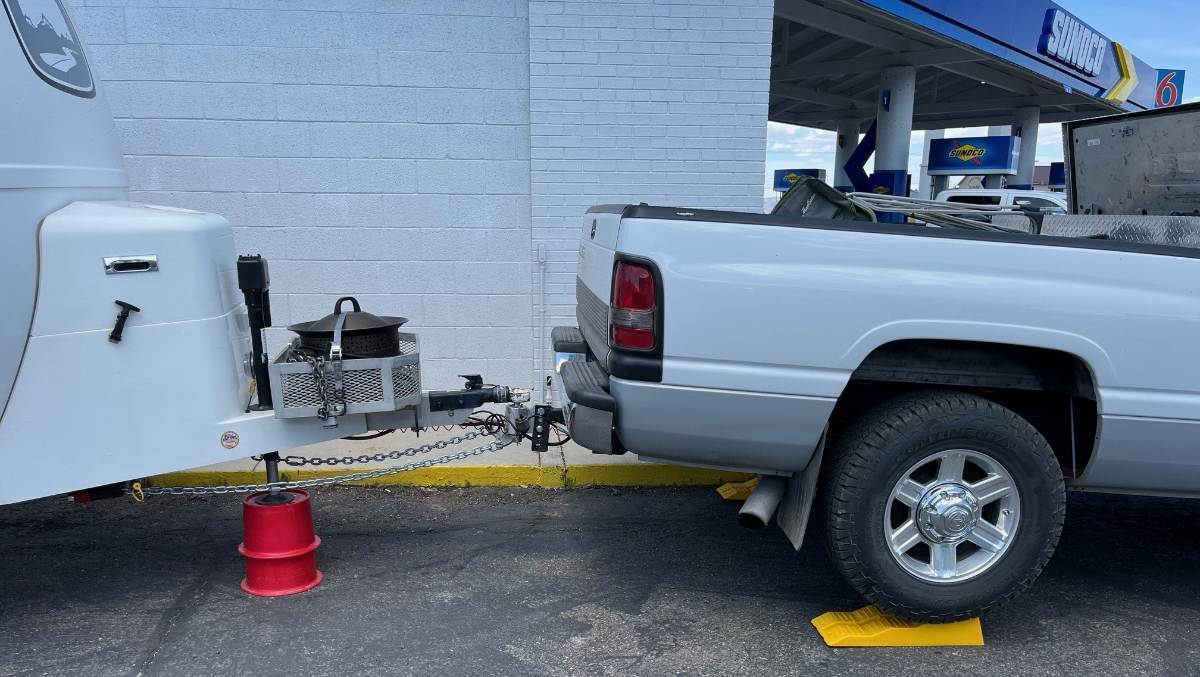
Lifting the front jack is a MUST at least 2-3" high. We read the LevelMatePRO app to know. If there are two ways you can pull into a dump station, enter to be driving uphill whenever possible. This should get the black tank 98% empty. The black tank is a taller tank and if nose up it should empty fully. The grey tank is another story. Besides nose up the grey will only fully empty when the curbside is also up 1-2". This is because the 4" waste line exiting the grey tank heads out from the rear of the tank towards the streetside (pic1). If the curbside is very low, the grey tank could be half full and not able to empty. Every time we dump, I'm taking our two 8" Andersen Blocks out of the truck bed, one under the front jack and one under the curbside jack, often lifting the curbside wheels up in the air. I lift the front up first and then pull the black valve, then I raise the curbside and pull the grey valve in this same order every time! Lift before you open the valves so that the waste water runs out most quickly. We had an extreme situation at the Sunoco in Cedar City UT. You had to back into the dump station which was uphill. It took all this lifting to dump effectively! 😎 (pic2)

-

Made in USA leaf springs
DanielBoondock replied to Mountainman198's topic in Mechanical & Technical Tips
I had to tread carefully on this one 😅 It was all fine probably because I didn’t replace the axels and kept it all aligned. It’s just unexpectedly 1.5 of the outer side U-bolts, with the bit oval hole on the tie plate, that are troublemakers. I’ve got enough to cut the high spots on a few others, but these need another 1/16 taken out or something. Anyhow with all that torque the underside bolt straightened out, this steel stretches, so it just adapted to the environment and certainly the slightly canted U portion won’t move. Anyhow I’m beat! I got an Oliver because I didn’t want to DIY, boy was I wrong 😅 Someone here warned me about that … anyhow we’re going to get a big El Nino this winter and will be traveling a lot right after so I’m in a race to pull it all together, but am at the end of my rope. I practically kissed the phone when he said “Yeah it’s fine …” 😅 I’ve got a couple minor more projects to do, small SiO2 ones and bypass the black washout for direct transfer, but that’ll do it -
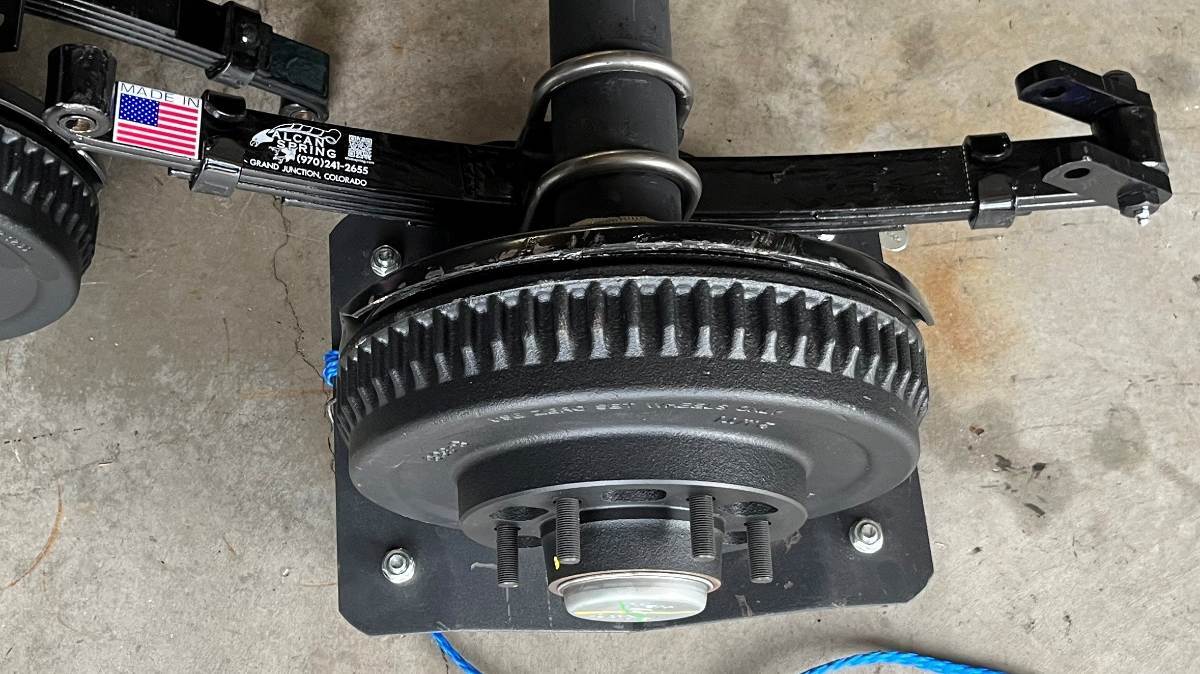
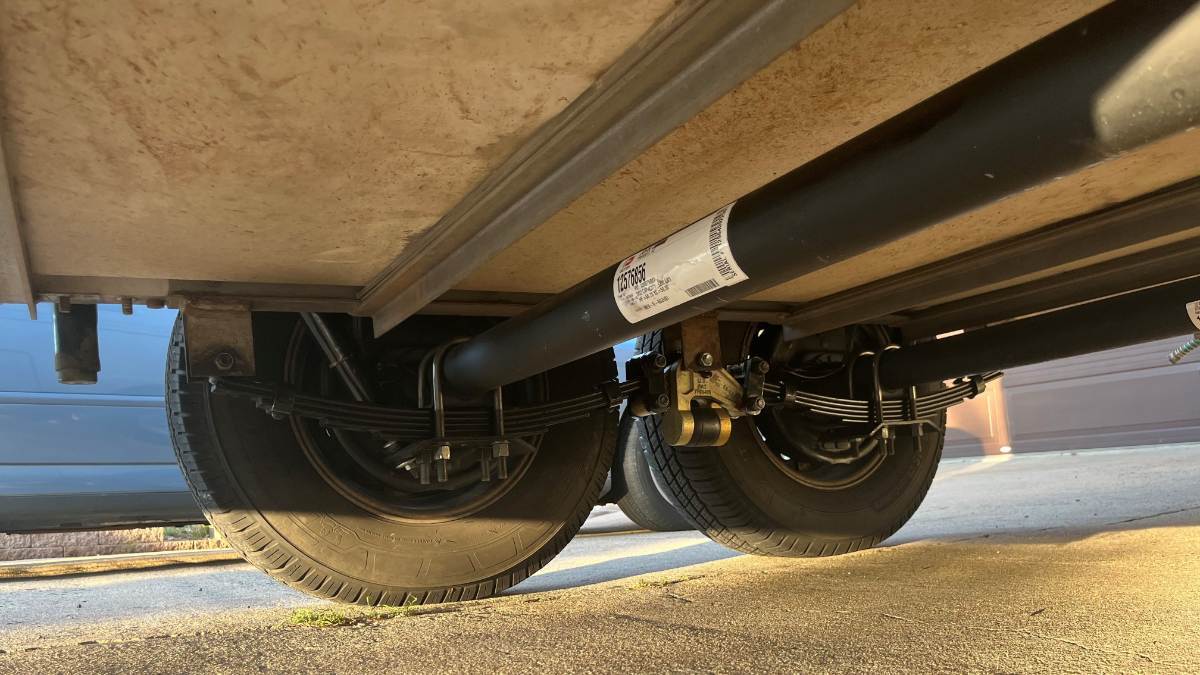
Dan, I quoted most of your message, beginning and ending with the best parts! I really like the start, "my good buddy jd1923." Back at you my friend, and your ending is perfect, "John you’re absolutely right." 🤣 It appears you're working 30 miles from home, without all your tools. I would think when replacing the U-bolts the leaf tie plates would be off where you can drill on a vise. If they're canted it must be the space between the holes is to narrow. I don't believe the cradles are actually wider since I got mine square. What I did since I was installing axles and springs at the same time was to get the U-bolts set with the parts on my garage floor (pic1). I tightened the U-bolts to the axles before installing the axles. I spent a bit of time measuring the distance from each brake baking plate to the leaf springs, and using 90-degree squares, the goal is to assure the leaf springs are as close to perpendicular to the axles as possible and the U-bolts perpendicular to the ground. I still cannot believe OTT is installing 1/2" U-bolts now, when on older hulls they installed 9/16"! So at some OTT Management Meeting a senior staff member came up with, "Let's upgrade our customers with D52 axles but save money on down-sizing the U-bolts." When I finished, you can see some light between the threaded portion of the U-bolts and each each leaf (pic2). But zoom into the front wheel picture and notice each bead of light is equal to or perhaps even slightly smaller in size at the top. This shows how close the U-bolts are to the leaf springs.
-
Made in USA leaf springs
DanielBoondock replied to Mountainman198's topic in Mechanical & Technical Tips
Final stretch, wrapping up the torquing which is taking a lot of arm strength Now, NSFW, I know my good buddy @jd1923 is not going to be happy with this but you’ve been warned 😅 … I’ve got a couple U-bolts that aren’t straight up aligned. They’re canted out a bit. I need my right angle drill which I don’t have to hog those holes out. Was thinking of various options and called Alcan. They said it’ll be fine if it’s not too much. Later if I want I can remove the plates and make it look pretty, but they didn’t think it critical. I will get this ‘done right’ but for now need to wrap it up so I can drive home (30 miles) Otherwise even with the aligned ones there’s gap to the springs, because the top cradle is slightly wider than the springs. There’s small gaps everywhere, it isn’t precision manufacturing. Anyhow John you’re absolutely right, it is bending the hanger in. Surprised we don’t use washers on these hanger wet bolts. -
Totally agree with Bill. Your readings seem high, but we always have to raise the nose when dumping. If we don't, we often have 6-12% left in the tanks (according to our monitors).
-
OK - I think I've got it. The reason that you have to raise the front of the Ollie to drain the tanks is common to all Olivers that I know of. This is because of the basic design of the tanks - they are fairly wide and long - but - not very tall since they have to fit between the inner and outer shells of the Oliver. The good news is that this design helps lower the trailer's center of gravity and more evenly distributes the weight of the tank's contents from side to side and front to back. In addition, the location provides protection to the tanks from sources outside the outer shell of the Oliver and given that in colder temperatures the area between the shells is somewhat warmer as compared to outside. Unfortunately, the downside to this location and design is that in order to completely empty the tanks, the front of the trailer must be elevated such that the liquid contents flow more completely (and faster) towards the outlet which is basically at the rear of the camper. Your 40% seems a bit on the high side but that could be a sensor issue (again, it really doesn't take all that much of a mis-placed sensor and/or the degree of level of the trailer to have a fairly dramatic effect on the reading). I think that most of us develop an idea/sense of when and how long we can "go" before these tanks need to be emptied and or what our readings really mean. But, in virtually all cases if we want to really empty these tanks, the nose of the Oliver must come up. Bill
-
It is from the internal display. But the readings seem relatively accurate, since it shows as 40% when level, and as we raise the front of the trailer, a lot of gray water drains out and it reaches zero on the display after it finishes.
-

Complete change-over to Victron equipment
ScottyGS replied to ScubaRx's topic in Ollie Modifications
Thanks JD... Good info on the Epoch batteries. I figured I was all square being that for this project I am "I F S L" rated. (that's I follow Steve Landrum for those of you not certified). Figured Inverter Services would be on top of their game but checked anyway and they did spec in the Essentials series. Currently trailer is getting the Furrion A/C upgrade and will be scheduled for the Epoch / Victron upgrade in November. We did a short trip out to "Land Between The Lakes" in KY a few weeks back and temps were in the 90's every day. We got by with the Penguin but I kept running into situations where it would be so much easier with the upgrades. Like being able to leave the dog in the trailer and go into a restaurant or store. Or, being able to stop at a harvest host or Walmart and not have the windows open and fan running and have to deal with any noise or bugs. Planning a big trip out west in spring to give it all a good workout. Hope to see you at the rally. Scotty -
How/where are you getting your percentage readings? The tank sensors can be inaccurate and/or in need of adjustment. Bill
-

Installing Trim-Lok Drip Rail on the Oliver
Tony and Rhonda replied to jd1923's topic in Ollie Modifications
@jd1923 That looks really good! Nice and clean. It's on my very long list of things to do on our Ollie. I'm deciding whether to put the drip rails on over the windows or along the roof edge. We're in Kentucky so slightly more rain than Arizona. Maybe both locations since the roof edge isn't very noticeable. Also deciding whether to install before or after we have it ceramic coated but your post has helped me decide. Thanks for the post! Tony -
Since we started using our 2024 Oliver Legacy Elite II, the gray and black tanks won't drain fully unless we lift the front as high as it will go. If the camper is fully level, the gray only drains to about 40%. Anyone else have this issue?
-
 chris44 joined the community
 -

Fresh Water Tank Overflow Condition
Wayfinder replied to Wayfinder's topic in Mechanical & Technical Tips
@jd1923 my screen was WAY up in the pipe, there was no reaching it with a finger. Only a bright flashlight revealed the screen up in the pipe. Not sure if they are all like that was products change constantly, but you'd think there would be a screen somewhere. -
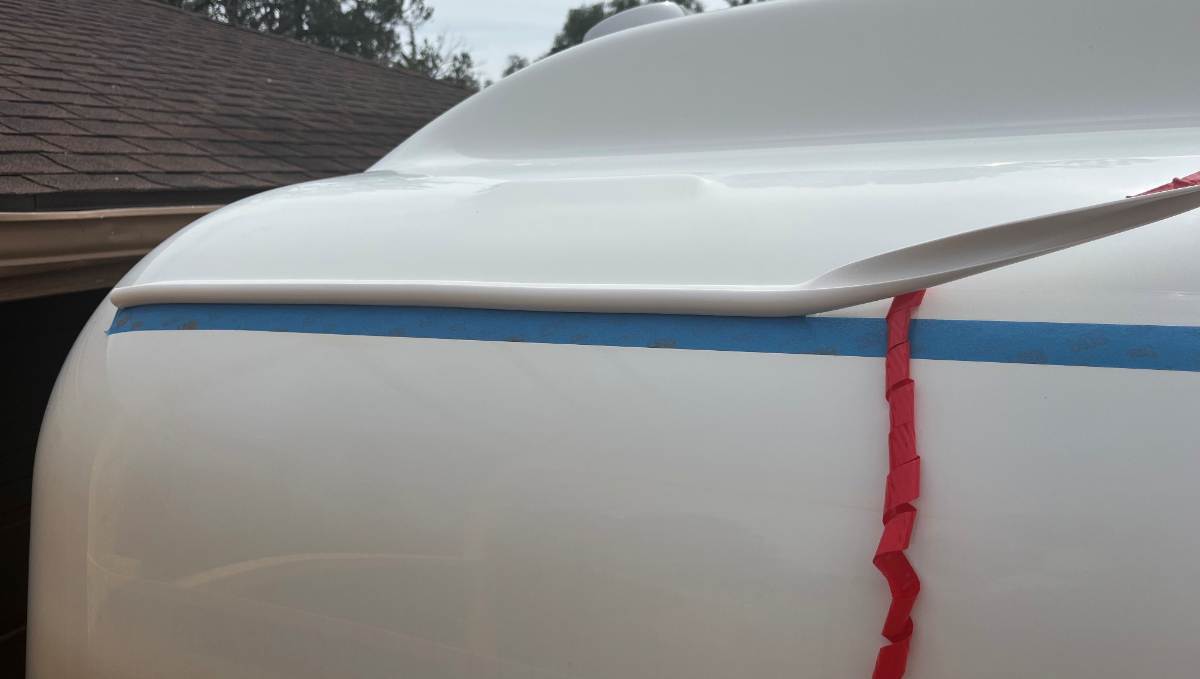
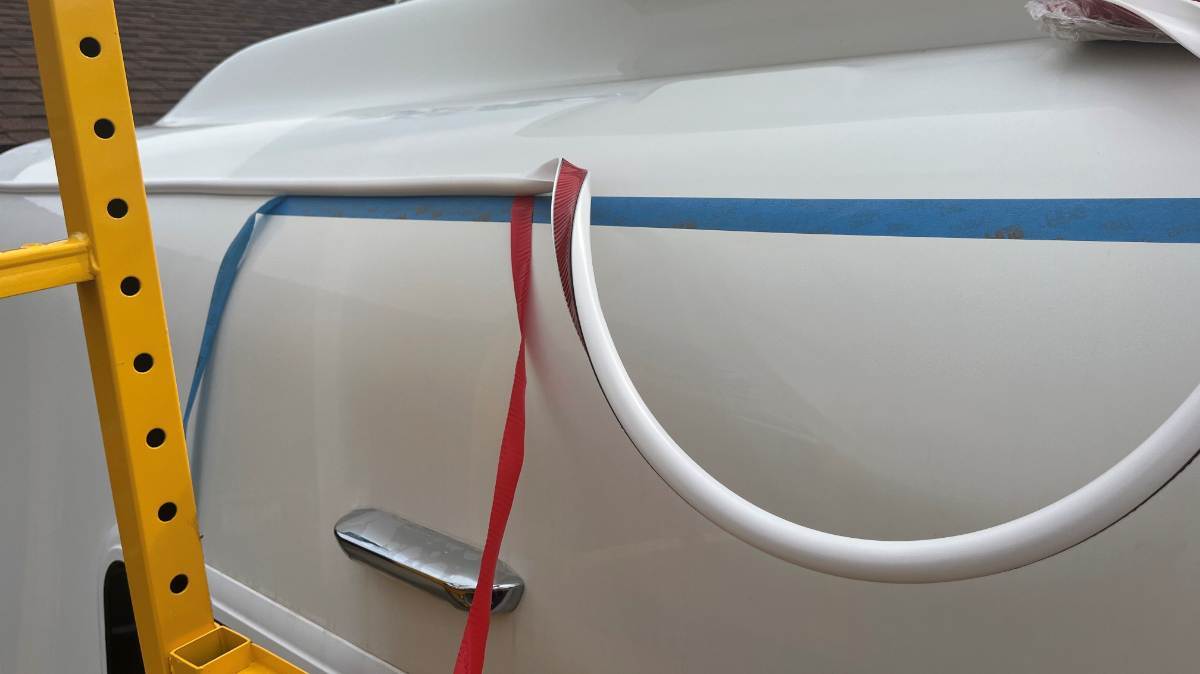
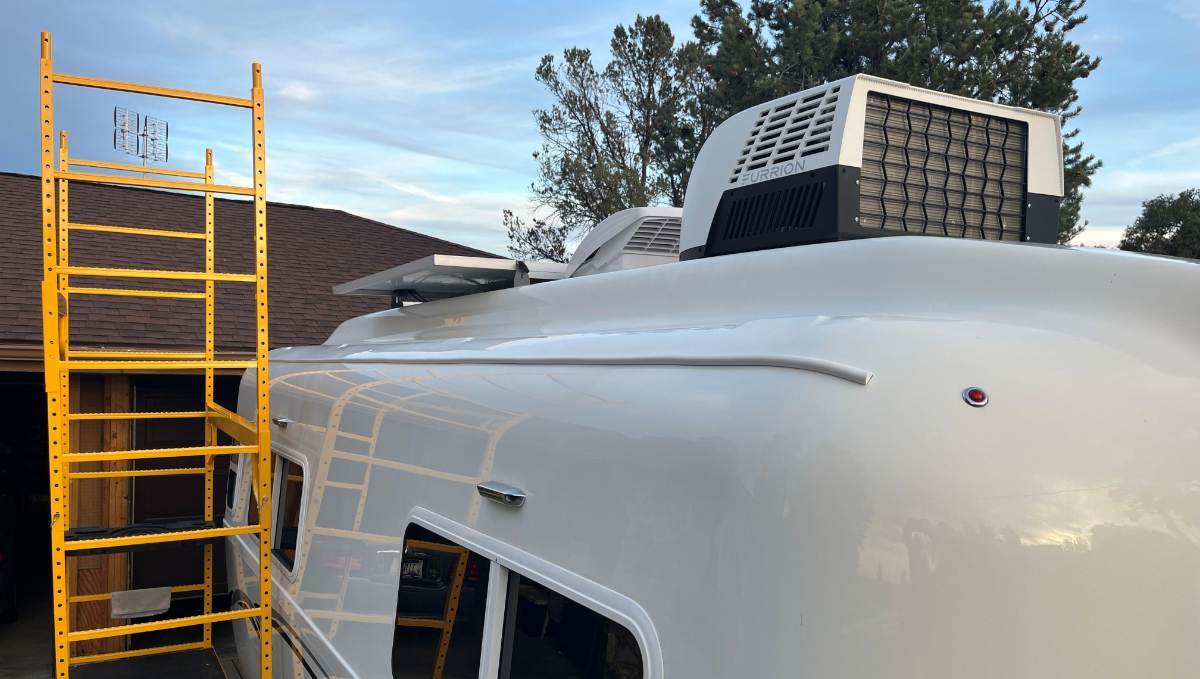
First step was to talk to my ceramic coating guy. I knew that 3M VHB tape will not stick well to ceramic coating. It's 39" from the bottom of hull belly seam to the bottom of the drip rail in the original installation. On the scaffolding, the floor set only 3 ft high to work at eye level, I measured 39" up about every 18" left to right and placed a 1" piece painter's blue tape just where the new drip rail will be (this step not pictured). Then I ran the masking tape the entire length of the hull. Next step was to sand off the ceramic coating. I carefully hand sanded just <1" above the masking tape, first using a worn sanding sponge and then 400 and 800 grit paper. Smoothing it with acetone you could see the yellow ceramic residue on the rags. Final clean with 90% rubbing alcohol. I was careful, but should have been more anal, laid a second line of masking tape so to sand exactly a 7/8" strip. Then, game on, VHB tape doesn't fool around! I cut the ends angled back using a hose cutter. Stuck down the first few inches just above the masking tape. You pull the red backing tape off only for the next length. You keep the 25 ft length coiled ahead of you. With an 8 ft scaffold, you also move it 3x as you work left to right. The product is a very soft PVC that can bend in any direction and stretch. You have to stretch it to get it in a straight line and then you have to let some tension off as you lay it down. It's not that easy keeping a straight line that long. I think it came out pretty good. I'm happy. From the ground it looks straight as an arrow! I took the final picture from up on a ladder so we can see the line. It is straighter than the "professional" who did the there other side and it's a good product which allows for a straight installation. 😎
-
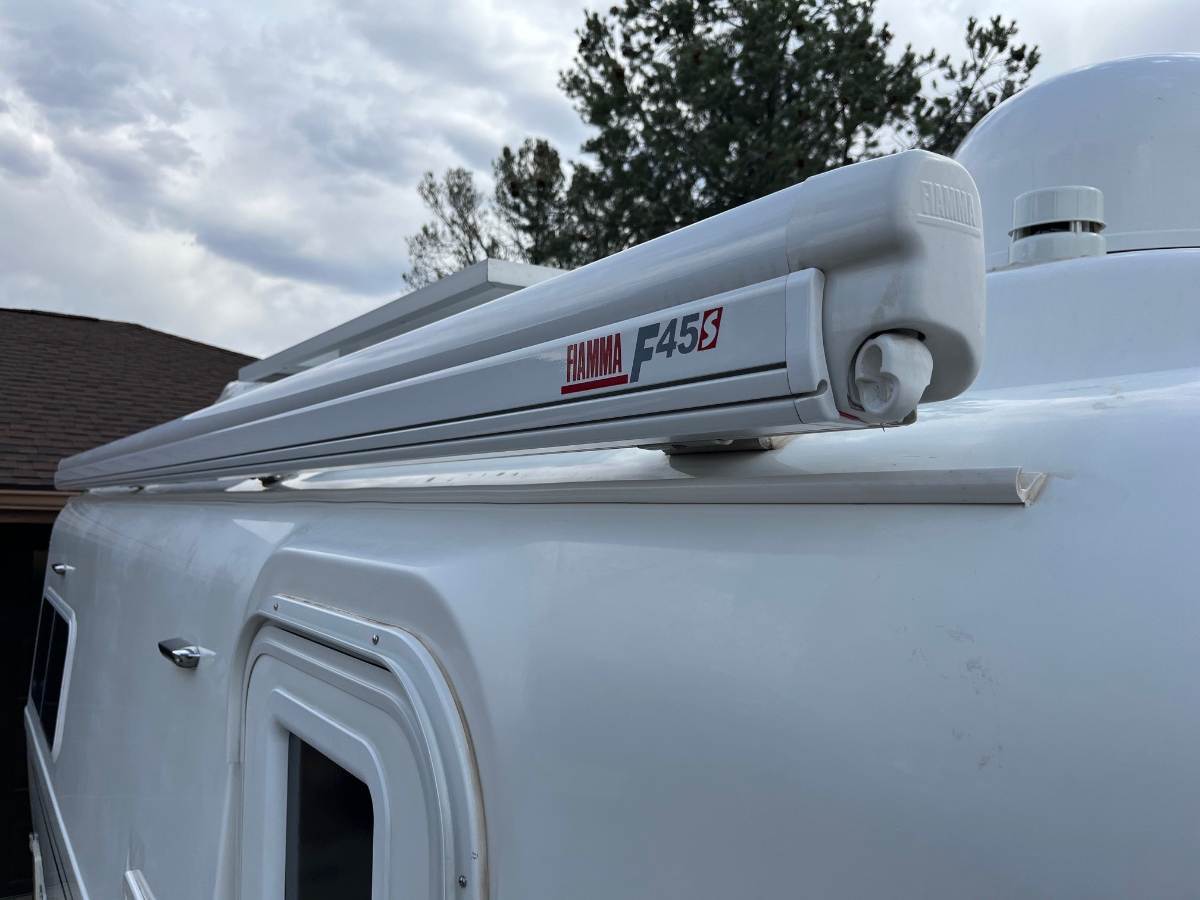
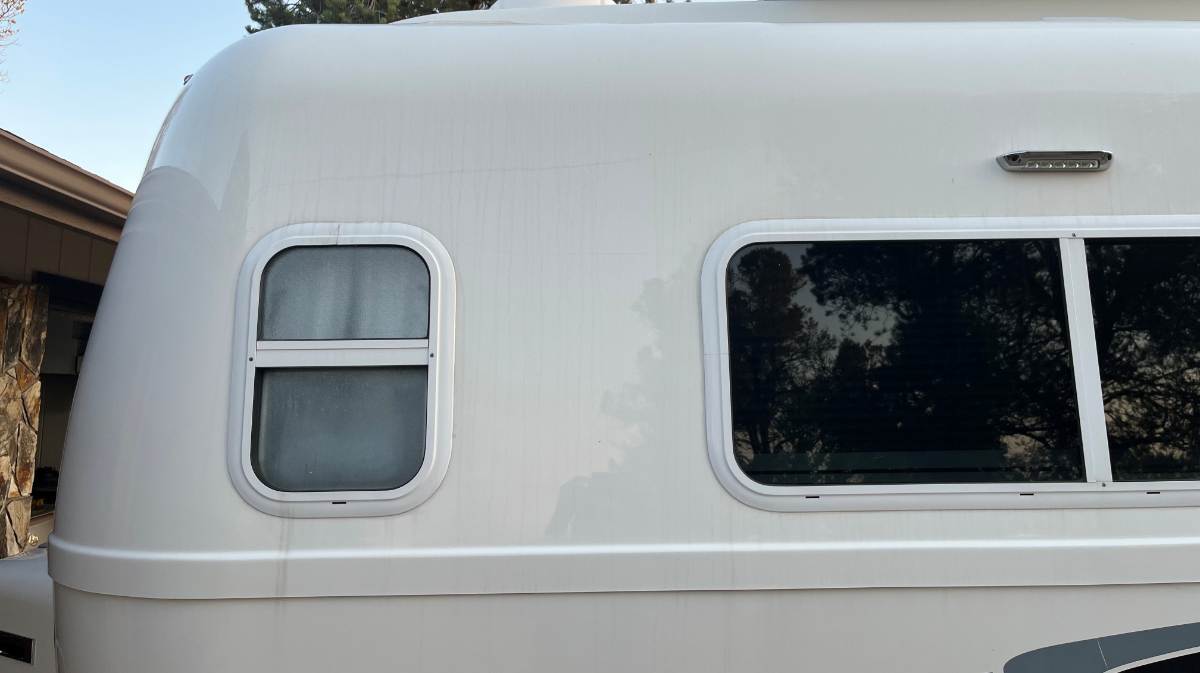
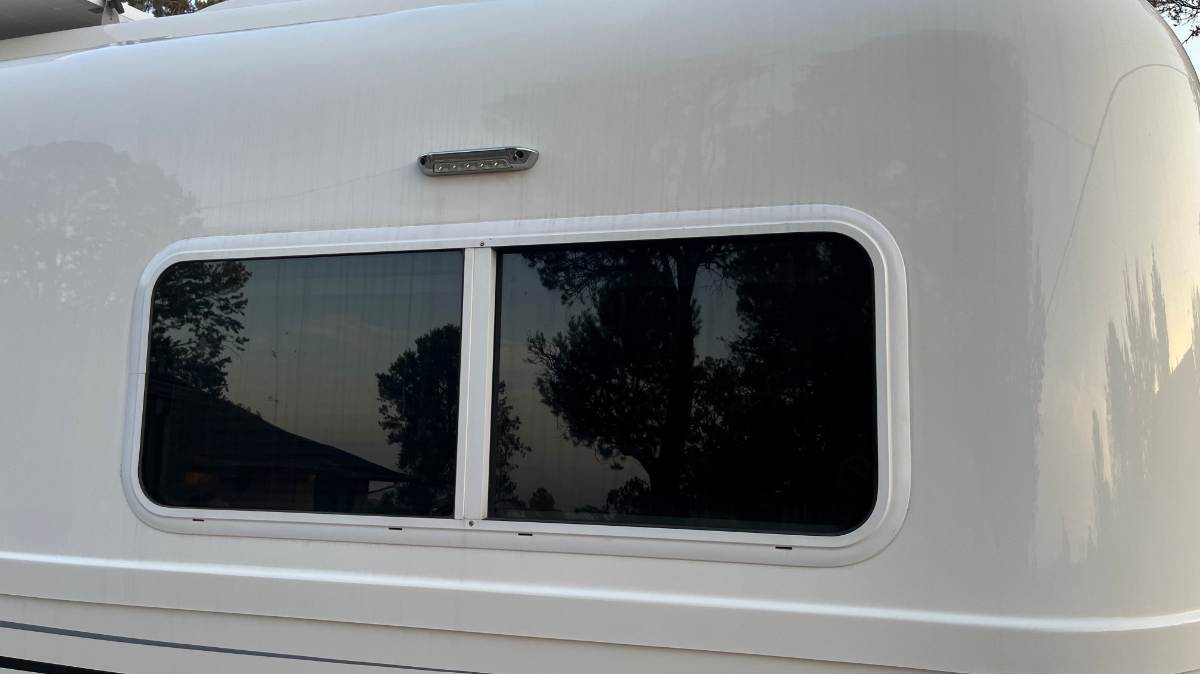
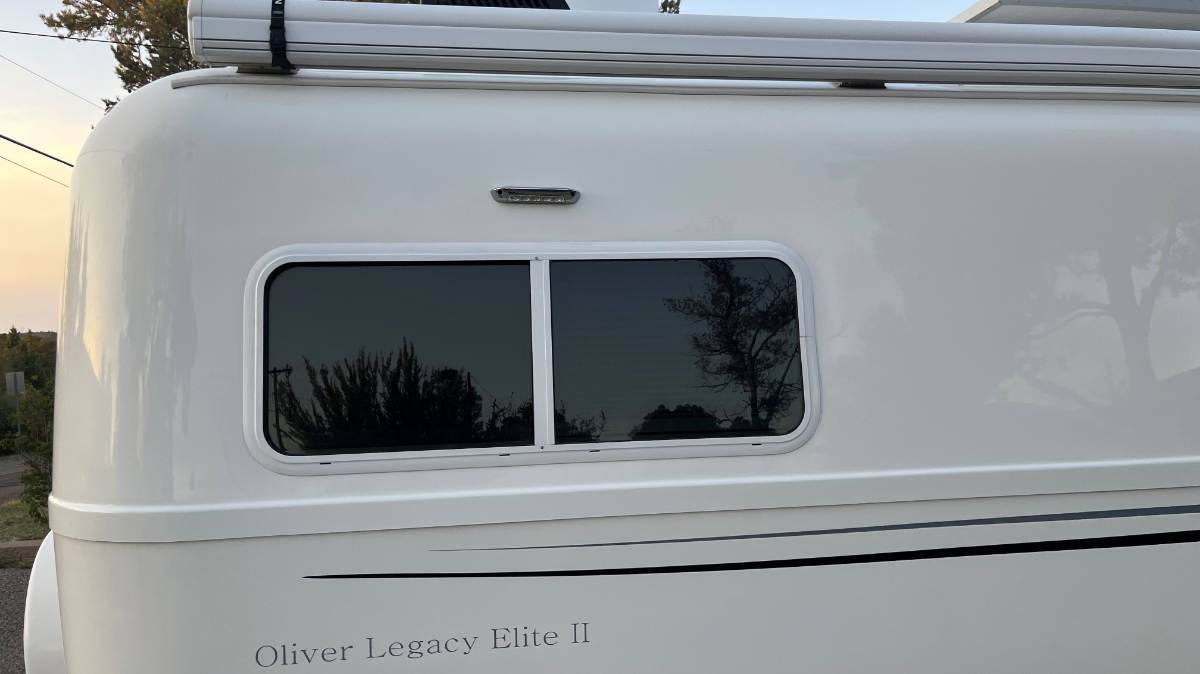
This came up in another thread recently, but I didn't post my installation there since the title of the old thread was "DO NOT use this product." 🤣 Turns out with the help of @ScottyGS the best product is the Trim-Lok Drip Rail: https://www.amazon.com/dp/B01CJRH19Y/ We've had streaking down the hull exterior mainly from nightly condensate (not much rain here). Our nights year-round are a 30F drop in temps and condensation collects on the roof and after dawn it will trickle down the fiberglass making dirty striping all down the body. It seems even worse after we made the investment in a full detailing and ceramic coating (we just notice it more). The first picture is from 2023 when we purchased out Oliver. Prior owner had remove the original gutter from behind the awning and installed this drip rail, curbside only under the awning and this thread will show installing one on the other side. The new Trim-Lok I purchased looks to be the same. The issue is, except for the the curbside where drip rail was installed there is dirty striping, not easy to clean. The next two pictures show examples of the striping and the final picture shows a picture of the curbside which stays clean! Next posts will detail the installation...
-
If using Baker's Hole call to find out the closure date, I think they said early October. We left there a week ago.
- Yesterday
-
Sorry to hear of these issues. A couple of thoughts. Henrys Lake is more than any 20 miles from the West Yellowstone gate and it is west of there not east. Bakers Hole which is a USFS campground just a few miles north of the town of West Yellowstone is a decent campground. They have some electrical hookups but no full for sewage etc. There are also a few other USFS campgrounds in the general area, Beaver Creek and Fishing Creek but they are a ways out from the park. Figure at least 30-40 minutes drive to the west gate. Fishing Creek is very shady so if you need solar not an ideal choice, Beaver Creek and Bakers Hole are much better. Flagg Ranch on the Rockerfeller Road between YNP and GTNP also has RV sites but no experience there. There are book docking places around the West Yellowstone area but none of them are special by any means. Heading west out of town from WY there is a slew of USFS campgrounds on the Hebgen Lake, Lonesomehurst being the first one. Rainbow Point also on Hebgen Lake is a large USFS campground and not too far from the west gate of YNP. I haven't been out to Rainbow Point in a long time so not sure what the attributes are there in terms of hookups. FWIW in the conversation my wife and I toured the Fishing Bridge RV spot earlier this summer. Not our cup of tea, very tight crowded spaces and unappealing. I can't believe they charge that much money for such an abominable space. Much prefer the campground at Canyon by a huge margin. If you are not opposed to camping toward the north end of the park there are also a quite a few USFS campgrounds out from Cook City & Silvergate. Haven't been down to Cody in a long time so not familiar with that entrance but would imagine there are many USFS campgrounds and RV resorts along this route too. Cutting to the chase my top recommendations would be the YNP campground at Canyon or Bakers Hole just north of West. Canyon might be closing down soon though. Hope this helps
-
Truma CP plus Reset Procedure
Tony and Rhonda replied to Tony and Rhonda's topic in Mechanical & Technical Tips
@FloraFauna Thanks for the manual. Looks like the one I have. Our Truma equipment was installed in 2023. -
Yellowstone Grizzly RV park in west Yellowstone is $162/night for FHU pull thru. Henry’s lake sP is ~20 miles west of the west Yellowstone entry gate and is $30/night for water & electric
-

Complete change-over to Victron equipment
thompsonkd replied to ScubaRx's topic in Ollie Modifications
Thanks JD. We are in the process of considering upgrading our Battleborn’s. Long term we would like to replace most of our electrical system, but want to start with batteries first. We have the PD converter and Zamp system with a 2000 watt inverter. Our course that means a new AC as well, since we have the original Dometic! Battery technology is evolving quickly, so it seems like we can get pretty robust storage, and hopefully it would last us for a while. Thanks again! -
Mike from Nashville was first to purchase Epoch (April 2024) and the Victron Multiplus II inverter/charger. He went with 2x 460 for 920 Ah in the Epoch Elite Series with Victron Comms. Two very large batteries just fit the battery bay without the Morryde tray which is not required, truly designed for watering lead acid batteries. The same two batteries today are listed at $5,200 (wow $2,600 each)! I believe the two were under $4K in 2024. I believe I was first to go with two 300 Ah Epoch Essentials for 600 Ah (mod link below). I purchased ours in July 2024 for $899 each. The list was $1,099 at the time, sale priced for $999, then 10% OFF for their 4th of July sale! Black Friday a year ago, I added a 3rd battery for $1,019 (ditched the tray, or you can keep it like Steve did). How did we ever do before 900 Ah? 🤣 When going Epoch you must consider the Essentials Series. The Elite is more expensive for "Victron Comms" and the PRO Series is a starter combo battery, no heaters or Bluetooth and you need a true Deep Cycle battery for power storage in an RV. Today the Epoch Essentials 300 Ah battery is up to $1,249! Epoch used to mark prices down and/or give 10% or 15% OFF. No more, look for their regular 5% off sale. However, last Black Friday gave 10% OFF and they could repeat that (just 2 months away). Also, if I was buying Epoch essentials today, they came out with a 334 Ah battery in the same case dimensions 2 lbs heavier for $1,299. This model is lower $/Ah ($3.89/Ah vs. $4.16). My first purchase was $3/Ah. If 334 Ah batteries were available previously I'd have 1002 Ah! Who will be first to break 1000 Ah? 🤣 Think that's too much? We run our variable speed A/C for days! https://www.epochbatteries.com/products/12v-334ah-lifepo4-battery Now with 2+ years experience, I will tell you the Epoch Bluetooth App really s#cks. Sometimes it sees my 3 batteries, sometimes 2 or none at all. Performance has gotten worse vs. better. I've uninstalled and reinstalled the app which doesn't help. I now count on my Victron Shunt and other Victron readings from the inverter, etc. The Epoch app sees all of my Ruuvi sensors and our Samsung products, so why in the world can their app not see their own products? 🙃 I've been the Epoch advocate for two years, but... This came up in another thread recently! I wrote a month ago that as their sales volume goes up, so will their price point! The price was $599 a month ago and now $30 more. give it a year and they will likely be $800 or more. https://www.vatrerpower.com/products/vatrer-12v-300ah-bluetooth-lifepo4-lithium-battery-with-self-heating-200a-bms-supports-low-temp-charging-4-f-5000-cycles-2560w-power I heard they have good reviews, from another Oliver owner, but do you own research on comparable LiFePO4 products today. If I was in the market, I would have jumped on 3 of these, 900 Ah for $1,800, or 600 Ah for $1,200 if that's enough for you. Just to be clear, I'm dissatisfied with the Epoch Bluetooth App, not the batteries. The Epoch Essentials have serviced us well for over 2 years, never a glitch. I have run them down under 20% SOC, down in the teens four (4) times and it no longer concerns me to do so (Chris worries a little). Via the Victron MP2 they perform as well whether full at 90%+ or low at 18% SOC and we run our inverter 24x7x365. For example, we just camped 10 overnights in SW Colorado, not once plugged in. We ran the Chill Cube A/C for 3 days, used everything 120VAC (oven, pressure cooker, induction plate, water kettle, TV/soundbar and modem/Wi-Fi). On day 10 we were down to 27% SOC of 900 Ah (which btw is equal to 81% SOC on 300 Ah Battleborn batteries). Got home with 40% SOC due to the Orion DC-DC charger while towing home (could have towed to another campsite with enough power for another 2 days). We have 320 rooftop solar and we setup our Renogy 400W suitcase on 4 of 10 days. The best thing you can do to your Oliver is get 2-3 times the Ahs in LiFePO4 batteries you'd ever think you'll need! 😎 Best wishes, JD
-

Truma CP plus Reset Procedure
FloraFauna replied to Tony and Rhonda's topic in Mechanical & Technical Tips
Here is the Cp plus manual (2023 version - yours may be different). Although resetting is a recommended step, it has never resolved my CP plus issues. CP Plus Manual.pdf -
Truma CP plus Reset Procedure
FloraFauna replied to Tony and Rhonda's topic in Mechanical & Technical Tips
I have had this problem on and off. First time was a wiring problem from the factory which was resolved. With that resolved, if you forget that the inverter is off and you are not on shore power, of course, you wont see the ac unit. I find that sometimes it takes awhile after the inverter is on for the ac to "reappear". Must say i havent figured it out yet since it comes and goes. Certaintly a communication error is suspect and probably a connection or wiring issue up in the ac since the furnace and water heater are reliably present in cp plus. -
Out Truma CP plus 'sees' our AquaGo but doesn't see our Truma A/C. I've found other posts about resetting the CP using the procedure in the manual but I can't find the procedure in the manual we have. I think I remember reading it in another post but can't find it now. I'm not sure we have the complete CP manual so would someone please post a link to the CP manual which has this information or the post with the steps to reset the CP. Thanks, Tony