All Activity
- Past hour
-
 Well…. My Oliver and TV played well together for 3 1/2 years before this issue started. But I will keep this in mind. Thanks @ScottyGS for the additional input.
 -
What a scare that must have been. Glad you are ok. I wonder if it helps that attaching an Andersen anti-sway hitch requires me to lock the coupler on the ball and then raise the ball quite a ways in order to get the hitch attached? If the coupler were not secure on the ball I would never be able to connect the Andersen,.
-

Reset 2.0 has started squeeking when backing up
Steph and Dud B replied to DunnYet's topic in Mechanical & Technical Tips
Yes! I have a tiny pocket IR thermometer I got at Harbor Freight. Not super accurate, but you're only really interested in the relative temperatures between wheels - looking for one running significantly/unusually hotter than the others (every trailer we've had had one wheel that consistently ran slightly hotter than the others for some reason). HF doesn't sell it anymore, but they have similar pocket IR thermometers on Amazon. I prefer the pocket size to the gun because I can grab it at a rest stop, check my wheels, then drop it in my pocket while I head to the rest room. (You look kinda funny carrying a IR gun into a restroom...) - Today
-
Reset 2.0 has started squeeking when backing up
Steph and Dud B replied to DunnYet's topic in Mechanical & Technical Tips
It's possible that one brake "overadjusts." One of ours does. There's no adjustment for this on the "Never Adjust" brakes. You can back it off with the star wheel, but it'll just go back to where it was the next time it adjusts itself. If that's the case, it might make noise for a while after each self-adjustment, then stop after some wear from driving. If that's the case, it's probably not a big deal, especially since you only hear it in reverse. -
 Thanks Scotty, this is very helpful and adds a new twist! The Oliver has LED lights for brake, reverse and taillights. The low amp draw of LEDs may not register with the factory brake controllers, cause for the error codes. @Boudicca908's truck is GM vs. Ford but could still be the same issue. This is worth a try! If true in this case, there could be nothing wrong with the factory brake controller, nothing wrong with Oliver trailer wiring, just the factory controller not playing well with LED trailer lighting, wow! Learning this, the U-Haul trailer test I suggested would not be conclusive! If U-Haul trailers have standard automotive incandescent lights the factory controller would not show error with the U-Haul but only trailers like the Oliver with LED lighting. Yesterday U-Haul failed to rent a trailer with brakes and 7-blade connection. I would try this $30 device asap and scratch the U-Haul idea for now. At some point, if you're able to tow a second Oliver and the error messages go away, that would be a viable test showing issues with your Oliver trailer wiring.
 -
 Talking to JD1923 now and I was telling him about a "trailer disconnect" problem I had years back with my Ford F150. What solved it was the "Tow Ready 20142". https://www.reeseprod.com/product/20142_trailer-connector-adapter-7-to-7-way It "fools" the truck that there is enough electrical feedback to keep that message from happening. It's not that expensive, less than $30. You might try it. It solved a very vexxing problem for me. Good Luck, Scotty
 -

Reset 2.0 has started squeeking when backing up
DunnYet replied to DunnYet's topic in Mechanical & Technical Tips
Or move the one out of my flattop cooking box to the truck cab 🙂. However, Rebecca would say I never met a tool that I didn't want two of, so.....(follows link). Agree on the Klein tools, can't count how many of their electrician screwdrivers I have. My electrical bag is pretty much all their stuff. Best recent thing, a USB meter when I was trying to figure out why the new charging port I put in the back was not working on my iPad. https://a.co/d/0i4XkaJ9 <- Shortened Amazon Link Love those - I have been considering taking off the plastic caps as I have lost two of the Oliver inserts and $50+ to put the company logo back on seems like money flowing the wrong way. Doesn't Oliver know I'm an influencer and they should give them to me for free? 🤣 🤣 🤣 Going to do one more day of spin test, give the lug nuts a torque, and happy Oliver camper our way back into Colorado today. Hopefully, all stays good till we get home, and there is nothing exciting to report tonight. Have an undercarriage day on my calendar before our next trip and will follow your video just to make sure everything is buttoned up before we head out for our next journey. Thanks for all the help!! -
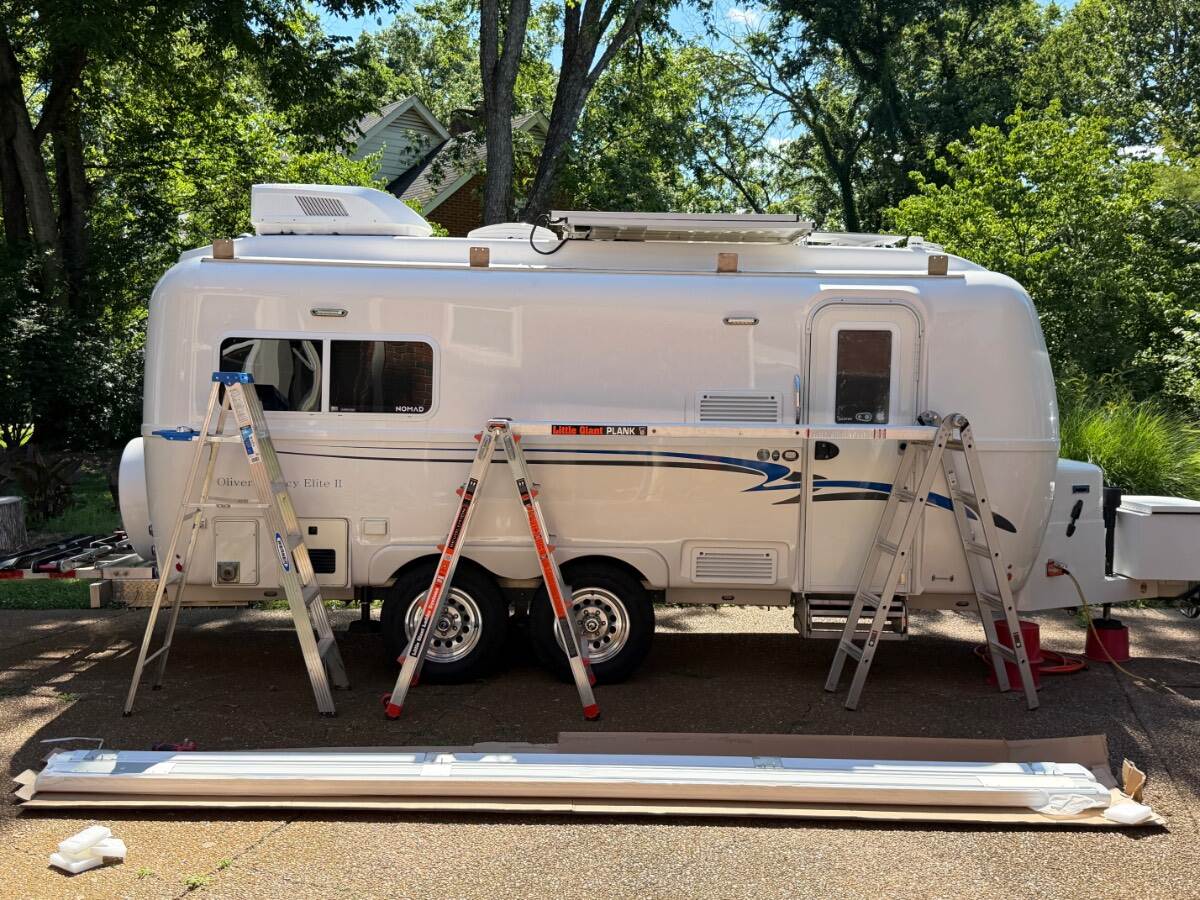
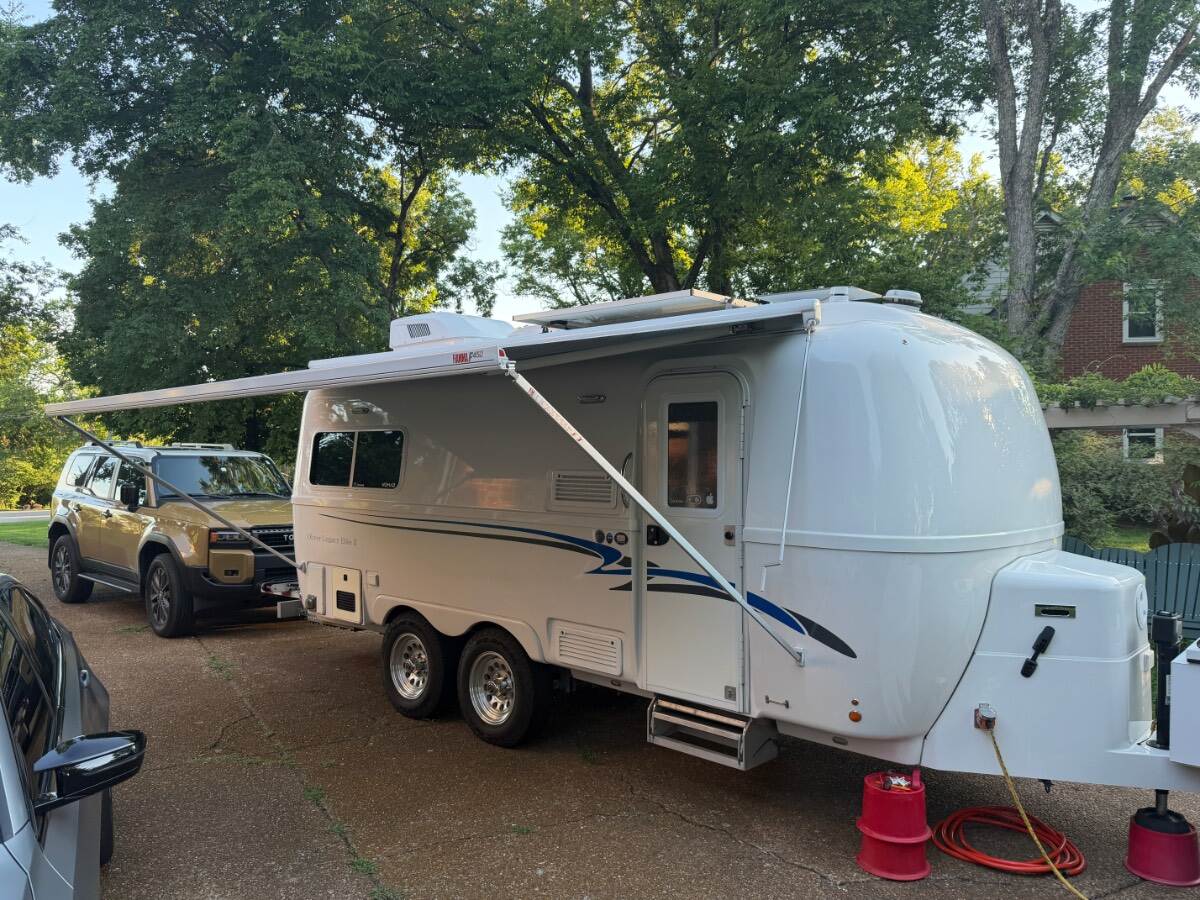
After 8 years of the Carefree awning, I decided to go with what I a wanted originally. A Fiamma 45s 450 (14 ft 8 in.). The Carefree was well made and incredibly durable but had some shortcomings. Mostly regarding closing completely. The Fiamma has a much lighter weight aluminum pole for extending and retracting. Also, like the pole connector on the right side close to the door. I ended up using the old brackets (used a square to mark with both awnings on the ground lined up) just to make the install simpler. The awning extension pole bracket holes on the camper weren’t the same so you have to drill another hole, not big deal. Love the new blue awning and seeing it when closed shut perfectly on both ends of case!

-
- 5
-

-
I ordered 25 ft from Rec Pro which is more than needed for the windows but wanted extra in case I goofed up a length or two and thought I might be adding some to other areas which I have not done yet. I cut each length to 56 inches which provides just enough overhang past the window frame. Hopefully adding caulk both above and below the gutter and especially at the ends might help the product to last longer too. On a recent rainy night I noticed water spots on the underside of the gutter indicating the benefit of caulking below as well as above. The real test will come this winter though with the extreme temperature variations we receive here in SW Montana. This method of slightly bending the gutter away from the windows seems to be working very well from my observations so far. Should be receiving new glazing beads from Steele Rubber today and will report back on those once installed. Good luck with your re-install.
-
@routlaw I may have missed it, but which weather stripping (gutter) material did you get and where did you order it from? My old gutters from 2021 gave out recently (no more sticky) and I need more. How much length did you order for the way you installed it? I like your installation versus the way I did it years ago. Thanks,
-
Reset 2.0 has started squeeking when backing up
jd1923 replied to DunnYet's topic in Mechanical & Technical Tips
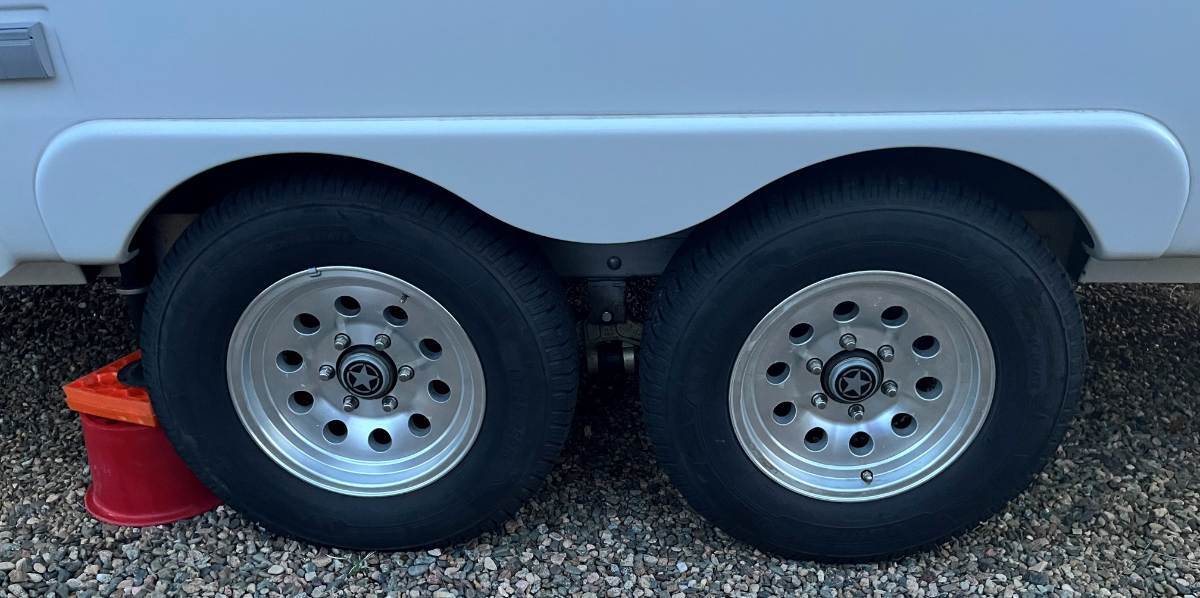
Hmmm! Squeaking one day backing up. RR wheel squeaking another day with the spin test. Spin test today all is quiet after 180 highway miles. Starting to sound more like brakes. They should self-adjust, so yeah issue "diffuses" as you wrote. In automotive issues it's always sound reasoning to think, "what did we work on last that might have caused this?" In your case it was Alcan Springs installation. They could have banged the wheel or dropped the axle on that side. Easy enough to do working on leaf spring replacement. Or maybe they noticed your brakes needed adjusting and tightened the self-adjusters which do not always adjust as they should. You changed your gain from 7 to 5 noting they were grabbing better. A lot of maybes... Try the spin test again on all 4 or... Forget about it until you hear something again when driving or backing slowly, like you did the first time. Enjoy your trip, maybe this was nothing. Two suggestions:1) If you do not have one... Get an Infrared thermometer digital laser gun. When you take a break after a bit of highway towing, asap measure hub and drum temps. Temps on all fours should be close to equal. One hub measures higher than the others, could mean a bearing issue. Higher temp on one drum (or lower meaning shoes not engaging) points to brake issues. You must remove your center caps to measure hub temps. Many of us have. You should like the Texas Star emblems stuck on my Nev-R Lube dust caps in lieu of those standard (big ugly) center caps designed to fit over the old-school bearings. I like Klien tools and purchased this model. It has saved me when my brakes faded coming down a steep range as my brake controller was acting up. I read temps on my truck front rotors up to 400F and waited roadside until they cooled to under 200F. Yeah, when you stop take temps on ALL 8 wheels! Amazon.com: Klein Tools IR1 Infrared Thermometer, Digital Laser Gun is Non-Contact Thermometer with a Temperature Range -4 to 752-Degree Fahrenheit : Industrial & Scientific 2) When you get home follow my how-to on axle maintenance:
-
Reset 2.0 has started squeeking when backing up
DunnYet replied to DunnYet's topic in Mechanical & Technical Tips
The plot thickens - or diffuses - I’m not sure which. @jd1923 I did the requested test this morning. Got no squeak on reverse spin. Could the trip from Dutch John UT to Rawlins WY gotten the brakes back in adjustment? I will test again when we leave the Cabela’s RV Park. I did visually inspect all four tires and did not observe any bald spots or scuffs. Just a higher than normal number of rocks in the treads from two nights on gravel. Possibly a self healing problem? I’m still planning to do a full undercarriage inspection up on jacks with wheels removed when we get home. Will update after tomorrows lift and spin check. -
 Chick joined the community
 -
 Darius Koenig joined the community
 - Yesterday
-

Adding a Matching Rear Porch Light and some Front Lighting
Tom and Doreen replied to jd1923's topic in Ollie Modifications
Looks great John! -
Adding a Matching Rear Porch Light and some Front Lighting
jd1923 replied to jd1923's topic in Ollie Modifications
Let me first revise this statement a bit. Love the Rear Porch Light installation, which copies the design and same product used for the Entry and Side Porch Lights! 😎 Not as much love for my new front light, but it's finished and it's not bad. I made a new mounting bracket for the front light from a simple flat bracket. I chose this part since 6" is a good total length and it's 2mm thick. Many SS brackets are thicker which would make it more difficult to form into a U-shaped bracket. Amazon.com: 4 Pieces Stainless Steel Straight Brace (6.1 x 0.7 inch,156 x 18 mm) Flat Straight Braces, Straight Brackets, 24 Pieces Screws Included : Industrial & Scientific Not easy working stainless steel which is a hard steel. I measured the required 2 3/4" width at center. After applying rings of black tape to keep the SS from being marred, I clamped the bracket tightly into a vise at the marked point. I used a jigsaw to cut the groove, running the moving blade right against the vise to keep it in place. I'm not a metal fab guy, so this is the best I could do. I used a "heavy metal" blade, but it wore out after one cut, needing a second blade for the other side. The grooves I cut positioned the correct location and space for the bend. I also believe the heat from sawing helped in hammering a clean angle. Then the bracket was too wide, so I used a bench grinder to cut down the width in the upper portion where it connects to the light. Filed the edges and used steel wool to shine up all sides of the bracket. Sounds like a lot of work but was done in about 30 minutes, (after days of thinking it over)! 🤣 It looks much better now. It's shorter than my previous install and I moved it forward a little. It's visually more pleasing since it doesn't conflict with the lines of the belly bar. It lights up the truck bed fully without shadow. You can see shadow only on the tailgate, but when it's closed the light reflects down to see the trailer hitch and cables if needed. We're good now! But these LED lights are BRIGHT! Maybe later a mini hood attached to the light, so it doesn't hit your eyes when standing to the side. There's always something in the minds of engineers! 😎
-
Adding a Matching Rear Porch Light and some Front Lighting
jd1923 replied to jd1923's topic in Ollie Modifications
But not much room at all. I looked at this yesterday and there's about 3-4" between top of belly bar and the sink countertop. Measure thrice! -
Thanks Rich, his frank language is funny too! 🤣
-
Seeking New Air Conditioner for Hull # 145
jd1923 replied to ScottyGS's topic in Ollie Modifications
My friend Ron, of course you know! Our son Adam played a USTA Tennis Tournament in the very nice Houston suburb of Clear Lake 15 years ago. I remember sitting outdoors, large-brimmed hat on for the sun, I was drippin' wet just watching! 😎 The 16-year-old boys had drenched shirts before the first set was won. Traveling the west vs. the gulf states is night and day. Wish we had a forum member in the east with a Chill Cube for comparison. The Chill Cube condenser fan wets the condenser by design. To my knowledge, no other A/C unit has this feature (perhaps Furrion has a patent). The water-cooled condenser increases the overall cooling efficiency. In very dry climates (the spring is our windy dry season), the little bit of condensate it pulls out of the dry air quickly returns to the air (evaporates). I have yet to see any condensate drip on our hull. When greater cooling is needed and it's humid, the fan should create a visible mist blowing from the condenser coils. More mist means less drip. But when the volume of condensate gets large it would overflow the condensate trough and run down the hull. -
Especially this geek! If you haven’t checked out Louis Rossmann’s channel, you should. He’s now siding with Will Prowse, and I think BB is toast! Here’s another good video from him to watch.
-
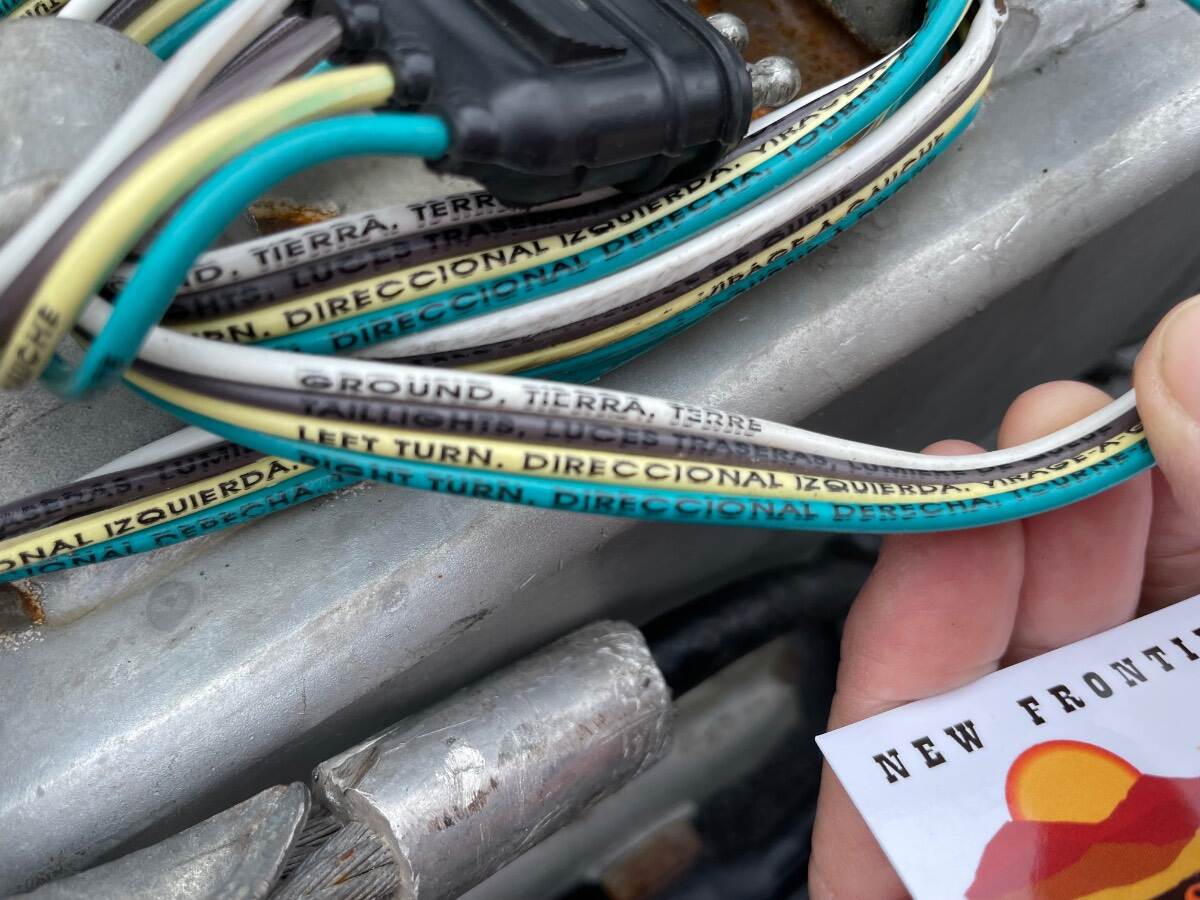
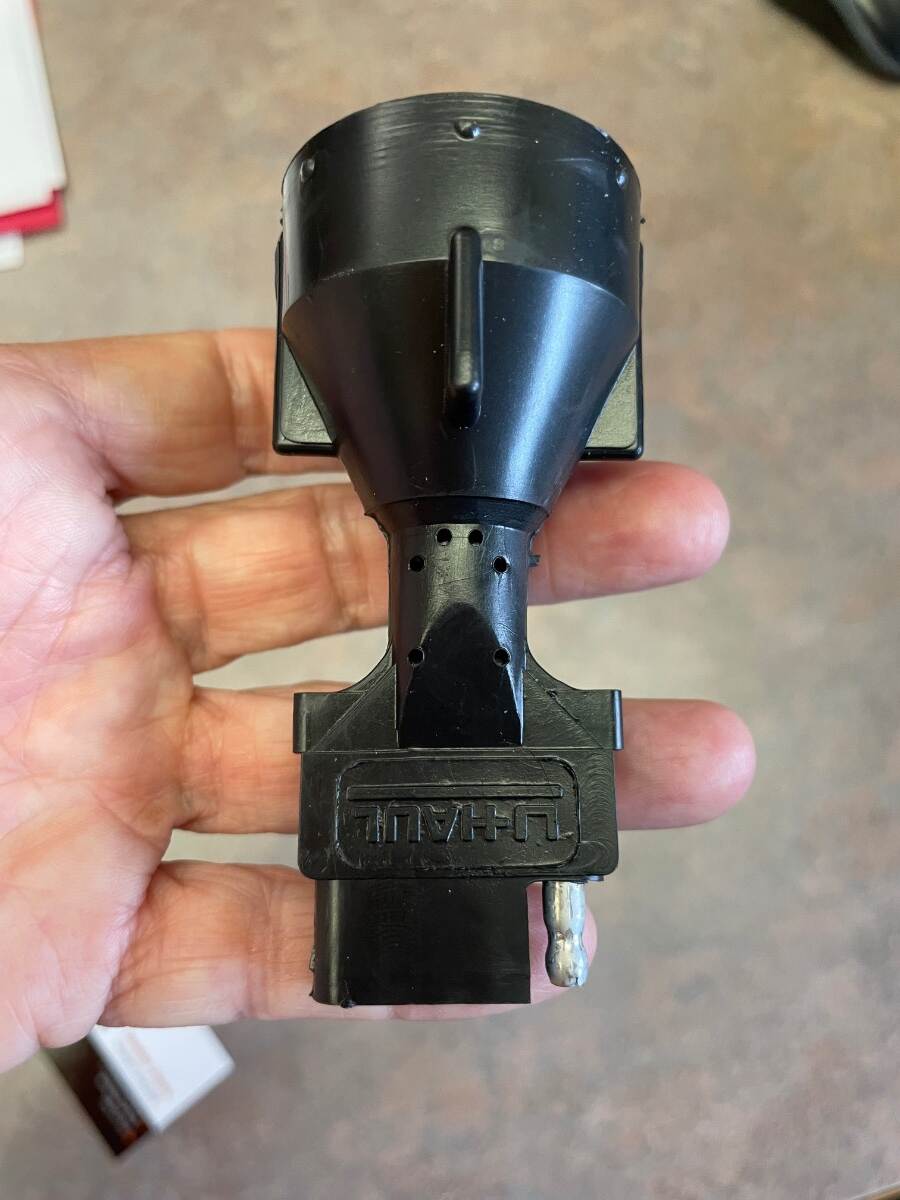
No, I’m agreeing it is likely correct because all the right wire colors are there for a trailer wiring harness. Blue wire is power to brakes.
-
Correct, 4-pin harness is for small trailers without brakes. 4 pins only connects turn signals and brakes lights. They’re wasting your time. You need a heavier trailer, large cargo trailer, car hauler, anything with 7-blade plug like your Oliver!
-

Seeking New Air Conditioner for Hull # 145
BigTexas replied to ScottyGS's topic in Ollie Modifications
Another Chill Cube customer here however I've not installed it yet. I waited until the heat pump version came out to make my purchase. I didn't see the no drain system as a problem. I have a small window unit at my vacation home that uses the same method of throwing condensate on the condensing coil for additional evaporative cooling. It sounds like a waterfall when it starts but has never dripped. Now, I realize I'm making a big leap of faith the Cube will work the same but I'm not too worried if a little condensate flows off the trailer. We're still rocking lead acid batteries and don't have an inverter. My goal wasn't energy conservation as we're usually plugged in or occasionally on a small generator at lunch stops. My goal was quiet and humidity control in the trailer. My hope is when the Cube ramps down to a constant run state, it will achieve both. Fingers crossed -
OTT told me the junction box was located here. Are you saying that this is not correct? Is there a second junction box not visible in this photo? (Reminder: I am checking in only periodically from my phone, as I don’t have WiFi in camp.)
-
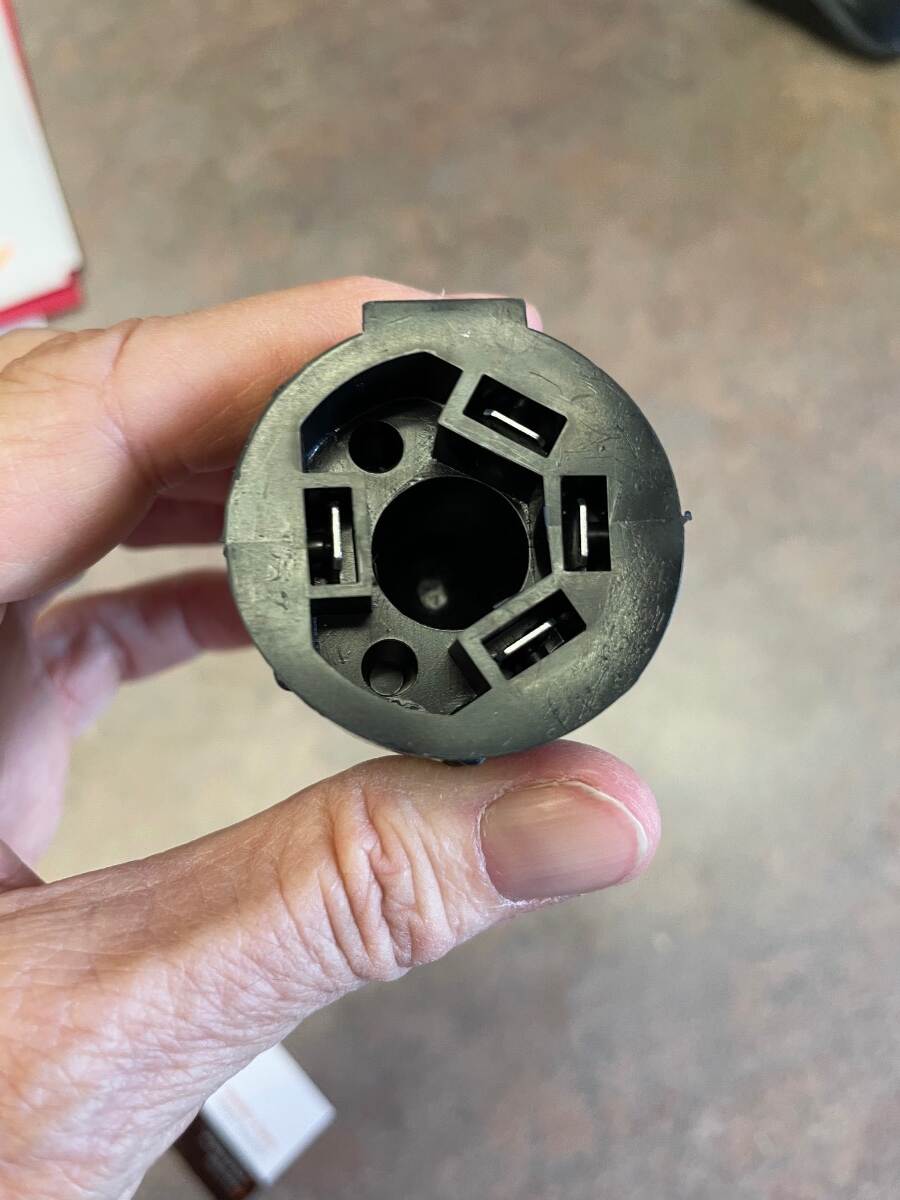
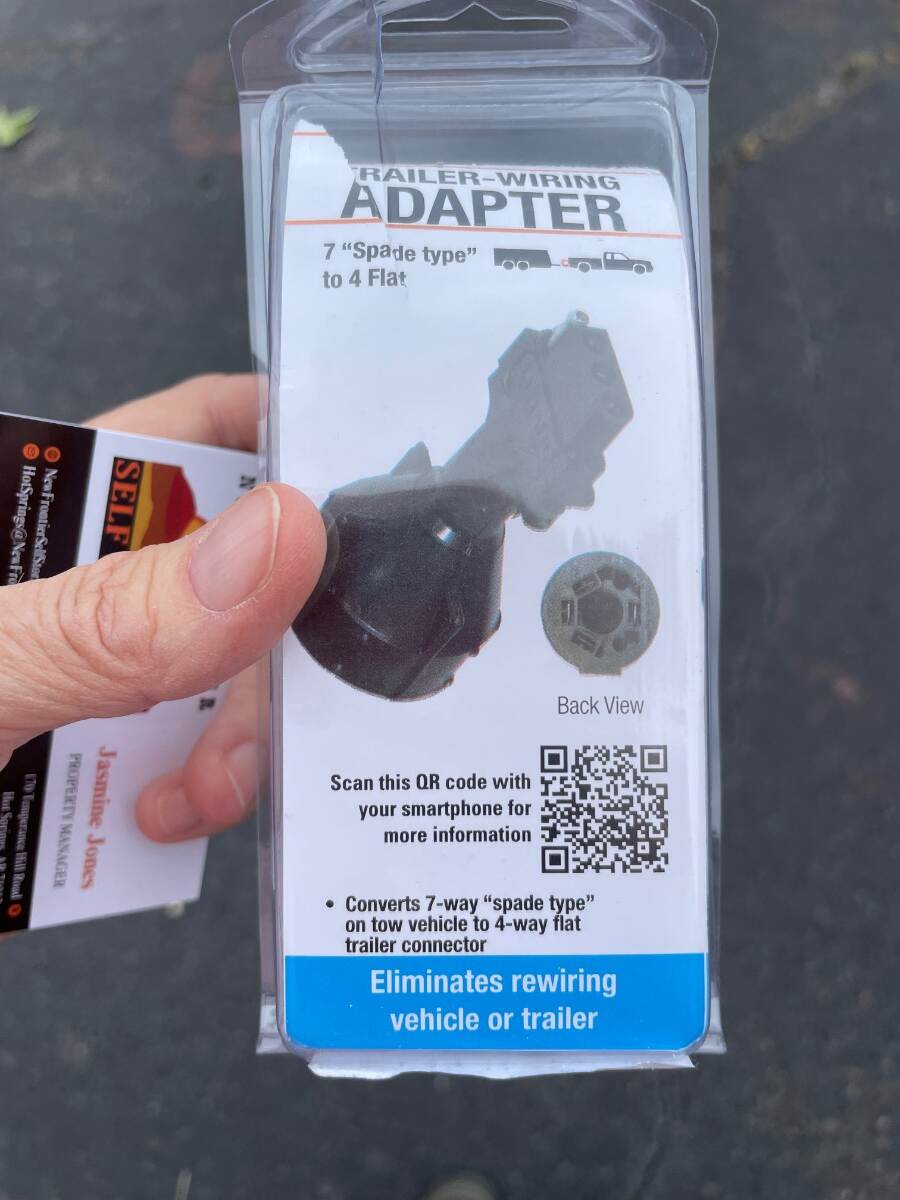
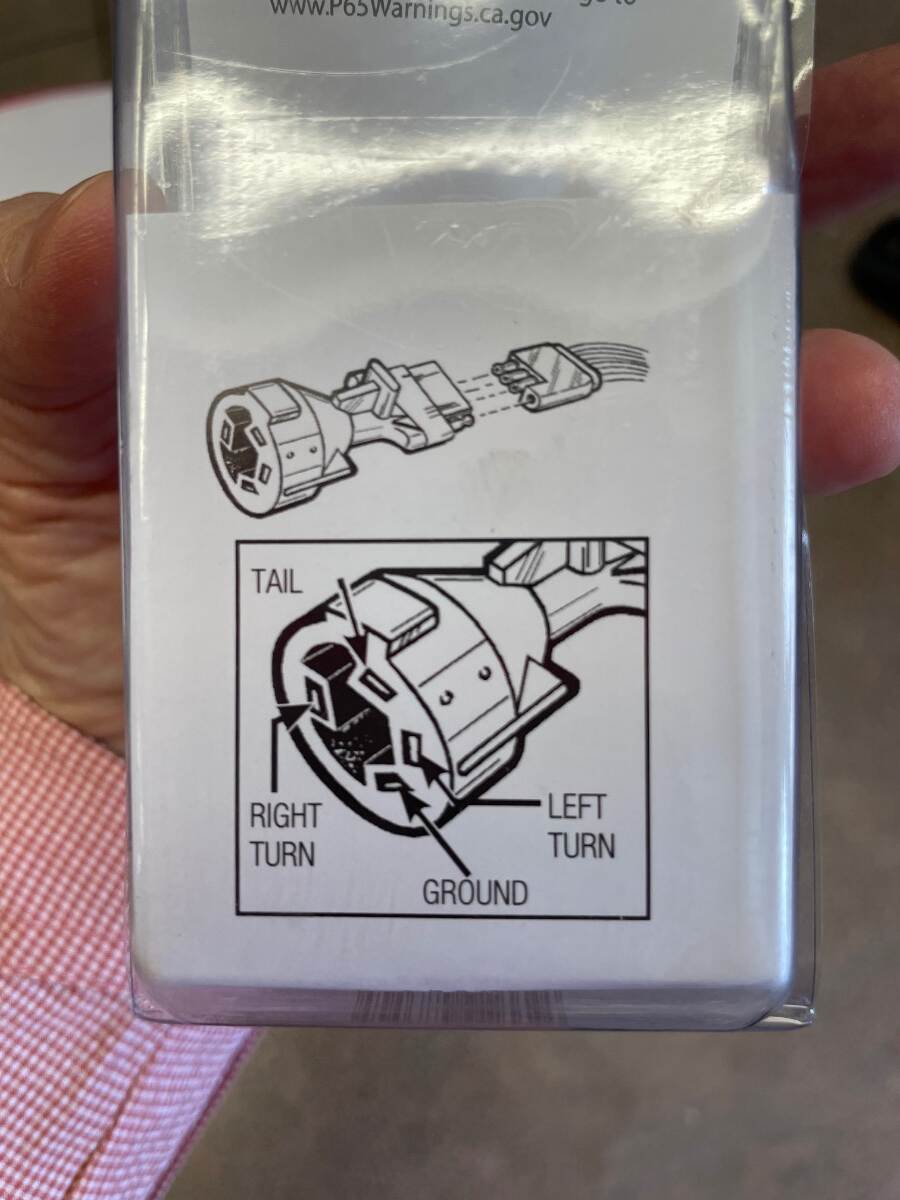
And indeed — though I specifically requested confirmation of 7 pin they only have 4 pin and wiring seems to include no brakes. Of course they sell an adapter, but I don’t think this will tell me anything. I’m on hold…
-

Seeking New Air Conditioner for Hull # 145
Ronbrink replied to ScottyGS's topic in Ollie Modifications
Having the condensate collect in pans in the DPll and drain via the inner hull tube Oliver installs is not without issue. Many have experienced, self included, condensate water dripping inside the cabin either from drain line blockage, improper leveling on setup or excessive humidity conditions. I have no regrets abandoning the tube drain with my chosen a/c replacement and no further worry of internal leakage. Just say’n! -
 John Stacey joined the community
 -
Seeking New Air Conditioner for Hull # 145
Ronbrink replied to ScottyGS's topic in Ollie Modifications
In humid climates there will be more than just a little drip, but being slightly off level as you suggest will divert any runoff to a rear corner. Even though condensate is like distilled water, be assured there will be some staining from contaminants it picks up as it leaves the condenser and drains outward. Maintaining adequate wax on the gelcoat will help reduce said staining and further cleanup of any resulting streaks.