Leaderboard


Popular Content
Showing content with the highest reputation on 07/27/2017 in Posts
-
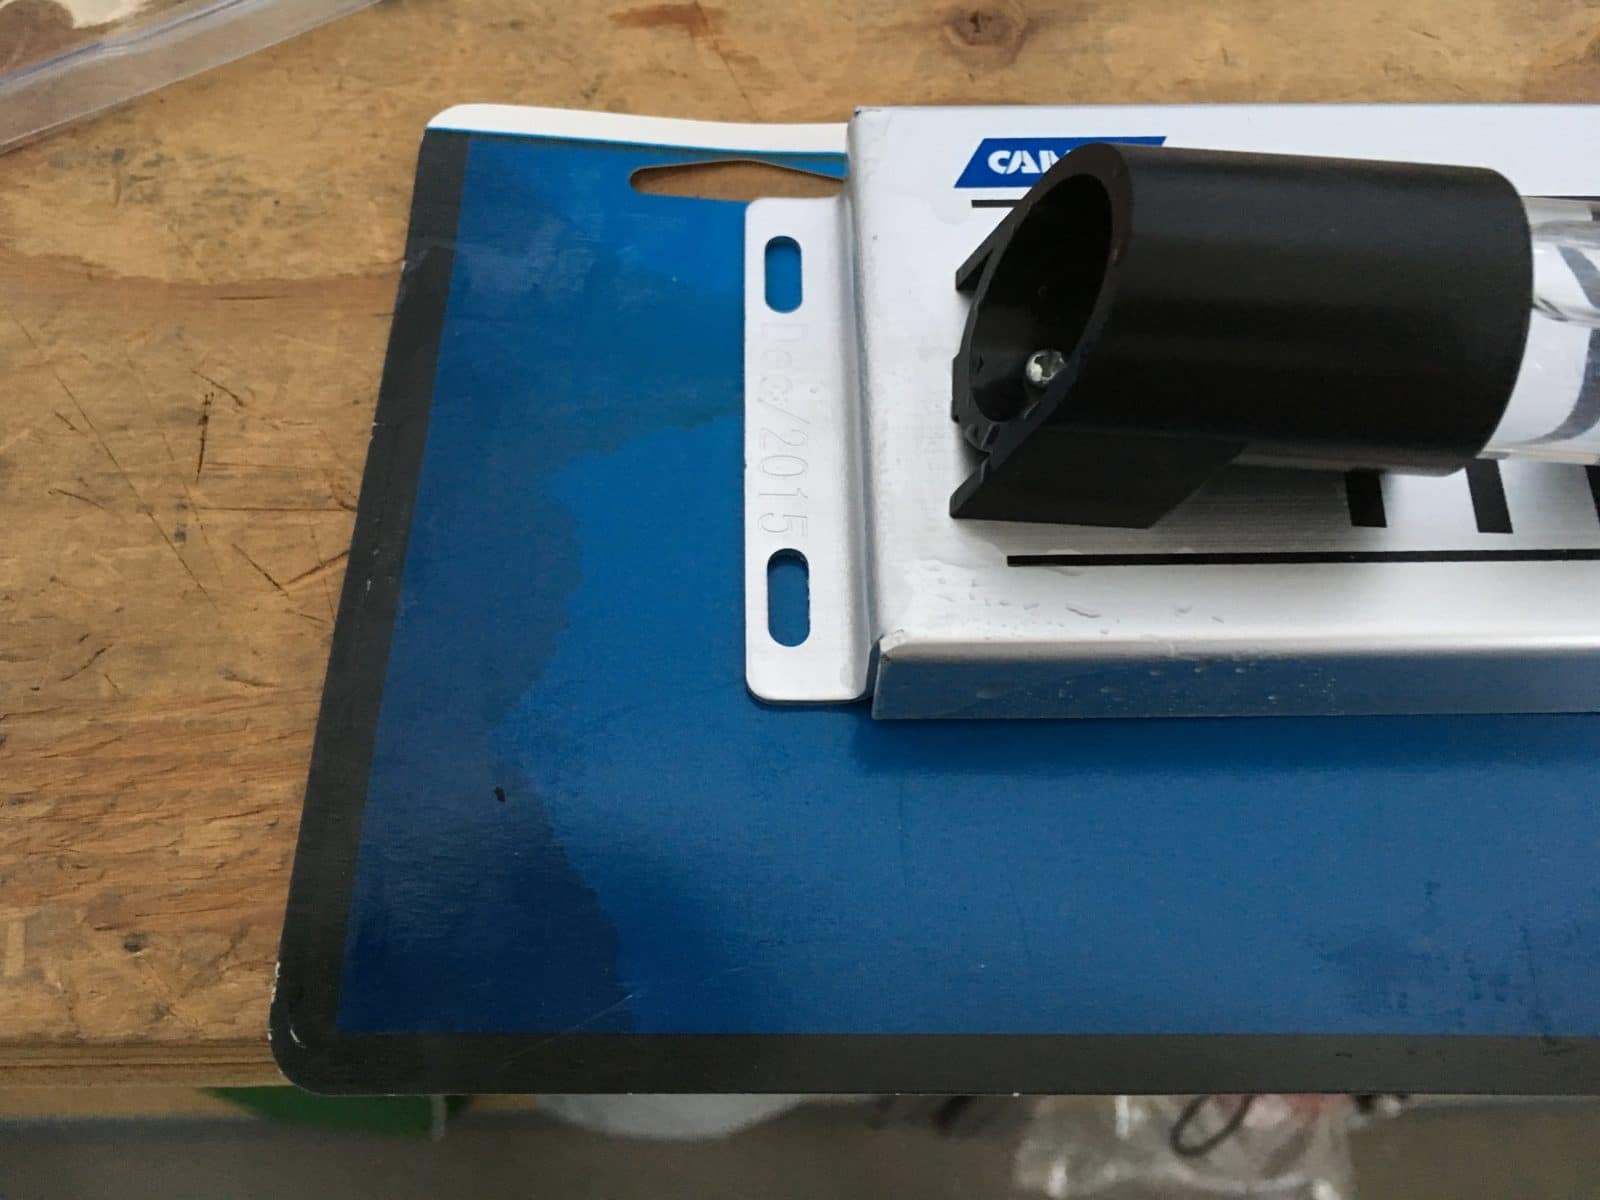
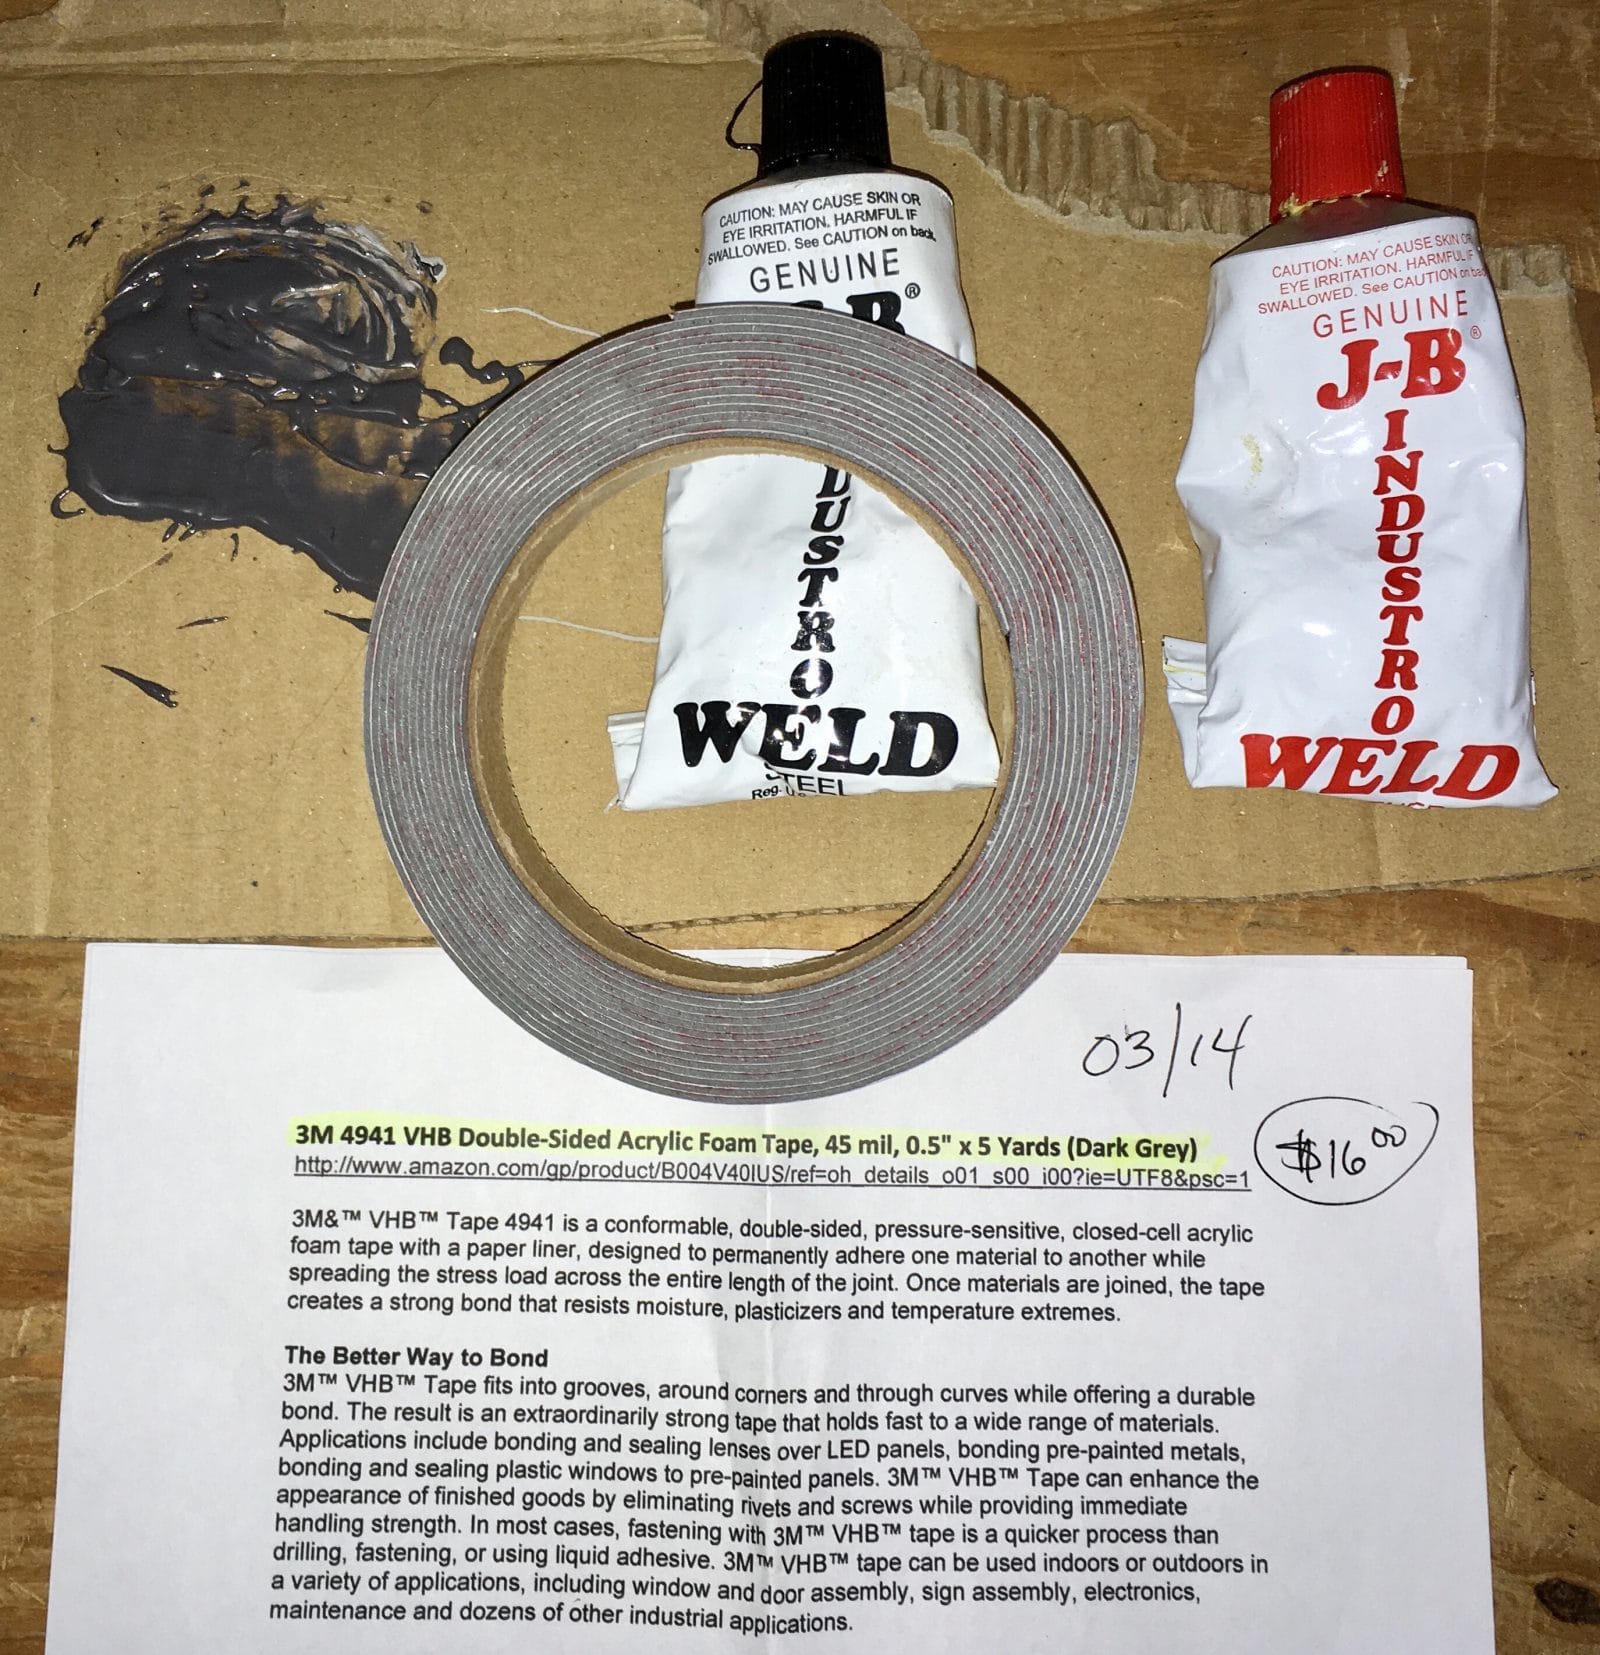
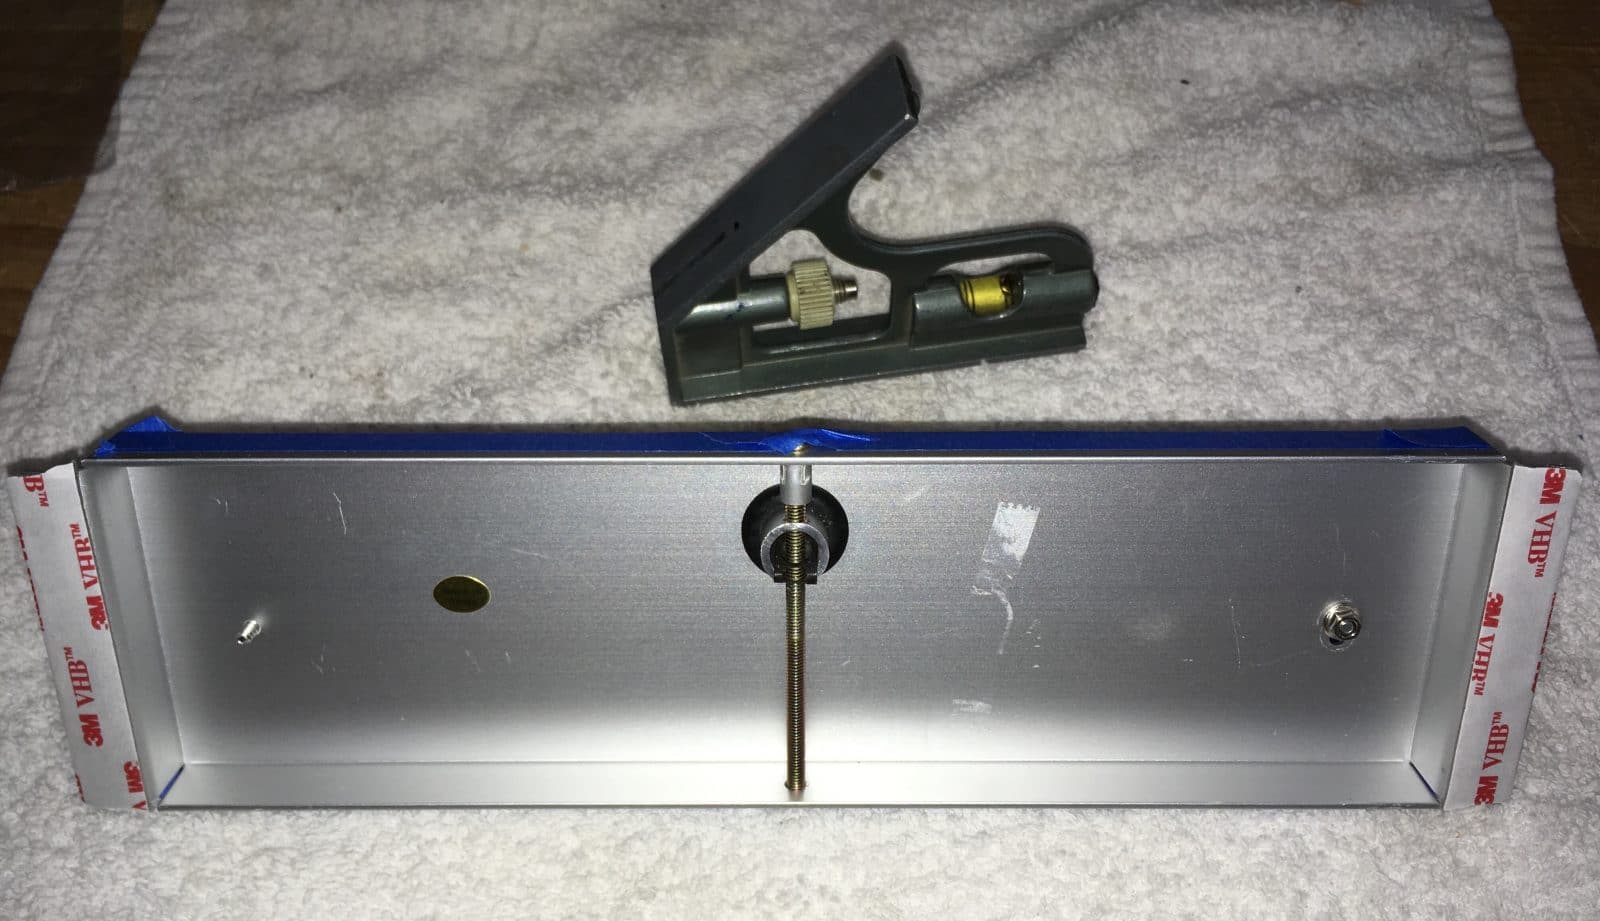
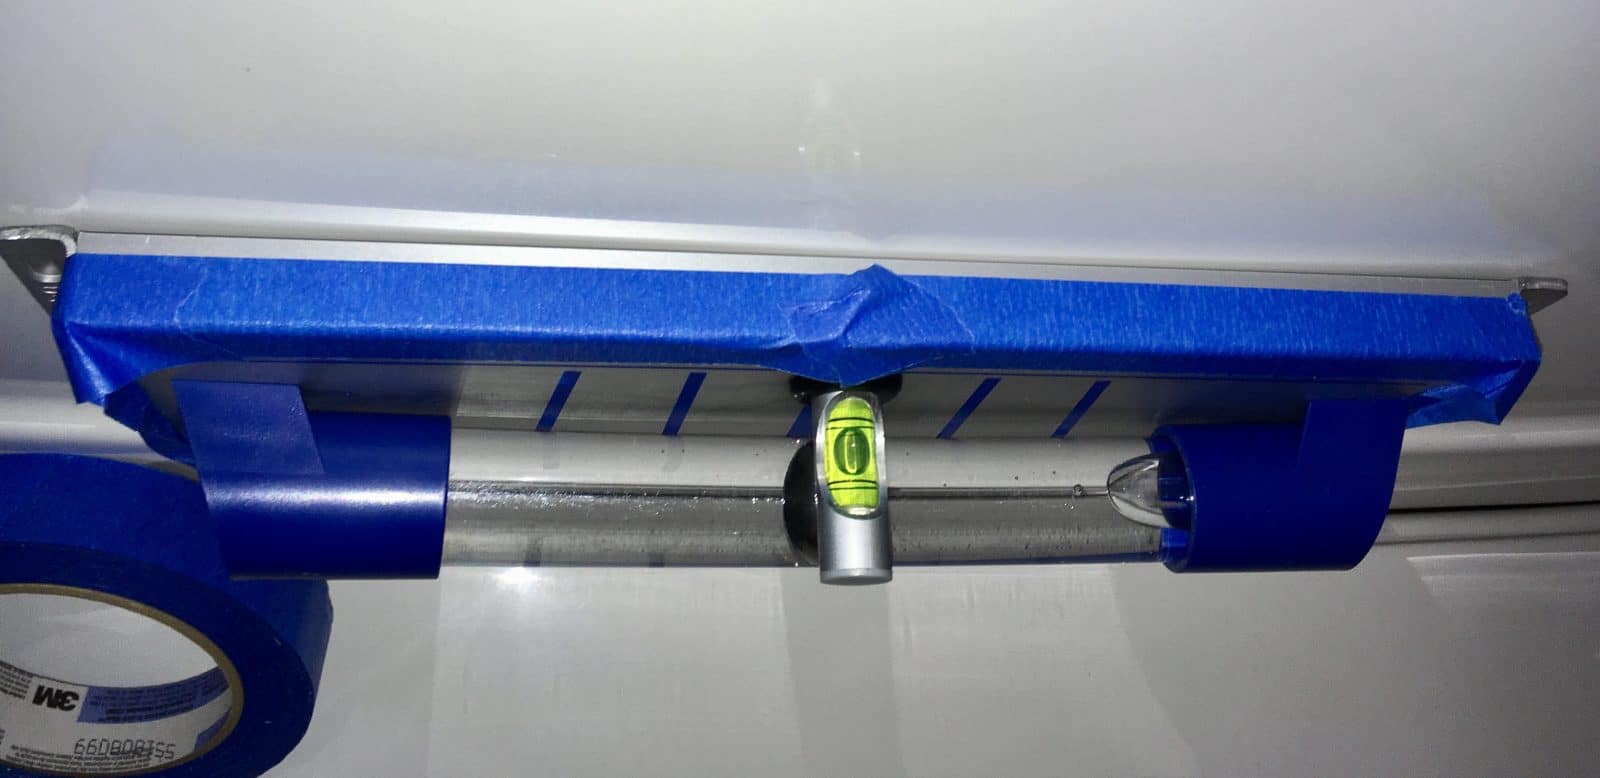
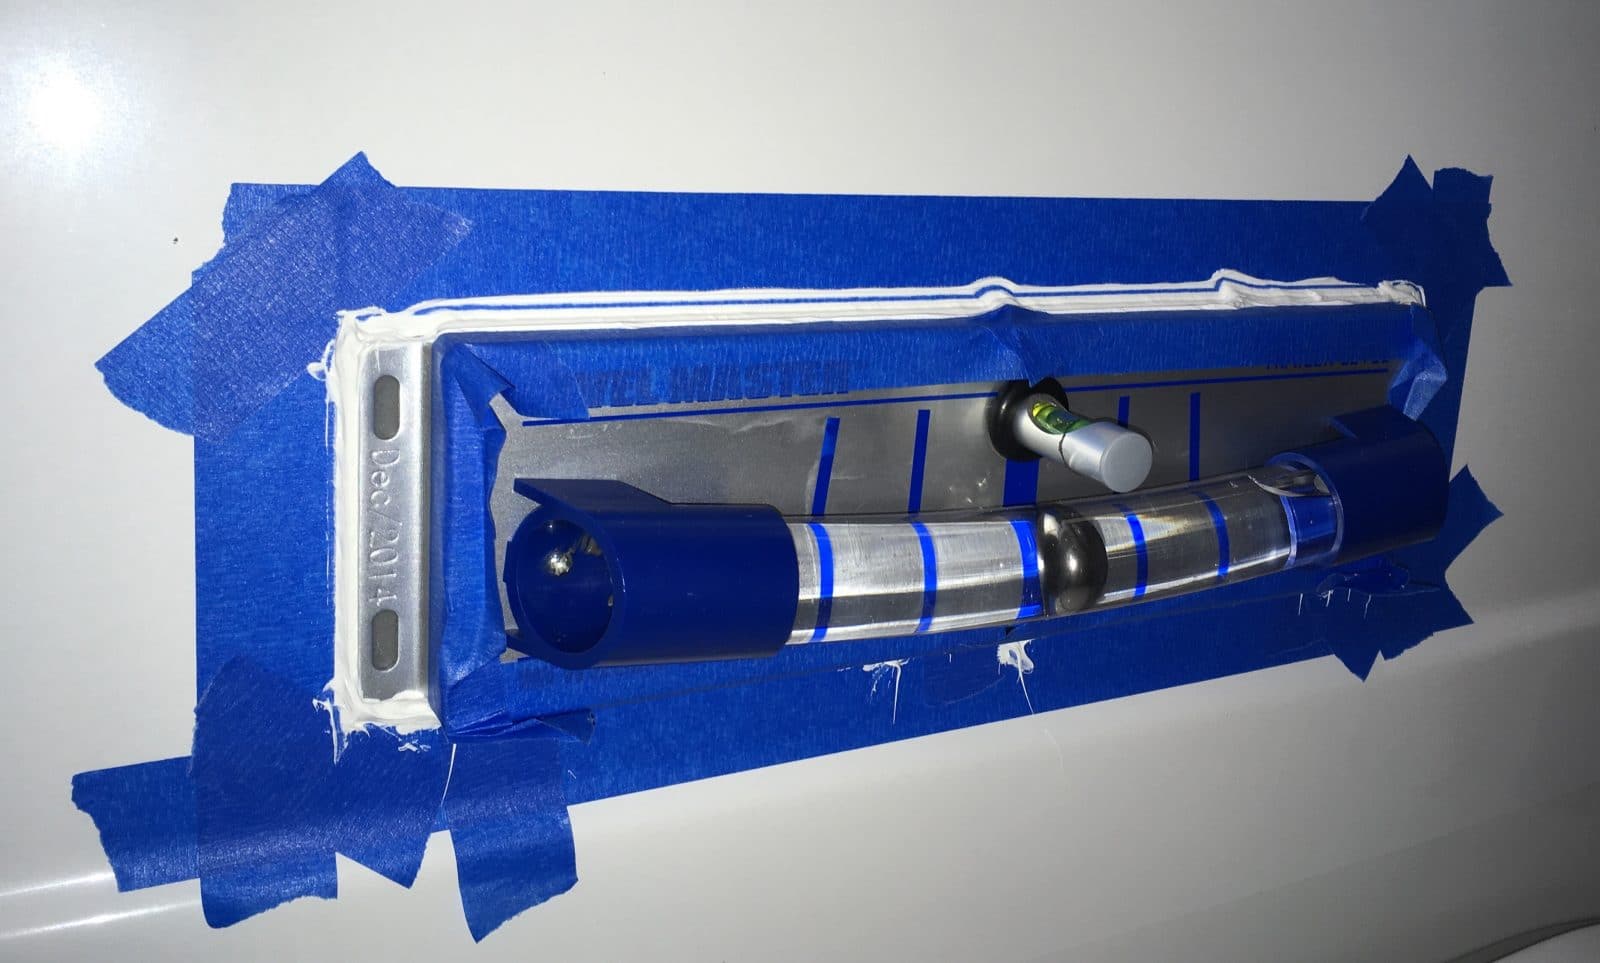
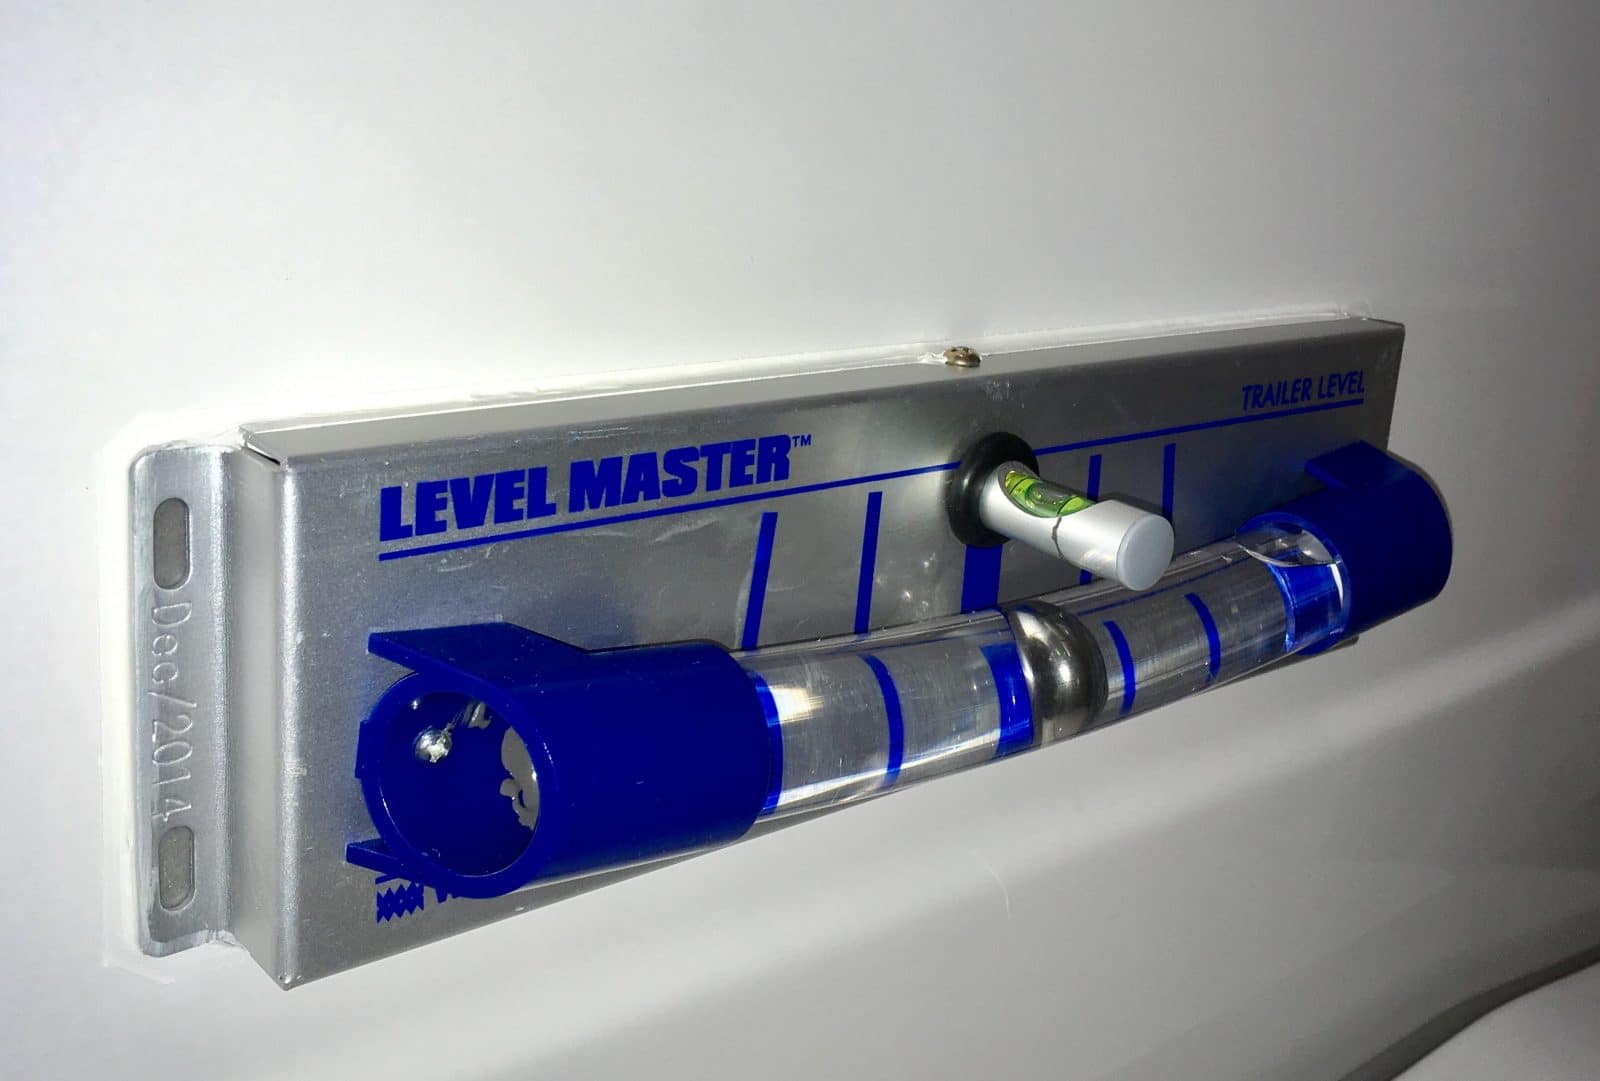
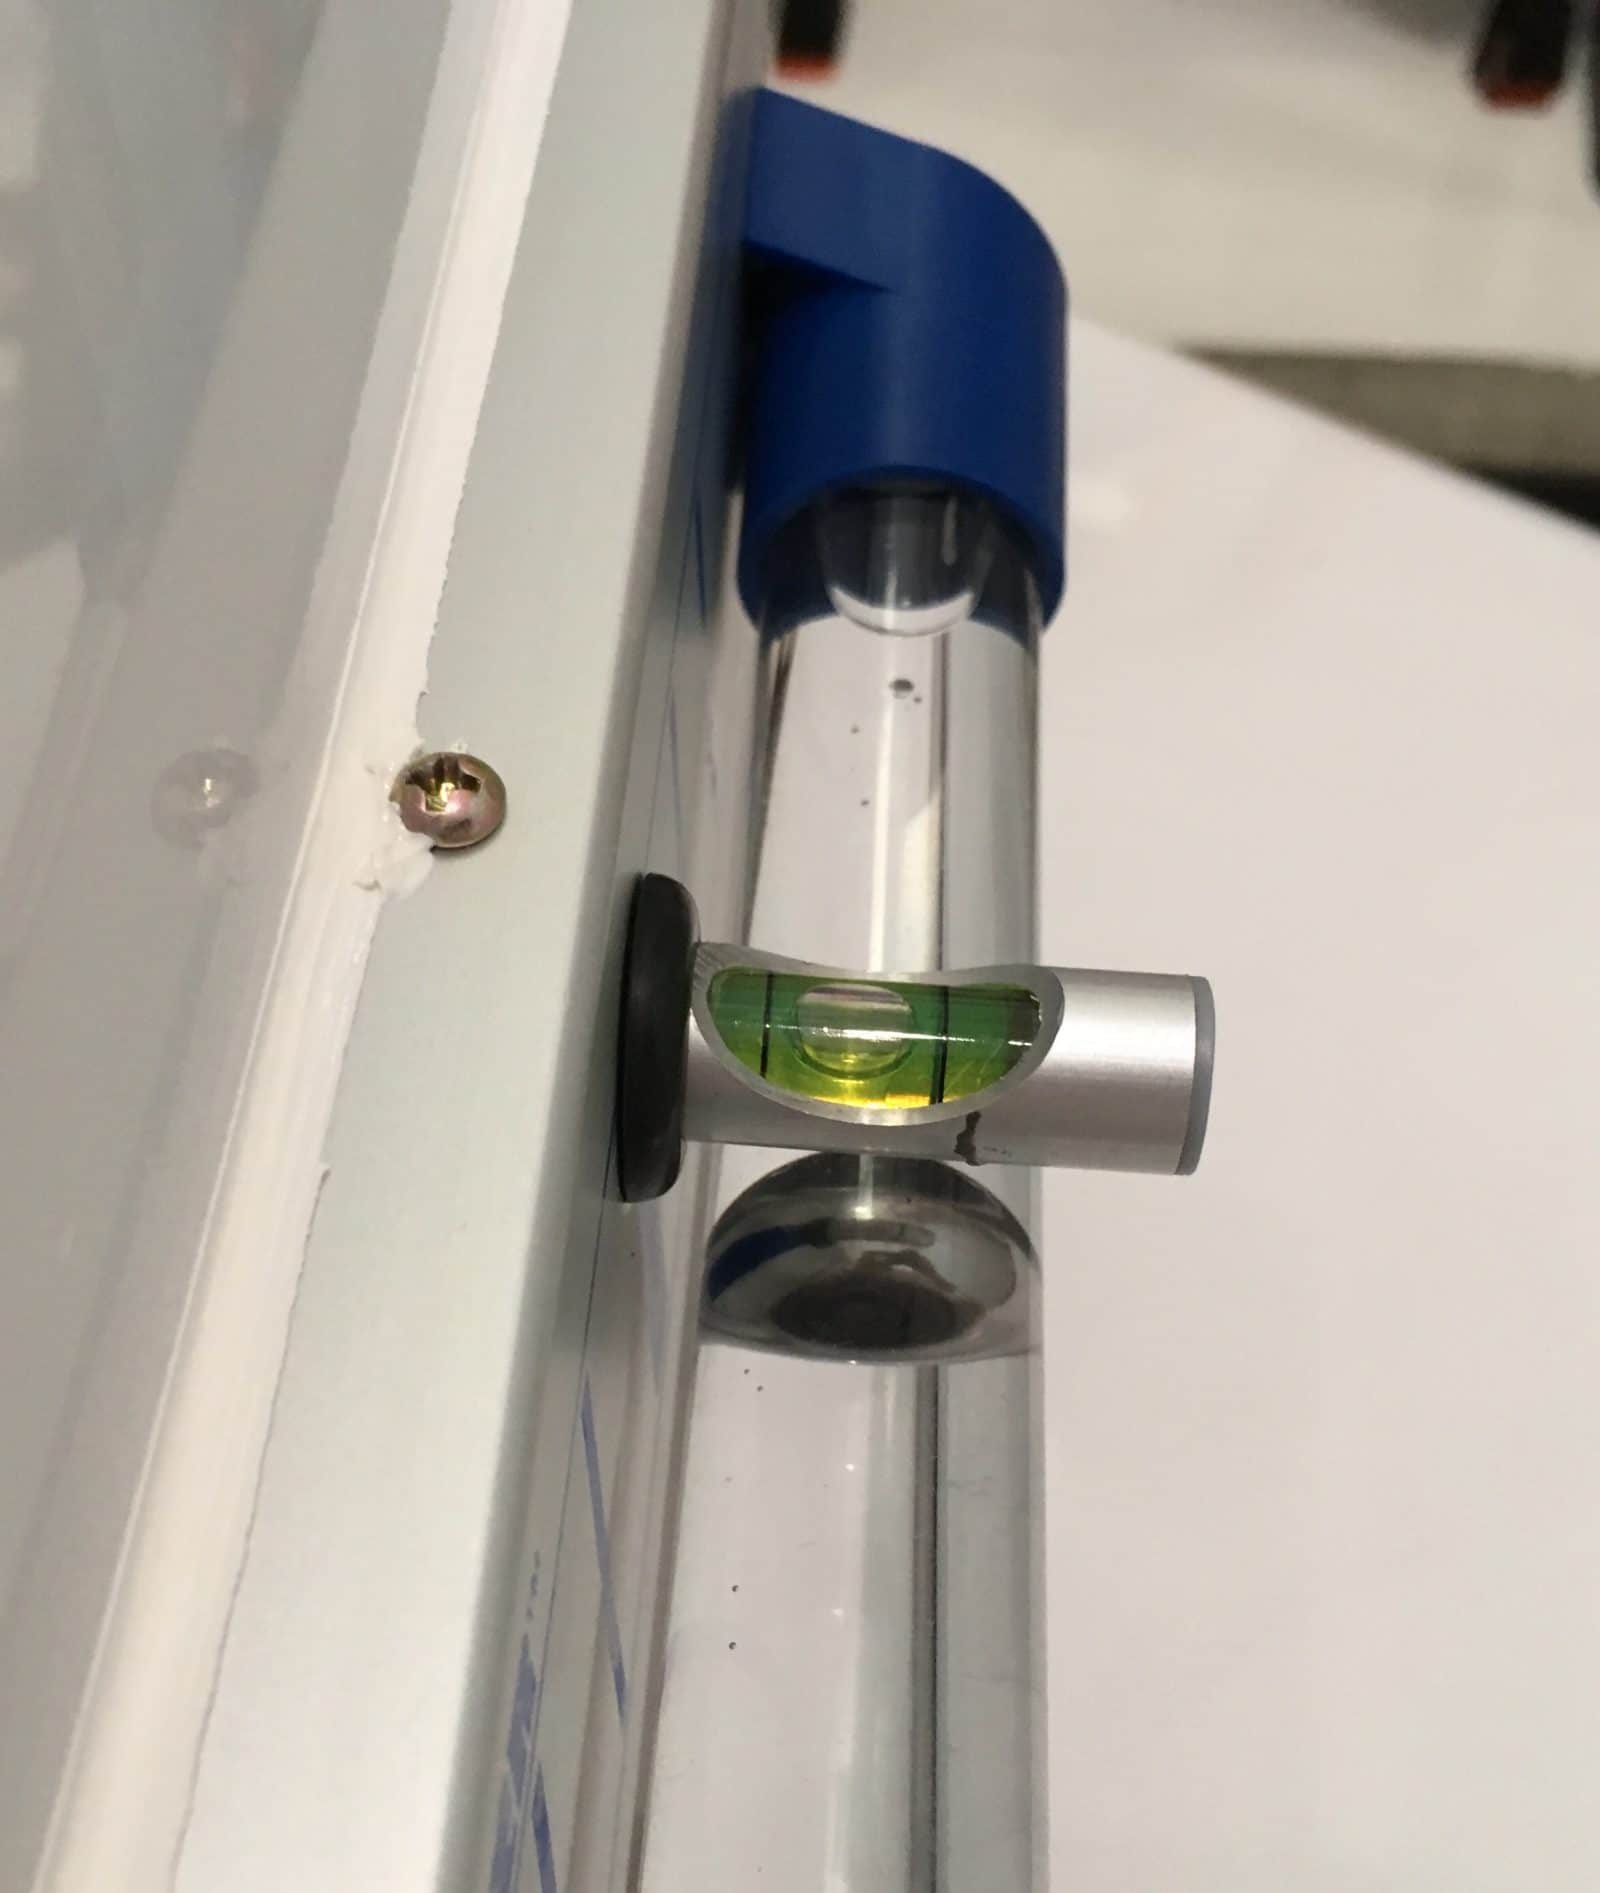
I originally wanted the Camco 25563 level because Amazon had it on sale for less than $15.... The one I received had leaked badly and there was oil all over the inside of the packaging, and the cardboard was soaked through: I arranged for a refund and another level through Amazon's painless return system. The next one I received had ALSO leaked, though not quite as badly. I returned that one and decided that maybe Camco was not a very good choice for this particular device. I went by the local RV Stealer parts department and found a similar model made by Level Master. It was $34, but it was not leaking, so I brought it home. After test fitting it where I wanted it to go, I pro-actively sealed the two ends where the factory plugs go, to prevent any future loss of fluid. Parts used: https://smile.amazon.com/Wheel-Masters-6700-Level-Master/dp/B000V55NB0/ref=sr_1_1?s=automotive&ie=UTF8&qid=1501042191&sr=1-1&keywords=level+master+trailer+level JB Weld (or any good two part epoxy) 3M 4941 VHB Very High Bond Acrylic Foam Tape 0.5" wide (used for securing automotive trim, very tenacious!) White Marine Silicone RTV Adhesive Sealant, UV stabilized. Not regular silicone sealer. The "Adhesive" part of the description is important! Masking tape and assorted measuring stuff Carpenters level I carefully secured the level vertically in a bench vise and added a thick layer of epoxy to cover the factory "plug" in the hollow tube. I let it kick off (two hours) and then did the other end: [attachment file="IMG_2792.jpg" There is no way that is going to leak, unless it gets hit with a bird or large rock..... Here is the back, showing the small bubble leveling screw. It has a hole at the bottom where it turns, this must not be covered with sealant on the final step. Also shown is the two strips of VHB tape. Alone they are probably not quite enough, but with the adhesive/ sealant added afterwards it will be plenty strong:: I cleaned the front of Mouse with isopropyl alcohol, and also the surfaces of the level. I used masking tape to find the center of the front wall. My choice for height is based on being able to see the level over stuff piled in the rear cargo area of my Land Cruiser, so it is an inch above the belt line. [attachment file=IMG_2794.jpg] I leveled the trailer left to right using the rear bumper, double checking the inside floor ... and carefully stuck on the level. Once pushed down firmly there is no removing the VHB, but if you lightly position it, you can readjust it. Once in the correct location, push and hold each side hard for 30 seconds. Now it is stuck hard! Detail showing that there is a gap all the way along, in spite of the curvature of the wall, thanks to the thickness of the VHB tape: Mask off the perimeter, leaving gaps on the bottom at each end and at the hole for the small level adjuster screw. The gaps are for moisture drainage: Inject the adhesive/ sealant into the cracks all around: Work it in smoothly by dragging your finger along it. Do not lick your finger! I am sure it tastes really bad: Carefully peel off the tape, do not let the sealant dry first. Mistakes can be wiped up with a dry paper towel: Make sure the trailer is level fore and aft and adjust the little level: Done: If the big ball is a little off center, you can adjust the entire tube a _small_ amount by loosening the left screw (looking at the front of the unit) and then gently tapping that end down or up with a screwdriver handle. The mount is slotted for that screw and the nut is serrated, so you can retighten the screw after and the nut will not turn. DO NOT LOOSEN THE SCREW MORE THAN A TINY AMOUNT, just enough to move the tube, or the nut back there may spin around and you won't be able to tighten the screw. Then you will say very bad words, indeed.... I will post more pics when I next tow Mouse. This should make it a lot quicker to get the side to side leveling done, from the driver's seat, by simply driving along until the ball is closest to dead center. John Davies Spokane WA
 2 points
 -
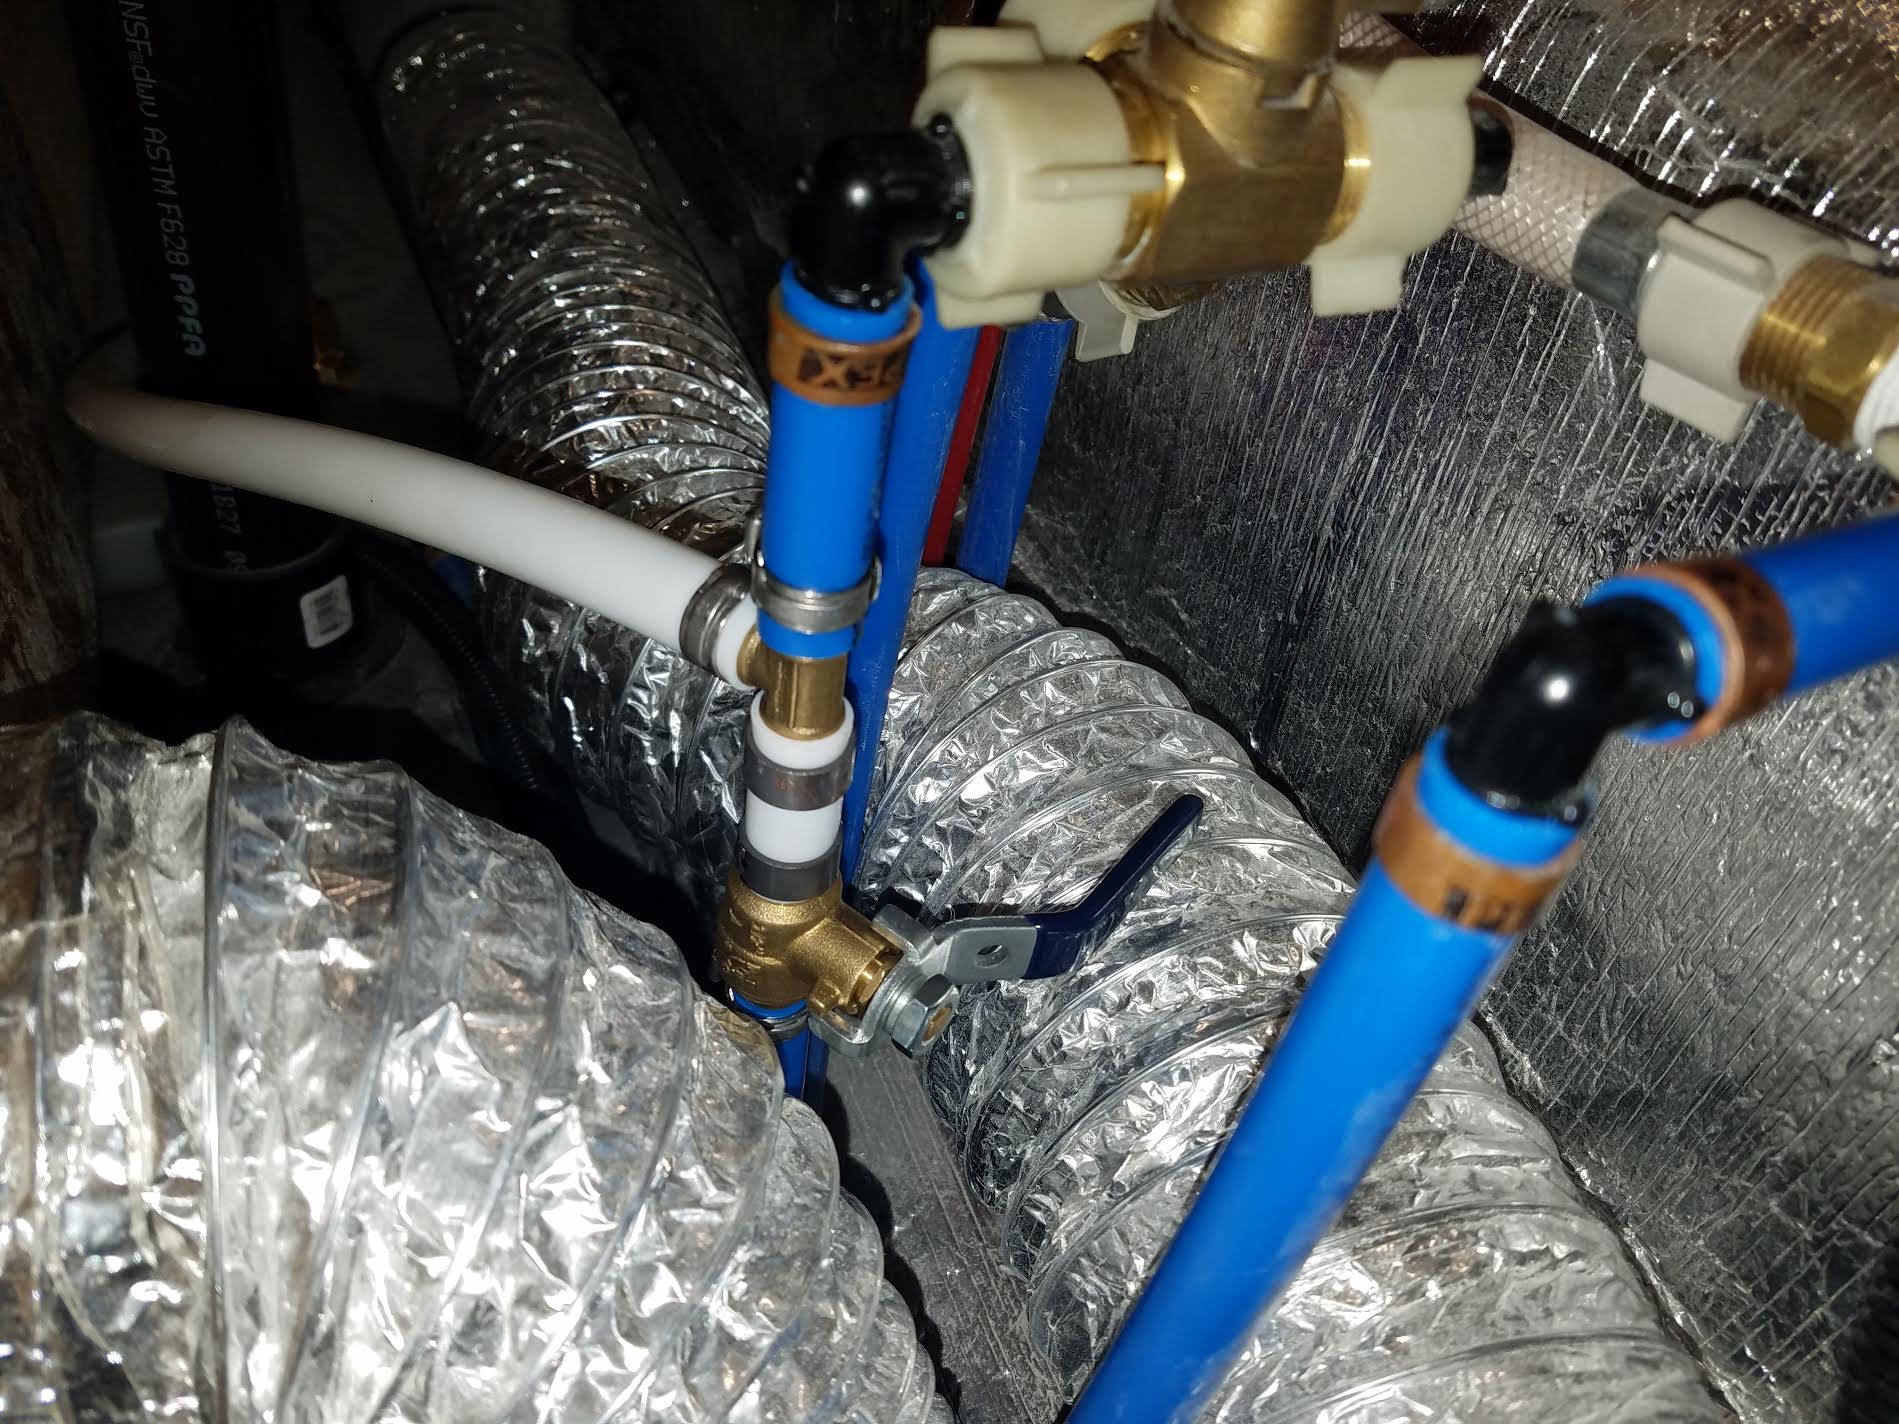
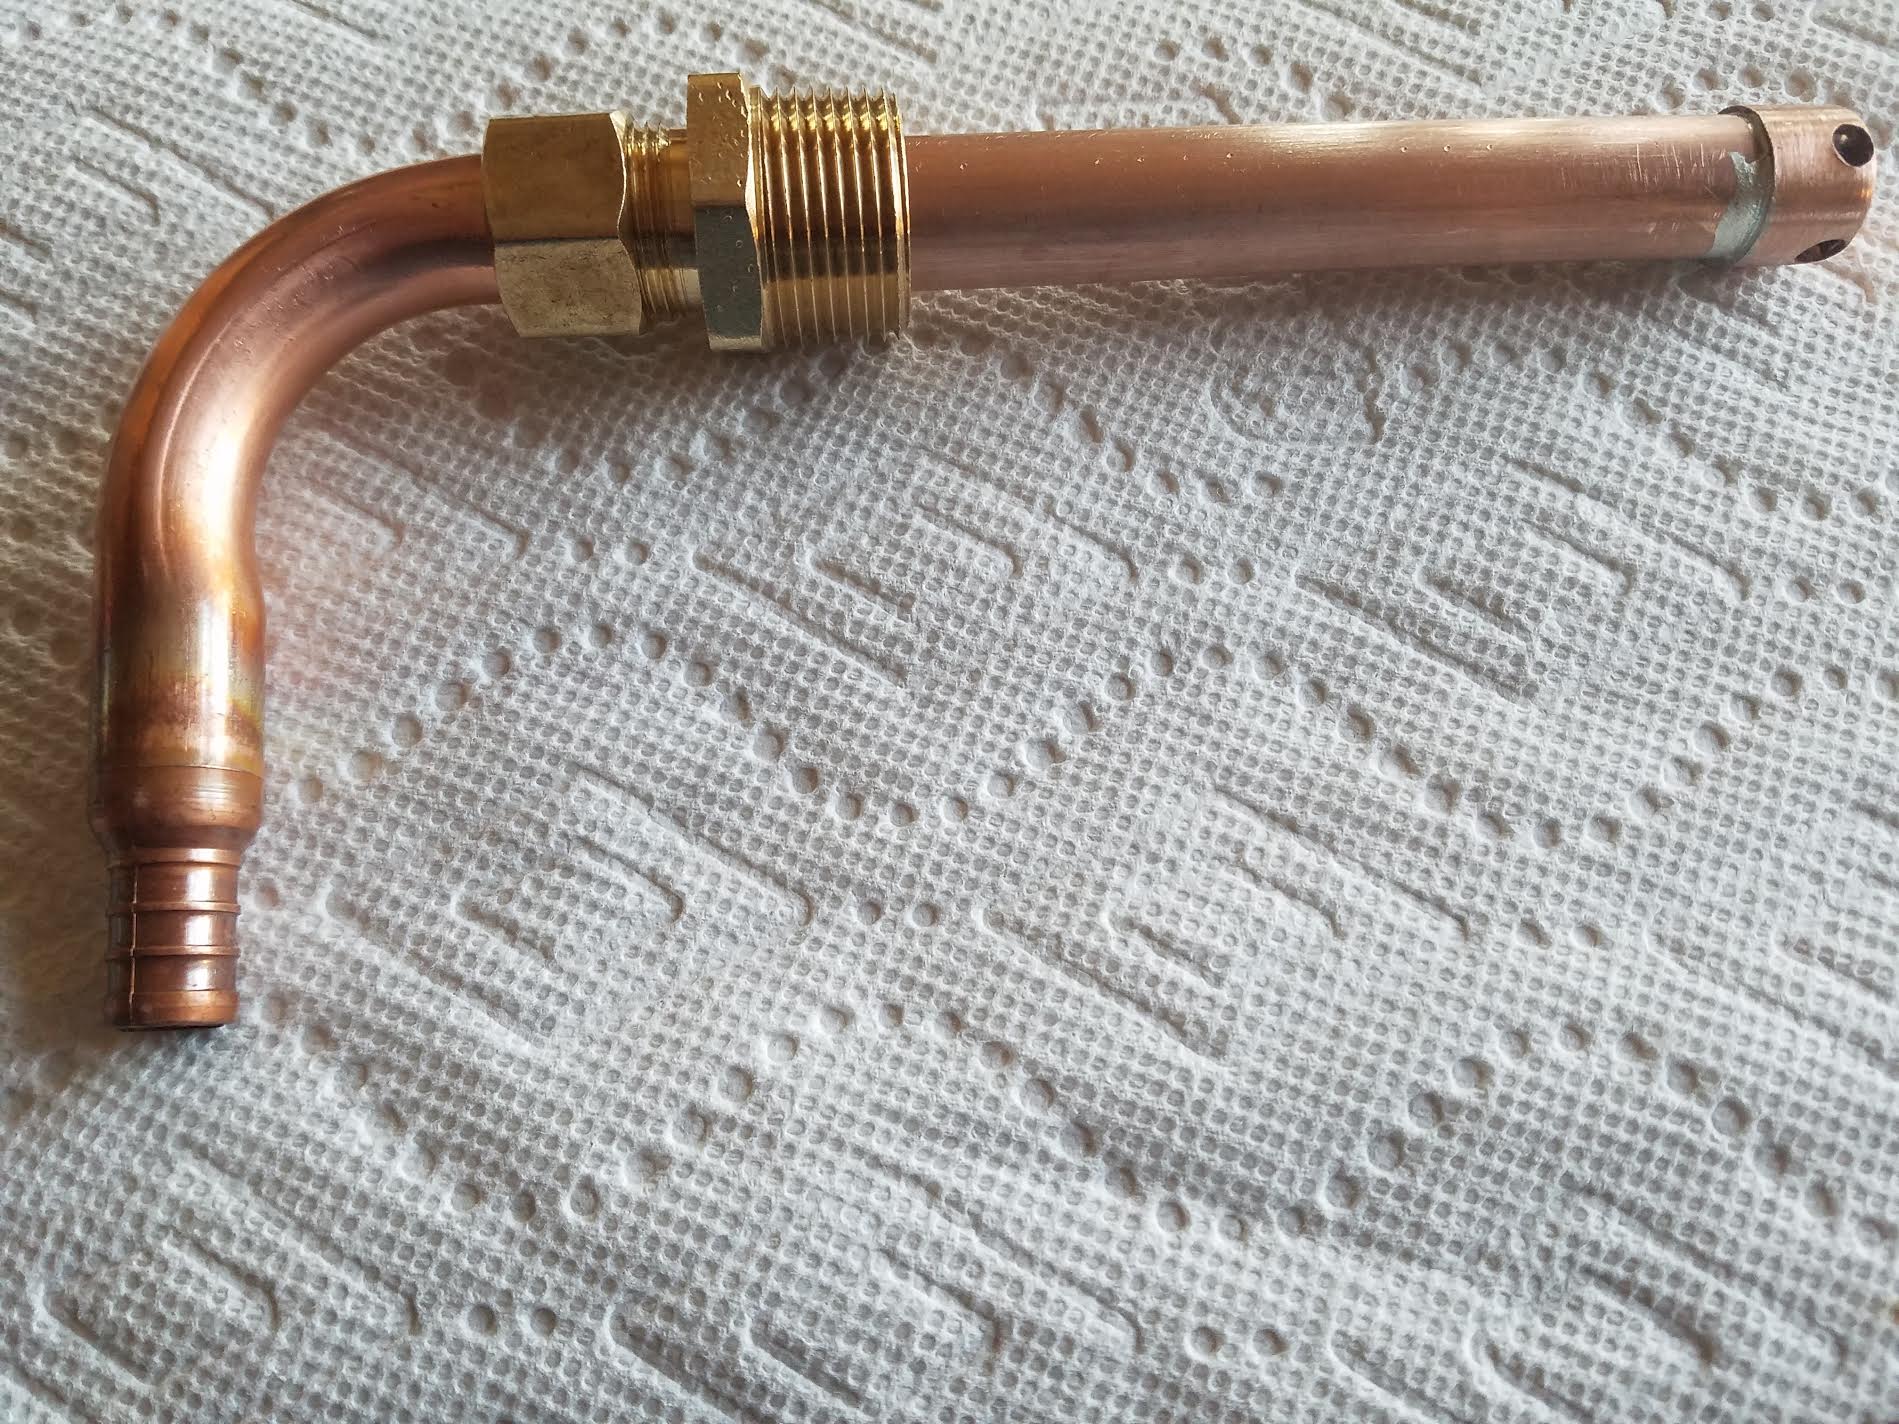
With all the talk lately about not being able to access all of the fresh water in the tank, I decided to make a new suction line and improve the situation. The stock line on mine will only draw water down to about 1 1/2" deep before it begins to suck air. In a 35 gallon tank that is only about 4" deep, this means about 1/3 of the water is not available, or about 11 or more gallons left in the tank. The stock pickup is on the side of the tank and cannot get all the water. So I made a top fitting that goes down and picks up the water at or below 1/4" from the bottom. When I started the installation I leveled the trailer and ran the water until it began to suck air. Mine did that at a reading of 25% on the gauge. If the front of the trailer is raised some, which I did not do, the reading would still be the same when the pump sucked air because the gauge reads right next to the pickup. You could get more water out of the tank with a raised tongue, but the gauge reading would be the same when it sucked air. After I installed the new dip tube, I continued to draw water and it began to suck some air at 6%. So, mine went from 25% (approx. 8 gallons left) down to 6% (approx 2 gallons left) when it began to get some air. Others have reported as much as 38% remaining which would be over 12 gallons. At a 6% reading I began getting aerated water, but a steady flow. Finally, the gauge went to 0% left. At that point is was about 1/2 water and 1/2 air at the faucet, but still flowing, or spitting. But even with a zero on the gauge it continued to pump out another gallon or so before I shut it off. All of this with cold only, not water drawn from the water heater. So, the volume from 6% to 0% was totally useable, probably not for a shower, but certainly for drinking. This is a prototype that works well, but it might still improve a bit with the next one. The pickup touches the bottom of the tank, but draws radially from below 1/4". It adjusts to any small differences in various tanks. It can be pulled out and cleaned easily if debris ever clogs it. All plumbing connections, where the new line ties in, are easily accessible and the existing tank fittings are not touched. The stock tank drain is retained. The area of the tank where the new fitting is installed is easily reached and the tools to do it all fit in the available space. After clearing all of this with Oliver to make sure there is no conflict with forum rules or warrantee issues with them, I can send anyone that wants to do this, a kit with the following: the pre-made dip tube fitting, a Polyethylene tank fitting, the special spin weld fitting driver, a 1 1/2" hole saw (if needed), the pinch ring tool and a PEX cutter. I'll also provide step by step directions for anyone who is interested. You'll have to have a powerful router with a 1/2" collet and a drill to drive the hole saw. Or, I can help you with a set of directions here on-line and you can assemble the parts yourself. The parts required are: (1) dip tube assembly, (1) 3/4" spin weld fitting, (6) 1/2" PEX pinch rings, 24" 1/2" PEX, (1) 1/2" PEX ball valve, (1) 1/2" PEX tee, a small container of Rectorseal 5. The only real tricky part is the spin weld. Besides the special procedure for spin welding itself, you have to make a new hole in the tank and vacuum out the chips. Here are some pictures:
1 point
-
We just picked up our Elite and the end of last March. Had a fine time meeting many of the crew at Oliver, Anita made us a pot of killer bean soup, and it was beautiful in Tennessee! We took the long way home, taking 3 weeks and over 2500 miles to get back, with about 2/3 of that spent boondocking in various campgrounds. We absolutely love the trailer and it sheltered us well through freezing temps, snow, wind, and mountain squalls. One thing we began to notice while boondocking was that when the water level gets around 36% +/-, the water pump would cycle for a much longer period of time before shutting off (like a minute). As the level got down below 33% +/-, the pump would not shut off at all. After much head scratching, calls to Oliver, and checking for air leaks or any anomaly, I discovered the issue. The outlet tube that is at the "bottom" of the tank, is actually kind of high up. The tank itself (32.5 gallon) is 4.5" in overall height. The distance from the bottom of the tank to the top of the outlet tube is 1.5 inches! What this means is that as soon as the water level gets down to the top of that tube, the water pump will begin sucking air and loose prime. I was very careful to make sure my trailer was absolutely level while checking on this. This is a 33% loss of available water in the tank (10 gallons). The only way to get to it is to raise up the front of the trailer, but this has it's own negative issues (refrigerator, black tank/toilet, come to mind) I would be curious to hear from you boondockers how you have dealt with this. Has anyone modified their tank or has this not been such a big issue to you? To me, this seems like a big design issue that Oliver needs to look at. The problem now is that the adapter/fitting that the pex tubing attaches to is glued to the exterior of the tank and there needs to be room for the gluing flange all around the adapter, this moves the tube up the tank wall. There has to be a solution out there somewhere. 10 gallons is a lot of water! I would never expect a 100% discharge, but only 66% is difficult to swallow, no pun intended there ;-)! Thanks, and again, we love our Oliver and I would and will recommend it to anyone. Just want to make it even better, and learn more about this kind of travel (this is our first trailer). Regards, Dave1 point
-
Video #1 :)1 point
-
I'm resurrecting your older thread Dave since now the problem has been resolved :) Reed Pick up tube installation videos -1 point
-
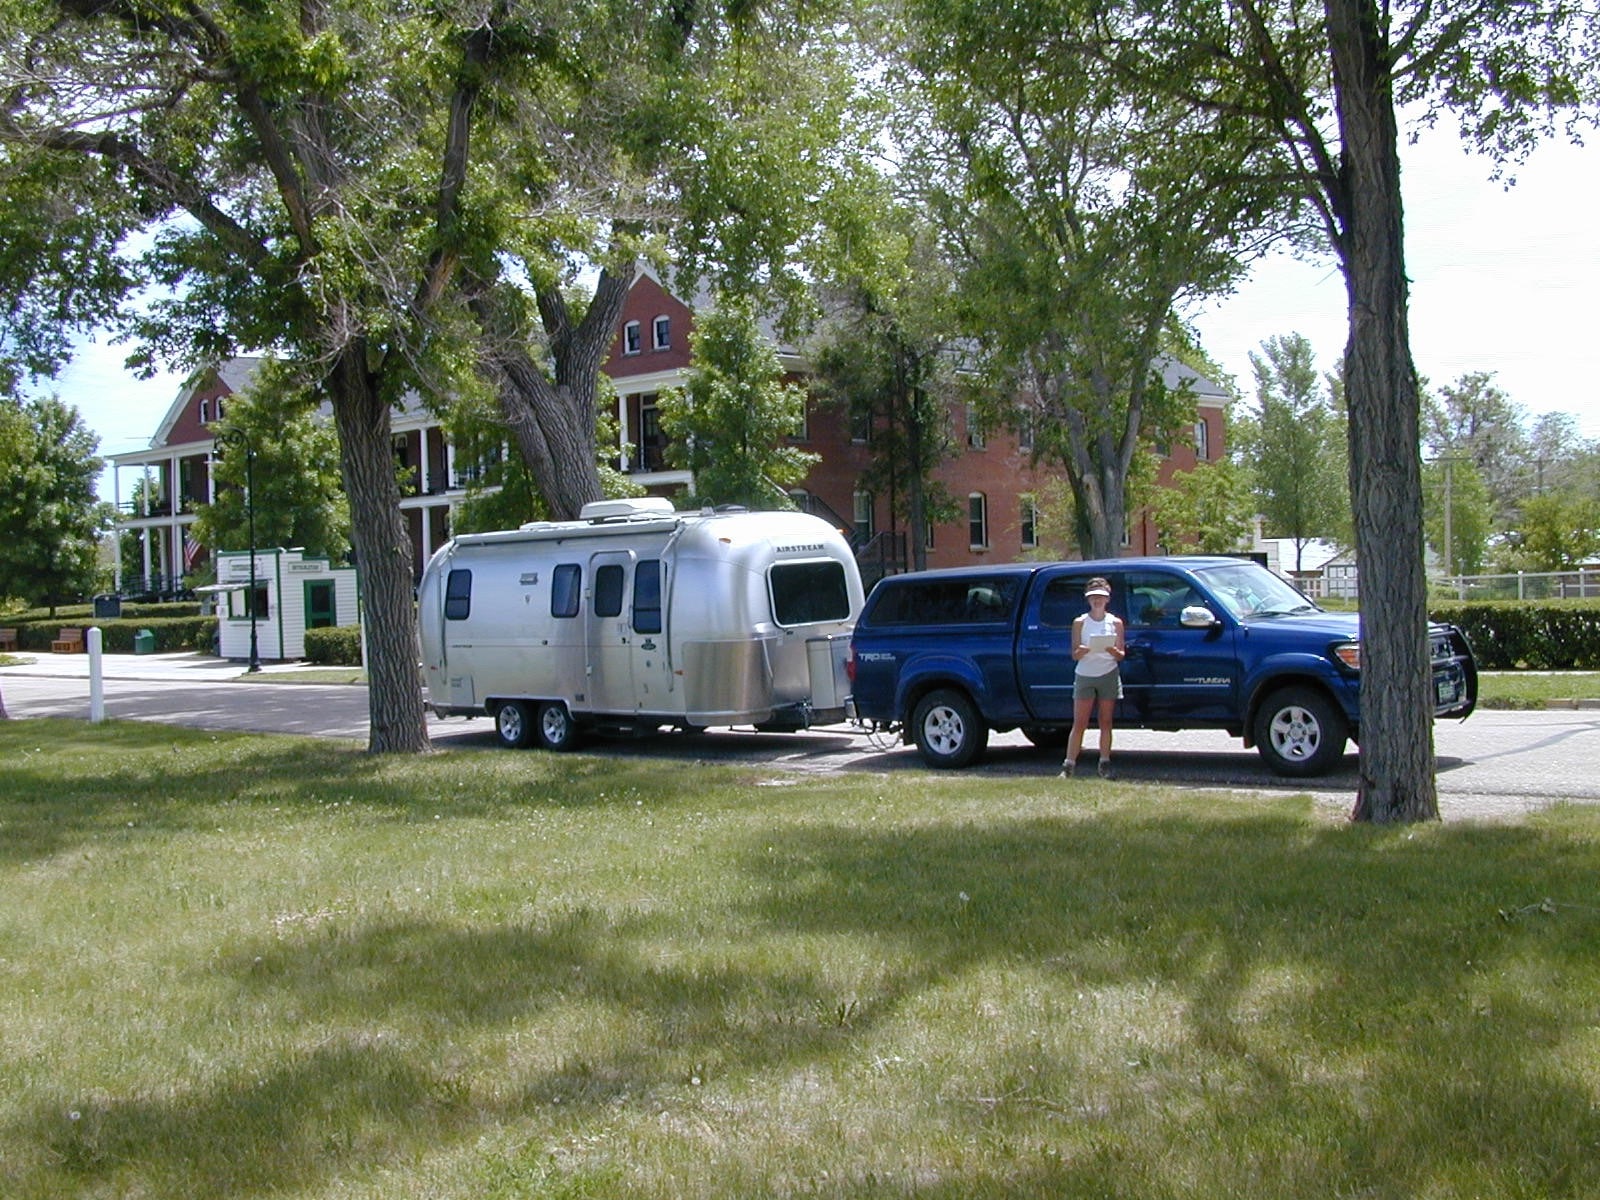
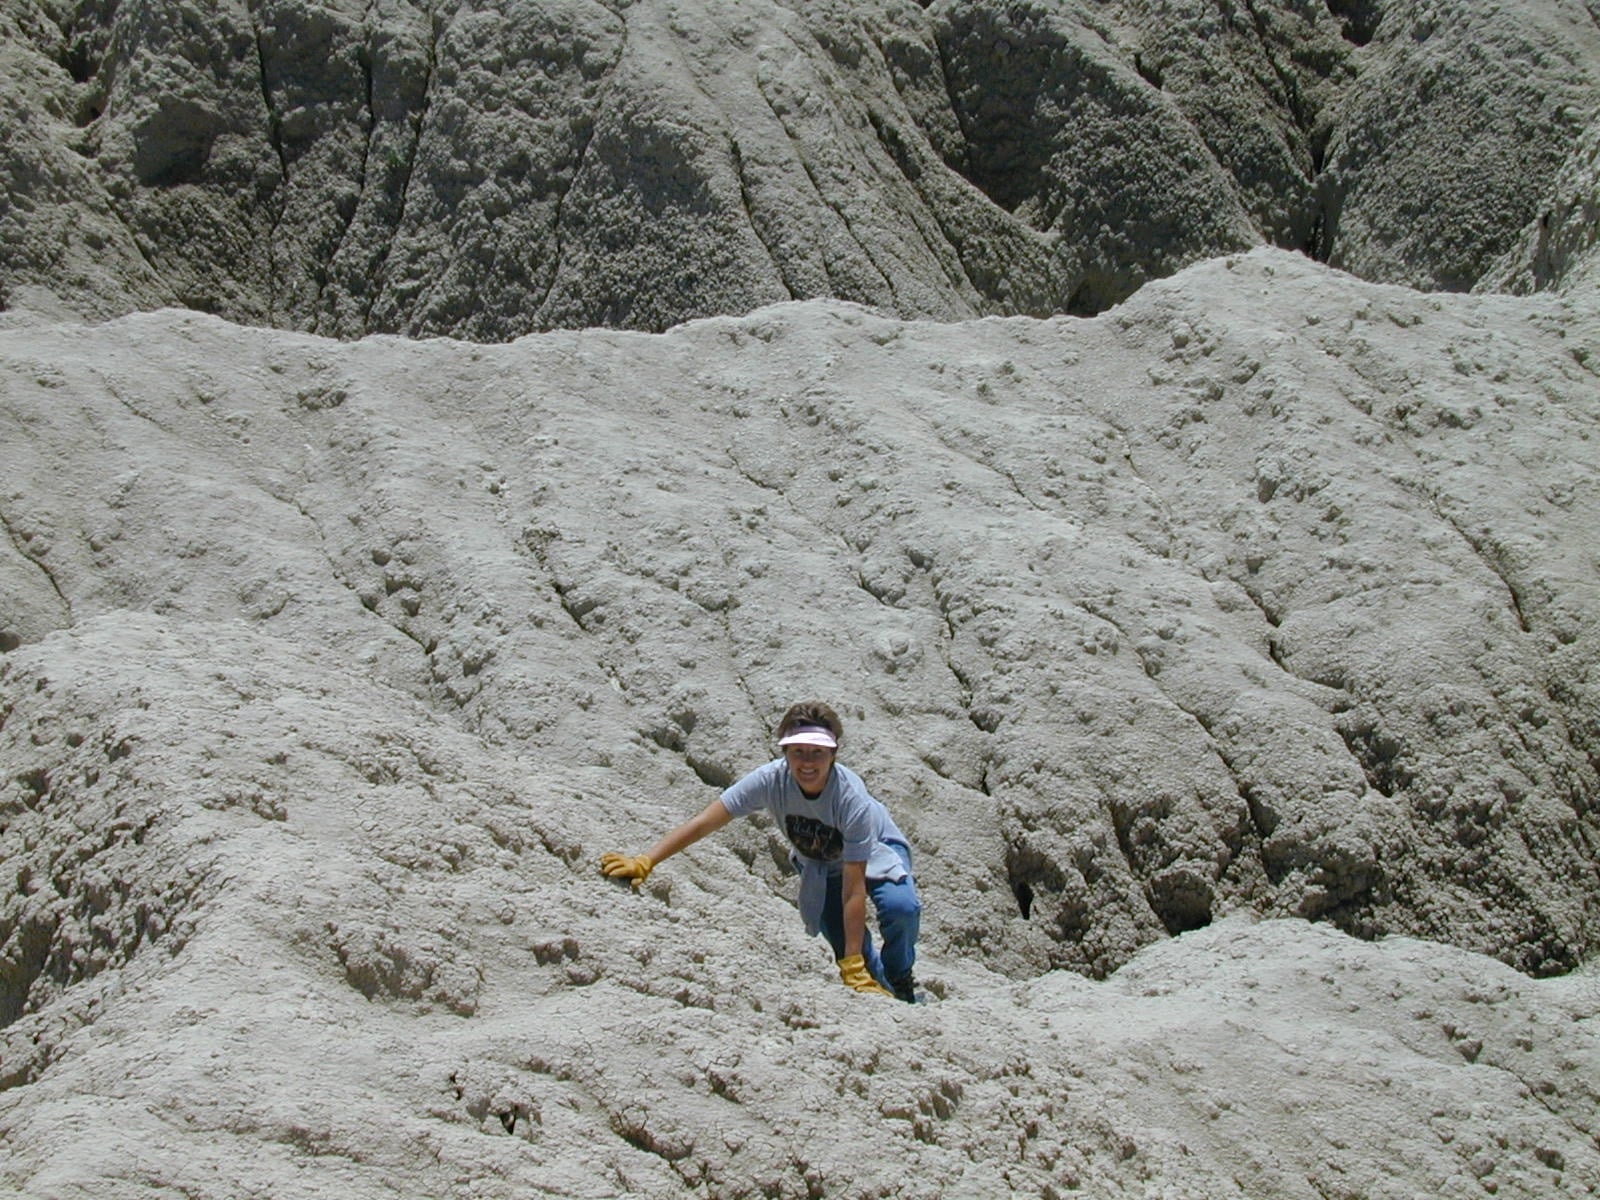
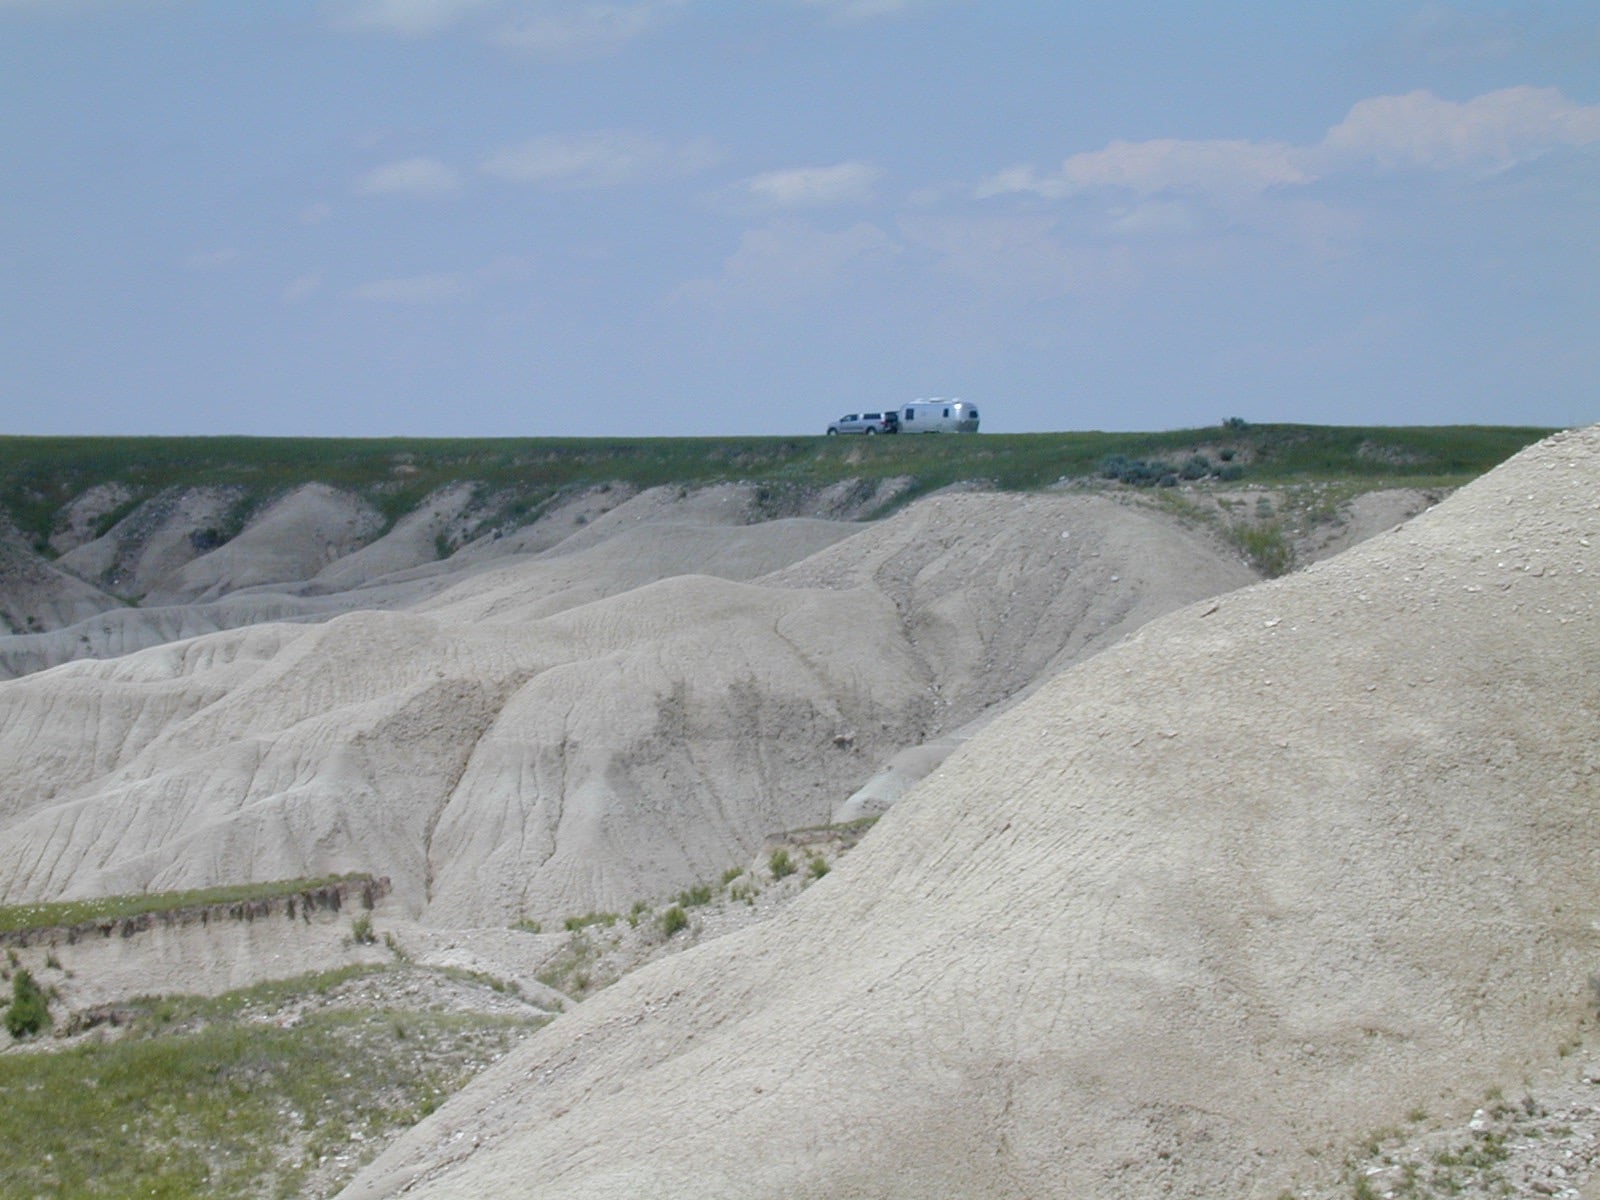
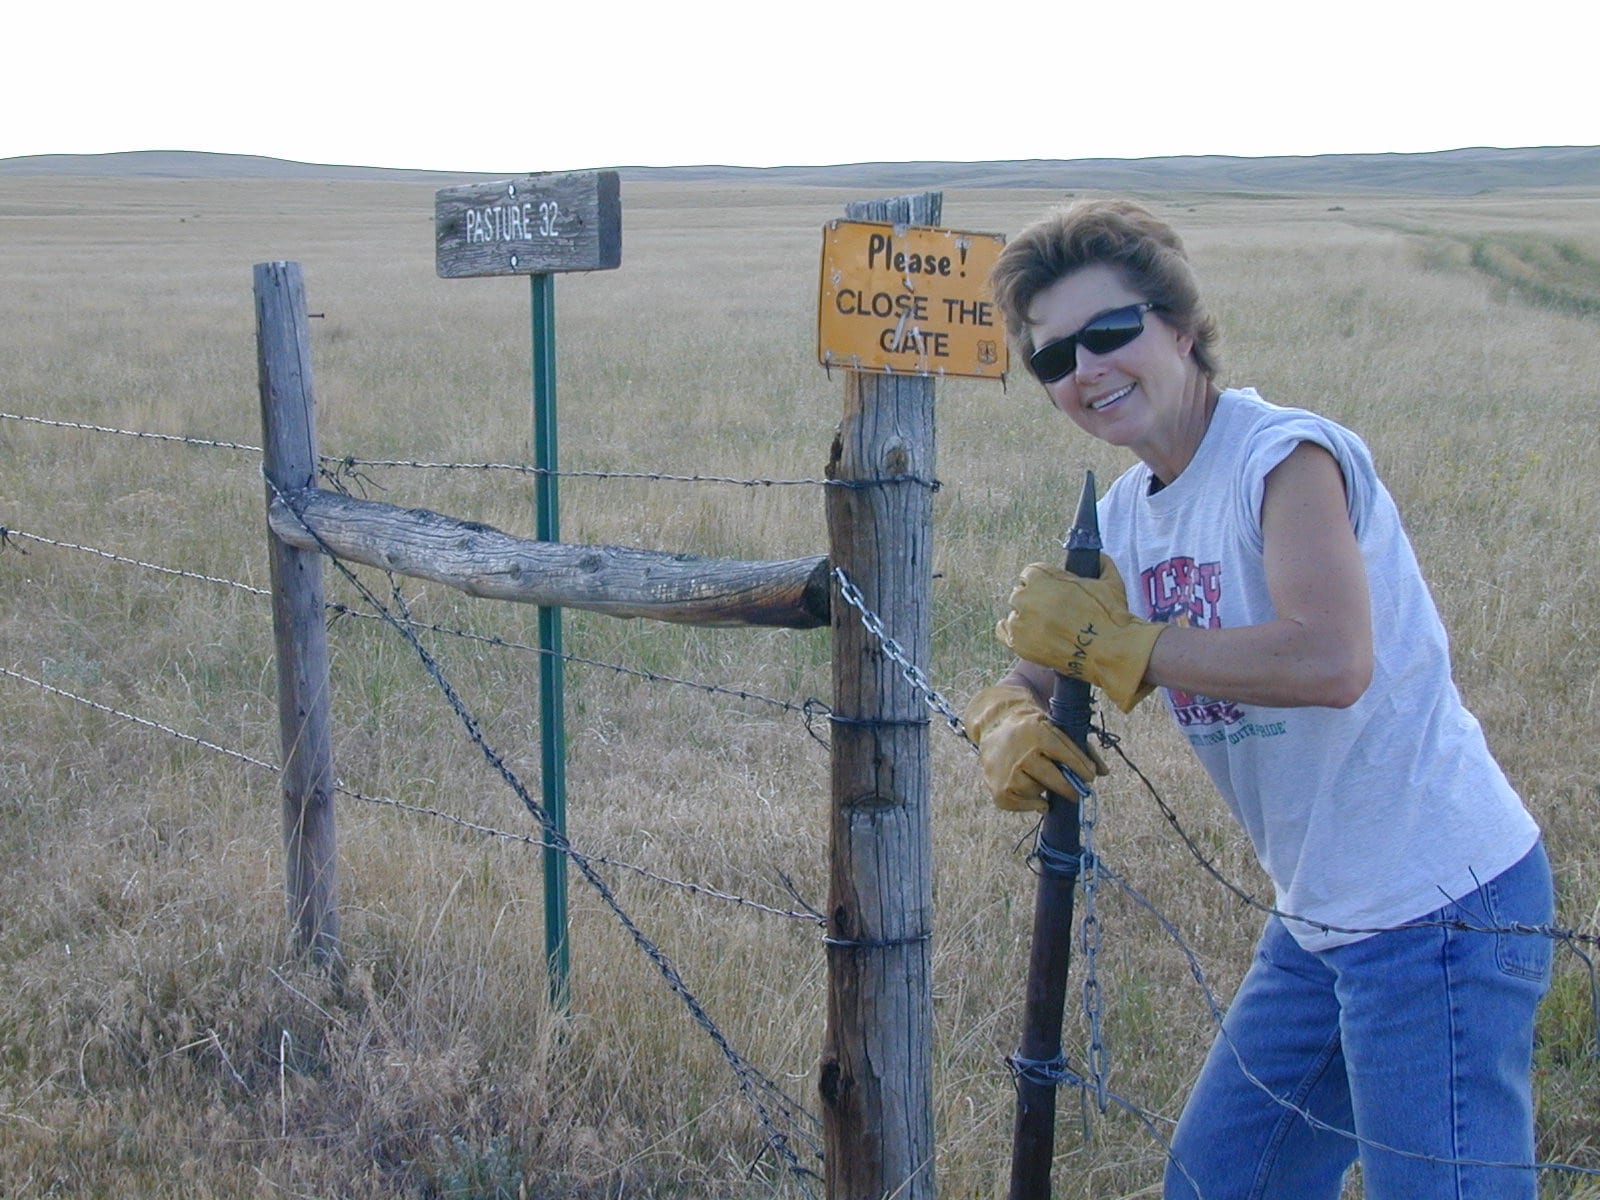
My first visit to Fort Robinson, Nebraska was in 1965. I was 15 years old and invited to go 'Fossil Hunting' in the Badlands of Western Nebraska. My friends had a pop up camper and drove from Independence, Missouri to Fort Robinson. Although since the 1980's the Ranchers I met and knew in the Badlands have died and their ranches have changed hands several times. In the 1960's to early 1980's there were not many fossil collectors coming to this sparsely populated panhandle of west Nebraska. I knew the local Ranchers, each by name. I was given free roaming rights for many years. Even the Mayor of Crawford, also an avid artifact and fossil collector invited me to stay at their home when I came as a 16 year old... with a 1956 VW. For an independent teenager who loved collecting fossils... wouldn't it been even more wonderful in a 23 foot Oliver!!!!! Sioux County and Dawes County, Nebraska. These are the same age as the Badlands National Monument of western South Dakota. Give or take a million years... 35,000,000 year old white clay and ash deposits. The area was humid, meandering rivers and a wide variety of animals. Saber Toothed cats, Rhinos, Horse, Deer, Rabbit, Mice, Moles, Tortoise, Pond Turtles, Birds, Snakes, Lizards and on. Their remains are still washing out of these same Badlands. The only areas that you can actually hunt these fossils is by paying a Ranch to collect. I suspect that today all of the major Ranches have leased collecting to professional dealers. BUT... Toadstool Park is open to those who want to wander these Badlands, but prohibit your picking anything up that is washing out. The main attraction for most is Fort Robinson State Park. They have wonderful tent and RV Trailer sites at reasonable prices. www.outdoornebraska.org has the details and when facilities open and close for the Season. A very nice restaurant. Melodrama in the Summers... making pottery, painting classes. For kids... turn them loose and they have unlimited recreation options. This is a 'destination campsite' with everything... yet reasonable prices! Fort Robinson's attractions are an Olympic swimming pool, Horse back rides into the bluffs, a very intact Cavalry Fort where Crazy Horse was murdered in 1877 and a monument marks the spot... right next to the camping areas. Tennis. A museum. The Black Hills are close enough where you can leave your trailer and drive to see Mount Rushmore and the Crazy Horse Monument, among other things worth visiting... like Deadwood and Lead. A busy 'day trip'! There is some National Grassland camping to the north and west of Toadstool. The gate will say 'Please Close Gate'. These areas are leased to ranchers for grazing, but they are Public Lands. You would be camped right in the middle of these Badlands. Wandering around them is a lot of fun. Can an Oliver do all of this? Your Oliver can do all of this and MORE... You are about 50 miles east of the Wyoming border and your camping trip can extend all the way to... Yellowstone Park and, beyond. I am including some photographs taken June 1, 2006. Just so you have a sense of what the area is like.
1 point
-
You might be led to believe that I really found Fort Robinson, Nebraska a vacation destination for adults and especially the youngsters with sugar highs from the TWO ice cream diners in Crawford! Two... and they are both generous with their mountain sized scoops! Turn them loose in the Badlands around Toadstool Park and let them burn it off. Your children, when adults, will also take their families. Our two daughters do and did. An Olympic indoor swimming pool with a high and low dive. I chickened out on the High Dive. It looks higher up when looking down... trust me, but try it. You can also swim out to a shallow pool that is outdoors. This is Big City Oliver Camping... The water is from the local aquifer and they should charge you for filling your fresh water tank. They include SHOWERS, as well at the campsite. College actors do melodrama during the High Season. They are very good. Where Crazy Horse was killed at the fort is now marked. I found two Indian Head pennies there when I was 16 years old. The gophers dig them up and toss the dirt into a pile... Craft school where the kids can make...well, some kind of art in water color and maybe fired clay. Check it out. A fine restaurant at the Fort is excellent. Tennis courts. Golf in Crawford. Agate, Nebraska has the Cook Ranch where Red Cloud and Sioux Indians would gather. The wonderful Agate Fossil Beds with a Indian museum with Sioux and Cheyenne leather clothing and accessories on display. As nice as Cody, Wyoming's Buffalo Bill Museum... but collected by the Cooks from the Indians themselves! If I missed something... please make a post to complete this Thread. When you are sitting outside your Oliver... at sunset, you can imagine how the soldiers felt when the Indians were on the war path. Oh... the fort was a POW camp for Germans in WW2. Many stayed in the area after the war. Cannot blame them at all. Above all... have fun. My last breath will not be 'Rosebud' the sled, but... Fort Robinson.1 point
-
LOL!!! This is EXACTLY me! -Angela :)1 point
-
John, the xtend and climb ladder that we have is stored in the closet against the bathroom wall. It stands on the floor and fits perfectly under the black plastic vent pipe that runs along that wall. I just wrapped a bungee cord around the pipe and the ladder and it has never shifted during travels. The clothes hanging in there also help to secure it. That's a pretty low-tech approach to securing a piece of equipment and I never intended for it to be my final solution. I put it there in a hurry when we were leaving on a trip. That was in early 2014 and it has worked so well that I've never gotten around to seeking a better way.1 point
-
Welcome Free2Roam! I can feel the excitement here! :D
1 point
-
John, As I wrote about in an earlier post, I have the fittings and the tool to install them. Plus I have the dip tubes in stock. My company is all geared up and the entire procedure is all worked out. We're just waiting to get the logistics sorted out with Oliver and a few other details. Then I can work out a system to get everyone fixed. Oliver needs to be involved in this for the existing trailers and the new ones about to be built. Not everyone will be willing or able to take on this modification, so it's not the time to rush in, on your own, with a rental arrangement outside of the work and planning that has already been done, or is about to be done. There is more to it than that.1 point
-
Camp Food Stamp folded up today after a month of fish fry's and dutch oven cooking. Here is a look for those that couldn't make it this year.1 point
-
FWIW, and maybe not the same in the new bigger trailers, our tank will read accurate till 6 per cent, and not suck air. Also, our bubble has never been adjusted. Don't really care. If the trailer is comfortable for us, it's comfortable and ok for the refrigerator, according to Dometic, and so it goes. If we can't level completely because of a weird campsite, we hope to leave the headboard side of the trailer high for better sleeping, and level enough so the doors swing properly (not too much twist on the trailer.) Most of the time, we're within an inch or so of level, if I just walk into the trailer , feel the level, and walk out and readjust the jacks. The bubble always lies. Not a huge deal. (BTW, you can use a partial water bottle on its side as a level, if you think your level isn't correct. Old school carpenter trick.) We also have a small pencil level we carry with us. To get that last few gallons, just as any other trailer, it can be necessary to jack one side and front a smidge to fill the inlet. We don't usually get to that point. As we normally wild camp, and carry fresh water in five gallon containers to supplement the trailer tank, I do the following to conserve water on most trips: 1. All drinking water is from the five gallon jugs, run into glasses or bottles. Coffee water is run into the tea kettle too. 2 I wash dishes with water heated in the tea kettle, from the jugs, in a dishpan. I can do dishes in a less than one quart tea kettle, by being careful. I also do dishes outside, most of the time, because I like it, and hate being inside when everyone else is having fun outside. I wipe food residue from dishes and silverware with the old napkins and paper plates after meals, save the dishes up, and do dishes once a day. Why waste the water, or the social time? 3. Rinsing glasses, brushing teeth, etc., is also usually done outside, with, you guessed it, the five gallon jugs carried in the truck. And the dog's water is from the jug, too. So, basically, the trailer water is toilet flushing (minimal water), navy shower (if no other facility available), and handwashing. Not much. 32 gallons goes a long, long way if you're careful. With extra jugs, we can go weeks without having to go into town for extra water. We do have a soft bladder that we've used to refill the tanks. It's not a big deal, but an extra trip and time, and I'd rather go hiking. Or go to the farmers' market, cheese factory, or whatever... Every time we come home from a camping trip, I have several thoughts (beyond, geez... all that laundry to do...) Our home is huge (it isn't), we waste a lot of water (we don't but certainly use more than we do when camping) and omg, we use a lot of energy... and we do, but we're careful about that at home, too, but still use so much more than when camping. If we all lived at home as we do when we camp (or as I did as a kid on the farm...)....well, it might be a better world. Camping has helped me reconnect with what is really important. Both our trailer (since 2008) and our home (since 2013) are solar powered. We conserve and collect water camping and at home. Precious resources. Precious world. Love the camping lifestyle, and love our Oliver, which makes it all easier. Sherry1 point


-
Recent Achievements
-


")


")


")
