Leaderboard


Popular Content
Showing content with the highest reputation on 03/13/2018 in all areas
-
Hey June, the cable connection should be on the back drivers side corner. There’s a cap that lifts up with the connection underneath. You need to get a coaxial cable for TV. You can get one at Walmart, Home Depot, etc. I got one 25’ long. Sometimes campgrounds will let you borrow one. Doesn’t hurt to ask. The connectors look like this: After you connect the cable to the outside of the trailer here’s what you need to do next. If you have the HD TV antenna (looks like a white flying saucer on the top of your trailer) look in the back overhead storage on the left for a small box with a small button and light. If the light is on, push the button so it goes off. Now you’re ready for cable. Turn on the TV and go to the menu to select cable as your source. Then do a channel scan and you’ll be good to go. Mike2 points
-
I did it. Ordered my Oliver which is scheduled for production in early February. My dream had always been pulling an Airstream until reading about the Oliver alternative. Without ever physically seeing the trailer I made a deposit. A few weeks later I was able to see the factory tour and was not disappointed. Looking forward to the adventures she may bring. I live with my lovely wife on the beautiful island of Hilton Head. We share our house with an unfriendly cat whose name is Pearl. I have a goal to be an average golfer, far from reaching. Hoping to visit golf courses around the nation in my travels. First time travel trailer owner and finding excellent guidance in this forum. I’m looking forward to our shared experiences and hope to meet some of you along the way.1 point
-
Happy ending! We are fully charged thanks to a friend who has a 30 amp outlet at his home that he installed years ago for his motorhome. So very thankful for good friends & fellow Oliver owners. Chris1 point
-
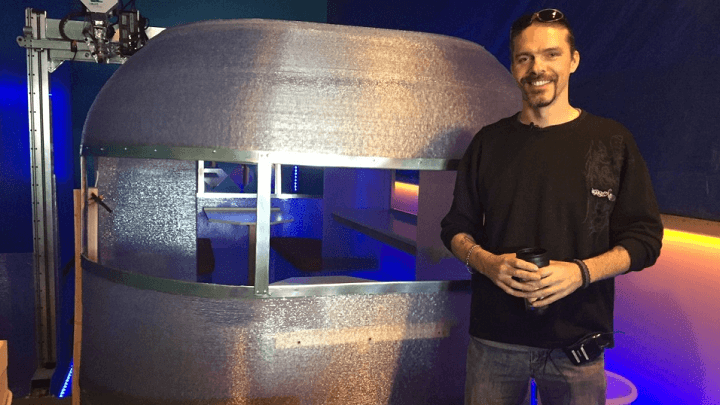
This little camper is 3d printed by a group in Saskatoon, SK, Canada. Cute as a button, it's also a new world record for the largest item ever 3d printed in one piece. Congratulations to Create Cafe 3d printing. The camper took about nine days to print. It will be on display in Saskatoon if anyone is going that way this summer. They plan to create two more slightly larger models of their camper, the Wave. 3d printed camper
 1 point
 -
I don't think that the copper would split in the tank because there is no pressure on that line, if someone did let the tank get cold enough to freeze, it would freeze in place and maybe expand a touch, as could the pex and the tank would probably split... Either way, letting the tank freeze with water in it at the rear is a bad idea, by lowering the tongue either back to level or forward a bit after draining the tank as low as possible, the remaining water would be out of the area of the dip tube anyway leaving no way for any accidents.1 point
-
When I first looked at this problem and was working on a solution, I quickly gave up on using the existing tank fittings because of the poor access. John's fix using the upper fitting helps to get around this problem. Dave had already come up with a copper pipe formed into a Z, sort of, shape to fit through the existing holes and then lay on the bottom of the tank. That seems like a good idea too, but hard to install in that lower fitting, in fact, next to impossible to install. The use of 1/2" PEX (5/8" OD) means it's too big to fit through the hole and John had to enlarge the hole to get it through. Another method would be to use 3/8" PEX (1/2" OD) or 1/2" copper tubing. And then adapt back to the 1/2" PEX outside the tank. John's curved copper example is good, but the bend is too sharp to make the corner. A hand formed 1/2" copper dip tube 90 might work very well if someone wanted to use copper instead of PEX. I debated between using copper or PEX for my dip tube coming in through a fitting on top and decided that copper was best for me. I was able to make the holes in the pickup so close to the bottom of the tank that mine will draw down to 6% before getting air and will struggle on down to zero percent with some bubbles. Those plastic PEX fittings that seal only with an O ring against the outside of the tube seem barely good enough and may leak with the sloshing water and vibration while driving. The drilled out brass fittings John used are much better. And they can be easily taken apart if needed. I want to re-stress that the tank fittings, especially the ones from the factory, are not very strong and can crack if the fitting is screwed in too far. Be careful! When using the copper crimp rings to connect the valves or splice the tubing, the tool can be cumbersome and hard to get in place. Lowes sells another one called a "pinch ring". The tool for these is more compact and works well. The rings are also stainless and can be removed easily if needed.1 point


-
Recent Achievements
-


")


")


")


