Leaderboard


Popular Content
Showing content with the highest reputation on 08/30/2019 in Posts
-
Hey Raspy.....or John......Thanks for taking the time to write all that. Not to sound like the ungrateful new guy, but none of that is new info to me. I do appreciate hearing it from an X oliver owner though. Its not new because I spent a fair amount of time at the dealer in Bozeman checking out the Black Series and communicated a fair amount with the company in LA. The biggest thing right off is the cold weather issues. I'm not talking cold either, I'm talking winter almost anywhere in America other than far south. This thing will freeze up during travel in North Florida in Jan! If they weren't asking for all the money, it might be worth it to me to come up with a closed in basement with ducting and all that jazz, but I think we all know it would be a nightmare trying to get an actual air sealed finished product not to mention it would be just as inefficient as any other cheapo RV in the US. I don't think the Oliver is particularly well insulated but there is nothing on the market with better air sealing, which anybody that has built homes in cold climates and pays even the smallest amount of attention to modern building science knows is the most important thing. That said, I am a little skeptical of how the Oliver will perform in actual cold weather. They play the "R" value game like every other company in the RV industry and the building industry. The thermal bubble wrap style insulation (reflectix) is a hoax. It might help a tiny bit in reflecting heat if it was exposed and used in conjunction with actual insulation, but by itself between walls its almost useless. In other words, science has not invented anything that takes the place of wall thickness which is why every single RV will run the furnace non-stop in cold weather. Its why my last three rvs have had small wood stoves in them so that we could do late season Elk hunts when it often drops well below zero. Since there is very little sun that time of year its either burn a fire or run a generator or have a $10k lithium bank and extra propane tanks. That said, the Oliver is air sealed and has a thermal air break between the inner/outer shells, hopefully it does an ok job at least not losing heat. The other problem with RV's is that there is no real thermal mass to hold heat so you just end up constantly heating the air which is getting the heat zapped out of it by all the cold materials in the cabin. With a wood stove, it holds heat so even on very low settings you get some actual radiation which is ultimately what provides comfort. Ok, rant about cold is done, but thats a main reason I'm not going with Black Series but I also remain skeptical of the Oliver so if you've done any camping even in the teens I would love to hear anybody's performance reviews. I think the suspension, hitch, outdoor kitchen, etc are all awesome and like you I'm sure, its what drew me to the brand. BTW, Jayco started making very similar units in Australia. If they introduce them here I think they'll crush BS. https://www.jayco.com.au/promo/adventurer Towing. I think unless you have a full size diesel, these things are going to be a bastard to pull. Even with a full size and the trick suspension, I think they'll buck and sway, especially the single axle models. I don't think they paid much attention to towing behavior just based on where they mount their holding tanks which also has me skeptical of their tongue weight specs. They are also just heavy in general across the line and I'm not 100% sure why. I'm sure the chassis is a pig but I guess cabinets and everything else. Lux. I agree completely that the layouts, full shower, finishes look very nice and liveable. However if you look closely with an anal eye, the fit and finish is similar to other cheap RV's. Plumbing, electrical, etc. You are right about the charger/inverter and electrical components in general. I also feel Oliver has quite a markup on some of the upgrades, not all, but for most people thats fine because they get the unit ready to go. I don't intend to get many upgrades, I plan to do them myself. For example, Zamp does not offer a MPPT controller and at 340 watts, a 20% gain in panel performance starts to make a lot of sense. Upgrade to 510w and you're leaving a lot of power in the sun. The inverter upgrade is a good efficient (.8 non-load draw), but its a $375 inverter that would take 20 minutes to wire in, Oliver gets $1200. Again though, 9.9 out of 10 buyers will never need anything more and the premium they charge is well worth it for them to have it dialed from go. A combo victron charger/inverter is how they should do it and just make it a standard feature, but I guess some people want to save the $1200 if they're only gonna plug in at campgrounds so I get it. Must be hard to create value for all types of buyers. I don't even know what I'm writing at this point, I'm just writing so sorry if its unorganized thoughts. Another thing I really like is the narrow egg shape design. As much as we're way off road a lot of the time, there is also inevitably going to be a lot of highway time, especially on shotgun runs to BC and Alaska for our beloved Sockeye runs. Or cross country to Florida for some lobster diving. Obviously fishing and hunting dictate our lives! Now even off road I find the narrower camper to be a huge plus for getting into tight places. Lets be real, unless you're a crazy SOB which maybe you are, at the end of the day a 23+' trailer is only going so many places. I am a bit hesitant with the Oliver because of that, but a good amount of their length is the rear bumper and long tongue. At least with a 7' wide body and the long tongue you can get that thing cranked over pretty good on those tight switchbacks down into some secluded mountain lakes and rivers. When my wife and I sold our business in 2012, we traveled in our truck camper with cargo trailer for 3 years. We thought back to all the places we camped and could only come up with a handful where we don't think we could get the Oliver in but if we couldn't we could camp close and drive in. Not the same but the sacrifice for some extra comfort and storage capacity. Ok, not sure I addressed everything you said, probably not. But now you know how I think a little so you can run next time you see me post! I appreciate the input and congrats on the HQ. Its a badass unit that I for sure lusted after for a while, but once I really looked at what I needed I just don't think it will fit my needs. I cant wait to see one being hammered on flying past me on a dirt road!2 points
-
Due to where the exit port is on the grey tank (rear, street side) I've found that by significantly raising the nose of the trailer (easy to do on an Elite One) and tilting towards the street side (battery side) I can easily drain that tank in 3 minutes, or less.2 points
-
https://www.harborfreight.com/automotive/jacks-jack-stands/bottle-jacks/8-ton-hydraulic-bottle-jack-96648.html Don’t stake your life on it, use this under the closest frame and run your stabilizers down as a backup. I do it the other way around..... just an hour ago I lifted all four tires off the ground for a pre trip bearing check. It took all of two minutes. The onboard jacks are perfectly fine when used prudently on level pavement. John Davies Spokane WA2 points
-
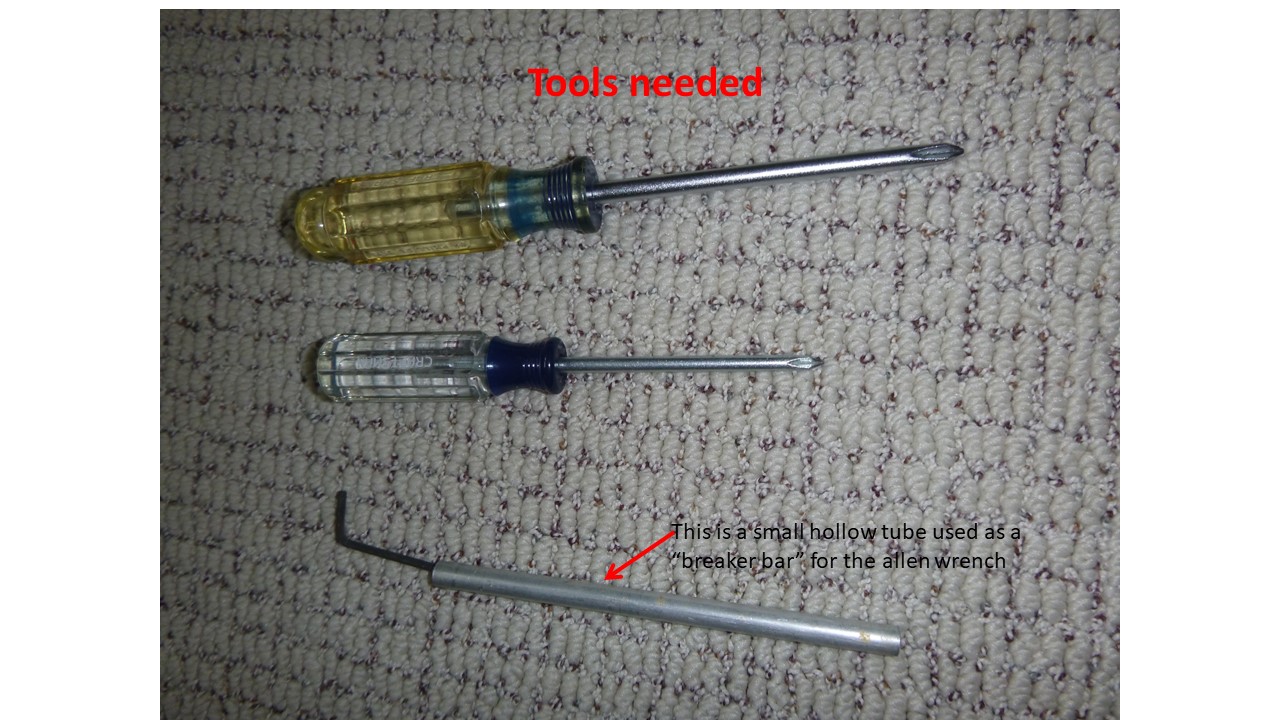
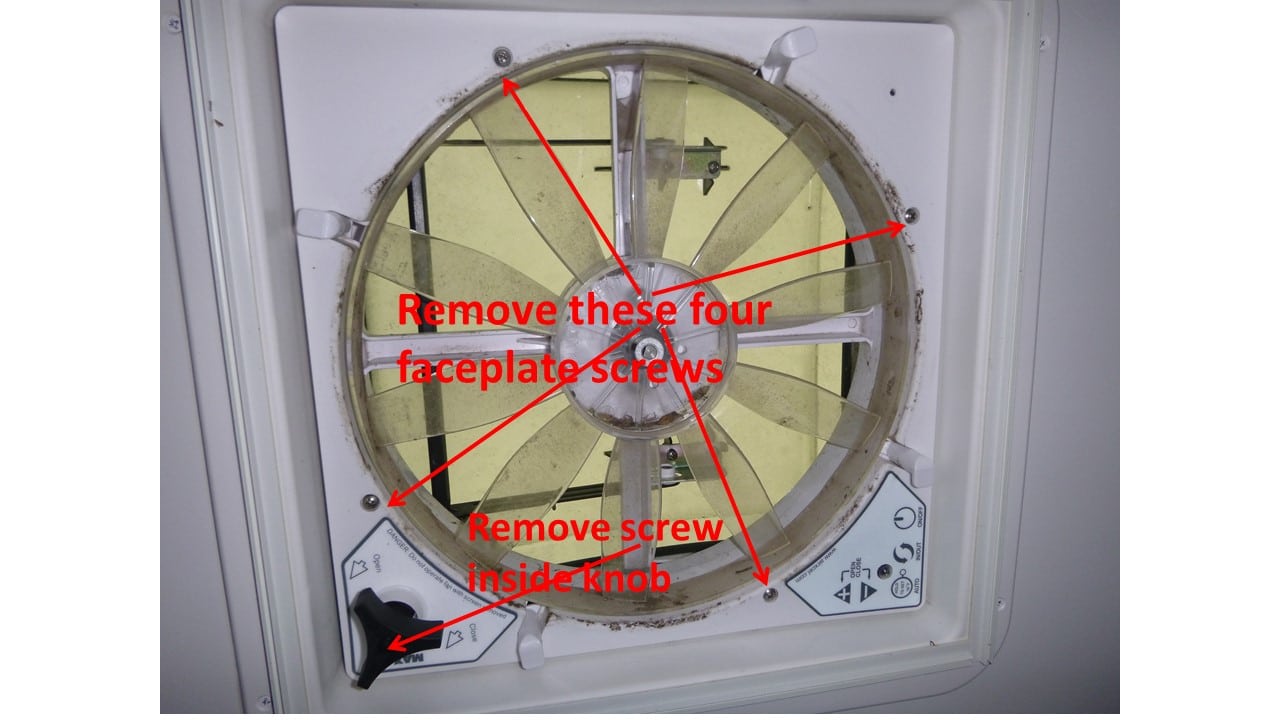
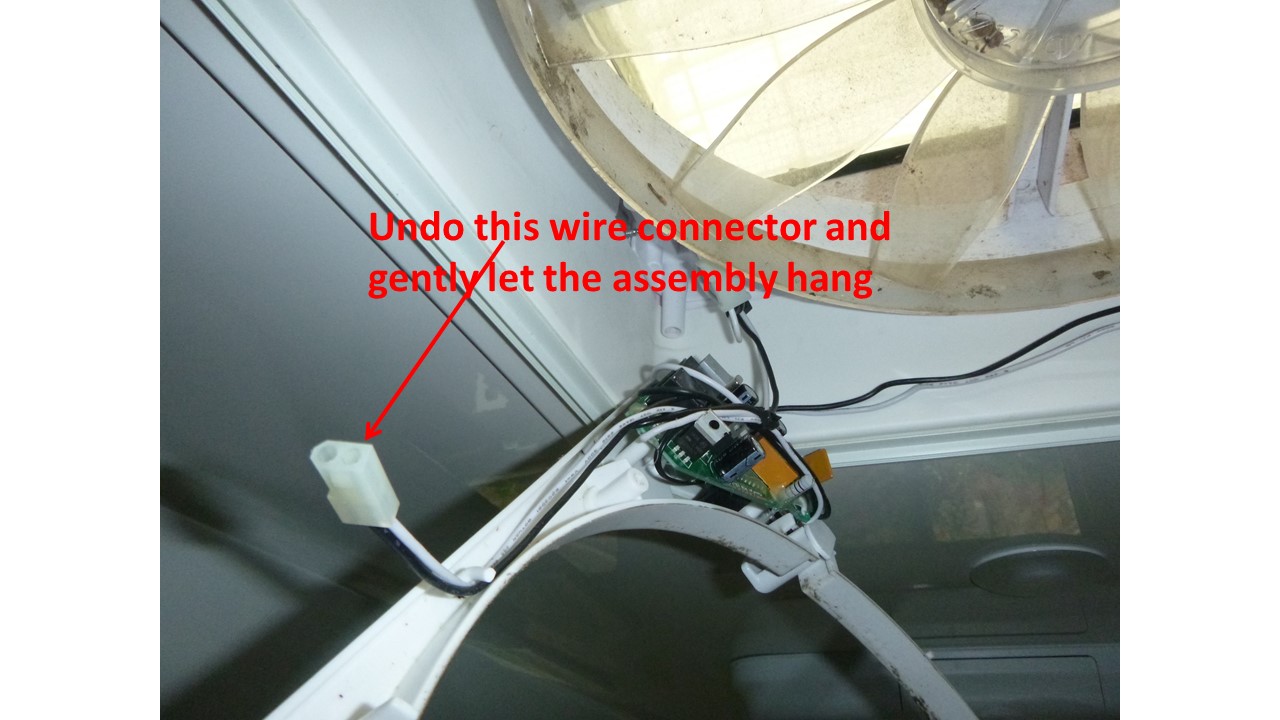
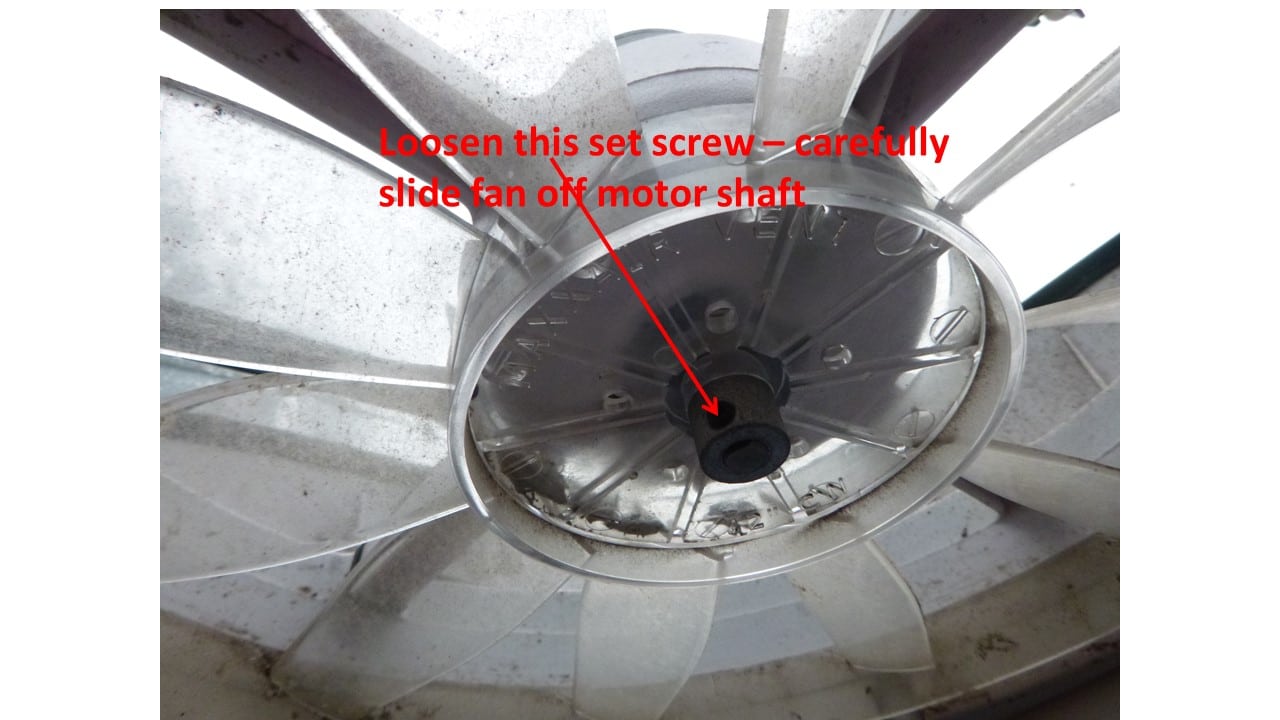
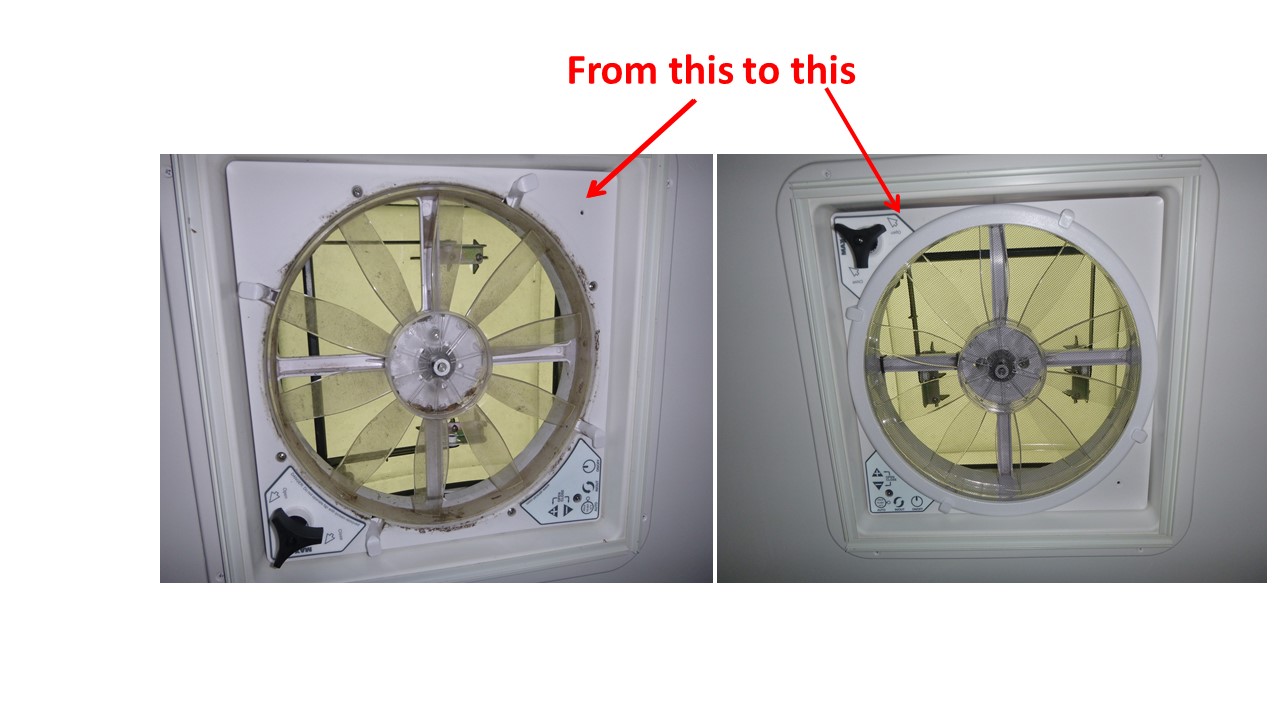
Sometime ago I presented a Mod where I installed a black filter material on the MaxxAir Fan in order to reduce light transmission into the interior of my Oliver. I thought an added benefit of this mod was that the filter material would keep the fan somewhat cleaner than it would have been otherwise since normally I only use the fan on the exhaust setting. While in Montana this year I noted a "couple" of insects that were trapped on the other side of the filter material and a few days before heading home the fan developed a ticking sound - particularly at slow speeds. So, I figured I'd remove the filter, fix that ticking sound and clean the interior of the fan for the first time in four years. Upon removing the filter material, I was totally surprised with the number of dead bugs and the nastiness of the fan. Since the MaxxAir frame is caulked into place (along with four screws) onto the inside shell of my Oliver, I proceeded to remove what I could of the fan without a total removal. Here is how I did it: 1 – Remove the screen by turning the four plastic “tabs” 180 degrees either to the right or left. 2 – Remove the inner face plate – the one with the controls and knob that is used to manually open the exterior cover (see picture) by removing four screws plus the screw in the center of the black knob. Disconnect the electrical connection noted in the picture and gently let the faceplate hang in place. 3 - Remove the fan using an allen wrench (3/32 I believe). In my case the set screw holding the fan to the motor shaft was either put on by a gorilla or had a bit of corrosion which caused the set screw to be difficult to loosen. I put a couple of drops of “Liquid Wrench” on the threads of the set screw, let it set for a few minutes and then used a small piece of tubing as a breaker bar as a help with the small allen wrench. Be a bit careful here with the force applied - you do not want to strip the inside of this set screw. Also be careful with all plastic parts in that they are easy to break. 4 – Clean and dry screen and fan. I used “Simple Green” cleaner and a soft brush to clean both the screen and the fan. The fan was then wiped down with the same mixture I use on the interior of the Oliver – 4 parts Duragloss detailer with 1 part Duragloss liquid wax – in order to give it a nice clean shine. 5 – Clean the inner face plate and clean all other interior surfaces of the MaxxAir. Again, I used this Duragloss mixture. 6 – Re-assemble all parts in the reverse order. Note that when re-installing the fan on the motor shaft, the fan set screw should be tightened against the “flat” surface on the motor shaft. Do not over-tighten any of the screws that go into plastic! Snug is sufficient. Don’t forget to re-connect that electrical connection that was disconnected in step 2 above. When re-installing the screen, if the four plastic “tabs” were originally turned 180 degrees then the screen should easily slip back into place. These four tabs can then be turned back to the original position into the indent on the face of the plastic on the screen. Do not force these plastic tabs, they are snug but finger pressure is all that is necessary if they and the screen are positioned correctly. 7 – Turn the fan on to make sure that all is well. For what its worth, the “ticking” sound was caused by a little label (serial number and model of fan) becoming partially un-stuck from the interior side of the fan housing. As the fan would rotate, the blades would hit this label causing the noise.
 1 point
 -
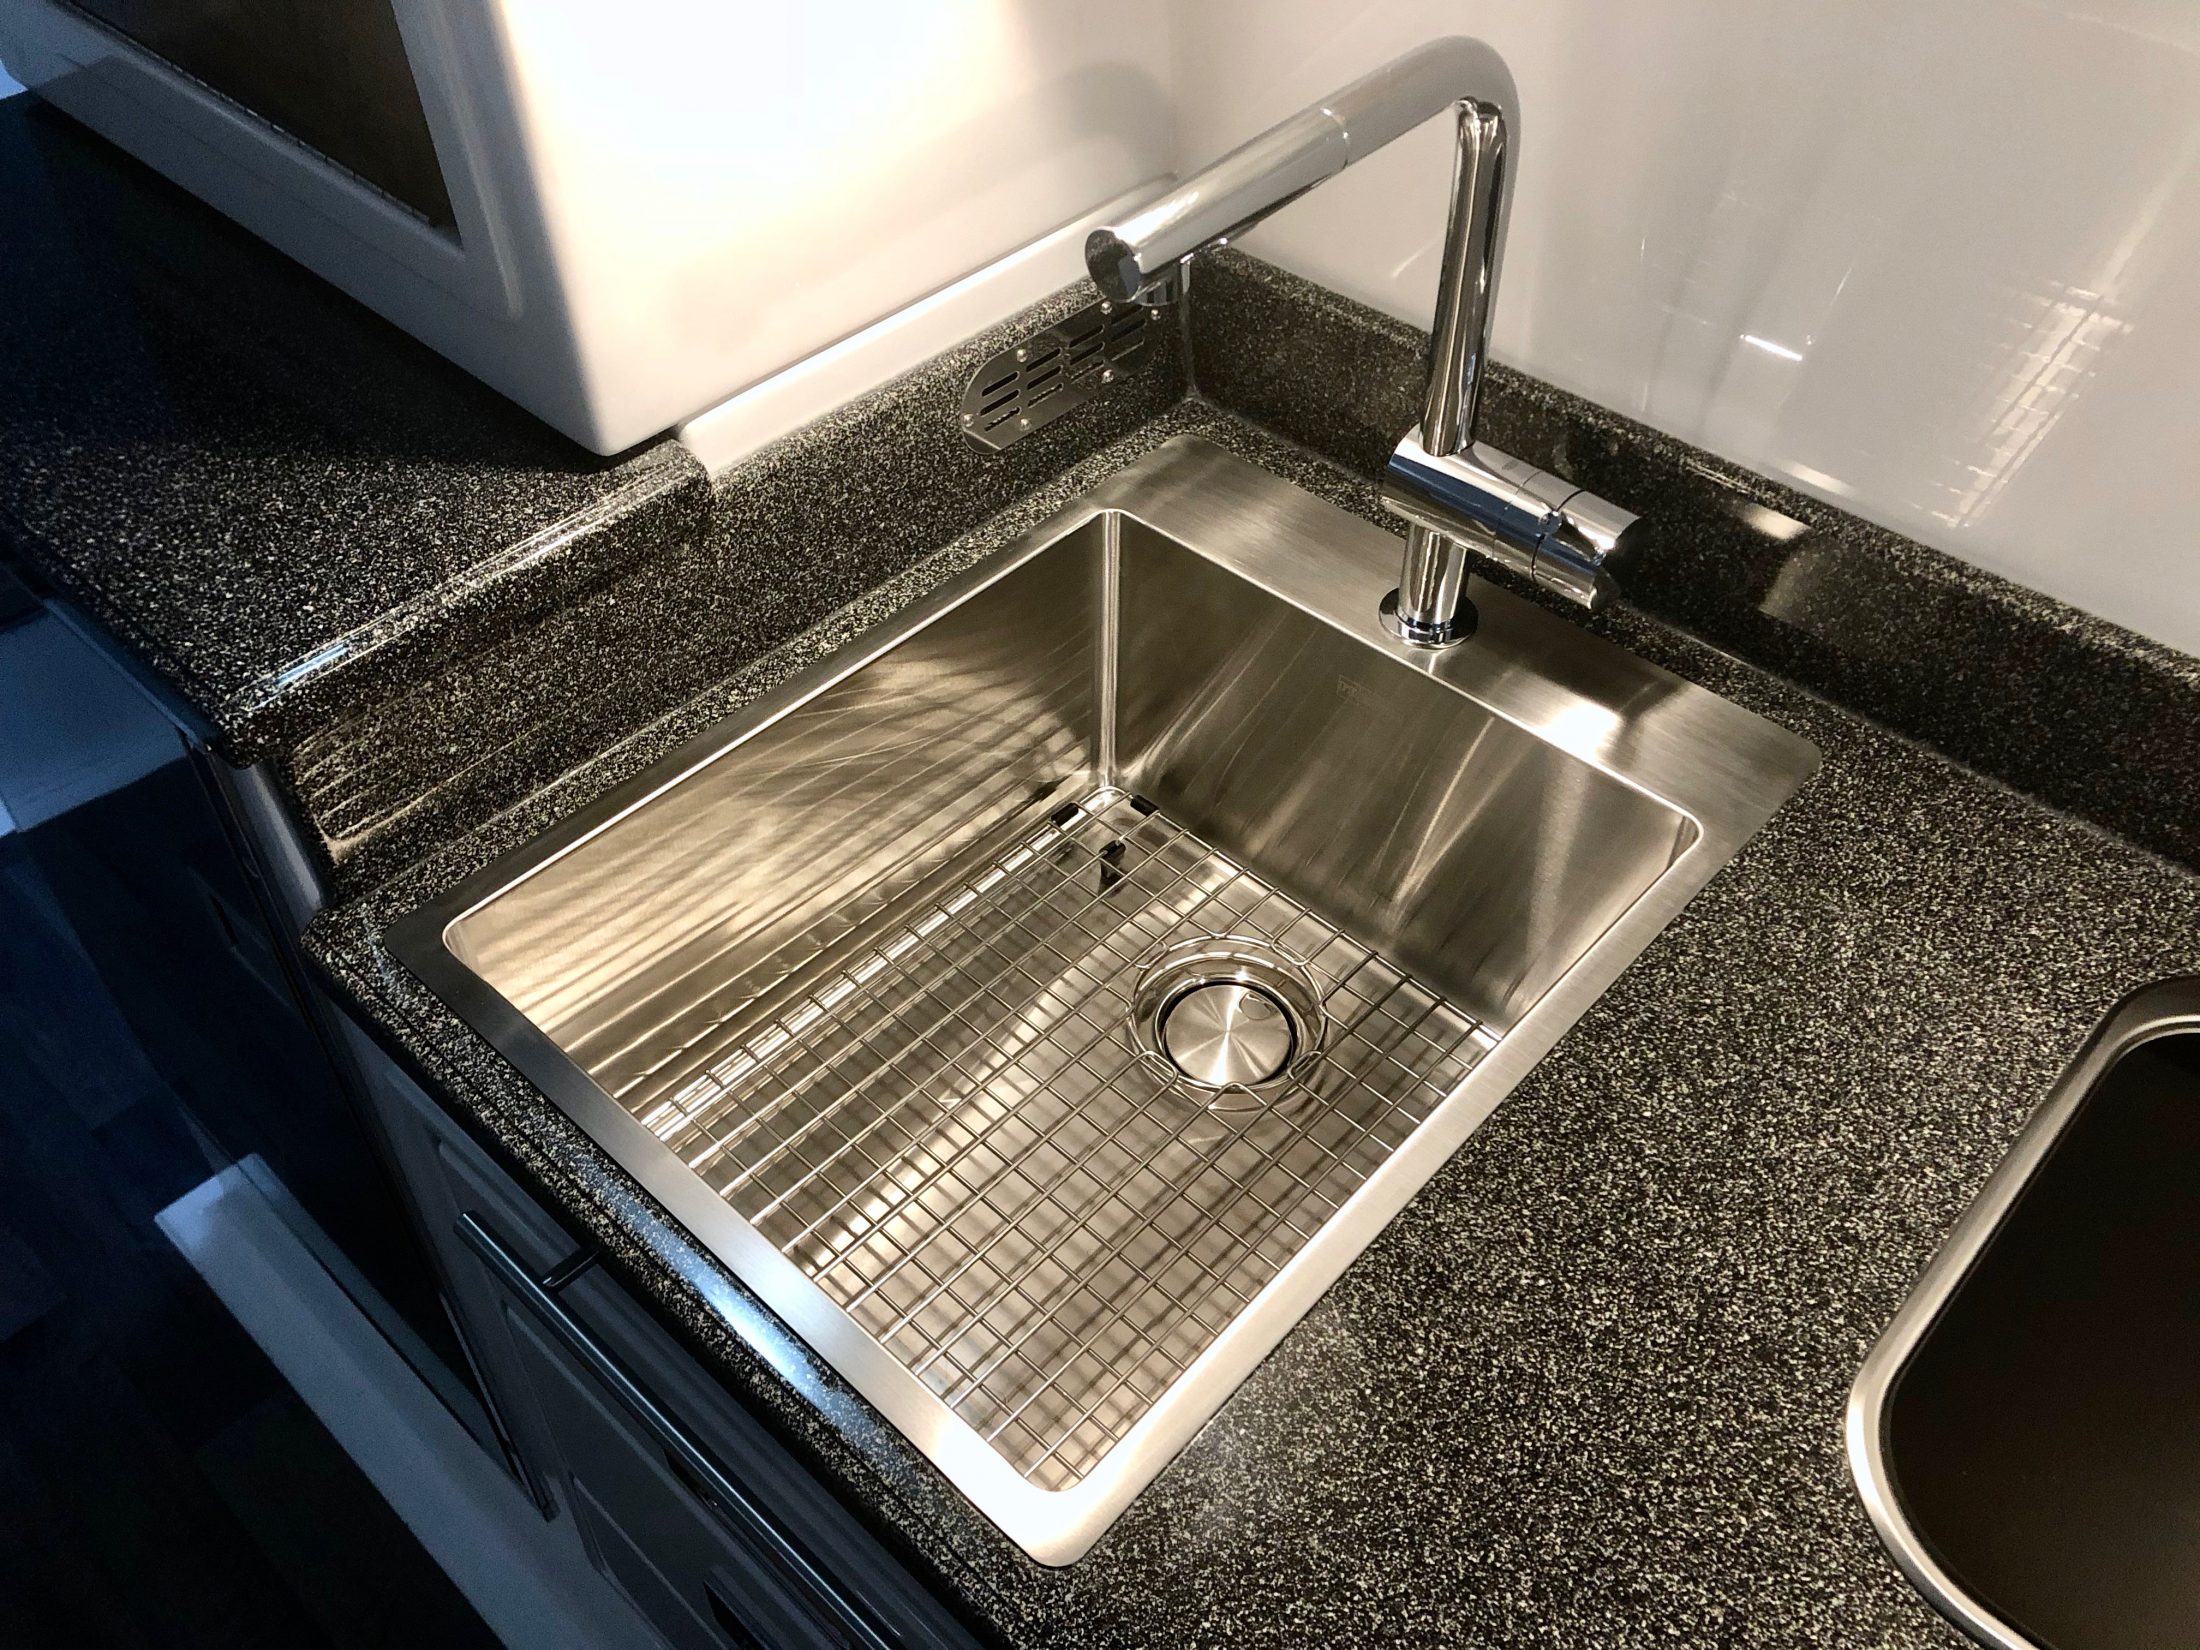
This, I like - I never cared much for Oliver's sink and faucet choices and I'd actually planned to supply them a sink and faucet to get installed on the line. Unfortunately the one I wanted wouldn't work and I was having trouble getting the proper dimensions from Oliver, so I just let it go and figured I'd replace it later. Well, that was a good idea until I realized that the cutout Oliver made for the sink was way too big for any of the bar sized sinks that I could find. And all of the full sized kitchen sinks were too big to fit. But finally I stumbled across this oversized bar sink from Franke. It's the 17" Franke Vector. Overall, it's the same width as the existing sink, but the lip is narrower, so the bowl itself is a bit wider. Mainly the sink is much longer and deeper. In overall volume, it's over twice as large as the original sink, but takes up no more counter space. Can't beat that. And because it's farther forward and 3" deeper, it doesn't splash all over the place like the original. In fact, I can even turn the faucet up all the way without it splashing over the front of the sink, which is novel. I like the Franke sinks in that they have the straight sides and look of a modern zero radius sink, but they do add a slight radius to the corners so that you can actually keep them clean. Installation wasn't too hard. I'd rate it 7/10. The difficulty was that I had to modify the base cabinet for it to fit. There's a wood brace running across the top front that is screwed to the fiberglass beneath the drawer trim, which had to be cut out, and also a portion of the left side of the cabinet. That sounds like a lot of structural support to remove, but the cabinets are mainly tied in at the bottom and I ran it past Jason beforehand to make sure I wasn't looking at it wrong. I have to say that the cabinets are stoutly built, and I'm not at all worried about it. The second problem I ran into was that my countertop wasn't perfectly flat. It bowed down in the middle slightly which wasn't apparent until I installed the sink. But I was able to temporarily shim the counter against the top of the cabinet while the silicone seal dried and then I glued PVC blocks around the perimeter of the sink to both hold it in place and to level the counter. The Franke sinks have an odd installation clip that wasn't designed with hollow core fiberglass in mind, so the blocks were necessary anyway. It's not going anywhere now. Of course I lost use of the flip out drawer but I hated that thing anyway. I glued a few ½" blocks to the front of the sink and then fixed the drawer front to the blocks with heavy duty velcro, just in case I ever need to remove it for some reason. The sink depth worked out perfectly with the existing cutout on the back of the middle drawer to clear the drain. I thought I was going to have to get a Hepvo trap to make it all clear but Oliver actually places the trap behind the cabinet, so no problem. I did have to get the narrowest profile elbow I could find to attach to the drain basket, so I had to go with cheap plastic rather than PVC, but such is life. At the end of the day, however, I decided to use a different drain basket that was a bit deeper, so I had to make the drawer cutout about a half inch deeper after all. The faucet is a Grohe that I found on sale at Home Depot for about half price, so that was a nice find. It has a really nice feel to it and unlike the sink, was a cinch to install. Grohe has a trick installation method that allows you to work from above so that one person can do it without crawling under the counter a hundred times. Oliver's hot and cold lines are convenient to get to and there's an access panel in the back of the cabinet that can be removed if you need more room to work. The only issue I ran into was that the counterweight for the sprayer was getting caught up on everything that's packed in the back of the cabinet. To fix it, I made a tube from some flexible plastic sheeting that I had lying around and just slid that over the sprayer hose. Now the hose slides easily inside the tube and as a benefit, the weight won't bang around inside the cabinet while traveling. So that's about it. I've learned that I don't have the patience or foresight to take progress pictures Like John does, so my description will have to do. But I'm happy to answer any questions.
1 point
-
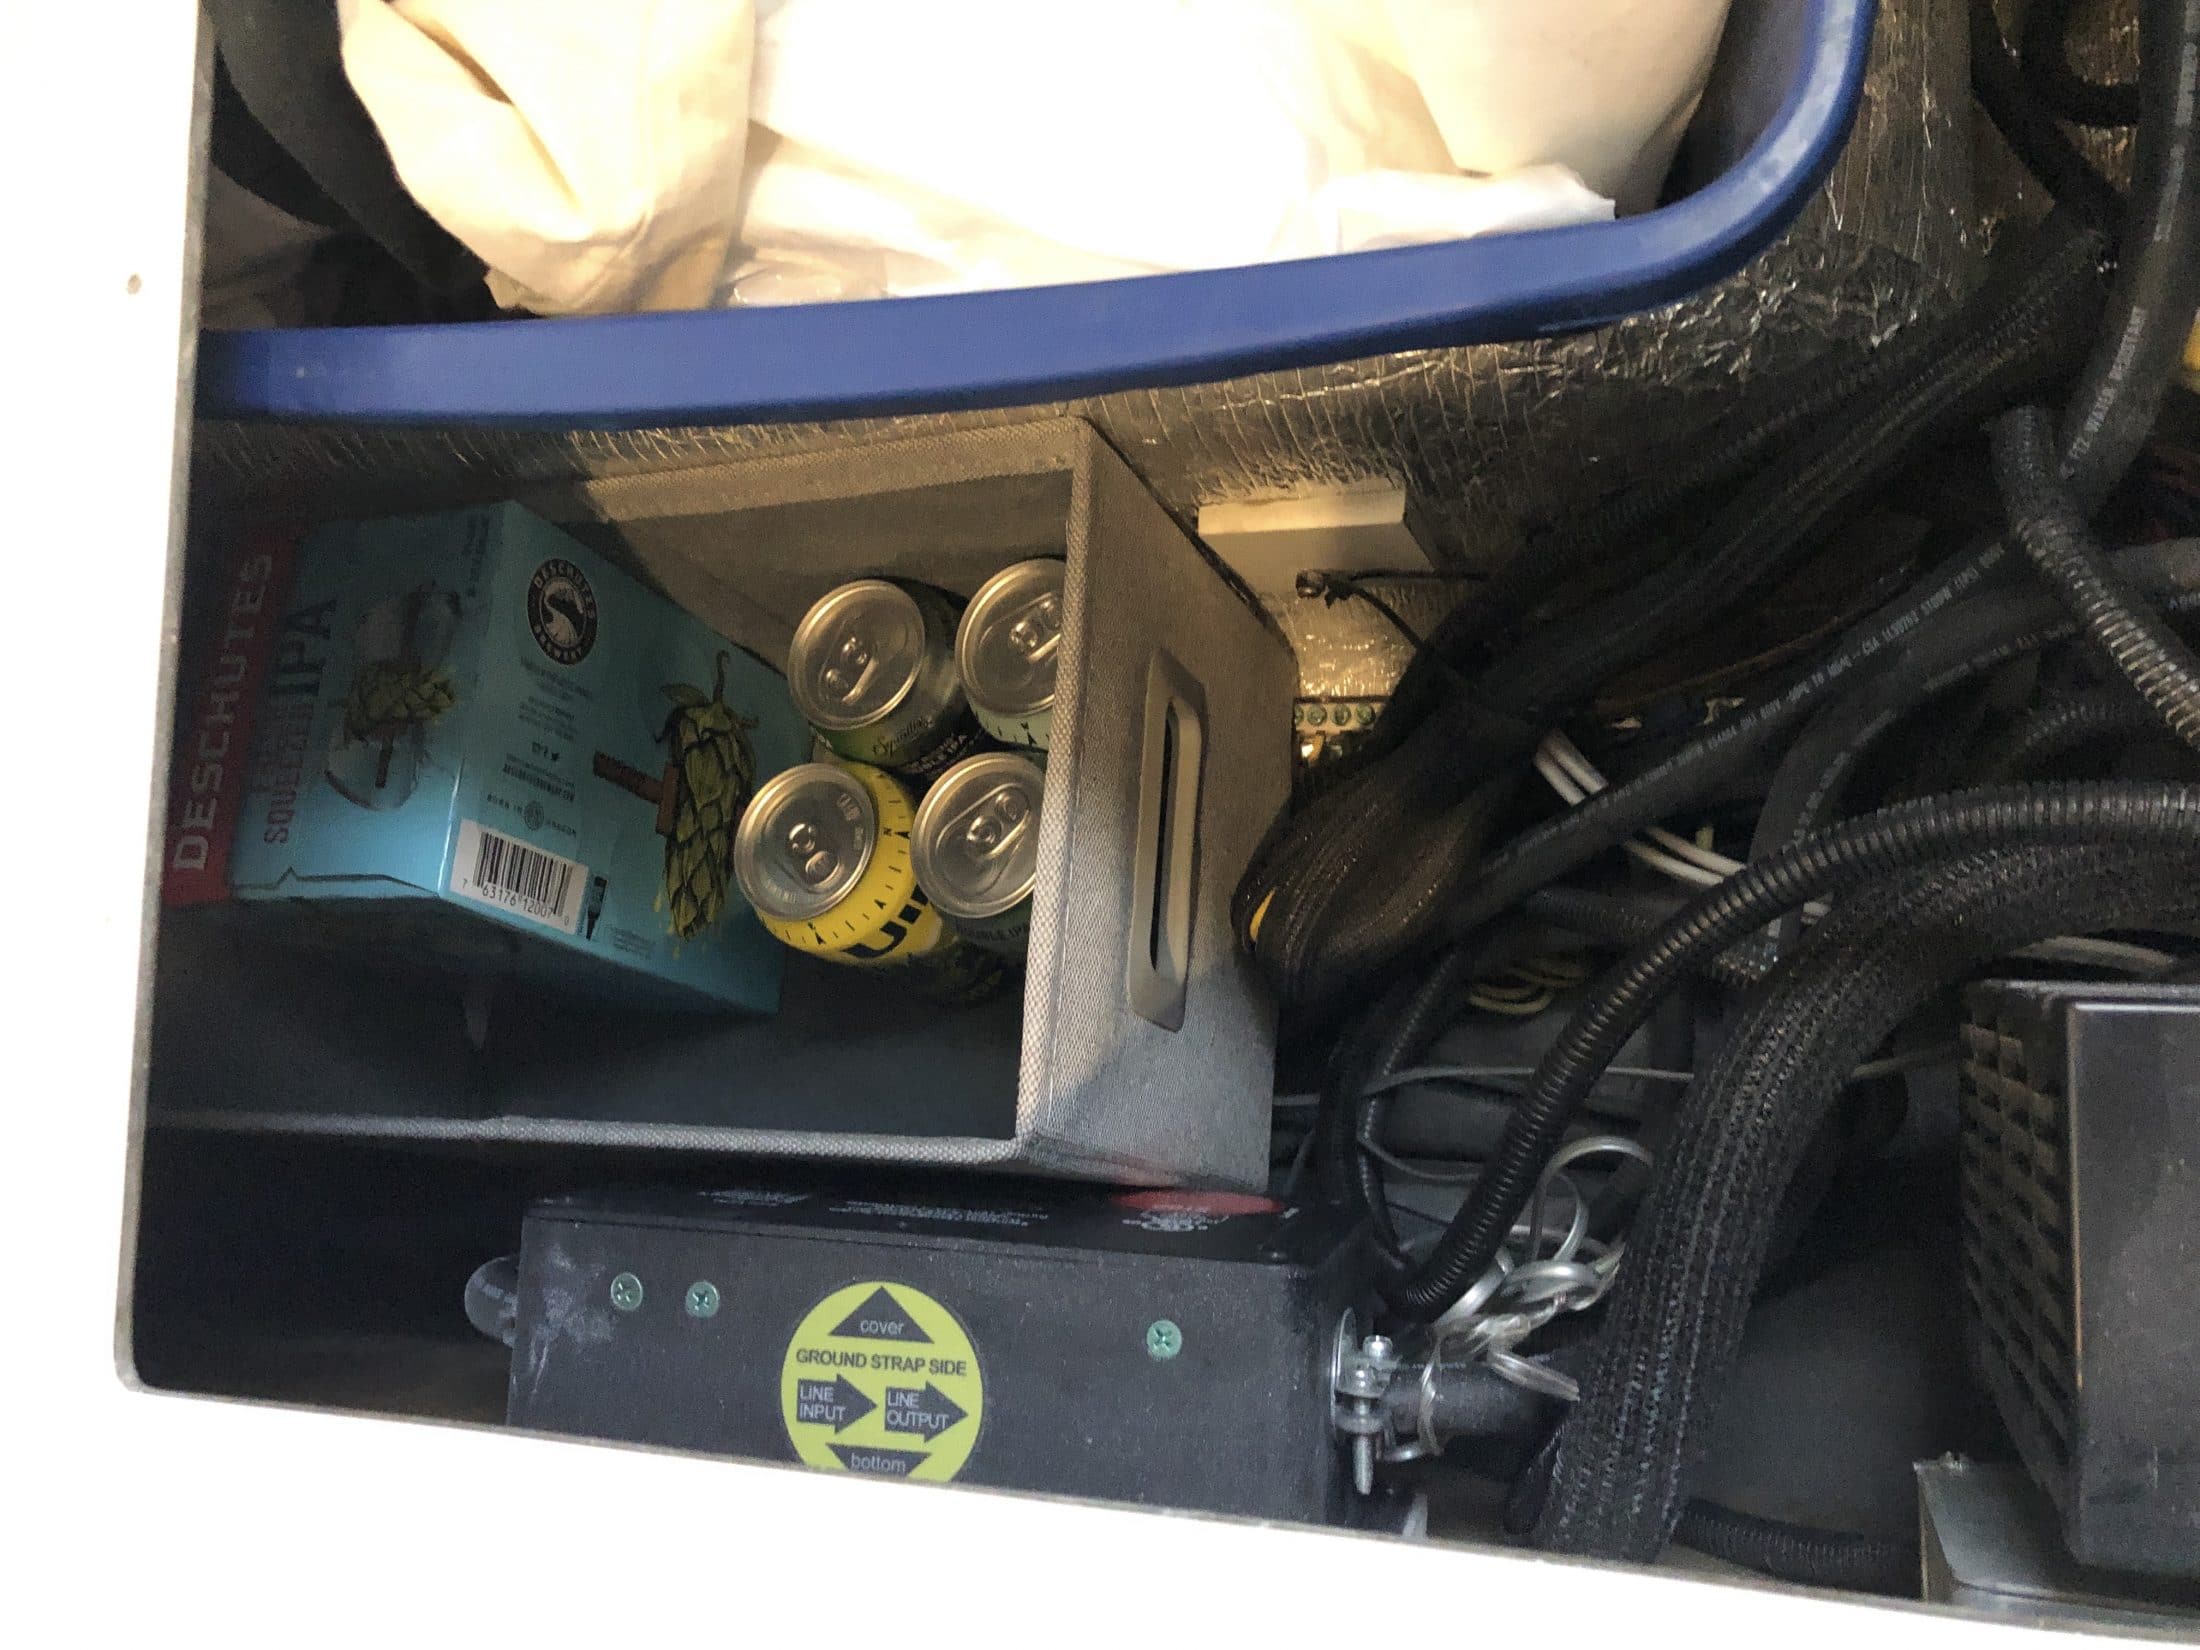
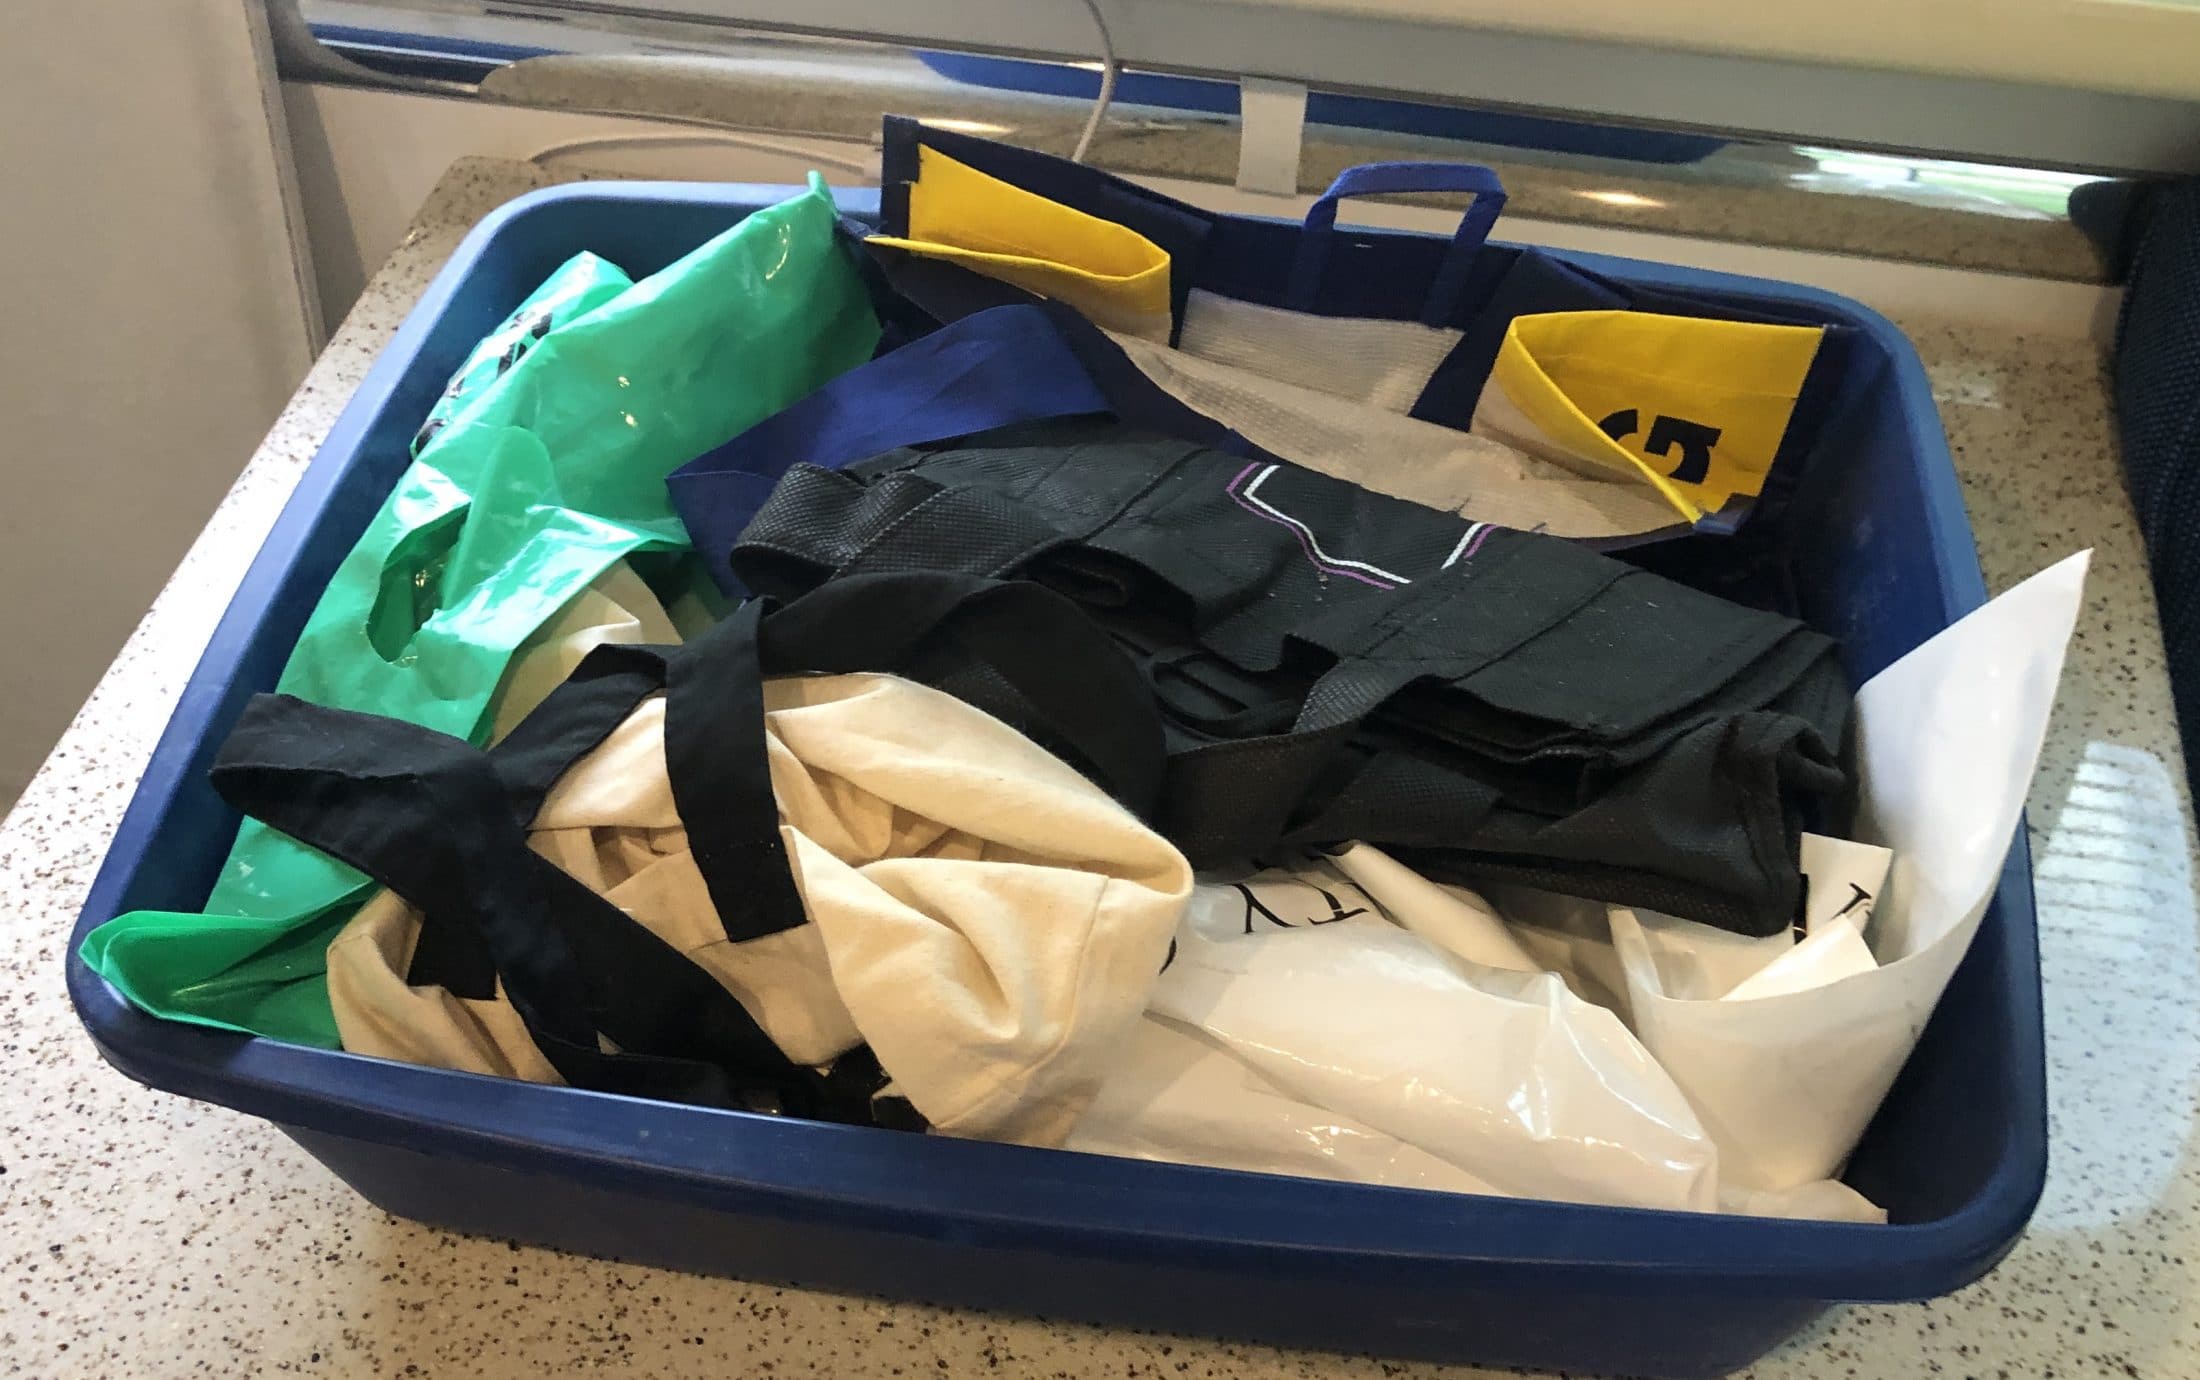
I decided to move the remote display for the surge suppressor to under the dinette, using mountainoliver’s method. When I did this, I looked at the space under the rear dinette seat and decided that I should try to use this space for storage. There is a lot of wiring in there, so I did not want to just put stuff in there on top of the wiring. I wanted to put a container in there so as to not interfere with the wiring. I measured the area and decided the maximum for the container was 8 inches wide x 15 inches long x 12 inches high. I found that the Container Store’s web site, in the storage section, has a nice filter in the sidebar where you can put in minimum and maximum sizes for each of the three dimensions, and then they show you what products meet that criteria. Using this I found the Light Grey Poppin 3x2 Storage Bin that measures 8 inches wide x 13 inches long x 8 inches high. Pretty close to a perfect size. The container comes folded up; you unfold it and place the bottom piece in to give the container some rigidity. It fit perfectly in my trailer. Fortunately, the container is not rigid, and if the fit were a little tight, you could trim the bottom piece to make it fit. It is flush up against the surge suppressor; I checked the instruction manual for the surge suppressor, and it does not have any warnings about providing cooling space around the unit. So I think I am okay. On this trip, I am storing extra beer in this compartment. BTW, the picture also shows a flat blue tray sitting on top of the wheel well. In this tray I keep the folders Oliver sent with literature and a DVD for prospective buyers that I show Ollie to; I keep some canvas tote bags on top of the folders.
1 point
-
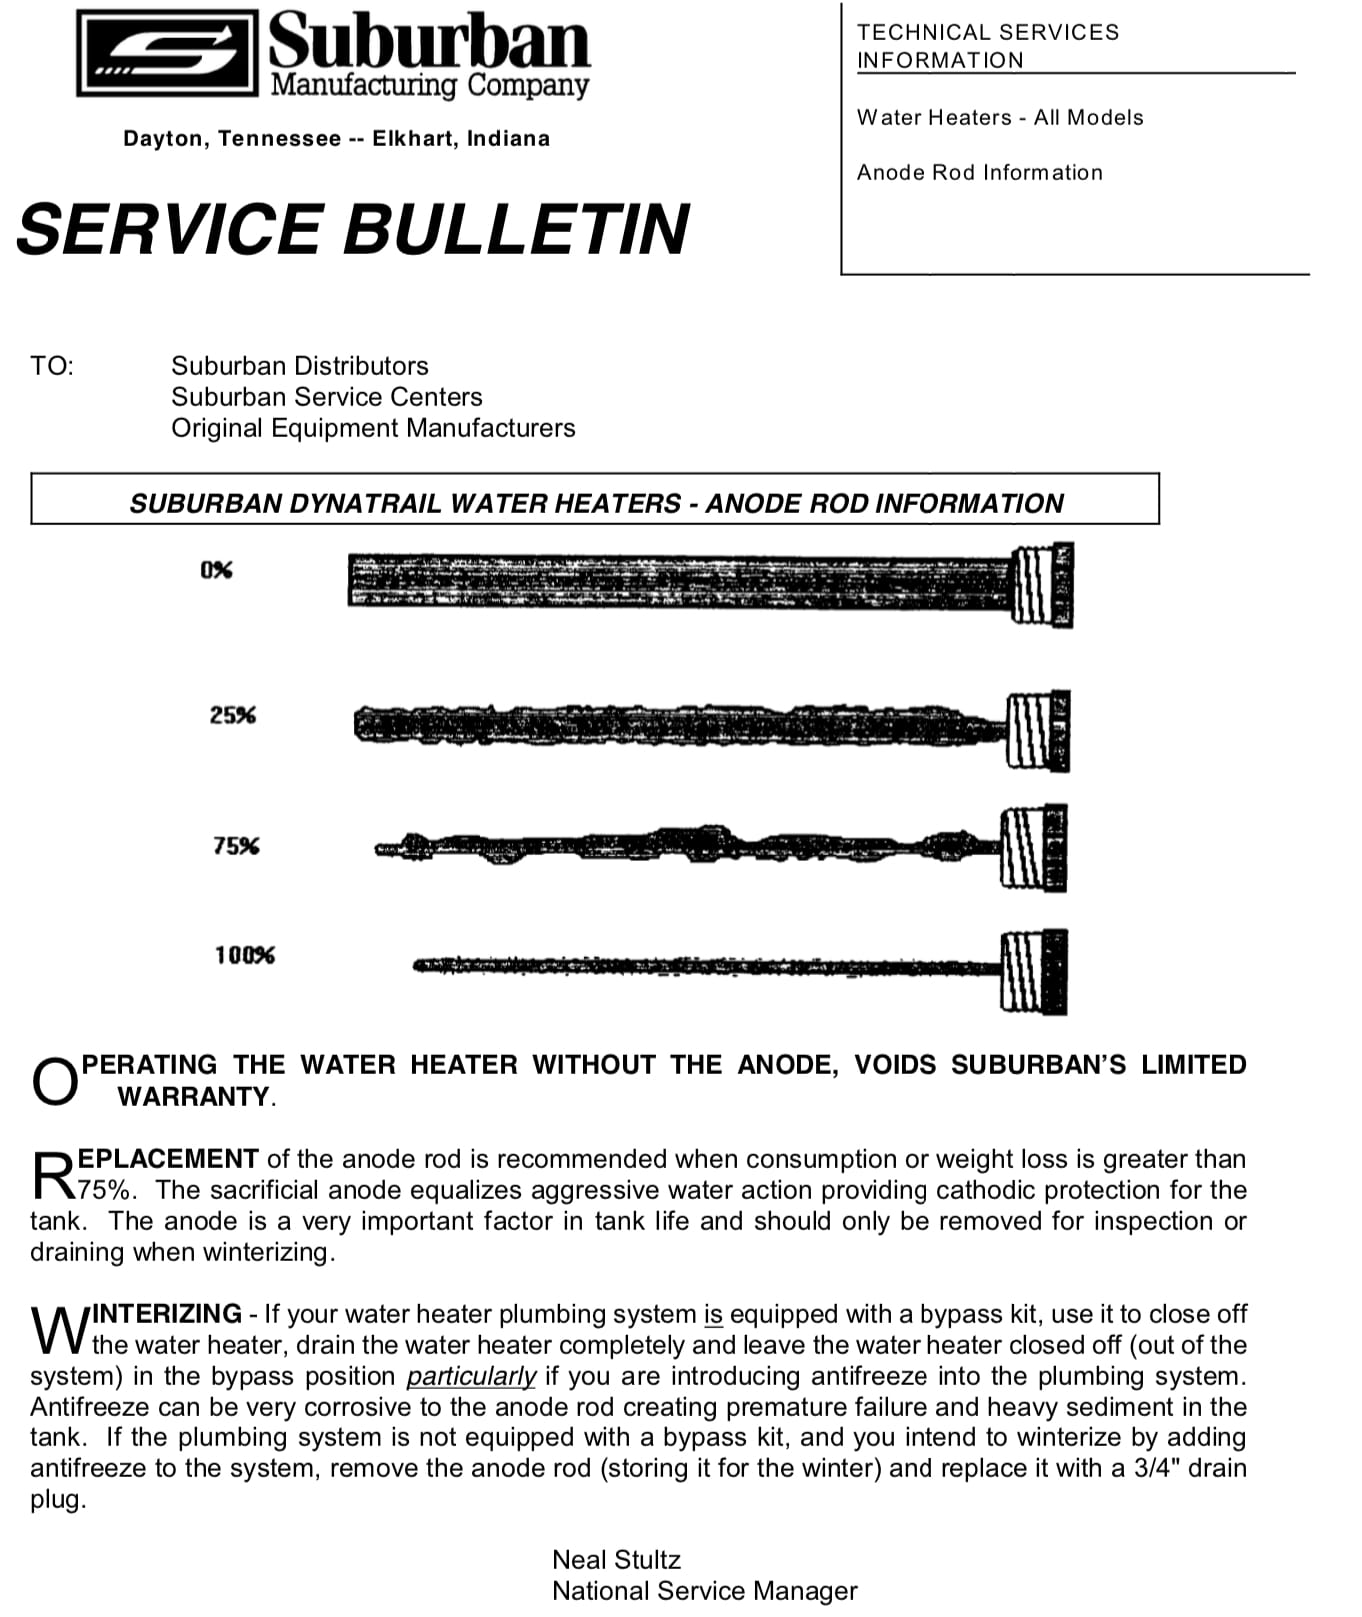
Found this, it indicated that the anode can look pretty darn scruffy and still be entirely serviceable. Just because it has some holes, don't toss it. They are not cheap. EDIT 08/29/19 ... this old thread lost its picture. http://www.chinookrvclub.net/careandmaint/anoderodinfo.pdf John Davies Spokane WA
1 point
-
John. All I can say about the rock sliders is that they are better than nothing. But they are not as strong as they could be, or should be, from what I can see.1 point
-
ahattar, You and I are pretty much on the same page. All trailers are a compromise. Some years ago I finished out a 42' fiberglass ketch, from a mere hull and deck, to a finished sailing yacht that I sailed to Mexico and back, among other places. The electrical plan that I devised turns out to be just what Black Series did and it worked very well for me while being simple. I've had three "stickies" and the electrical systems were all disappointing. The Oliver has been trouble free, with the exception of a couple of bad connections and a missing grounding cable to the frame, but I think the inverter/charger design is the way to go and should probably be standard equipment. The biggest drawback with the Black Series is freeze protection. I spotted that right off and had to resolve how to fix it sufficiently before committing to the trailer. Fixing it requires some work and expense, but I think it will be fine when I'm finished. Here is how I plan to do it. 1. The dealer, RVs of America in Lindon Utah, is installing a "winter package". This includes all insulated piping underneath, tank heaters and tank insulation. This is not the ultimate answer and would certainly not be sufficient for very cold weather, but it will help with what we do. 2. I am going to install a recirculating hot water system that will provide two benefits, while being very simple. The first thing it does is give instant hot water at the rear shower and sink, to save on water usage. The second thing it does, when turned on, is provide just enough heat to the lines, both hot and cold, to keep them from freezing. This draws about .5 amp of DC and will recirc water from the water heater to fight the cold. It will cause the water heater to fire up occasionally, but that's fine as the main energy source will be propane and not electrical. I also plan to put low point drains on wherever needed so I can leave it parked at home in the winter. Previously, with my stickies, I would simply hook up a compressor to the shore tie water port and blow out the lines. Then leave an oil radiator style heater set low inside. This worked for years. My Oliver spent winters in the garage which has radiant heating, so winter freeze protection for it was not a problem, but the HQ will not fit through the door. I'm towing with a Ram 3500/Cummins. Having enough power and weight in the tow vehicle is not a problem, but the HQ will be significantly harder to pull than an Oliver. I know it will cause a mileage hit with it's higher profile and 1,400 lbs more weight. The thing that really caught my eye with the HQ was the suspension. I will not be tearing across the desert at speed, but I have not been able to make a conventional leaf spring, equalizer setup do what it seems they should do, that is ride smoothly with little vibration. Going 60 miles or so into Death Valley on gravel rutted roads is not friendly to this arrangement. Every trip out there is painfully slow, or causes stuff to go flying, cabinets to open, screws to back out, window coverings and cushions to go adrift, and the microwave to try and escape. If I never strayed off the highway and paved roads, The HQ would seem like severe overkill. On roads, I'm sure the Oliver would be a much more friendly partner. Compromises, compromises. I'm sort of a restless type, I guess, and I also like the engineering aspect of designing and dialing things in. It's so much fun to be out there, have everything I need, and have everything working well. So we'll see how it goes. The whole Australian trailer concept seems like it will be a game changer over here. For years, I've been sorry we could not get stuff like that here. All the way through, there are differences in the trailers that make sense. It seems like every American sticky is just a variation on the basic theme, that are all built in Indiana with the same parts and at the lowest quality they can get away with. It's about time there were more options. Oliver has been a wonderful addition to the whole scene. Their frame and fiberglass work are outstanding. They are artists with fiberglass. Now, Black Series is a third option that is not a cheap sticky, and has game changing features. It's aluminum, but not fragile like an Airstream. Fiberglass is undeniably a fine material for trailers. And it has the advantage of being produced in such a streamlined shape. Me deciding on one, doesn't mean the other is bad. Thanks for your thoughts.1 point
-
One final wrinkle: "And the one in the rear I can turn 90 degrees so that there is extra space behind" On mine the rear width is just 17" -- so I cannot turn it 90 degrees. Also, the width at the crook of the L is just 15" So it goes...1 point
-
Clearly, your TT follows the dotted line and 3 crates can fit: However, my TT follows the solid line as originally posted. Perhaps production found it less labor intensive to just have a straight wall instead of following the curve. So there's dead space in there?1 point
-
There is a way to speed up draining the fresh water tank, besides waiting for the infernally slow drain. Turn on the water pump, and open the valves on the outdoor shower. Drains in about ten minutes.1 point
-
WandR - 2 years and 4 months ago under the title "bathroom curtain rod", I posted what I did to make a curtain for that little bath window. Ya might want to take a look (use the Search function) unless you already have something in mind. Bill1 point
-
Bill - It is hard to argue against being safe and doing what makes one feel safer. Obviously, anytime you're messing around with something weighing as much as an Oliver it pays to be careful. Using jacks of any sort has always made me a bit nervous. That little "head" on bottle jacks looks even smaller to me when in use even though I always use something between it and what I'm jacking in order to distribute the weight a bit over a larger surface. The pressed steel parts of vehicle jacks never look strong enough to hold up what I'm about to work on. Sure, jack stands help with my fears but they are bulky and carrying them all the time is a bit more than I can bare. Which ever way you choose, just be careful and be redundant if possible. Bill1 point
-
ahattar, One of the reasons I went to the HQ19 (which I don't actually have yet do to a delay in production), is the suspension. If you thumb through various posts you'll find some of us wish the suspension was better on the Oliver. It has very limited travel and hits metal to metal as a stop. The vibration while traveling on rough roads seems to be something very hard to tame in all trailers with conventional equalizer/leaf spring suspension. HQ uses independent swing arm and coil suspension with large dual shocks on each wheel. It also has larger 265/16 LT tires with twin spares. Another point that figured into the decision was the outside kitchen. We do a lot of cooking outside, to help keep the interior clean, and because there is much more room to prepare the ingredients outside. So I always carried a table, a stove and a quick disconnect hose for this purpose. Not with the HQ. It has a large preparation area, a sink, drawers and stove. The whole thing pulls out like a large drawer, with no setup time. The Oliver is extremely easy and efficient to tow. The HQ15s don't tow as well (unstable), they have a very small refrigerator, and no counter space in the kitchen. The HQ19s tow well (stable), but have more wind resistance than an Ollie. The HQ19 really shines on interior comfort, so it will be very comfortable to live in for longer trips. The Oliver is much better in cold weather as it comes from the factory. Ducted heat, interior piping and interior tanks make the difference. The ducted heat is not so useful for interior comfort as it is for freeze protection. The HQ series have external plumbing and need a winter upgrade to do well in the cold. Mine will have that before I pick it up. The HQ trailers all have excellent ground clearance. They use standard 5200 lb axle bearings and 12" brakes. They have dual heavy duty off-road shocks on each wheel and they come with a parking brake. Olivers use 3500 lb axles and 10"brakes on the LE2. The heavy duty jockey wheel on the HQ is another plus off-road. It enables the trailer to be towed out when disconnected from the truck and it allows the trailer to be turned around in it's own length if you get trapped at the end of a one-lane road. Having rock sliders and two spares are also nice features for off-road. So, for traveling efficiently on the highway, using the toilet and shower mainly at campgrounds, and cooking mostly light meals, (with no oven or hood), the Oliver is an excellent choice. For living in the trailer comfortably, cooking larger meals, or cooking in an oven, traveling rougher roads where excellent suspension and ground clearance really count, and for unexpected recovery situations, the HQ is the better choice. The HQ17 is an interesting choice because it has bunk beds in the rear and a large fridge. This might be better for traveling with kids or to bring along a couple of buddies. One other interesting feature for off-road use, is the dual water system. 16 gallons of drinking water with a triple filtering system as standard equipment. Plus, a 50 gallon general water system for washing dishes doing laundry, showering and general cleaning. This can be filled with lake or stream water while keeping the drinking water entirely separate. The HQ19 also has a washing machine! Either one seems structurally superior to others with similar design. The double fiberglass body, with insulation, on the Oliver is excellent. The HQ uses a structural aluminum tubing frame for the body and composite aluminum walls that are very tough. It has a diamond plate lower area all the way around for even more strength, and rock rails. The frame is heavy steel box members and is hot dip galvanized for absolute rust protection. Then the whole underside is coated with a bedliner like material. Olivers have their famous aluminum frames that are also very nice. Both have long tongues that allow the truck gate to be opened while connected. The HQ has a front propane locker built into the body and the Oliver has a nice fiberglass shroud over the bottles. The HQ has a nice equipment and jerry can storage locker on the other side of the front, next to the propane locker. Very handy for wheel chocks, hoses, power cords, a shovel, fuel cans, ropes, etc. All the miscellaneous stuff that always goes along. The electrical system in the Oliver is a standard type system used across the RV industry. An inverter is optional and needs a transfer switch to tie it in. It has automotive type fuses on the 12v side. The HQ uses an inverter/charger combination that is very nice as standard equipment. Much more up to date in design. And it uses circuit breakers for the electrical, serviceable tank monitor sensors and Square D residential circuit breakers on the 120 volt system. These breakers are readily available at Home Depot or any hardware store. The HQ comes standard with 300 watts of solar. Oliver offers their solar as an option. Both have all LED lighting, but the HQ also has LED flood lights on the front and rear, as well as both sides. Oliver uses the high quality and very well proven Bulldog hitch coupler. The HQ uses a fully articulating hitch that is better for off road use. The movement of the trailer can never get to the extreme limit of hitch with the articulating system, as it can with a ball hitch. But again, for normal use with a ball system, the Bulldog is the best there is. Over the years, with Oliver, there has been some trouble with cabinet doors, and drawers, not staying closed. Various things have been done to fix this. The HQ series uses locking catches that will not open. I think either brand is the best in their areas. Molded fiberglass, Oliver. Non-molded, Black Series. Towing efficiency, Oliver. Ease of towing, Oliver. Living conditions, HQ. Off-road, HQ. Modern design, HQ Long term durability, ? Factory commitment to the customer and proven reputation over time, Oliver.1 point
-
Well, I was hesitant to join a forum until I saw the conversations you guys were having. Been looking at the Black Series HQ15 but decided its gonna be too much work to make it worthy of our shoulder season elk hunts here in Montana. Came across Oliver and am strongly considering the double axle. We spend 90+% of our time off road. I wouldn't say that we're full on overlanding through rivers and crazy articulating obstacles, but we intend to test the lifetime warranty. I've gone through multiple RV's over the years and I'm trying to justify the Oliver's price tag on the fact that I can be done swapping trailers every few years before they fall apart completely. I'd love to get some feedback from you guys if you've got the time or desire. Either way I'll check out some of your past posts so I can limit asking you to repeat yourselves. Thanks for all the info, glad you guys are here.1 point
-
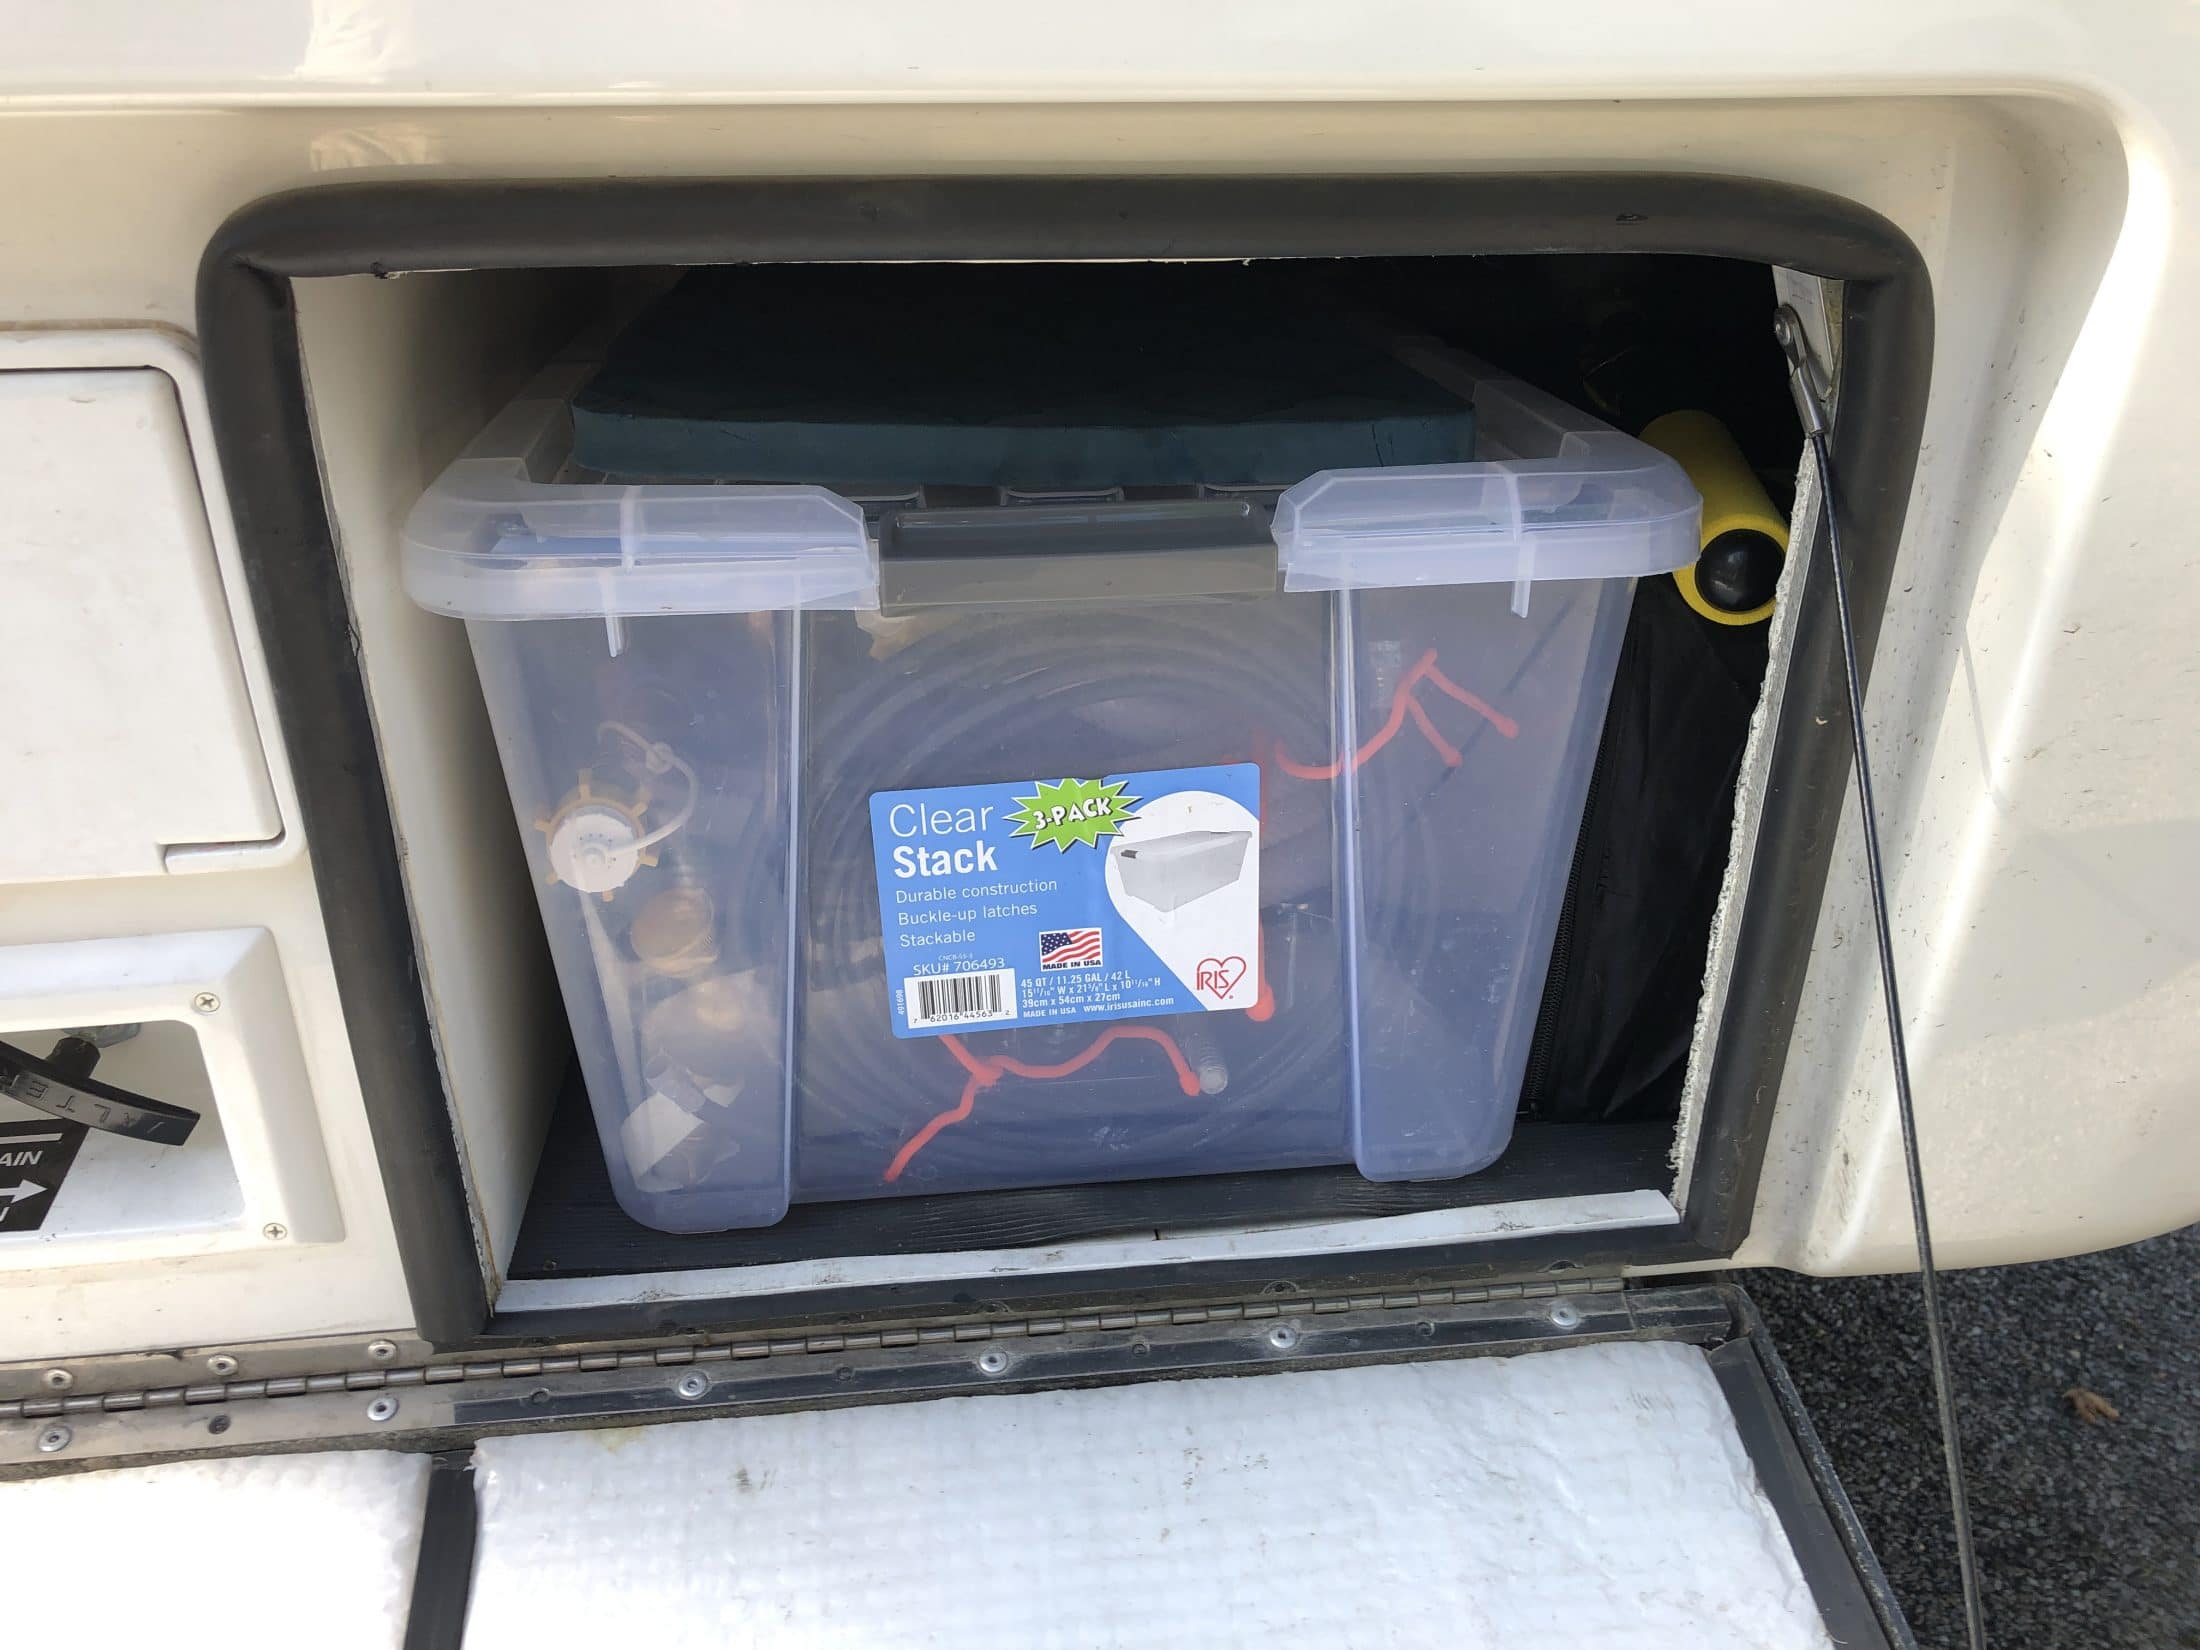
Based on what I read on the forum, initially I got a bunch of 12 x 12 milk crates to store things in the basement. However, I found that the 12 inch dimension was constraining. My specific complaint was that I had to coil the hoses very tightly so that they could fit in the 12 inch container. I also needed multiple boxes to store the essential items, and the space in the boxes was not used efficiently. I have now purchased a larger plastic storage box, 15 11/16 wide x 21 5/8 long x 10 11/16 high. I think this size box is widely available; I got mine at Costco. I like this box for several reasons. 1) It is much easier to coil my hoses to fit the 15 inch dimension. 2) The 15 inch width fits perfectly through the basement door. 3) The 21 inch length puts the box right up against the wall that is the side of the night stand for my Elite II Twin Bed model, maximizing space usage. 4) The box is large enough that the one box can hold all of my most routinely used items: water hose, water filter, 2-way garden hose splitter and pressure regulator, 30 amp electrical cable, circuit/voltage tester, and my X-chocks. I also have a coaxial cable in the box, but we have used it only once. There is still room left that I could use for other items. This one box holds all of the things that I need most frequently. Additionally, the size of the box makes it easy to put all of these items into the box.
1 point


-
Recent Achievements
-


")


")


")
