
ScubaRx
-
Posts
3,307 -
Joined
-
Last visited
-
Days Won
173
Everything posted by ScubaRx
-
David Kemp (trumpetguy) was using this equipment in his Oliver. He is now using the same in his Airstream. In full Florida sun, he was running his AC off the Trojans for as much as 8 hours at a time! Hopefully, he will chime in here with his experiences. The company has a complete Dometic Penguin II installation instructional on their website. It fits neatly inside the unit on the outside. The necessary unit costs a little over $300.00.
-
Thought I would test this since apparently nobody has posted in the past 24 hours.
-
Where's your baby's cover? Sometimes it gets cold at night!!! Very well done, and a great idea. Good work.
-
Just wanted to report that Scott Oliver introduced me to Jason at the factory yesterday and he's not "creepish" at all! He will be a great addition to the forum team and will be able to spend the time necessary to get and keep it running well. Welcome aboard, Jason...
-
John, I don't have a wiring diagram although it's not really necessary for your project. I would be happy to help you with it. I installed one in mine about a year ago. You will be working with both 12 Volts DC and 120 Volts AC. I believe Reed Lukens can hook you up with a wiring diagram.
-
Good to see both of you at the factory this past Wednesday. I hope you two are having the time of your lives. Where's the next destination?
-
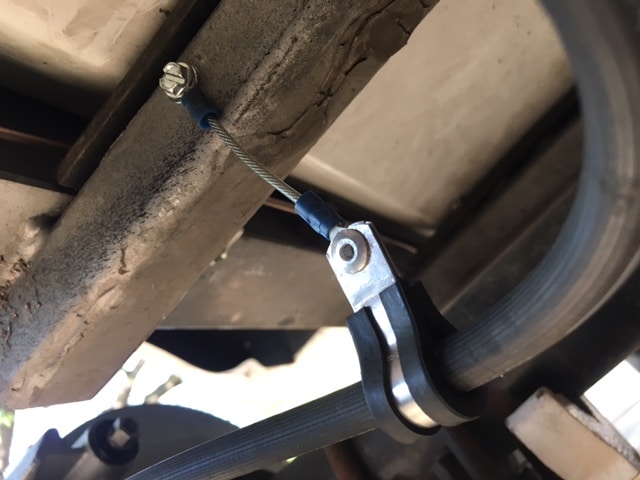
John, thanks for the kind words. I did consider something commercially available but I needed something the next morning and I made them up from stuff in the shop. The hangers were made about midnight one evening in a fit of desperation and inspiration. They consist of a short piece of vinyl covered cable, some #8 washers, a couple of ring tongue electric crimp connectors, some of these (opened up and re-bent to conform to the diameter of the brake hose), a pop rivet and a sheet metal screw. My advice is to make these up on the bench rather than under the trailer at the time of installation...trust me. Despite what it looks like, the hose is hanging straight below the attachment point.

-
If they're willing to do it for $375.00, jump on it. The company I spoke with in Weatherford, TX gets $2900.00 for the install. Of course this includes the equipment and installation all done in one day. For something I could do myself, I thought that was a little steep plus I would have to drive to Texas. For $375.00, that's a hell of a deal. I'm just way too particular (and cheap) to let just anybody touch my trailer. Justin Reeves at the factory is another story. That guy is a meticulous gifted craftsman that I can recommend without reservation.
-
In 2007-early 2008 all the Elites were sold with 3500 lb axles. Somewhere in middle to late 2008 problems started to arise due to the fact that these early trailers were too heavy for that size axle. The factory swapped out most (if not all) of them for 5200 lb axles with 6 bolt lugs and provide 3 new tires and wheels for each. It's doubtful, but there may be some still out there with the original 3500 lb single axles. During our Elite II build I asked for twin 5200 lb axles to be mounted on ours because that was what we had on the original Elite I. All the new Elite I's have been equipped with 5200 lb axles.
-
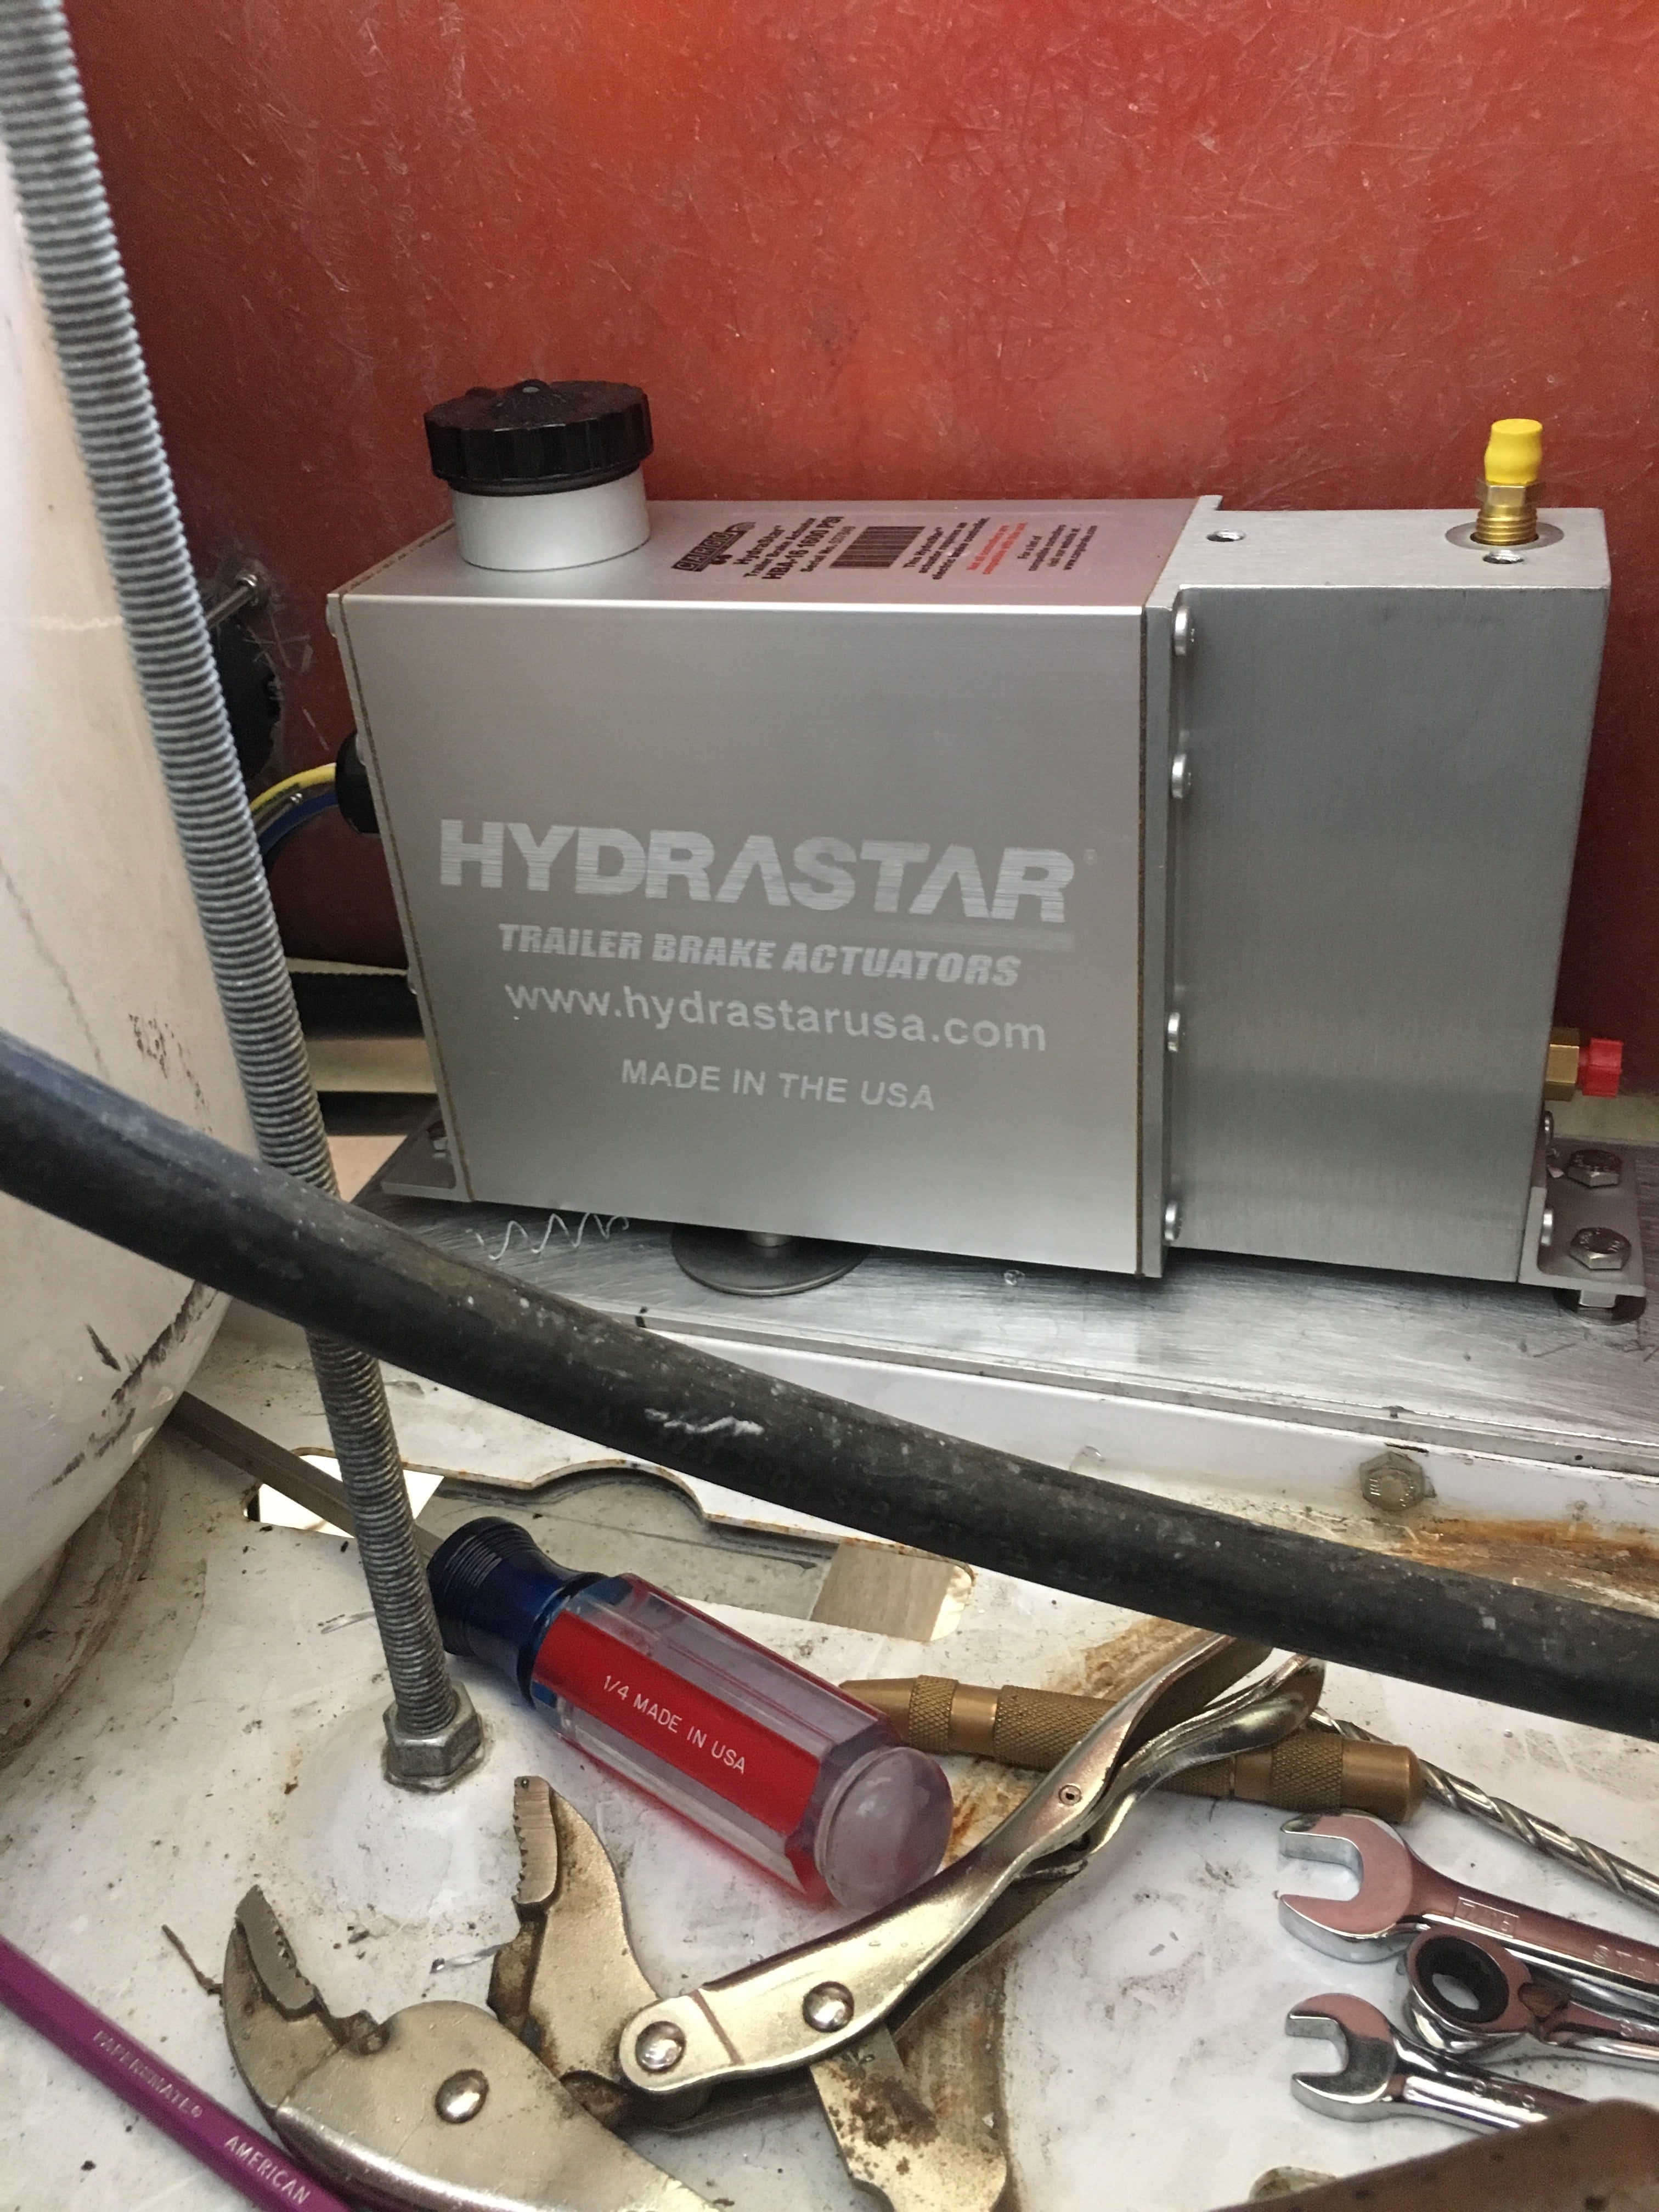
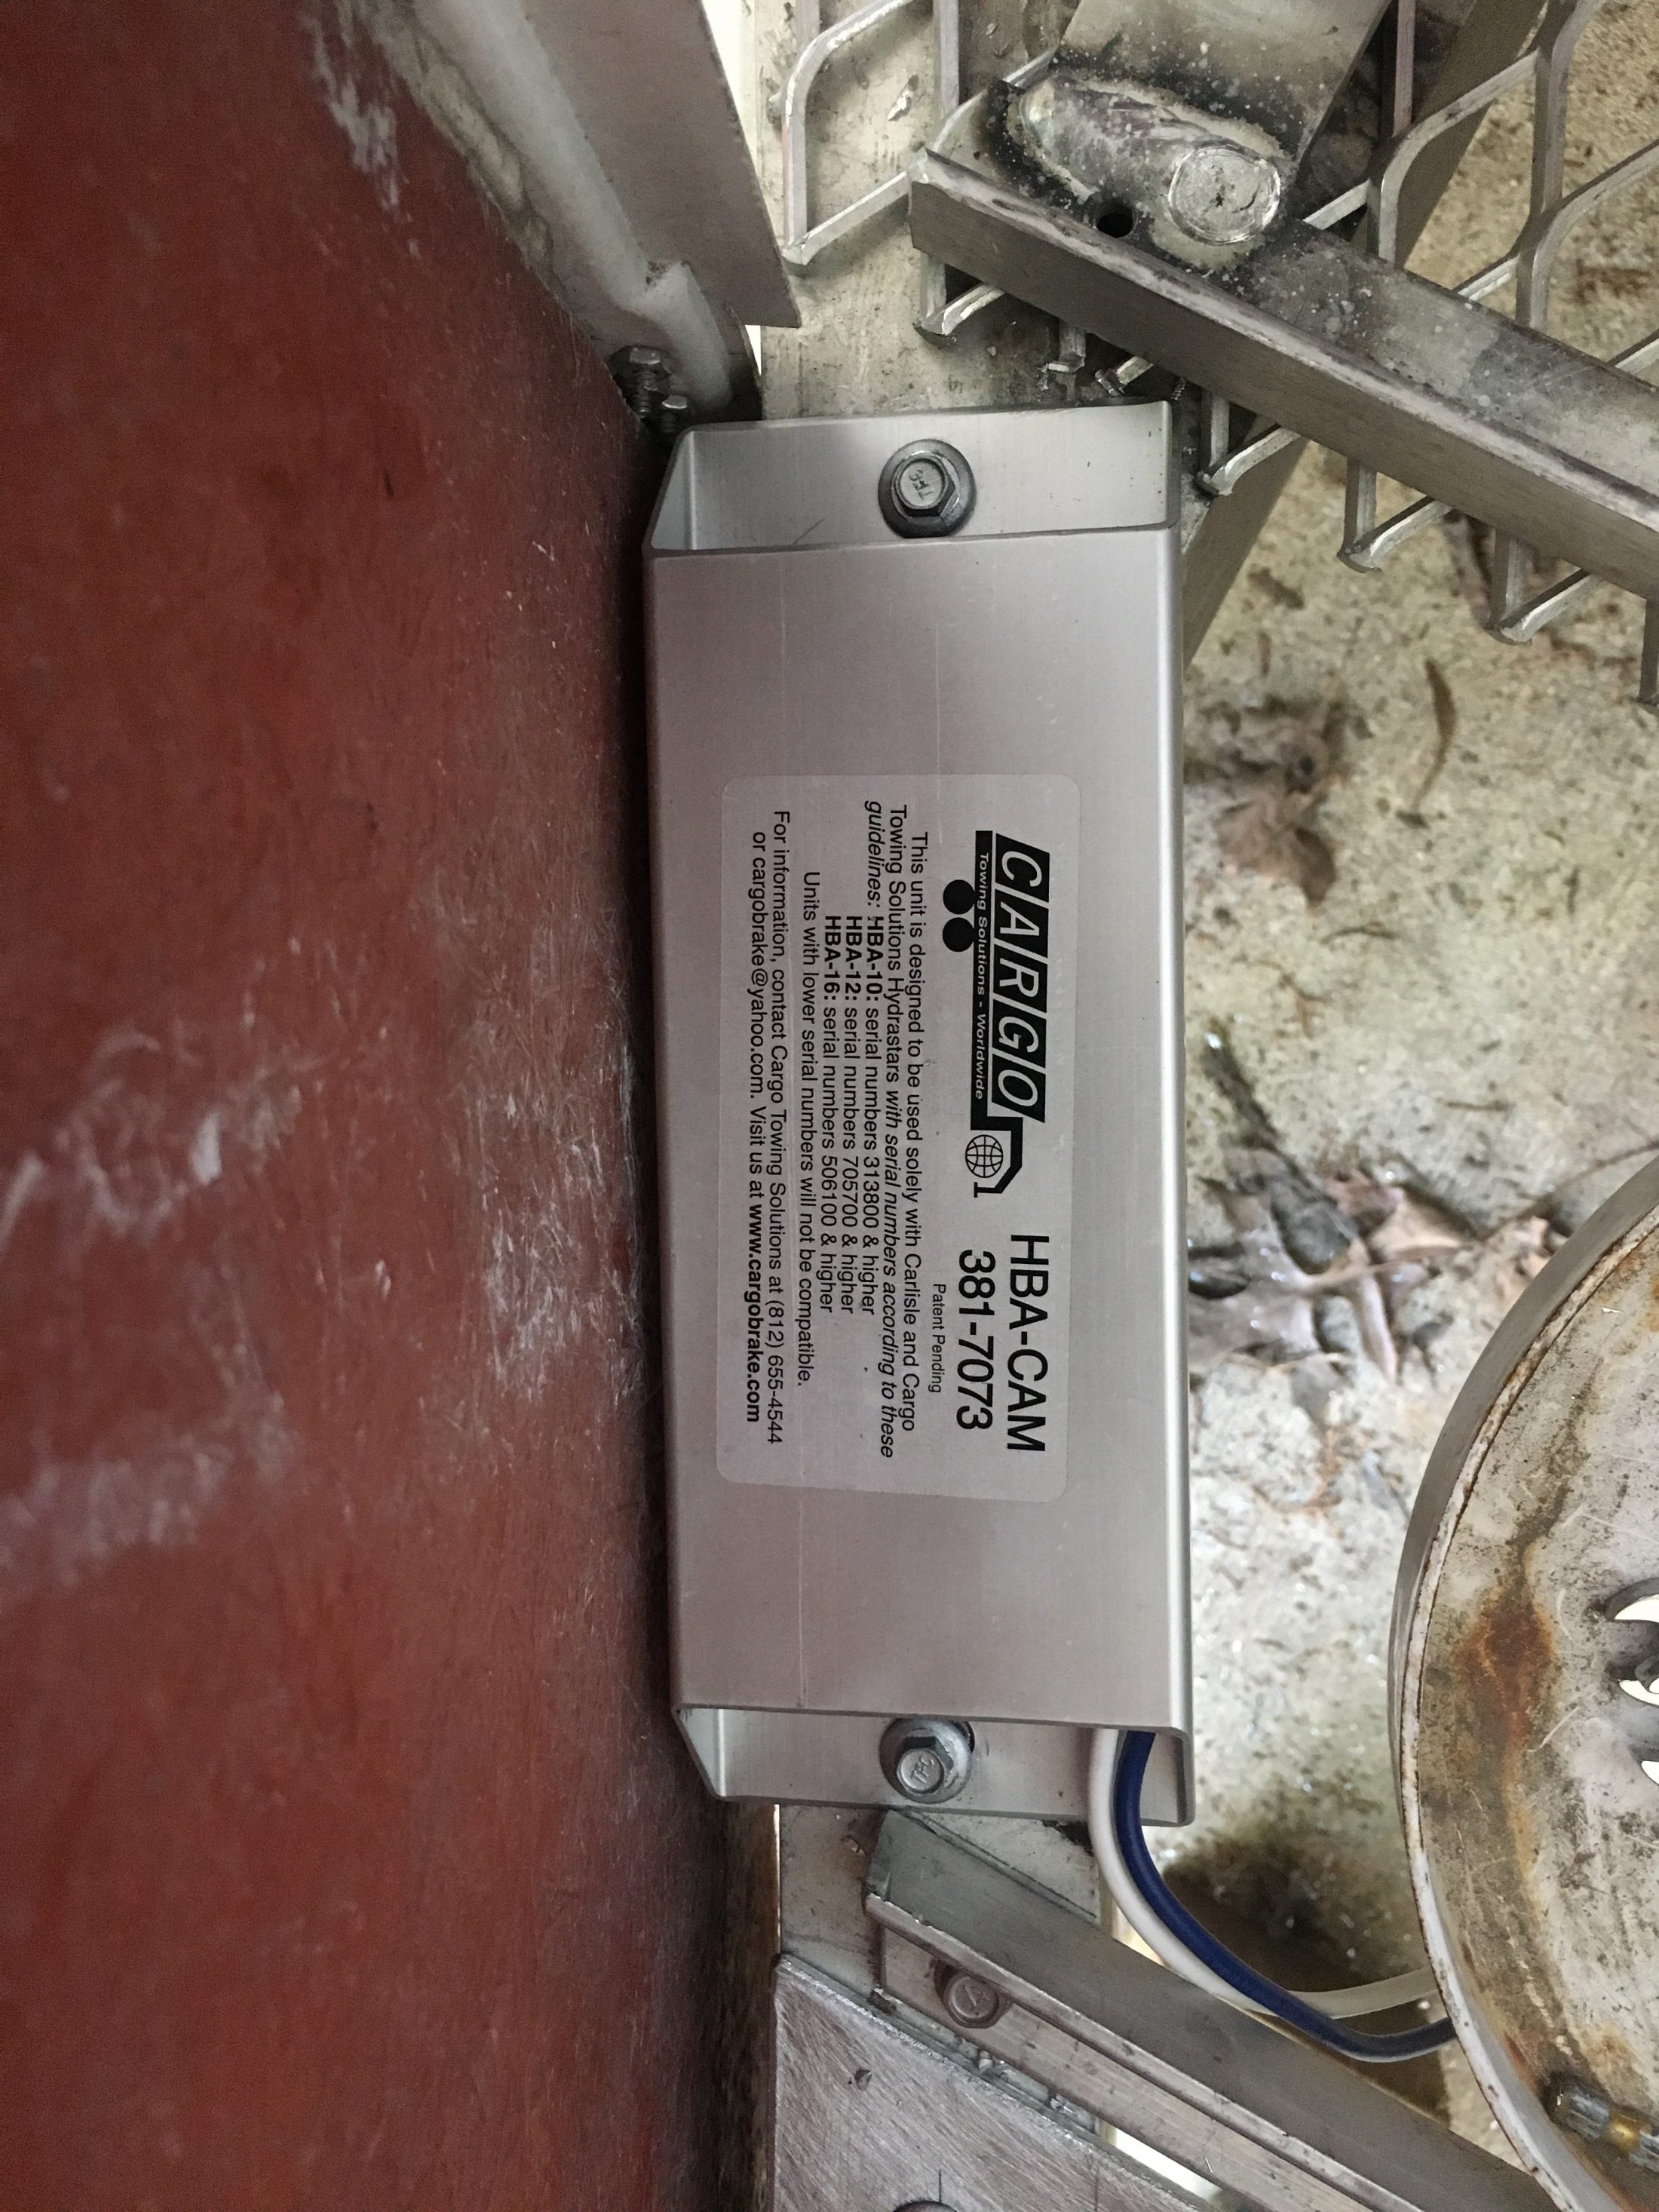
It does seem ironic that all of a sudden Oliver would be willing to install disc brakes instead of the supplied drum brakes. It could be that I was at the factory this past Wednesday where John Oliver and Jason Essary took a close look at my installation. They must have really gotten on the stick about sourcing parts and deciding on labor. I chose the Kodiak brand of calipers and rotors because that seems to be the industry standard. I suspect that Oliver would prefer to buy their Dexter axles already outfitted with disc rotors. I don't think that is a problem. I would, however insist on the Carlisle Hydrastar HBA-16 actuator and the accompanying HBA-CAM. This last piece of equipment is only necessary if you have a late-model General Motors, Ford or Dodge pick up. It allows the in cab controller to work with the Hydrastar actuator. The reason I recommend installing it no matter what is that it will allow your trailer to be protected against the future should you change brands of tow vehicle. It would be, however easy to add in the future if you so chose to wait. I went with the Dacromet coating because I determined from my research that it apparently represents the best value for dollar spent. Of course, stainless steel would be much better but the price was more than twice as much. Plus, as you pointed out, your tow vehicle will not be equipped with nearly as nice of equipment. I mounted the actuator in the front propane compartment just forward of the propane tanks. It fits nicely in this area. It allows easy access for adding brake fluid. If there is a drawback to mounting in this location it would be the distance from the brakes themselves. From what I read the closer it is to the brakes the faster the response time. My entire usage so far is a trip to the factory and back. For me that is about 250 miles round-trip. I found them to be much more sensitive than the drums. For anyone who would like to address specific questions you may feel free to call me anytime at 662-255-0181.
-
When our Oliver was built in early 2014, there were no "standard" tires or anything else, for that matter. I discussed tire selection with Jim Oliver and he suggested the Michelin® XPS® Rib™ LT225/75R16/E 115/112Q LRE. That is what we went with. I have been extremely satisfied with them.
-
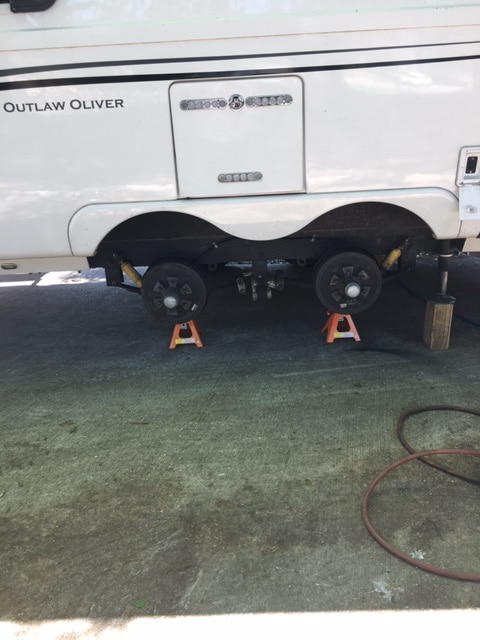
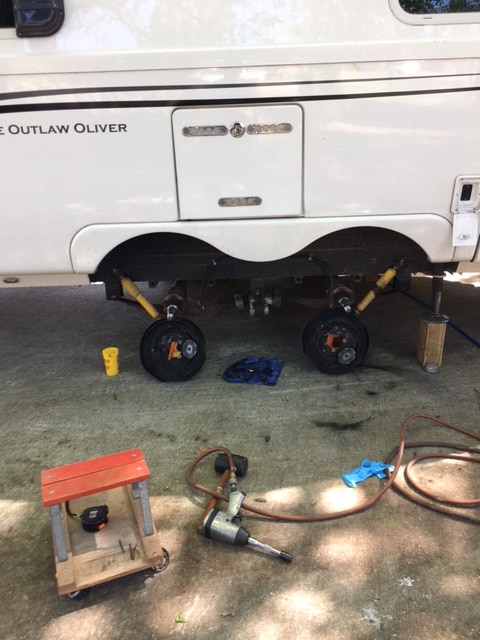
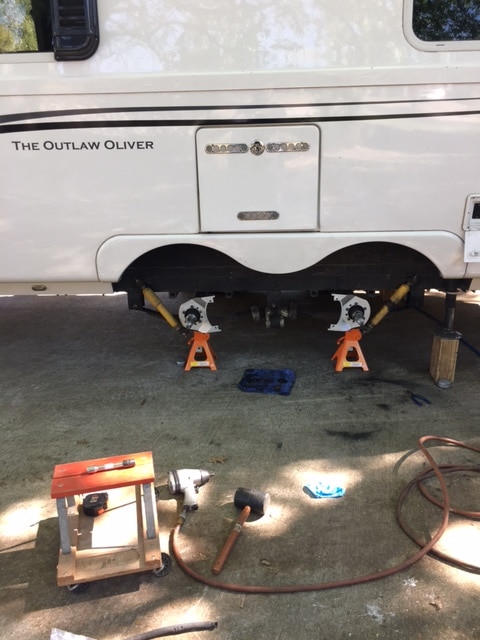
Well I finally bit the bullet and installed disc brakes on the Outlaw Oliver. It was not a particularly hard task, not nearly so much as installing the Dexter EZ-Flex system. The cost was just under $1300. See the Oliver-Disc-Brakes-Chart.pdf for a complete break down of what I bought and where.
- 63 replies
-
- 12
-

-

-

Day/Night Window Shade Questions
ScubaRx replied to rideandfly's topic in Mechanical & Technical Tips
OK, Tali and I restrung the shade with the broken string this evening. Not the most enjoyable task we've ever done but it beats a sharp stick in your eye. A little complicated until you've done it a couple of times but once you "see" how it works it's really not too bad. I had to partially disassemble another one to see how much tension to put on the strings. I'll be happy to restring one for anybody for only $500.00 string included. -
On our GMC Sierra there is about 5 inches of clearance from the top of the hitch lever to the tailgate when lowered.
-
I just walked in the door after being in Hohenwald since yesterday. I looked at the drawer problem and it has been corrected. It is my understanding that they are retrofitting all the ones that are still there on the lot to be picked up by future customers. Surprisingly there are about 12 finished trailers waiting on customers to come pick them up. I do realize that there are folks that live further away from the factory than I do but if one of them was mine I'd be on my way! Anyway, back on subject they have built a jig mechanism that aligns the longer screws and puts them in at a proper angle. I believe that this will end the problem coming out of the factory. For those that have the shorter screws it should not be a very difficult job to replace them at home.
-
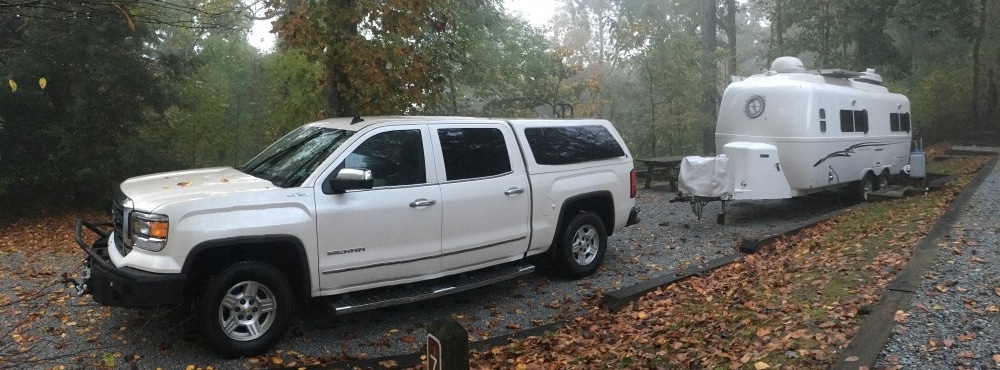
Towing: 2014 Elite II, 5320 lbs factory weight at pick up (2 x 30lb empty propane tanks, no water, no cargo.) Weighed 01/27/2017 at Eloy, AZ on the Pilot Truck Stop Certified Cat Scale. Truck and Trailer together weighed 14,820 lbs. Two adults, 120 lb of dogs, Full tank of gas, full fresh water tank, some in black and gray tank, full propane tank and 1/2 full propane tank, Yamaha 3000 watt generator on tongue. Trailer alone weighed 7100 lb. about 800 lb tongue weight. Because of oversize axles my trailer has a GVWR of 10,400 lbs. Current Tow Vehicle: 2014 GMC Sierra 1500 SLT w/6.2L (420 HP/460 lb torque) and NHT Max Tow package, Trailer Tow capacity 11,800 lbs (based on SAE J2807). Hitch platform rated at 1200 lb.
-
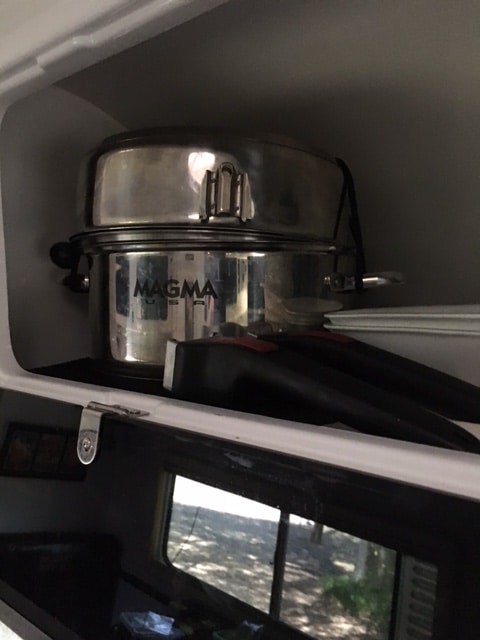
Yvonne, your Magma set will store very nicely in any of the overhead cabinets. We store ours in the one right over the cook-tops. It fits perfectly thru the opening and I recommend you store it as far forward as possible so that it will not slide during braking.
-
I spoke with a representative at Oliver today and expressed concerns about several things including the difficulties a lot of folks are experiencing with the forum. I was told that Matt (and perhaps others) are working on developing a new forum. I asked if they were planing to use new software not based on WordPress and was told that 'the goal was to make it like other forums'. I'm not sure if this means there will be new software or not. It sure would be nice to get to a standard software format that most everybody else uses. Escape, Fiberglass RV and Airstream use vBulletin® Version 3.8.8 Beta 1 Copyright ©2000 - 2017, Jelsoft Enterprises Ltd. The Casita Club Forum and Casita Travel Trailer Forum use Community Forum Software by IP.Board. My personal favorite is vBulletin. I really hope that this is the case because there are people that have joined and then could not get on as well as folks that have become dismayed at the difficulties and just gave up. The forum is absolutely Oliver's best and cheapest advertisement and information dissemination service. At the very least it should be user friendly and fun.
-
Voices and Post Numbers are still there. It's just that now they are the same color as the background so you can't see them except faintly in the slightly darker every other thread line. I'll take up for Larry, if it were not for him and him alone, this forums would not exist - AT ALL. He started it back in 2008. I'm not sure if Oliver knows or understands how important these forums have been to their company's success and it's people like Larry and Betty Harmon that have made it great.
-
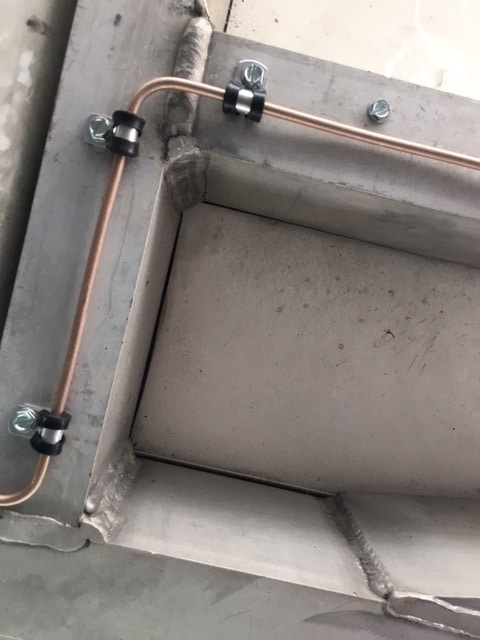
On our original 2008 Outlaw Oliver all the switches for the exterior lights were on the port side of the propane cover. Not only were they outside, they were on the opposite side from the door. This was not very handy for illuminating that strange noise in the middle of the night. One of my first mods was to add additional switches and convert them all into 3-ways. That way we could operate them from inside or outside. While I was running all those wires, it hit me that it would be nice to have control of the jacks on the inside also. More wire...and switches. During the build of the 2014 Outlaw Oliver, I directed the electrician to add remote wiring to the rear upper cabinet for future plans to add interior jack controls. Its nice to be able to control all three jacks from the inside. [attachment file=48112] [attachment file=48109] [attachment file=48115]
-
I agree, the forum has become/is becoming all but unusable with the slow connection speeds and the seemingly endless changes that pop up unannounced almost daily. So, would the keymaster Id'd as JWalmsley please step forth with a post and explain what your function is. We also need a direct contact cell number for you so we can contact you whenever there is a problem. Since the forum members generally consider this a 24/7 job, it would probably be wise to include your usual bedtime so we'd have an idea when it would be too late to call you.
-
Day/Night Window Shade Questions
ScubaRx replied to rideandfly's topic in Mechanical & Technical Tips
Great job. I've got to tackle my broken one also. For some reason this intimidates me a hundred times more than drilling holes in the hull. Weird... -
Those of a certain age will remember and his aversion to work.
-
I can't tell from the photos, but I would use VHB double stick tape.
-
TEN OLIVER YEARS AGO by Larry Mountainborn Harmon
ScubaRx replied to mountainborn's topic in Submit Your Story
Thanks Larry for sharing an insight into the earliest of Oliver's days. As the very first Oliver Owner, you and Betty paved the way for every one of us that have followed. Oliver has grown and changed thru the years and some mighty fine folks have come and gone. We all owe a debt of gratitude to your down-home wisdom imparted to us across the years thru your videos and posts. Thank you from each and every one of us......