Galway Girl
-
Posts
784 -
Joined
-
Last visited
-
Days Won
25
Everything posted by Galway Girl
-
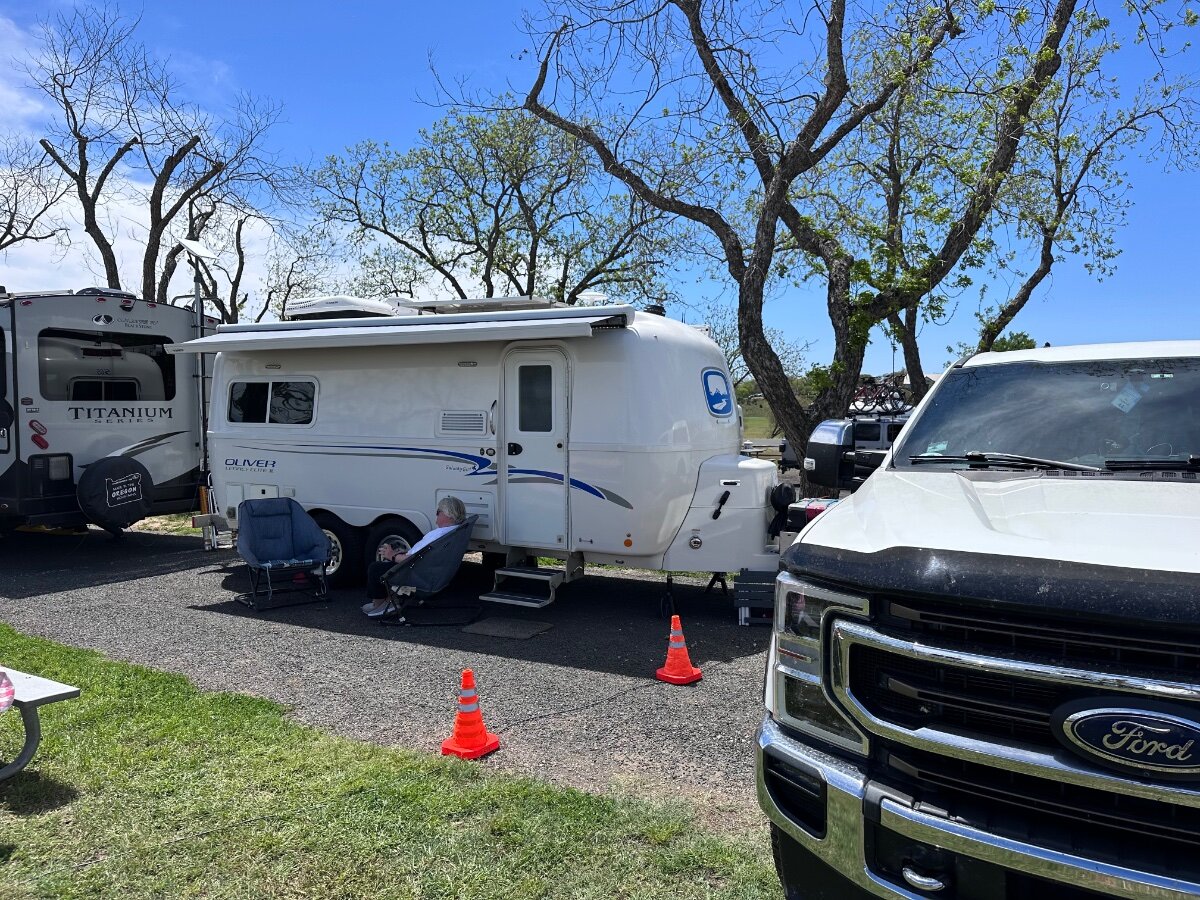
We’ve been in Main this week at Schhodic Woods Campground in Acadia NP We left this am to head south stopping a Walmart to re-supply. Upon returning to the trailer I noticed that the steps were much closer to the ground. Upon further inspection I found (After 5 years and about 65000 miles ) Hull 505 EII finally broke a leaf spring. it was the curb side rear and sheared just where the first and second leaves meet. Lucky this happened 5 miles from a Maine Trailer location. it looks like the issue was caused by a small crack in the leaf that has the bolt eyes. That small original impurity caused internal rust weakening the metal and over time and bumpy roads it finally snapped right where the next leaf touched the longest spring. I called them at 11:30 and they got us in on a Friday at 12:30 and on the road by 2:30. That’s pure luck! I had a spare pair of springs in the bumper from our Alaska trip, but had them put on 2 new springs that were a perfect match, so I kept the spares and put on the new ones on the rear axle. $314 installed! new springs Maine Trailer 101 Coldbrook Rd, Hampden, ME 04444

- 25 replies
-
- 13
-

-

-

-
In my case the ball bearing on the top hinge didn’t work, so my temporary solution are some nylon toilet shims screwed down to the threshold. They hold the door up and are slick enough to bear the load. When I get home I’ll do the full repair (assuming the parts arrive.) Craig - hull 505
-
The contact that picked up my service request about new door pins is listed below: she was very helpful but needed a picture of the door to find their internal part numbers ( which I never found) . Deanne Cummings DCummings@coralind.com (205) 345 - 1013 ext. 52235 Coral Industries www.coralind.com 3010 Rice Mine Rd NE | Tuscaloosa, AL 35406
-

Truma water heater repair #3
Galway Girl replied to Galway Girl's topic in Mechanical & Technical Tips
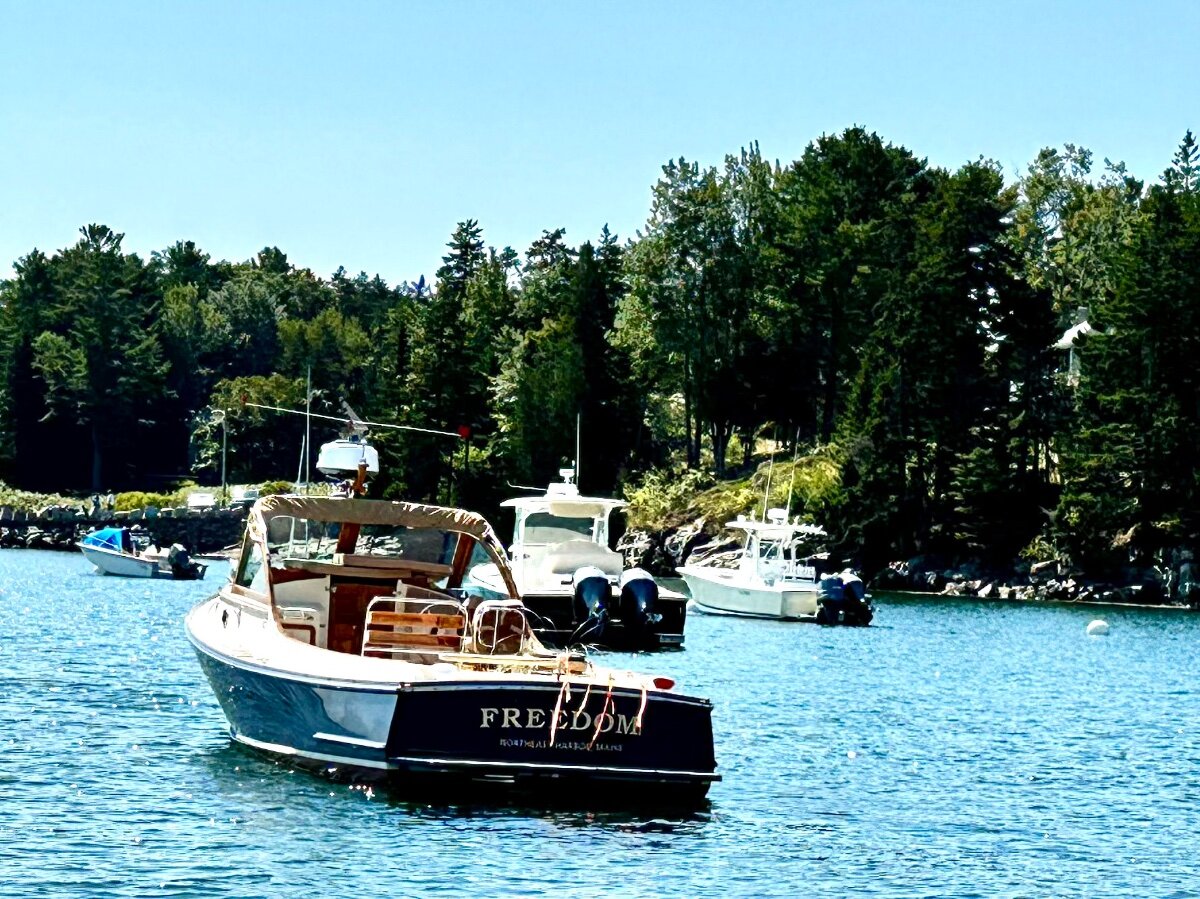
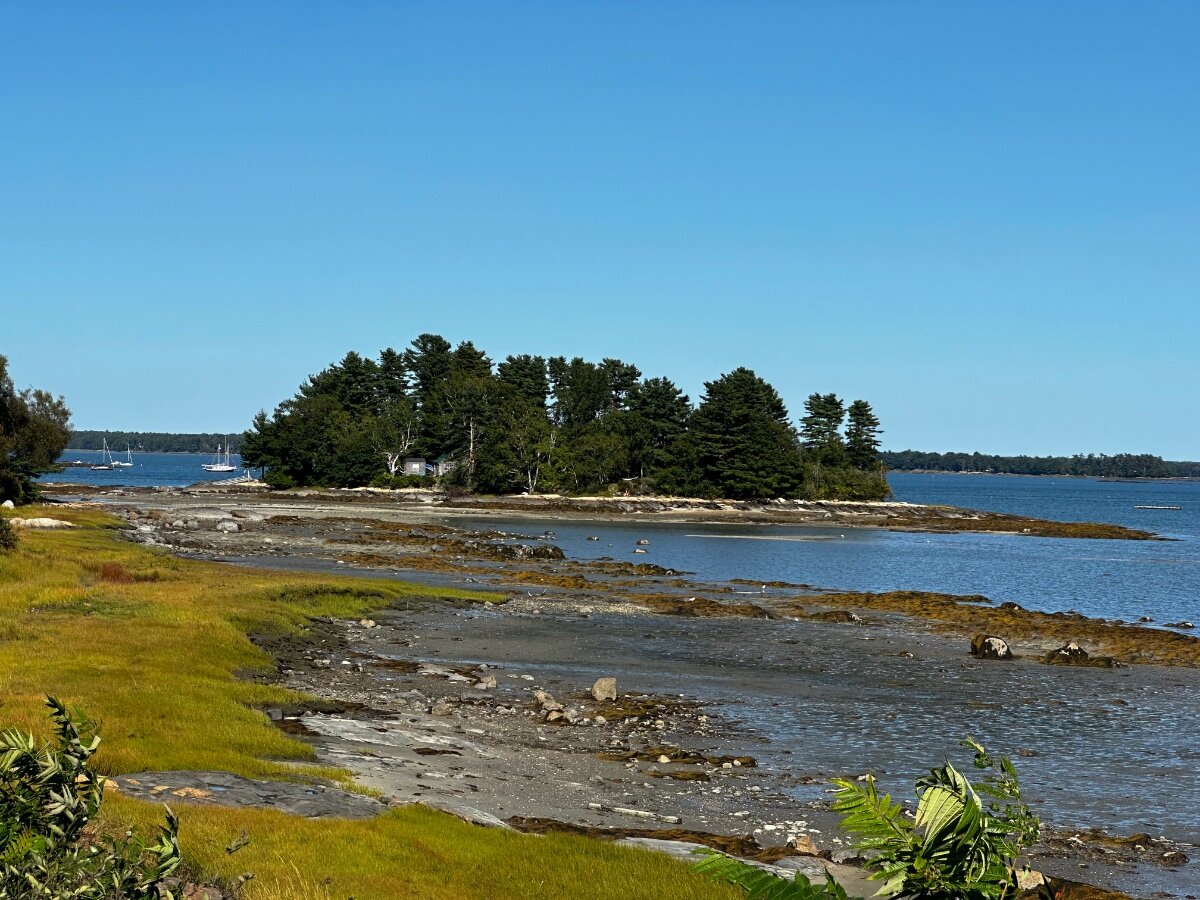
Yes, the last issue was from Truma factory, improper torque on the regulated gas line into the burner. Nova Scotia was fantastic. view from site 54 at The Islands PP.
-
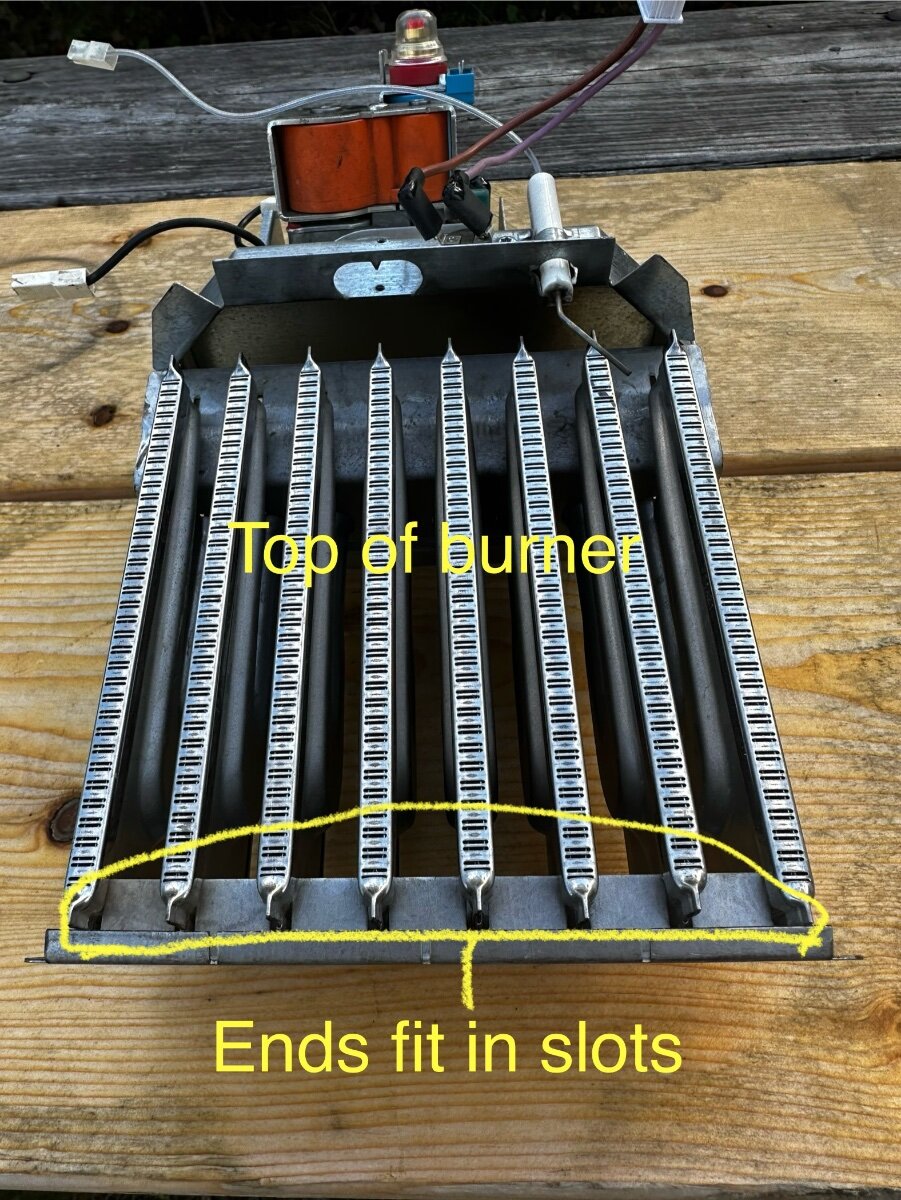
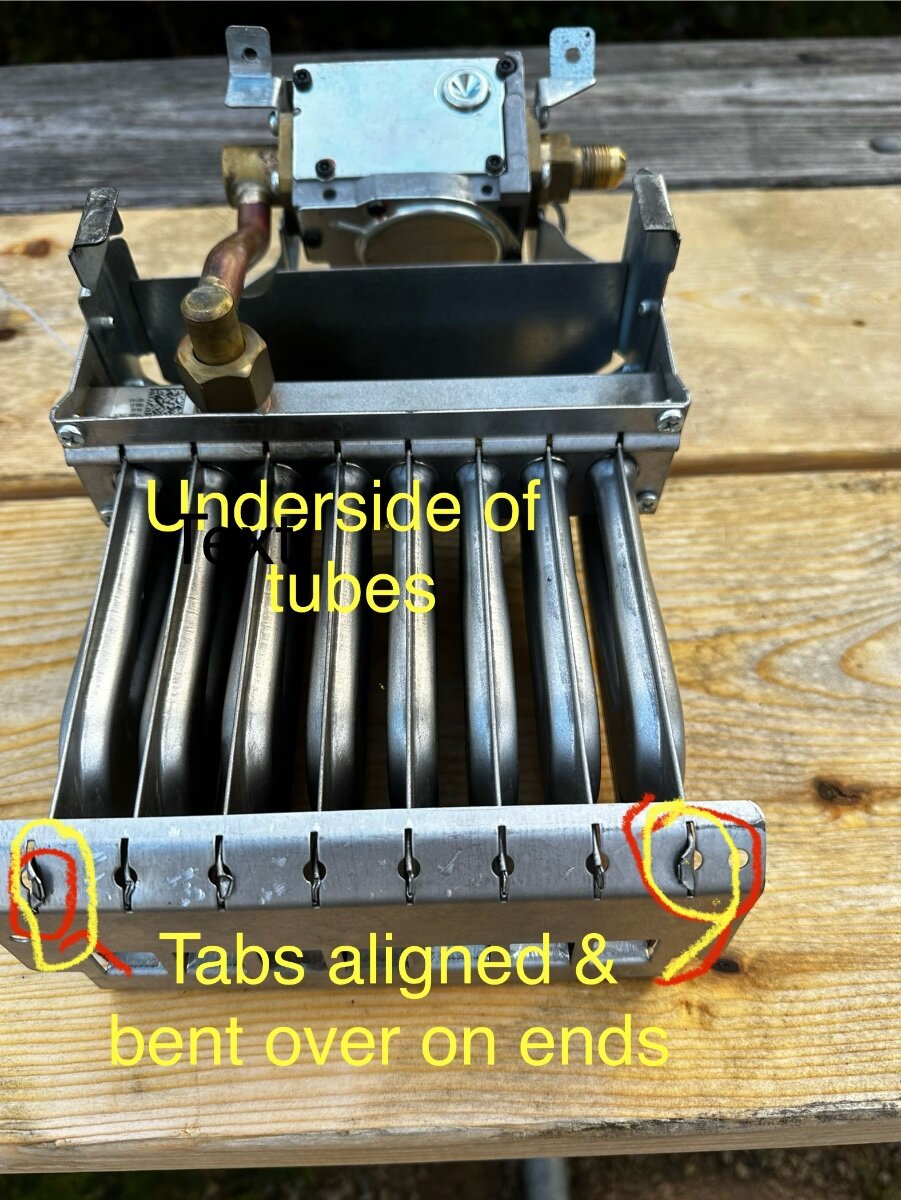
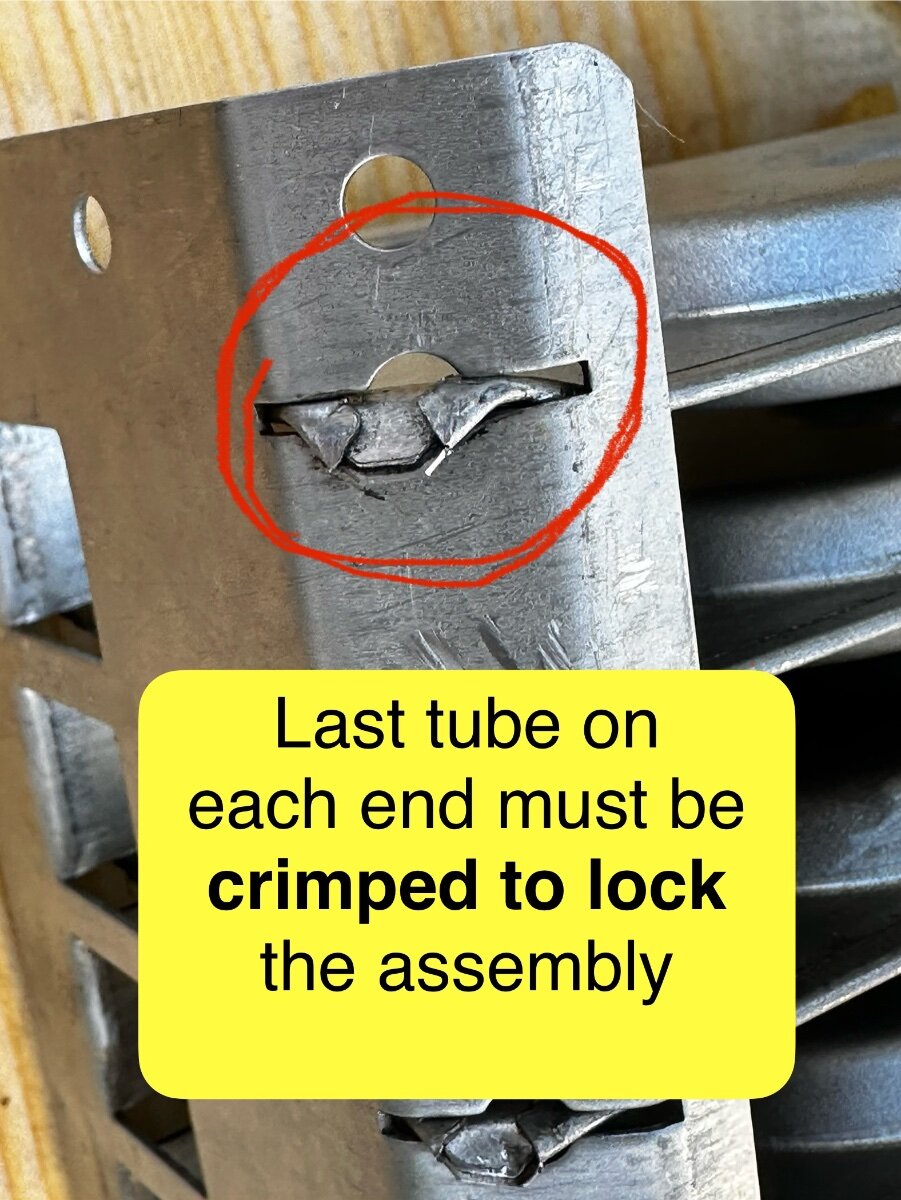
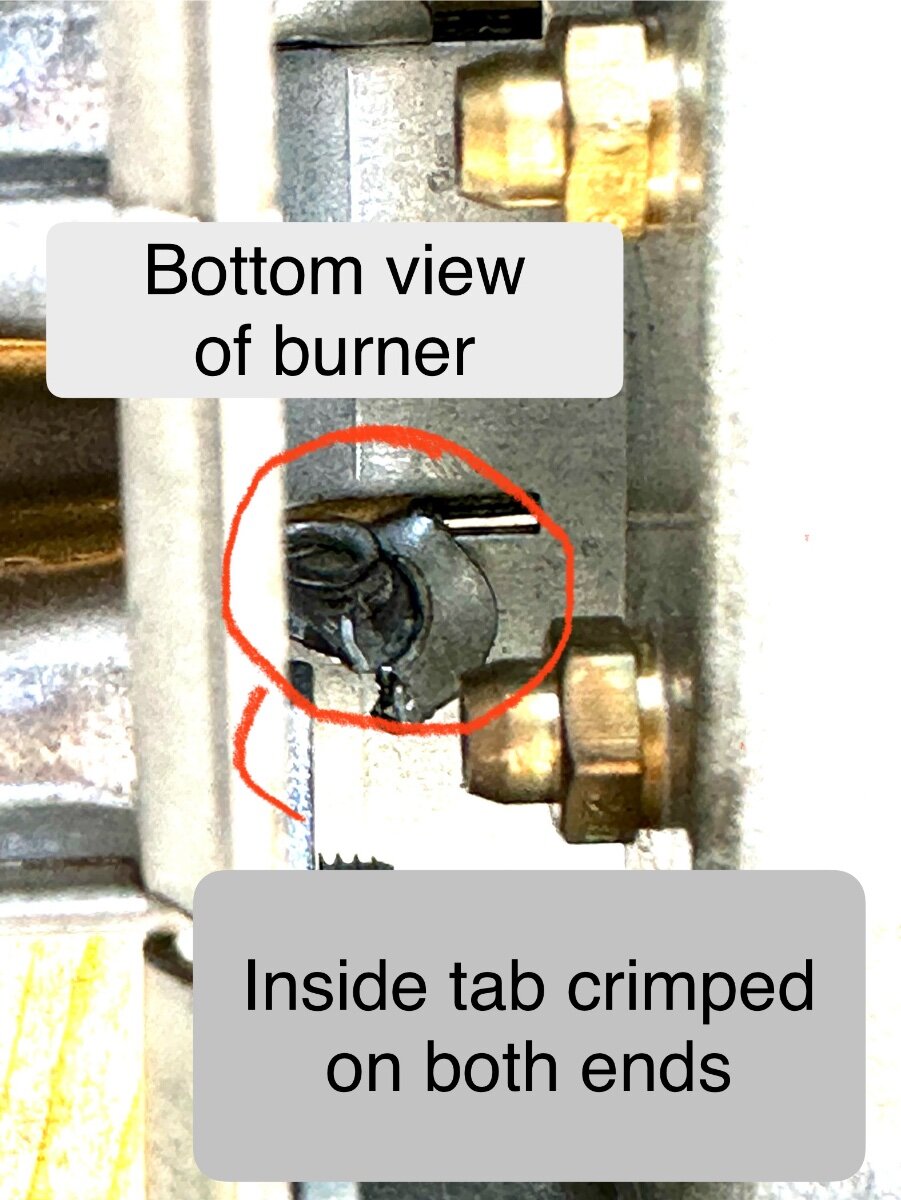
We’ve been on some bumpy roads in Nova Scotia and it caused an issue with our truma water heater. Symptom: Louder than normal water heater ignition. A loud whoosh or pop on ignition. Strong enough to blow out the flame. A smell of gas! Cause: Burner tube assembly had come apart on the end of the tubes by slipping out of the retaining slots (last tube on either end) Fix on the road: Removed the burner and regulator assembly and re-assembled by re-aligning and re-crimping the burner tubes into the frame. Time: 40 minutes Tools: Crescent wrench & pliers for gas feed 2 Different size torx bits for burner screws Steps: Turn off gas & let burners cool down Pull fuse for water heater Take pix of wiring ( for re assembly) Disassemble gas feed using backing wrench Disconnect various wires from plugs & headers ( Includes 2 screws to remove igniter) Remove 2 screws on front of burner/regulator assembly Slide out burner. Reassemble burners in slots and crimp end burners Reinstall in reverse order, checking for gas leaks before reinstalling fuse. Run water heater to test. Enjoy hot water ! The last right and left burner tubes had fallen out of the registration slots. That caused gas to flow from the two orfices directly into the burner chamber. ( A nice big ignition event that blew out the other burners.) I reassembled and crimped them back in place. video describes which tabs need to be crimped. IMG_0872.mov
-
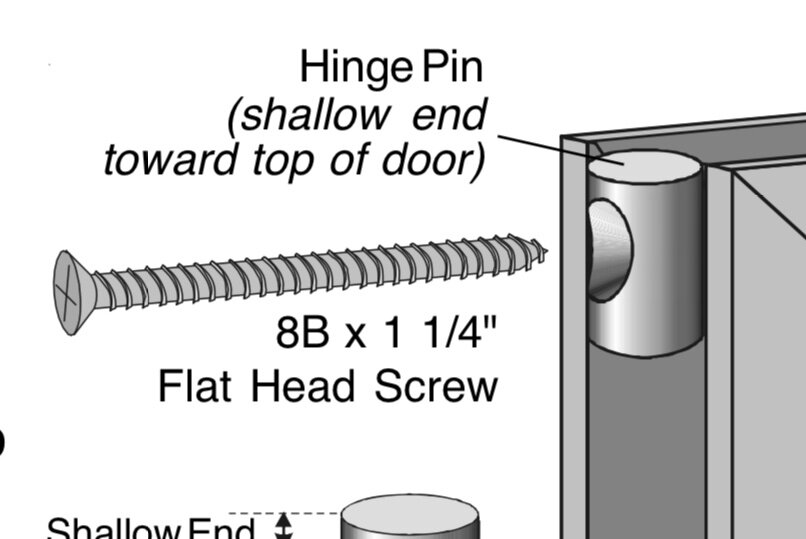
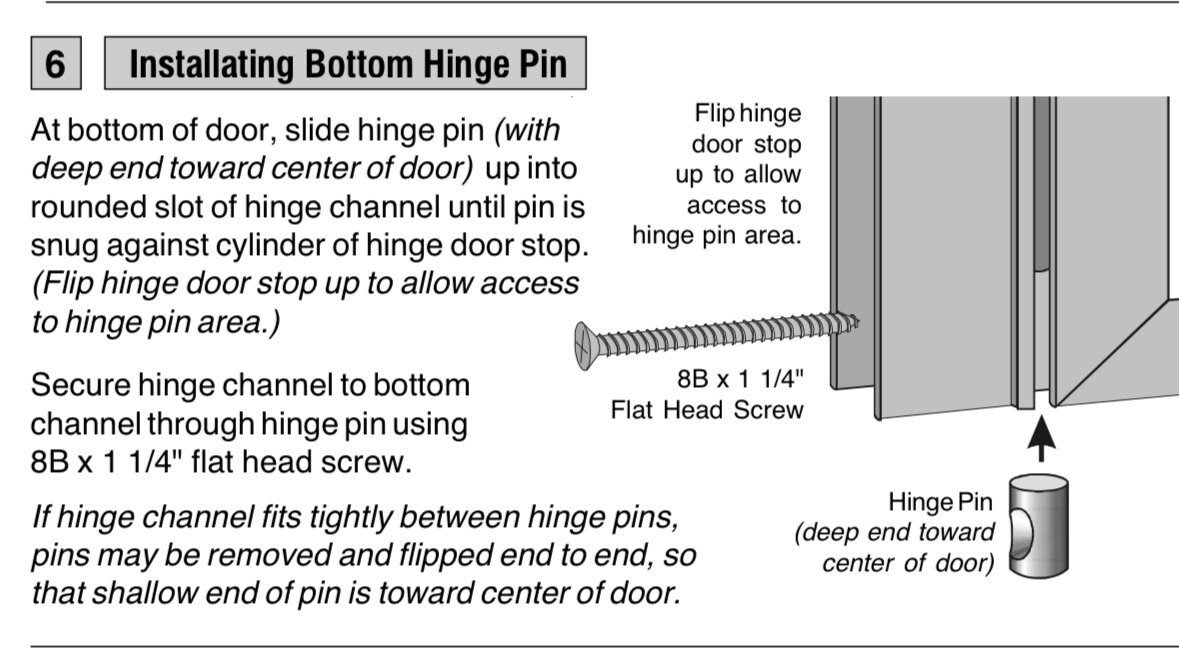
The contact at the door manufacturer is mailing a couple of new pins. I’ll install them when I return home in December. In the meantime I’ll use some shims to meet the door from jamming. Craig
-
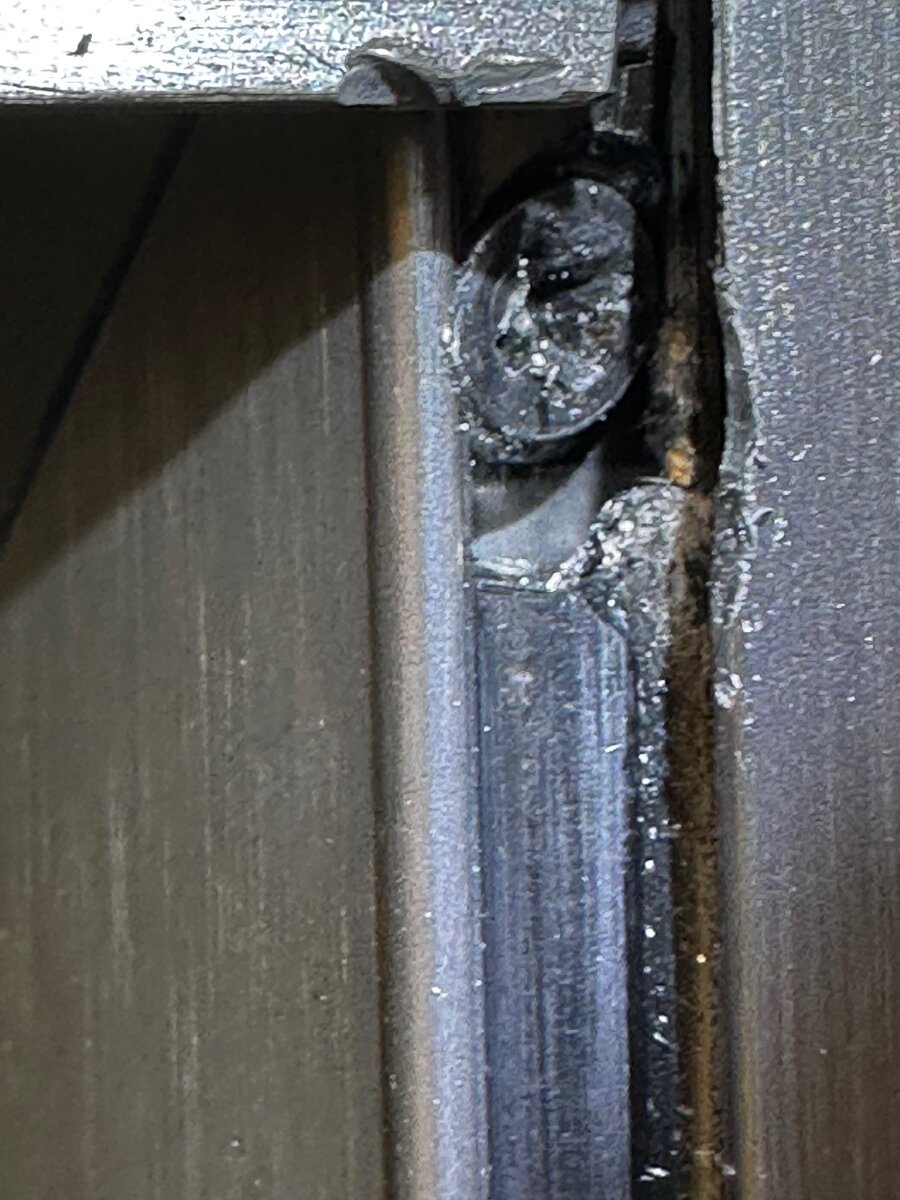
Here’s the failure: top hinge lins have worn away on the lower side of the pin. This causes door to drop and stick. Another owner put 2 BBs in that space, but new hinge pins are the fix. below pix is with door lifted and you see the space that has ground away.
-
From the company that makes the door: KstlKD_HingePin_982.pdf Excerpt below of bottom. It appears my hinge pins have worn away the silencers sleeve so it now drops the door down. once I get confirmation of what’s happening I’ll update. craig
-
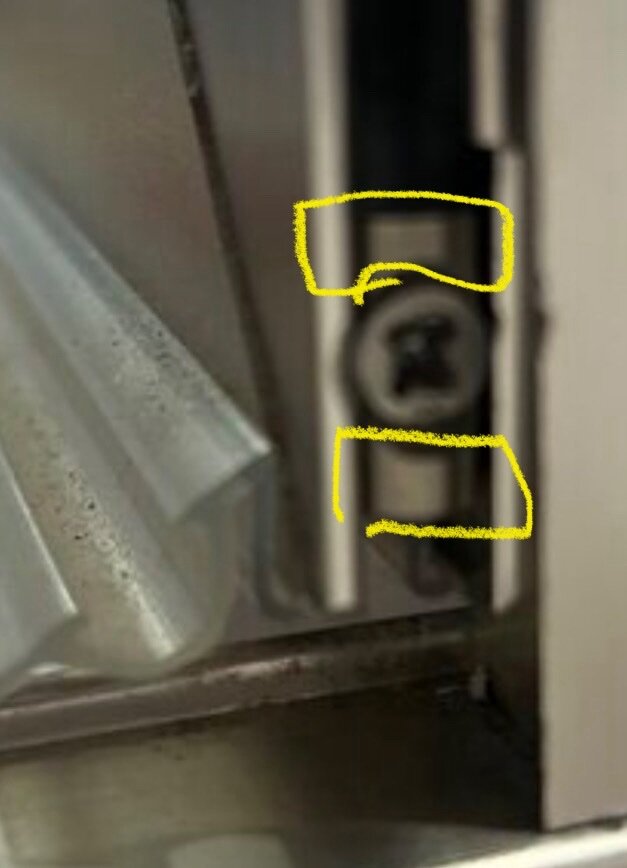
Thanks @Patriot In my door those pieces above and below the screw (in yellow area on your pix) are missing. tried loosening, lifting and tightening to no avail. I think something fell off or wore away
-
I placed a plastic cap under the bottom off the hinge. This temp fix holds the door up to cleat the threshold. i wonder what the bottom of that hinge is supposed to have under it? Is there a pin/bushing missing on mine? Anyone that can show a pix of a functioning bottom door hinge area would be a help I have a ticket open for this..
-
Our 2019 EII bathroom door is no longer functioning. When trying to open it has dropped down and sticks on the bottom frame. We have to now vertically lift the door to open and close . Anyone know how the door hinge is supposed to be adjusted? I’m considering placing a nylon pivot block in the bottom left (hinge corner) to hold the door up. Craig
-
Here is the article on upgrading hull 505. it included new inverter and batteries. https://4-ever-hitched.com/ggs-blog/f/lithium-battery-upgrade?blogcategory=Electrical+Upgrades
-
Several of us have stayed at Ladybird Johnson Municipal RV Park, a city park of Fredericksburg. https://www.fbgtx.org/236/Lady-Bird-Johnson-Municipal-Park its near a winery, golf course and local airfield and about 5 min from downtown Fredericksburg. park has full hookups and shade trees . ( pix below is from last April for the eclipse)
-
Some pix from Acadia NP this week.
-
- 14
-

-
-
-
The drip line can be accessed in the basement (bottom street side) and above in the attic corner street side. You would need to remove the concealing panels for access.
-
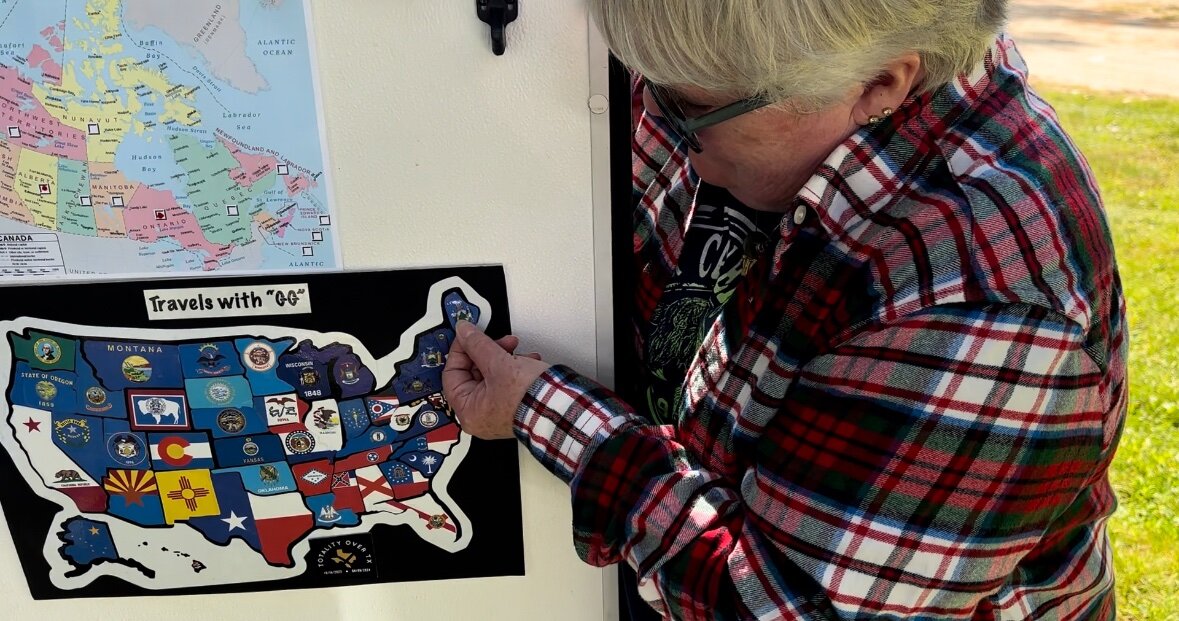
We are in Maine which makes the last state we had to visit with our Oliver to have a blackout of the US. We absolutely love this NE part of the US and have resolved to come back again. Onward to Nova Scotia. Craig & Rose Hull 505
- 6 replies
-
- 10
-
-
-
-
Just drove the northern section plus Shenandoah this week on our way north to Nova Scotia. Will plan for the Southern section in the future.
-
In April 2024 (this year) I had the factory review the repair. Jason said it all looked stable and they didn't see any further signs of fatigue or cracks. I'm keeping my fingers cross and carrying a rivet gun and stainless rivets in the truck just in case. Craig
-
I had issues where my battery box actually broke loose along the top mounting flange and had to be repaired. It sounds like yours is along the bottom. Maybe send a pix to show the issue? Craig - Hull 505 Here's that battery box thread...
-
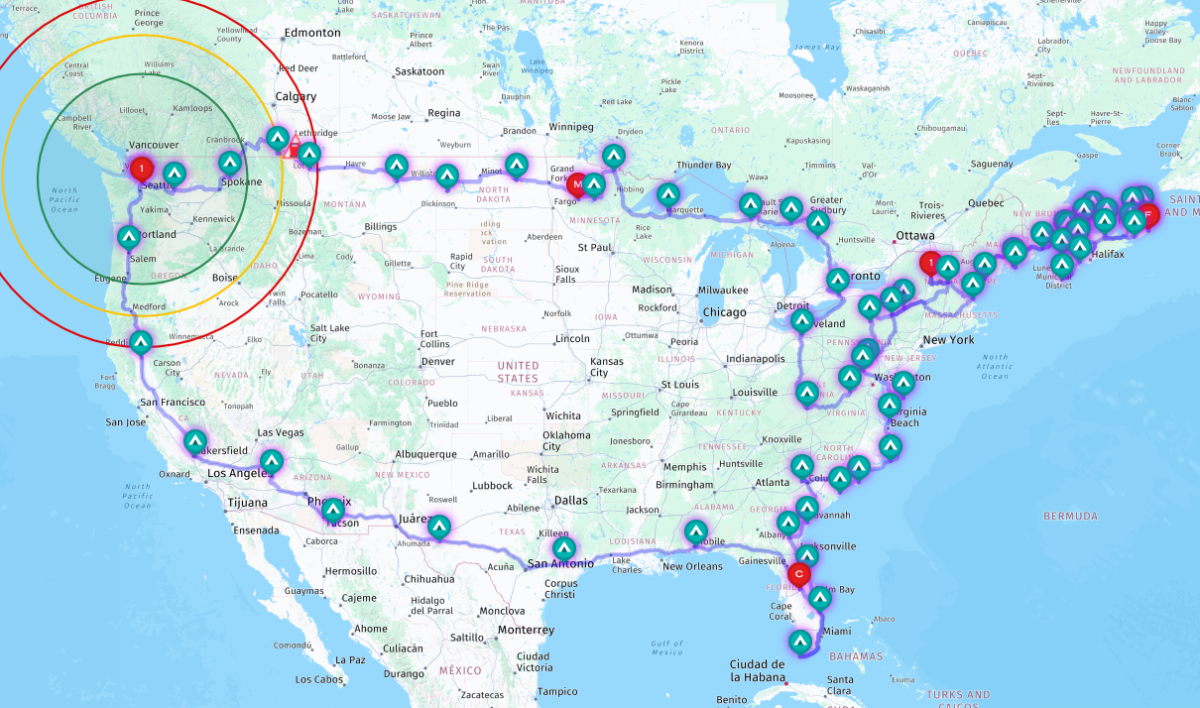
Congratulations on your new trailer. We'll be in New Hampshire at Hampton Beach in October during our our around the perimeter trip from WA to Nova Scotia to Florida across to California and back to Washington. Maybe we'll see you on the road in NH in Late August or Early October. Check our blog down below in our signature for ideas for your future travels. Craig & Rose Hull 505
-
Thanks to @MAX Burner and others who shared their installation. I was able to install the upgrade today in a reasonable time without rushing. My tip after having done the install with simple connections.. "Do a dry fit to see where the wires are going to land and build a simple wiring harness." The Light and the Fan each have their own white and black wires, it would be nice if the fan company provided a pre wired header to plug those in to the light shroud with a long bare white and black out of the harness to connect to the trailer leads. If I were to do it over, I would make my own header and tuck it up inside before securing down the fan. I think the trickiest part was measuring to cut the extension tube because of the Oliver's slightly curved ceiling. Craig
-
Thanks for the tips.
-
We're going to be on the east coast coming from west. We want to get a transponder for the toll roads. A bit confused about Ez Pass and trailers. In some articles I see you need only one transponder but have the trailer also registered. Other articles say they just count axles. In any case - looking for advice from folks back east with experience. Craig
-
Trip Planning - Wow to the Power of Wow
Galway Girl replied to HDRider's topic in Campgrounds & Parks
I believe you when you say it's tricky to setup all the various "booking sites" and having to save a number of various login's and passwords. Here's our coming season - August through December showing our Planned Stops....all but 2 are pre-booked. We started planning this back in December as we needed to book Florida sites that early. Used RV Trip Wizard for planning and a variety of other tools to actually find specific sites based on pictures of the sites. Hope you have a good trip. Craig
-
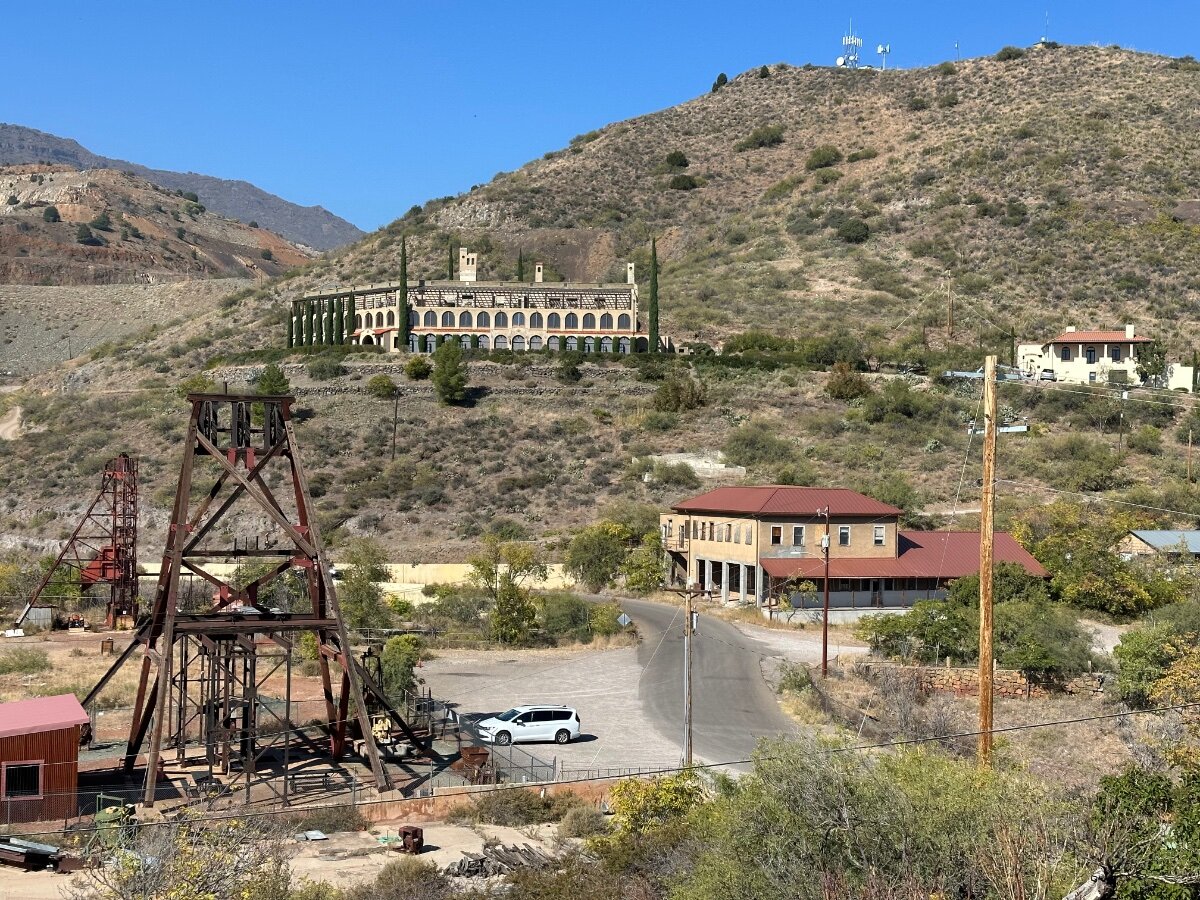
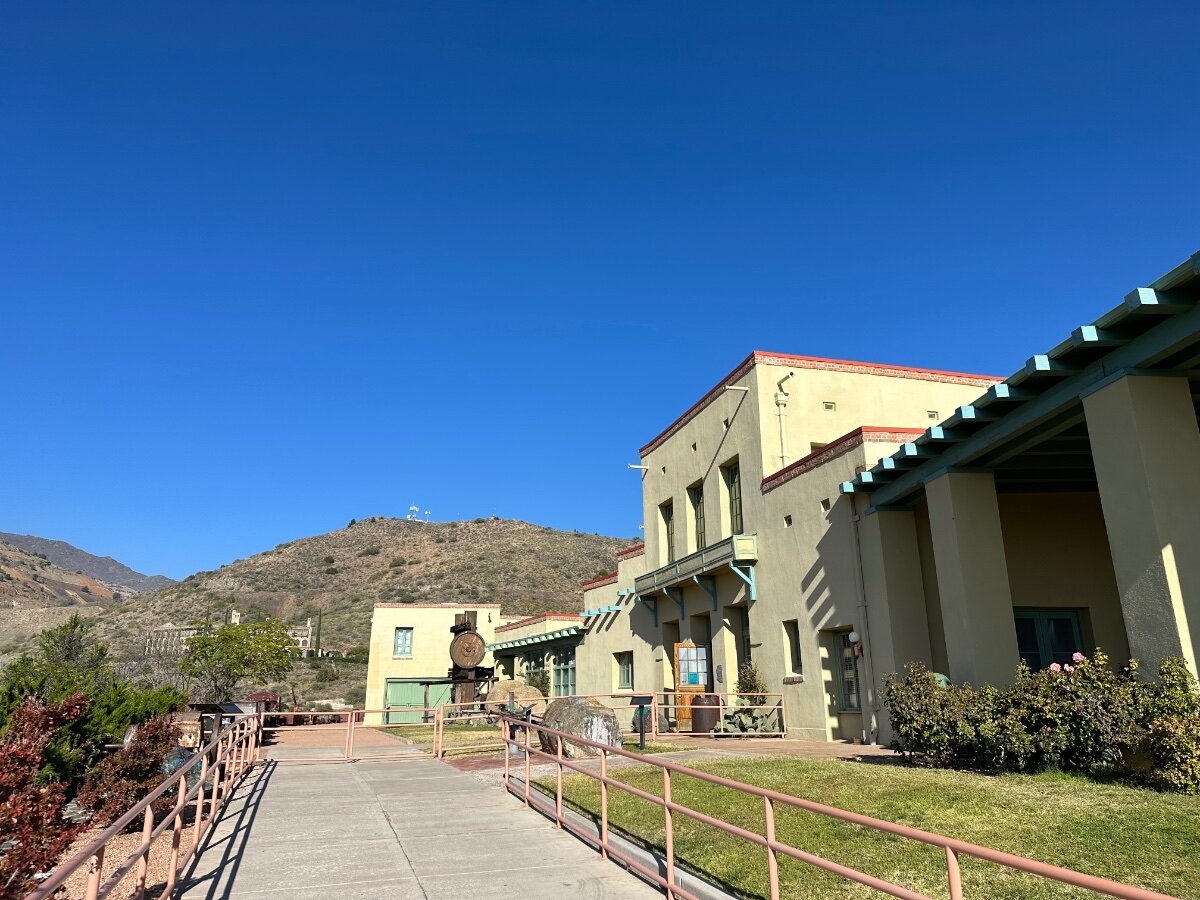
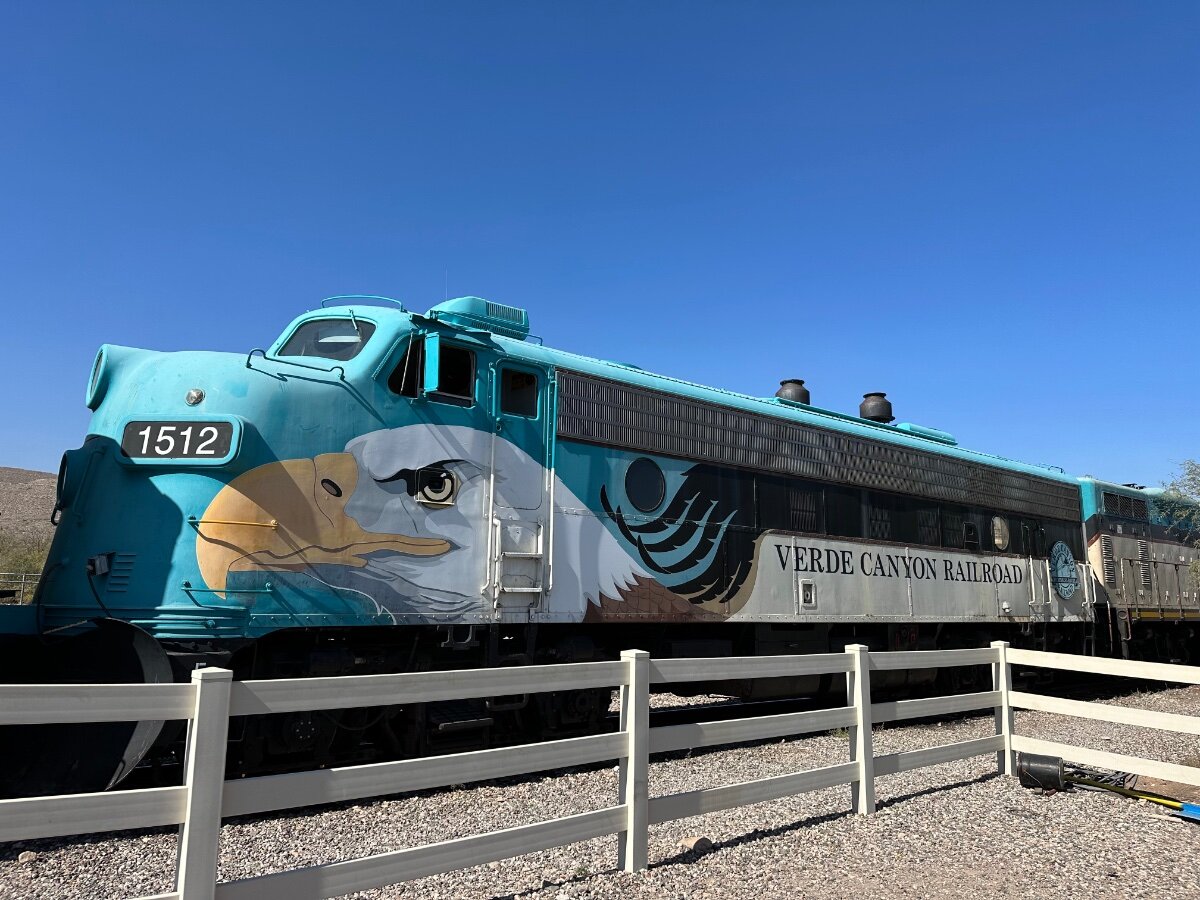
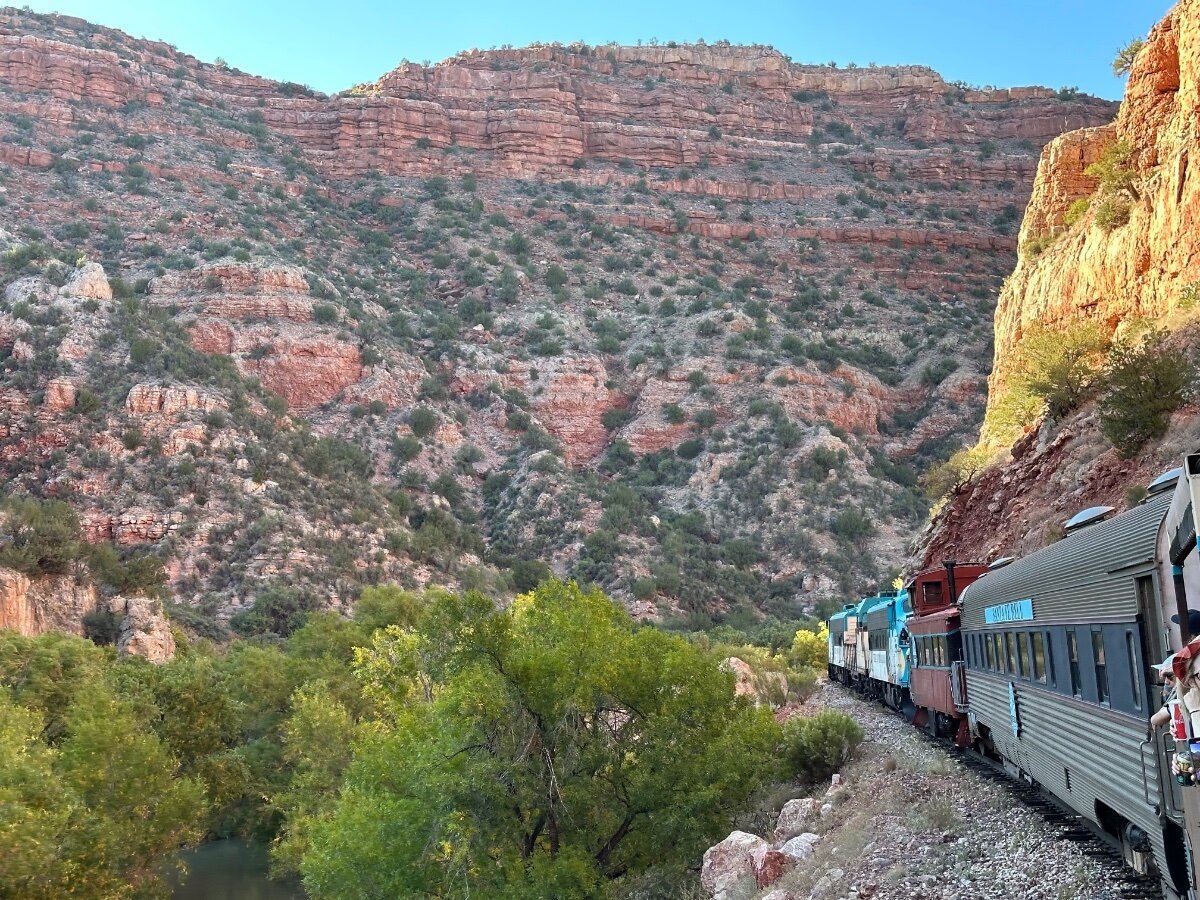
We've stayed 2 times at Deadhorse Ranch for a week in the fall. It's one of our favorite places to go as there are so many things to do and see within a short drive. The town of Cottonwood has a historic old-town with many tasting rooms and food offerings. Some ideas in < 15 min drive include: Tuzigoot Natl Monument Historic Jerome (Mining town) Verde Canyon Railroad Tour Old Town Cottonwood Wineries & Tasting Rooms including the local wine university. Day trip to Sedona is about an 45min. easy drive. You can see some of our photo's of the campground and area here: Site 8 - Deadhorse Ranch SP Tuzigoot Nat'l Monument Jerome State Historical Museum Verde Canyon RR Tour in Clarkdale about 15 min from campground