Patriot
-
Posts
2,881 -
Joined
-
Last visited
-
Days Won
146
Everything posted by Patriot
-
God Bless our military 🇺🇸
-
Great job Jason and Aaron!
-
- 5
-

-
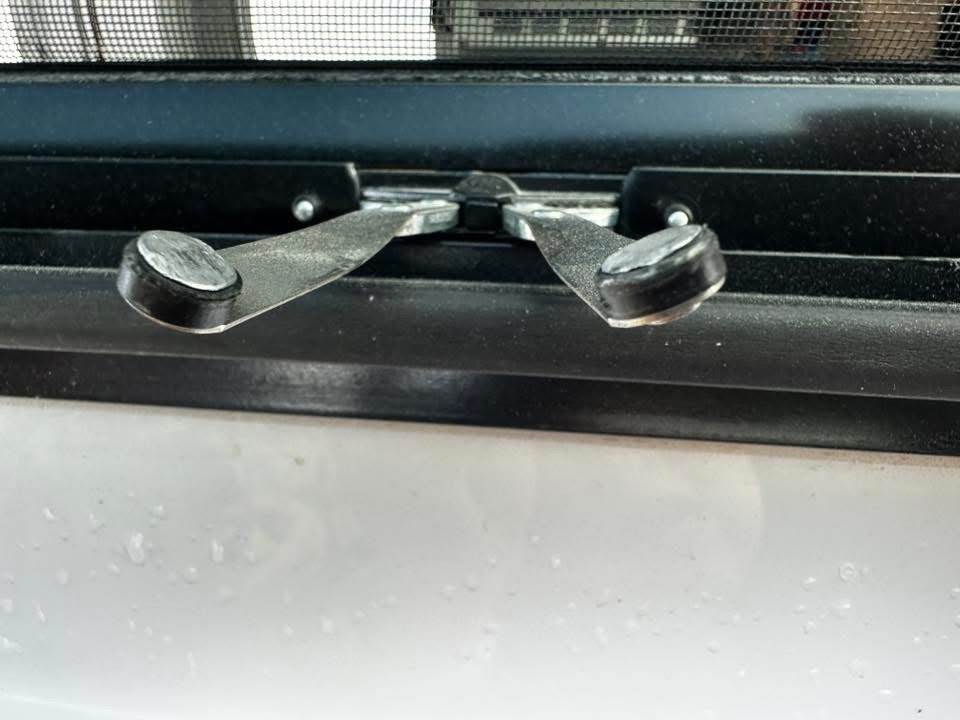
Yes, by the photo from FB these hinges are 2026 the awning style windows with the 3” opening at the bottom.

-
Back to the drawing board on awning windows.🤔 The key question is are these the new 90 degree opening awning windows Oliver has since began installing, or the previous model awning windows that only opened 3” at the bottom?
-
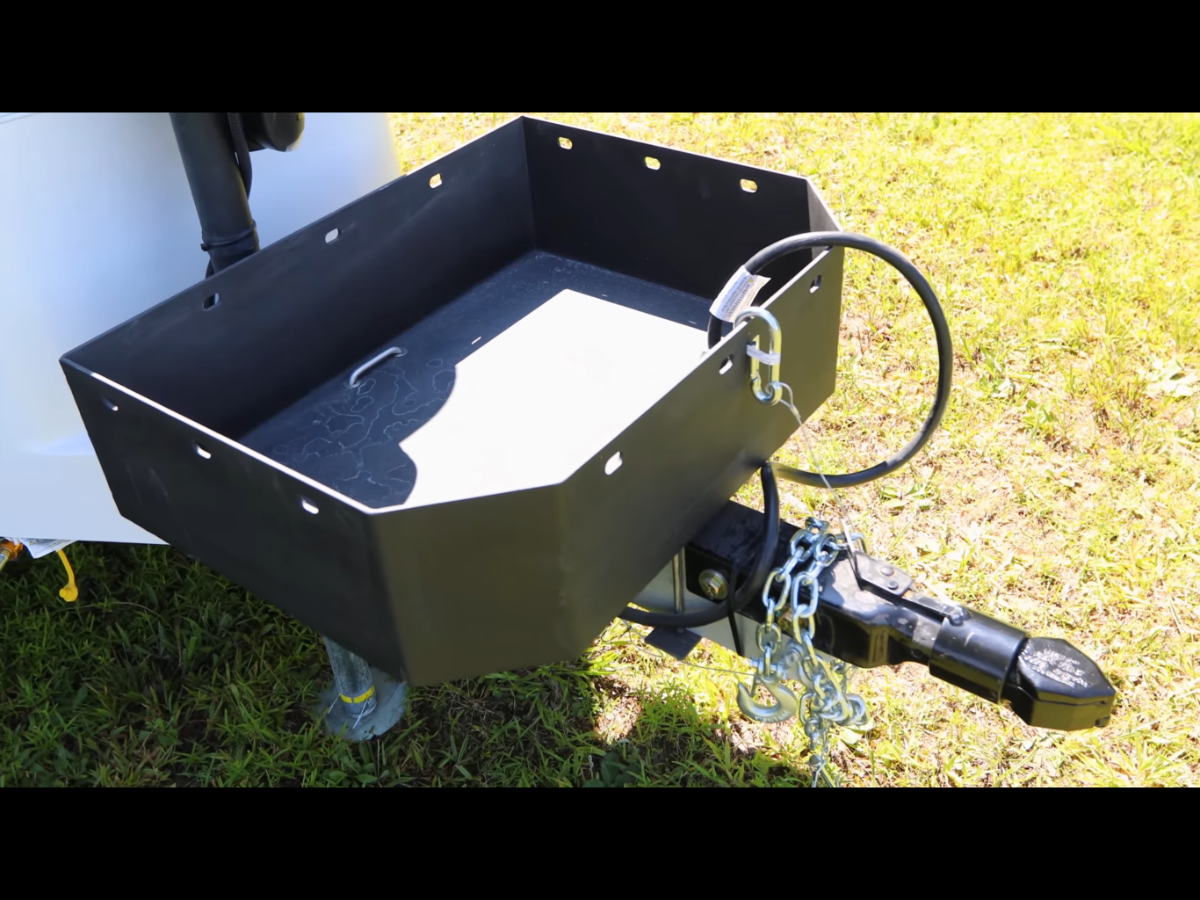
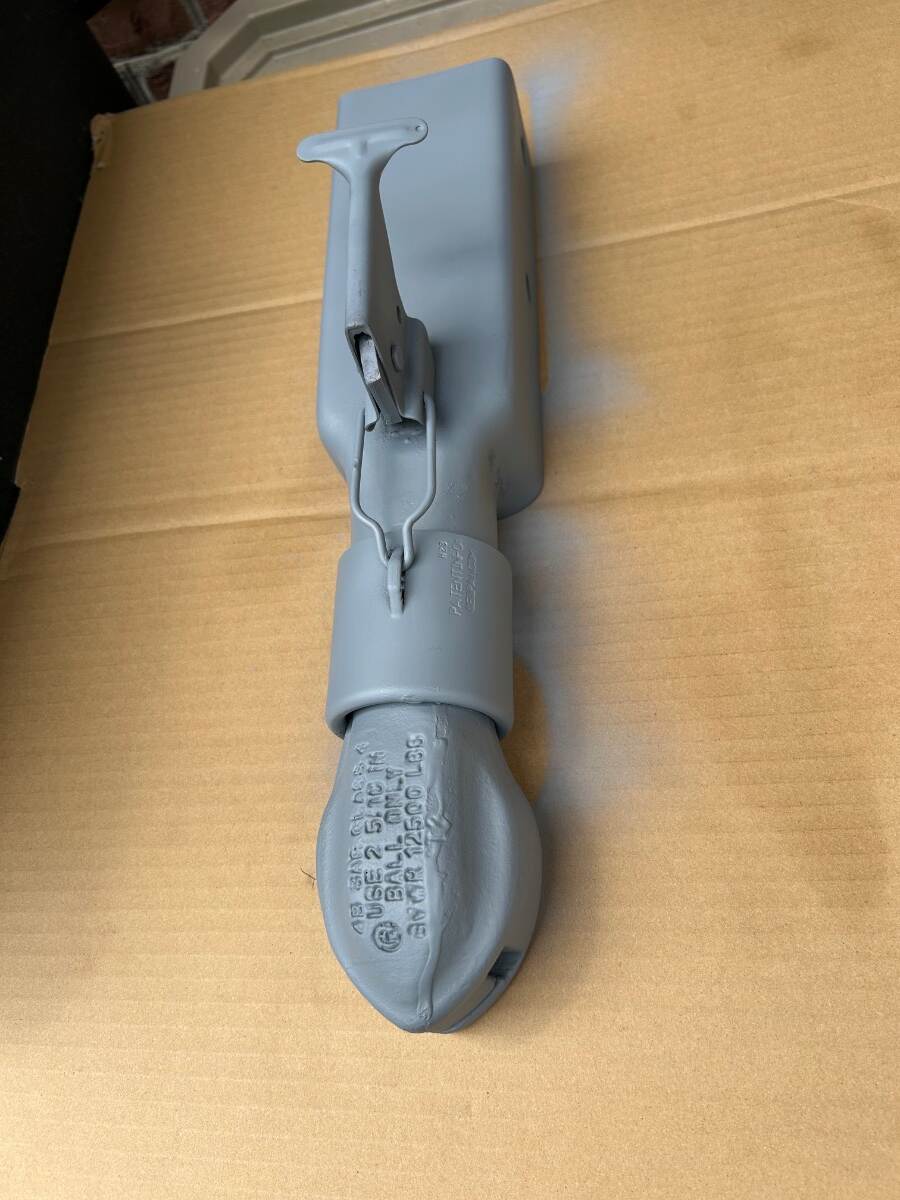
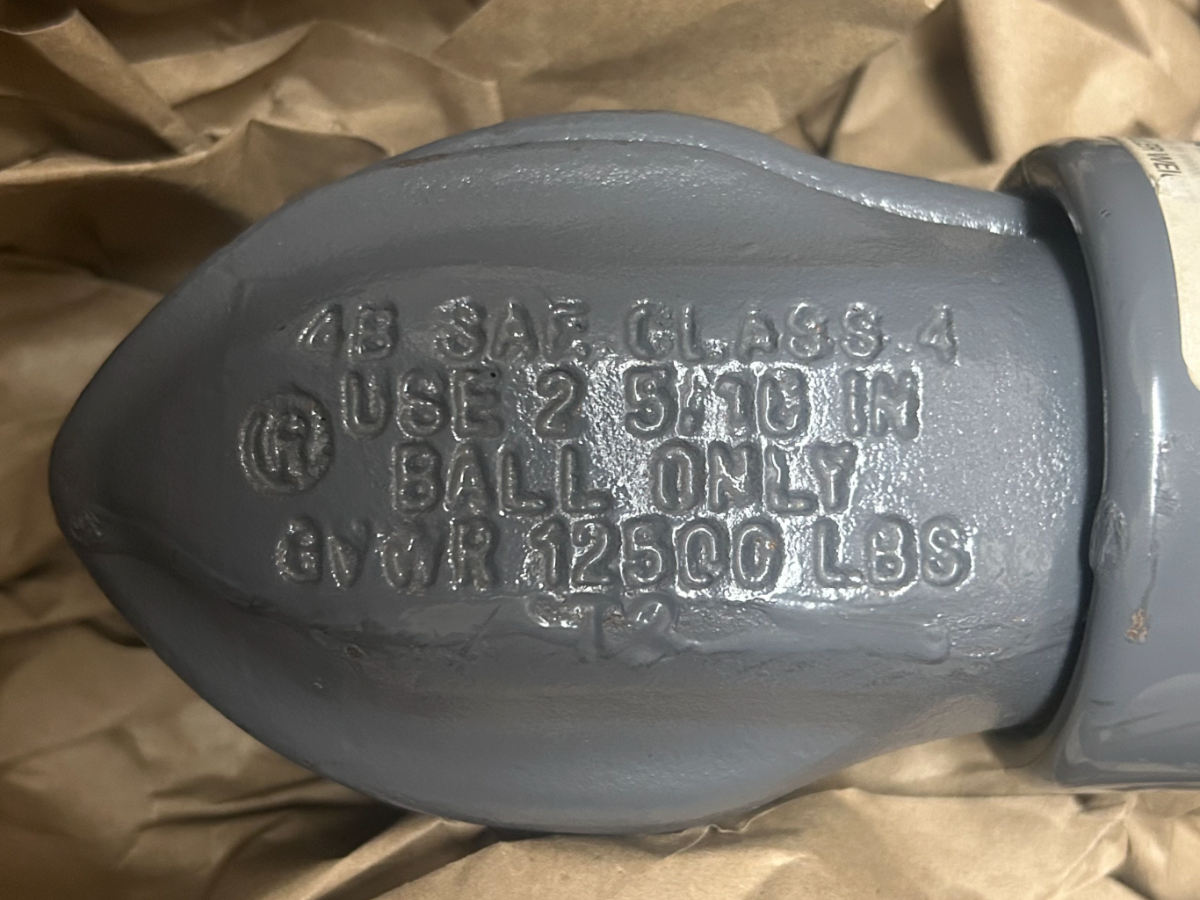
Yes, you are correct. Oliver has had to source another coupler supplier. Bulldog is supposedly in bankruptcy proceedings as of Oct of 2025. Hopefully they will restructure. Pic of new coupler -
-
Welcome and Congrats and enjoy the delivery day! There is something really special about taking delivery of a brand new Oliver, it was for us. Before you know it your day will be here!
-

Upgrading from a Bulldog 2” coupler to 2 5/16 BD coupler
Patriot replied to Patriot's topic in Ollie Modifications
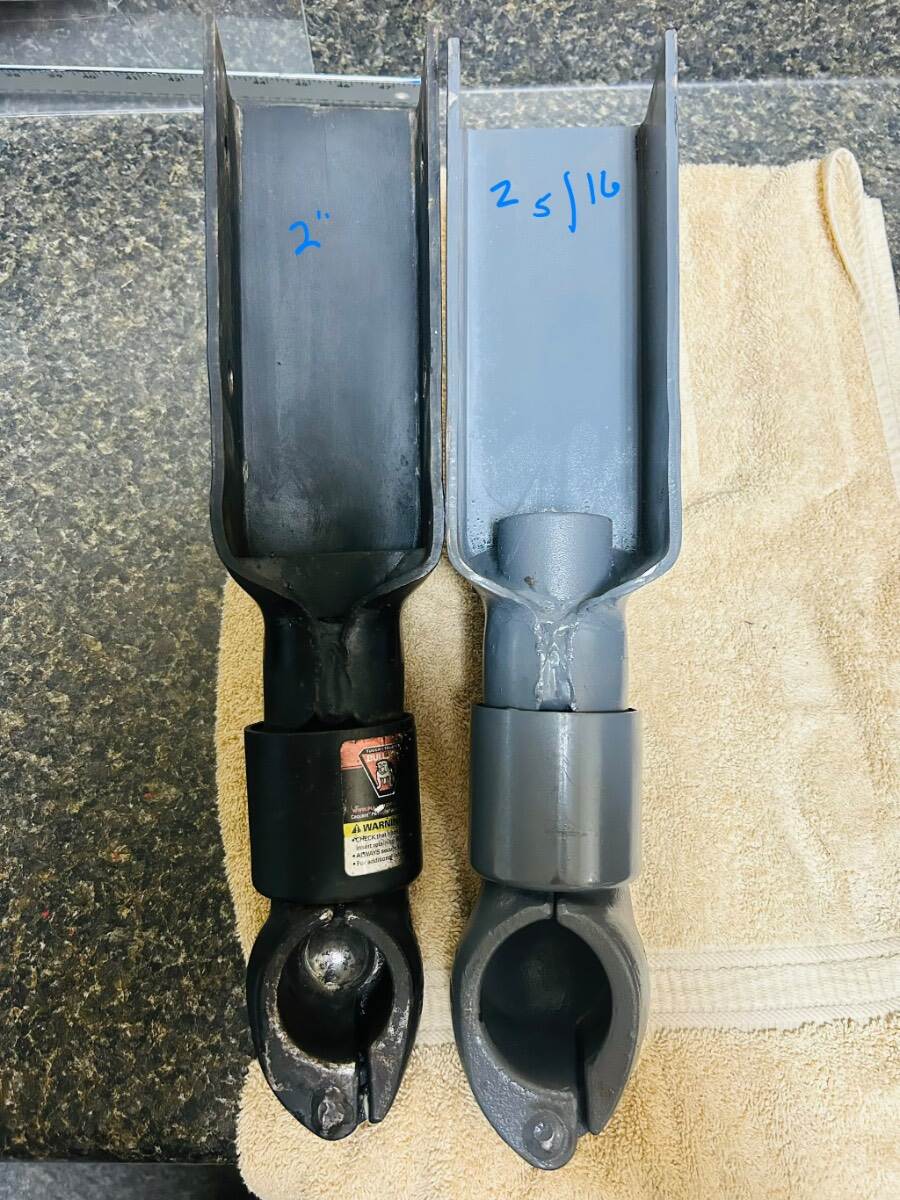
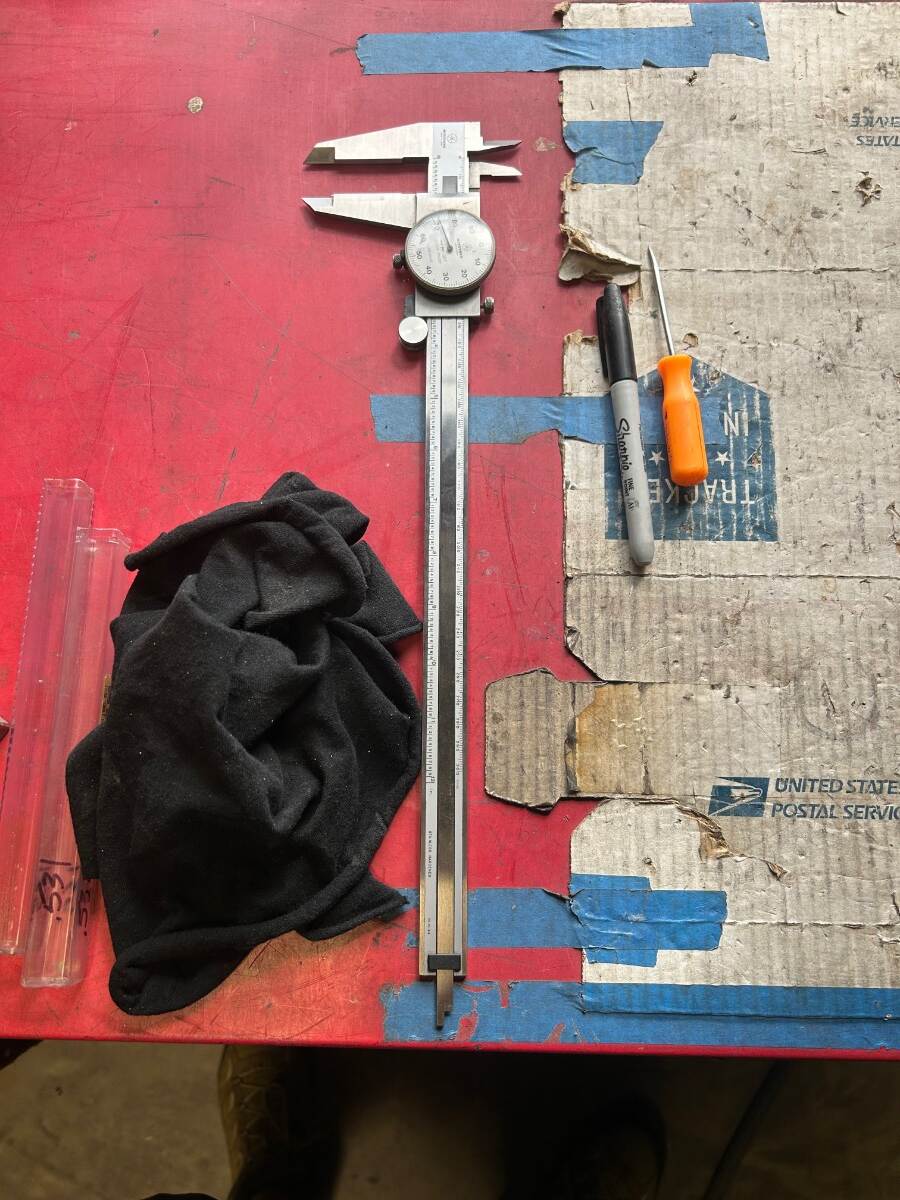
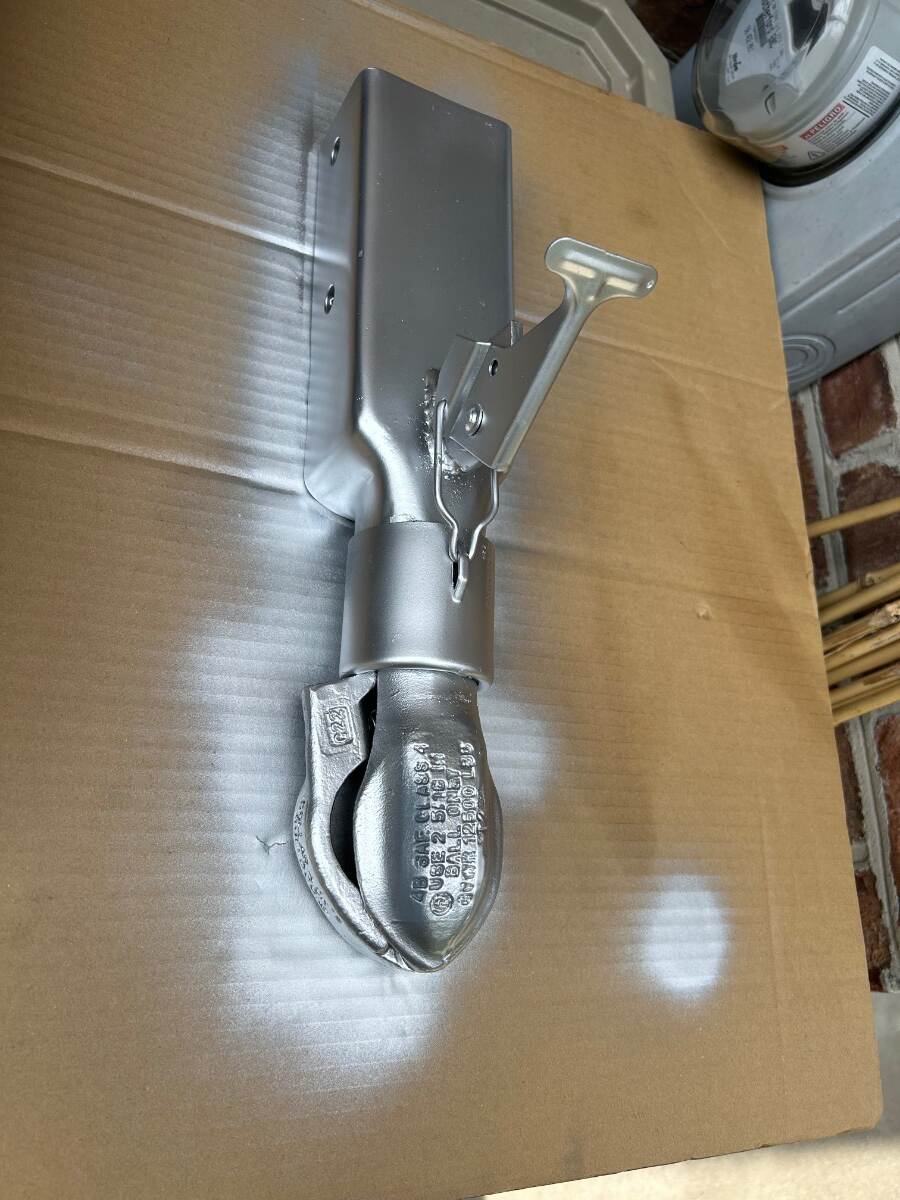
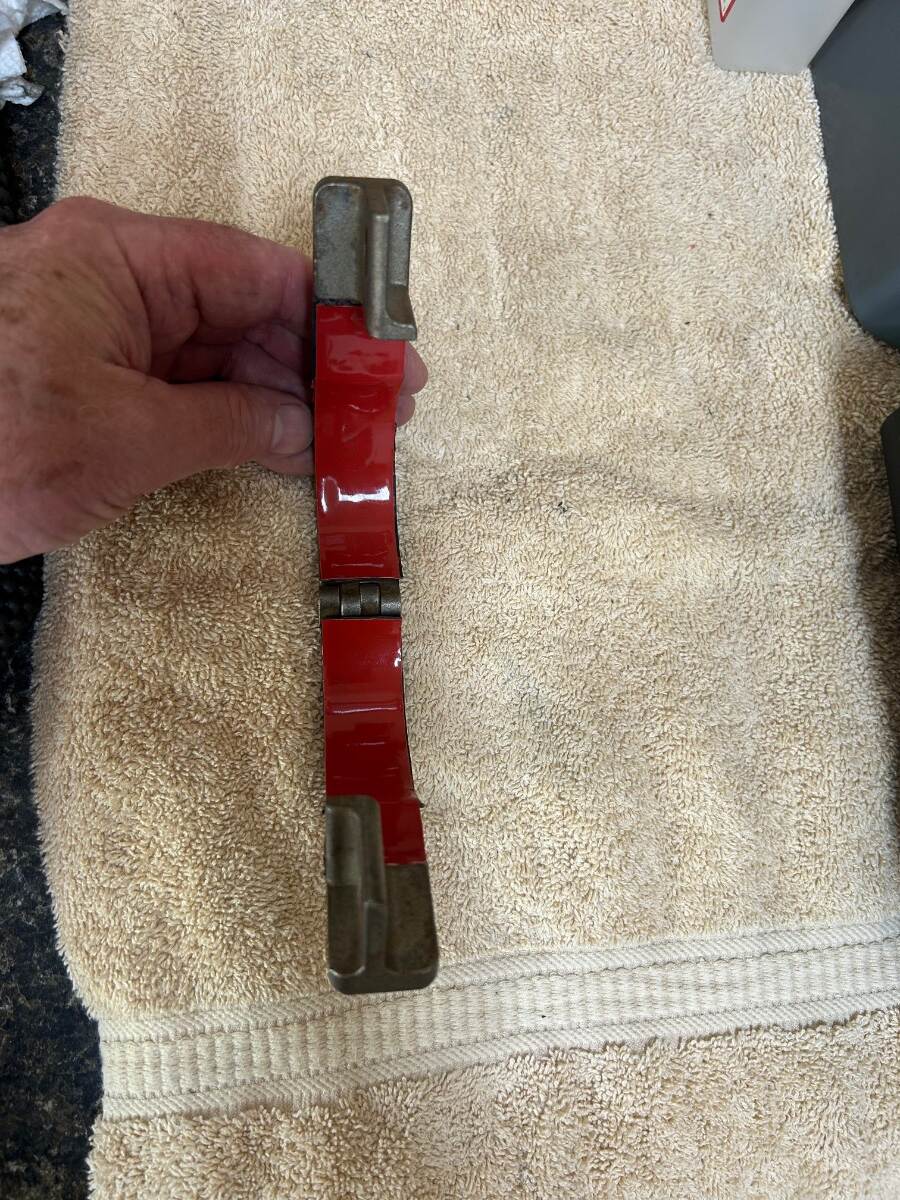
You are 💯correct on the stamping of the hitch sleeve being different on each coupler during BD’s production. This has to be accounted for and calculated when drilling new holes for a proper fit. My buddy who is a machinist measured each of the 1/2” coupler holes individually and then transferred and dialed in those exact measurements onto the new 2 5/16 coupler. He totally nailed and fit was better than factory. An inside pic of how different the couplers actually are. Pic of the bottom of the 2” coupler on the left and the new 2 5/16 coupler on the right. You cannot see the difference in the sleeve fold, but it’s not the same and thus requires exact measurement of each hole prior to drilling for proper precise alignment and fitment on the tongue. My buddies tools of the trade and his knowledge were invaluable today.
-
Upgrading from a Bulldog 2” coupler to 2 5/16 BD coupler
Patriot replied to Patriot's topic in Ollie Modifications
New Bulldog 4B4 coupler drilled, de-burred, cleaned, primed and painted, installed and torqued down. Another project completed despite the smokin heat and humidity of the day. I could not be happier with the final product fit and finish of this mini mod. A big thanks to a close friend who owns a machine shop that does precision work. He measured twice and drilled once. For those running the S/S coupler, I applied double sided tape a few years ago on inside of the coupler to keep it from the metal to metal wearing the paint thin on the coupler. It worked great, so I reapplied it again with new tape. I opted for silver metallic to match the swooshes on XPLOR. A few mod/upgrade photos.😎 Safe Travels! My buddy Brian gotter done! Thanks Brother!!
-
Upgrading from a Bulldog 2” coupler to 2 5/16 BD coupler
Patriot replied to Patriot's topic in Ollie Modifications
Hey Tony, The repair kit will work on 2” or 2 5/16 couplers. -
Upgrading from a Bulldog 2” coupler to 2 5/16 BD coupler
Patriot replied to Patriot's topic in Ollie Modifications
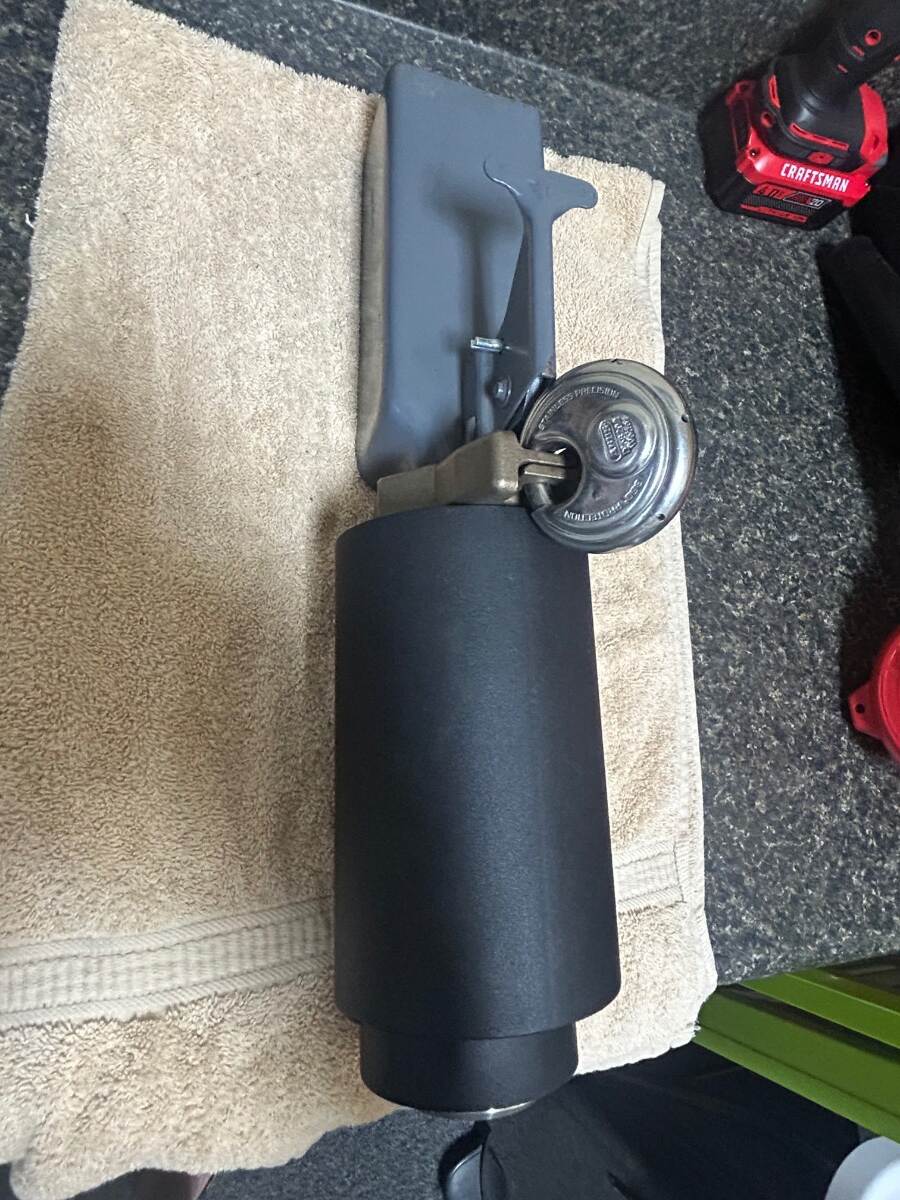
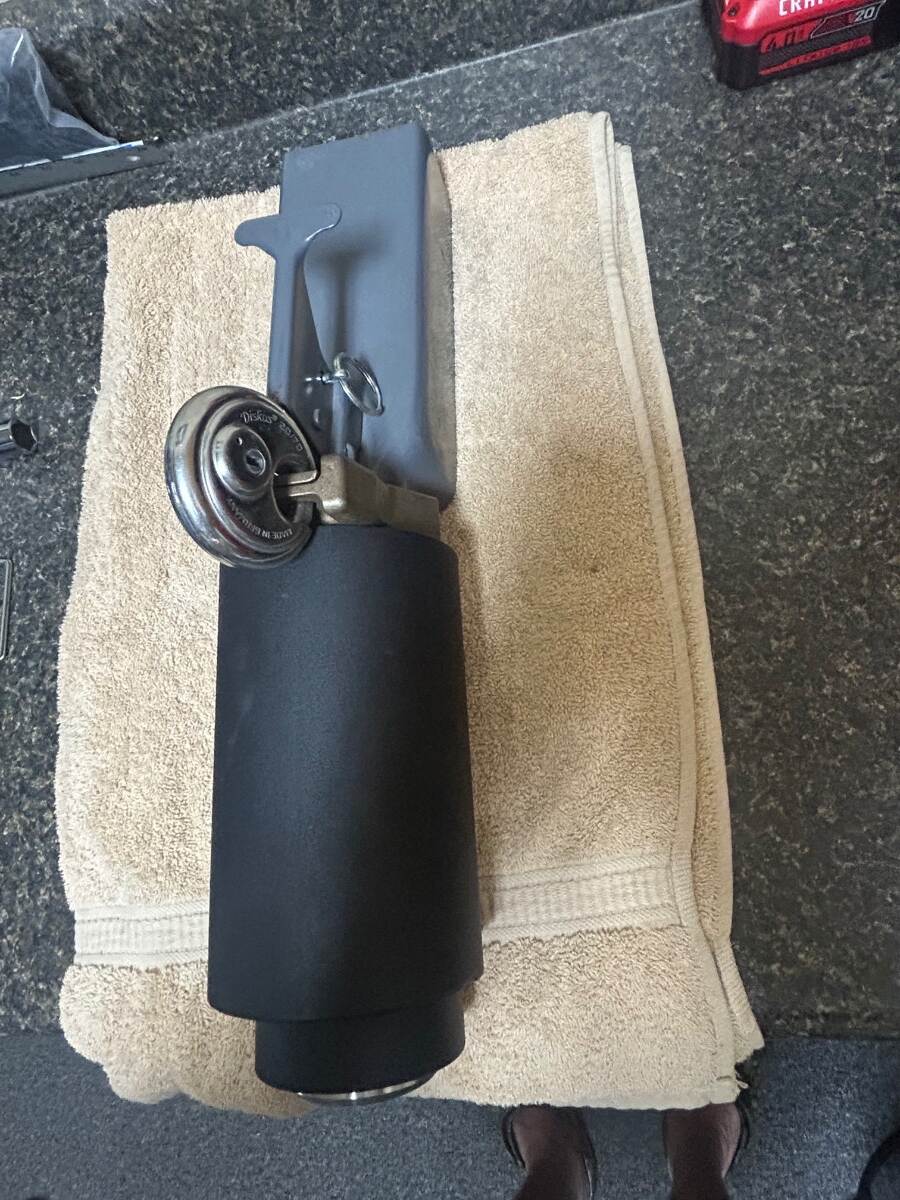
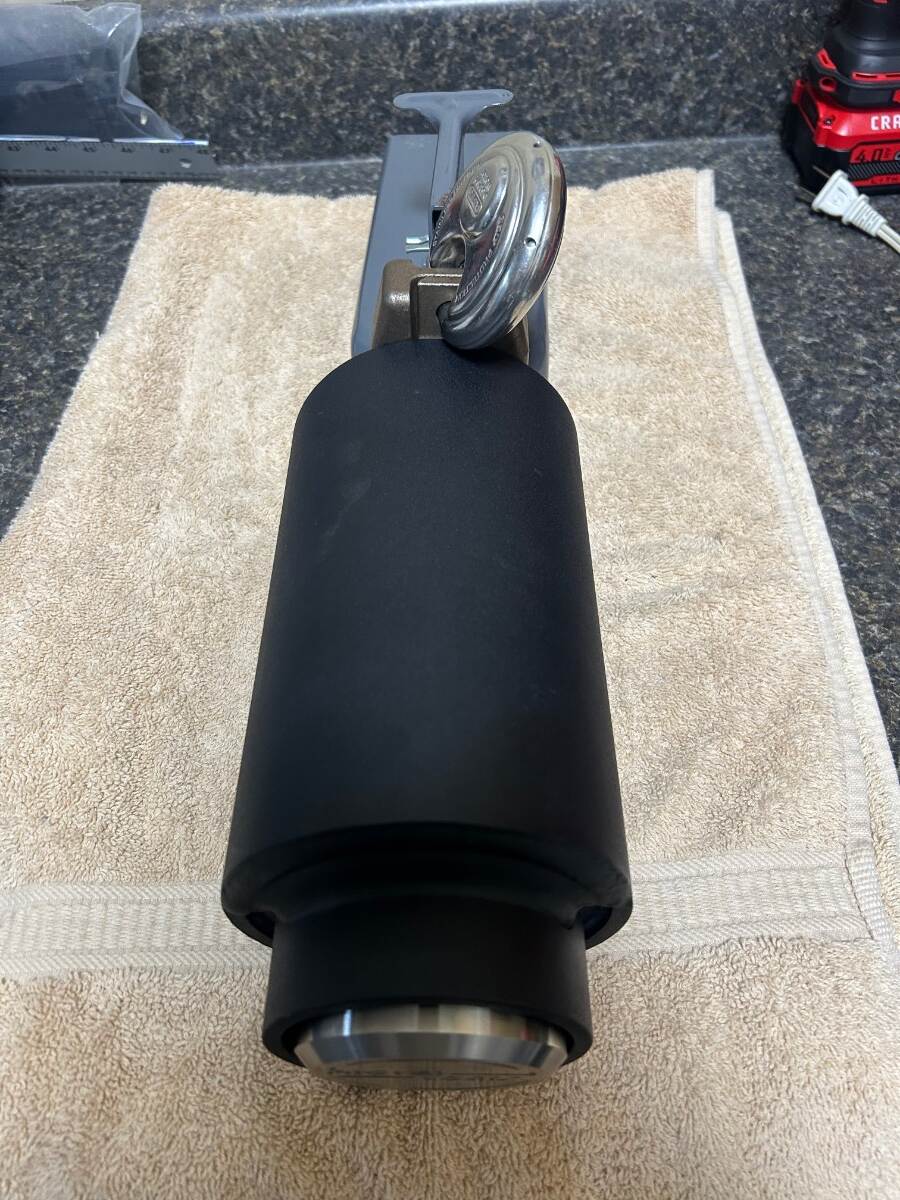
When parked at camp, I use a Proven Industries coupler lock with the optional S/S puck and Medco lock which is extremely robust. It’s just about bomb proof. **** A note to any owners upgrading to the 2 5/16 BD coupler and IF you presently use a Proven coupler lock for with a 2” ball, no need to purchase a new Proven Industries lock. Your current 2” coupler lock will work. I mocked mine up this morning on the new BD 2/16 coupler and its fits perfectly. Do not loose the keys, as I cannot imagine trying to remove either of these this locks.
-
Upgrading from a Bulldog 2” coupler to 2 5/16 BD coupler
Patriot replied to Patriot's topic in Ollie Modifications
Yes sir Bill, another big plus to the S/S collar. 👍🏻 -
Upgrading from a Bulldog 2” coupler to 2 5/16 BD coupler
Patriot replied to Patriot's topic in Ollie Modifications
Hopefully they will restructure like many companies do. Only time will tell. -
Upgrading from a Bulldog 2” coupler to 2 5/16 BD coupler
Patriot replied to Patriot's topic in Ollie Modifications
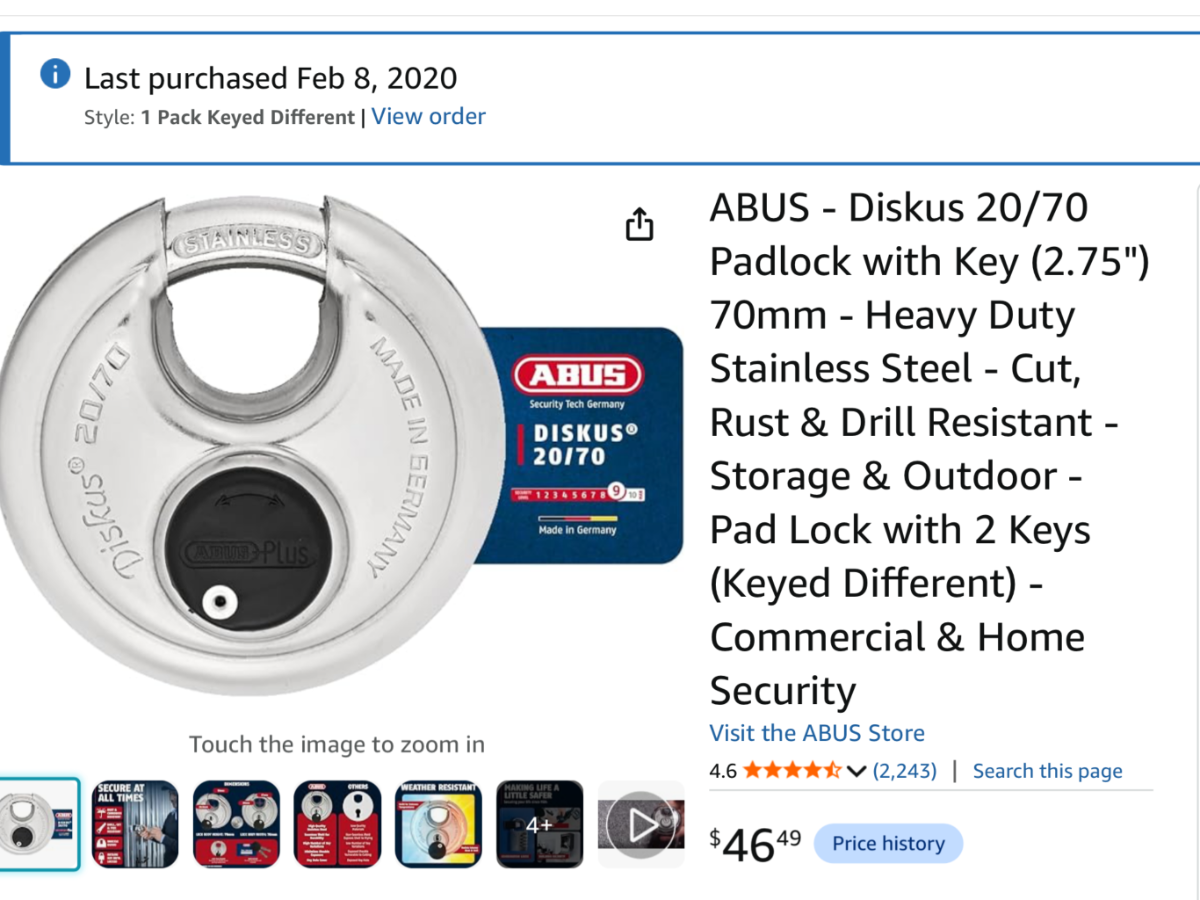
We have used this coupler security and ABUS lock combo since we took delivery in June of 2020. Since it only takes less than 5 minutes to remove the BD coupler via the two bolts off the trailer tongue it’s a good deterent and better than nothing. Also when on the road it makes for an easy eye safety check during a walk around of our rig. This combo continue to serve us well 6 years in. Both have strong reviews. I will use this collar and lock on the new 2 5/16 coupler. Another plus with the S/S collar, you cannot secure the collar on the coupler locking mechanism if the coupler is not properly locked down so the clam shell cannot be moved back on the hitch ball. A nice little extra built in secondary safety feature. https://www.amazon.com/dp/B00HL2NM0K?ref=ppx_yo2ov_dt_b_fed_asin_title ABUS Stainless lock made in Germany- https://www.amazon.com/dp/B009S5Y6ZS?ref=ppx_yo2ov_dt_b_fed_asin_title&th=1
-
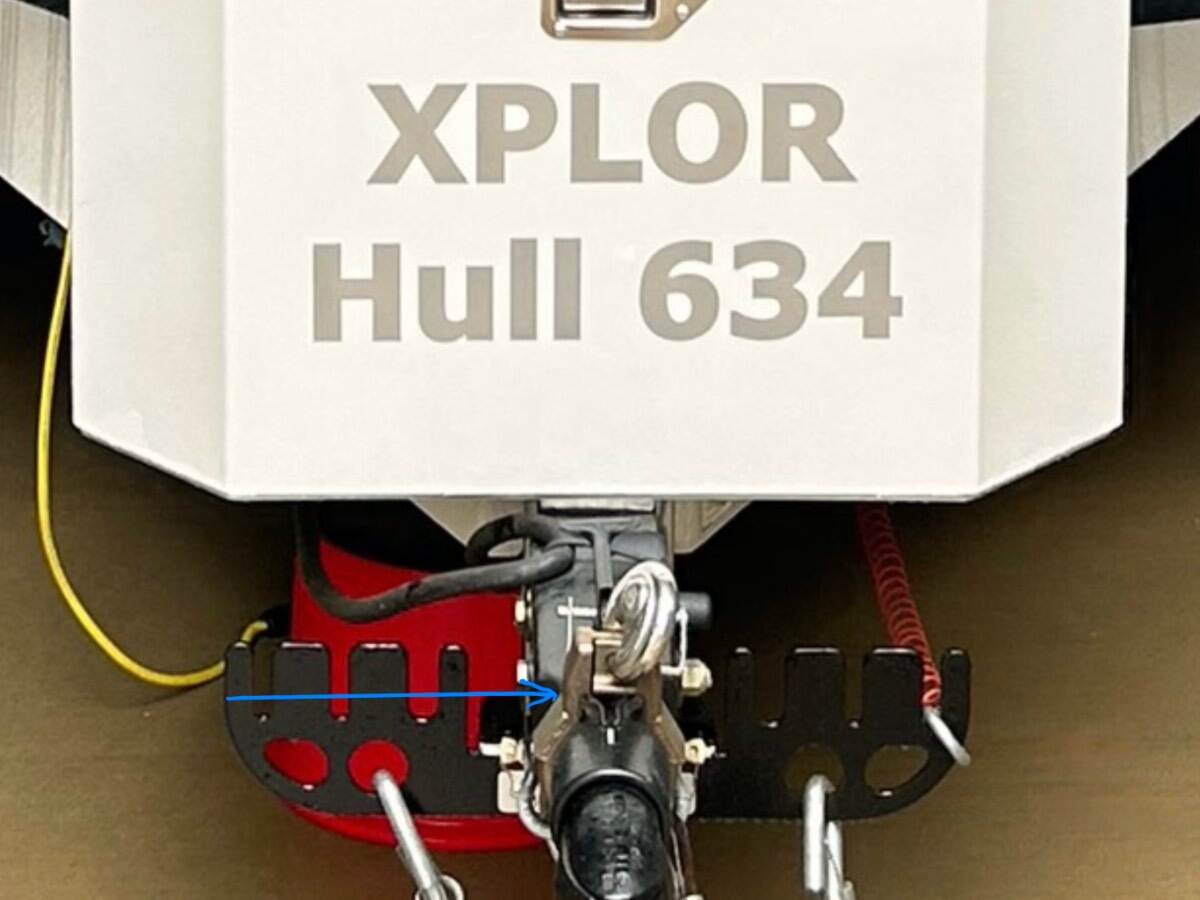
Oliver Bulldog 2 5/16 coupler upgrade. I decided to finally pull the trigger and upgrade our Oliver from a 2” 7000# Bulldog coupler to a new Bulldog 2 5/16” 12500 coupler. I also ordered a spare coupler repair kit. These 2 5/16” BD couplers are becoming difficult to locate and purchase with Bulldog filing for bankruptcy protection in Oct of last year😳. It’s my understanding, that BD is no longer manufacturing and shipping these couplers to RV manufacturers possibly due to bankruptcy proceedings. (open source) I did attempt to purchase a 2 5/16 BG coupler from Oliver and they no longer have this upgrade in stock and available to purchase and ship. Jerry at Oliver told me they have no idea if or when they will have this coupler in stock again and are seeking alternative options. Will there will be a restructuring with BD? Anyone’s guess. I will be taking the new coupler to a friend’s machine shop to have the holes precisely drilled. If you’re on the fence about upgrading to a 2 5/16 12,500 #coupler it might be a good time to search for a vendor that has one on the shelf and ready to ship. A big thank you to @rideandfly for helping source this coupler! The Vendor I ordered from was Croft Trailer Supply in Kansas City, Mo. Ended up myself, @rideandfly and @John Dorrer purchased the (3) they had in stock. If it’s an upgrade you’re considering you may not want to wait. Safe Travels! Hull#634 XPLOR
-
I understand and yes, upgrades are spendy! We also use our camp chairs for drying towels which work great too! 😊
-
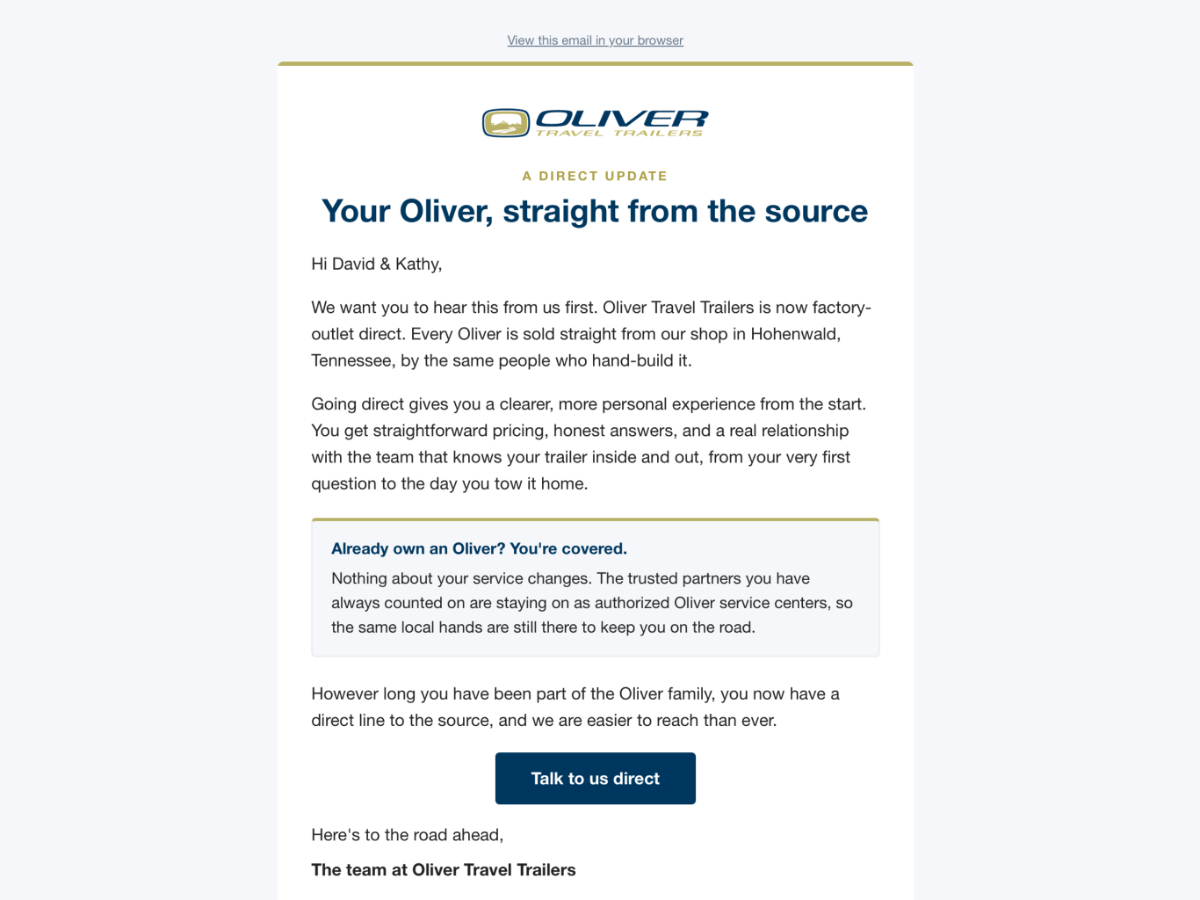
Oliver just sent this out to owners on June 30th to those who have opted receive their regular marketing emails.
-
We never did purchase a suction cup style bar. Our 1UP USA Super Duty bike rack it works great as a towel dryer or we just use our camp chairs. Necessity is the mother of invention. 😎 Old photo after our Truma Aventa factory install which Oliver did a stellar job on. We are so glad we got the low profile Truma when we did. One of our top retro mods.
-
A lot of truth..
-
Cleaning the gap around the linoleum floor
Patriot replied to Ken Root's topic in Mechanical & Technical Tips
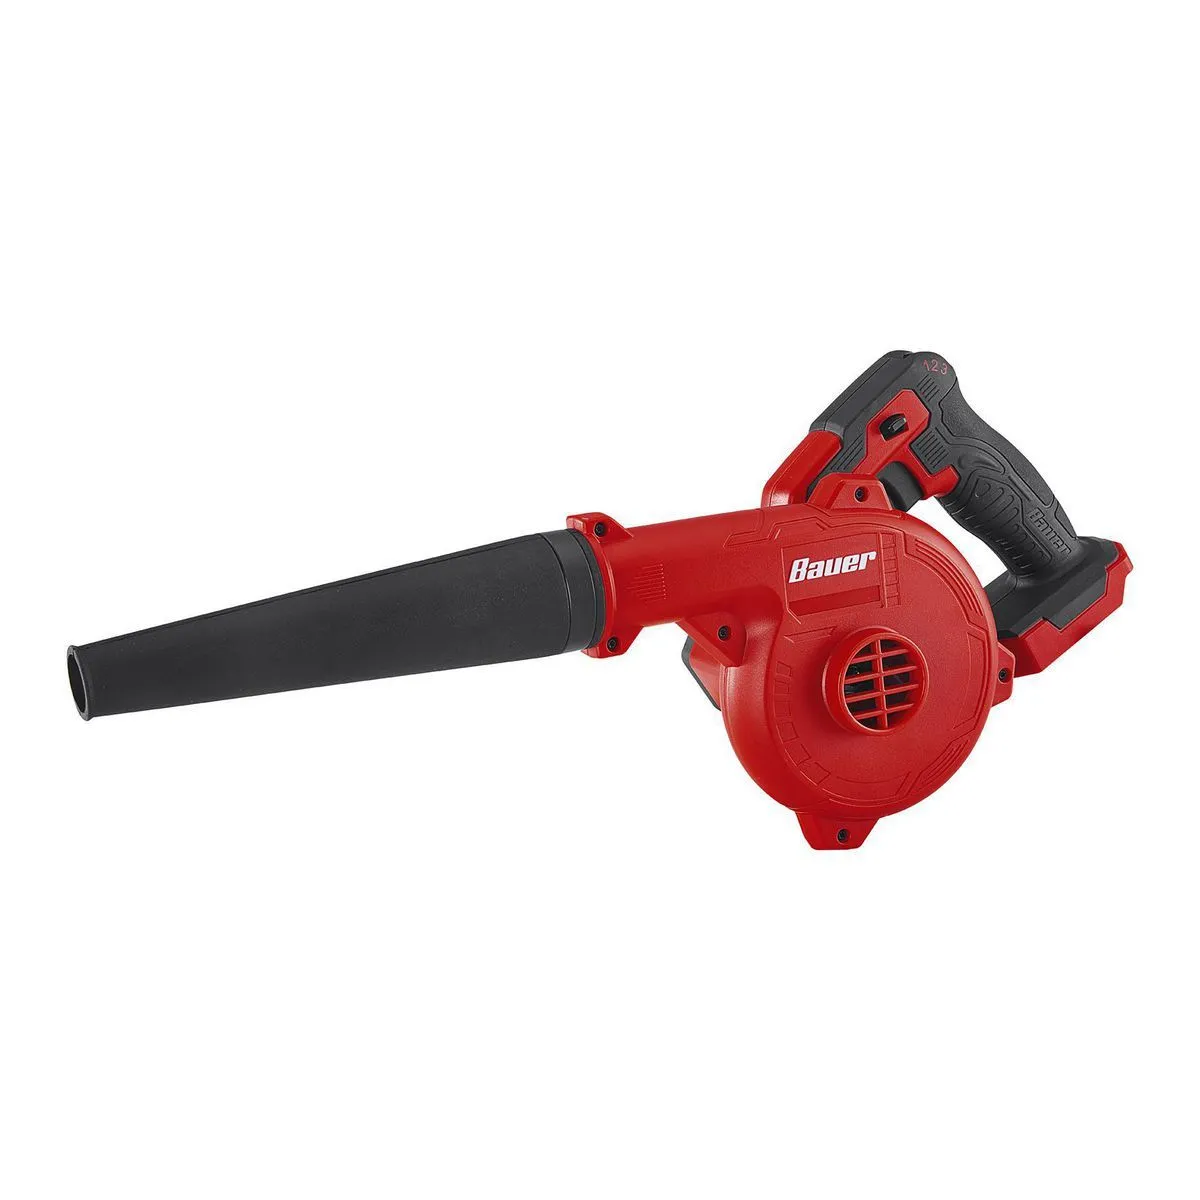
Here- no sweeping, just open the screen door dust goes back where it came from. Helps keeping the exterior screens clean too. Neither of us wear our shoes while in the Oliver. We have found this little blower is super handy. Also works for blow drying a washed TV and inside and out. “No brooms club here” 😄 Harbor Freight - BAUER 20V Cordless, 200 MPH/120 CFM Compact Workshop Blower - Tool Only $40
-
Yes, correct.
-
Lesson learned. So after a little deeper dive into cause and effect of how my water filter failed, I learned the following. Last fall when we winterized, I turned off the water supply to the Truma. I went out and pulled the yellow lever down, pulled the filter out and drained all of the water out of the Truma tank. With the system and the tank drained, I reinserted (error on my part) the Truma filter and it must have had a tiny amount of residual water near the internal plastic sacrificial disk inside the filter which resulted in it freezing and then cracking. If I had completely removed the filter and stored it inside the Oliver as I have done for the past 5 yrs, I likely would not be needing a replacement filter. Important to note, the Truma tank system was completely void of water with exception of what residual was in the filter housing which was apparently just enough to cause the sacrificial disk to do what it is suppose to do…fail. To complete my inspection of the Truma hot water tank, I temporarily used my winterization filter and the system worked as designed. We had the system set at 120d within about 8-10 seconds we had unlimited hot water in the galley and shower. Here is what I learned -open source- If your Truma AquaGo filter (or Easy Drain Lever) blew out, gushing water from the housing, the internal plastic disc or O-rings likely failed. This is almost always caused by residual water freezing and expanding inside the housing, or the O-rings being misaligned. [1, 2, 3, 4] The Fix You cannot repair a broken filter assembly with glue or tape due to the system's high water pressure. You will need to replace the entire filter/drain assembly. [1, 2, 3] Depressurize the system: Turn off your RV water pump or city water supply, and open a hot water faucet to relieve the pressure. Remove the old filter: Lift the thumb latch on the easy drain lever to drop the assembly down. Inspect the housing: Look inside the chamber for any leftover pieces of broken black plastic. Install the replacement: Pop the new filter cartridge into place and snap the lever back up to lock it. [1, 3] How to Prevent It Truma designed the filter to fail (break) first to prevent the internal mixing vessel from freezing and causing a $2,000+ tank replacement. During winterization, always make sure you pull the yellow lever, remove the filter cartridge, and drain the water entirely. Do not reinstall the filter until you are ready to use the RV in the spring.
-
@DunnYet Open source - No, you should not leave the Truma winterization (bypass) filter or standard stainless steel filter installed all season long. [1] If you are actively using your RV during the camping season, you should be using the standard stainless steel filter (or the Truma Electric Antifreeze Kit if actively in use). The official winterization plug/filter is strictly designed to replace the standard filter for winter storage and is not meant to be run full-time. Keep these quick winterization rules in mind: For Winter Storage: Drain your Truma system and remove the filter cartridge entirely. Store the filter in a dry place inside your RV and leave the yellow Easy Drain Lever closed. Leaving any filter inside during freezing weather can trap water, expand, and permanently damage the unit. [1, 2, 3] For Active Winter Camping: If you plan to travel in freezing temperatures, you can use the Truma Electric Antifreeze Kit. This specific kit can be installed in place of your standard filter to keep the water heater from freezing without draining your propane. [1, 2] For Normal Summer Use: Remove the winterization plug and reinstall your standard stainless steel mesh filter before de-winterizing and turning your water system on for regular use.