DavePhelps
-
Posts
395 -
Joined
-
Last visited
-
Days Won
20
Everything posted by DavePhelps
-
I know it's not as fun, but opening a hot water valve at any faucet will relieve the pressure in the hw tank. When first learning how to winterize my trailer, I blew out the lines with compressed air without putting the hw tank in bypass mode. I can't remember the exact sequence of events, except when I unscrewed the anode that sucker shot 20 feet across my yard just missing me by inches. Live and learn! Dave
-
I somehow missed Snackchaser's post last night. Thanks for that great idea about using a fuse instead of a breaker for the charger to battery connection! It makes good sense to me. So I will amend my proposed diagram above to eliminate the 50 amp breaker, and replace it with a 60amp ANL fuse (per JD's recommendation). Wondering if now would be a good time to add a battery disconnect switch, or if I even need one. Seems like a lot of folks have added them. I could add one to the negative 4awg wire between the battery and the ground bus. I read (Battleborn Battery website) that putting the switch on the negative lead is potentially safer, so trust their call on that. I really appreciate all the input I get here. I could hire this all out, but I really want to learn all that I can about the electrical side. And I like doing the work on my own trailer. I've done a lot of my own residential AC work, but the world of 12VDC is quite different in many ways! JD: There is a 30amp breaker between my solar charge controller output and the battery. With the 'aux' connection on the controller side and the' battery' connection on the battery side (seems correct?). The solar panel inputs are not fused, at least not inside the trailer. I need to now draw out a complete wiring diagram of the entire system. It may take a day or two as I'm pretty swamped right now with other projects. But I'll get it up here as soon as I can. Again, I really appreciate all the help I have received here.👍 Dave
-
Thanks so much JD for your help with this. I had a feeling that the aluminum plate was a bad idea so glad to get the confirmation! Regarding your statement above, do you mean I need to run a second 6AWG positive wire from the LiFePO4 battery to the Battery(line) side of the 40 amp breaker? While still keeping the two fuses connected? Or a more simple solution might be to eliminate the battery to battery connection between the 50 and 40 amp breakers in my diagram (revised by turning the 50A breaker around as you suggested) and instead connect the aux side of the 50amp breaker to the battery side of the 40 amp breaker. That way power from the LiFePO4 battery would travel down the existing 4AWG wire and then jump over to the 40 amp breaker without traveling through the 50 amp breaker as you suggested. This has my head in a knot. I'll draw it up tomorrow! 🙏 Dave
-
After reading all these posts carefully, and especially the one from JD, I have come up with this wiring plan. I still may consult with an RV solar technician but though I'd post my crude diagram here for any comments. Sorry, my computer graphic skills are non existent. Forgot to write in that all negative leads from charger to battery will also be 4AWG. This is just the Charger/converter side of the system. I left out the solar side for clarity. Also note the orientation of the fuses to make sure I got that right. I wasn't aware that there was a battery and aux side to them. There are no indications of this on my current Bussmann fuses, but I do see this on newer ones. I may connect the two fuses with a 1/8"x1" copper bar as has been described elsewhere on the forum. Mostly for a clean connection as the distance will be so short between the two. My plan is to mount both fuses to an aluminum plate that is bolted to the existing Starboard panel (?) or whatever it is that Oliver used to mount their components. Dave

-
Received this PDF from Progressive Dynamics. Thought I would post it here for anyone's interest. News to me that when calculating wire length, the combined length of the positive and negative leads must be added together. Dave Wire-Guage-for-Lithium-Charging.pdf
-
So one final question. The Bussmann circuit breaker between my converter/charger and the hot bus is 40 amp. The next size up is 50amp (Blue Sea) With my new 45 amp charger, and new 4awg wiring, it seems like the 50 amp breaker would be the way to go. Or is the OEM 40 amp breaker adequate? Thanks. Dave
-
OK, let me try to get through everyone's good advice! 🙏 My new PD converter/charger module is the PD4045CSV, which puts out a max 45 amps. My solar array is 200 watts (Elite 1 remember). I think the newer models are a bit more.... I hope to add an aux 100 watt panel in the future, so 300 watts of panels. Yes, my Blue Sky charge controller is for the solar panels, and there is already a schunt installed that communicates with my Blue Sky IPN Remote display. It sounds like 6awg works for the solar side of my battery charging, but is lacking for the increased amp output of my new converter/charger? According to Snackchaser"s chart, 4awg wire would be the correct size, for the 45amp output of my converter/charger. I think I have enough OEM 6awg wire to install new crimp connectors and keep that wire in place from my charge controller . Some of the old ones were not so great. Even have some exposed wire on two connections that were over stripped and then the heat shrink was cut too short..... For the new converter/charger, I'll run new 4awg to the battery. Sounds like a plan is emerging! Not a lot of room in my trailer's electrical space under rear dinette seat, so glad I don't have to break in to my BS charge controller, it's kind of buried in there. Thanks again everyone for helping me through this. I'm good with the tools, but with the design side of electrical work I'm a bit lacking. Best, Dave PS. guess I'll also have to check the fuse from the converter/charger to battery to make sure it's rated for 45 amps.
-
My 9 year old AGM batteries are finally at the end of their life and I’ve decided to convert to a LiFePO4 battery system. One Epoch 12v 300ah battery I am looking at will fit nicely in my Legacy1 battery box and will have almost 2x the amp-hr capacity of my 2 6v AGM’s. . I have ordered a new Progressive Dynamics charger/converter module as my old one does not have the lithium switch or the other manual means to charge lithium batteries. So this is all good. My question is about the wiring. I do not have an inverter, nor do I plan to get one in the future. Between propane and 12VDC, I feel pretty comfortable. My current system however is wired with only 6awg wire. This seems way too small (or not??). The crimp connections are also of poor, bordering on dangerous quality. So I want to redo all the wiring from the batteries forward. Distances are short but with the new lithium batteries, I’m wondering what gauge wire is recommended? I have the Blue Sky charge controller and can’t find in the OM the max wire size it can accommodate. Any other ideas or cautions for this conversion would be appreciated! And thanks to those who have posted a lot of great info in other posts about this conversion. Cheers. Dave
-
I took both my torque wrenches to my auto mechanic. I've been a loyal customer and he was happy to take them. When the Snap-on truck stopped by, as they do fairly regularly, he had the calibration tools on hand in his truck as they regularly test/calibrate torque tools for all the shops they visit. One of my wrenches was a Snap-on, the other was a Precision Instrument. Fortunately, they both tested in spec. Good to know! Dave
-
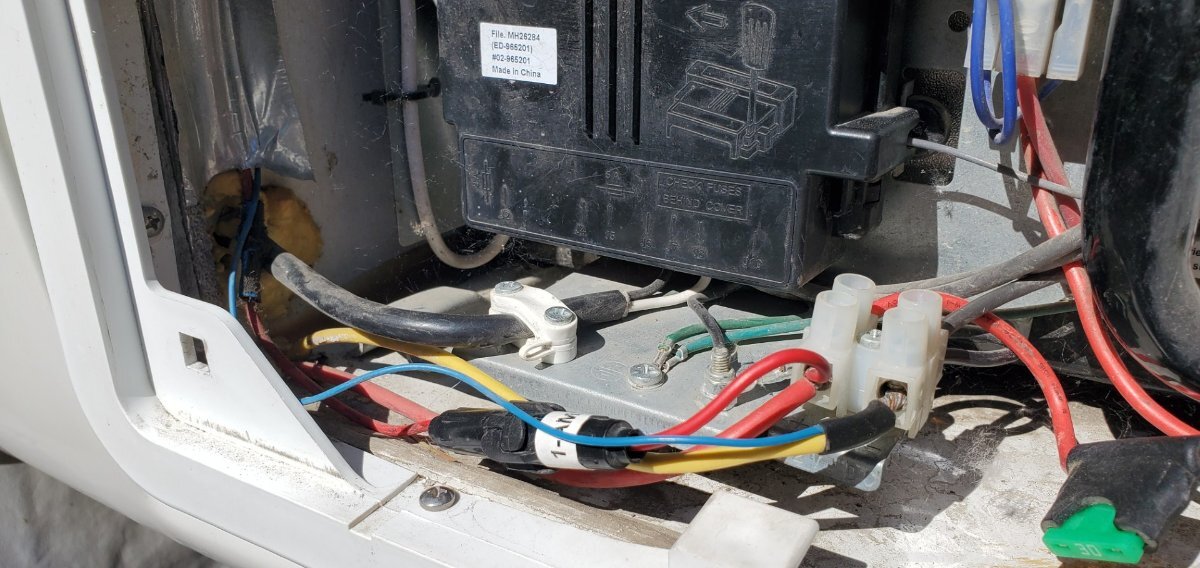
I had the same issue with my aux cooling fan not coming on. Once again, the issue was a loose connection. That blue wire coming off the fan ends up coming out on the left side of the lower refir access panel. Look for the silver tape on the left side of the pic. There it combines with another yellow wire and inserts in to a terminal block (I believe that is what these are called?). In my case the blue wire was loose in the terminal block so I carefully braided the two wires together and reinstalled them in to the block. I bypassed the temp switch to verify all was well and the fan fired up, which it was not doing before. Now whether or not the temp switch is also bad is another story. I hope to test it next trip out. But check that blue wire connection at the terminal block! Good luck. Dave
-
This is unexpected, and a little concerning. On my 2015 LE1, the water heater and refrigerator have separate fuses, as they should. So to Ron and Phyllis, check your panel! Dave
-
How did you test this? I ask because if the problem you have is a grounding issue, then you may still have power to the receptacle. If you tested by using the hot and neutral wires supplied at the plug, and the neutral is bad, then your meter will show no power. Most all of my electrical issues have been with bad (loose) grounds. Hook up your meter to your supply (hot) wire and use another neutral/ground to see if you get power. If you do, then you know it's a grounding issue and you can start tracing that back to the bad connection. If you still have no power using a different ground, then most likely it is a supply line issue, so work back from there. Also, since your receptacle is out and disconnected, I'd do a continuity check to be sure it is functional. Finally, I have the Dometic 3-way refrigerator and there is a 5amp fuse for the AC heater hidden away in a control box attached to the back of the refir, accessed by removing the lower vent outside. Check your manual to see about yours. Time to buy a multimeter if you don't already have one! These issues can be challenging to trace. Just be methodical and don't ignore the grounding side of the tests. Good luck. Dave I edited this for some better clarity...I hope.
-
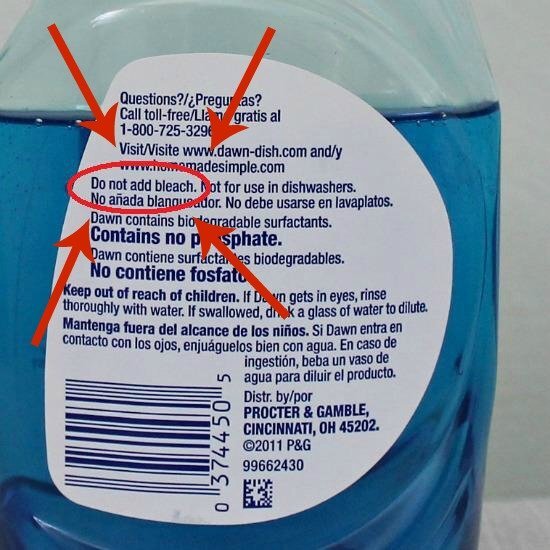
Wow, thanks for the update GJ!! I don't know if Dawn changed their formula, but back in the day, the label said "do not add bleach"! I checked my latest bottle and this warning was not on there! I love Dawn so am not disparaging it in any way. I will say, however, that when some bleach has found its way into my Dawn mix, the smell definitely changes and is more noxious. Maybe there is a Ollie chemist among us who can enlighten us.... Cheers, Dave
-
I'm pretty much on the same page with what Mike said above. With the black seals, I have never had a mildew issue, so haven't used bleach or other products as part of the cleaning process. My Ollie is stored out in the open, but if I lived where it was very hot and humid all summer, and mildew became an issue, I would change. Then I would wash the seals, then use a mild bleach solution, then 303.... Just don't add bleach to Dawn detergent if that is what you use. The ammonia in Dawn will combine with the bleach to make chlorine gas, not something you want to be breathing! The seals are easy to remove and replace and have to come off for window track cleaning anyway, so I try to get to them once a year if I can, sometimes I miss a year. Dave
-
I have the black seals. I take them out every year, and clean them with the same soap I'm washing the trailer with. After they're dry I give them a good wipe down with 303 Protectant. https://www.amazon.com/303-30313-CSR-Protectant-Plastic-Fiberglass/dp/B00KN0UOEE This has worked well and has kept the rubber supple, although they have shrunk a bit and don't fit completely around the perimeter of the windows. Maybe an inch short, the gap I place at the top. Can't remember if it came this way. I May replace them just for the tighter fit, but the 303 has otherwise kept them in good shape 8 years later. Dave
-
Talk of sealants always create quite a stir. Just go on any boating forum, look up sealants and stand back!! What I have used with success is this product: https://marineformula.com/products/marine-formula-10oz-aerosol Yes it's expensive, but I have been successful removing embedded silicone oils from the gelcoat with some wet sanding and a final polish. You will not sand through the gelcoat with 1200 grit paper! I would still do a reseal around the perimeter of your windows/fixtures as this is your first line of defense from water intrusion. It can be done well and look great. It just takes time, a good tape masking job, and an understanding of the ins and outs of the sealant you want to use. You don't know how good the butyl tape (if that is what was used) job was done under the windows during installation. So I would not take chances there. The pic of your window makes me cringe. Whoever did that really had no care for aesthetics or function. Use the Debond (there are also other products, but I haven't used them), a plastic razor to get the bulk of the old sealant off. Then go to the wet sand stage. Try to keep the Debond contained to the work area. Dribble a little on and start scraping. I just "resealed" my fender flares! Strictly an aesthetic decision! I think it looks much better. But certainly not necessary. Dave
-
Butyl tapes do indeed have strong adhesive qualities, and Bed-it is no exception. Of course, their sealant properties are their strength and the main reason for their use, but they also create a tenacious bond to whatever they stick to. https://www.generalsealants.com/butyl-tape-the-ultimate-guide/ Now if it is a structural application we're talking about, mechanical fastening would also be needed. But for the Oliver lense, I don't see that as necessary, and possibly a situation is being created where more pathways for water intrusion are being created by adding fasteners. My lense stuck tight to the butyl tape, then it was edge sealed, and several years later, being stored in the open outside in the PNW, not a leak. Everyone will have their system. I am intrigued by the Polyethers though. Unfortunately the tube of PL Marine I bought to try out was just a PITA to tool off (what the heck do you use???), and I threw it out and went back to my tried and true Sika 291. Maybe I had a bad tube. I may try the 3M version next as I like that Polyethers are compatible with more materials than polyurethane. I have had, however, no adverse reactions with the 291 on the Oliver lense, or the other plastic components on the trailer. If I was bedding these components, I would not use 291, but for edge sealing, so far so good. I do think though that the Polyether will be a more versatile and useful sealant going forward. Bummer about Oliver moving exclusively to silicone. They're not doing anyone any favors by going that route. Don't know what kind it is so waiting to hear more about it. Regarding silicone contamination of the gelcoat and future resealing issues. I have had good results wetsanding the afflicted area out with 1200 grit sandpaper and the appropriate solvent. When spritzing the area with water no longer beads up, the silicone oils have been removed. It's a pain but necessary if you want good adhesion, even if you plan to reseal with silicone...but don't do that!! Cheers. Dave
-

Trailer batteries not being charged by TV while under way
DavePhelps replied to DavePhelps's topic in General Discussion
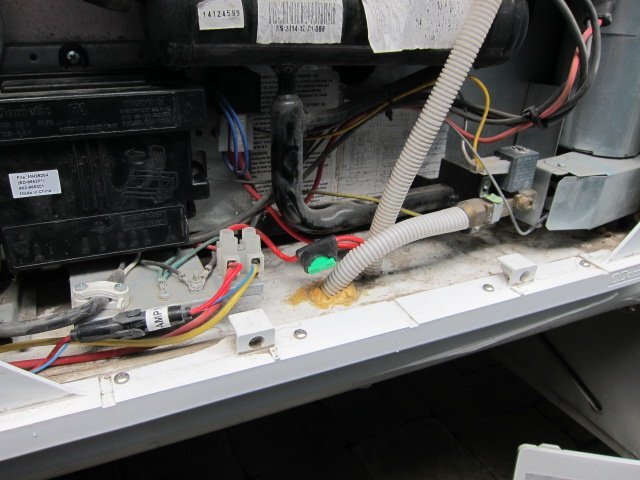
Thanks JD for all your input. My batteries are the Lifeline AGM's and they have been great. In fact, I may just replace them with the same when the time comes as they have completely met our electrical needs over the years and have some advantages over the lithiums like cold weather charging, TV charging, and cost! The 30 amp automotive fuse for the fridge's DC heating element is seen when you remove the lower fridge vent/access cover. It's green as you can see in the pic below. Inside the black box on the left are two cartridge fuses: a 5A ac heater element fuse and a 3A control system fuse. We bought a fridge button guard from RV Widget Works as it is very easy to bump into those fridge selector buttons and change a setting. Happened to us a few times and since putting the guard on, no problems. http://www.rvwidgetworks.com/Photo-Gallery.html Thanks again for your tips and insights. Dave
-
Trailer batteries not being charged by TV while under way
DavePhelps replied to DavePhelps's topic in General Discussion
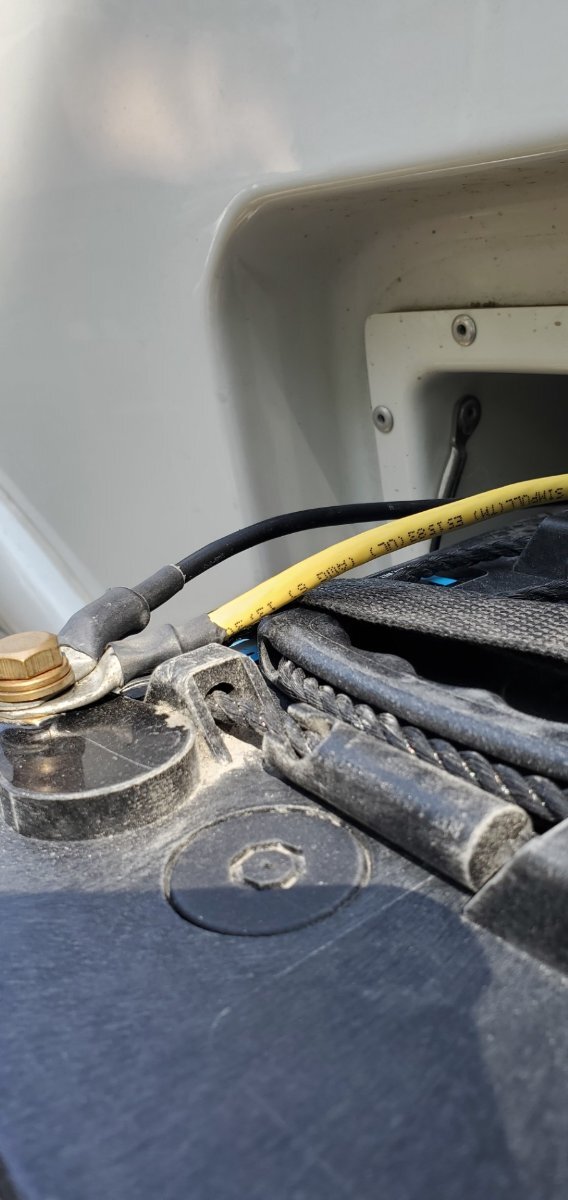
Went back for another look and my setup is very similar to JD1923, minus all the inline fuses. This time I disconnected the black wire from the buss and retested with all power sources disconnected except my TV. That black wire tested 12.8V with my engine off and 14.5V with engine on. The buss was dead. So that mystery is solved at least. The crimp on that wire connector was pretty awful. I hope Oliver has upped their game with those. Onward. Dave -
Trailer batteries not being charged by TV while under way
DavePhelps replied to DavePhelps's topic in General Discussion
So the black wire you disconnected is the charge wire from your 7pin plug? This is what I have pretty much determined for mine. To check this, I disconnected the trailer batteries, shut off the solar, disconnected shore power, and plugged the 7pin into my TV. Multimeter showed 14.51 V at the bussbar. I didn't disconnect the black wire from the buss for the best test, but am pretty sure that black wire is the 7pin charge wire. Hopefully you agree! This leaves me a little stumped as to what my refir problems are now. Since my batteries are now 9 years old, I may get them load tested. Also, while checking the 30A in line blade fuse that protects the wiring for the refir's DC heating element, it pulled out broken. That could have been me as it was hard to pull out, but maybe a bad fuse was the issue. Have since learned that you can check those fuses for continuity without pulling them.... So there is more to work out. It might take another trip to see if it happens again. In the meantime, I'm learning a lot about my electrical system! Thanks for your response. Dave -
Seadawg, What do you use as a tooling lubricant for the PL marine? I had no luck with it using multiple different solvents. I went back to my Sika 291.... Also, with a quality butyl tape like Bed-it tape, I do not think mechanical fastening is necessary for something like the Oliver lense, unless you like the look. Mine stuck down with powerful tenacity. Then adhesive sealant was added to that. It's not going anywhere. Your choice! Dave
-
Another option, and one that I prefer to traditional saw toothed hole saws, are diamond grit hole saws. The hole is much cleaner and smoother, there is no chipping of the gelcoat, you have much more control with the cut, and no drama of worrying about the holesaw catching an edge and torquing your hand off or marring your work piece...especially on the larger holes. 5/8" will not be a worry with that here. 5/8" is pretty small, these probably won't have a pilot drill, but you can still use them effectively with the proper technique, or using a template as a guide. If you are set up to use Lenox hole saws and have the mandrel for it (and 7/8" isn't too big) I'd consider this: https://www.amazon.com/DG-HOLESAW-14DG-22-2MM-PK/dp/B002QMK8VQ/?_encoding=UTF8&pd_rd_w=Ou7U8&content-id=amzn1.sym.a725c7b8-b047-4210-9584-5391d2d91b93%3Aamzn1.symc.d10b1e54-47e4-4b2a-b42d-92fe6ebbe579&pf_rd_p=a725c7b8-b047-4210-9584-5391d2d91b93&pf_rd_r=EGJYD83A35XQGWK1X3ST&pd_rd_wg=HMKiX&pd_rd_r=ea23425b-78dc-49b7-9ce2-921c2afd6922&ref_=pd_hp_d_atf_ci_mcx_mr_hp_atf_m&th=1 Otherwise, I'd still get a 5/8" diamond grit (Bosch makes great smaller bits) without the pilot bit. Use water from a spritzer when drilling! Dave
-
Our favorite subject....sealants! That darn Oliver light strikes again. You may want to rethink not removing the lense, but I understand why you would not want to. My lense (hull 107) was "bedded" in some open cell foam weatherstripping. It was totally useless as a secondary barrier for the 3M 4200 that I think was applied around the perimeter of the lense. Thankfully it was not silicone. After a thorough cleaning, I used butyl tape to bed the lense, then Sikaflex 291 to seal around the edge. Several years later no leaks at all. There's been talk of the new polyether sealants on the market. I tried a tube and found it not very workable...maybe a bad tube? It was not past the expiration date. They say the polyethers play well with plastics where the polyurethanes do not, but I have not noticed any adverse reactions with my Oliver lense, and I like the 291 for everything else. If you want to give the polyether a try, and don't want to remove the lense, then maybe this is the way to go: https://www.westmarine.com/3m-4000-uv-fast-cure-polyether-adhesive-sealant-white-10-oz.-cartridge-3760196.html?queryID=d26afaac5e5422519ed7e4ec5eec6510&objectID=3760196&indexName=production_na01_westmarine_demandware_net__WestMarine__products__en_US Tape around the outer perimeter on the gelcoat, and you can tape the lense as well to help with getting clean lines. Take your time with the tape, use small pieces to define the radiused corners.Try not to get too much sealant in there! When you tool it off with a little paint thinner on your gloved finger, the sealant edge should just butt into the tape edge. If a lot of the sealant goes over the tape, then when you remove it, you're going to have a mess to deal with. Tool the sealant tight to the edge of the tape! Once the tape is off, a very light swipe with a thinner soaked gloved finger will smooth out the small ridges left from pulling the tape. Those ridges will collect dirt and look bad after a while so I think that last light swipe is important. Good luck. Keep an eye on your marker lights up there. One started to leak and the water ran down the wire to its low point, right over a neutral bussbar. Good luck! Dave
-
Trailer batteries not being charged by TV while under way
DavePhelps replied to DavePhelps's topic in General Discussion
Thanks Galway Girl, but my system is much different from yours. It has similar fuses and busses, but not much else looks familiar. I guess I'll need to call Oliver. None of the fuses have tripped. Will have to keep digging on this..... Dave -
This is a new development. I don't like to travel with my propane on, and have always traveled with my fridge (Dometic 3 way) in DC mode. Up until now, I have always arrived at camp with 100% trailer batteries (I have the two 6v AGM's in series) and a cold fridge. This last trip, when I got home, there was a pulsing noise from out of the black box located behind the lower access/vent panel for the fridge. When I turned on the overhead lights in the trailer, they pulsed in sync with the refir. Batteries were down to 74%, and fridge was up to 40 degrees. After checking all the fuses I could locate (all good) I took my multimeter and checked the 7 pin plug on my TV, which read 14.43 V, so that is not the problem. With the trailer now plugged in to 120V ac, batteries charged right up to full pretty fast (13.68V after resting). I then checked the fridge on AC, no issue. Then on DC, no issue, and no pulsing noise anymore. Then on propane, no issue. Somewhere, between the trailer's 7 pin connector and the trailer batteries, there is a problem, the batteries are not being charged. My Elite is a 2015 model and I hear that the charge wire from the 7 pin plug goes straight to the batteries, but not sure. Anyone know the color? I've seen diagrams where it is black or red.... There is a black wire coming off the batteries but it seems to go to my Blue Sky charge controller. Thought I'd ask here first before calling Oliver. Also, being new to DC systems, I assume it is best practice to disconnect the batteries, and the solar input before diving in to the system? Of course, I'd disconnect the AC as well! Thanks for any ideas, always appreciated. Dave