NCeagle
-
Posts
383 -
Joined
-
Last visited
-
Days Won
10
Everything posted by NCeagle
-

2,000 watt inverter vs 3,000 watt inverter
NCeagle replied to Fritz's topic in Mechanical & Technical Tips
FWIW, it has now been 7+ weeks I've been running the new firmware on our 3000 XC Pro and haven't had any problems since the upgrade. My Oliver ticket related to the [20] error code has been closed for several weeks now. What may be confusing some folks is that there are 3 sets of firmware on the inverter... U1, U2, and U3. You have to keep scrolling until you see the U3 version - that's the one that is being upgraded. U1 and U2 remain unchanged during this upgrade. -
I used a roll of butyl that I bought from RecPro when I bought the Houghton. I did let it sit for a few days before my first water test and all was fine. I did not bother to water test again after I tightened the bolts yesterday morning and more butyl oozed out (primarily from the areas around the bolts - the corners of the frame). I doubt it would have leaked but I lost faith and took the butyl out (patience is not a virtue for me 🙂 ). I'm wondering if I didn't have the urge to keep tightening the bolts if all would have been fine. When I took the Dometic off, I had to scrape butyl away so I thought that's all Oliver had used. However, once I had the unit down I saw that Oliver had used both a foam seal AND butyl tape. I thought that was overkill but whatever it takes to make the unit watertight I guess. I also remember thinking that the bolts securing the Dometic were just barely hand tight.
-
Hi @SeaDawg, I'm not using the Dometic thermostat for the Houghton - just the remote. The cycling is probably normal because it does it most (every 6 minutes or so) when it's "maintaining" a temperature. If I turn it down to cool the trailer, it cycles much less and cools the trailer down quickly. I trust the thermometers I'm using, but that 67F felt like 55F with the fan on and the AC running. It was too cold and that was good news! I'll have to play around with the dehumidifier function a bit more once the humidity gets bad here in NC. The manual says to set the mode on dehumidify and then set the temperature 1 degree cooler than the room temp. I just noticed when I tried that my sensors humidity didn't move much but it wasn't super humid to start with. I spent the past few hours removing the butyl and putting on the foam seal. I like it better already as I was able to get the bolts correctly torqued and the foam is 1/2 compressed. I did use the spare foam to build support pads in the back and level it off too. Hope this works better. I don't think the butyl was leaking, but it was getting too messy and I thought it would eventually fail. Maybe the way I put the butyl on (too much?) or the weight of the unit pressing down on the butyl in the recent heat made room for too much settling. All I've ever used butyl for before are windows, so this was new to me. Glad we have options.
-
UPDATE: Some initial findings / observations on the cooling capability of the Houghton unit. I have been testing a new ventilation system for my battery compartment and part of that testing involved heavy use of the Houghton AC. It cools the Ollie great in my opinion, although I ripped out the super loud Dometic before I had a baseline to compare to. Here's some data that shows the outside temp (near 90F) and the AC cooled inside temp. The trailer is in my metal garage, so shaded heat... I had the Houghton set at 68F initially, which keeps the cabin at 72F (cabin is always ~4F warmer than setting). At 1:00 PM, when things outside were really heating up, I turned the Houghton down to 60F (the minimum cool setting) and it was able to bring the Ollie cabin down to 67F and hold it there. I think the differential of ~23F cooler in the cabin is admirable. At 7:00PM I set the Houghton temp to 66F and it held the temp steady at 70F. The unit does cycle a lot just like the Dometic did - I think that's the way these units work and may also be related to the location of the AC within the Ollie - towards the rear right next to the MaxxAir fan is not ideal according to installation instructions. On another note, I'm not very happy with the Butyl I used to seal the unit to the roof. I checked the bolts and they were VERY loose from settling in the heat, so I tightened them up and a bunch of brutal Butyl oozed out. I'm worried I may have overtightened now and have to water test again. If this continues, I have the foam gasket @SeaDawgused ready to install. I played around with the heat as well and while it works I think of it as a backup to the propane furnace. I tried the dehumidification setting as well but couldn't get a drop of water out of the Oliver with it. Not sure if / how it works yet.

-
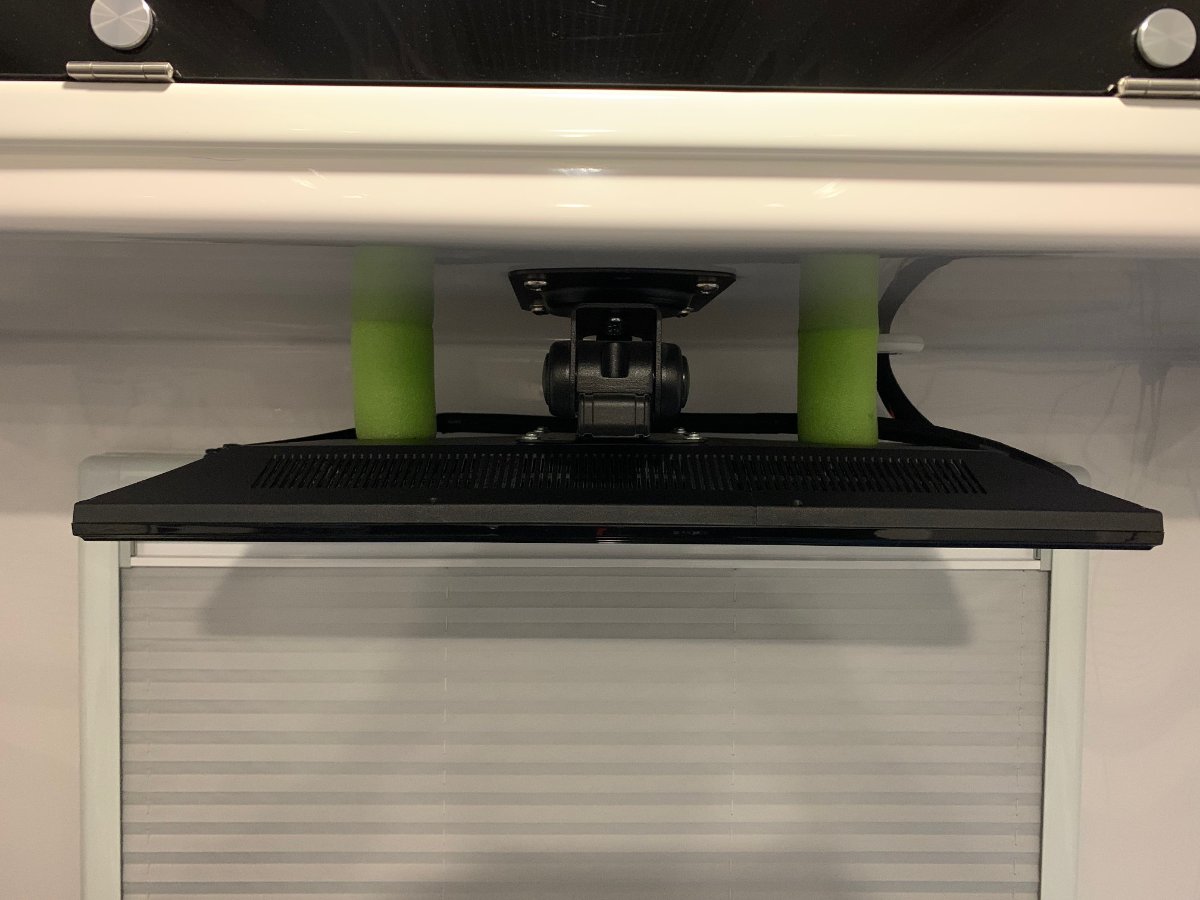
Our fold up television unclips itself and falls down frequently while towing our trailer. It's also very wobbly in general, so I was looking for a way to stabilize the television. I decided to try a couple pieces of pool noodle as stabilizing shock absorbers and so far so good. One will stop the television from unclipping itself, but two (one on each side) provide additional stabilization and prevent the wobble. The television hasn't fallen off since I put these up and although I haven't put a camera on it while towing, I can't imagine the television is wobbling any more either. The noodles don't flex much so they provide very stable support. Because of this they had to be perfect in size, so it was trial and error. Mine were both 3-3/8" thick. A softer type of material like foam or sponges would be easier and may even work better. I'm sure other owners have developed a slew of ways to stabilize the television while towing, but unfortunately forum "search" turned up . 🙂
-
Yes, when connected to shore power, that's exactly what I do - I turn off the charger at 80% or so and back on at 50% - which is several days since there's primarily lights and fans draining the batteries slowly. I figured out how to use the Xantrex 3000 software to turn the charger off and on. I know the BMS protects the batteries from overcharge, but being full all the time does stress the cells as well. If I know I'll be dry camping, I will top the batteries off, but I'll not keep the charger on (including solar) when they get back to 100%. I'm not sure if any of this will increase the longevity of the batteries significantly, but I don't mind doing it so far. Time will tell.
-
We bought our 2020 Elite II with LifeBlue Lithiums, so I can't comment on an upgrade, but I can comment on things I've learned that you may want to consider in your "design". 1. Temperature control: the Lithiums like to be at room temperature (+/- 20F). OTT installs a heating mat custom made for super-cold conditions. I know a lot of owners with Lithium, including myself, have sealed off the battery box vents and insulated the door. Conditioned air is also something to consider. @John E Davieshas vented and installed a computer fan to help with temperatures in his battery box. I took a different approach and decided to keep the battery box air tight and tie it in directly with the cabin conditioned air using a dedicated 4" smart fan and ducts. 2. A charger that has either software control or an easy to access cutoff between the charger and the batteries. Lithiums don't like to be topped off and kept at 100%, so I have found that I do a lot of shorter charge cycles like from 50% to 85% or so. Turning the charger off / on may be something you find you would like to do more often than you have in the past, so easy access is very nice to have. Good luck - I'm sure you will get lots of great advice and help from other members that have just done the actual upgrade! John
-
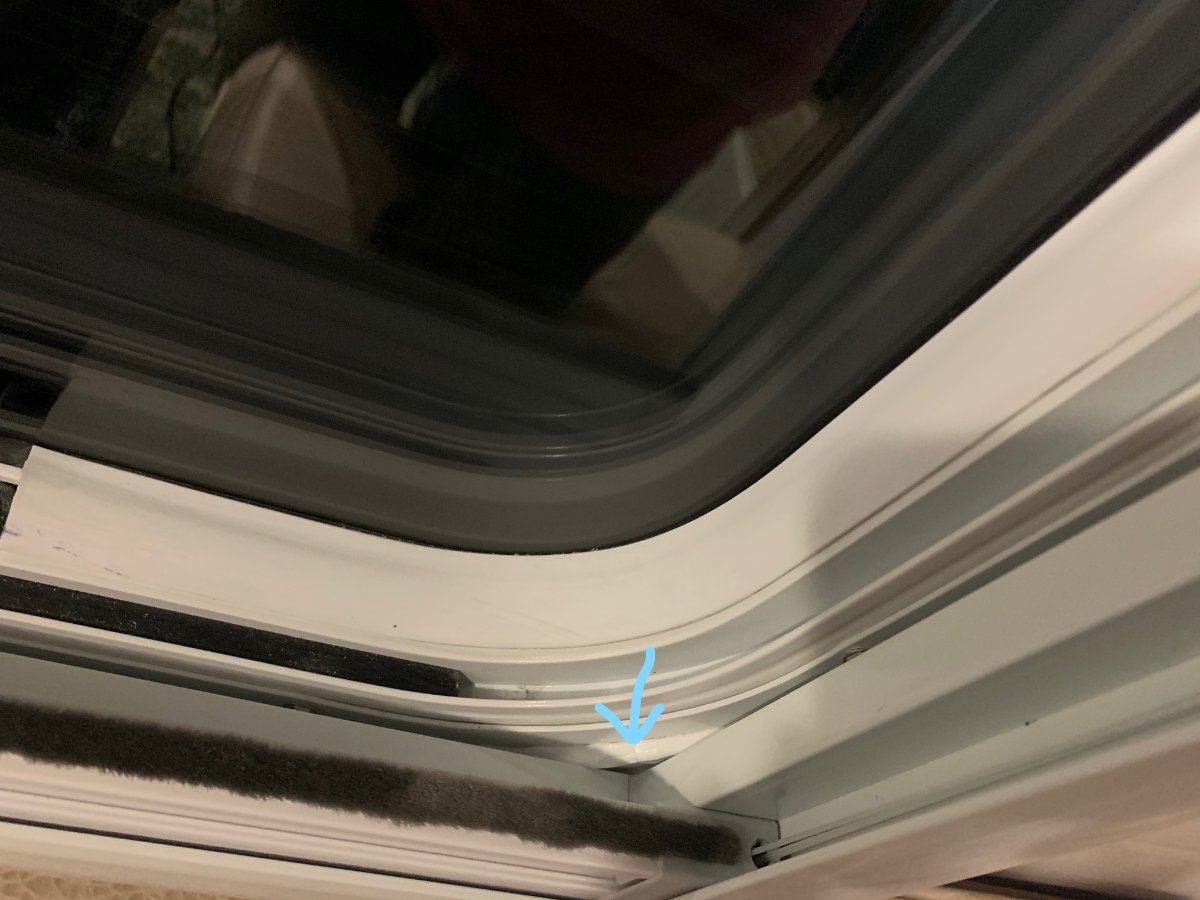
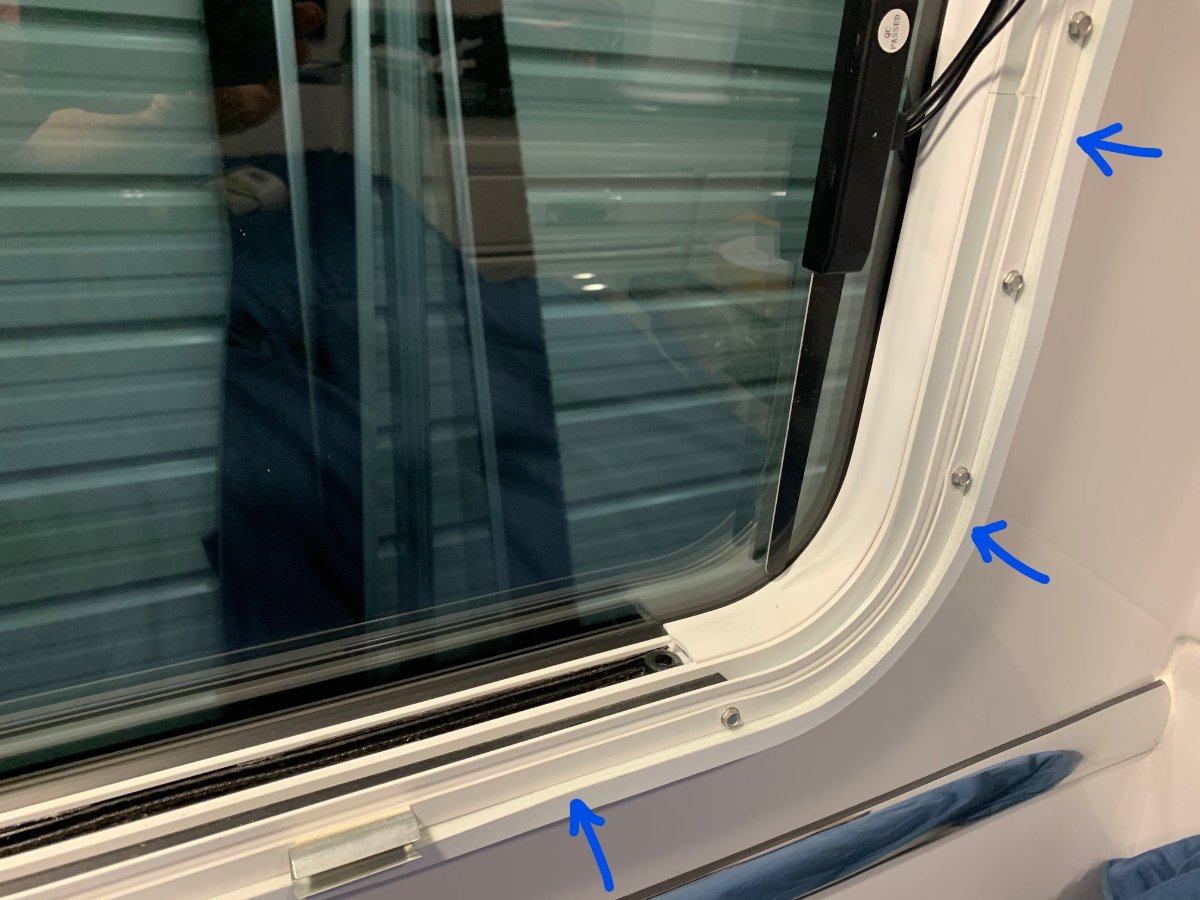
The back window has a different design - there is no "lip" on the actual window frame, so the foam strip and approach were a bit different. Rather than use 1/2" x 1/2" foam weather strips attached to the side of the lip as I did on the larger windows, I used 1/2" x 1/4" foam weather strips (fowong White Door Weather Stripping 26 Feet, 1/2 Inch Wide X 1/4 Inch Thick, High Density Foam Tape Roll Neoprene Rubber Adhesive Weatherstrip Door Seal, Window Insulation, 2 Rolls X 13 Ft Each). The foam fit perfectly against the front of the frame rather than the side to create the overlap needed to block out light and insulate / remove leaks. Here's a picture to show the different approach...
-
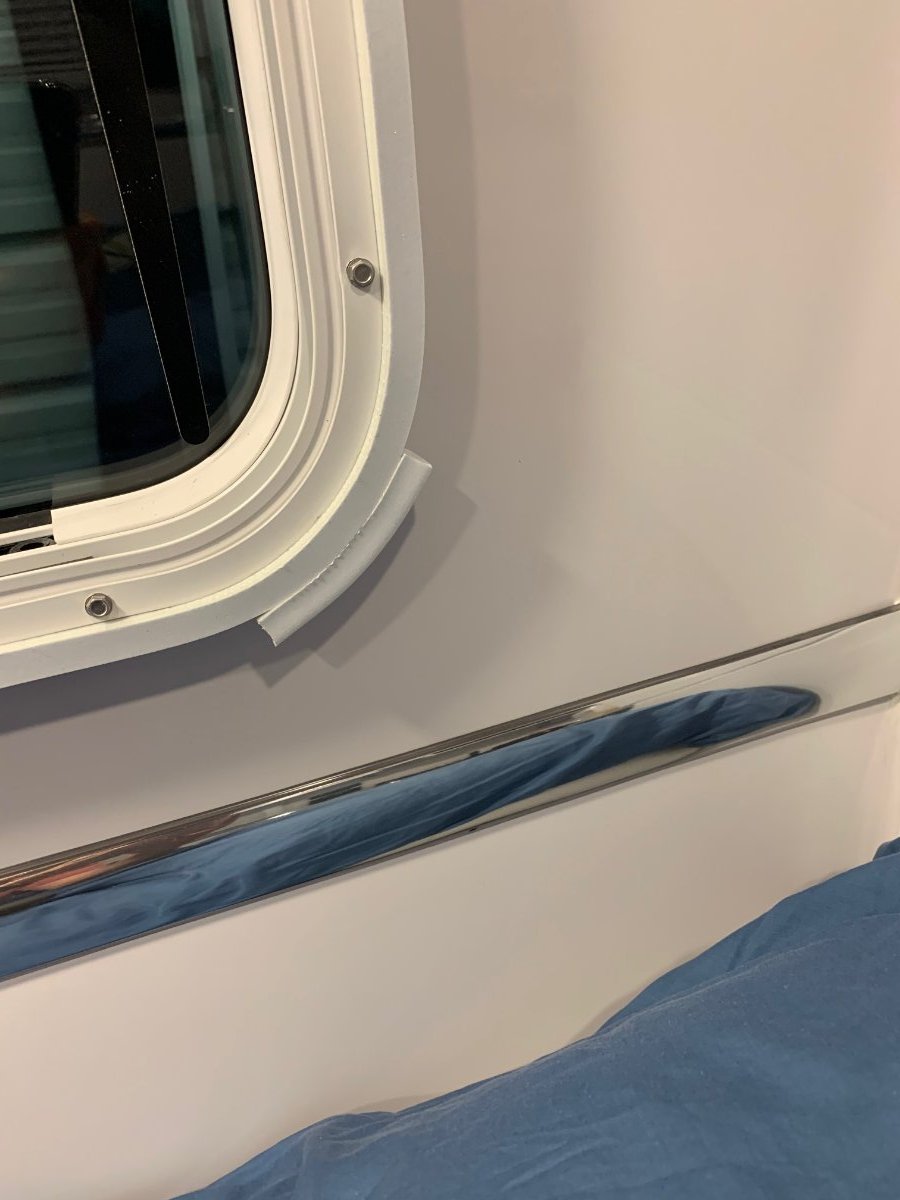
Hey John, thanks for the compliment! I do think that weatherstrip from Home Depot would work great. There's actually another 1/2" - 3/4" of space behind that 1/2" foam I used, so 3/4" wide will provide even better "grip". I had a totally different design in mind when I started or I would have probably chosen 3/4" or even 1" wide. Since you added this to your honey do list, something else you may want to consider is that each corner ended up with a tiny strip of sticky white tape there (the edge hanging over is sticky). It doesn't look bad because it's white - but it wouldn't be for long since it's sticky, so I took some 3M tape and cut strips to create a nice, white sticky free surface. It was easy to put the strips of white tape on those corners before putting the frame back up. Hopefully it won't collect dirt as easily. Here's a close up shot to describe what I'm talking about:
-
Thanks! All definitely a labor of love. It has kept me sane during my "early" retirement, especially with covid. I was just looking at my shrinking "ollie do" list and thinking how mad I would be if I had to start over for some reason! 😬 I couldn't agree with you more on all the awesome mods others have done and shared on the forum - It helped me tons and I've adopted many ideas and designs. We've also got our 4th camping trip planned for next month, so it's not all work and no play!! 😉
-
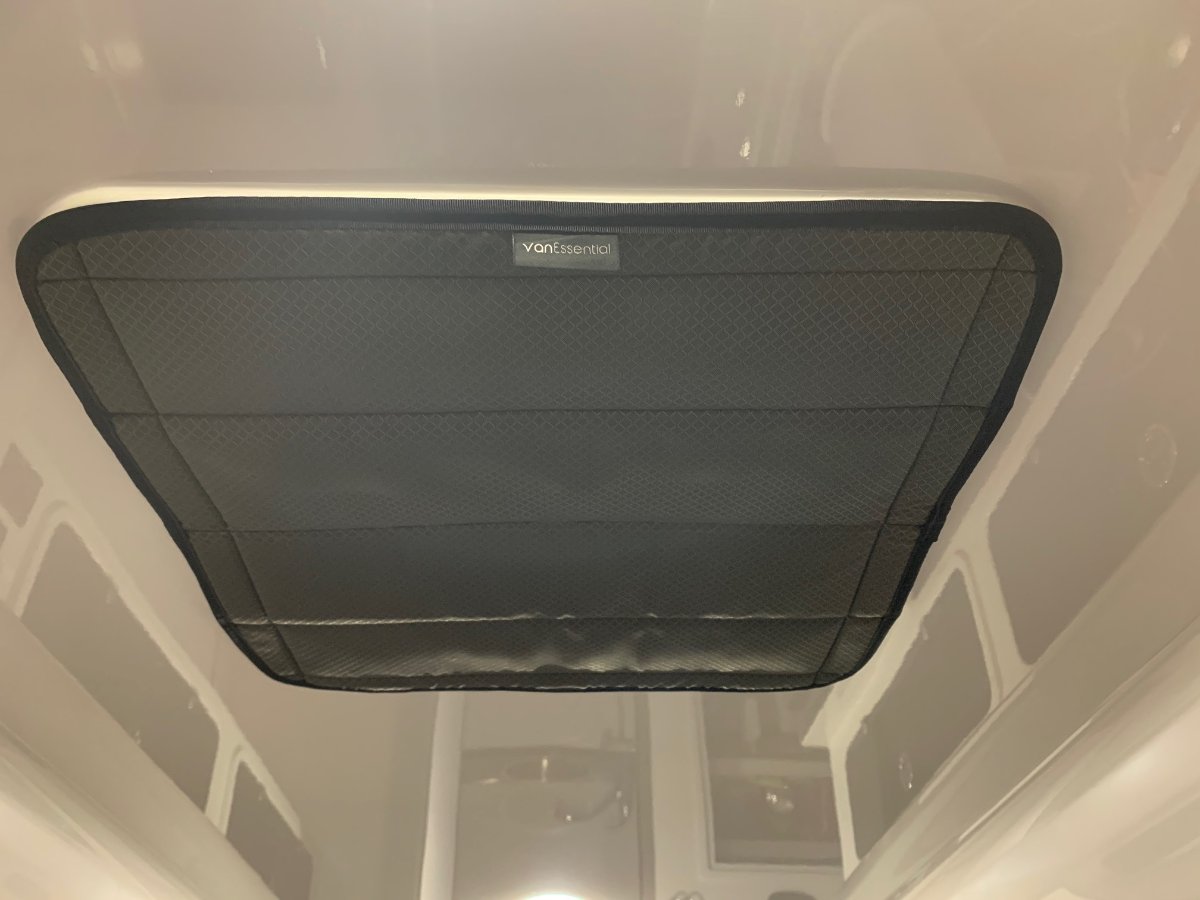
In order to insulate AND black out light that enters through the Maxxfan, I ordered this: VanEssential Magnetic Insulated Roof Vent Sun Cover for MaxxAir Fan, Fantastic Fan - Olive Gray It's not the cheapest one out there, but I like it because it completely blacks out the Fan, it's insulated and the installation is superior to other products I saw out there (hidden magnets vs velcro). This one takes a bit more work to install as you have to remove the inside trim on the fan (which is caulked), install / tape magnets to the inside of the trim, and replace the trim (and re-caulk). So all in all it took me about 2 hours. The magnets work great and reviews say that they work much better than velcro, which has a tendency to tear free from the trim and leave a glue mess behind, especially with heated trim. Here's a picture of the final product:
-
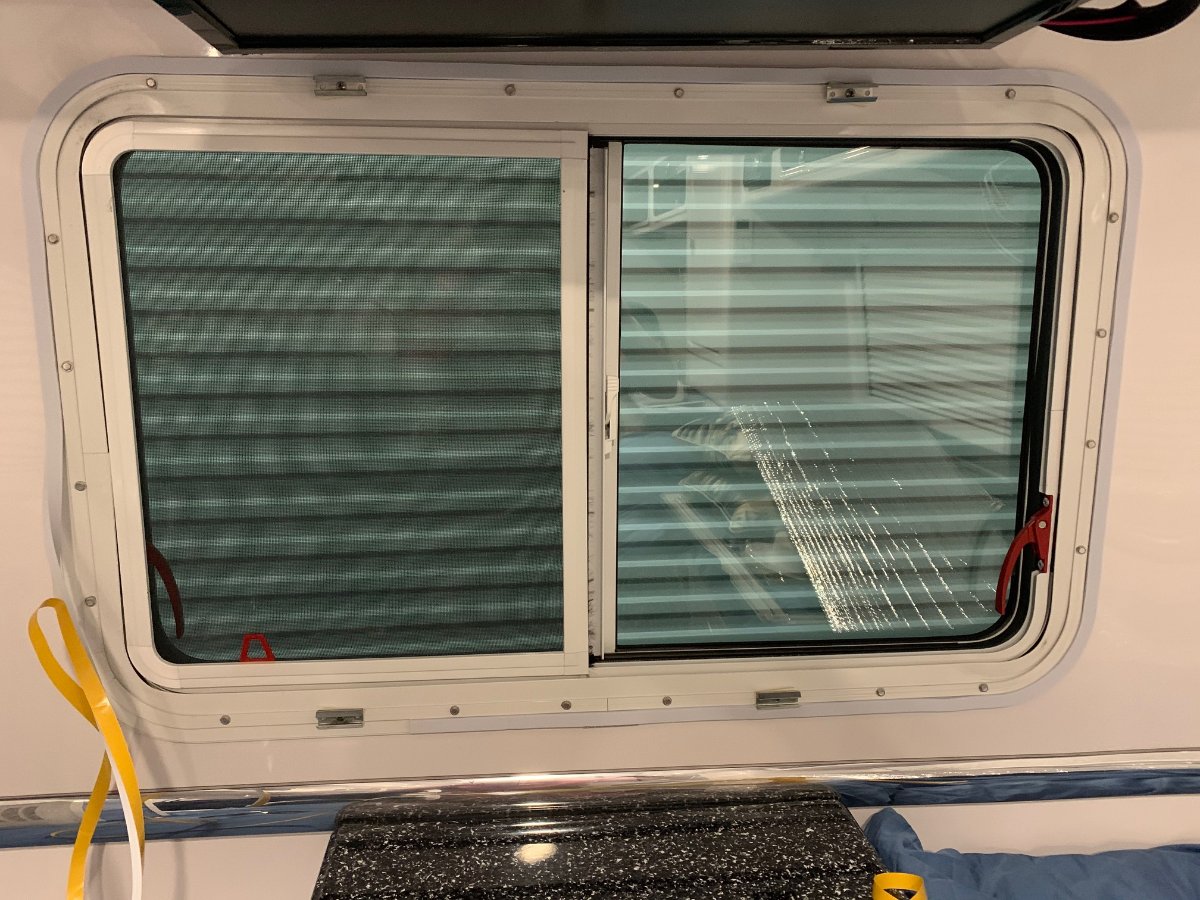
I'm guessing there are lots of owners out there who have figured out various methods to either insulate, black out or do both to their windows. I'll share what I did - it was pretty simple and fairly inexpensive. The materials I used were a roll of Reflectix BP48010 Double Pack Insulation, 48 in. x 10 ft and a pack of White Foam Strips with Adhesive - 2 rolls, 1/2" x 1/2" for each large window (I'll reply to this post with an update on the back window, which is a different design). I took my window frames out and measured and cut the reflectix to fit inside snugly, even a bit oversize to make sure it insulates well and blocks all light. With the reflectix only in the window, I could feel hot air coming up through the crack and I could also see light coming through when the cabin was dark. To fix both those issues I used the foam strip to go around the outside edge of the window, leaving 1/4" overhanging the ledge. This overhang will fill the small gap(s) that exist between the shade frame and the window frame. It took one pack of foam strip per "large" window (with a small amount left over), so 3 packs total if you want to do all of them. I also found that there was still a small gap in each corner where the shade frame is more square, so I used a small piece of foam on each corner: Then I put the window frame back in and reinstalled the reflectix to make sure everything fit nicely: And the blind will further secure and snug everything up: Voila... no more hot/cold air or light penetration from the windows if you don't want it. The stripping is "permanent" in that it won't be removed on purpose but the relectrix can be put in and taken out as needed. When not in use I roll it up and it stores nicely in the basement.
-
I just saw a post from yesterday that included the hull number. I picked up Hull 688 a little over 4 months ago. Oliver has built and delivered 70 hulls since then. I'm not sure how that compares to the past, but during Covid and considering what is being built and delivered, it's admirable to say the least! When can I buy some stock? 🙂
-
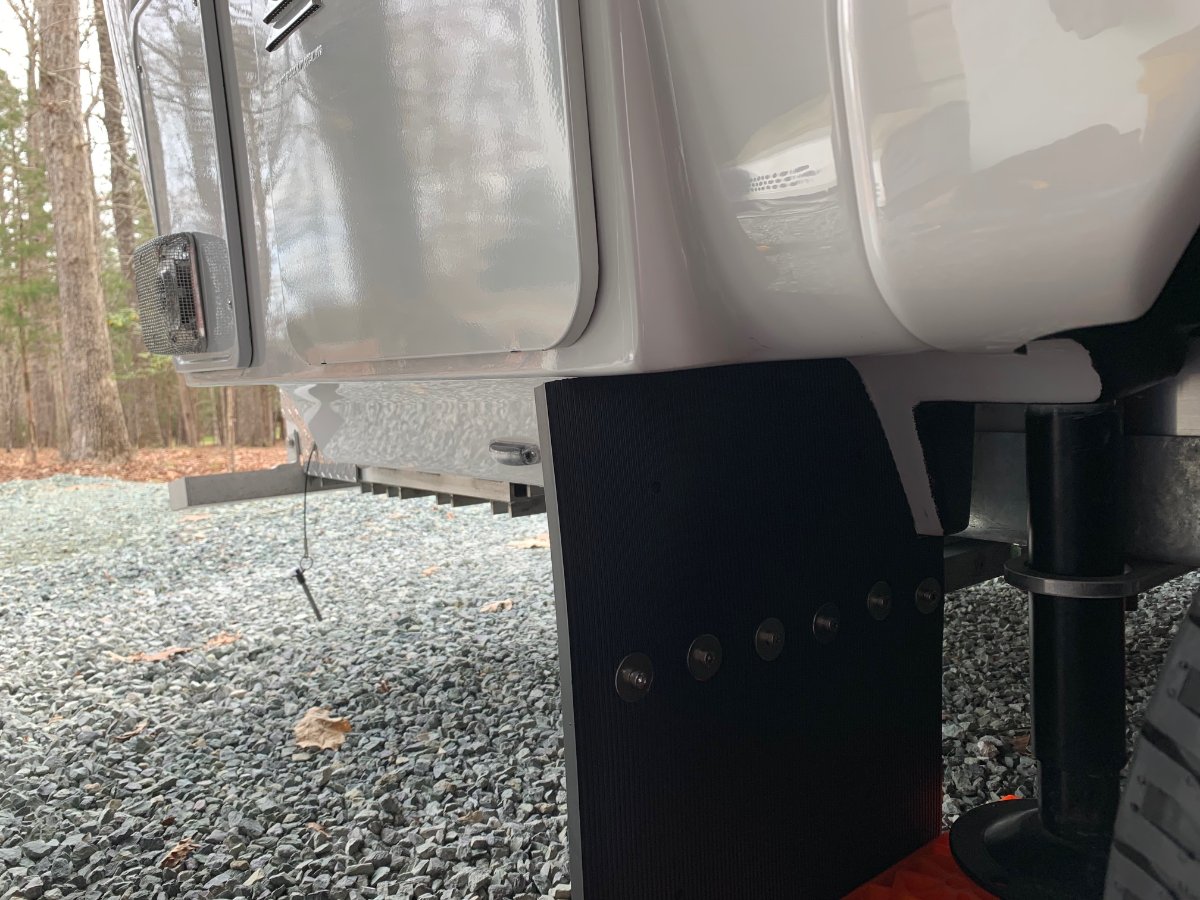
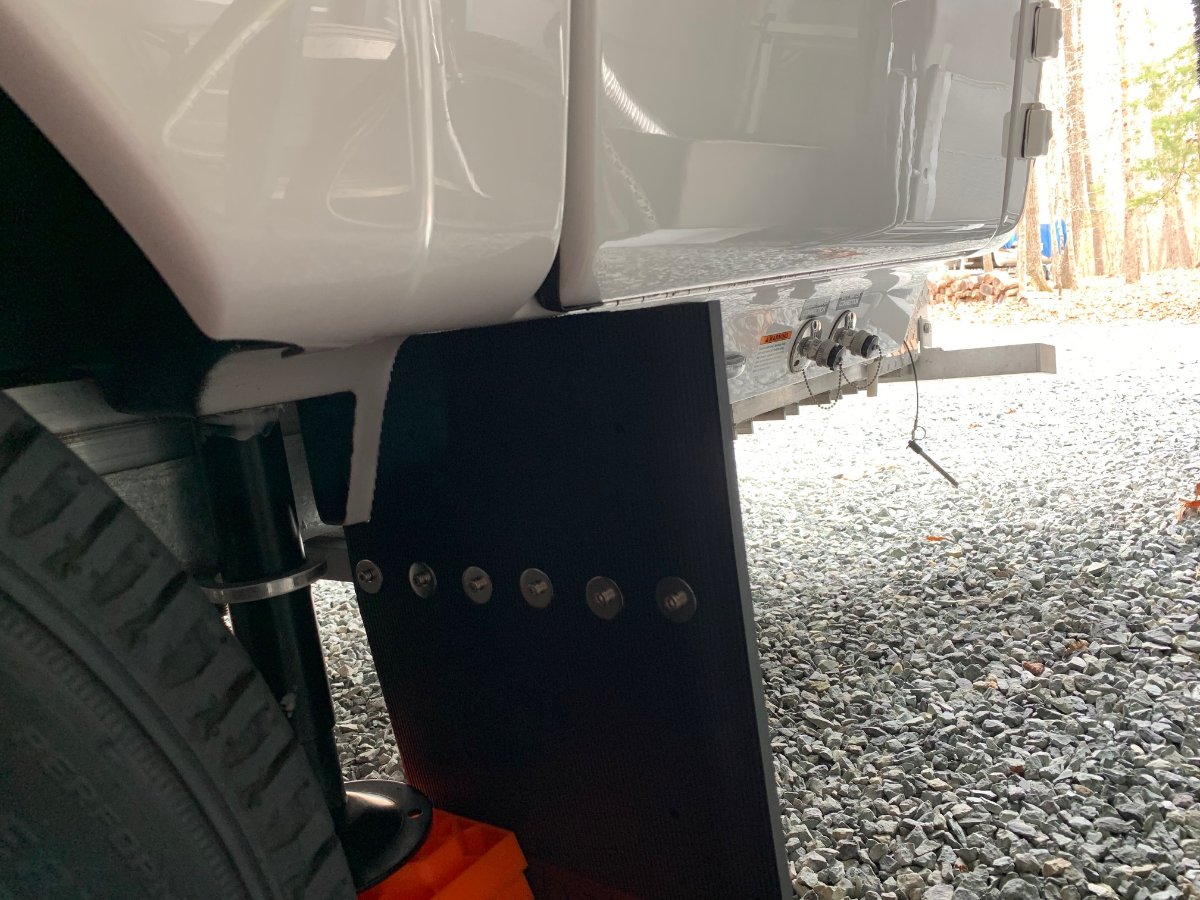
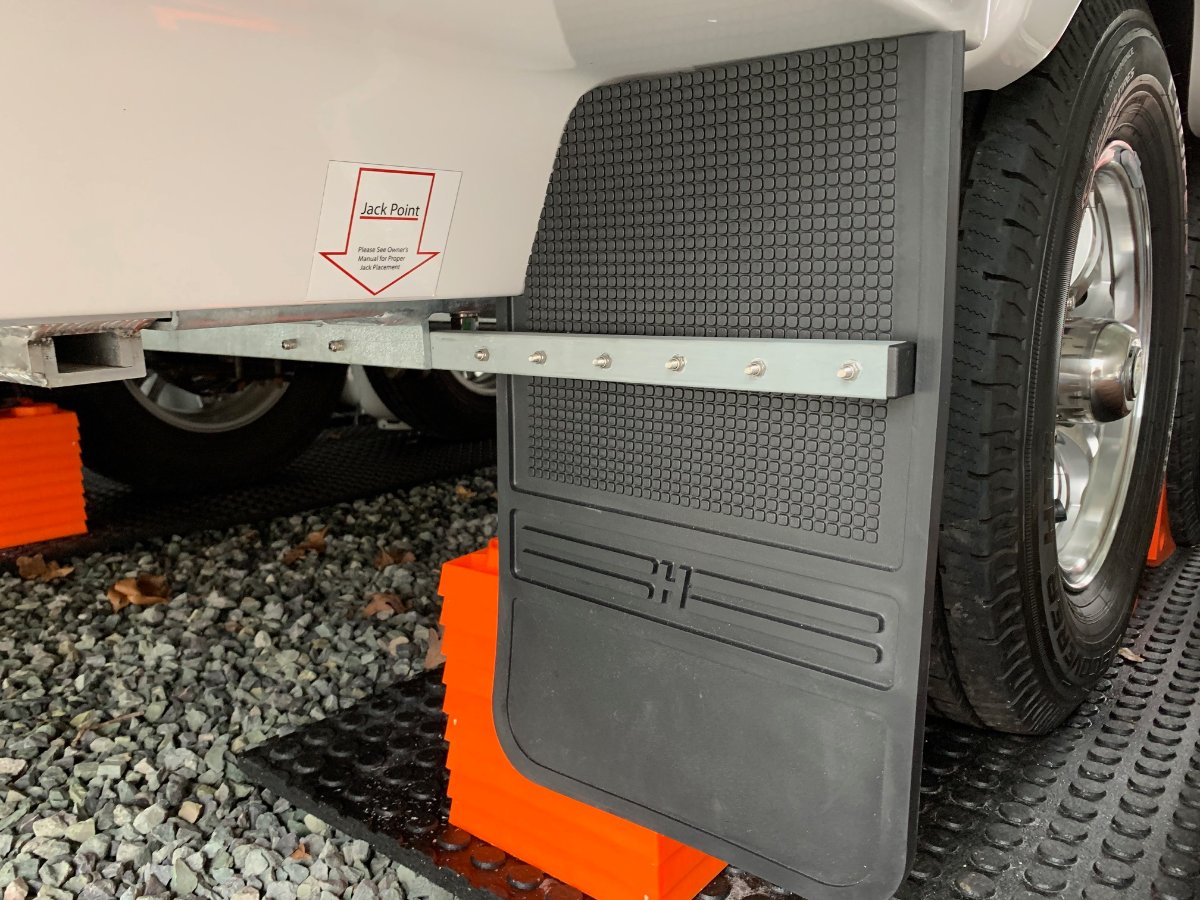
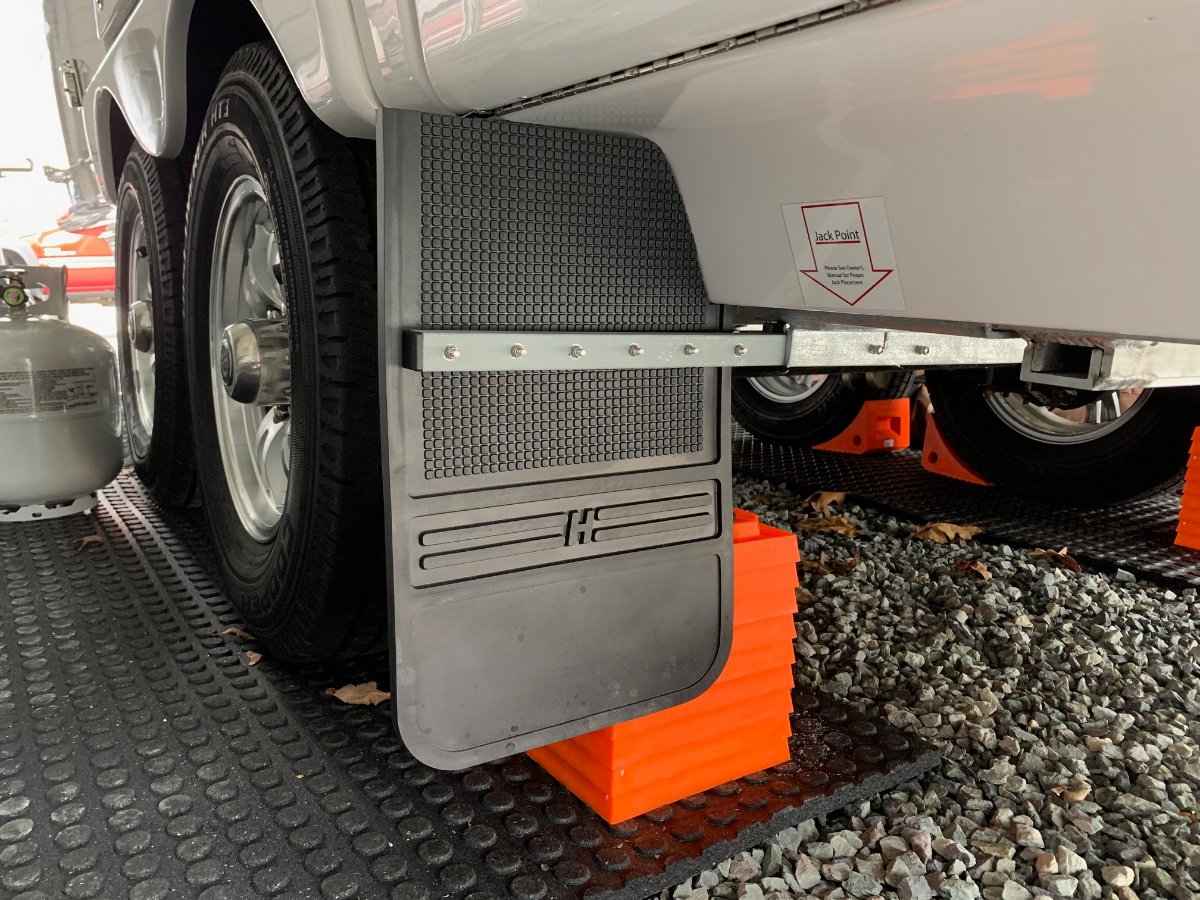
I did end up using the 1"x1" steel since it's galvanized, I plan on towing in winter / salt, and needed to find something useful for it. I "galvanized" it again after cutting and drilling. I'm going to keep a close eye on it and if it starts to rust, I'll take it off and replace it with aluminum. I used M5-0.8 Socket Head Cap Screws for everything. I did not use washers on the 2 bolts / screws that attach the bar to the frame. The screw / bolt head diameters are not much larger than the threaded portion of the bolt so l "hope" that's my "fuse" to protect the frame if there's a solid strike on the bar. I sure wish OTT had mud flaps standard or as an option. I already had a few "dings" in the gelcoat from driving it home after delivery that could/would have been prevented with flaps. 😞 Numerous owners have done this mod, so I'm not adding anything innovative or new here, but I know pictures are worth thousands of words and maybe will help someone thinking of doing this mod, so here they are:
-
Easy way to repurpose an unused black tank for grey water
NCeagle replied to NCeagle's topic in General Discussion
I've only used that brand of pump a few times now and it seems fine - comparable to others I've had in the past. This particular one does have parts / kits available to repair it, but ones I've had in the past just had the motor die after a few years of pretty heavy use before anything else broke. I use it for different things around the house. Examples are transferring water from rain buckets to my pool (a lot) or getting water off of my boat cover when it caves in and turns into a pool 😁. A rainproof switch with a permanent, long cord would be SUPER NICE (and smart too) - right now I just unplug it from an extension cord coming out of the exterior 120V receptacle on the curb side. Definitely don't want to be standing in a puddle! It does get warm when I run it for extended periods - like 20 minutes or so transferring water from rain buckets - so I give it time to cool down when needed. I didn't think pictures of this setup would be interesting, but I stand corrected! Next time I have it set up I'll update this post with a few if someone doesn't beat me too it. 😉 -
Grey tank full before tank monitor says so....
NCeagle replied to jordanv's topic in Mechanical & Technical Tips
I have found the grey and fresh tank SeeLevel indicators to be confusing for the most part (black tank sensor works much better). At first I thought they were good for "ballpark" estimates, but the readings are never consistent and repeatable so I've come to the conclusion that relying on them is risky. The tanks are just so "shallow" that the slightest difference in leveling can result in huge discrepancies in the SeeLevel readings. My strategy is going to be to fill the fresh tank and use the onboard pump rather than just city water pressure. By using the fresh and grey tank level indicators together I'll have a better "estimate" of how full / empty the tanks are. -
Easy way to repurpose an unused black tank for grey water
NCeagle replied to NCeagle's topic in General Discussion
@John E Daviesis right on. His description is how I did it. I did NOT use a filter since we don't put any food / grease into our grey tank so it's soap and hair only - not a problem for the pump (as of yet). I'm not sure what good pictures would do - I didn't take any - but it would show a hose coming out of the back bumper (connected to the black / grey drain pipe with this: Camco Durable Sewer Cap with Hose Connection- Caps the Sewer Connection to Prevent Leaks, Easy Install and Simple Use (39463)). Then there's a pump like this Trupow 1/10HP 330GPH 115-Volt Mini Portable Electric Utility Sump Transfer Water Pump with Water Hose Kit that attaches to the drain hose and subsequently another hose to the black water flush port / inlet. Hook it up, then pump in some grey water until the black tank is full. Common sense provides the valve configurations... when filling the black tank, the black tank valve must be closed and the grey must be open. Problems can be avoided with the vent, etc. by not overfilling the black tank. It's not that hard to be careful. I timed how long it took my pump to transfer 15 gallons of grey water to a bucket before I tried this. It took that pump listed above 3 minutes and 45 seconds for 15 gallons. I ran the pump for 3 minutes and 30 seconds and then checked my black tank SeeLevel monitor and it was at 95%. I figured that's close enough, so I can run the pump for 3.5 minutes safely. There's no other way I can think of to easily use the black tank without plumbing modifications. I wanted to preserve everything for resale just in case. It's also worth noting that we ordered the composting toilet with our Ollie, so the black tank is there but has NO hole in the top cut out. If you upgraded to the composting toilet and you still have the hole on top of the black tank you would have to cover / seal the hole. -
Actual / Measured Tank Capacities on 2020 Elite II
NCeagle replied to NCeagle's topic in General Discussion
Wow, thanks for sharing this Overland. I did a similar thing when I was filling my tanks, but I used 5 gallon increments instead of 2 gallons. I also found the SeeLevel readings to be all over the place and not of much use. I heard lots of gurgling and had to shake the trailer around to get the air out of my grey tank too. So you are definitely doing much better than I can do at the moment. My 2020 owners manual says the fresh tank capacity is 30 gallons, the grey tank capacity is 32.5 gallons, and the black tank capacity is 18.5 gallons. I'm going to try again and be much more precise in my measuring. The real bummer is the grey water is our limiting camping factor at the moment and now that I've got an easy way to use my black tank for grey water I'm not able to use 6 gallons of grey capacity (2.5 gallons in my grey tank and 3.5 gallons in my black tank). I opened a case on my black tank. It really "stinks" (pun intended) that my black tank is only 15 gallons and it's supposed to be 18.5. 😞 I wonder how many other 15 gallon black tanks are out there.
-
Here's one way to use a black tank that may be available for other uses (e.g., a composting toilet installed). Since the black and grey tanks share the same drainage pipe, an unused black tank is only good for holding extra grey water without major modifications to the plumbing. It's pretty simple to put a cap with a hose connection on the end of the tank drain pipe and then use an inline hose pump to pump up to 15 gallons (in my case) of grey water into the black tank. I never thought having extra grey water capacity would be important, but camping on the East coast involves pretty hefty fines if you are caught draining your gray water into nature. I also assumed that camping with full water / electricity hookups meant unlimited, long hot showers in the Ollie (not the case!). So, 15 extra gallons of grey water capacity could mean you don't have to tow your trailer over to the dump station in the middle of your camping trip because you have to empty your grey water tank.
-
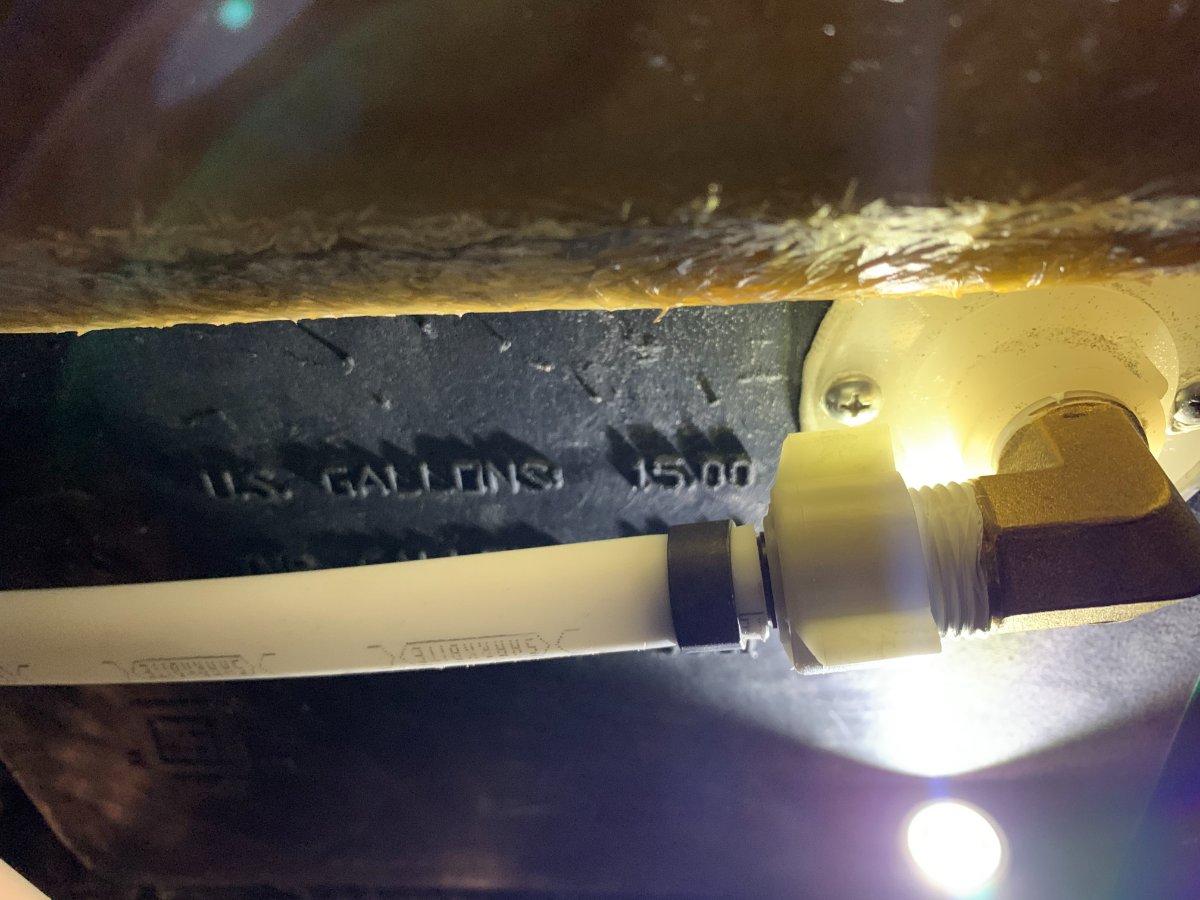
I was sanitizing my holding tanks yesterday and decided to measure the actual amounts of water I can store/use in various situations. Here's what I found: - Fresh water tank - I can fit 28 gallons in the tank before it starts to overflow. The pump can pull all 28 gallons from the tank with the last few gallons requiring a nose high Ollie. Documentation says this tank's capacity is 30 gallons. - Grey water tank - this tank holds 30 gallons before it's full. Documentation says this tank is 32.5 gallons. - Black water tank - this tank holds 15 gallons before full. The documentation says this tank is supposed to hold 18.5 gallons (note that the tank has "15 US Gallons" stamped right on it). So, it seems that in real life, each tank holds about 2 gallons short of it's capacity. Not a huge problem, but worth noting if you are dry camping and trying to plan water usage carefully.
-
Xtend and Climb Pro Series 780P 12.5” telescopic ladder
NCeagle replied to Patriot's topic in General Discussion
I'd say 10' or 12' to actually get on the roof. I've used both to get on the roof with no issues at home. I do carry an 8.5' version of this ladder in the Ollie closet while on trips: https://www.amazon.com/gp/product/B082V77HJY/ref=ppx_yo_dt_b_asin_title_o08_s00?ie=UTF8&psc=1. I really like it because it's small, lightweight and has a one button push to close. The 8.5' is fine to climb up and inspect things primarily - you can get on the roof with it if necessary although getting back down is the "challenging" part although not bad on the awning/curb side. -
And I did open a ticket and Jason is checking on it again. He told me again that Service doesn't even have them and he's asked multiple times. If this is a dead end, I may have to take the time to build one for 688 - I can use the 2019 schematics as the baseline and I know many of the changes now from questions to OTT and digging around myself. I hate the idea of having to get service someday and the service guys having to cut open and dig around in the Ollie just to figure out what is what. 😞
-
wriggled and jiggled
-
I've asked Service (Jason) and Sales (Phil) for them by email and phone. No luck. I know of several owners that are asking. It's crazy. I've opened a handful of tickets just because I don't have the electrical diagrams - simple questions that could have been answered. For someone who loves to work on their Ollie, I have it listed as my number one quality issue / gripe by far. Now I know Patriot is after them too. I'm going to open a service ticket and see where that gets me.
-
HOW TO: Lithium Battery Powered Vent System
NCeagle replied to John E Davies's topic in Ollie Modifications
That's the big question that we can't answer right now - Lithiums are too new. So the way I'm looking at it is this... had OTT offered me an option to have an "air conditioned" battery box for $150 or so, would I have done it? Heck yes - considering I'm spending so much on these Lithiums. So like you RB, I wonder too whether it's worth it - but I have this vision of Dirty Harry looking at me and saying "Do you feel lucky, punk". 😃 At some point, the cost does not outweigh the potential benefit of course. My guess is that as Lithiums become status quo in travel trailers / RVs they will be located in air conditioned spaces as opposed to vented outdoor boxes used today.


.jpg.15f940f26c9f46b24aa4a720a90df607.jpg)