NCeagle
-
Posts
383 -
Joined
-
Last visited
-
Days Won
10
Everything posted by NCeagle
-
 It's great to see that Oliver will have the Elite and Elite II at the Overland Expo East this coming weekend (as they did in the West Expo)! I wish I was going to be there as I had planned, but jury duty has snatched me away from the world for a month or so it appears. I hope some other Ollie owners go and take some good pics. **Word of warning about pre-purchasing Overland Expo tix: We've all learned to "plan ahead" with respect to our camping plans - that's just the way Covid has made it. However, Overland Expo has a very strict policy of not giving refunds inside of 60 days out from the opening day, even if it's something "unexpected" like jury duty or a death in the family. Kinda un-American if you ask me. Bottom line is I'll NEVER again buy Overland Expo tickets early and my desire to attend an Expo has all but disappeared after this experience.
 -
Hi @Gliddenwoods, that error code means the remote display is not communicating with the Xantrex inverter, but it doesn't/shouldn't impact the functionality of the inverter in any way - you just have to use the display and controls on the inverter itself rather than the remote. Check this thread about the "20" error code and make sure your firmware, etc. is up to date. It may not fix your specific problem, but it's a good place to start: https://support.olivertraveltrailers.com/portal/en/kb/articles/xantrex-inverter-error-20 Keep us posted - there are quite a few owners that have wrestled with the Xantrex and learned quite a bit about it in the process. Good luck!
-
I think the easiest way to think of solar is it's just another battery charger. If you don't want anything charging your batteries, include solar in your list of chargers to turn off. I have Lithium batteries as well, and I don't keep any of my battery chargers on all of the time because the Lithiums don't always like to be at or near 100% as you mentioned. Our hull #688 (2020) has a nice solar cutoff switch in the cabinet above the street side bed. Hope this helps!
-
I wouldn't have guessed that because you would still have to replace half of the connector anyhow if replacing the jack. 🙂 I was thinking the wires inside the jack could be easily disconnected and reused for the new jack but I may be wrong - I serviced the jack earlier this year but didn't pay attention to how the wires connect.
-
Thanks for sharing this tidbit John! Our hull #688 also has two inline fuses for the tongue jack. I have seen both fuses but I never really connected the fact that they were both on the tongue jack mentally, so troubleshooting may have frustrated and embarrassed me at the same time - especially with no electrical diagrams. 🙂 This is now on my To Do list as well. I was thinking of using a crimped butt connector with heat shrink tubing for this task. Any reason you recommend a single pole wire connector like the Anderson?
-
The Ollie doesn't need a large dehumidifier for the small space, and I've found the Ivation brand to be the best for its size (small). A compressor type works best in warm humid climates and a desiccant type works best in cooler, humid climates. If you live in the Pacific Northwest, the desiccant would work well year round. If you live in Florida, the compressor would work best. If you live in North Carolina like I do, you may opt to have one of each and use the compressor most of the year and the desiccant in the cooler months. The drain hose is just some standard vinyl tubing. I think it's 1/2" and you can buy a roll of it at any hardware store and have as long a drain as you like. Ivation 14.7 Pint Compressor Dehumidifier - Small and Compact with Continuous Drain Hose for Smaller Spaces, Bathroom, Attic, Crawlspace and Closets - Ivation 13-Pint Small-Area Desiccant Dehumidifier Compact and Quiet - With Continuous Drain Hose for Smaller Spaces, Bathroom, Attic, Crawlspace and C
-
Norcold will not work on anything but DC
NCeagle replied to Jibbyboo's topic in Mechanical & Technical Tips
I really strive to keep my posts positive and I LOVE my Ollie, but continuing to see posts like this still stirs up negative feelings for me. This was also my very first problem to solve on our first camping trip after picking up our Ollie in 2020. It was aggravating that I ended up having to call Oliver Service after more than an hour of fiddling around with the fridge. Even more aggravating that Oliver told me that all is normal due to how things are electrically connected to the inverter. Embarrassed that it was such a simple issue, it was the first time I realized and mentioned to Oliver that the electrical diagrams for my trailer were MISSING from my owners manual! I was told then they were no longer being made available. Many owners of 2020+ Ollies have asked for electrical diagrams and the answers given by Oliver always vary and never make much sense. I love my Ollie and I think Oliver is an outstanding company all around, but I have already spent WAY too much time tracing wires and trying to figure out what is connected to what. Another silly example is the time I wasted trying to figure out why my TV wasn't charging my batteries while driving. Another call to Oliver resulted in a simple answer that it wasn't connected when you order the Lithium package. I have several others and I'm sure I will have several more. I've spent WAY too much time making tweaks to the 2019 electrical diagrams so I actually have a partial one. I dread having any type of electrical issue that I can't fix and have to take to a specialist. Guess what they are going to ask for first? I wish I didn't keep get these feelings of anger whenever I have any type of electrical issue or feelings of fear that I'll get one I can't figure out. Ok, I've vented on this topic again. Unfortunately I don't think this is going to go away. Guess I'll try not to read posts that have silly electrical issues new owners are trying to figure out without a diagram. 🙂 -
We bought a Dometic CC 40 Portable for $524.99 two years ago right before we picked up our Ollie. It's no frills AC or DC and has worked great. It seems to be a good size for us. Coupled with the Ollie fridge, we've had plenty of room for everything without having to buy ice. I can even manage to lift it on the back of the truck tailgate when it's full of drinks still... barely. 🙂 I use it a lot even when I'm not camping. Definitely love not buying ice, so whatever you end up with you will be happy with that!
-
After more than a year, the TV stabilizer shocks have worked as far as not letting the TV unclip and fall down while towing. I suspect the noodle stabilizers do help a bit to reduce various stresses on the bracket and surrounding fiberglass by keeping it from bouncing around, but proper inflation of the tires is probably much more effective and important to everything else in the trailer as @John E Daviespoints out. I run all my tires at 50 psi with a tpms, so not quite as cushy as 42 psi, but much less than when they came out of the factory. I think the best we can all do is soften up the tires and make sure everything is tied down and secured while towing - but it's still like putting the trailer and it's contents through an earthquake every time it's out on the road - so things are going to happen...
-
Fridge Fires??? Fridge Defend by ARP ???
NCeagle replied to Jim and Frances's topic in Mechanical & Technical Tips
Yeah, not much room in there. I think your idea of removing that junction box to make room would work, but you would still want to aim the blower to get air flowing up the left side as that's where your cooling absorber coils are. If the blower blew air straight up into the boiler I think it would be defeating the purpose of the boiler a bit. Also, the fan temperature sensor goes on the lower absorber coil and it's even obscured! wow. -
City water and fresh water hex end wrench -Amazon
NCeagle replied to Patriot's topic in Mechanical & Technical Tips
In a pinch I've also used a bolt with a hex head on it that's the right size before. I clamped the bolt on the threads with a pair of vice grips or something and then you can use the bolt head as a hex wrench. 🙂 -
Fridge Fires??? Fridge Defend by ARP ???
NCeagle replied to Jim and Frances's topic in Mechanical & Technical Tips
John, that really stinks that you have to remove the fridge - I would have just done the fans for that benefit and waited (for a required maintenance or something) to connect the boiler sensor if I would have had to remove mine. I'm camping in some really hot conditions though, so if you are not you may not get as much benefit from the fans as I'm seeing. Worth considering though? -
Fridge Fires??? Fridge Defend by ARP ???
NCeagle replied to Jim and Frances's topic in Mechanical & Technical Tips
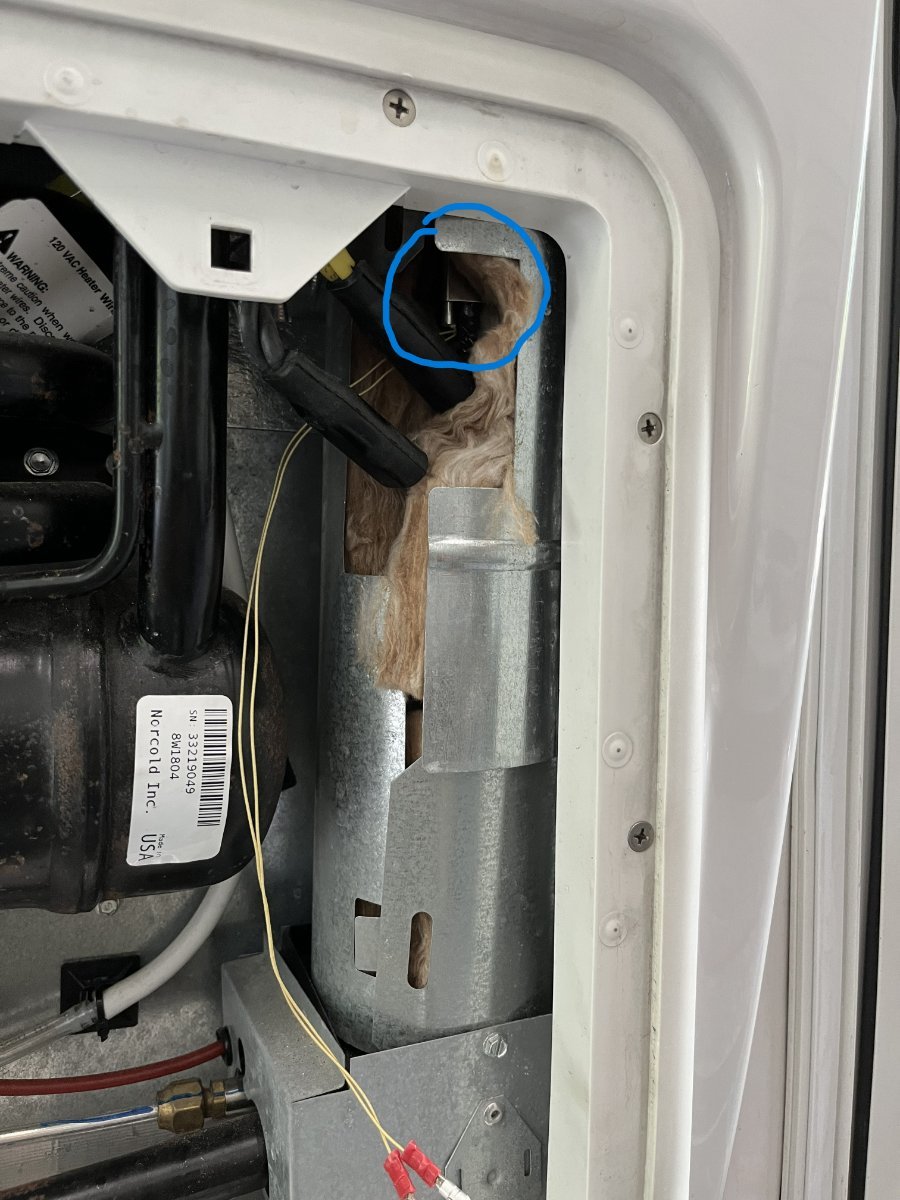
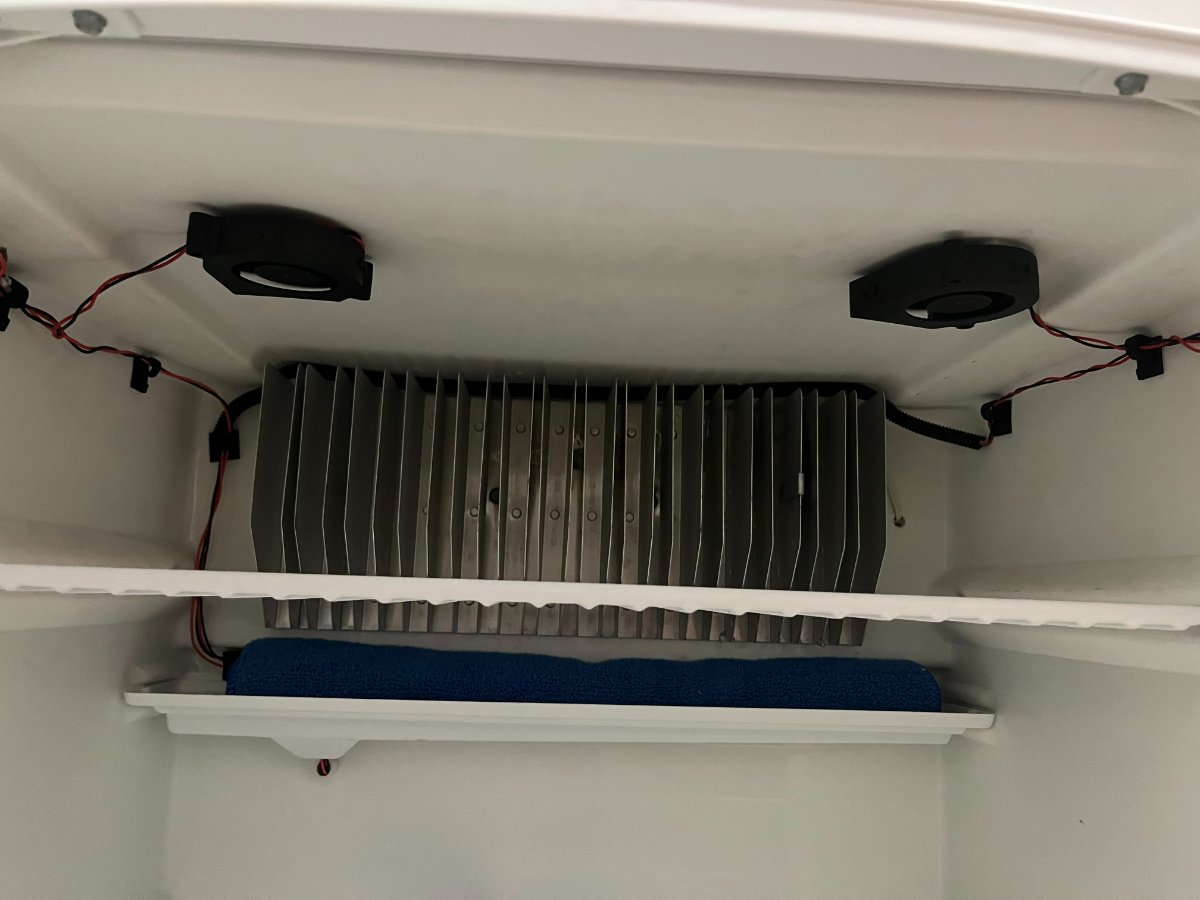
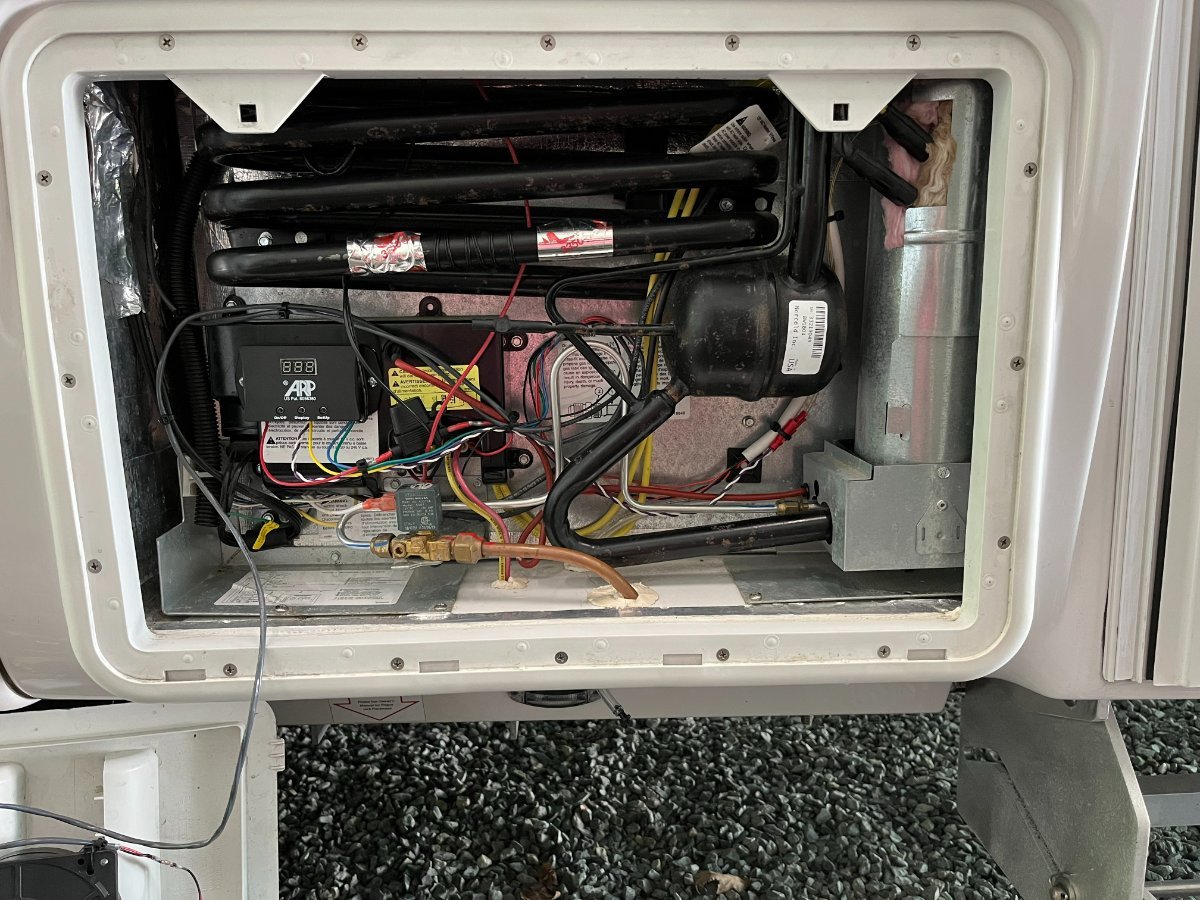
I just installed the full kit with the 4 additional fans. Glad I did as the fans seem to have an immediate positive impact on efficiency on hot days even though Oliver had already installed one fan within the vents. Based on some initial tests, I'm pretty sure the ROI is pretty good for this device on efficiency improvements alone. The installation on our Norcold 4000 was pretty straight forward but tedious with all the small wiring required for the full kit with fans. Fortunately I did not have to remove the fridge to get the sensor on the boiler tube. I also had an easily accessible drip tube to run the interior fan wires. It took me 12 hours start to finish (4 hours per day for 3 days). That includes the research, planning, getting the electrical components needed and the installation, testing and configuration. Of course, knowing what I know now, I could install another one on the same model in a couple hours max. 🙂 Here's a few pictures - not a lot of detail as online manuals and videos are really good - and each fridge is going to be different wire colors, etc. I mounted the external fans pretty much exactly like @C&MCurrie, so not going to duplicate those. Happy to answer questions though! Here's where I put the boiler tube sensor: And here's a picture of the two little fans I installed on the roof of the fridge: What it looks like after the install:
-
Fans do indeed help in hot weather. I have just installed the Fridge Defend by ARP on my Norcold 4000, which included 4 fans..Two small fans inside the fridge as well as two larger fans for the lower and upper outside vents. Oliver already had installed an optional fan in the middle of the outside vents, so I now have 3 fans working in sync outside on 3 different levels (bottom, middle and top) and the two interior fans. I have run a few tests the past few days with the new fans on and off in 95F-100F heat. I started with a room temperature refrigerator and a setting of 6 on the fridge temperature. The minimum temperature the fridge could achieve was reached in each case in about 15 hours (when the first off/on "cycle" occurred). The results were pretty convincing: Min temp in 15 hours with single Oliver installed fan: 40.0F Min temp in 15 hours with all 5 installed fans running: 28.1F I wish I knew which of the fans were most important, but the way the ARP is wired, it's all on or none on. I suspect it's a combination of all the fans. Nice thing is I bought the ARP for peace of mind as I do tow with my fridge running as most of us do and I know the absorption fridges are inefficient and can be dangerous when off level for even a few minutes. Nice bonus to add the fans (relatively inexpensive) along with the ARP controller.
-
@Katjo, check this site out: https://www.zarcor.com/rv_products/rv-door-window-kit/ There are several options from tinted to clear glass. Several owners have made this modification, so if you search the forum for "zarcor" you should find lots of good info. Cheers!
-
They do use bear proof trash containers there and preach to everyone about not leaving trash of any sort around. People are people though - the guy in the camp sight right next to mine left a 3/4 jar of peanut butter in the burn ring along with all his other perishables. Riding my bike around I saw several dog bowls with food/water out in the open. Fortunately the rangers patrol and come around quickly after check out and clean up after some of the idiots but you're right - they may need to be relocated eventually which is sad for the bears. Definitely glad it wasn't a big brown bear!
-
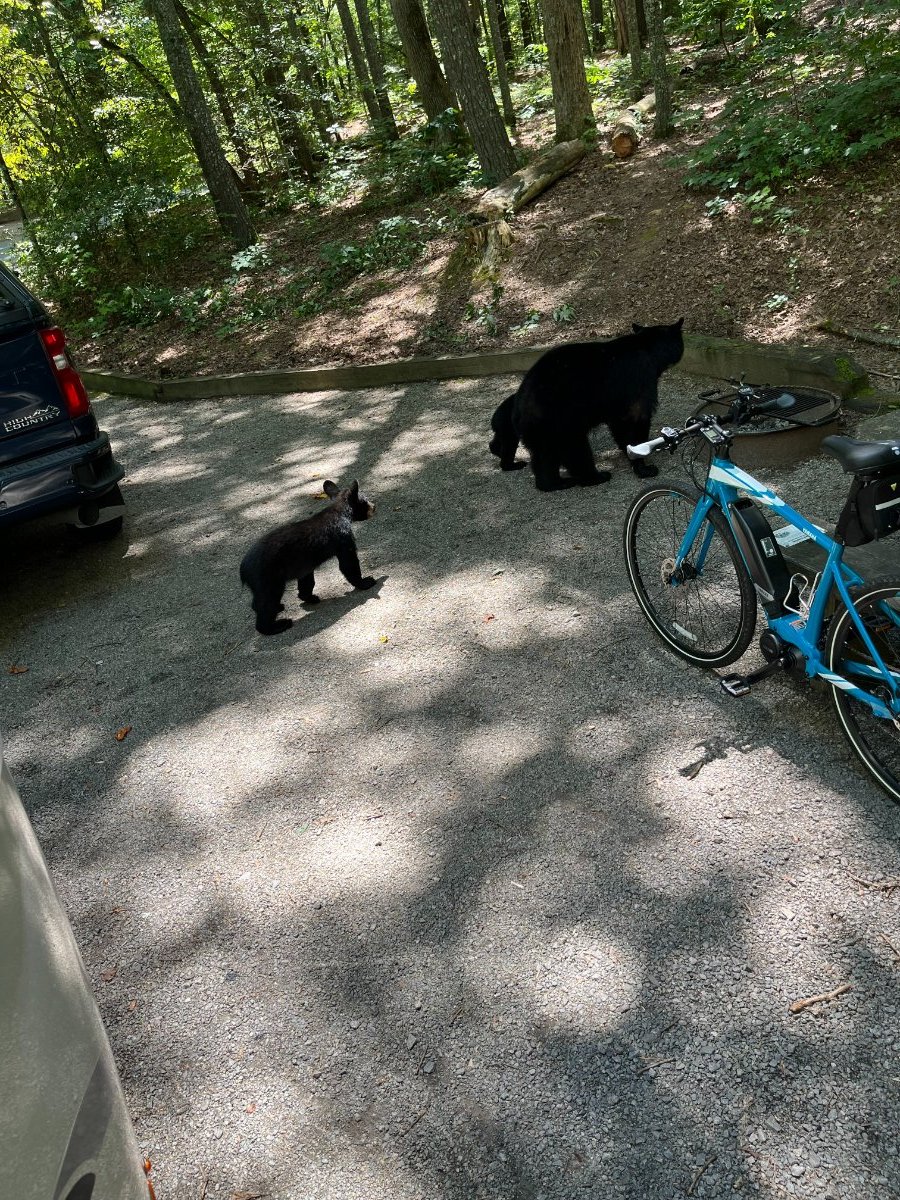
After all these years of hiking and camping in places where bears are common, I've seen lots of damaged garbage cans and coolers and many other things that proved bears were around, but I had never actually seen one. Boy, did that change in a hurry at Lake Powhatan campground in Asheville, NC a few days ago! I had one leg out of the trailer headed to pick up my hat that I had left on the table next to my bike when I saw one!! I had my iPhone in hand and snapped a shot while stepping quickly back inside with a heart rate that was probably looking like I had just finished a marathon. 🙂 But wait, the story doesn't end there. I'm peeking at the bear through my door window (I have the Zarcor you can see through) and here comes two cubs right behind her. I stick my arm back out the door and snap this picture: Wow. Even though mama isn't very large by bear standards, I'd not want to get between her and the cute cubs. I had just gotten done riding my bike and I had my bear spray on my belt as I always do when hiking or riding in bear country. I did not have either on me stepping out of the trailer thinking I was grabbing my hat and coming right back in. Lesson learned!
- 17 replies
-
- 11
-

-

-

-
Hey John, yes that was a typo. I only fill it through the outside port. I avoid overfilling it using a stopwatch and the See Level monitors. I'll run it for 2.5 minutes because my pump runs pretty close to 5 gallons per minute. Then I'll check my grey and black See Level monitors and it confirms about 12-13 gallons into the black tank. I don't push it to 15 gallons for fear of pushing water up the vent and into places it doesn't belong. Yuck. 🙂
-
Just an fyi that obviously may change from trailer to trailer and year to year: We have hull 688 (2020) with the composting toilet option out of the factory. Although the hole is there in the fiberglass floor under our Nature's Head, our black tank has no drilled holes on top - or anywhere else. It is also properly vented so you can fill it through the outside port (I use it for extra grey water storage only).
-
Ah, that makes sense now - the batteries must have been at a few percent when the See Level sensor was showing a short (low voltage). I've accidently run my Lithiums down to zero a few times and they are still fine. As @John E Davies mentioned, the BMS is there to protect and Oliver doesn't put lithiums without a BMS into it's trailers that I know of. Hopefully you have figured out why your batteries weren't charging? There's a physical breaker between the batteries and the inverter as well as inverter software settings, like the Charger Ignition Control not being set to "off", for example, that will also disable the charger function. Lots to learn, but it really does get easier as you gain experience. If you understand how the major systems work at a high level, you will be able to enjoy the trailer and have confidence you can resolve (most) issues that pop up when you are camping, etc. Good free videos online. I also camped next to a couple last year that made $ traveling to specific campsites to teach RV owners the ropes of owning an RV. Really lots of good options including this forum! Take your time... and enjoy the ride!
-
On that occasion, that big 12V breaker must have popped right when you unplugged from shore power, which is odd but possible since the inverter is connected to both 120V and 12V. The 120V and 12V systems are independent of each other. For example, I know on my trailer, if I pop the 12V breaker with shore power attached, all my 12V stops working but everything plugged into the 120V outlets and the A/C keep working via the 120V passthrough from the inverter. On the other hand, if I unplug my shore power all my 120V stop working (unless I have my inverter set up to invert of course) while the 12V works just fine. That's why this problem that @MnG KYis having is so strange to me. Whether you are plugged into 120V shore power or not has nothing to do with the 12V system, which is plugged into the batteries.
-
I'm a bit confused by the information in this thread. Does the 12v system (lights, pump, fans, tv, etc.) work when on shore power but not when disconnected from shore power? That would be bizzare imho. If there is a short in the 12v connections (seems likely from your description of problems plus the SHT message on the See Level monitor) I wouldn't expect shore power to fix that. It would also be an interesting data point to push the button on the Xantrex remote "in" so that the inverter would try to work without shore power (the pic you sent has the Xantrex button "off" or out). To try this, push the Xantrex button in while on shore power then disconnect and see if anything works (12v and 120v). Good luck - electrical issues can be frustrating but as others on this forum have mentioned, it's almost always a loose ground somewhere. More details and info may help the many knowledgeable owners help you.
-
I had an error code on our Norcold (2020 Hull 688 so probably the same as yours) that I got rid of with a soft reset. To do that you hold the on/off switch for 3 seconds (or maybe just one), let the unit set for a few minutes, then hold the on/off again for 3 seconds. Check page 7-8 of the owners manual as there's a blurb in there about the n code. There is a way to do a "hard" reset apparently, but it involves disconnecting wires from the control board and likely would invalidate the warranty. Hopefully a soft reset works for you! 🤞
-
When boondocking, we all manage our power carefully because we all know what happens if our batteries go dead - the trailer is unusable for the most part. How much capacity does one need? That's a huge variable obviously. Some folks need very little and some need a lot. We have found that we need enough to survive that common 10 hour quiet period during the night when there's no solar or generators to help out. Unfortunately, we have needed more than our 400Ah capacity that we have on several occasions this summer! I know - there's other owners rolling their eyes right now thinking I'm crazy. Needing more than 400Ah capacity doesn't happen often, but it has happened to us one too many times now. The scenario is a hot, humid summer night where you can't sleep because of the heat and humidity. In this case, we like to run our A/C occasionally to cool the cabin and our small dehumidifier constantly to keep the humidity / dewpoint around 60 (comfortable) - or just pack up and go home because sleep is pretty important. 🙂 In this situation we average around 40-45 Ah, so we need 400 - 450 available Ah. Close for our batteries, but not quite. I don't like to stay home just because it's too hot or too cold out... or come home early from a trip for the same reason... So I started pondering various solutions... I contemplated upgrading to the new Lithionics 600 Ah lithiums that Oliver is now using, but they still cost nearly $5K EACH!!! 😞 I ultimately decided to use another pair of cheaper 100Ah lithium batteries that I recently purchased for the trolling motors on my boats (Ampere Time is the brand and it's been super good to me so far). To do this I added a Renogy 20A DC to DC charger under my streetside bed right next to the batteries. If I need to put some Ah into my main batteries during quiet hours, I just bring my Ampere Time lithiums out of my truck, put them in my basement and hook them up to my DC to DC charger before bed. The Renogy delivers 150 out of 200 available Ah to my main batteries. The loss is due to the inefficiency of the charger (10% loss) and I'm also running the Renogy microprocessor and fan off of the Ampere Time batteries (15% loss). Eventually I'm going to upgrade my LifeBlue batteries to something with more capacity - but I have literally "bought" some time to wait for prices to fall and technology to provide more capacity in a smaller footprint. Of course one good thing may lead to another... I'm thinking of putting a 40A Renogy DC to DC charger in the back of my truck now so I can charge my spare batteries while driving! All of this makes me feel like I'm catching up to @ScubaRxwith extra tricks (and things) to pack in my truck for camping trips! 🙂
-
I have both my solar charger and my Xantrex inverter / charger set up to charge my lithiums to 13.2V and float them at 13.2V. That keeps them at right around 55% SoC, so pretty much perfect for storage when you want your systems operational and your batteries at a safe SoC (have to keep an eye on the power and make sure it's always on - not a problem for me since my Oliver is stored at home). I do fully charge my batteries about once a month or so as that is recommended by almost all lithium battery manufacturers. If you learn how to properly configure your lithium chargers (configurations change based on use cases), then you can manage your batteries to hopefully get the full potential out of your batteries. For what it's worth, my LifeBlue lithiums have the following SoC at the following voltages (I think all batteries will vary a bit so test your own), and I change the settings regularly based on my use cases: 13.1V = 25% SoC (not used, but nice to know - this is where I would like to recharge if possible) 13.2V = 55% SoC (I use this voltage when I'm storing our trailer at home) 13.3V = 67% SoC (I use this voltage when I'm camping with full power hookups) 13.4V = 98% SoC (I don't use this voltage much) 13.5V = 99% SoC (I use this voltage just before I leave on a trip if I want the most without fully topping off) 13.6V - 13.8V = 100% SoC (achieved with a setting of 14.4V on the charger until the amps drop to zero)