
SNY SD UP
-
Posts
352 -
Joined
-
Last visited
-
Days Won
2
2 Followers

Recent Profile Visitors
5,127 profile views


SNY SD UP's Achievements
")


-
I would definitely contact OTT Service. if you just had the “Full Monty” service then they should have noticed this.
-
"My Bad" but, I have found that if wifey starts a conversation with, "Honey, I think you need a tool to help you do this", she has my complete attention for the duration of the conversation, no matter what else we discuss... I think she realizes it too, as we have had some rather meandering (like what do tools have to do with making sure my daily work clothes are in the hamper on laundry day...) conversations, but I was paying attention to every word until we were done. Before we were married, my father told Maggie, "He is not hard of hearing, He is hard of listening..." Now I have hearing aids, and I still do not listen. 🤭 B~Out, I just heard the word "tool".
-
"The price for a horoscope varies from around $30 to hundreds of dollars. " Darn Spell-changer's... 🤣
-
Yes, Then you truly have a missing "knockout" as Craig astutely noticed, and again as he recommended you should let OTT service know by opening a ticket, and reporting such. Be sure to add your OTT model year to your salutation as that helps all responding better understand what the issue may be. B~Out
-
[Disclaimer I have no association with, or financial involvement with Garmin] Just now, Garmin "Cyclops update for North America software update" available, not sure if new, or the update was not downloaded and applied earlier. The Garmin RV890, If you use this to plan trips, be aware that it is a “Real-Time” device. By that I mean if you are actively planning a trip during the winter (Nov-Feb, Mar) months, to and through Alaska, the NWT, Northern Quebec, Labrador, or other places where the roads are not passable during the winter months, the RV890 will not allow you to route through these areas during those winter months but may re-route you many ,000 or mi/km via another route. At least has been my experience. As you get closer to your departure date and the routes you want to take are no longer impassable due to snow, the RV890 may (if you choose shortest distance option) allow you to route the trip the way you want to go. i.e., If planning a trip from FL to AK, and you plan on leaving in May, you may not have passable roads in parts of AK until late May, so you may have to wait until closer to AK to get the RV890 to take the route you want. I believe this was done to prevent RV890 users from being routed through unsafe routes, or worse. I do not know if these “Garmin” updates which come from time to time would update “seasonal” route openings/closings. My guess is if a route is blocked by a major land/mud slide and it is obvious it is not going to be passable for some time, then that information would “hopefully” be on a Garmin update. I do know when we were travelling to Tumbler Ridge, BC in ’23 or ’24 while it was in the early stages of a BAD FIRE, the only thing suggesting “not passable” were the Mounties actively closing roads behind us as we made it to the town, then exiting out our “pre-planned” route away from the active fire. By the time we were back to an area where we could check our RV890 for routing, the route in had not changed. B~Out
-
And when at a location that i can get a good iNet connection, i will check to see if any updates. I want to make sure that the "navigator" has most recent updates...
-
thank you Bill, I always check for updates before doing anything new on the RV890. One of the Checklist items before we leave is to check for updates. B~Out,
-
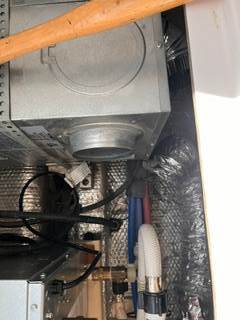
Have you done any mods to the duct work based upon "Snackchasers" post, if so i would look for a disconnect of ductwork from that port. Your Oliver is #1238 what year s/b on your signature? it would be interesting to see if the factory has changed the heater duct runs based upon Snackchasers changes... it appears as though Oliver has changed the open heater ports, so this one appears to be facing the galley, as you can see it from the galley access port. Back in 2020 (our model year) there was one open towards the rear, which must do a 180 to head towards the front of the trailer and one facing the front of the trailer. Our galley-side port still has its knock-out port intact. For me it was like a "Fun House" optical illusion for a minute until realized what i was seeing based upon my 2020 experience.... B~Out
-

Bathroom Heat - a more direct approach!
SNY SD UP replied to Snackchaser's topic in Ollie Modifications
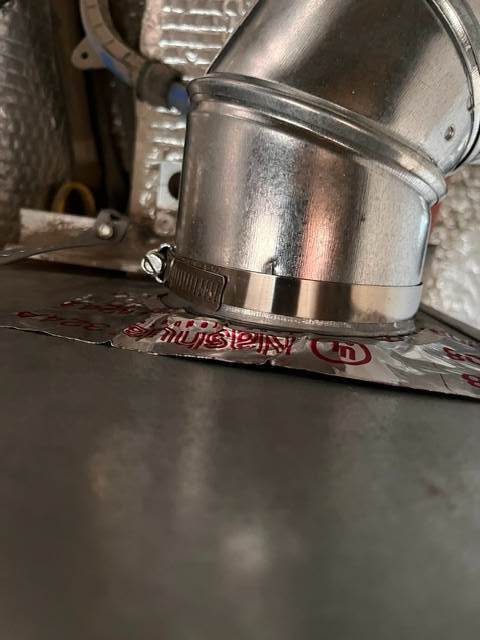
i was wondering about that. i did not see any screws, glad I asked. here is a picture of my beveled connector collar. Did you twist & remove the connector collar to drill that hole? I accidently removed mine when working the elbow on to it. Took me 10 mins to get it inserted & locked in just right. that is why my foil tape is there to stabilize it, in case i go the "Screw the 180" route. Now i might bring my 180 with me and try to do that mod on the road if things are a bit chilly inside. Maggie said that she felt a lot of heat coming out of the shower exhaust next to the TP caddie. i was reading but did not catch if you mentioned, Did you replace any pex to move the line that is "Right in the WAY!!!" to connect the under the bed exhaust vent? Boy-h-boy, they sure did want us to have a nice 45 elbow in there. The way i see it is, if i can move the water line, then i can have a Rigid Tee in there on the way to the Kitchen Exhaust.
-
Bathroom Heat - a more direct approach!
SNY SD UP replied to Snackchaser's topic in Ollie Modifications
Geoff, Did you end up putting a screw into the "Connecting Collar" coming out of the rear of the Truma heater and the start of the rigid duct (180° turn). Or replace it with a "straight out" " not beveled" connecting collar. I found the design of the existing connecting collar had a slight beveled towards the inside. I believe this is to allow insertion around it of the flex ducting, which has little weight to it. but for heavier rigid ducting and the heavier flex ducting there is for lack of a better word more “Torque” on that connecting collar. My rigid 180 as shown kept sliding off no matter how tight the 4” clamp was cranked down. So, I went back to a heavier (than supplied by Oliver in 2020) duty flex tubing. I even had the rigid and heavier flex on the floor to reduce torque, and it would still come off with the slightest of movement. I liked everything else i saw and it makes sense. So, I did "phase I" of re-ducting. Maybe the re-design will be adapted at factory assembly. B~Out,
-
Bathroom Heat - a more direct approach!
SNY SD UP replied to Snackchaser's topic in Ollie Modifications
-
SNY SD UP changed their profile photo
-
Thanks Geoff, we have been carrying a non-op "Dometic Type 9500E (120 VAC) Power Cassette Awning model 202(LL)(CC).003(#)", around for about 3 1/2 tears hoping to find a service center on a trip, that would have a replacement motor. I will reach out to them as well. B~Out,
-
Dometic toilet 311 valve leakig
SNY SD UP replied to Nick and Linda Stratigakis's topic in General Discussion
Do not buy a "Lippert" replacement part. Sales ppl will say it is a match, but it is not. Tech will say put in the 2nd screw and it will stop that leak. maybe-maybe not. As the ppl at carnivals (not to disparage any OTT owner who has done that) would tell this 10-year-old who just spent his $5 on basketball, ring toss and water pistols, in the midway, "Close, but no cigar, Son"... The upside, I may have found an authorized Dometic dealer to work on our awning... just not before we head-out. B~Out -
Dometic toilet 311 valve leakig
SNY SD UP replied to Nick and Linda Stratigakis's topic in General Discussion
issue resolved. We bought a Genuine Dometic Water Valve, it is now installed and working as designed. -
Dometic toilet 311 valve leakig
SNY SD UP replied to Nick and Linda Stratigakis's topic in General Discussion
The Dometic "Flush Valve Kit" arrived by pony express (3 days) and I installed it late last night. It is the proper part for our model of toilet. However, during re-assembly when I inserted it into the back of the toilet, it did not “Click” as mentioned in the Video or Forum comments. I pressed it in the best I could, but no “CLICK”, removed it and re-inserted the old one and “Click”… re-inserted new one, no "CLICK". I did however add the “second screw as was suppled”, so now I have (2) screws holding the “Flush Valve” in place. And what is with the worm gear clamps (existing & supplied), the heads are not 1/4 or 5/16's, sheeez but I did snug them up tight. This morning I will look for any subtle differences between the old and new Flush Valve. And I still have a very slight drip coming out of the back of the toilet where the “Flush Valve” inserts… I believe I have a work-around, in that I found out where I will re-locate Willis’s water dish. Maggie was not impressed. B~Out