MAX Burner
-
Posts
1,681 -
Joined
-
Last visited
-
Days Won
68
Everything posted by MAX Burner
-
Welcome to the Forums and to the OTT Family! You'll not be surprised how much support you'll receive when searching for answers to questions you'll have with your new OTT on this platform - not to mention from OTT Service Team in TN. Our good friends towed a 23-foot Airstream Flying Cloud for a couple years with their new A-Q7 V6 3.0L; their only comment (that I can remember, that is) was that they had to keep a "weather-eye" out on the rear tires. Under the load from the hitch weight, the suspension seemed to add excessive camber to the rears and wore out the inside tread faster than expected. Enjoy your adventure to the NE and Nova Scotia!!! Keep us tuned-in to your Oliver experience... Cheers!
-

Opening Up Storage Space Under Bath Sink...
MAX Burner replied to MAX Burner's topic in Ollie Modifications
The ones we bought had a protective coating that had to be removed before mounting on the wall. Hope this helps... 😎 -
"One is None. Two is One". Just say'n
-
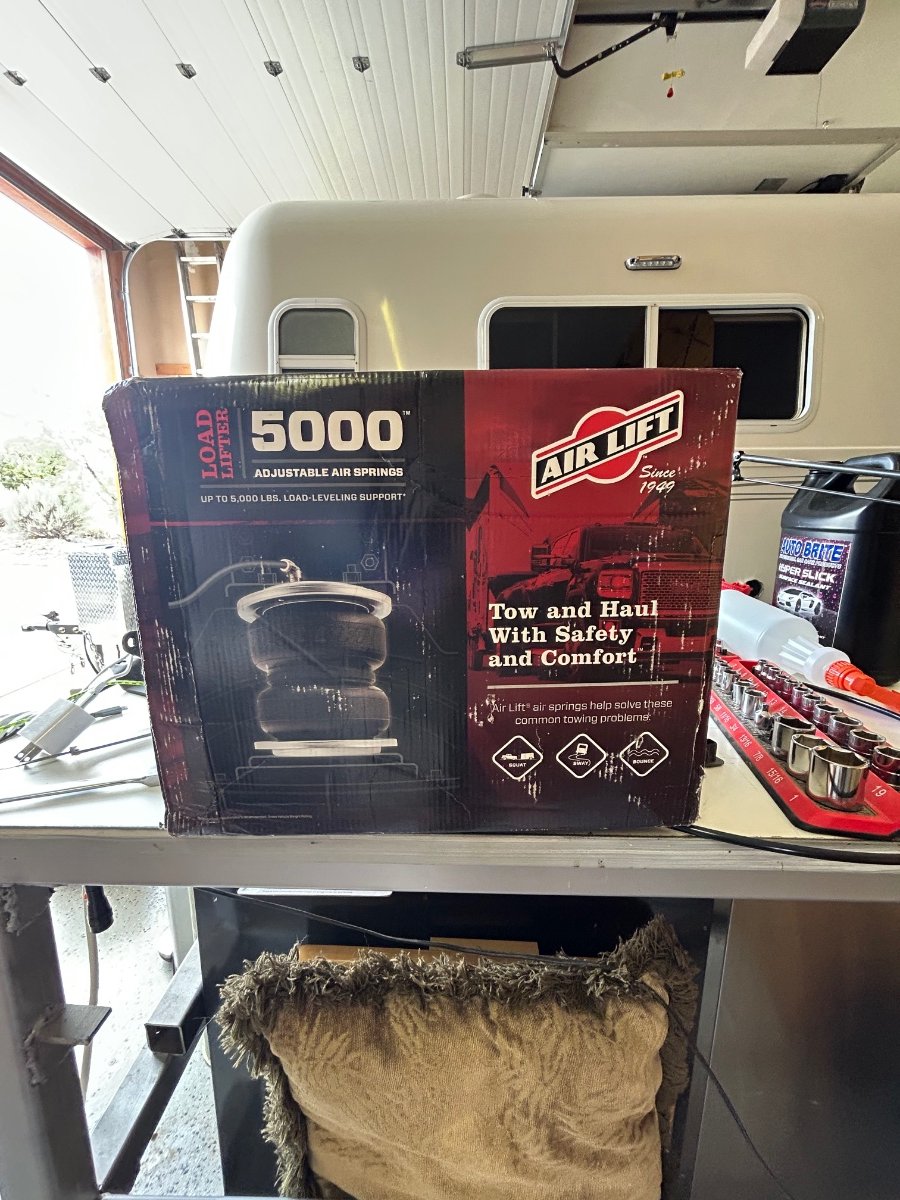
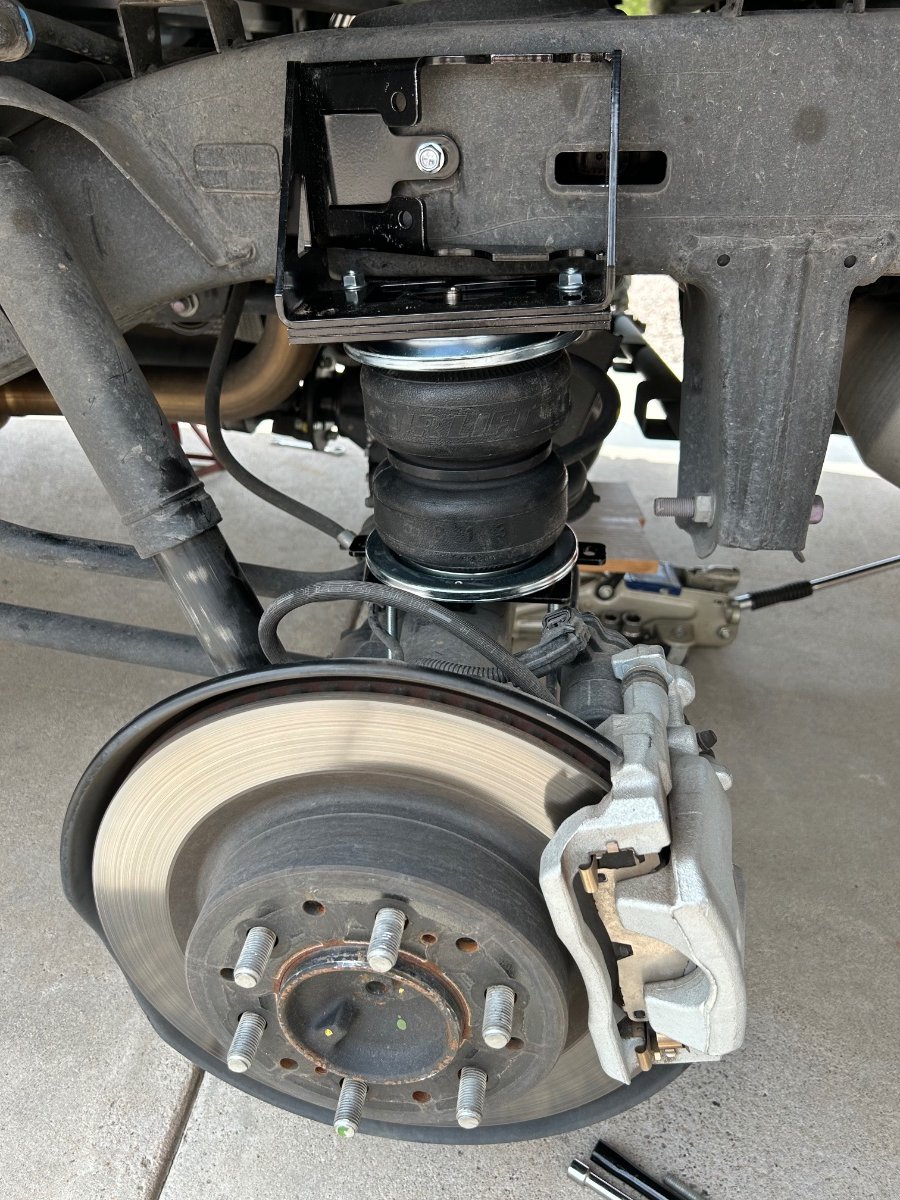
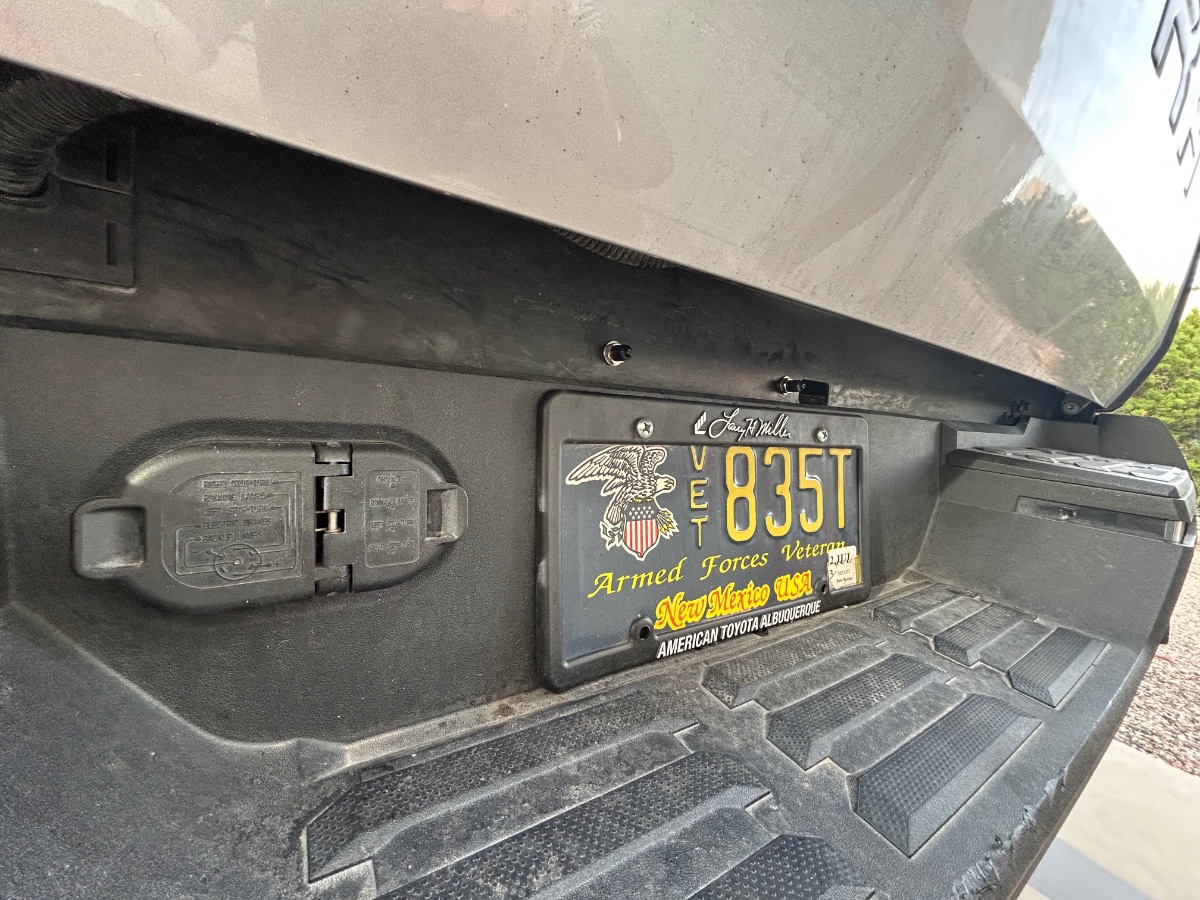
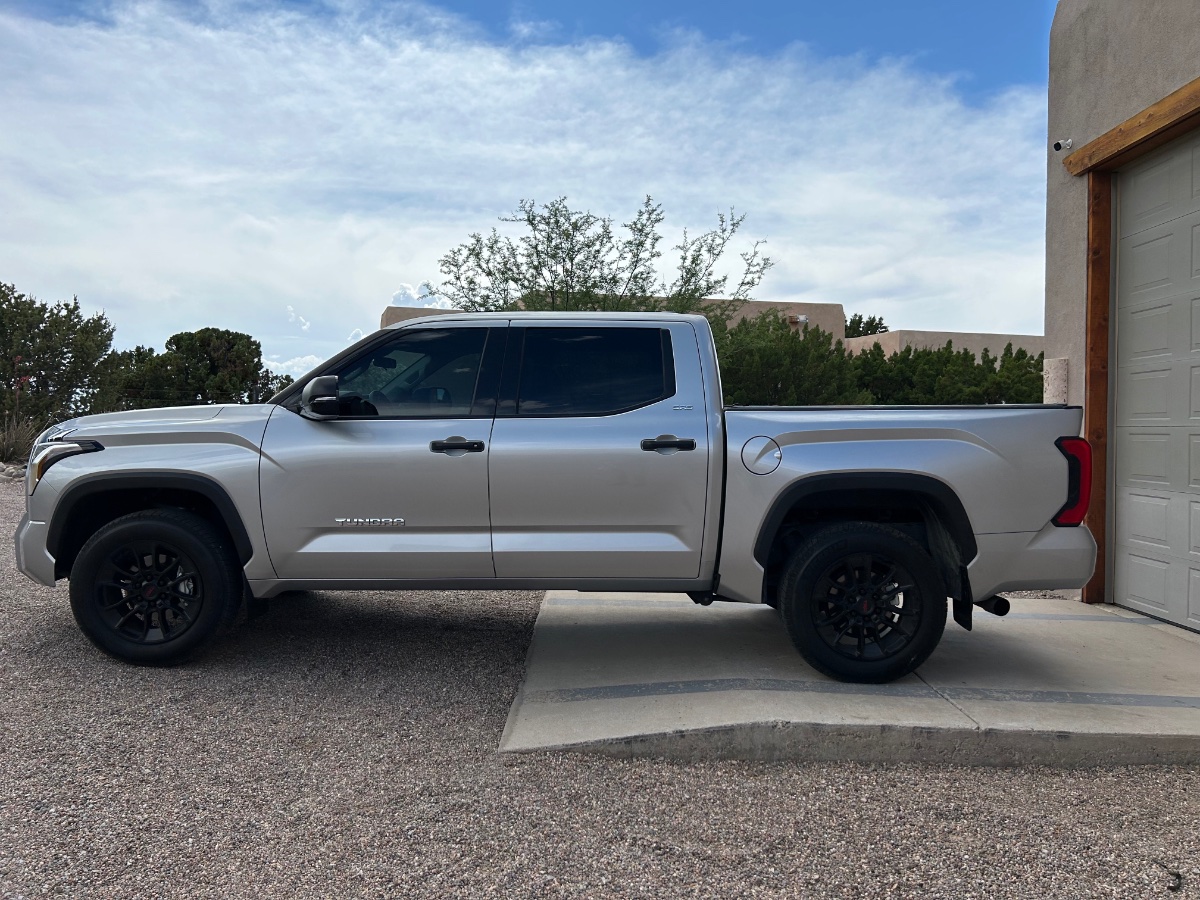
So, we went with the AirLift Kit. Spent most of yesterday afternoon installing a set of airbags on the Tundra... Researching Firestone, Torque, Rough Country, ReadyAir, and a couple others it came down to performance, stability ratings, guarantee, and price point. Firestone Ride-Rite and Air Lift Load Lifter 5000 were the toss-up. The various limited lifetime guarantees were mind numbing to sift through, but that said, the Air Lift seemed slightly better than most. The internal jounce in the Air Lift was comparable to (if not a bit beefy-er) than Firestone's. Price point - about the same. $450-ish. The Air Lift kit won the decision. We've done business with e-Trailer over the years and decided to stick with a known entity - slightly more $'s but worth it for the customer relations. Safety-chocked front wheels, floor-jacked the Tundra at rear differential, safety-jacked, removed rear wheels and prepped for the install at noon yesterday. 3+ hours later - done. Air Lift install procedures are 5 stars! Custom description and color photos for the 2022 Toyota installation - absolutely 100% correct and detailed in all regard. FYI, we assembled the port/starboard bag assemblies the afternoon before to prep for yesterdays drill. The factory jounce assembly is removed and no longer required when installing any air bag kit. It was interesting to discover that our factory jounce actually hit the top of the axle recently by observing that some of the road debris had been rubbed off by it! Hmmm... Once safety-jacked, (used frame points fore and aft of rear axle on both sides) with 2 jack stands on either side, lowered floor jack positioned under the rear diff to make enough room between frame/axle so air bag assemblies could be correctly positioned. Bolt-on procedures went smoothly without issue. The Air Lift Kit frame brackets were used to relocate hydraulic brake line mounts so as to keep them free yet stabilized which we thought was a brilliant feature. We liked the Schrader valve mounting position that another Forum member used which was the two upper license plate screw holes - but our truck's configuration couldn't accommodate that option. Decided to locate the individual port/stbd valves just above the license plate mount to be somewhat "out-of-sight" but still easily accessible for airbag inflation/deflation. Routed the 5-foot air lines from valves to the bags up and away from exhaust heat areas and cable-tied accordingly. Connected lines with "PEX-like" push-in fittings on top of airbags. We sprayed the air line connection at the bags with soapy water checking for leaks - no bubbles! Inflated each bag to 45psi after completing the installation as part of the leak-test process. Re-checked the system this morning - all good. Will be headed into town later today for a test ride - I'm thinking running the bags at 25psi for the first ride attempt. Will report back regarding ride "feel". Below pic shows truck bed height at 45psi, FYI: We are expecting better stability, less jouncing, and an overall longer lasting suspension. Realizing that air bags DO NOT change cargo capacity in any way, the benefits of airbags, such as eliminating "sag" and possibly better braking, should meet our driving/towing characteristics. Cheers!

-
Discount Tire refuses to sell me LT tires for my trailer
MAX Burner replied to John E Davies's topic in General Discussion
Exactly right on! MAX's "hard rule" on towing anything - DON'T SKIMP ON RUNNING GEAR. Period. -
Discount Tire refuses to sell me LT tires for my trailer
MAX Burner replied to John E Davies's topic in General Discussion
Didn't know that, good to know. Our experience has been only with TV's. Thanks! -
Our Oliver Galley gets a new 3 quart insta pot.
MAX Burner replied to Patriot's topic in General Discussion
I'm thinking this threat could easily "moderate" into a new thread devoted to yummy IP recipes... just say'n, HA! -
Our Oliver Galley gets a new 3 quart insta pot.
MAX Burner replied to Patriot's topic in General Discussion
It's easy to get to the level of "huge fans" of the IP! We also use the larger IP version in the main galley of the house.... Cheers! -
Ah! @mossemi - beat me to it, brother! HA!
-
We spent a month from NM to Key West several years ago. Making reservations before departure were what we consider the basic plan from which many deviations were made. Specifically, we found an RV park on Grassy Key which we planned to stay 2 nites - it was so nice those 2 nites turned into 4, and the plan pushed back from there. It always seems to work out. Enjoy your roaming! Cheers...
-
@topgun2: Same here. Researching for model number ATM...
-
Our Oliver Galley gets a new 3 quart insta pot.
MAX Burner replied to Patriot's topic in General Discussion
...oh, sort of something like this: We love ours and it fits nicely on the top shelf of the pantry. D's got tons of recipes... Great for our morning oatmeal! Enjoy!
-
@Geronimo John previously requested in one of our recent thread on "Relocating Bath Water Pump Switch and LED", for us to post a new thread discussing options for opening up storage under the bath/shower (HEAD) sink. In that earlier thread, G-John referred to an insulation modification engineered by @John E Davies which is actually an element of this suggested mod as well. D and I wish to thank both G-John and JD for their combined encouragement for this and other OTT modifications we've logged to date. FULL DISCLOSURE: We haven't completed the mod, but members should get a good idea of the direction its going - and we will continue to update progress. 1. Background: We mentioned in the WP Switch/LED thread, the PO installed a marine-grade deck hatch on the front side of the sink cabinet after removing the "cubby shelf" which housed the PW Switch/LED package. The deck hatch is available on Amazon: As shown above, the hatch is configured with 2 "dogs" that adequately seal the compartment within as we have yet to discover water intrusion after showering - believe me, we've checked! Higher quality deck hatches are available at a higher price point than this one, for sure. On the plus side, the rubber seal used in our hatch cover is totally replaceable. In fact, some are available that more closely match the latch hardware OTT uses for the upper storage cabinets in the main area. Here's how ours is configured: 2. New storage area: When relocating the WP Switch, we cleaned up the wire bundles and PEX lines in the void below the sink. JD noted in his "How To" thread about how to better insulate this void - especially since PEX lines are located there. We will do the same insulation upgrade in Phase-2 later this summer. D is calling this a "game-changer" for her because it opened up the space below the forward dinette seat for other items - now that the void serves as storage for dry paper goods previously under the seat, as shown below: 3. Path forward: We're planning to add shelving in this compartment for better organization after the insulation upgrade. I'm actually hearing rumblings from D of converting the forward seat storage area into a mini wine cellar - more on that in another update... So as @Patriot might say, "Mod on..." Cheers!
- 13 replies
-
- 21
-

-

-

-

-

-
has anyone tried the new Dometic fresh jet 2200?
MAX Burner replied to Roadlotus's topic in Ollie Modifications
Same here! -
Discount Tire refuses to sell me LT tires for my trailer
MAX Burner replied to John E Davies's topic in General Discussion
Although we still do business with DT, we've also had very good luck with Costco Tire section, FYI. -
NICE! We also had one in both of our AS's and also in our 2019 Casita - a convenient touch, IMO.
-
Truma Aventa owners, cowling counter sunk fastener holes
MAX Burner replied to Patriot's topic in Mechanical & Technical Tips
Good anti-water intrusion fix... -
Low voltage at the cigaret lighter
MAX Burner replied to Bill and Nancy's topic in General Discussion
@Bill and Nancy: BRAVO/ZULU, Brother! Well Done. -
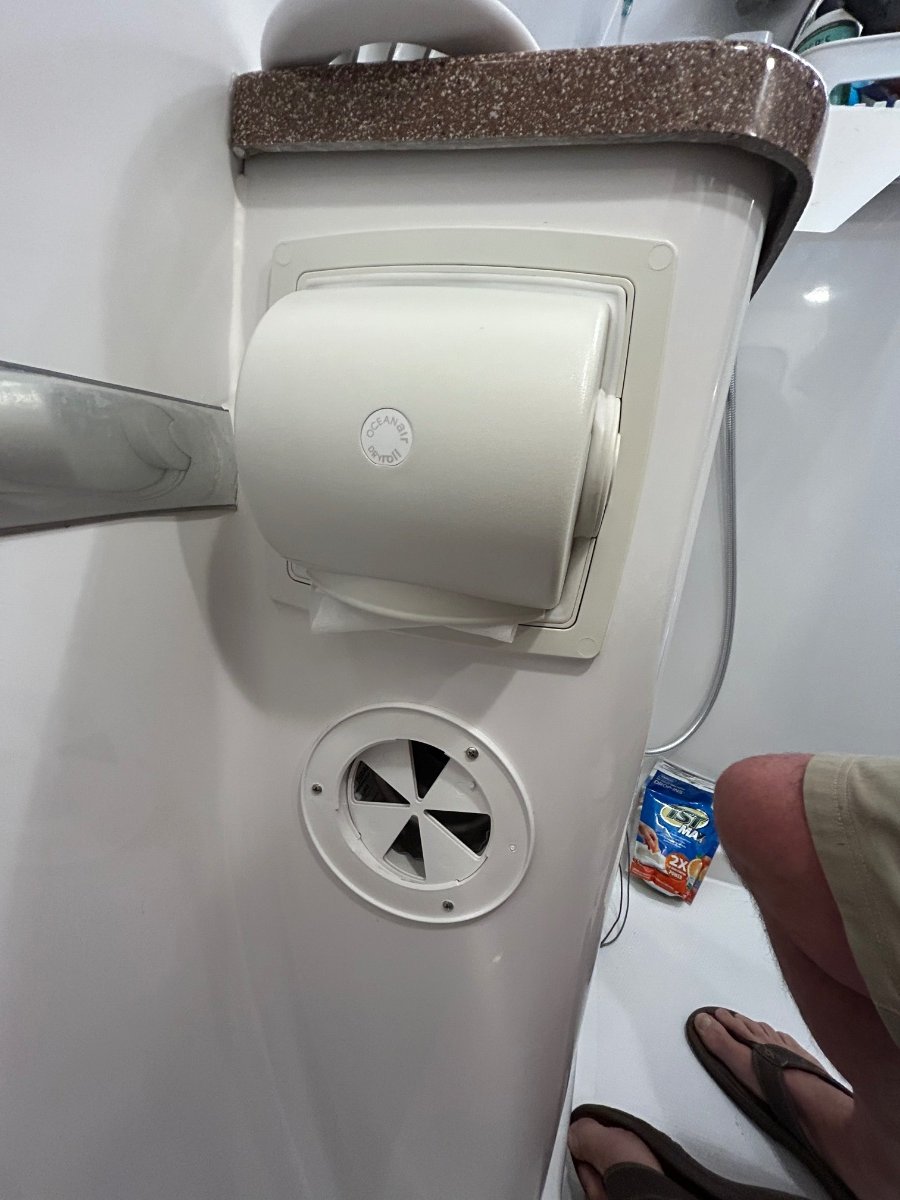
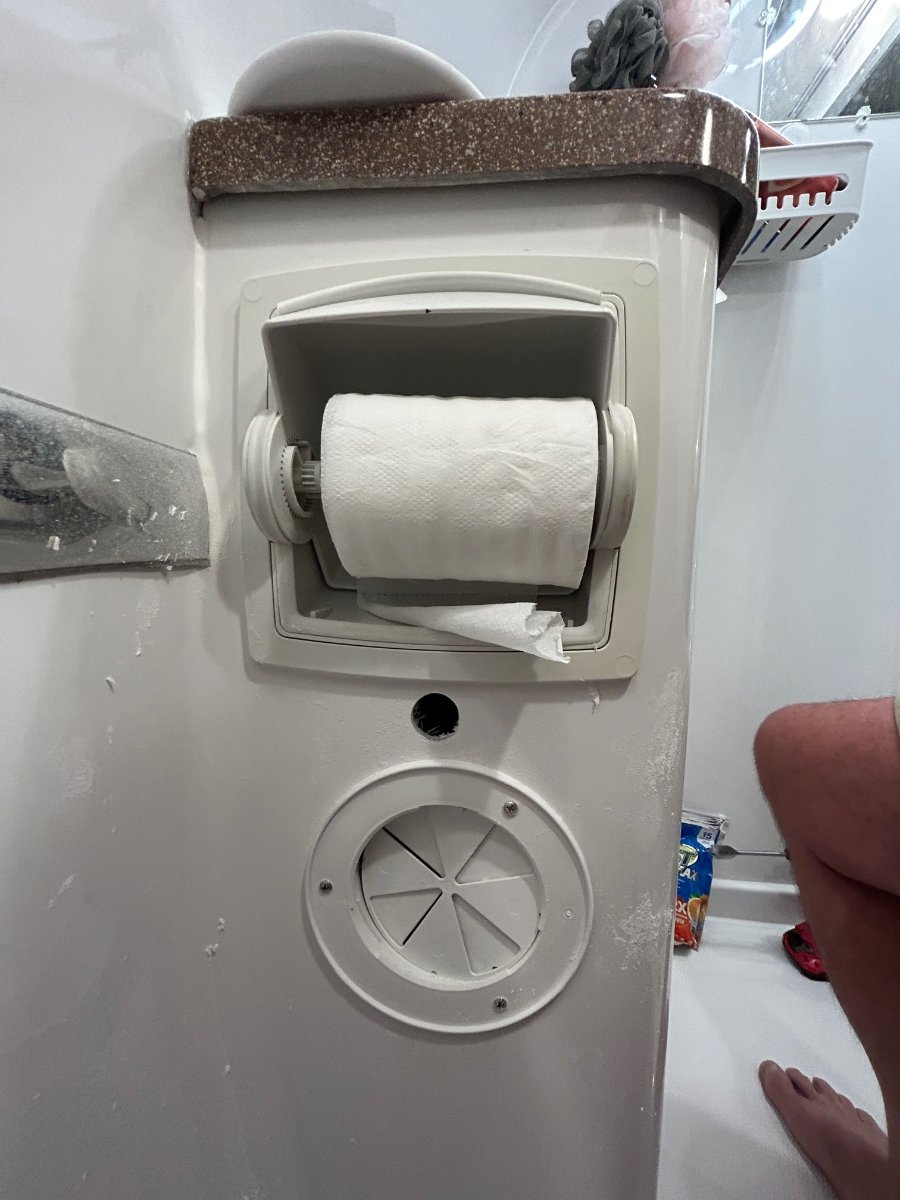
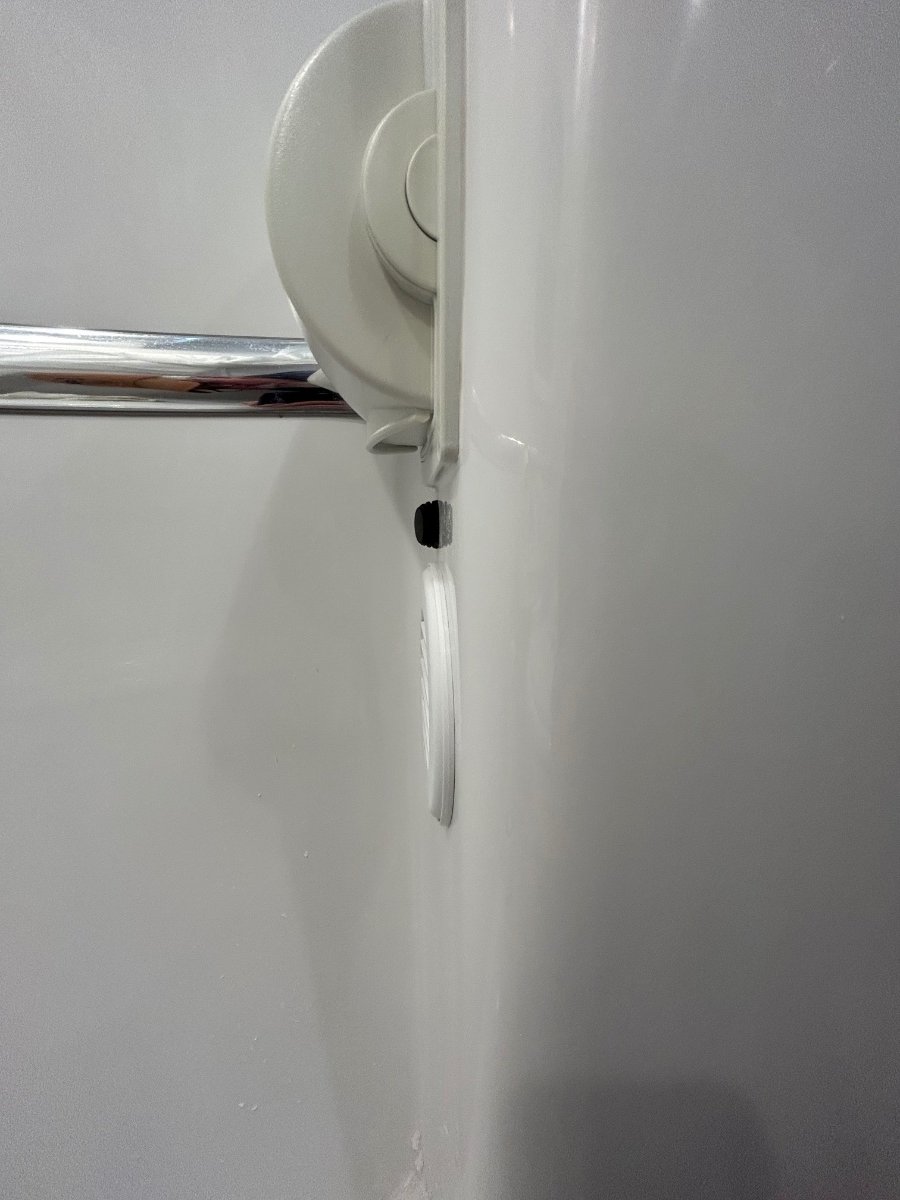
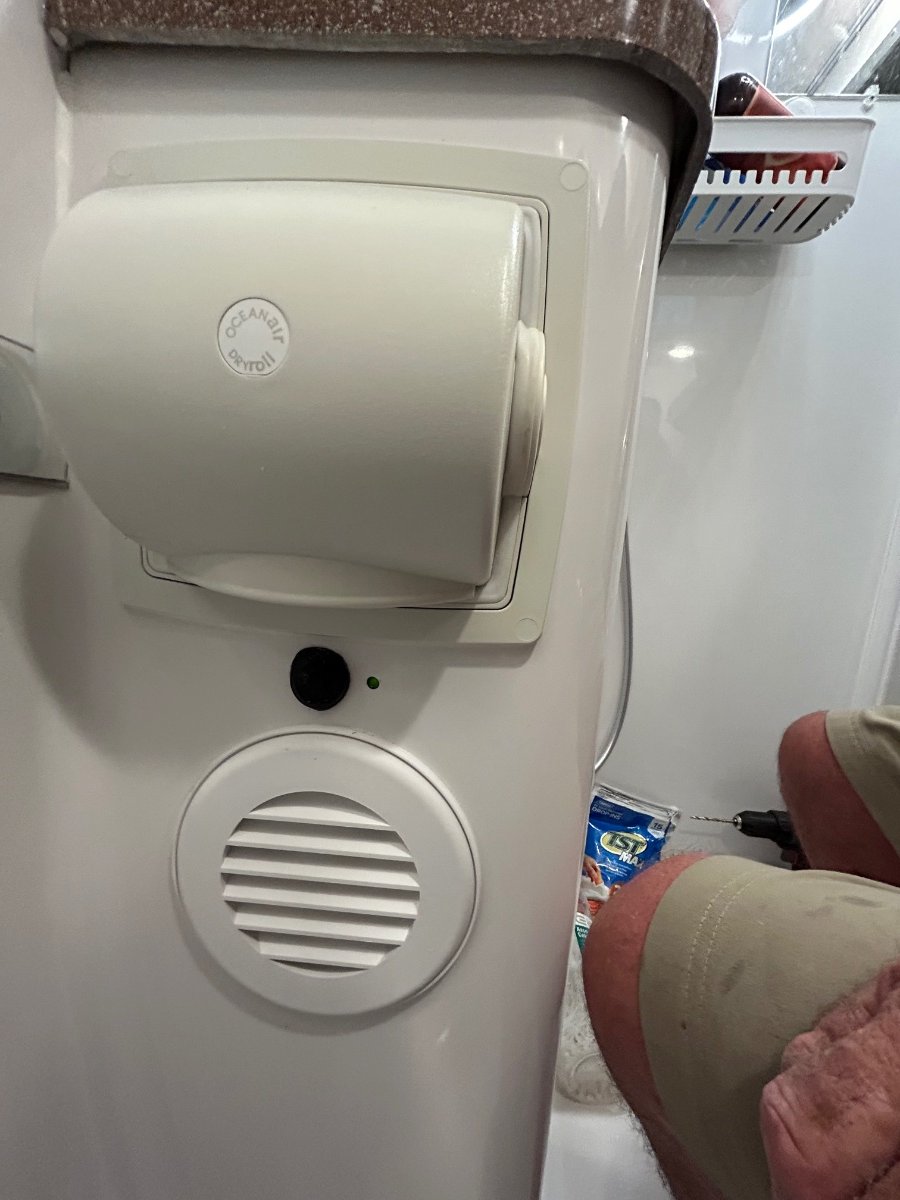
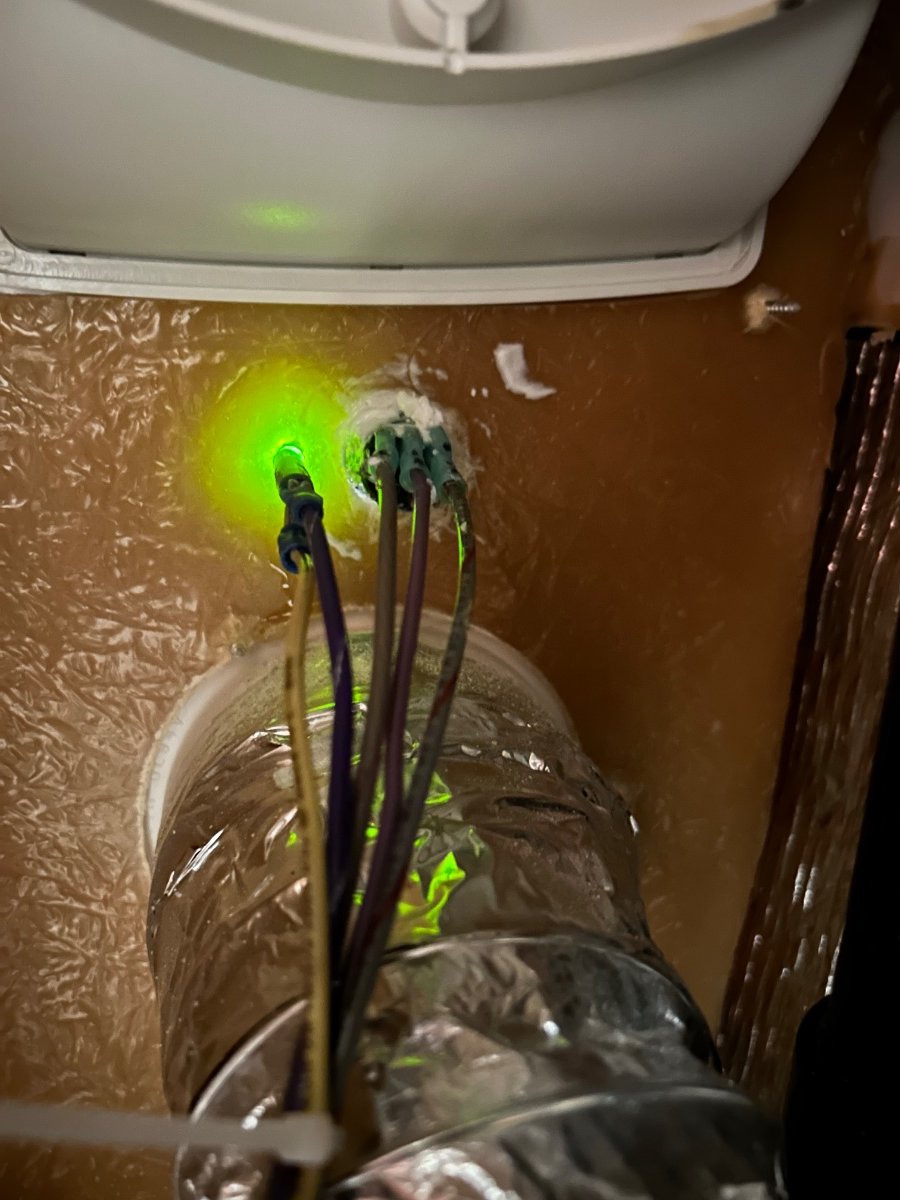
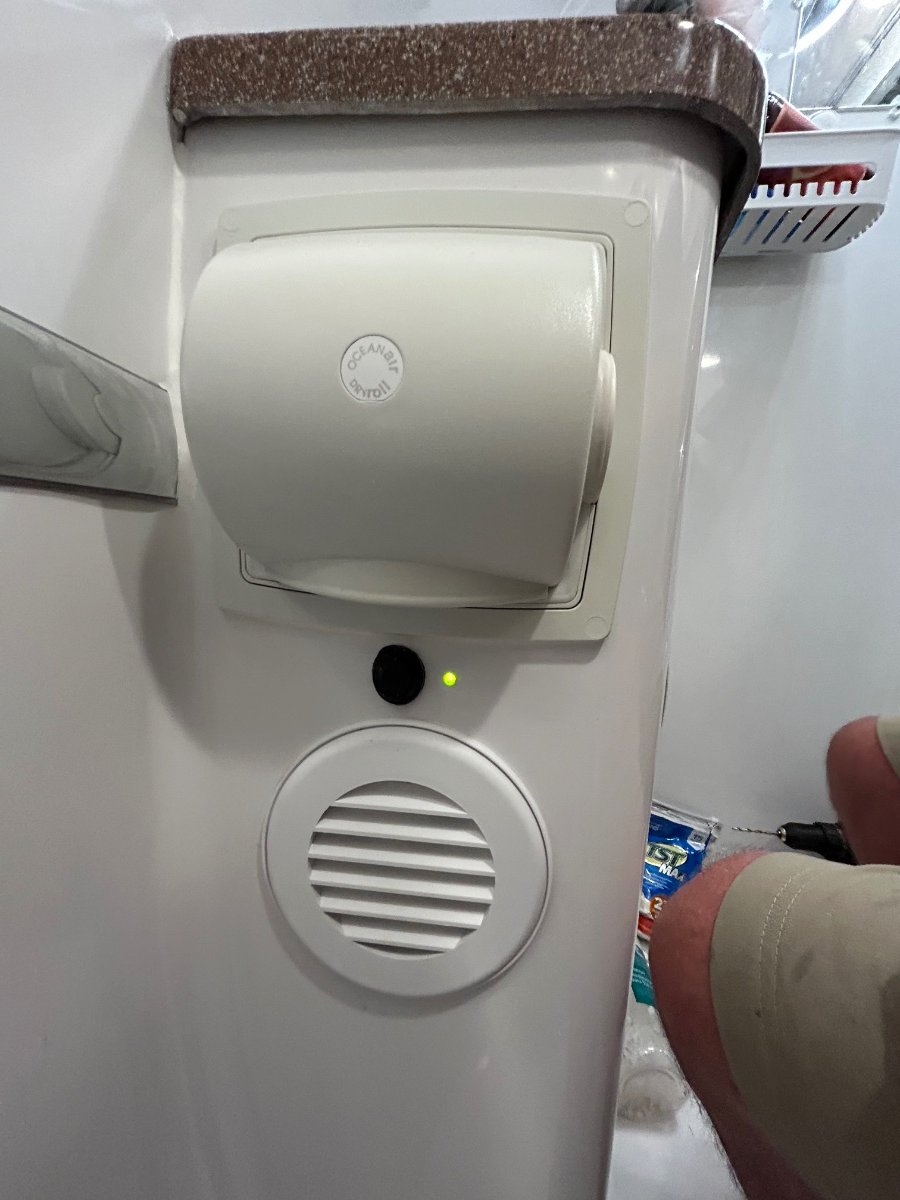
Problem: We've had our OTT for several months now, and still getting used to the "in's and out's" of the rig. One item that's been bugging us is that there wasn't a way to energize the water pump when occupying the head. WHAT? Background: So, the PO decided to remove the "cubby" shelf under the bathroom sink which housed the factory WP switch and LED and replaced it with a 2-dog marine-grade hatch to access space in the forward area under the sink for additional storage. I get that, 100%. However, they didn't (for unknown reasons) reposition the switch/LED before completing their mod. This was either an oversight, or running out of time, or outside their wheelhouse, or... whatever, it doesn't really matter. There's a modification project that's hatching here. After rooting around (with my vintage 6-foot frame) on the shower pan looking into the forward-most storage void, lo and behold, the WP switch AND LED wires were found wrapped-up and tucked away. The 5 wire-bundle of switch/LED circuits were fully intact and operational. Whew! Right? Fix: Ok! Let's figure out a logical placement of this, what we consider, a non-trivial feature to have working correctly in a proper RV head. I decided to reach out to a couple members for their thoughts (many thanks to JD and Geronimo John) - another huge benefit of the OTT Forum. Several ideas surfaced to include repositioning the switch/LED on the upper bath cabinet near the existing light switch or on the port side of the sink cabinet. We opted for the side of the sink cabinet. Below are some pix of the repositioning modification we knocked-out yesterday: 1. Carefully measured, marked, pilot-drilled, and drilled switch hole: 2. We chose the area below the TP Compartment because it would seem to give more "anti-water intrusion protection" than the space above the TP holder. 3. Measured, marked and drilled LED hole: 4. Used a couple drops of Gorilla Instant Glue for the LED mounting placement. After glue cured, applied clear silicone to provide additional water resistance: 5. Let there be light... The rubber-booted "marine-grade" switch should be fine in this environment and away from a direct shot from the shower head much like its original factory position in the upper area of the cubby shelf. We debated actually posting this to the Ollie-World because it would seem to us that it's a "one-of-a-kind" modification. However, if anyone else out there has a similar situation, hopefully this may be of help. At least for now, we'll no longer be stranded in the head during one of those middle of the night "needs" without being able to flush... Cheers!
-
Of course there are! HA!
-
That would be way COOL. Get on it, brother! HA!
-
@topgun2: Will this unit control more than one LED circuit?
-
It would be interesting to find a supplier for "dimmable" LEDs and adding rheostats for the master switch panel patio and courtesy lights. SOBs out there have this feature.
-
Welcome to the OTT Family! Be sure to refer to the forums for virtually anything Oliver-related - its simply a wealth of information, experience, and friendship. Working with the folks at the factory and supplemented with support from the forum forms a base of knowledge for you to handle just about any conceivable issue. Enjoy the ride... it will be a life-changer as you're entering into retirement! 😎
-
We got our's on that sale...