Overland
-
Posts
3,835 -
Joined
-
Last visited
-
Days Won
212
Everything posted by Overland
-
I'm about to buy an extra spare to take on an upcoming trip, and was giving some thought to going with an AT tire. It would be different than the others for now, but I'm pretty sure that I'm going to replace everything else next year. We travel on gravel a lot, and the current tires are showing it, so I'm thinking about ATs more for their toughness than traction. On the other hand, I'm not all that confident with their performance on the highway, especially in the wet. What do you guys think? Will highway performance / safety suffer that much or am I overthinking it? After all, the truck has ATs on it.
-

Thoroughly Confused Soon-To-Be Elite 1 Owner
Overland replied to Moonlight Mile's topic in Towing an Oliver
I'd refer to the owner's manual. That, or there should be a sticker on the Escalade's hitch somewhere (often the bottom) that lists the maximum tongue weight. If it says 500lbs without weight distribution, then you should use the Andersen. -
Any ideas on warming the bathroom and closet?
Overland replied to John E Davies's topic in Ollie Modifications
Set your AC fan to auto and it should work properly. -
Winter storage - with solar or 110 pug-in?
Overland replied to Grotegut's topic in General Discussion
Charge them to 50% and then disconnect them. If they're disconnected, they won't charge, and you can plug the trailer in and run the heater all you want. -
If you put it on the battery box, you might have trouble accessing it if you ever buy different batteries. With my batteries there’s no way I could get a hand in there. Might not apply but worth a thought.
-
I have our switches mounted under the street side bed, on top of the wheel well. I think that’s where Oliver usually puts their inverter, but mine was too big for that spot and so it’s located under the front dinette seat. What about putting the switches below the pantry, in the space that can’t be mentioned? Easy access, but hidden from view. Might be hard to actually wire them up there though.
-
Clearance from ground to bottom edge of Elite II?
Overland replied to NCeagle's topic in Towing an Oliver
I’ve noticed in the latest rounds of factory photos that Oliver has switched to Reflectix style insulation, which is sort of like a foil bubble wrap, rather than the thinner foil backed foam that they were using before. I’d think that it should be more effective. I’ve been adding a layer or two of reflectix in the lower hull myself, over time as I do other things. Unfortunately, there’s no way to get into the upper hull, but with some work you can access much of the lower hull. We’ll see if it makes any difference. One place I’m glad to get the extra insulation is around the beds beneath the windows. It’s actually quite easy to stuff two layers of reflectix in there from below, and I’m hoping that it will keep those walls warm at night and eliminate the condensation if you happen to sleep up against them. So far, I’ve added extra insulation behind the bath vanity, extending somewhat into the closet and bath floor, all of the curb side from the fridge back, then all along the back and forward on the street side to the pantry. The insulation goes from about the belly band down to the floor and underneath the plumbing in all those areas. -
We have a cell based GPS as a backup, just because it was/is essentially free for us. We already had an LTE modem for the trailer, and Victron provides free geolocation via their VRM portal. All we needed extra was a $30 USB GPS dongle. We also have a Spot hidden away between the hulls, only because at the time it was the cheapest solution - not anymore. Which reminds me, I need to go grab it to update the firmware We have an InReach, but that stays with us in the truck or on hikes.
-
Any ideas on warming the bathroom and closet?
Overland replied to John E Davies's topic in Ollie Modifications
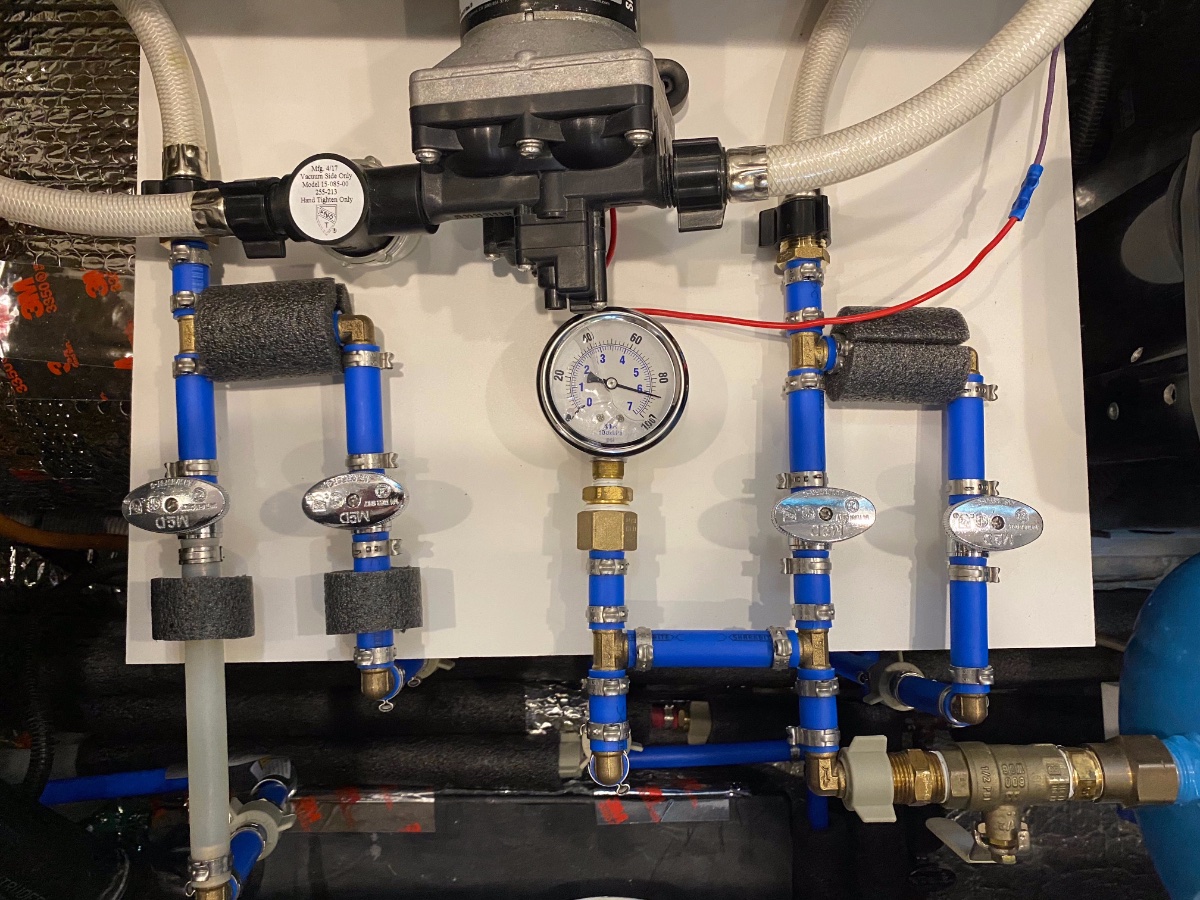
lol, it's...different. Wait 'til you see the rest of the plumbing mods. Pressure testing now, before I finish insulating and tie everything down.
-
Any ideas on warming the bathroom and closet?
Overland replied to John E Davies's topic in Ollie Modifications
My fridge is a 12v Isotherm, which is shorter than typical. Oliver raised it up on a small platform. I'd like to take advantage of that space somehow, someday. -
Any ideas on warming the bathroom and closet?
Overland replied to John E Davies's topic in Ollie Modifications
I’d think any or all of that would be possible. My black tank and drain pipe are long gone of course so I can’t use the idea myself. Accessing the back of the tank to install a new line would be difficult, but just cutting the existing vent to connect that to the air vent in the vanity would be a cinch. You might need to rearrange a bit of the other plumbing but that’s easy. Cutting the pipe in the front dinette seat and running a full 4” duct from there to the side wall of the bath might be the easiest solution though. I’d just check that pipe once a year to make sure that it’s not generating static and building up dust. It would be easy to clean of course even if it did. -
I'll have to give the tape a try next time, though it wasn't bad after the first one. I could have used the tape on the Ollie sign, though - I found that to be tougher for some reason. I guess with the curved corners on the windows, you'd have to roughly tape them and then smooth out the caulk after taking off the tape?
-
All I can say so far is that, just like other 3M marine sealants, this stuff is thick, sticky, and really hard to work with. The first window took a while to get my technique down, but the others went quickly. It seems to last longer in the opened tube than the 4200, so that's a bonus. It dries very smooth and shiny, as you'd expect from silicone. Or not, I guess - it's a silane modified polymer, which I assume is technically different than silicone, but related? Any chemists on the forum?
-
To update on all of this, last week I noticed that my newly recaulked rear window was leaking. Of course, after some inspection and head scratching, it turned out not to be the window, but the Oliver light in the attic above. So I recaulked that, along with a few other roof items. Interestingly, though - when I scraped off the old caulk on the Oliver light, it was the same gummy stuff as above. And since I hadn't cleaned that with the Duragloss, that doesn't seem to have been the culprit. Instead, I think it must be just how the original caulk aged. Odd.
-
Any ideas on warming the bathroom and closet?
Overland replied to John E Davies's topic in Ollie Modifications
FYI, Here's a photo of that space, duct removed and pipe insulation added, taken from the new access panel under the fridge, looking forward. This was a test fitting - in the end, I cleaned that space up a little and wrapped the pipes together in a blanket of reflectix before sliding them back through.
-
Any ideas on warming the bathroom and closet?
Overland replied to John E Davies's topic in Ollie Modifications
Absolutely, that was a consideration. At the end of the day, though, I don't think I was getting much air through there, so perhaps it was an irrelevant debate. But it's an interesting question - since there isn't space for both a duct and pipe insulation, which is better? In general, I like the idea of having a duct there to keep the pipes toasty, or perhaps to thaw frozen lines after the fact. But for that to work, you need both the pipes and duct to be uninsulated, which makes the pipes more prone to freezing in the first place, and your duct much less efficient. And the duct was pressing the pipes right up against the floor of the outer hull (which is remarkably thin, to my surprise - probably no more than 3/16"). I also had the additional 'requirement' of wanting to run the return line for my hot water circulator back along the same path as the supply, rather than all the way around the trailer perimeter, because it eliminated about 8' of plumbing and moved that line away from my electrical, vs the way that Oliver had done it. Anyway, I came down on the side of insulation vs the duct. If that turns out to be a mistake, at least I now have good access to that area via hatches in both the closet and under the fridge. So I can change it back someday if I want, or at a minimum, repair any damage. -
Any ideas on warming the bathroom and closet?
Overland replied to John E Davies's topic in Ollie Modifications
I believe that plastic air ducts have to be of a special type that don't build up a static charge that collects dust. At least I know that's why you don't see fiberglass ductwork. I'm with you on the dust. I've done a ton of cleaning but there are still some spaces that I can't get to. But I feel like I've reduced it to the point that it won't cause problems - all of what's left seems to be a thin coating that's well adhered to the hull now, thanks to condensation. I'm hoping in fact that some added air flow will help keep the hull space a little dryer. -
Any ideas on warming the bathroom and closet?
Overland replied to John E Davies's topic in Ollie Modifications
One of the things I discovered while doing some recent plumbing work was that my duct to bath was squished underneath the floor between the fridge and closet. It had apparently gotten pushed out of place when they put the hulls together and about a third of it was pinched tightly between the two. That left a duct that was probably no more than 1 ½" clear. There's not a ton of space there for a vent to begin with - it's a little tunnel created by the water tank, shared with the bath plumbing. I had a little bit less space through there than other people since my hot water line was insulated, so it's possible that my problem was caused by that. The duct should be taped to the hull there to keep it in place, and I assume that there's enough space for the duct there normally - in my case I think it would have been squished a bit anyway. Unfortunately, there's not a good way to inspect for that problem, unless you cut an access hole in the closet floor or under the fridge, or run a camera through the duct. I've ended up just abandoning the duct and I'm rerouting a new one down the other side, which is only possible because I removed the sewer pipe. It's also going to have a tight squeeze under the floor of the dinette, but it should be better. I'll add the new vent in the bath near the floor, next to the grey tank valve. My shower curtain keeps that wall pretty dry, so that shouldn't be an issue. Then the existing vent should make for a nice return air, with the added benefit of getting some air flow around the vanity plumbing. I plan to attach that vent to the rear connection on the furnace, and then daisy chain the two cabin vents off the front connection, which is the opposite of how it's done now. Hopefully that should get a bit more flow to the bath vent, since it won't be teed off another. I don't think that I'll be able to use rigid duct because of all the twists and turns, but I'll use insulated flex duct, which should at least make whatever air gets to the bath a little warmer. I may do some sections in rigid duct if it makes sense - I'll play it by ear and see. I'll have to use 3" duct at the dinette, but I guess I'll use 4" up to that point. I may see if I can fit a solid 3" duct through that space - there's a lot of wiring in the way and I don't know if I'll have the maneuvering space to get it through the hatch. Any and all advice on this little project would be welcome. -
Only if you like drinking antifreeze. Even if you only add it to the city water port, it may not be in the tank itself, but it's in all your other plumbing.
-
Gettin to be a tough forum. Better do your homework before you post, David. 😂
-
That's good news on the Truma. There are some plumbing spots on the Ollie that don't get good ventilation. One of those areas is right at the fill ports - the plumbing is in a tight channel along with a good bit of wiring and then covered with the basement floor. Unfortunately, that's where the check valves are. It's a sensible spot for them to be, if your goal is to minimize the amount of water that will spill out when you detach a hose, but it's a bad spot if your priority is to keep them from freezing. I've only had a line freeze twice, and neither were with the trailer winterized. Once was the cold line to the bath, but it trickled enough that it cleared up in a few minutes with the water on. The other was at the fill ports when we had to travel all day through freezing temps. We had some water in the tank, so we could use the plumbing; but if we hadn't, then we'd have been out of luck since both water ports were frozen solid. I also had one check valve fail - not leaking, just stuck open - but I don't know if that was freeze related. Could possibly have been related to the above, but I don't know for sure.
-
Exactly - I think that's one of the main advantages of having a compressor and knowing how to blow out the lines. I don't know if you could really do a 'partial' winterization, due to the configuration of the plumbing; i.e., whatever water you leave in the system is likely to end up at the check valves. Which are brass, and thoughtfully connected directly to the brass hose fittings so that they will freeze as quickly as possible. But I think you'll find that blowing everything out is quick enough that it's not too much of a chore. Maybe a 30 minute job? If you really want to travel in freezing weather, I'd recommend moving those check valves, and...upcoming post teaser...perhaps a few other things.
-
55 psi is the spec, but I found that mine was closer to 40. I raised it back up to 55 for a while, before reducing it back down to 40 after doing my water saving mods. That was the lowest I could set it to before seeing a drop off in pressure at the shower. Regardless, it was fine at 55. Truma specs a limit of 65 psi for their water heater, so that would probably be your limit on water or air pressure. No idea if the Suburban has a limit. From what I've seen of amateur youtube PEX testing, press fittings are the Achilles heel of the system. Crimped fittings of any sort seem to hold past the point of the PEX itself failing, which is somewhere in the 300+ psi range*. Furthermore, the push fittings that I've seen tested were brass SharkBite brand, and my experience is that the big white plastic push fittings that Oliver uses are far easier to remove than SharkBite. Of course that could be because their release mechanism is better designed, but I'd worry though that they just don't hold as well in general. But within the range we're talking, I'm sure that they're fine. * With cold water, just increasing pressure until failure. I'd guess that the point of failure with hot water and holding the pressure for a long time would be lower. But if we're talking about blowing out the lines with air, that type of testing seems like a valid comparison. edit - from this page, it looks like PEX is rated to 160 psi for cold water (74°) and 100 psi for hot (160° - fyi, Truma spec their water heater at 120°)
-
Is overconfidence a talent?
-
To my knowledge, they've always recommended using the antifreeze method. As they should, since it's probably the most idiot proof least risky way of doing it. I think you'd have to use pretty high pressure to damage any plumbing, but I suppose that it's possible. The main problem though is that it's very difficult to get 100% of the water out, and that water could settle at a joint, in a faucet or valve, etc., and potentially cause damage if it freezes. Having said that, I've used the compressed air method for the past two years and haven't seen any problems - tough I've also made a few modifications that should help in that regard.