John E Davies
-
Posts
5,759 -
Joined
-
Last visited
-
Days Won
243
Everything posted by John E Davies
-
 Jason confirmed that 43 ft lbs is correct, and he forwarded my ticket to Engineering for review. Maybe there will be a future technical bulletin about regular checking. I wonder how many “broken” jacks have been replaced that were in fact still OK - they were just bound up inside from too much side motion at the frame. If the repair was done at the factory, an Ollie guy might have noted the loose fasteners. I doubt that an RV repairman would notice enough to say, “hey, I’ll tighten them up to see if it starts working right…!” John Davies Spokane WA
 -
GJ that is fine, thanks. I am going to save that. I see they are still over torquing the lug nuts!!! I use 90 ft lbs, which is an acceptable value for a 1/2” stud and an aluminum wheel. 120 is for steel wheels. It is 25% too high for Ollie wheels. John Davies Spokane WA
-
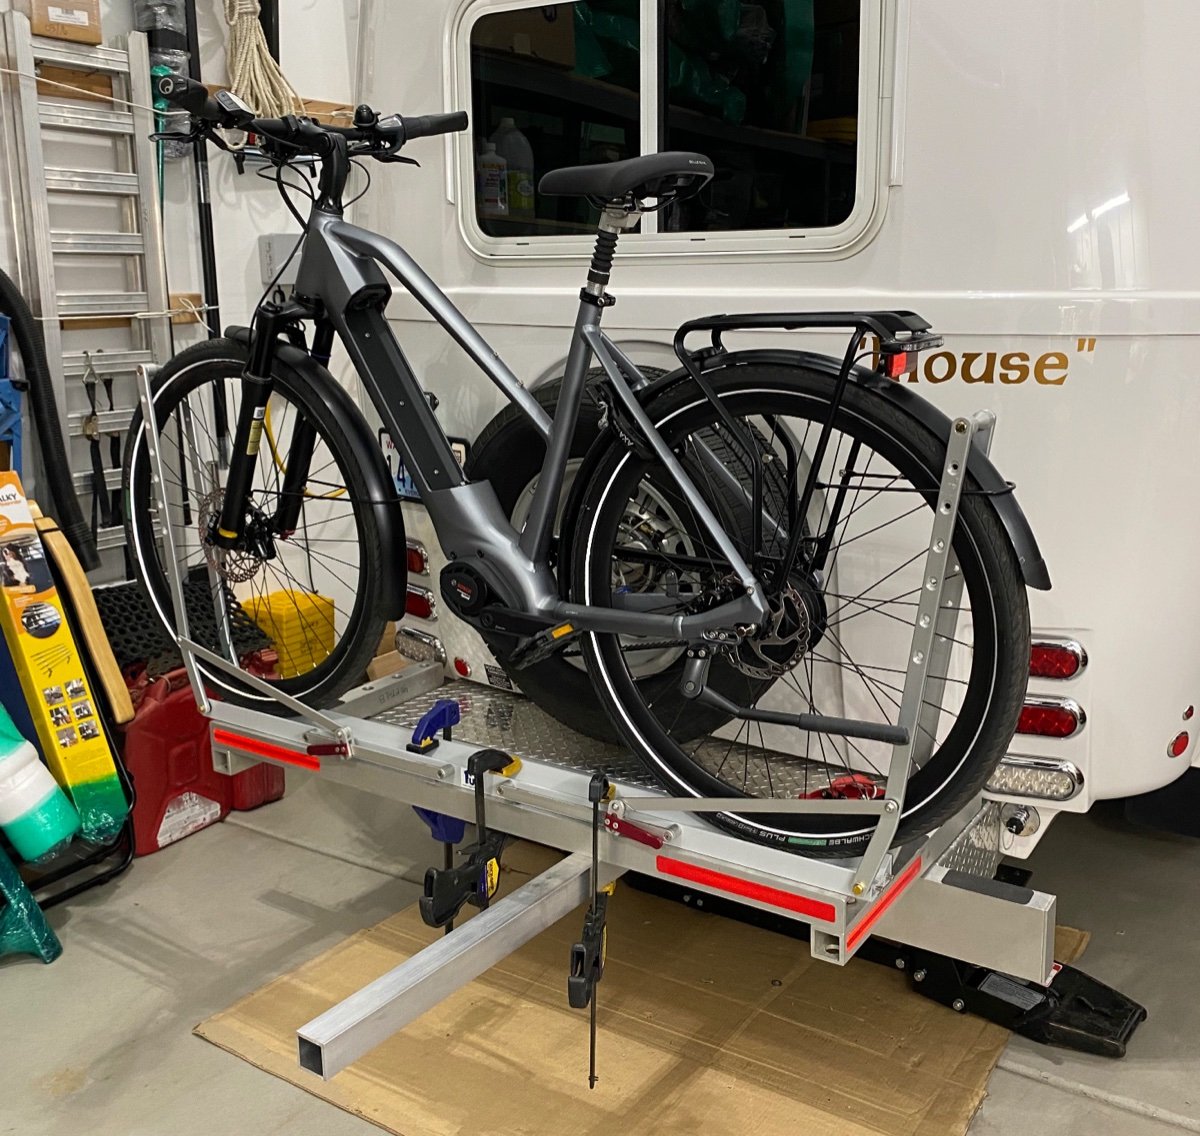
Updating, here is the new ebike…. I am going to add two tie down extension arms sticking 12” out the back and a tie-down rail along the top of the sewer compartment opening. That way I can run straps to the seat post and to the stem. The 1-Up Super Duty tray bolts directly to the beam. The bike tires and aero rims definitely will block the trailer lights!, I am going to need an add-on light bar, to install on the crossbeam (where the red reflector strips are now). I found this one, it is very bright with central backup light and SEQUENTIAL amber turn signals! Woohoo! The LEDs should add some welcome lumens when reversing the trailer at night. 49" LED Tailgate Light Bar for Trucks [Rigid Aluminium Frame] [Amber Sequential Turn Signal] [Tail & Reverse Light] Before I order, has anyone use this, or can you recommend a more suitable one for around $50-$75? BTW, the bike is a Gazelle Ultimate C380+, a fast Class 3 (28 mph pedal assist only) with 85 Nm Bosch mid-drive motor, Enviolo stepless hub, Gates carbon belt drive, four caliper brakes, and a 500 wh battery. We have steep hills everywhere - the main road just a half mile from our house is 14 to 16% - so my wife picked a bike with big motor, big battery and big brakes😬 I guess I am going to have to invest in some extra locks. … https://www.bicycling.com/bikes-gear/a37039662/gazelle-ultimate-c380-plus/ With the added lights I can cover the bike😬. Thanks for any suggestions, John Davies Spokane WA

-
It would be truly astounding if they sold structural “aircraft grade” aluminum of any type, this is definitely not it…. https://www.acehardware.com/departments/hardware/metal-sheets-and-rods/sheet-metal/5024849 Ollies are made from 6061 T6 or a similar “tempered” alloy, which is a very good thing indeed. There are several Ace stores that I visit when the box stores don’t have something (which seems to be happening more and more often) but none of mine will cut to size, which is frustrating, but understandable from an economic standpoint.. They are independently operated, so they can order different inventories, but I believe it all comes out of the same Ace warehouses. i have had them special order items for me, they are very helpful people. It would be cool if they worked on RVs with the same attitude.😃 John Davies Spokane WA
-
Any large city will have a “specialty metals” supplier (usually it is not also a steel supplier), I get all my materials from here, which is just five miles away. Very handy! https://alcobrametals.com/aluminum/sheet-plate/6061-t6-aluminum-sheet/ While you could order from them, you must buy a big piece and the shipping will kill you. If you can locate a supplier on Amazon Prime that will sell you a 12” x 12” square, that would be fine. I personally would go into the local store, tell them what you need, and they will either find you a cheap cutoff scrap, or cut it to the exact size you want for a dollar or two…It wouldn’t have any rounded corners, they use a big shear, but it would be close to finished. An alternative is if you happen to know a pilot or an aircraft tech, they could bring you a piece, it is super common in aviation. It doesn’t have to be 0.032”, you could go thicker to 0.040”, but the heavier stuff is harder to work with hand tools. I would not go thinner than 0.032”, it won’t be rigid enough. Do NOT use the cheap “dead soft” aluminum you find at the box store, it is not at all appropriate and it dents super easy. John Davies Spokane WA
-
E.51 displayed on Xantrex pro SW 2000
John E Davies replied to Liana's topic in Mechanical & Technical Tips
Add you hull number to your signature so we know what you have. AGM batteries cannot be evaluated for their “health” other than through a load test. The resting voltage is not an indicator, plus with four, one can be bad and it will draw down the others when you apply a load. It is very typical for them to tank when using inverter power, especially the microwave (AKA the Battery Killer). Before pulling your hair out chasing phantom problems, make sure the AGMs are indeed fine. If yours are over three years old, the odds are high that at least one has gone tango uniform. There are cheap handheld battery load testers available but I am not convinced of their accuracy, nor am I aware of one that does 6 volt batteries. You could take your batteries, or the trailer, to a battery store like Batteries Plus Bulbs and they will test them for you at no charge. They need to be charged and the cables disconnected so they can be checked individually. Be prepared for bad news😬 FYI with the batteries disconnected your break away system won’t work, so drive carefully. John Davies Spokane WA -
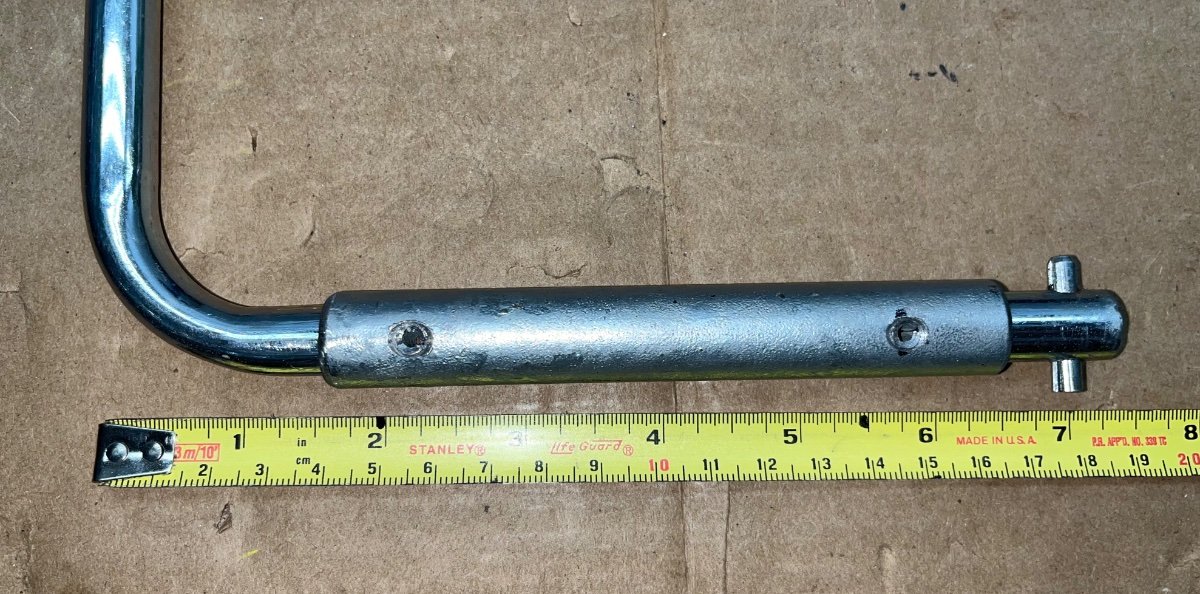
Normally the tool end with the square drive works fine to turn the jackscrew, going straight though the gearbox parts. The square gearbox pin is tall enough that the tool clears the surrounding mattress support. Unfortunately, if a gear breaks, the gearbox could lock up completely, so using that top square shaft would be useless. So you would take off the gearbox, lay it aside, and turn the lower section, IF your tool isn’t too short, like mine was. In my case it was an important troubleshooting tool, I had to know if the lower parts were frozen…. John Davies Spokane WA
-
I have never checked these before in five years, I guess that was a big mistake. My right jack bound up so hard that it would neither raise nor lower under a load. I was able to free it up - see this thread: https://olivertraveltrailers.com/forums/topic/6811-how-to-lengthen-your-emergency-jack-handle-so-it-will-fit-the-rear-jacks-with-the-gearbox-removed/ I discovered that the top of the jack would flop around with no weight in it, I am not sure how I could have missed that, I found the two lower bolts, that go through the frame, to be loose one full turn. Tightening all four (both the left and right jacks) to 43 ft lbs using a 3/4” deep socket removed the movement and both jacks run better now 😳 I started a service ticket, I need to know the specified torque. I used a standard value from a table. The two upper bolts on each side were fine. Does Oliver recommend a periodic inspection for these bolts? I don’t recall seeing one. Is 43 ft lbs OK? The front jack bolts loosen all the time. Thanks. John Davies Spokane WA
-
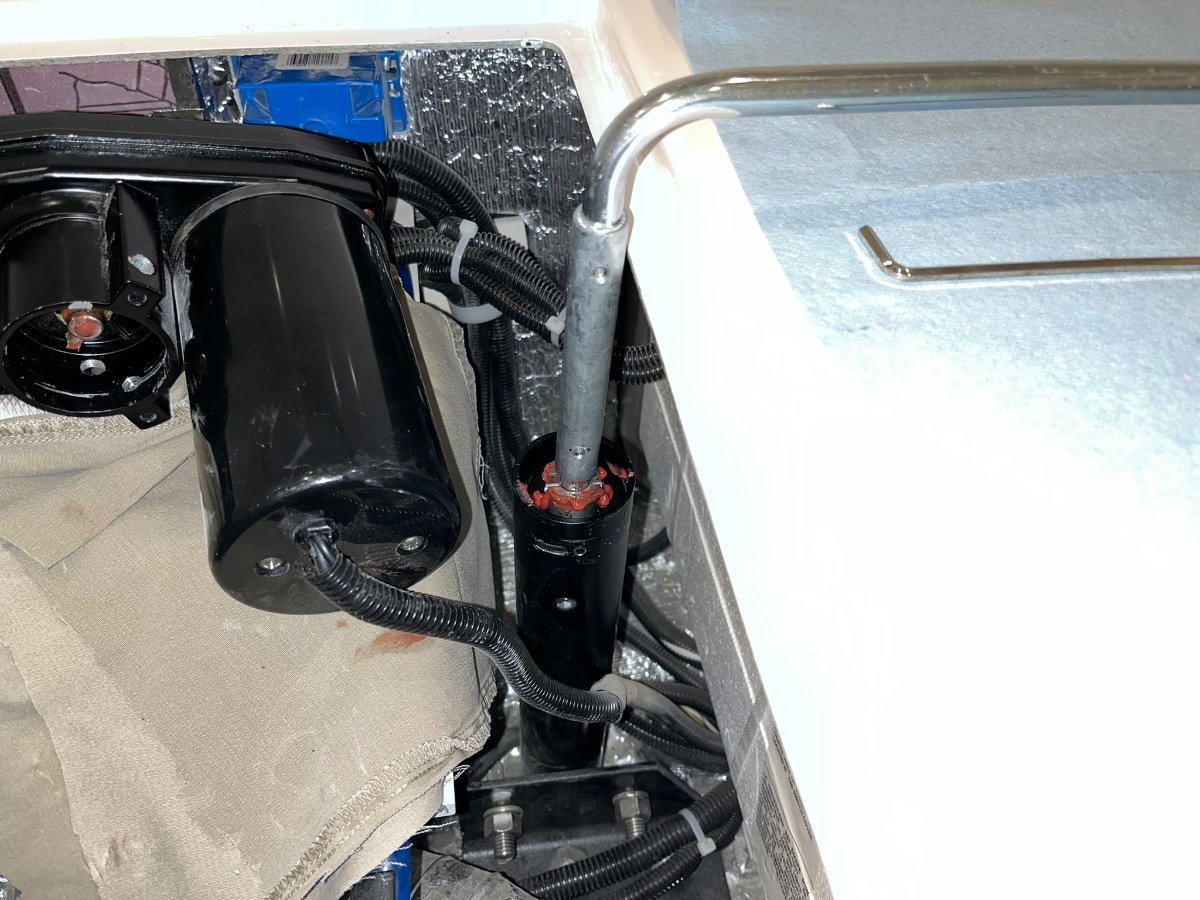
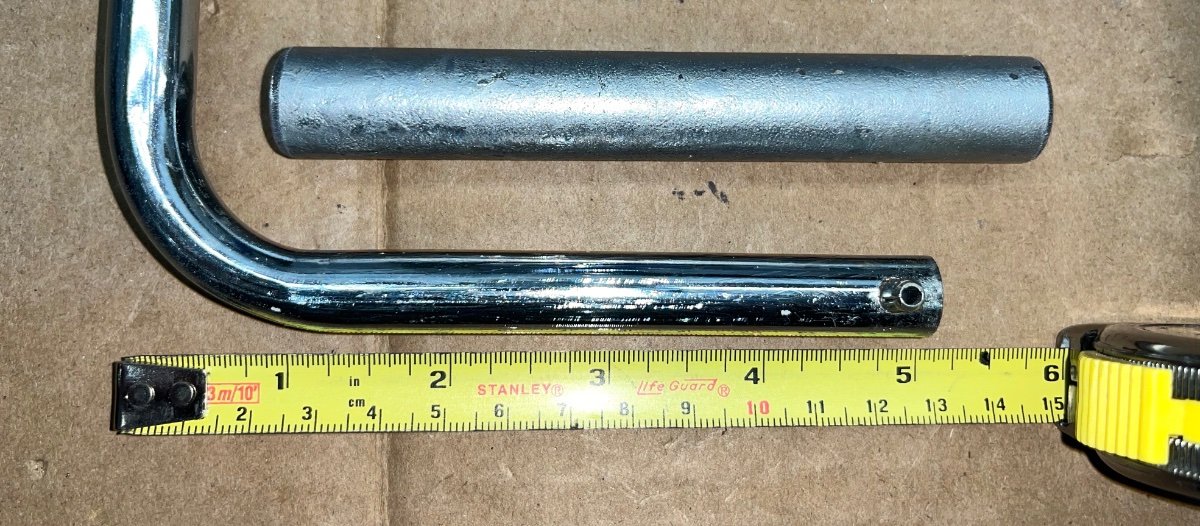
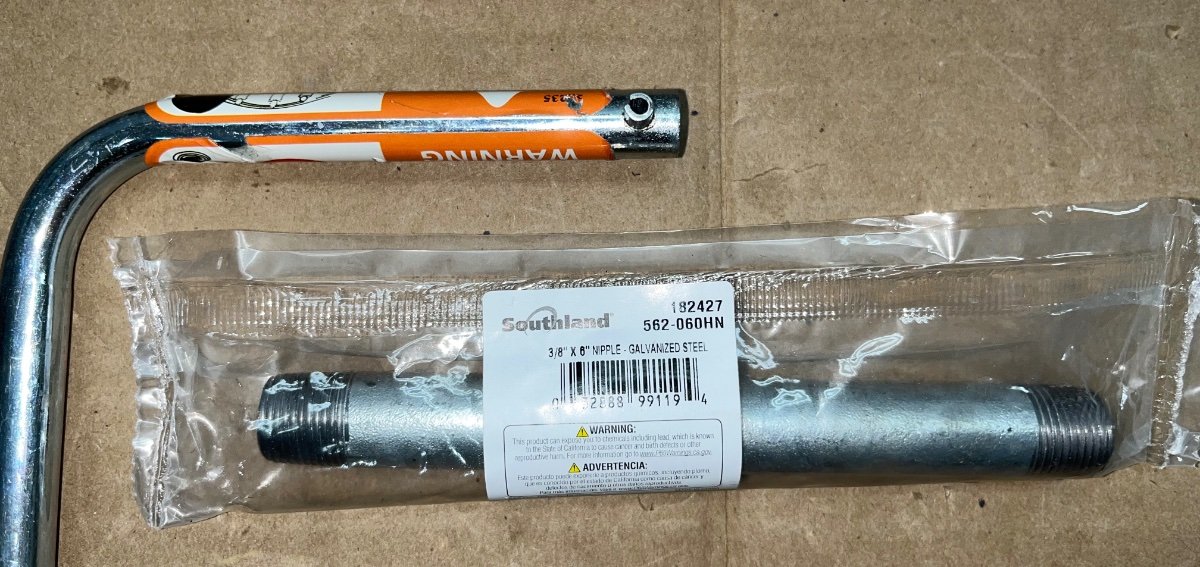
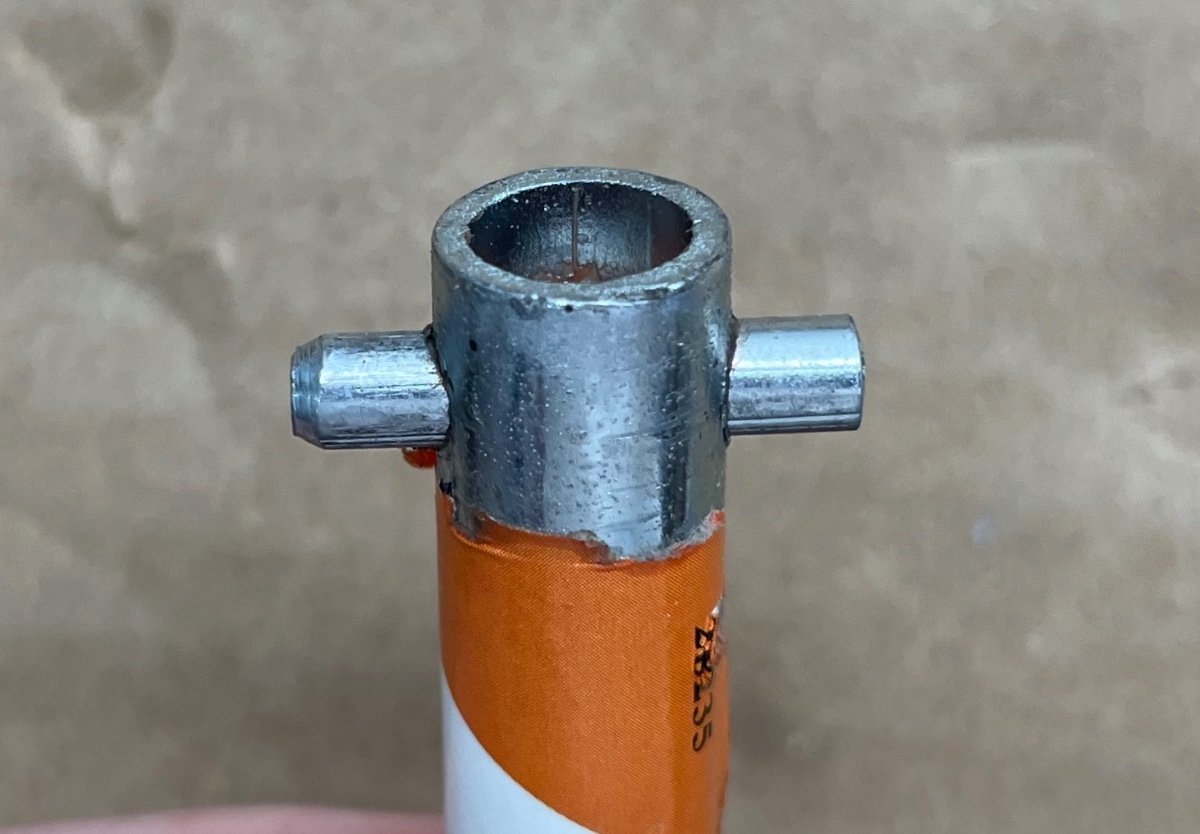
EDIT: see related thread - https://olivertraveltrailers.com/forums/topic/6812-check-your-rear-jack-mount-hardware-bottom-frame-bolts-were-1-turn-loose/ I serviced the two rear gearboxes and then to my dismay the right one refused to go up or down under a load - STUCK. I use the emergency crank tool to see what was going on, using the square shaft on top of the gearbox, and it was really really tight, something was binding for sure, so I removed the three Allen screws and lifted off the gearbox. And tried to turn the lower screw part using the other end of the tool. FAIL - it is too short to clear the surrounding fiberglass bed support, it would only move about 170 degrees. I said some very bad words, and I am glad I did not have to deal with a failed gearbox in the boonies, I would have been stuck. I needed a short length of heavy steel tubing with a 1/2” inside diameter so I could make an extension. I found that a 3/8” MPT pipe nipple works perfectly. Unfortunately that size is hard to find and about double the price of a more common 1/2” MPT nipple. Here is what the end of the tool looks like, the part that drives the lower jackscrew, under the motor unit. I used a 3/8” MPT x 6” nipple, the longest I could find at Home Depot. Drill out the internal burrs and the long seam weld using a 1/2” drill bit and cut off the threaded ends. Cut the tool in the center of the straight part and insert each piece into the nipple 1”. Drill and install two 5/16” roll pins and trm any excess material so you don’t cut yourself using the modified tool. It is a very snug fit, I considered adding epoxy but that isn’t needed. NOTE I turned the end 90 degrees from the original orientation, so the tool will lie completely flat in a galley drawer without gouging the drawer bottom. I was able to free up the lower part by turning it back and forth to get the jack working properly. THEN I found the true cause, the support bolts that go through the trailer frame were super loose. I turned all four (two per side) one full turn before they tightened to 43 ft lbs. Now both jacks run much better under a load. I started a service ticket and will make a new thread about the loose bolts. I hope a few owners will look at their tool and measure the part with the pin in it. If it is 5 inches, it will be useless in an emergency. I am curious to know if everybody has a disfunctional tool like mine. John Davies Spokane WA
- 5 replies
-
- 10
-

-

-
I am not sure exactly how that would help. I have used this pattern every now and then for many decades, usually for an electrical quick connection that has a broken retainer, or to simply make sure something could not possibly separate. You could also use stainless safety wire in your X pattern, it follows unusual routes better than nylon ties. That would be OK for plumbing, but not for wires! John Davies Spokane WA
-
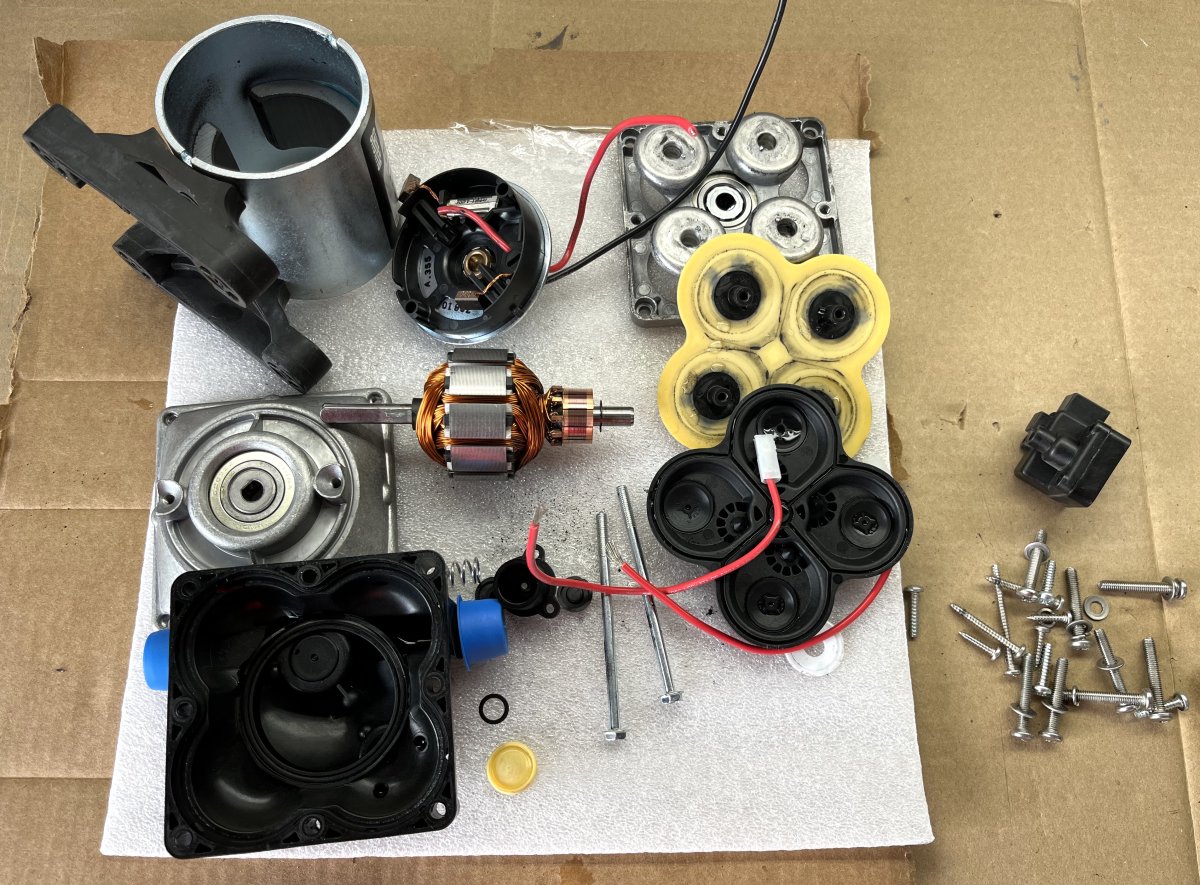
I got tired of the old pump cluttering up my bench. I am not sure why the unit was stuttering, the motor shaft did seem to have some rough spots on it when I rotated it by hand, but it sure looked nice inside and the bearings were smooth. I was surprised to see how clean the pump section was, I do periodically flush with vinegar and my residential water is chlorinated city water. I tested the pressure switch with an ohm meter and it was fine, so I bagged that to keep as a spare, I put all that nice stainless hardware into their proper storage bins 😀 and tossed the rest of the parts. There is a lot of copper on that armature, I suppose I could have cut and removed it to recycle. I was actually impressed with the build quality for a cheap RV part, it seems to be well engineered.. John Davies Spokane WA
-
I don't know what cables it uses, but there should be an appropriate "through hull" connector. I would drill a hole behind the propane bottles, mount that connector there. and run the inside cable from under the bath sink. From there it is simple to get to the rest of the interior. I haven't read through this thread, it has 60 comments so it might help. https://www.reddit.com/r/Starlink/comments/kl6a9d/installing_starlink_cable_through_exterior_wall/ John Davies Spokane WA
-
Natures Head Vent Hose - How to Clean Inside
John E Davies replied to Steve-Gwenne's topic in Mechanical & Technical Tips
Was there a filter between the fan and the main compartment? There should also a second one where the air comes in. Those should stop all dust going into the hose, both filters should be rinsed periodically, though the inlet one stays cleaner, unless you have a sheddy dog... If you keep the media moist enough that dust doesn’t form in the first place, that will reduce the number of cleanings. John Davies Spokane WA -
I would cut out a slightly larger backing plate from 0.032” 6061 T6 aluminum, say an inch bigger all around, the same stuff Oliver uses everywhere. Remove the old plate, fill the holes with epoxy, and bond the new plate in place. Use a white product like Marine Tex (not my favorite JB Weld, because that is dark grey)…. Reinstall the bumper. I don’t think you need to do any actual fiberglass repair, as long as there isn’t any ugly sideways displacement, it looks like it just pushed it inwards, crushing the core a little. This mod won’t stop that kind of sudden, unexpected damage, but it will prevent the chrome hold open from breaking or pulling out of the hull. https://olivertraveltrailers.com/forums/topic/5788-how-to-cabin-door-bungee-hold-open-strap/ John Davies Spokane WA
-
Talk to me about the extendable tongue.
John E Davies replied to John E Davies's topic in General Discussion
My Land Cruiser 200 has a short 112" wheelbase and a long rear overhang. I already have a +3" Andersen stinger and can't practically go longer. I wish I could..... thanks for the comment. John Davies Spokane WA -
You can do a vinegar soak for a few hours, 50/50 with water. Followed by a flush. If it hasn’t been done in a couple of years, it is due. John Davies Spokane WA
-
Are you sure the outside AC switch is positioned correctly? It is confusing because on mine it is upside down, it is marked properly but you move it down for ON. Also, has your circuit breaker inside the trailer tripped or did you leave it open? Both of these electrical components can fail, and they are cheap to replace. https://olivertraveltrailers.com/forums/topic/3243-how-to-service-and-inspect-your-suburban-hot-water-heater-gas-system/ John Davies Spokane WA
-
Natures Head Vent Hose - How to Clean Inside
John E Davies replied to Steve-Gwenne's topic in Mechanical & Technical Tips
There should be no crud in it, there should be a fine filter before the fan to catch all that. Check to see if one is installed, and clean it as needed. Remove the pipe and plop it into a five gallon bucket with hot soapy water. John Davies Spokane WA -
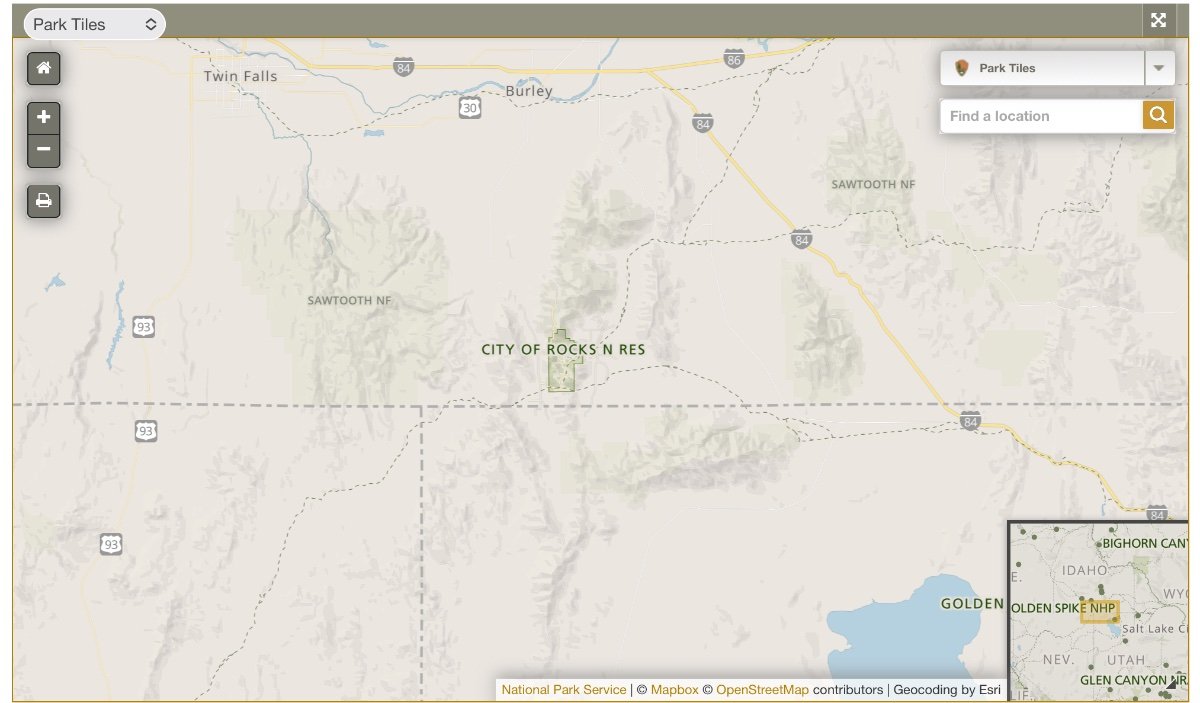
Fritz, that looks terrific, I have never heard of it. Granite is a nice change from the ever-present grey basalt in this area. Could you possibly start a new thread with extra pictures? I will be headed down that way in a month, going toward Great Basin NP and would like to stop by there a couple of nights. Here is a screen capture showing the location, it is almost Utah. John Davies Spokane WA
-
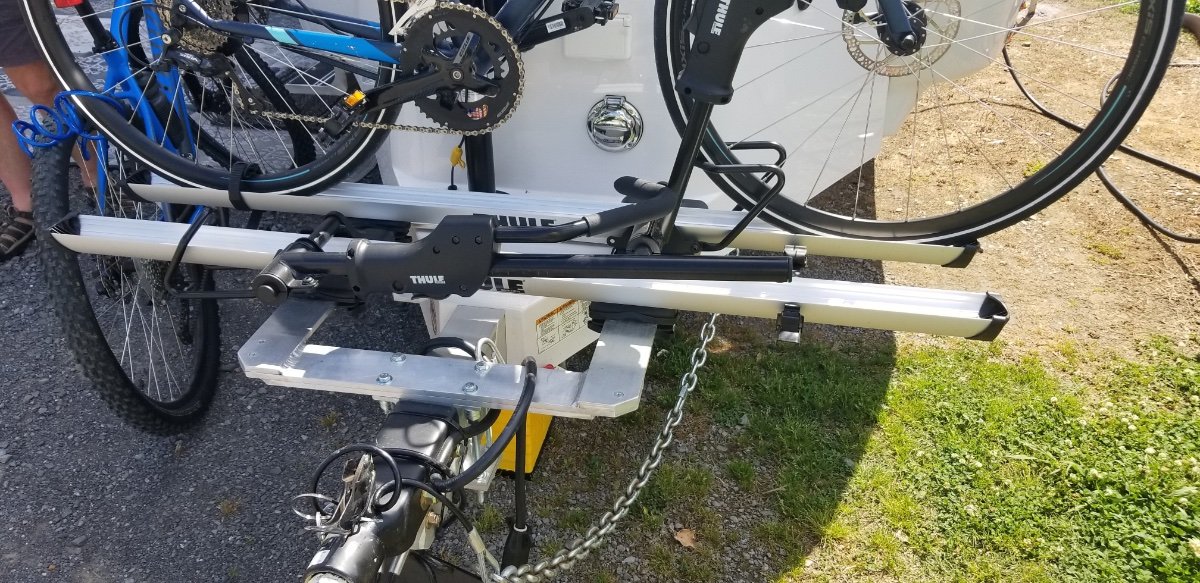
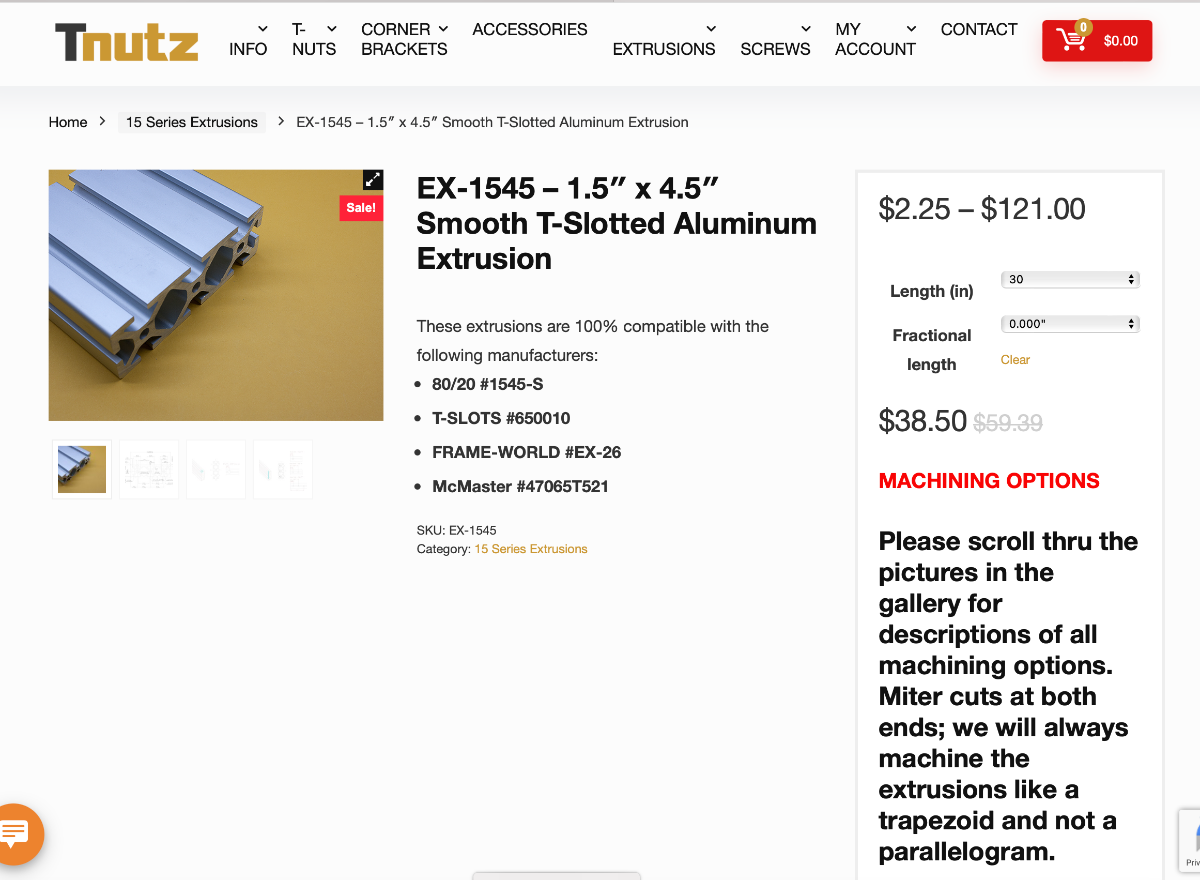
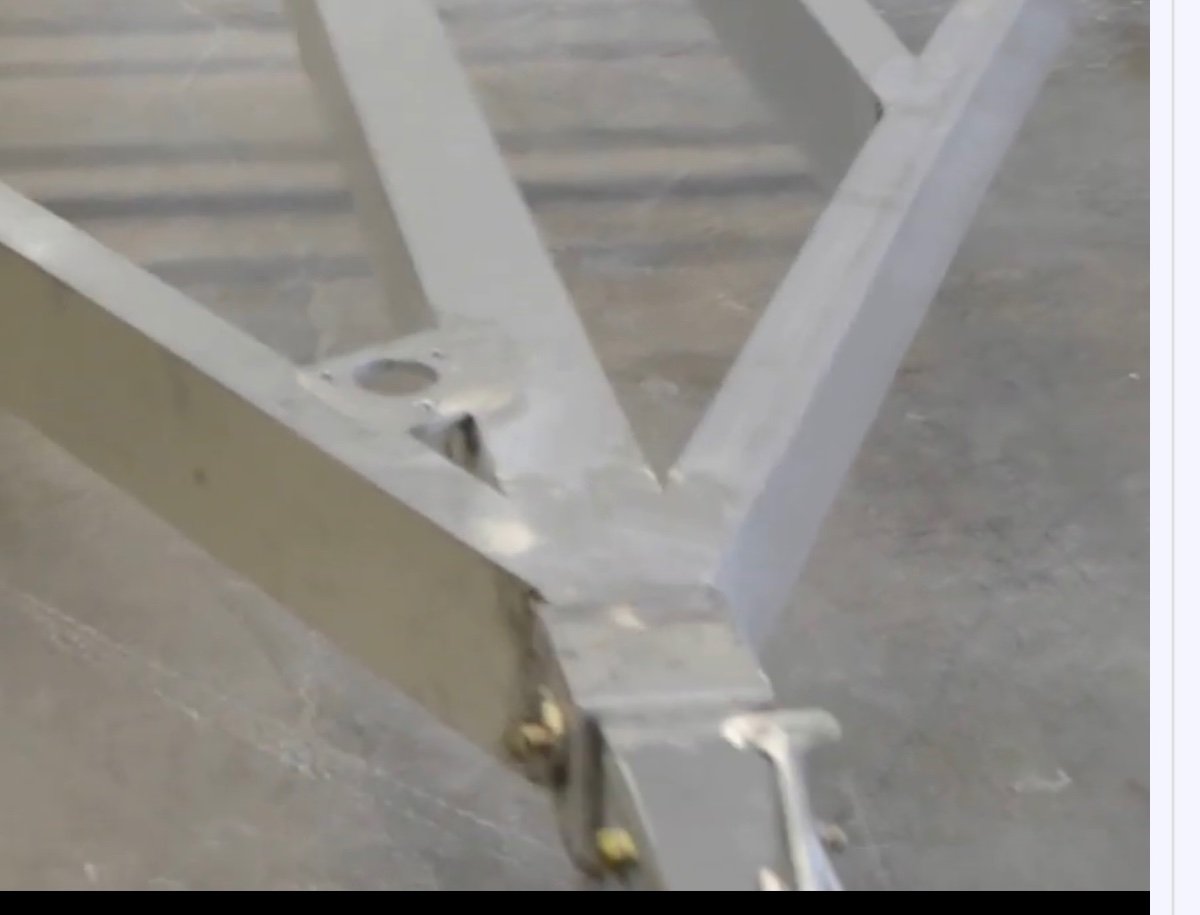
Thanks - this pic? That is downright beautiful, and overbuilt even by my standards. It appears to be 2" x 3/8" plate, sandwiched a bunch of times for super rigidity. Pretty welds too. I guess if the intent is to have the bike trays act as the fuse in a collision or severe jackknife, to save the frame from damage, that sure would do it. My intent, if it will work, is to use this stuff, securely bolted to the frame with stout backing plates, with the single tray bolted directly on top. The size approximates a 2" x 4" rectangular tube.. It is super super rigid and very easy to work with, compared to welding a big support frame. These extrusions are used in overland expedition racks, they absorb a lot of abuse. John Davies Spokane WA
-
Talk to me about the extendable tongue.
John E Davies replied to John E Davies's topic in General Discussion
Thanks Mike. I have to say that it looks a more than a little weak compared to the newer frames, especially with 100+ pounds of rack and wiggly bikes levering away at it at freeway speeds.... Here is one of those pics, cropped a little: One reason I would like a fixed low mount is that it doesn't stress parts. neither the bike nor the trailer. Another is so I can drive the bike onto it using a ramp and the walk mode button. John Davies Spokane WA
-
Talk to me about the extendable tongue.
John E Davies replied to John E Davies's topic in General Discussion
Reviving an ancient thread…. Can anybody post a few good closeup pictures of the original setup? All I could come up with is this blurry screen capture of an old factory tour. This was on an LE2. They were using a smaller square (?) beam for the tongue main member and it appears that the extension is also an aluminum beam. The new frames are much beefier, 5” x 3” x 0.625” wall. The tricky part would be eliminating play and I believe that there was a bolt failure, that could be interesting, depending where the safety cables were located😳 Is there a beam extrusion available with correct dimensions that would slide snugly into or over the existing big one on my later hull? Would Oliver consider modding my trailer to give an extra 12”, enough for me to install a sideways single bike tray in front of the jack? Any idea of cost? I can submit a ticket, but first I wanted to see exactly how they did it in the Olde Days. What would be cool is if they would sell the necessary parts as an extension kit for an owner to have installed by a (very) qualified local welder. Otherwise it would be a long round trip for me to go back to TN. It is really hard to source small lengths of reeeeealy big aluminum beams. Buying a ten foot length to obtain a foot or two is not economically viable. Welding on a fixed extension is probably going to be far simpler, but being able to remove it for storage and theft deterrence would be neat… Thanks. John Davies Spokane WA
-
Forgot this, has anyone mounted a single bike tray across the tongue, just in front of the electric jack? It would bolt down hard where the factory tongue cargo tray goes. I plan to experiment when the 1-Up tray arrives. I would much rather carry the ebike there, if it could work, it is way cleaner because of the Stone Stomper, and a lot less bouncy, and then I could retain the rear cargo rack. And use a solid bike cover without worrying about the lights…. The fiberglass doghouse cover might have to be cut away there, so the tray could mount directly onto solid aluminum. Any ideas on how difficult that would be, with it in situ? I would rather not remove the entire unit. The 1-Up tray is exactly 24” shorter than the SS. Unfortunately I am pretty sure the only way this will work would be by extending the tongue a foot. I would not mind that at all, I would make it removable for storage, but I would also have to buy a new longer Stone Stomper mesh panel from Au$tralia…😤 this could get expensive very fast. Pictures would be welcome. I am fine with fabricating brackets 😁 John Davies Spokane WA
-
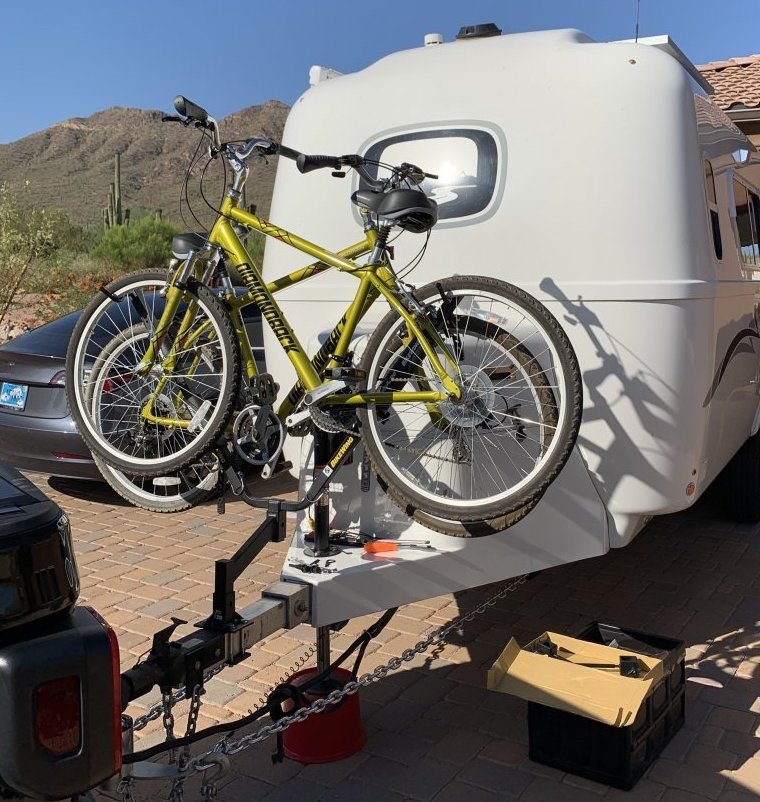
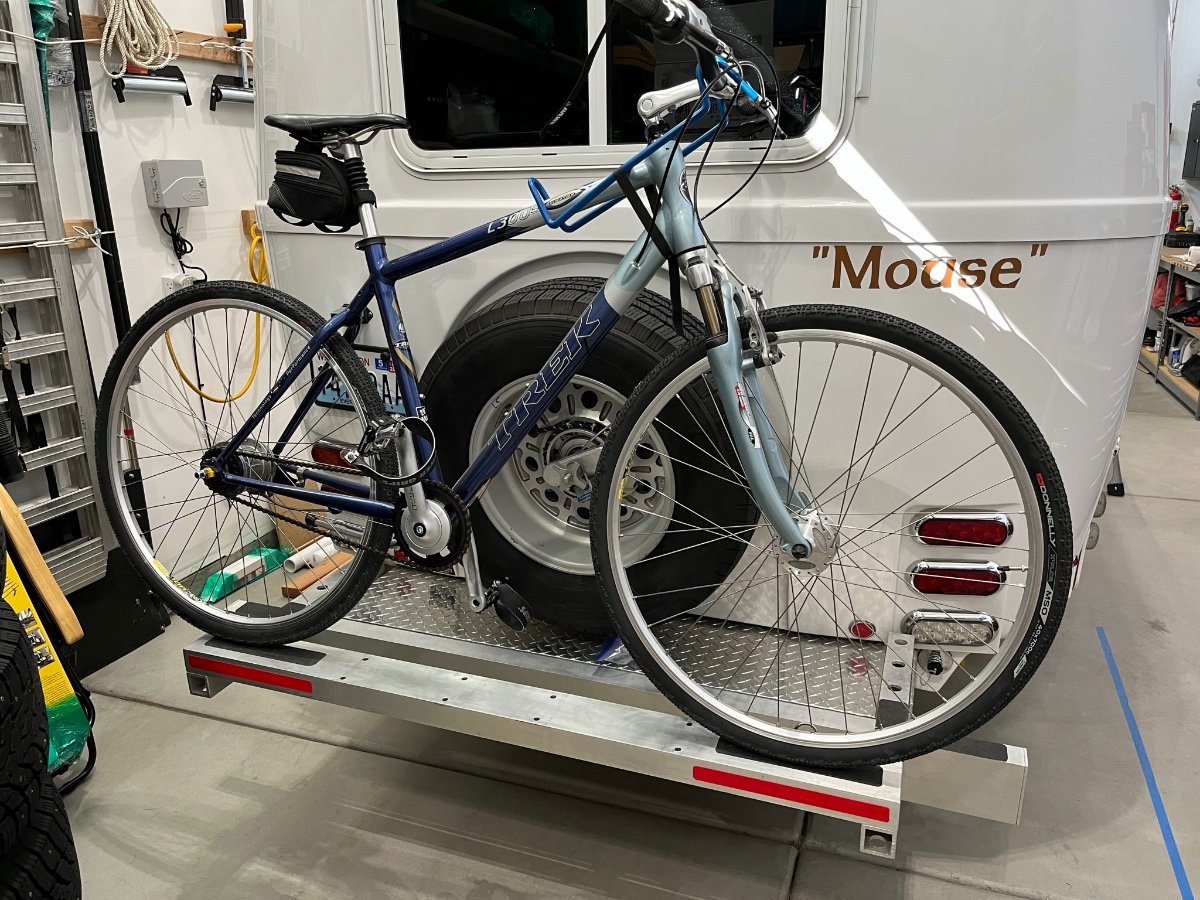
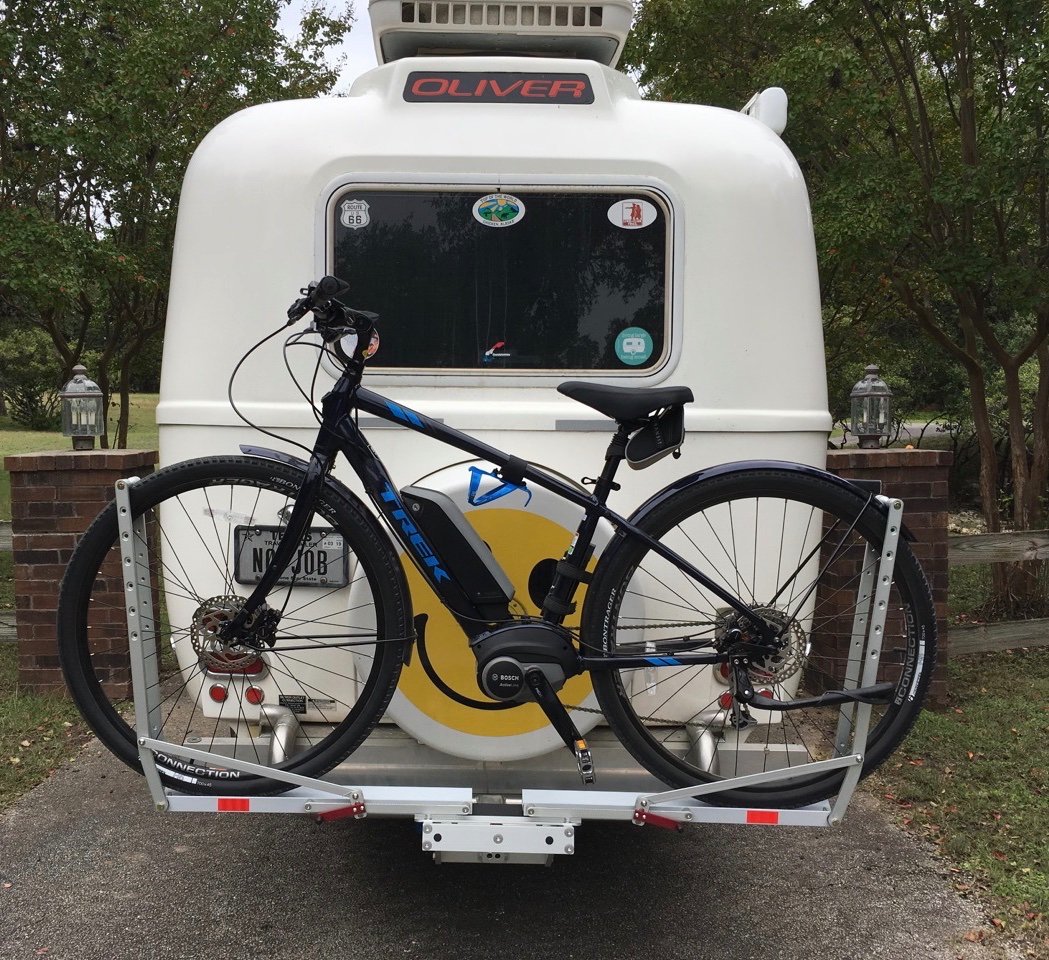
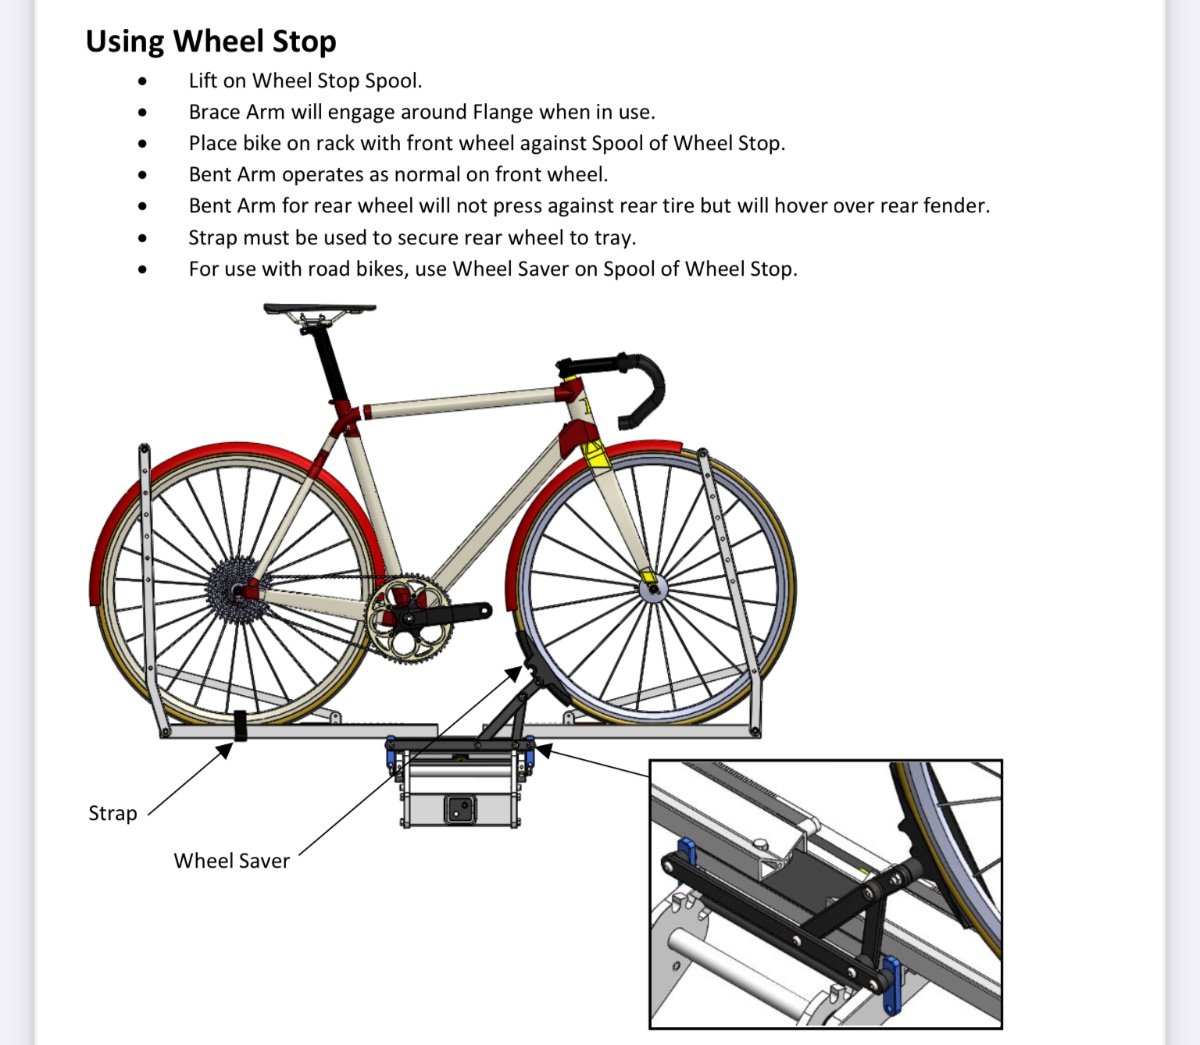
My wife is shopping for an ebike, I will be mounting a single 1-Up Super Duty roof tray onto the back of “Mouse” in place of the existing cargo box, it will simply bolt down to the cross beam. Test with my old Trek “analog bike” circa 1998. We will be carrying just one bike, for her use, though I may poke around on it a little. I have neuropathy issues…😤 Has anyone found a solution for a cover that doesn’t flop around and/or completely block the trailer lights? 1-Up sells one with clear windows for the wheel parts, but it is $329 😳 If not a full cover, do you use anything over the seat, drivetrain or rotors to keep crud off them? Remove the seat and post, along with the battery? How do you keep crud out of the open battery compartment? This ebike stuff is new for me, I haven’t carried bikes for over 20 years and that was on top of a hard top utility trailer. Pictures or links would be most welcome. I do have a pic of Pete (and Bosker)’s setup, maybe you can post some details? And did you ever post a full thread about your cool custom receiver? BTW, that rear fender looks unhappy, were you aware that 1-Up makes a Wheel Stop that will take care of fendered bikes? It lifts up and jams against the back part of the front tire. Thanks. John Davies Spokane WA
-
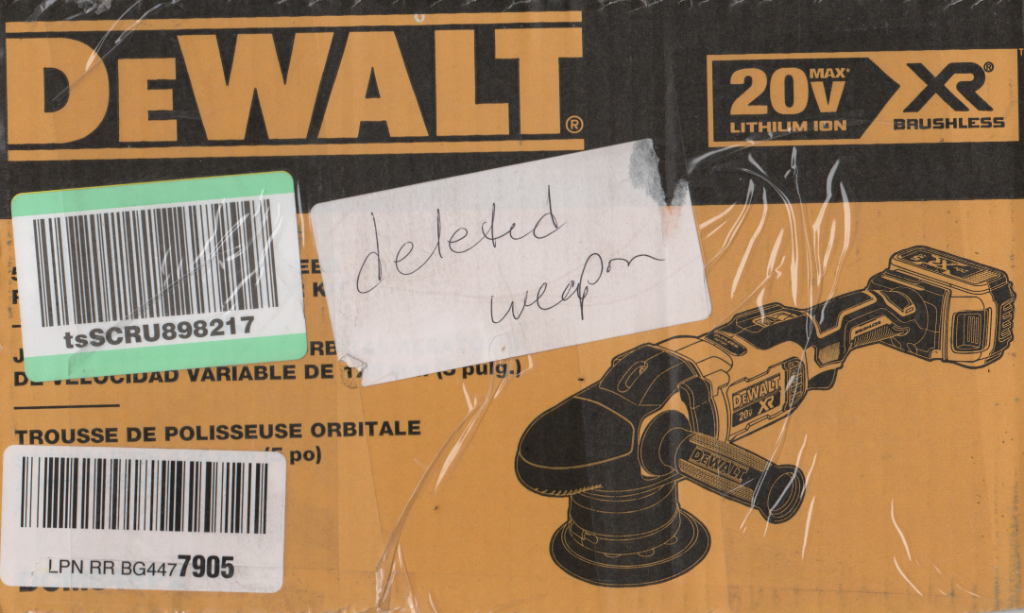
I bought this on eBay at a great discount, they advertised it as Open Box. This is what I found on the outside of the Dewalt box: I am not sure what happened. Was this a case where somebody tried to ship a firearm illegally as "tools" and the shipping company found it? It looks like somebody tried unsuccessfully to peel off the sticker, which explains why it shipped to me inside another plain box. I have never heard of this situation when buying an item online, any comments? There was nothing wrong with the tool or any of its parts; unfortunately there was no free Uzi inside…. 😬 John Davies Spokane WA