John E Davies
-
Posts
5,759 -
Joined
-
Last visited
-
Days Won
243
Everything posted by John E Davies
-
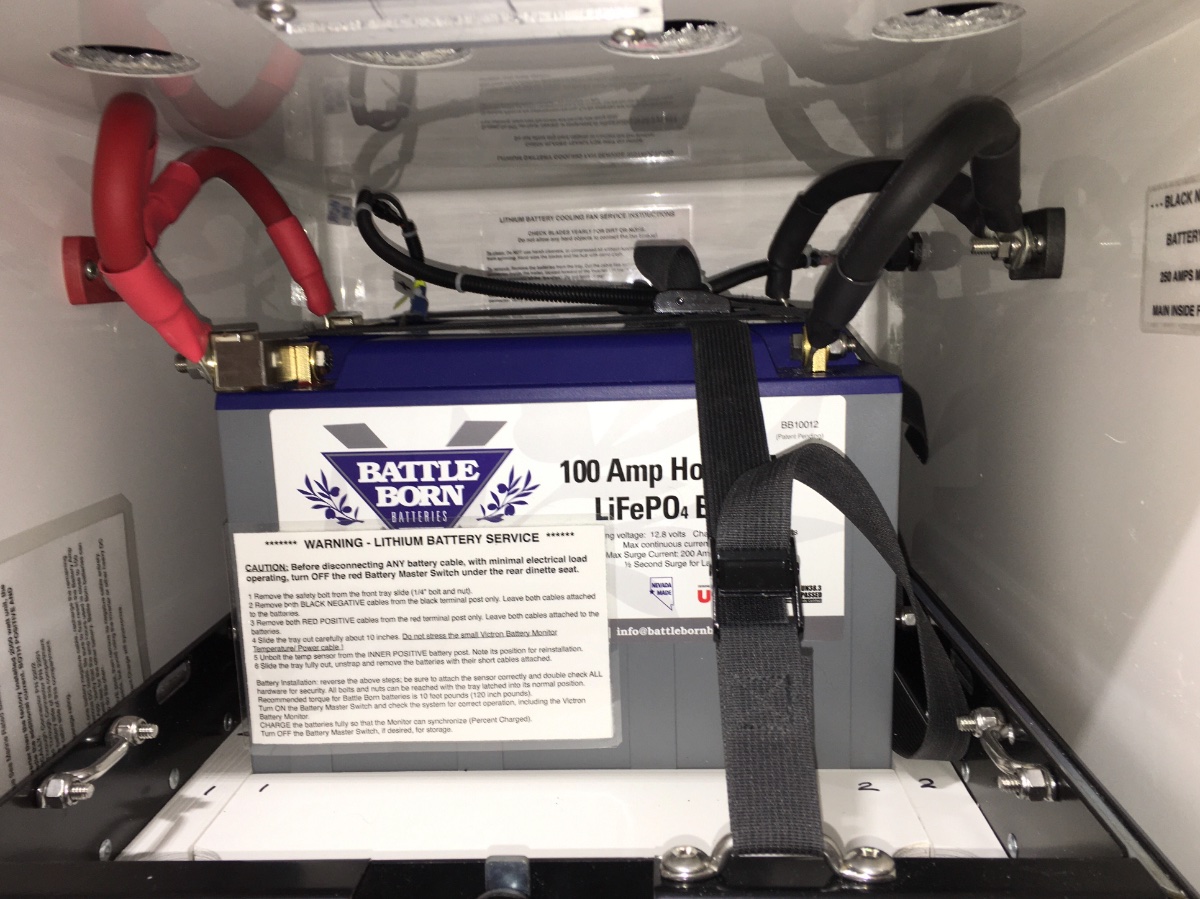
Lithium batteries are happiest when they are not subject to extreme temperatures. The Oliver battery box has vent holes in the door, but the actual "container" itself is sealed tight, and the area above and around it is a dead end air space; there is no way to get the heat out in summer, or to get warm cabin air in during winter. I wanted to get good airflow through this space, with natural (convective heat flow) and forced (computer fan) movement. Another benefit is that the air flows from the open cabin space and through the two electronics compartments, cooling the hot accessories that are installed there. Like the battery box, those spaces have no natural airflow - they get hot in summer and cold in winter. This will help to moderate those temperature swings. Here is how I did it on Hull 218. FYI, to the best of my knowledge the factory lithium package does not include any kind of venting to the cabin interior, though an electric heating pad is included. Please comment if this is incorrect! John Davies Spokane WA
-
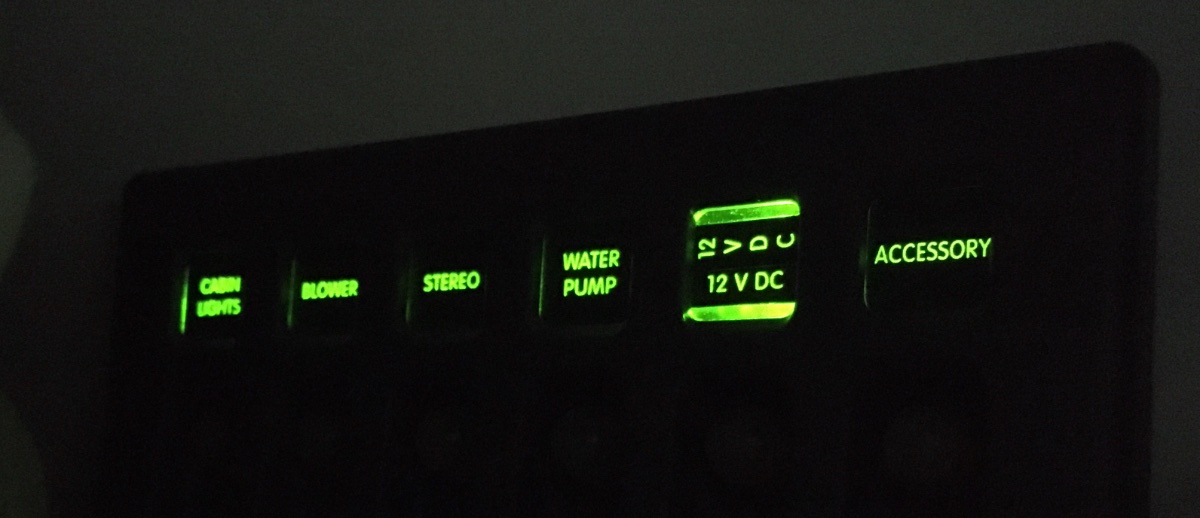
 I found a possible way to eliminate the Blue Sea 5376 rear circuit breaker LED lights. Has anybody tried this? I started a Service Ticket asking about disabling the lighting. EDIT - Service says that removing that lighting wire will work. It should be simple enough (remembering to cap or insulate the loose hot wire).... Thanks, John Davies Spokane WA
-
Has anybody messed around with this? I am trying to get my unknown loads completely eliminated or reduced. I want to be able to run ONLY the Natures Head toilet fan off the lithium batteries, to keep the bacteria happy. I don’t want to keep plugged into shore power with the converter running because that is not great for the battery health, and it is stored indoors, so no solar. For example... these are the current readings on my VictronConnect app: Phantom (no known loads): 0.12 amps Toilet fan ON: 0.16 amps (+0.04) Propane detector ON: 0.21 amps (+0.05) - Solution: added a manual power switch. Stereo ON: 0.36. amps (+0.15) - Solution: turned off circuit breaker in rear overhead closet. I found these possible extra reductions: Redarc DC to DC charger: 0.01 amps - Solution: turn off its circuit breaker Blue Sea overhead circuit breaker LED lighting 0.01 amps - requires opening the unit and cutting wires. Not practical. Any other possibilities? I have pulled fuses and tried all sorts of things, I still cannot figure out where that extra power is going. The Victron BMV-712 Smart Battery Monitor uses just 0.001 amp. I am getting there, I was at 0.36A and am now at 0.15A with just the toilet fan turned on. Maybe I should call that good...? Am I anal? No need to answer that one.... I suppose I should be out camping. EDIT: 0.15 amps x 24 hrs x 30 days = 108 amp hrs per month. So it would flatten my 200 AH bank in two months. Sure I can keep recharging it, but I would rather not just keep adding cycles. Maybe I will rewire the NH circuit, as suggested by a member, and power that “keep alive” wire with the master switch turned off. John Davies Spokane WA
-
It is not a simple answer, it depends on a lot of things. When the brakes quit working (the autoadjust brakes are prone to, well, not autoadjust) or the bearings start showing signs of distress (like dry rumbling sounds, excessive heat, play in the hub or outright failure) or you have simply worn out the linings from not having a diesel TV (or not using your gears in a gas one). Or you are headed out on a really long and important trip with few services. https://olivertraveltrailers.com/forums/topic/2778-brakes-auto-adjust-vs-manual-adjust-what-are-the-differences/ In my case one Dexter inner seal failed two years ago on a local trip. The brake shoes got contaminated with oil and started grabbing so badly at the slightest application that the tire would skid on concrete below fifteen mph. Backing way off on the controller was the only way to proceed, which means essentially no trailer brakes for the rest of the trip... So I installed new brakes on that axle and installed new Timken seals on all of them. Now I am at 16,000 trailer miles with the OEM bearings and it is time to freshen everything. If you have an older Ford Power Stroke 6.0 you may be familiar with the term “bullet proofed” engine. They have some really serious design flaws but they can be made reliable with certain upgrade$$$$$ and continued use of potion$. That is what I am doing, making the drum brakes as good as they can be for short term reliability. Replace just backing plates or also replace the hubs? New linings will eventually work with slightly worn drums, but it will take a lot of miles before they work well, since the diameters do not match (the shoes touch entirely in the middle). Putting new linings in very worn drums is never wise. And most shops will insist on all new parts at full retail prices so they will function reasonably well when the trailer leaves the shop - shops hate warranty returns! The fix for long term reliability and easy DIY maintenance is di$k brake$$$$. I hope you understand my humor. And I hope you are not paying shop labor for all this. John Davies Spokane WA
-
Is there a retail website? The only one I found is for manufacturers, dealers and repair shops. I would love to order at wholesale, but I have no affiliation with a shop. The closest Textrail dealer is near Boise, almost 300 miles away. Thanks, John Davies Spokane WA
-
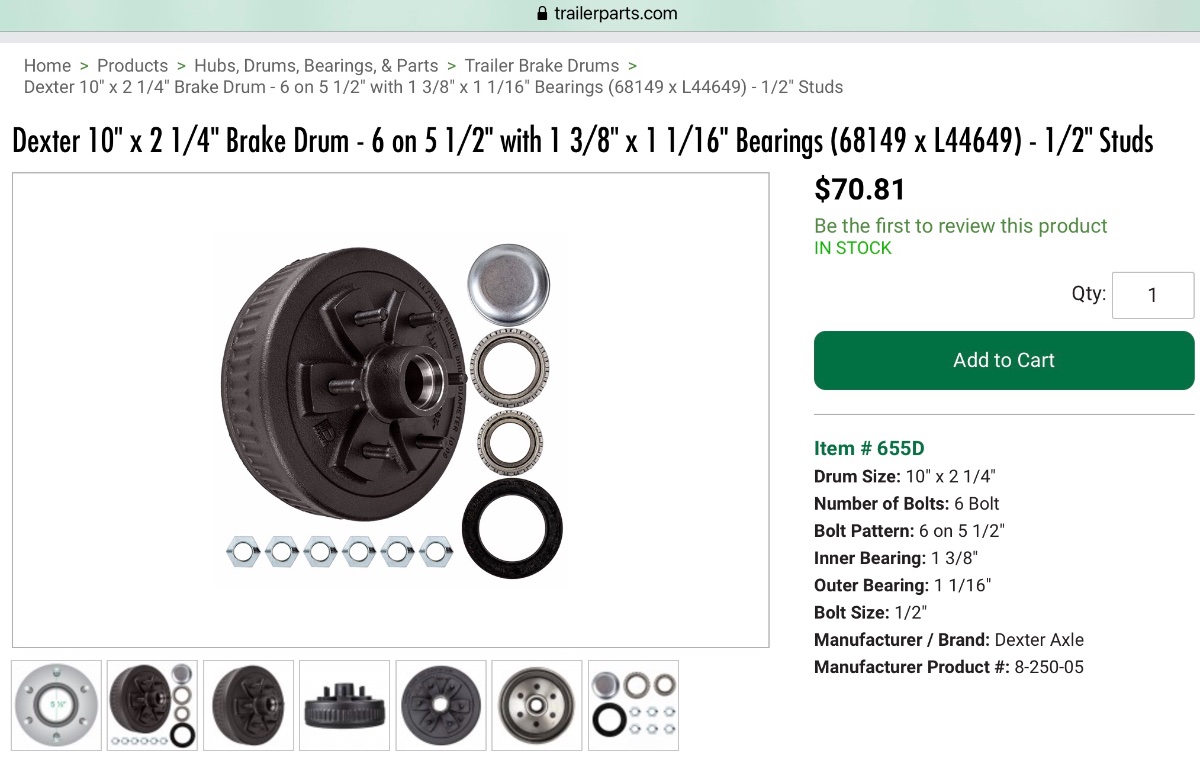
I need to rebuild one axle before I head up to Alaska in the Fall, I already did the other one due to a seal leak (and I swapped the brakes for the much more reliable manual adjust type). I would love to install disk brakes but that is not going to happen for a while. I blew my Ollie Ca$h Re$erve already over the winter, big time. 😥 I need to order a pair of manual adjust brake assemblies and 2 hub assemblies. I found these. And these: They ship FREE and the cost is a whole $100 less than the same exact OEM parts from eTrailer.com. Any other suggestions, or is this a winner? FYI I will install really good Timken bearings, races and seals, and use really good grease. Thank you. John Davies Spokane WA
-
Alaska and BC planning for September, need some info
John E Davies replied to John E Davies's topic in Campgrounds & Parks
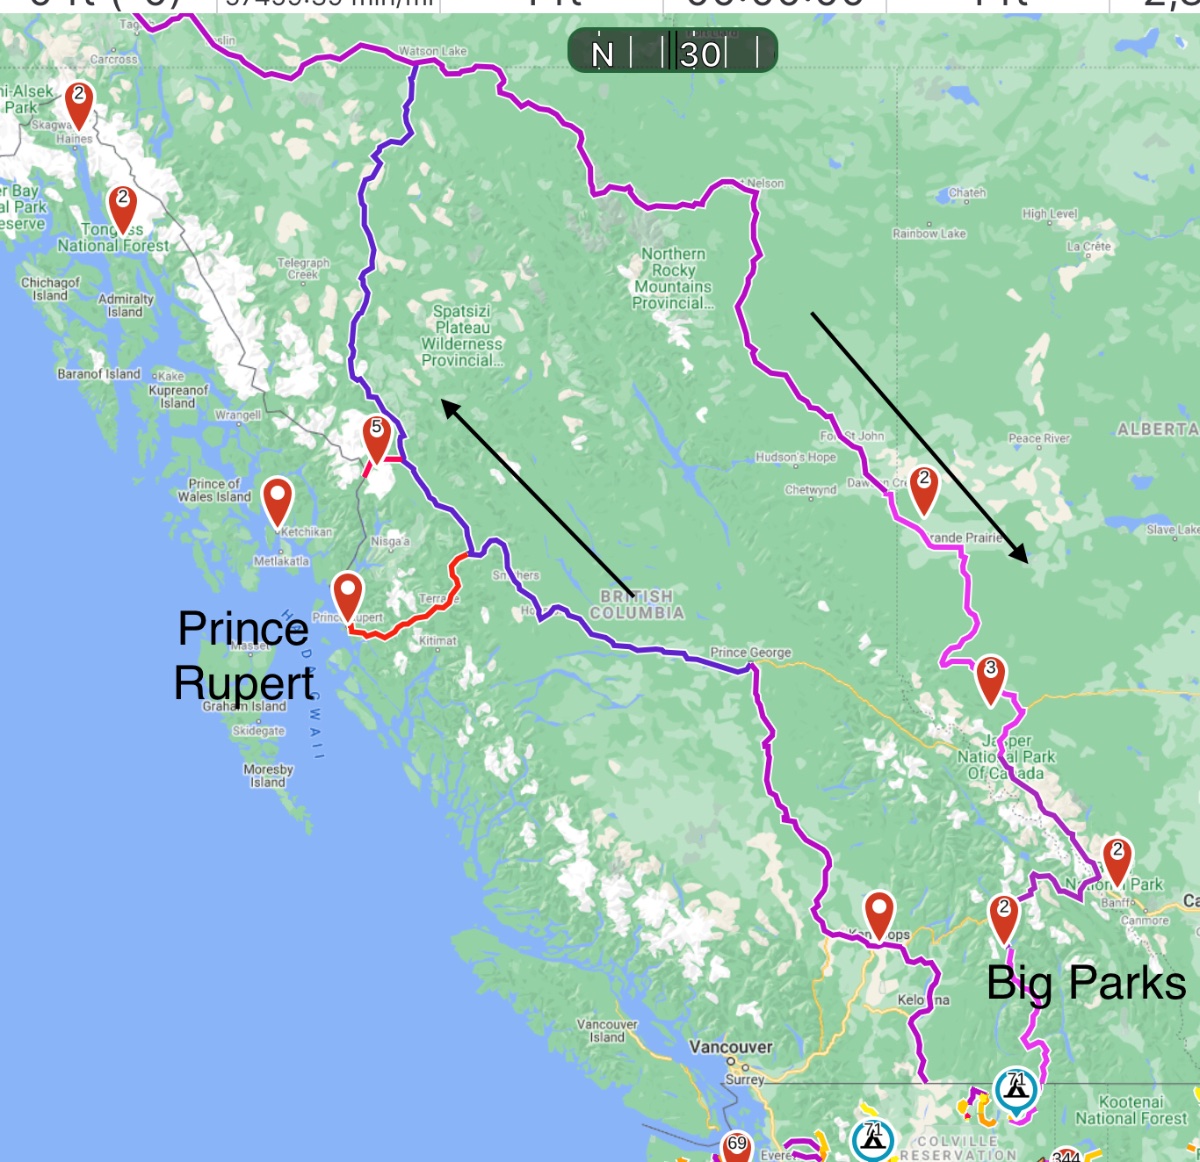
We will go nowhere near the Big Parks on the way up, we have seen them (and canoed on Lake Louise), but we will pass through there on the way back if we take the eastern route. We want to cover lots of miles each day going up, so we can take it easy in AK. Coming back down will depend on lots of things, but we hope to do some wandering then. It is looking like an earlier departure from Washington will be prudent. Thanks for all the comments. John Davies Spokane WA -
Alaska and BC planning for September, need some info
John E Davies replied to John E Davies's topic in Campgrounds & Parks
I am considering bringing a second dismounted truck tire, for just this reason, if I do slash a sidewall and end up using the main spare, I could have that other tire mounted and put it back under the bed. Otherwise I will have to wait and find a replacement, which would be expensive and require a trip to a city, and locating a matching size and brand would be harder. And all this is a huge hassle and $$$. I am guessing that many of the small towns in the boonies have a tire store or repair shop that could mount it. (???) Airing down the tires really helps to reduce flats but that won’t stop a spike or a big knifelike shard of stone. What do you think of the timing, should we leave WA a week earlier and brave the Labor Day holiday crowds? Unfortunately the Canadians also celebrate on the same Monday.... Thanks, everybody. John Davies Spokane WA -
Alaska and BC planning for September, need some info
John E Davies replied to John E Davies's topic in Campgrounds & Parks
I have been rethinking a revolver, and your comment reinforces that. I can shoot, it just really hurts my joints from the brutal recoil. But I think that would be a minor issue if charged by a brown bear... I may look for an inexpensive Taurus 44 (4” barrel, 45 ounces of steel, ported barrel, $500 street price) and ship it direct to this place in Tok. It can go by medium USPS flat rate box each way, $25 including $600 of insurance, they charge a $30 fee (senior discounted by $5) at their end to receive and hold it, and then they resend it for $30 plus shipping when I depart AK. Plus whatever the gun shop charges at my end to handle it. But an actual FFL transfer is NOT needed and specialized shipping is not needed if I ship to myself C/O the destination store. It would be much easier if they would just rent out these things for a month.... but I could either sell the Taurus there as I left the state, or do that here after it gets back to WA. https://alaskagunshipping.com/shipping-your-handgun-alaska/ OTH, it would cost just Canada$25 to bring my rifle, and the permit is good for 60 days, and multiple border crossings. Did you see folks strolling along with slung long guns, or would that look too odd on a Valdez bike path? John Davies Spokane WA -
Alaska and BC planning for September, need some info
John E Davies replied to John E Davies's topic in Campgrounds & Parks
RB, we plan to leave the return trip pretty much wide open, so we can adjust our schedule depending on weather, wildfire smoke and stuff we find to do. We do not actually need to “recreate” on the way home at all, BC is our “back yard” so to speak, it is just 90 miles to Canada, eh, though we have not explored much of it except for the lower 100 mile tall strip of BC and AB. It will be easy for us to access there in the future. Alaska, not so much..... it is still a fair drive, even from here in the Pacific NW... I understand the .44 mag, unfortunately I can no longer comfortably shoot a big revolver due to worsening peripheral neuropathy. I do plan to bring my Henry Big Boy X .44 Mag lever rifle, with bear loads. I will keep it loaded and close at hand when camping, and I could lug it around on hikes, but it will be a whole lot less comfy than a handgun, though I expect it would cause no raised eyebrows in remote parts of AK. In Canada I cannot carry it anywhere (unless I happened to be hunting with a resident guide). 😥 I will feel naked with only bear spray. I do understand the firearm declaration laws for Canada. John Davies Spokane WA -
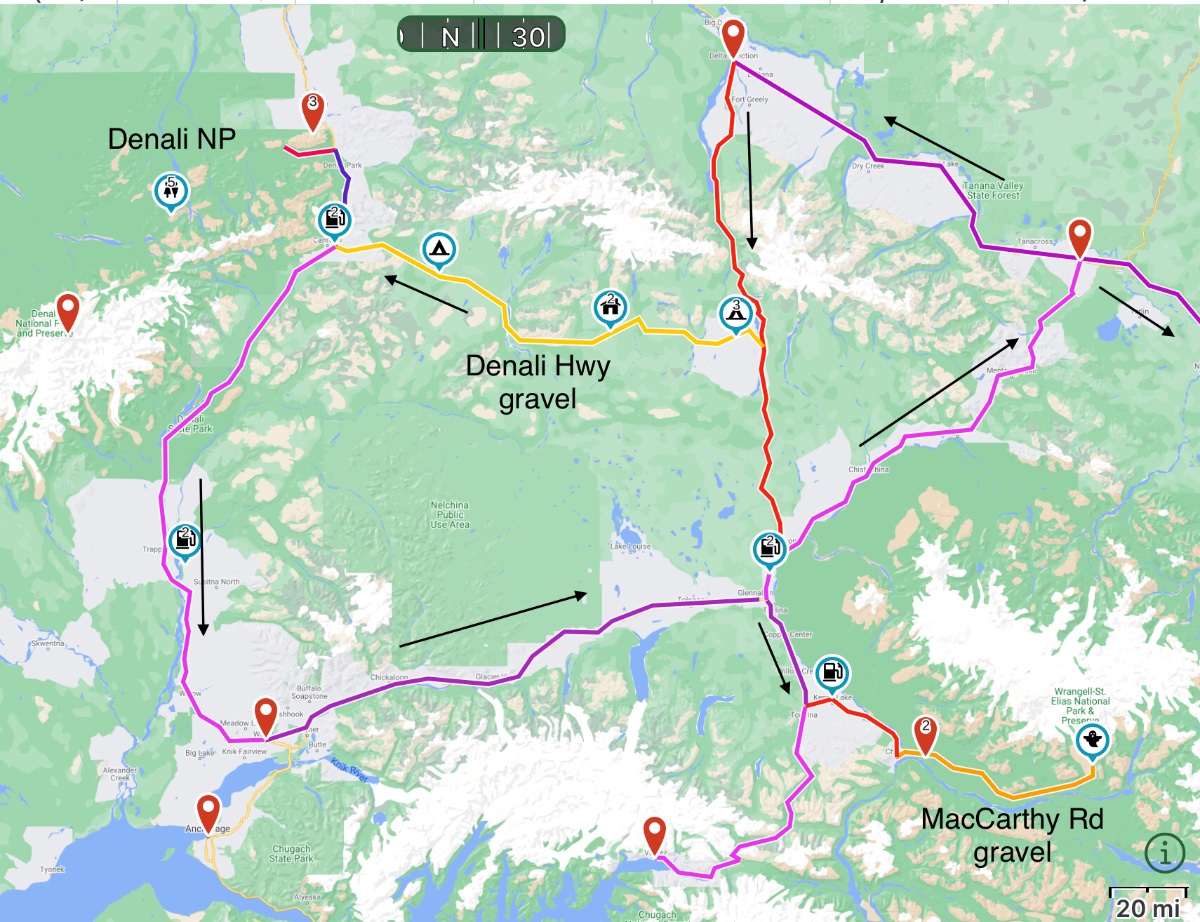
After years of talking about it, we are finally ready to head north, depending on whether or not Canada opens up her borders to US visitors. We plan to spend four weeks on the road and more or less haul @ss up there just after Labor Day, 2000 miles/ 40 hours from Spokane WA to Tok, AK ... And then drive these Alaska routes as shown by the arrows. Weather permitting, we can hang out a few days here and there to wait for photo opportunities (no rain, sun breaks). Drive the Denali Hwy (gravel) westbound, to see Mount Denali in all its glory, plus elk, caribou, birds, etc. My wife is eager to do nature, northern lights, and time lapse photography. The caribou hunting season will be over by August, so hopefully there will be no crowds of hunters along that road. YouTube Denali Hwy and Denali NP Then to Denali NP for a few days, loop south and back east to visit the Kennecott Copper Mine via the McCarthy Road (more gravel - we would like to park the trailer for that section) and then to Valdez. YouTube McCarthy, Kennecott Mine, fast forward to 9:00 minutes, very cool Then back up to Tok and turn right for Canada. That south central AK loop with side trips will be about 1400 miles. Then slowly work our way home through BC and Alberta by the eastern route, hopefully missing the crowds at Jasper and Banff, and any early snow in the passes. We might detour to Prince Rupert going north, if the weather is good, we do want to see the ocean, but I am guessing Valdez will provide better views and whales and such.... We have no desire to deal with crowds, cruise ships, helicopter flights, tour buses or Anchorage. We want dark skies, star gazing, northern lights, solitude and wildlife. No hookups needed, nor do we even need established campgrounds. DNR ones are fine (Geezer Pass). Any and all advice about places to see and stay will be greatly appreciated. Thanks, John Davies Spokane WA
-
That is very cool, my wife depends on reliable data access for her work, unfortunately they still don't have any sats in polar orbit, so if you want to go the Alaska (the big part) you will still be out of range: "SpaceX Service's ESIMs will communicate only with those SpaceX satellites that are visible on the horizon above a minimum elevation angle of 25 degrees." The RV antenna will have to be prorfessionally installed, and will it be as big as the home ones? That might be a problem on the limited and curved roof space of an Ollie. Maybe use a telescoping mast coming off the rear frame extension.? I'm guessing it won't be usable when driving.... John Davies Spokane WA
-
TPMS -Tireminder App version
John E Davies replied to TexasGuy's topic in Mechanical & Technical Tips
The spare tire sender wakes up by itself after driving a few minutes and it stays working like the other four. You can also wake one up by flicking it with a finger (imagine flicking a booger, sorry for the perfect analogy🙄). First thing in the morning while doing my walk around inspection before leaving the site, I wake the display and then flick the senders to get “today’s” pressures, not the ones from when they last went to sleep (when they were warm from driving). This is in case one happened to pick up a nail and was quietly deflating over night. (You would not know until after driving a few minutes otherwise.) I never use a tire gauge unless one of those morning readings seems odd. They do not indicate super accurate numbers, but they are very consistent. John Davies Spokane WA -
https://reserve.wanderinglabs.com/new It needs a whole lot of work to be of any use use to me. It seems to be mostly State Parks, but even using the Corps of Engineers filter, it did not show any of their reservable campgrounds in WA. It shows just thirteen COE locations, all in a handful of southern states. And I tried the WA State parks filter and it returned zero hits. Unless I am using it wrong? It seems to be disfunctional. John Davies Spokane WA
-
That looks very sexy, but I personally would prefer a stainless steel version rather than aluminum. It would be no work at all to cut it. Especially for the price! My bottles are not locked, I think having them under the weird doghouse provides a lot of “visual deterrence”. OTH I would probably just get a Master Python 6 foot cable lock ($13 at Amazon) and sleep well enough. The tumblers are not secure, but it is a lot better than nothing. John Davies Spokane WA
-
TPMS -Tireminder App version
John E Davies replied to TexasGuy's topic in Mechanical & Technical Tips
I bought the amp and found out that it was not needed for either my full sized Ram pickup or my shorter Land Cruiser. There have never been any issues with connecting, except when a sensor battery gets low, which is to be expected. I have never even needed to raise the dorky antenna mast on the display.... https://olivertraveltrailers.com/forums/topic/2482-review-tire-traker-tt-500-tpms/ IF you needed to install it, a good spot would be in the left overhead cabinet at the bathroom divider wall. You could splice into the power and ground wire for the cabinet lights, that is where I mounted the Garmin backup camera transmitter. John Davies Spokane WA -
Campgrounds near Mt Rushmore/Custer State Park
John E Davies replied to TexasGuy's topic in Campgrounds & Parks
I can’t advise about Rushmore, except to say it is usually insanely crowded in warm weather. I suggest that you continue north to the Roosevelt NP area. https://www.beyondthetent.com/camping-in-theodore-roosevelt-national-park/ John Davies Spokane WA -
That is pretty cool. Thanks for posting! The Australians have been using what they call “poly block” hitches for off pavement towing, for decades. I had a Treg model and it was terrific. I am glad US manufacturers are starting to use this concept. Did you buy the warranty? I found this picture on that page. It does appear that, like a rubber torsion axle, you can expect it deteriorate over time. Does it start to get noisy? Rubber axle bushings can be destroyed by exposure to water and grit. Are these rudder tubes exposed in the front of the tube? Please keep us updated on how this works out. John Davies Spokane WA
-
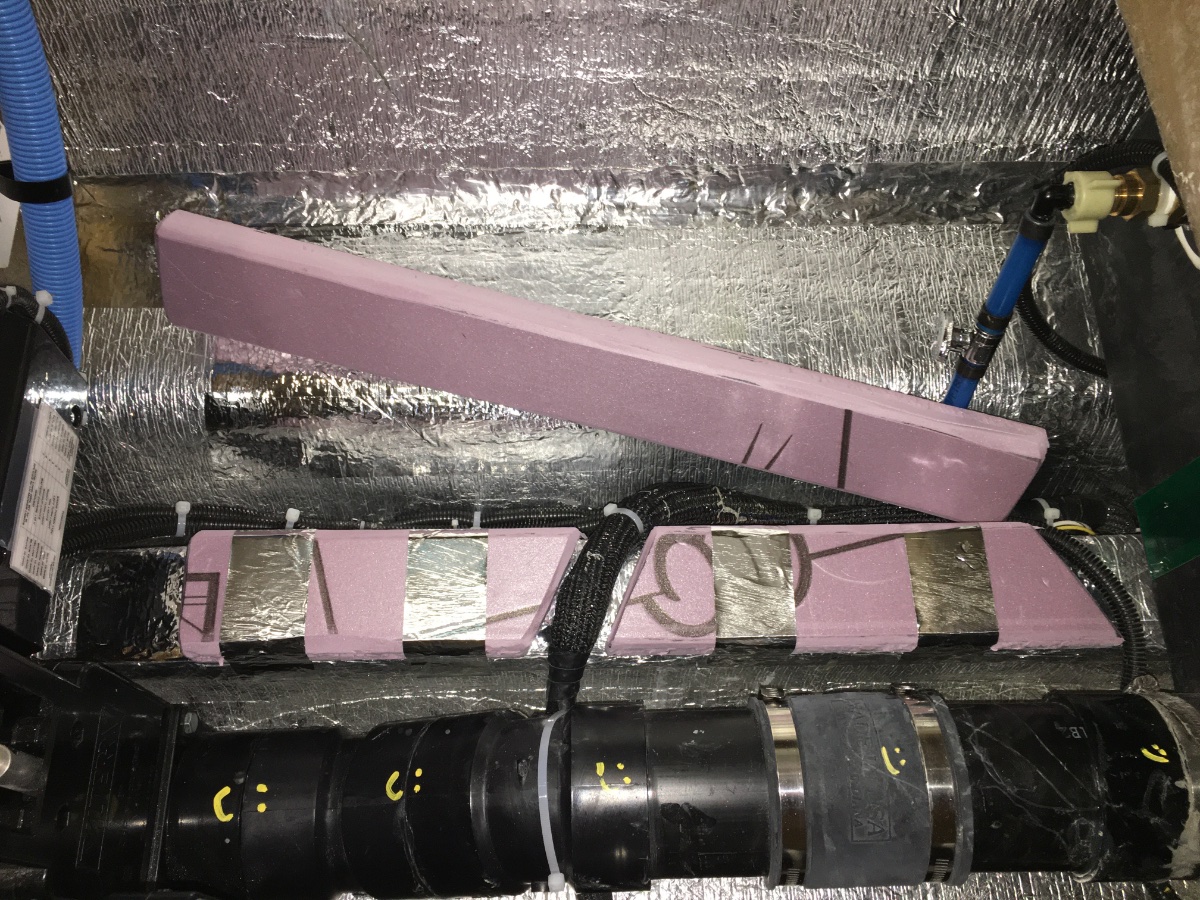
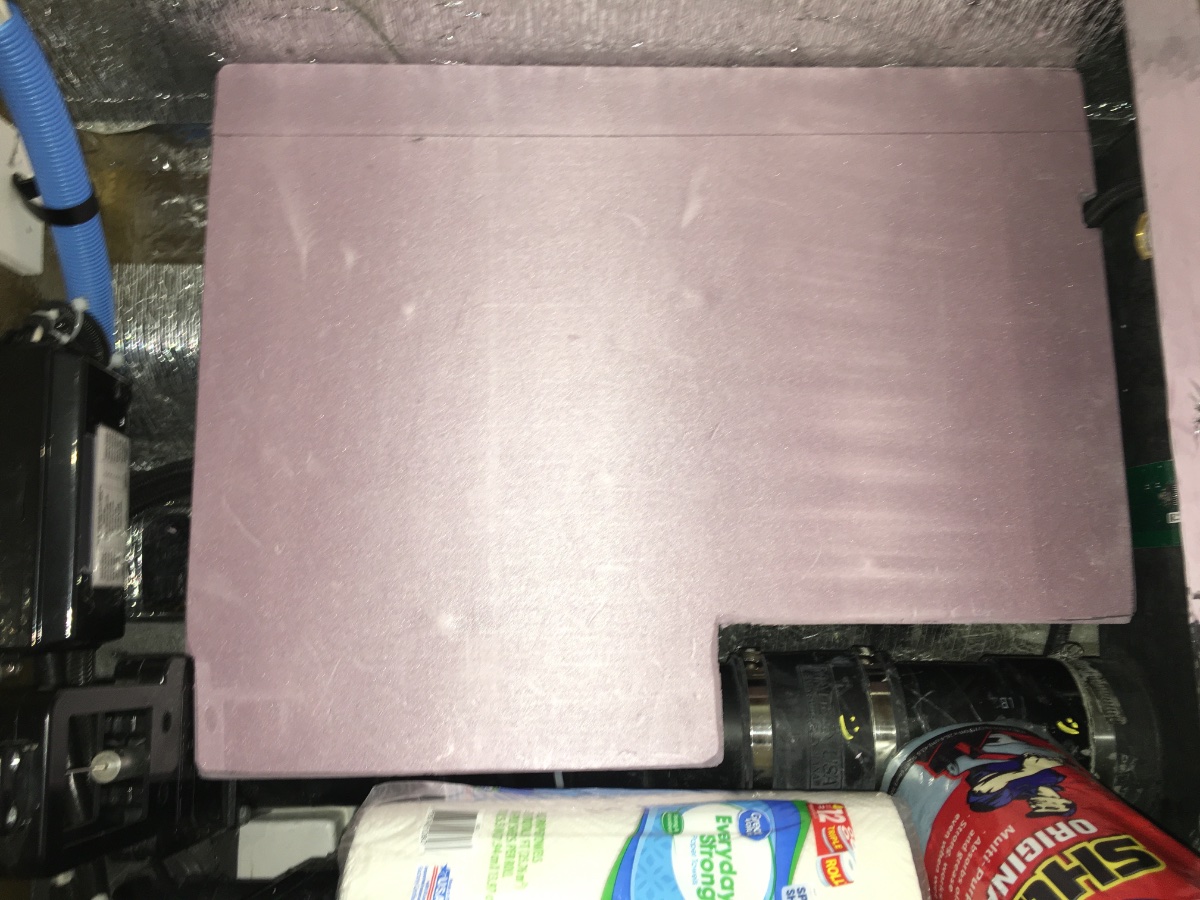
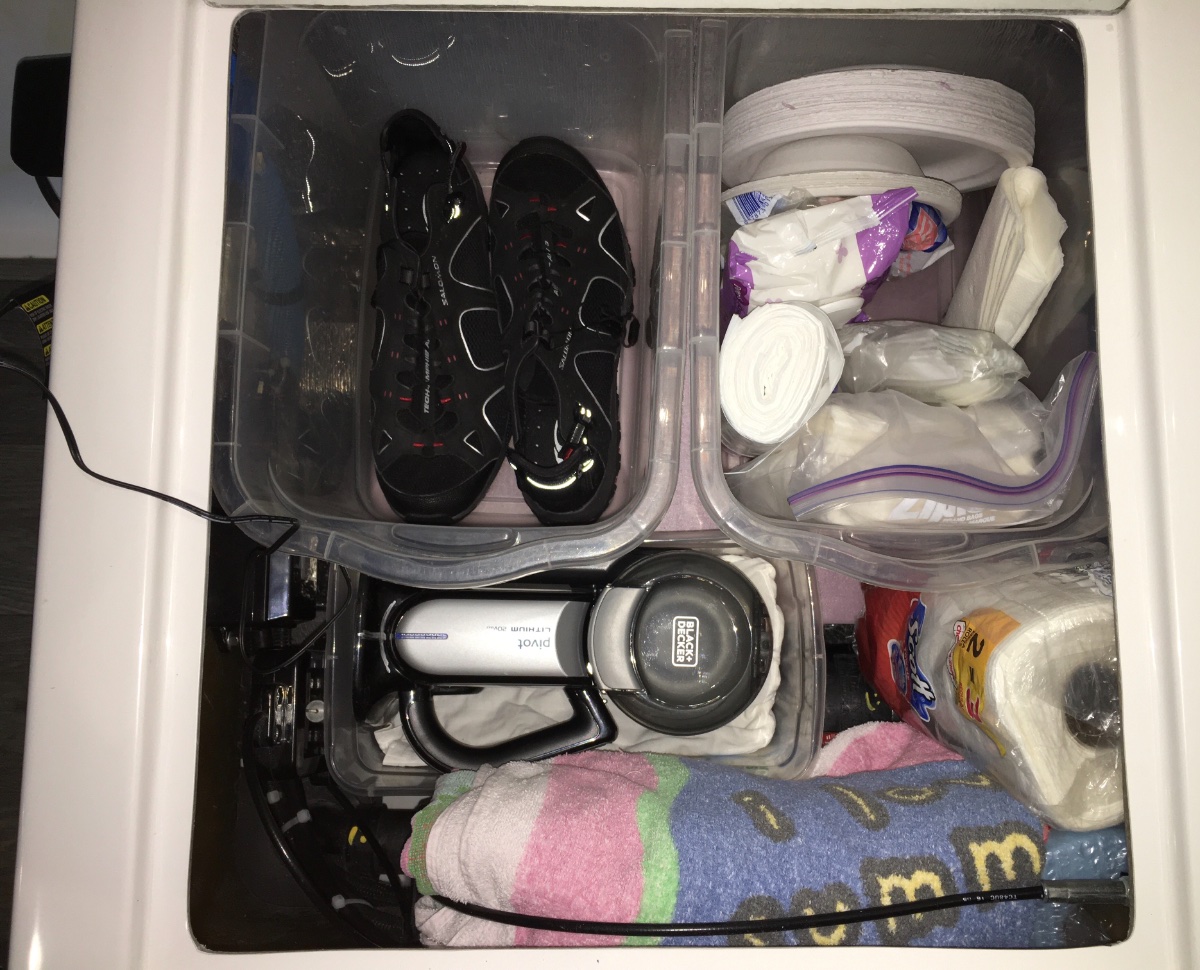
This is pretty bad for storing just about anything hard, I had been using a bunch of loose foam sheets to pad the wires and plumbing. I made strips from 1" thick Dow Corning R5 rigid foam board from Home Depot. It can be cut with a SHARP knife and dressed smooth with a bench top belt sander. Wear a dust mask! I used 3 mil aluminum HVAC tape to secure it. The frame member got 2" total thickness, the outside got 2.5" to make it level side to side. The black tank rinse plumbing has been bugging me for years, so I removed it completely (Natures Head toilet!) And capped the bottom fitting with a1/2" FPT Cap, so nobody could accidentally flood the interior: I cut out a tray and it just rests there, so access underneath is not an issue. Here is the area stuffed fairly full, it all lies nice and flat. The material is not especially strong, but it weighs absolutely nothing and is easily replaced if it gets damaged. Plus it is fire retardant. If you wanted it to look nicer you could cover the entire top with the aluminum tape. The material is however 100% waterproof. I tested that by submerging a piece in a glass of water for 12 hours. No worries! John Davies Spokane WA
-
- 7
-

-

-
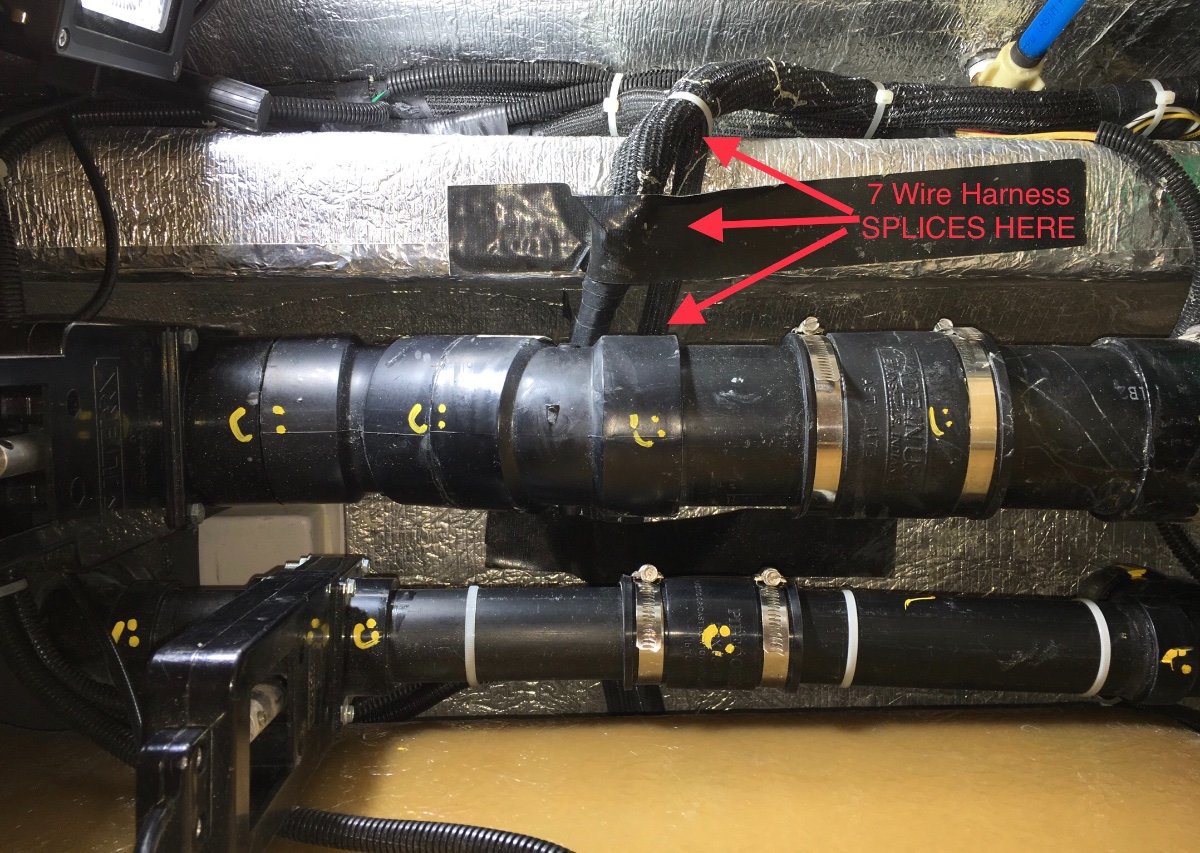
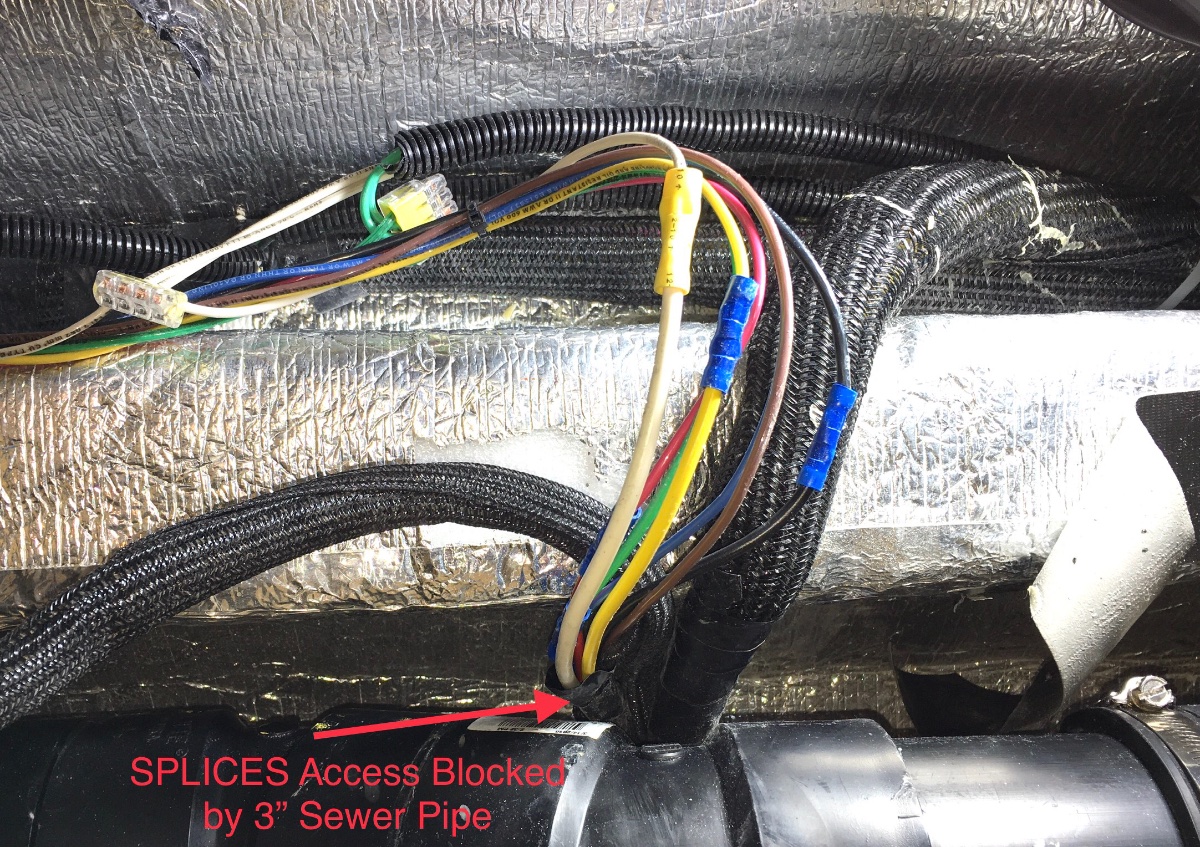
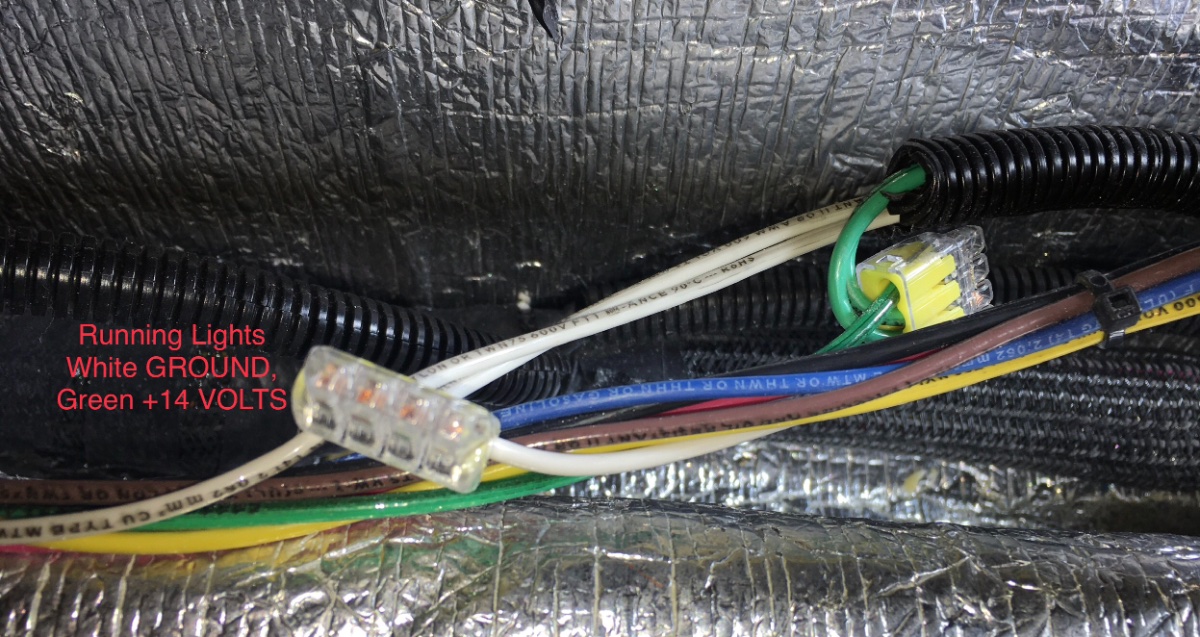
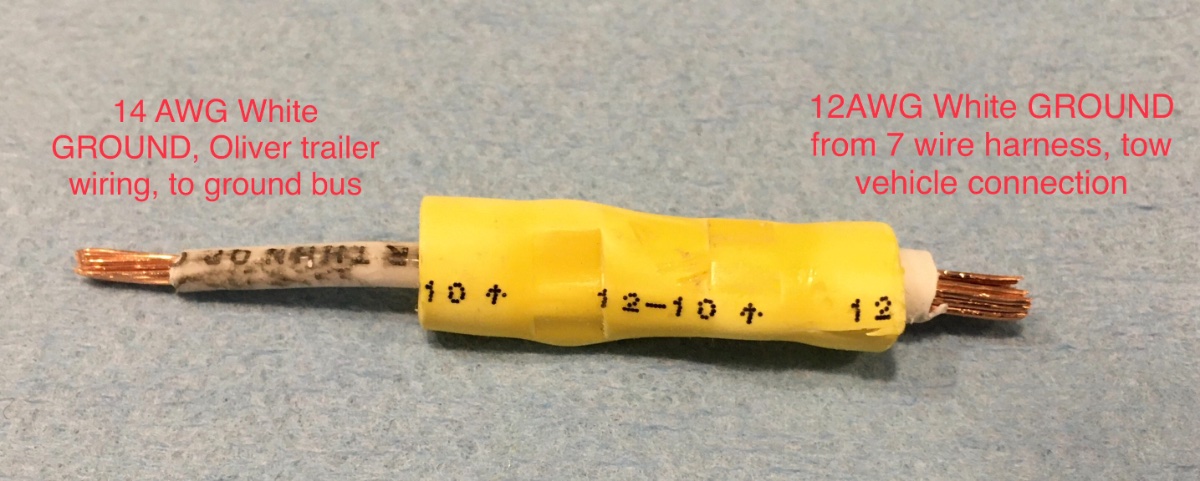
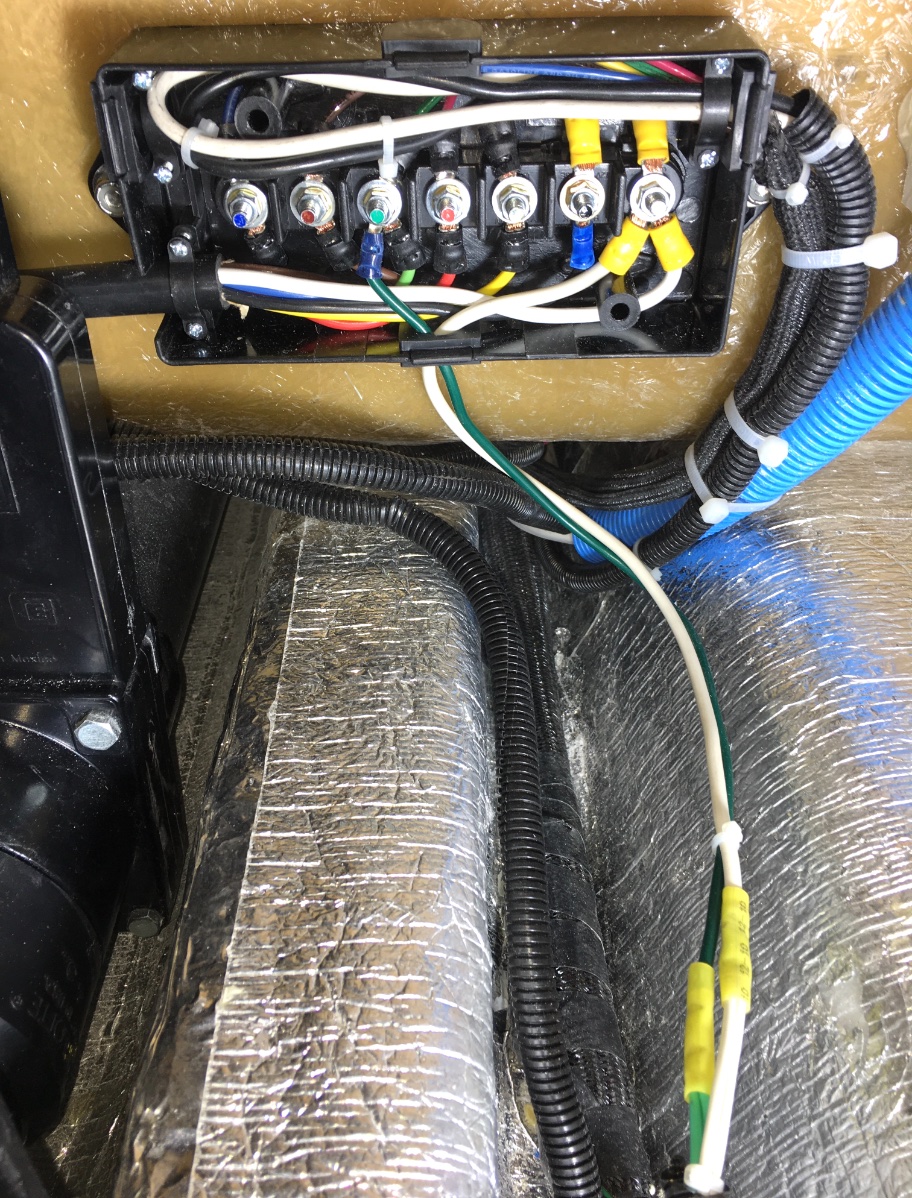
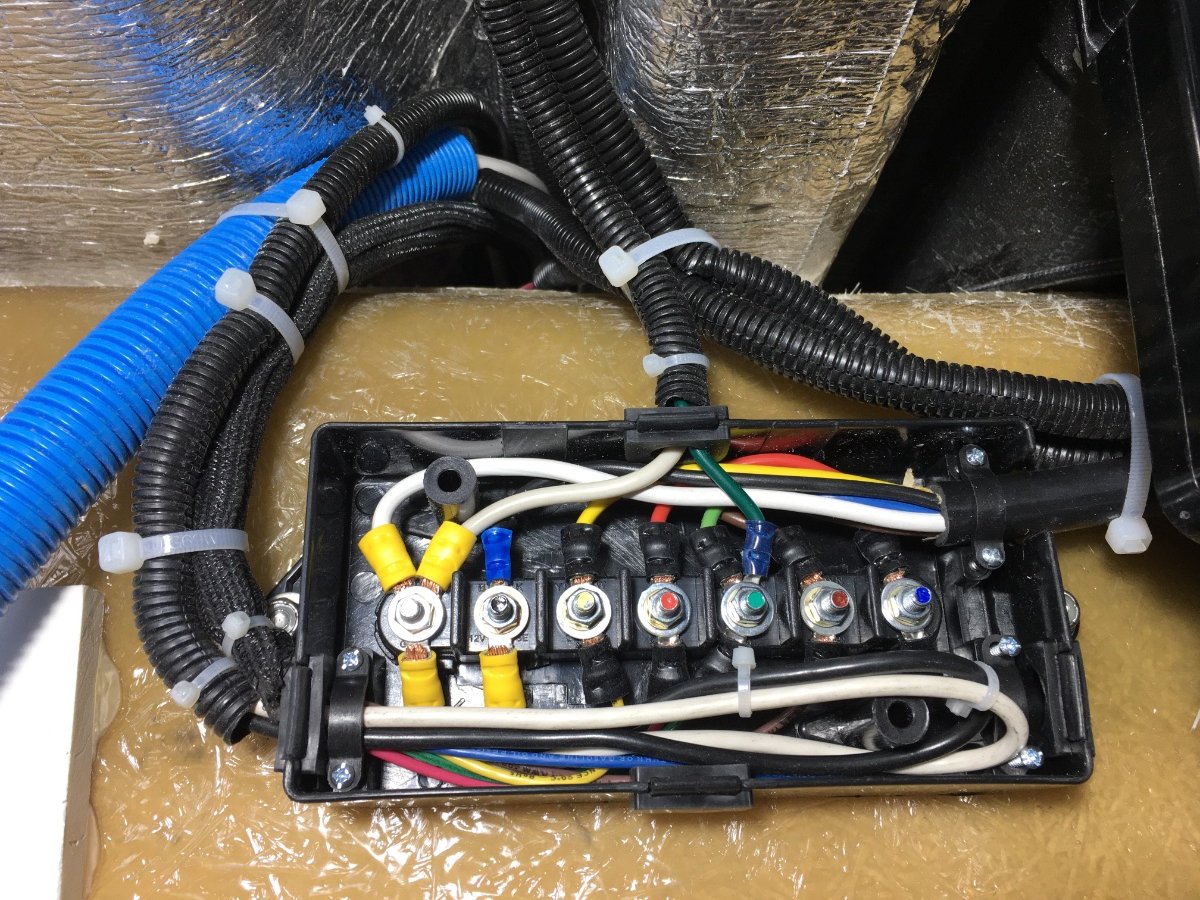
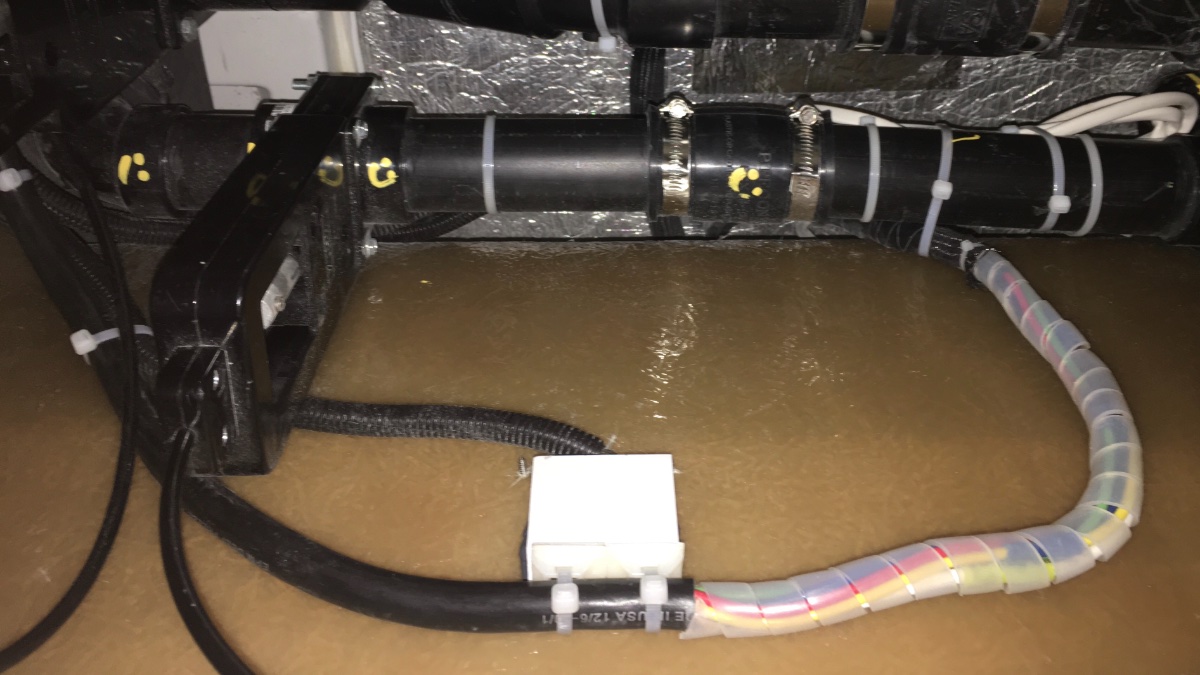
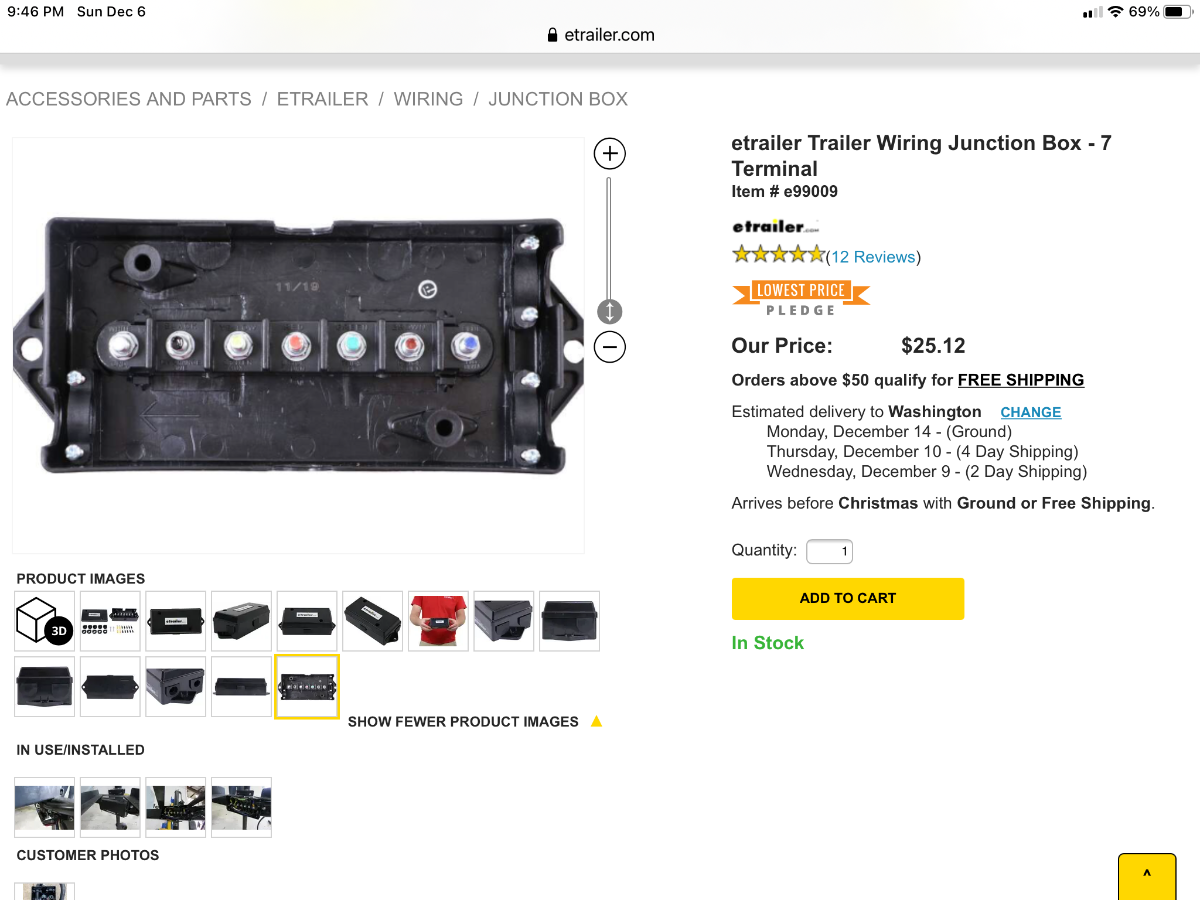
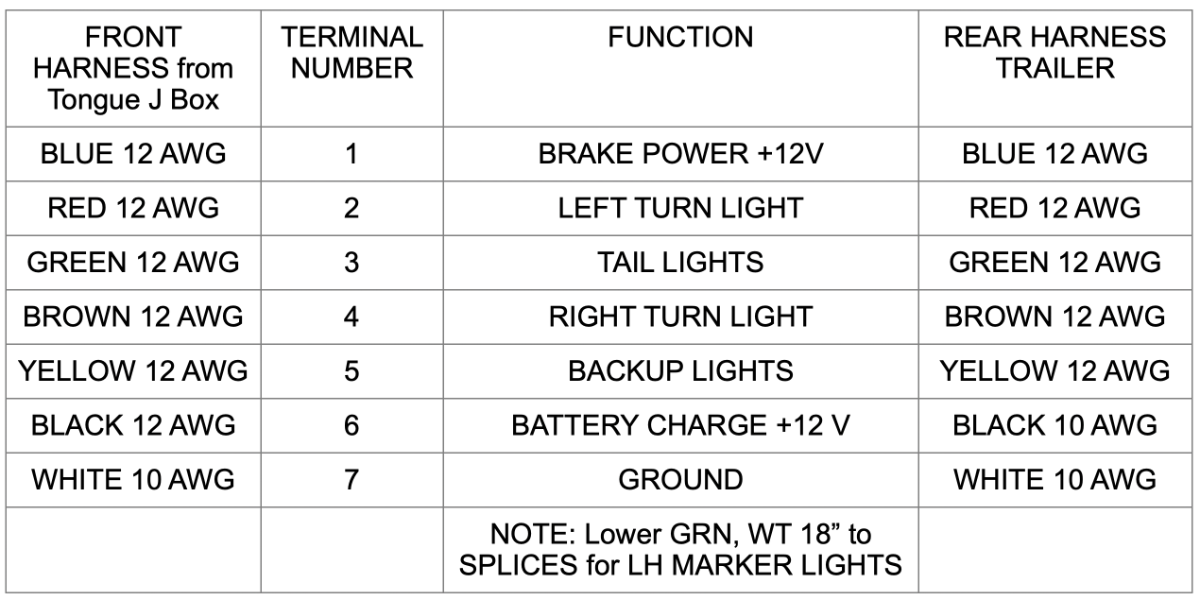
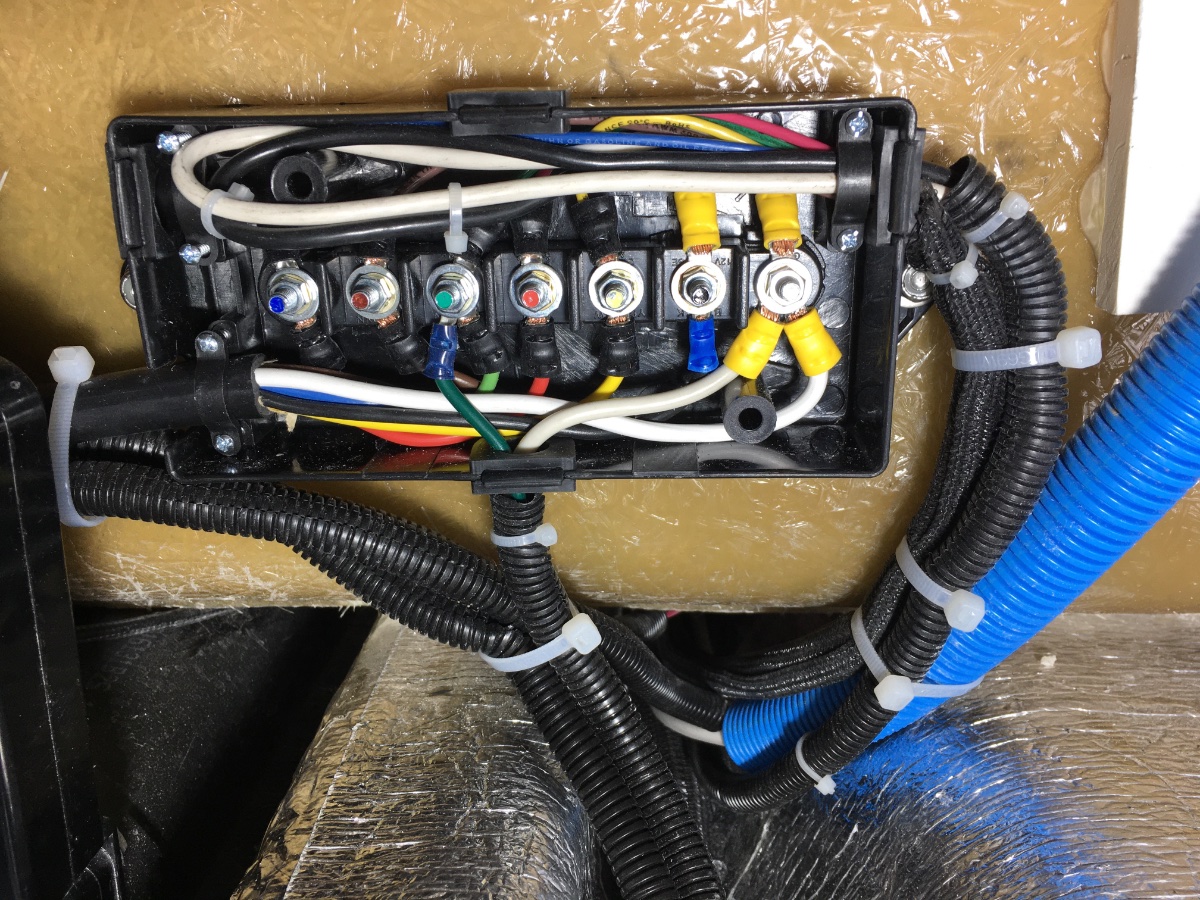
Here is a related thread, I installed a similar box up front under the jack: ... https://olivertraveltrailers.com/forums/topic/2688-how-to-junction-box-for-trailer-harness-repair-or-extend-the-harness/ This all came about because I wanted to install a ... Redarc DC to DC Battery Charger .... and I needed to know FOR SURE that the wires were big enough. 12 AWG is the absolute minimum according to Redarc, and bigger is always better, especially in an Ollie with a very long run back to the batteries. Here are the existing butt splices, half of them are absolutely buried under the sewer pipes. Time for a J-Box! So I cut all the splices, and dragged the ends up to where I could inspect the wires. Most were OK, but the white Ground wire was not. Somebody extended the front wire with a smaller sized one. Darn it! I bolted down the box next to the 120 VAC outlet. I spliced into the green and white running light wires and brought them up to the box via the bottom hole. The other wires come in from the left and right sides. I ran heavier 10 AWG black and white wires (power and ground) from the box back to the appropriate posts. So now the Redarc charger will not suffer from excessive voltage drop, and with the easy access, it will be very simple to troubleshoot any future 7 Wire Harness problems. The new splices are easy to ID because they have clear spiral wrap plastic, and they are secured to the inside wall using a 1" thick block of HDPE plastic, bonded with JB Weld directly over the small LED light. The placard goes inside the J Box using 3M double stick tape. Here is the placard, in Apple Pages format: Oliver Junction Box wiring placard Rear 7 pin.pages Note that I indicated where those marker light splices are - I hate not knowing! John Davies Spokane WA
-
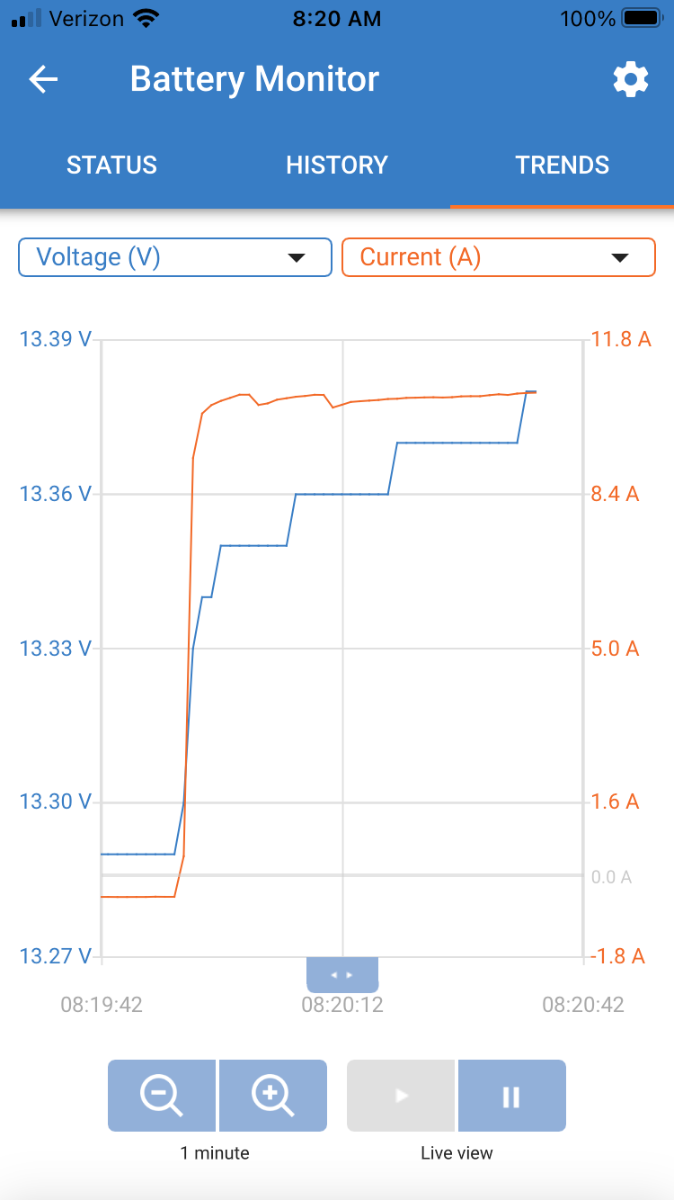
My Land Cruiser 200 charging voltage is 13.6 volts with the trailer hooked up (using a digital OBD2 Scan Gauge).It never gets above 14 volts, regardless. Here is the history using my VictronConnect app, showing the initial parasitic load (propane detector and stereo mostly) of about minus 0.3 amps, then the engine starts and the trailer battery voltage and current shoot up nicely, to just under 11 amps. It maintains that charge rate right up until the batteries are close to full. , The only fly in the ointment is that the wiring needs to be 12AWG or larger, all the way from tongue to charger. My Hull # 218 had a splice from 12 AWG down to 14 AWG, so I had to rewire the entire 7 wire harness, essentially. That is another thread. ... https://olivertraveltrailers.com/forums/topic/5271-how-to-junction-box-for-the-7-wire-trailer-harness-under-the-front-dinette-seat/?tab=comments#comment-54709 I went on a 90 minute, 40 mile test drive yesterday, it worked flawlessly, I can monitor the Victron app inside the truck, the sky was hazy high clouds, not ideal solar conditions, but the total charge current kept around 16 amps, going up to 22 when the sun broke through a little. Total cost was about $312, not including all my labor! Questions are welcome. John Davies Spokane WA
-
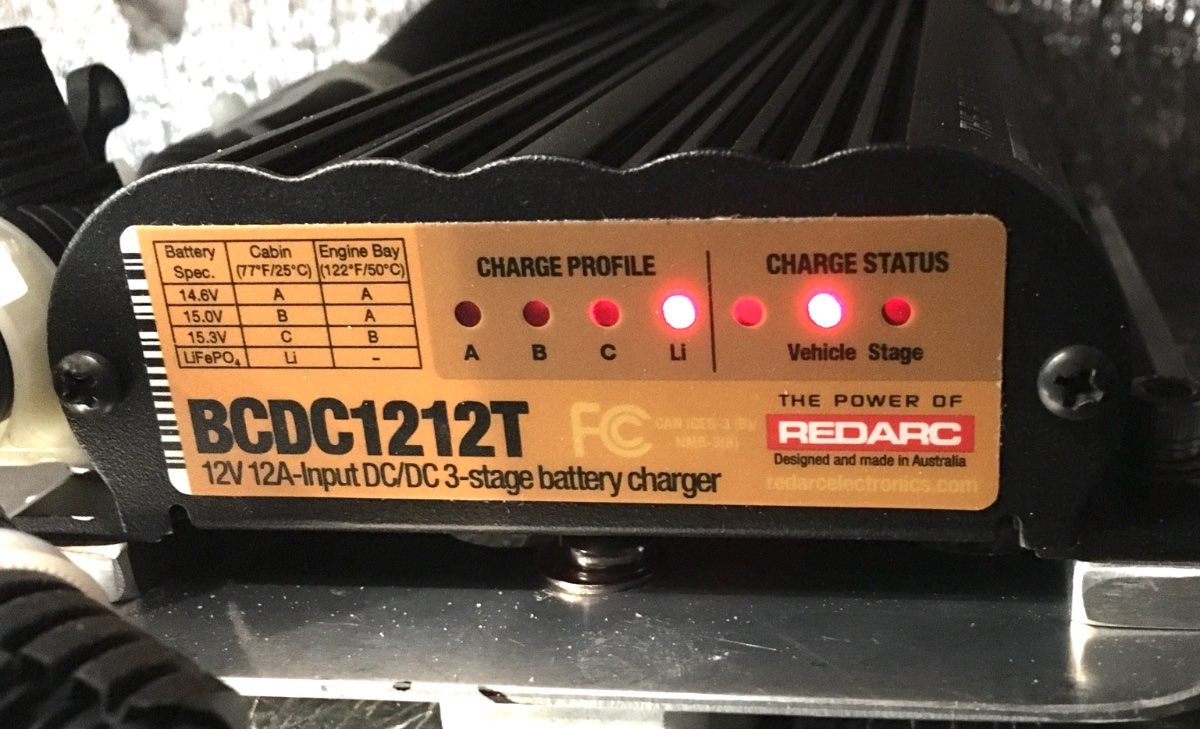
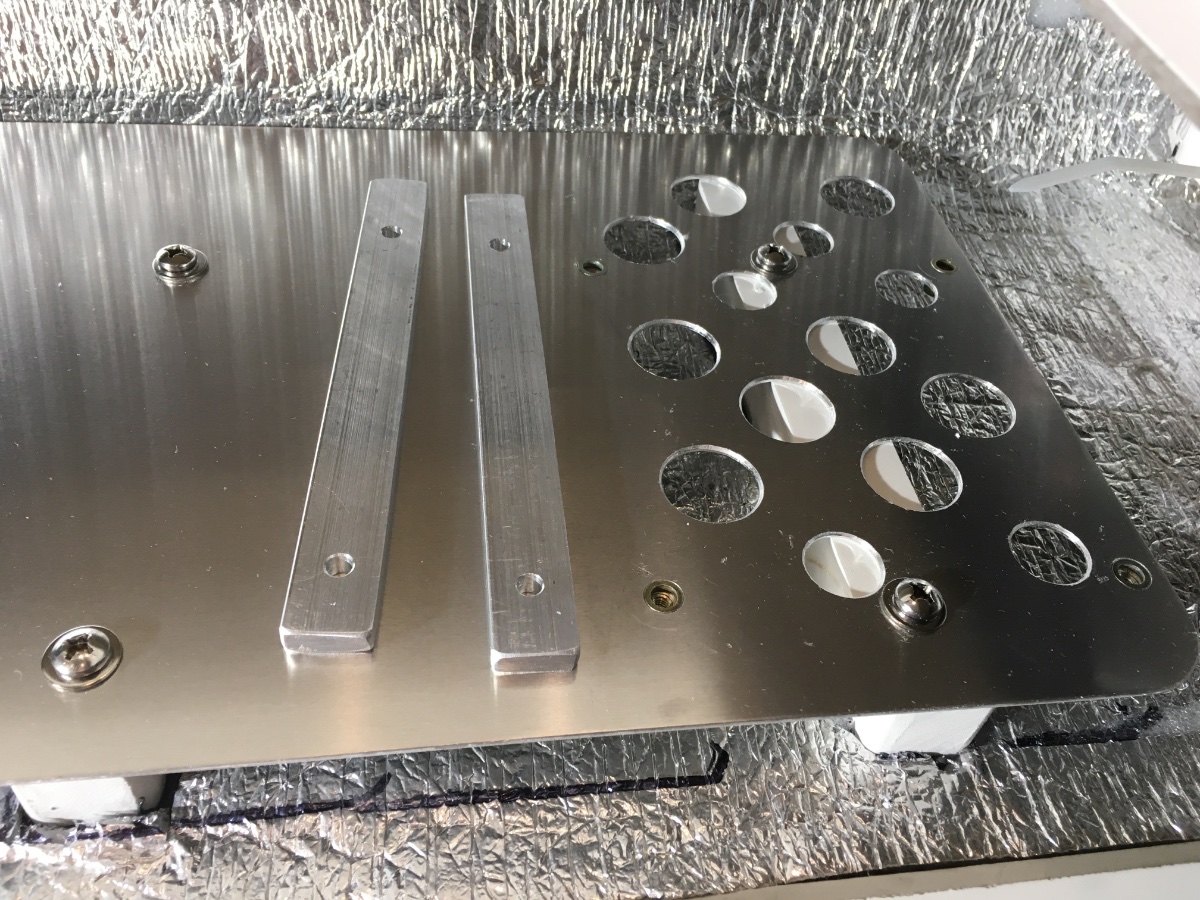
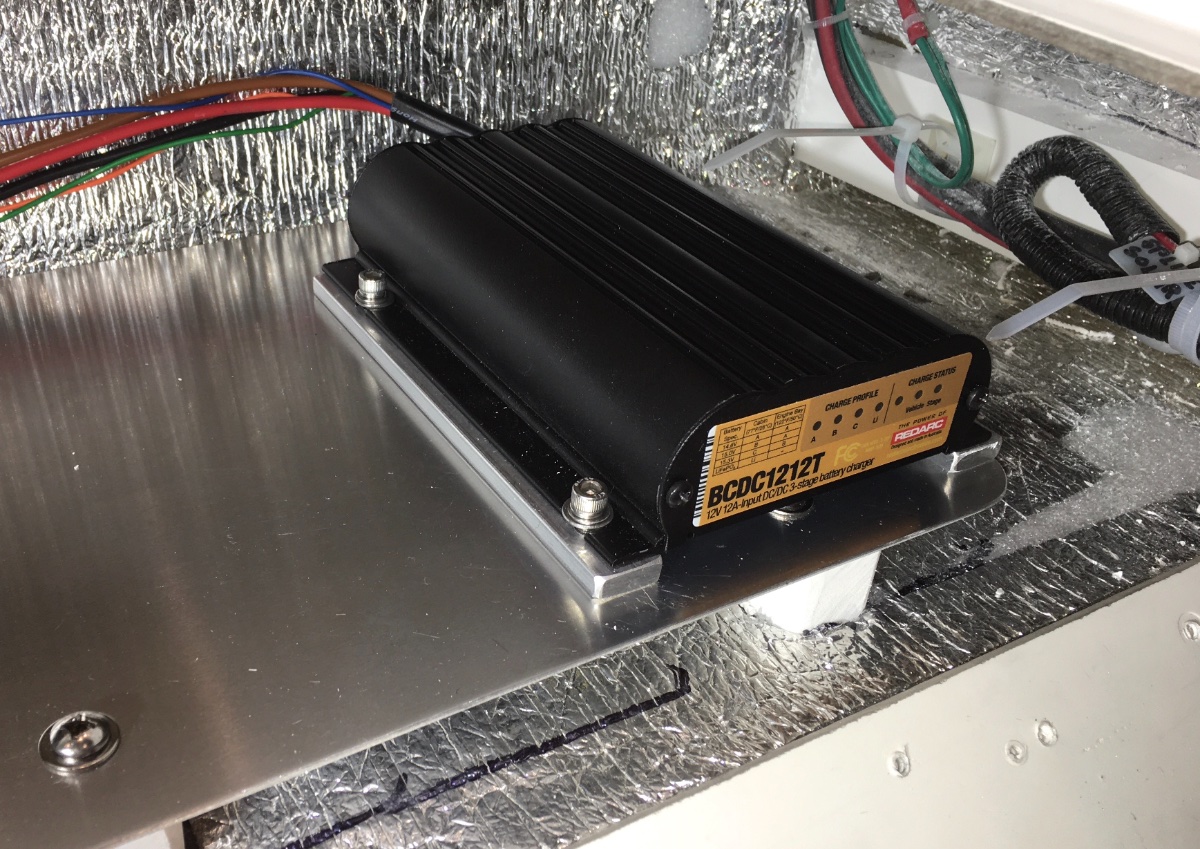
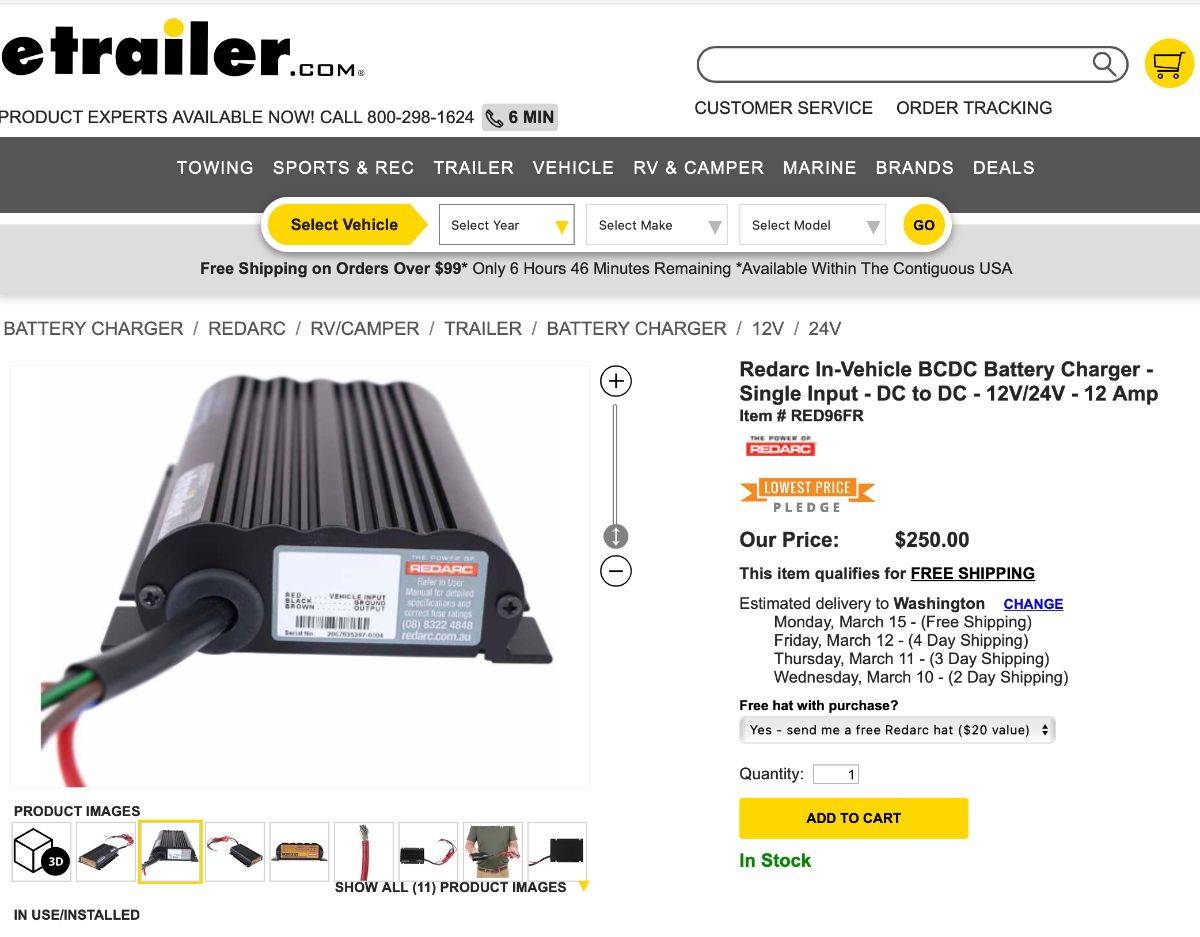
FYI, related thread and discussion: https://olivertraveltrailers.com/forums/topic/4759-redarc-trailer-charger-mounted-inside-the-ollie-for-100-lithium-charge/?tab=comments#comment-49376 https://www.etrailer.com/Battery-Charger/Redarc/RED96FR.html I won't add much commentary, it is pretty self explanatory. The instructions allow you to mount in any position, I chose horizontally with 1" cooling holes and a 1/2" gap between its housing and the mounting plate for cross flow of air. Note that there is a ton of extra space, I plan to add a small Victron MPPT Solar charge controller for my portable panel, it will go just to the rear of the Redarc, and there is room for another circuit breaker too. More.... John Davies Spokane WA
-
POLL - IMPORTANT Inspect your battery cables!
John E Davies replied to John E Davies's topic in Mechanical & Technical Tips
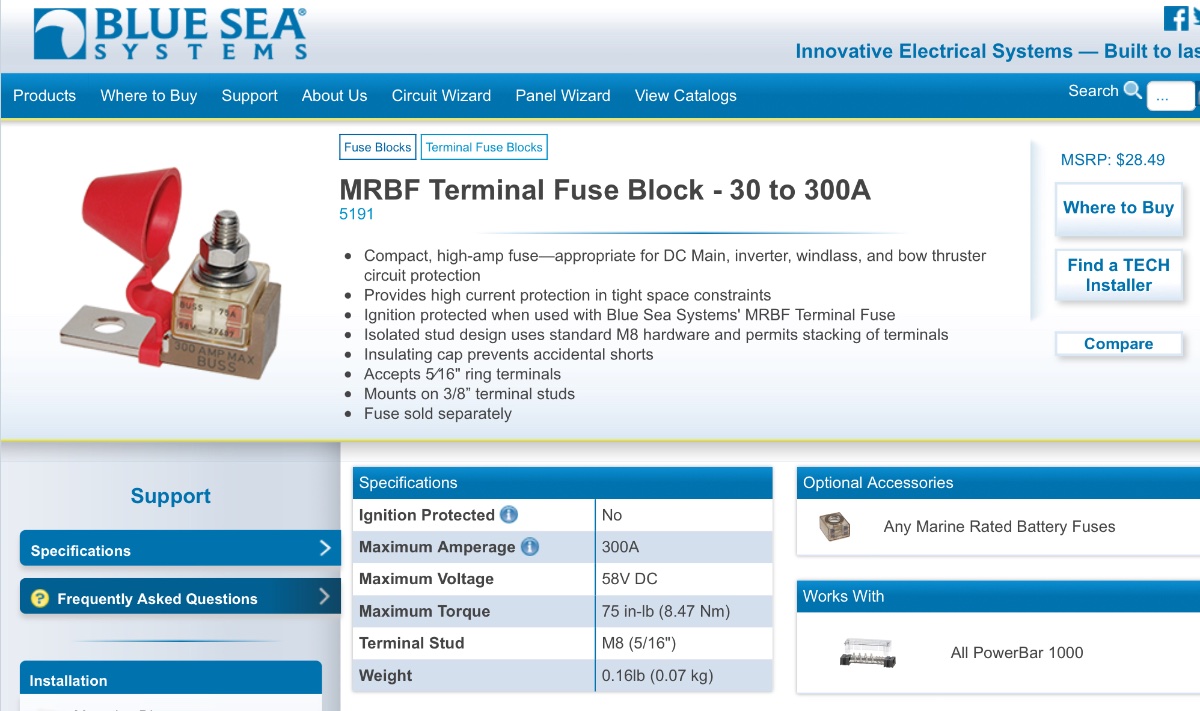
Jim, you can easily add terminal fuse blocks to your positive posts. John Davies Spokane WA
-
HOW TO: Stone Stomper Gravel Guard.
John E Davies replied to John E Davies's topic in Towing an Oliver
FYI, one disadvantage with Rock Tamers is that they do need to be close to the ground to work correctly, but when you are traveling briskly on a gravel road, they can drag when you encounter a dip, and shoot up a rooster tail of gravel onto your trailer. This is a non-issue with a Stone Stomper. John Davies Spokane WA -
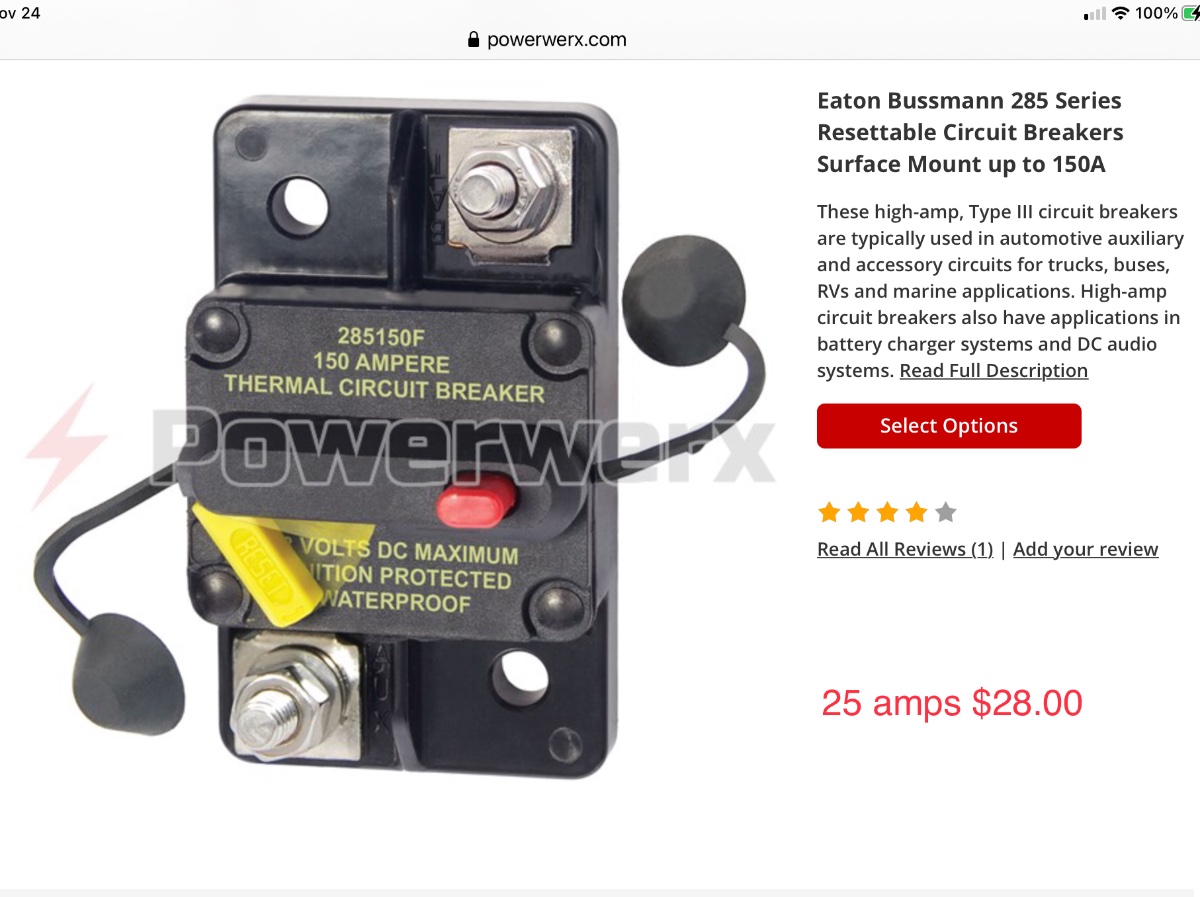
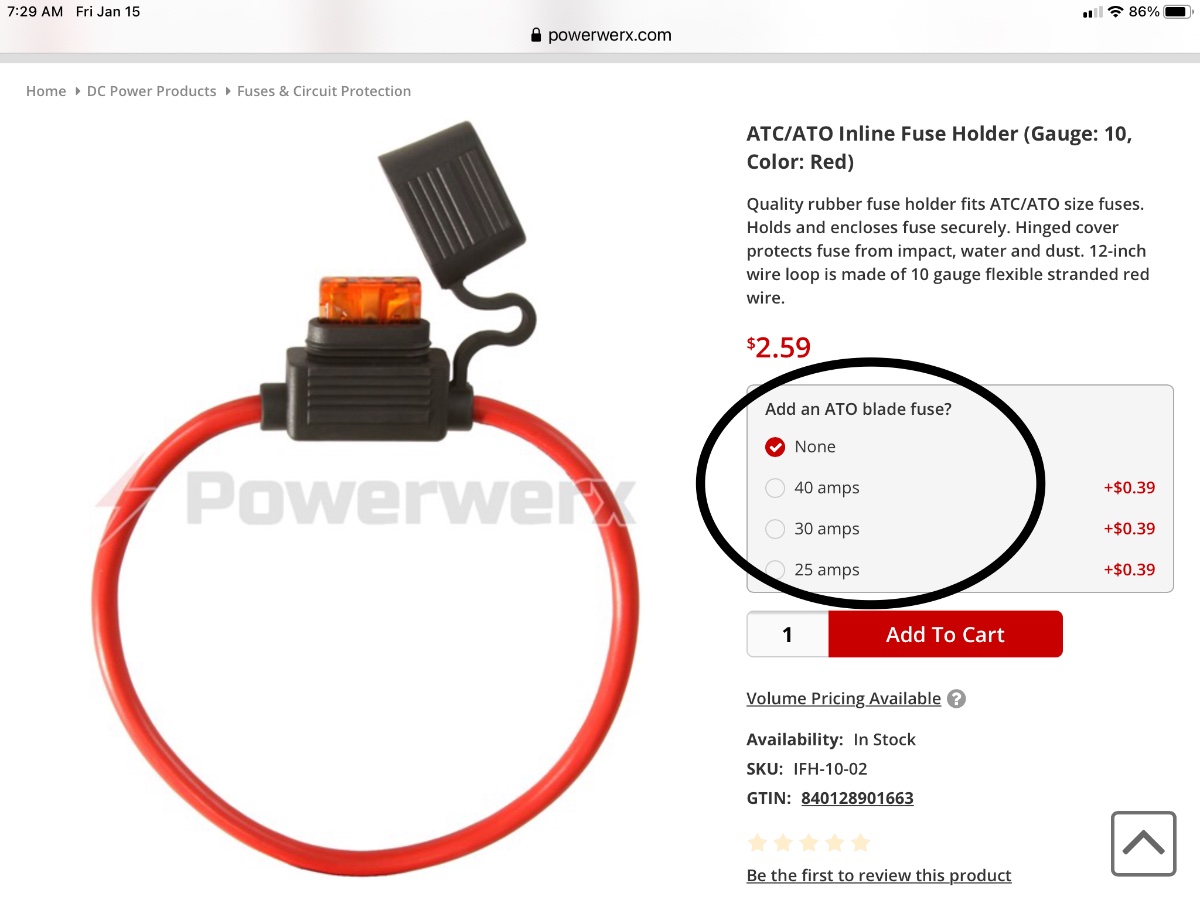
Update via email, Jason described the factory wiring of this switch, I have NOT completely inspected my trailer to verify this. The circuit is not fused, and he could not tell me why. The wire goes from the rear bus circuit breaker, then it exits through the belly and runs along the outside to the breakaway switch. So some of the wire is out in the open, but several feet of it is NOT, and that remains a fire hazard IMHO. I kept the 20 amp inline fuse that I added, and will not worry about anything more. I will continue to test the switch operation before each trip. If you feel like crawling around under your trailer, look to see if there is a wire coming out above the axles, heading toward the front. Please comment about what you find, or don't find 😉 Thanks. John Davies' Spokane WA