John E Davies
-
Posts
5,759 -
Joined
-
Last visited
-
Days Won
243
Everything posted by John E Davies
-

HOW TO: Fabricate battery hold down straps and anchors
John E Davies replied to John E Davies's topic in Ollie Modifications
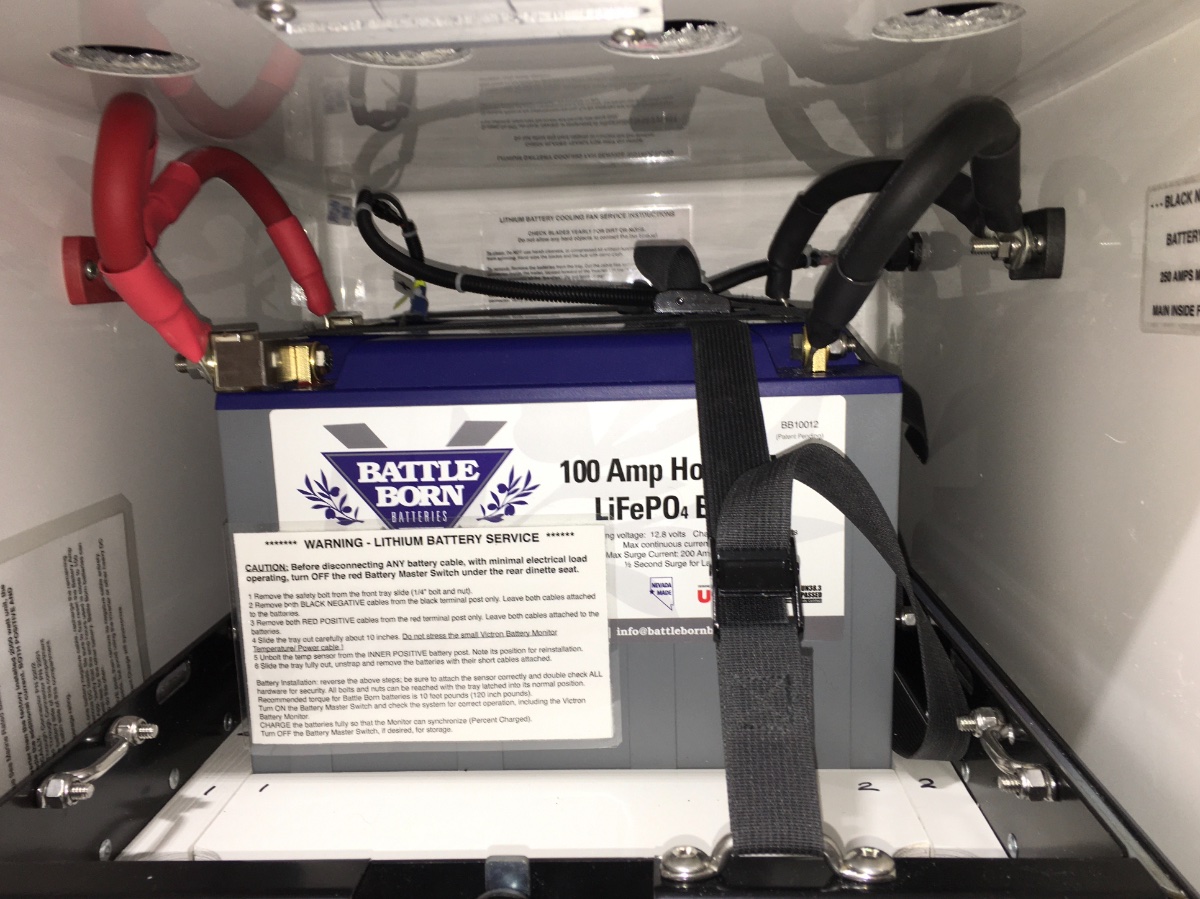
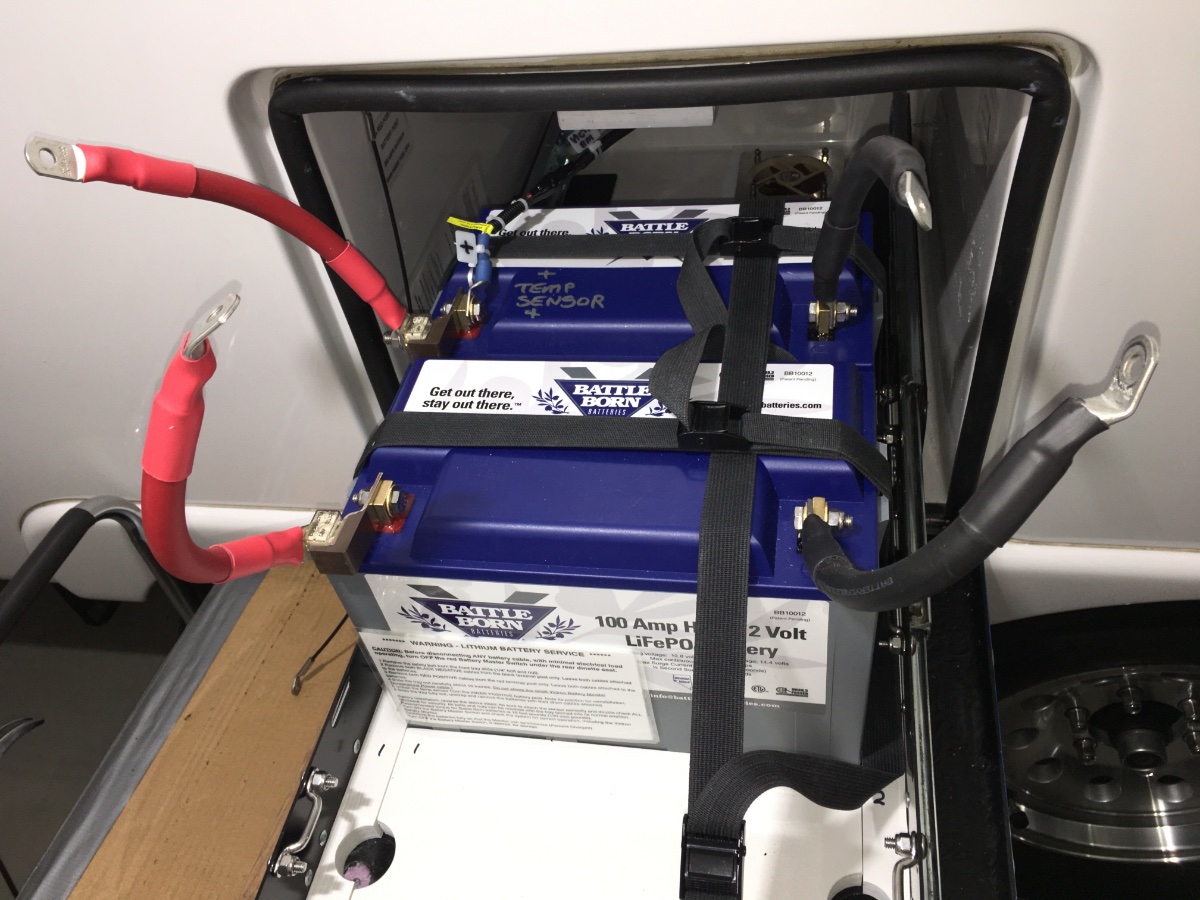
Yes, two 5/16" nuts on the side terminal posts, all connections can be accessed very easily with a full sized ratchet handle with the tray in place. Flip the cables off the posts, slide out the tray.... each battery positive post is individually fused. This will be a future thread.... The temp sensor is not required for the BB batteries, their onboard BMS takes care of any temperature compensation, I installed it so the VictronConnect app would show the temperature, so I can keep track of conditions inside the box. Using the app's Network feature, my new Victron MPPT controller also shows that info on its own solar display. The cable has two wires and a mini fuse, so it takes the place of the power-only black one that comes with the BVM-712. So, not needed at all, but very handy. https://www.amazon.com/Victron-Energy-Temperature-Sensor/dp/B08NHQ6TF4 John Davies' Spokane WA -
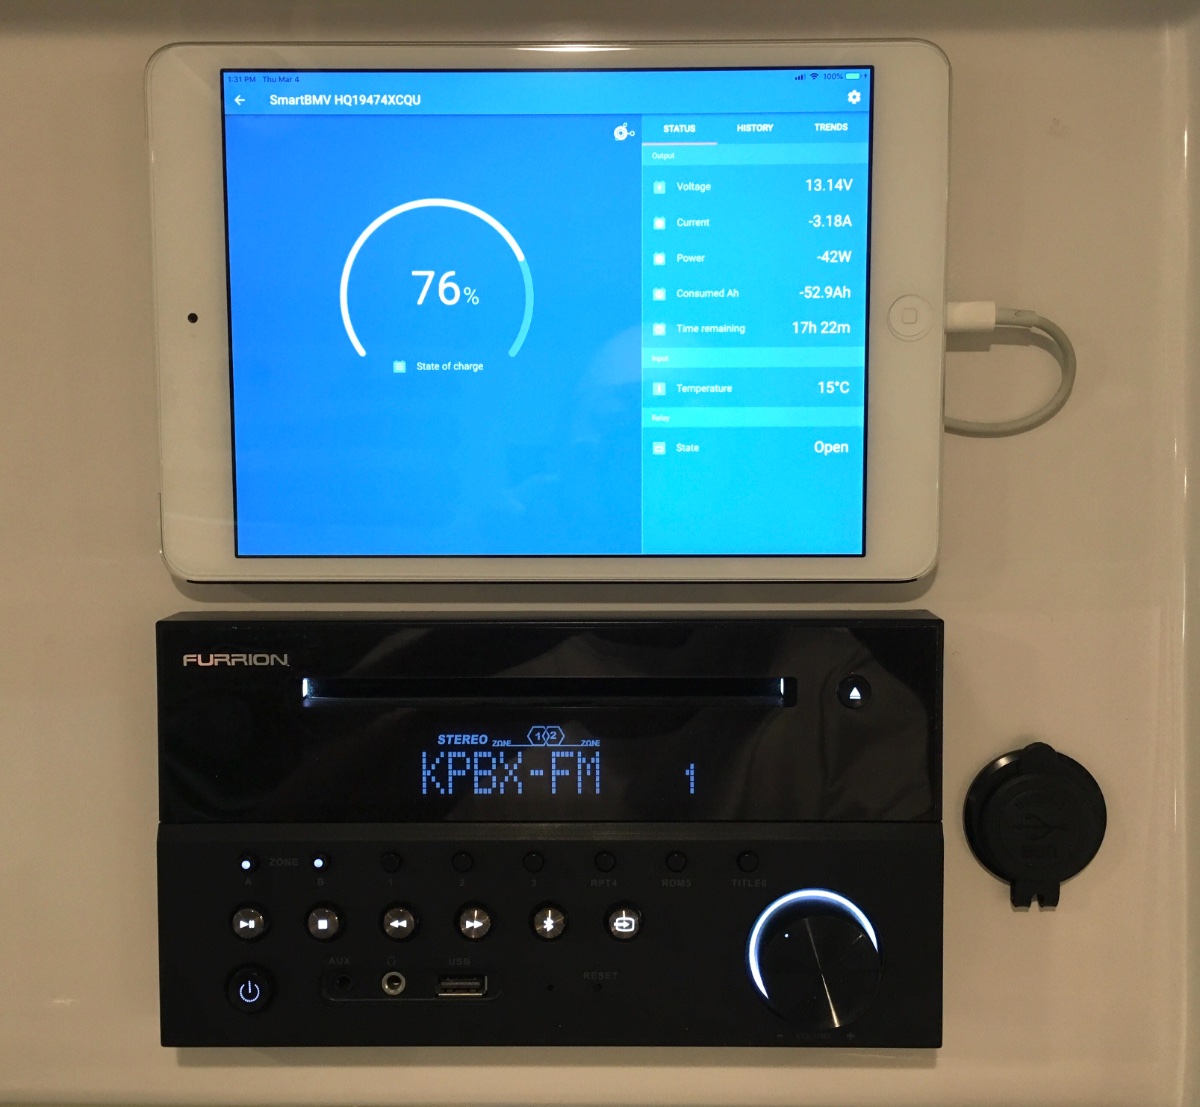
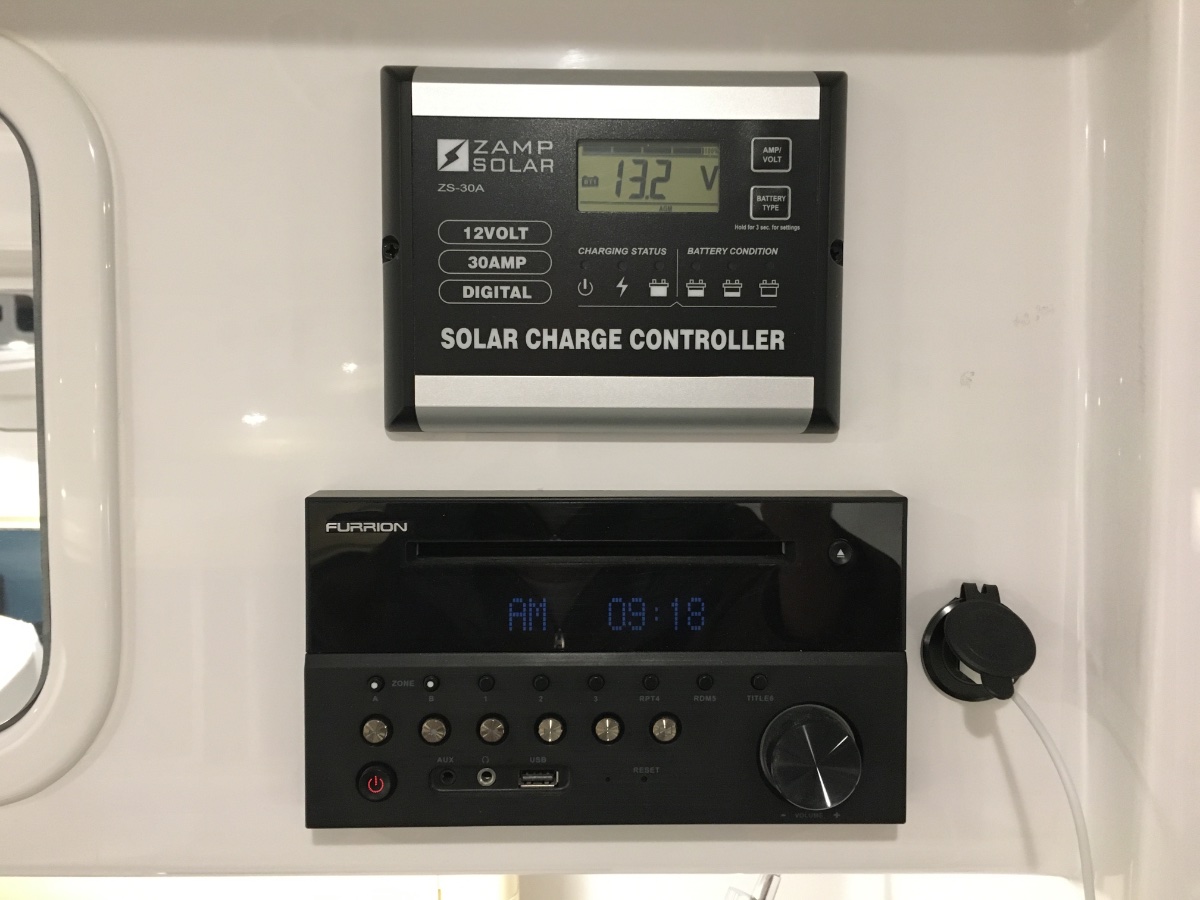
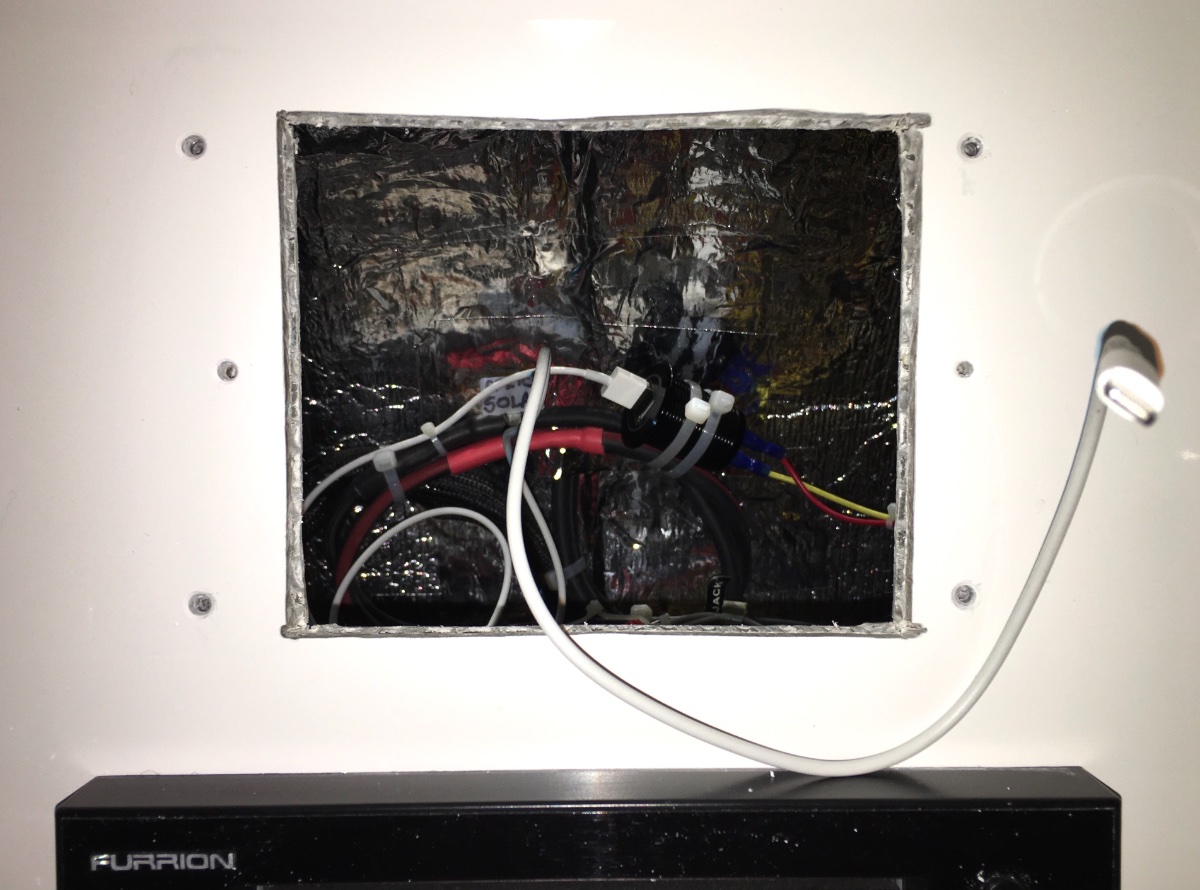
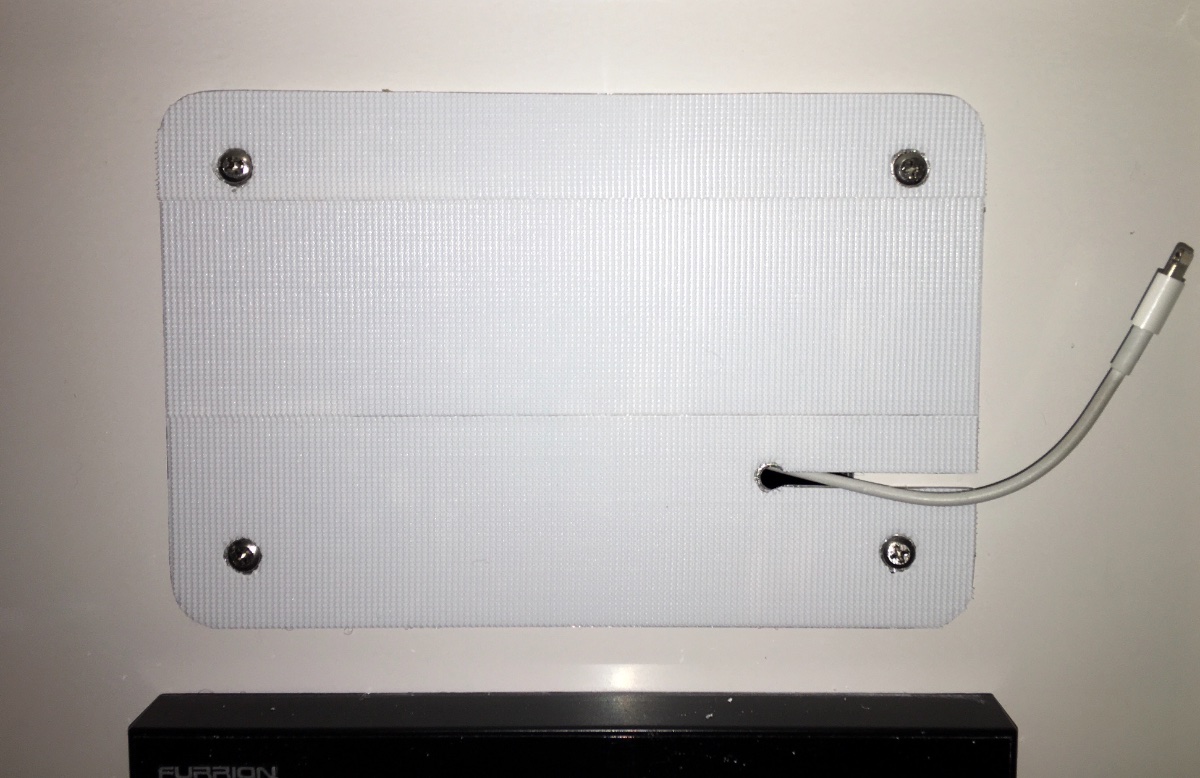
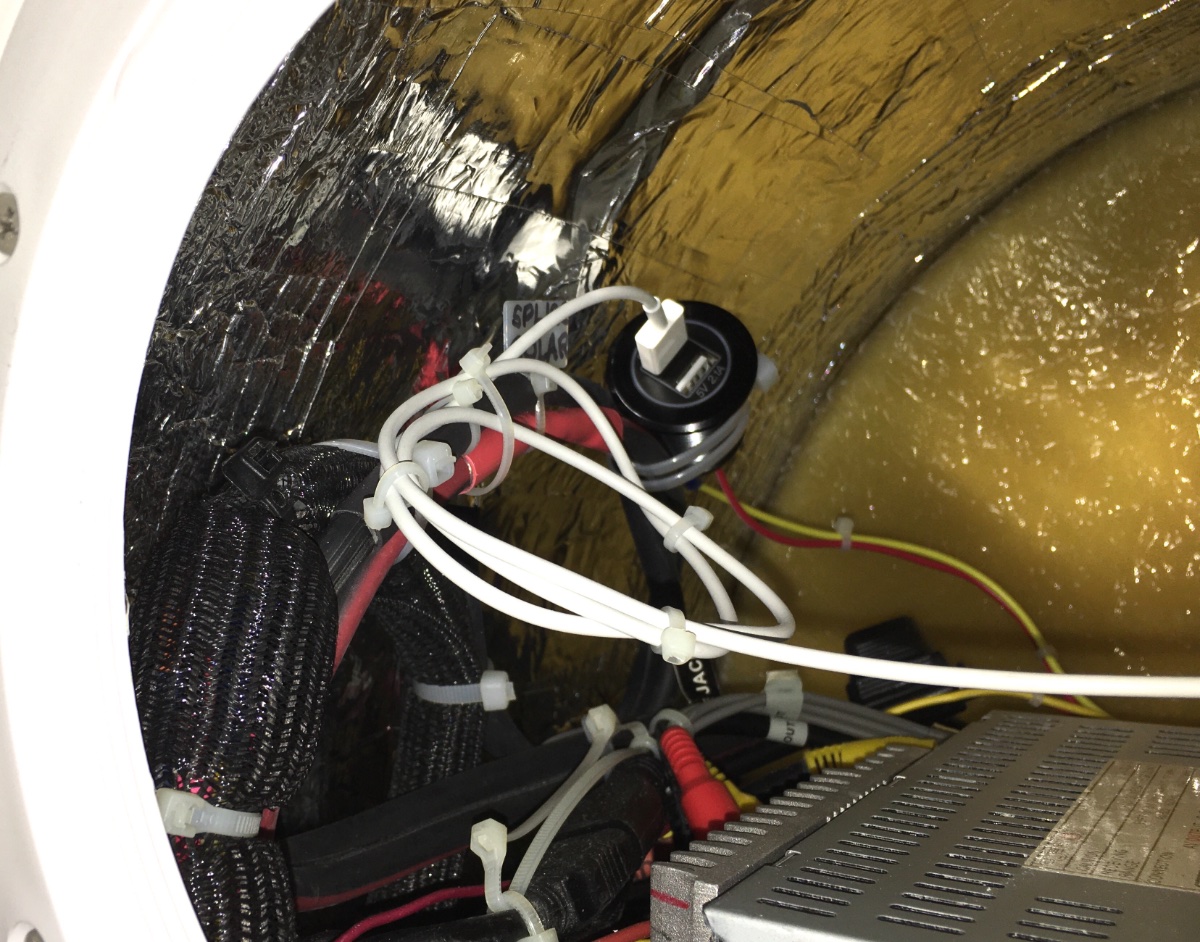
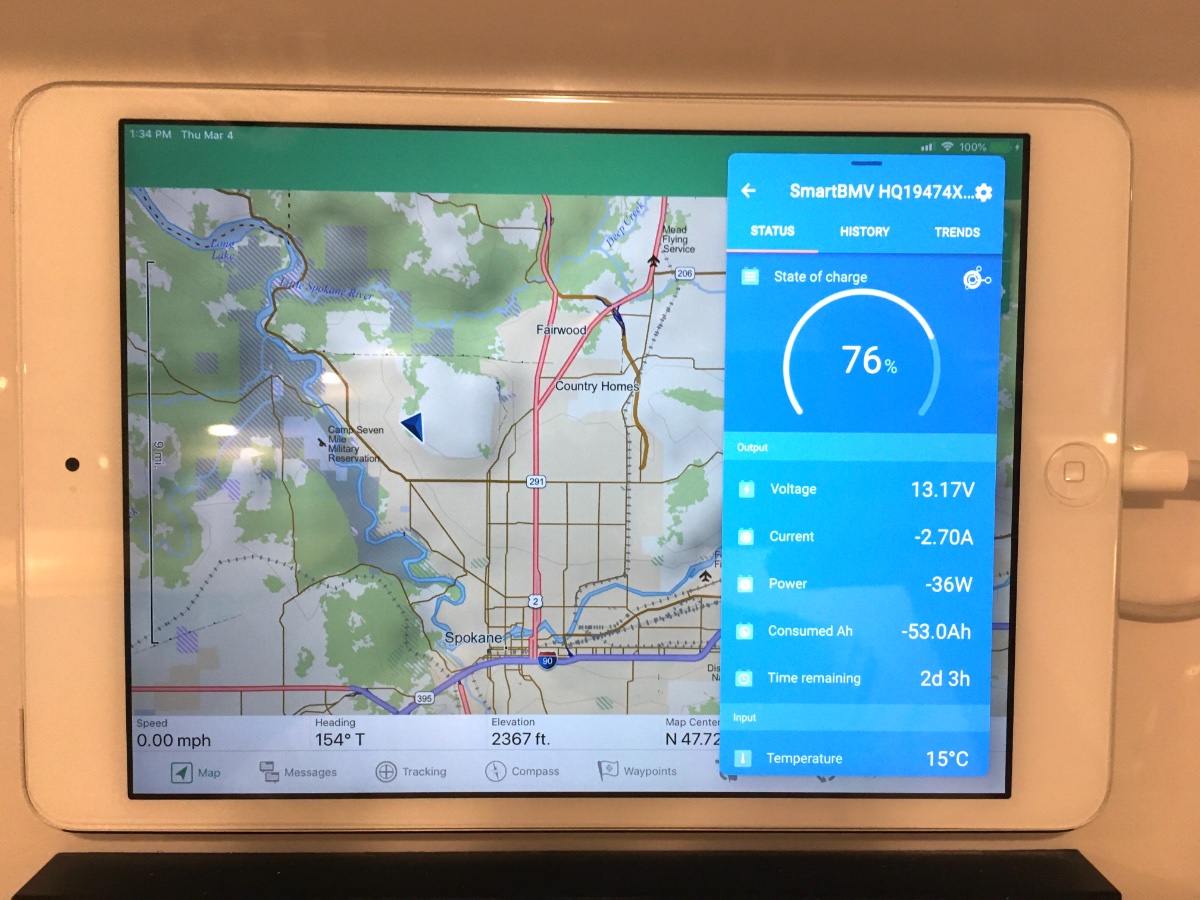
I mounted a Victron MPPT controller under the street side bed, so I had a really big hole to fill where the Zamp one used to be: Super heavy duty vecro ... Velcro Professional Heavy Grade white A 2.1 amp dual USB charger mounted inside, spliced into the stereo power wire with an inline fuse: My old iPad Mini 2 will support a Split Screen (but only a Mini 4 or later will support Dual Screen, where both windows are active). My main purpose was to have an easy to view head height display for my VictronConnect App, which shows both the battery and the solar status. I can also send or receive text messages from my Garmin inReach, view map apps, or just about anything else. This unit has a cellular chip, so the gps works, but it does not have an active cellular account, so I need to be near wifi to get new new data. OTH I can download lots of maps for offline use for my Pocket Earth Pro and GAIA Pro nav apps. Even dimmed it would be way too bright at night, so it will get put to sleep. John Davies Spokane WA

-
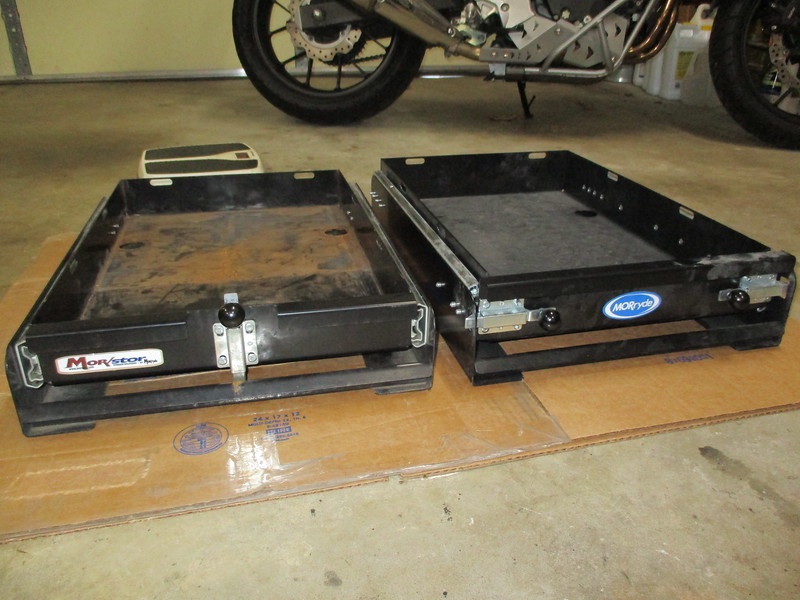
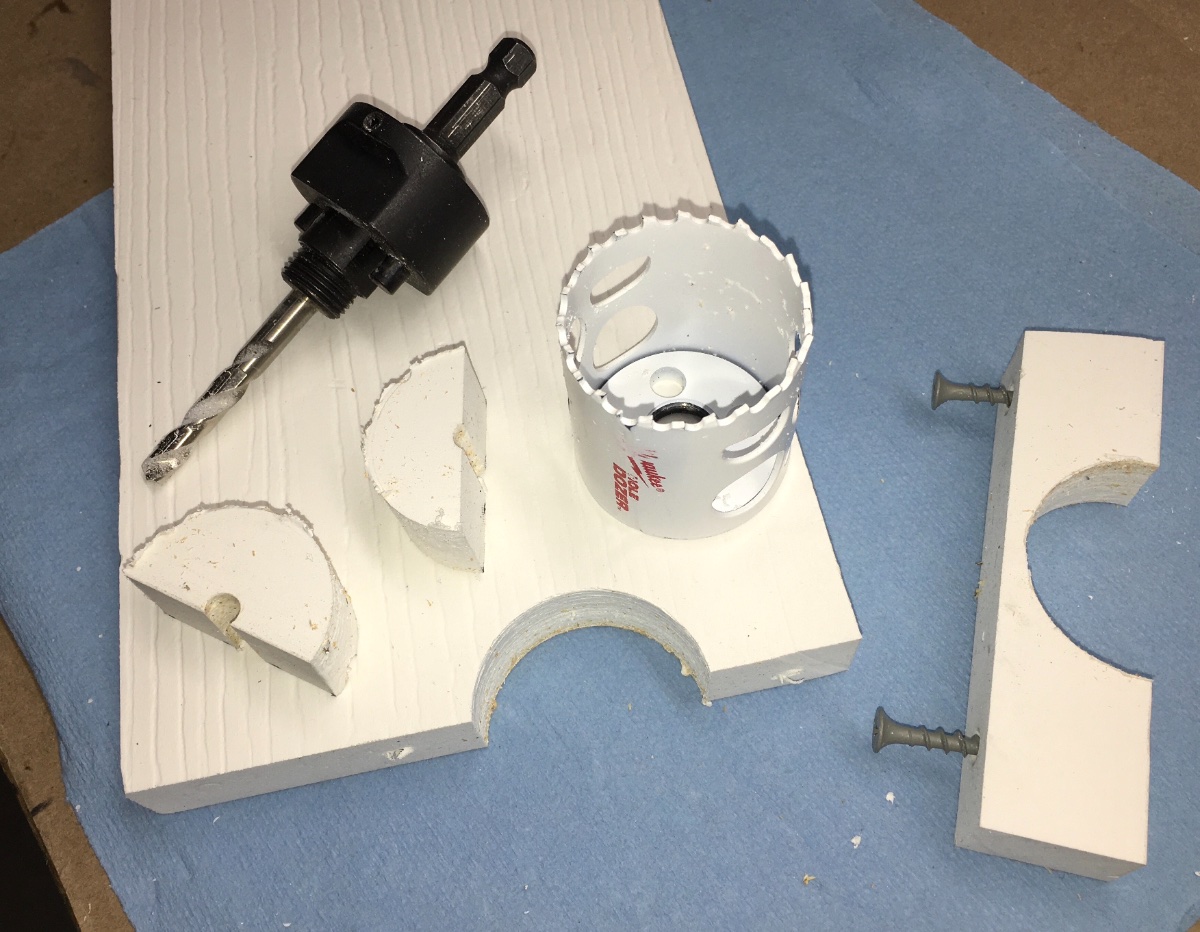
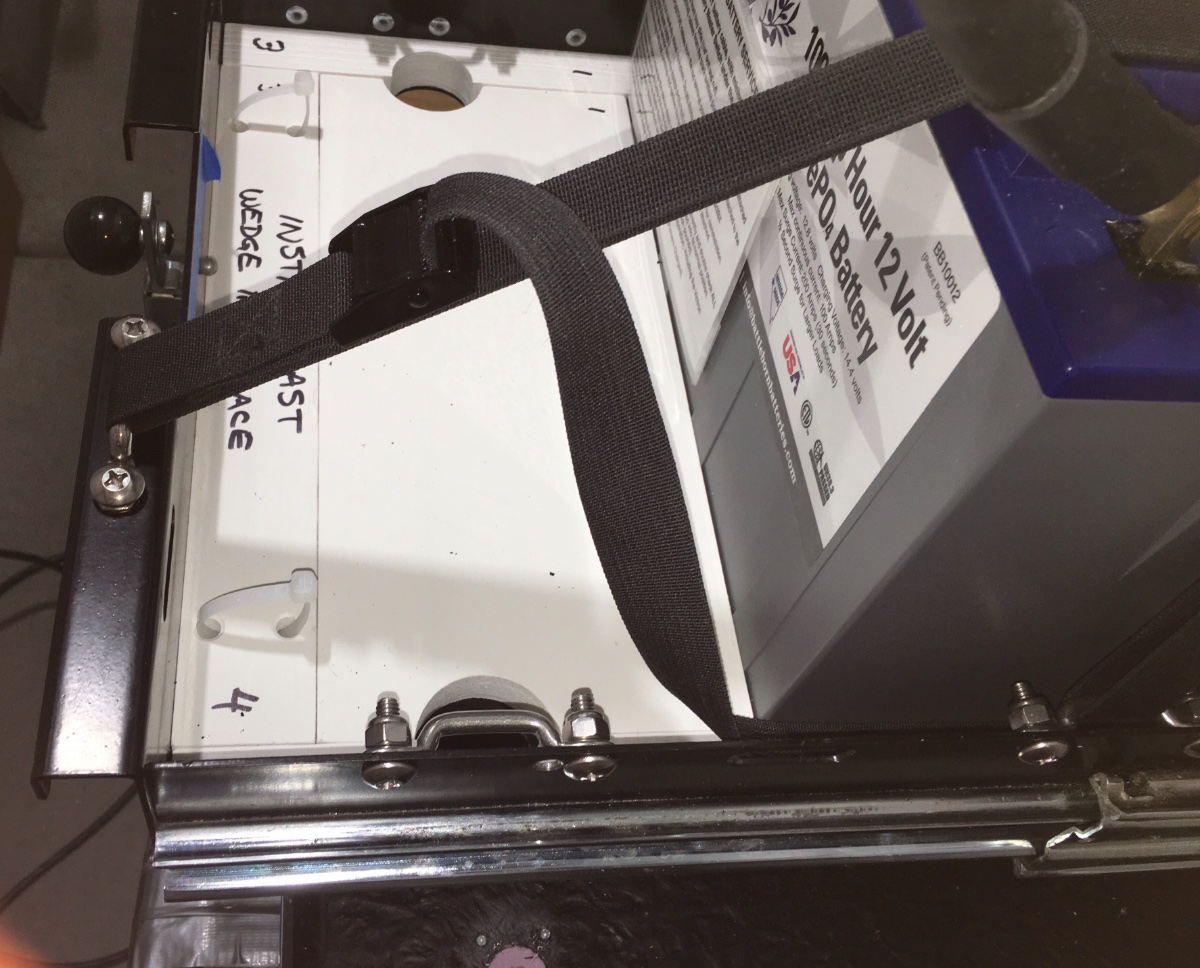
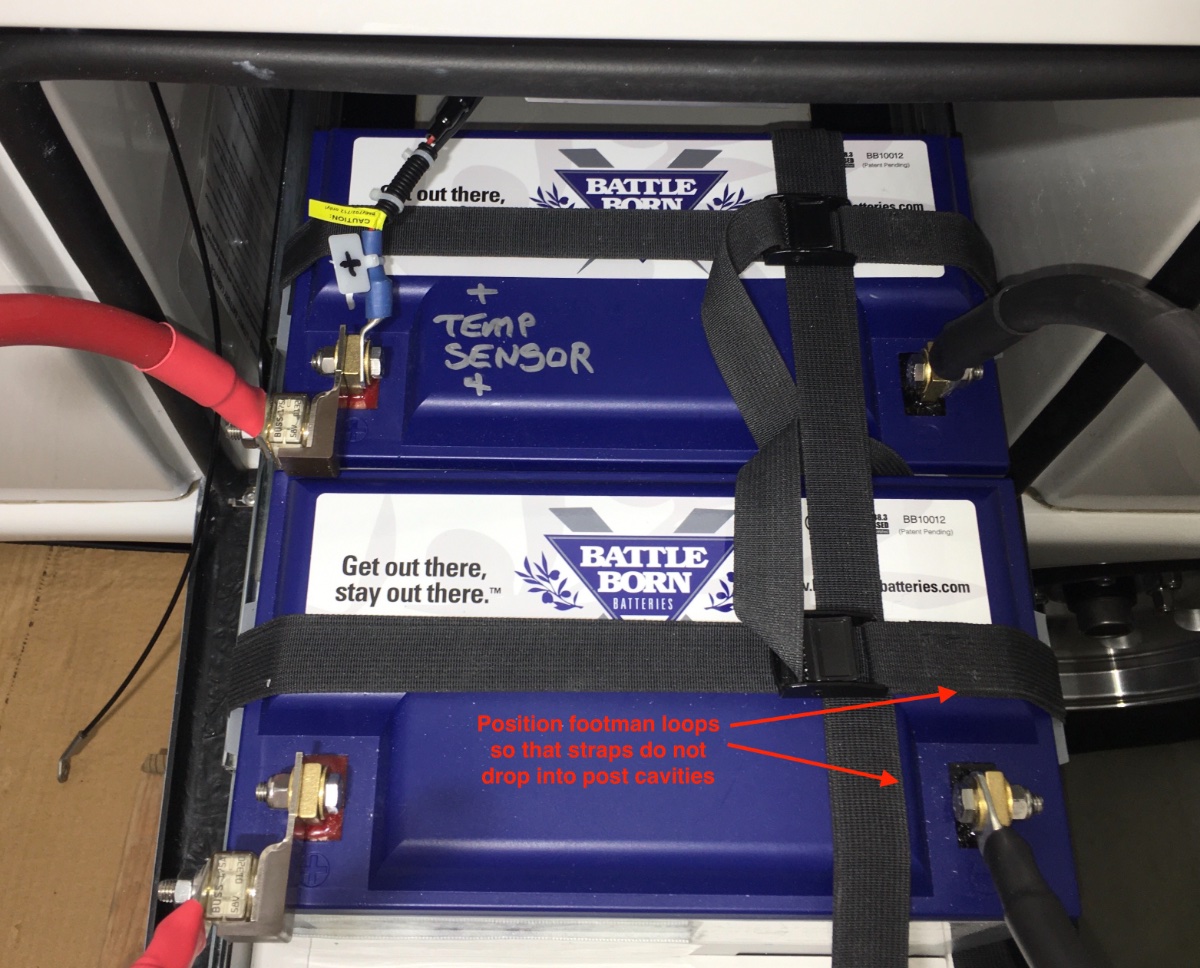
Note: This is NOT factory wiring! The standard battery tray slots may not work if you install non-standard batteries, like my two Battle Born lithium 100 AH ones. Here are the two types of trays for an LE2 - the current version is on the right, it now has two latches since the single one has been known to fracture. This was posted by an Ollie member, I cannot recall his name. I hope he will let me repost it. Note the strap slot locations. Materials needed: Straps and anchors. Once source is Amazon, there are many universal strap kits of variable quality, pick one with stainless steel parts. This would be OK: .... I prefer to use known high quality parts, especially in a case like this with thousands of dollars worth of new batteries at stake. Order these Raingler straps . ... https://raingler.com/products/tie-down-strap-set-of-4. ... which are available in Mil Spec (zero stretch). I bought the 120 inch version and cut them all to fit. Shorter ones might work for you, but allow at least twice the actual length since these double back on themselves. I used three and kept the fourth as a spare. Footman loops (again, very high quality): https://raingler.com/products/footman-mount-set ...I drilled out the holes and used 1/4"x20x 3/4" stainless screws and self locking nuts. ... Stainless Philips Truss Head Screws ... These screw heads will clear the tracks if you locate and drill the holes high enough! Nuts will not clear them. Tray spacers, inexpensive, easy to cut with a power saw, flame retardant: How to drill large air vent holes in the SIDE of a PVC board - attach a scrap: For my setup, I made a 1/4" spacer strip for the inside, and a 1/2" spacer strip for between the batteries. This leaves enough room for a third battery, and I preinstalled the footman loops for that one to make its installation easy. The front and back spacers were cut to fit, to make a snug fit. Footman loop location: depends entirely on the battery type. Make sure all straps clear any cavities or openings. I chose to install one strap per battery, and also one "fail safe" strap across all of them (side to side). This way if any one strap loosens, the battery will remain secure. FYI, my new wiring design allows the batteries to be easily removed and it also eliminates the extra length of heavy cables that can cause problems. John Davies Spokane WA
-
One option nobody seems to mention is to extend the tongue a little. The original Ollies came this way. There is no reason you couldn’t do something similar to get extra room up front for bikes (when backing especially), plus as a bonus it lowers the tongue weight. I would check with Oliver Service to see what they say, it will void the warranty for that part of the frame unless they do it for you “in house”... I would not mind an extra 12 inches of tongue, if it could be easily removed and shoved under the A frame during storage. This is my old aluminum utility trailer, I added a square steel receiver and it allowed me to quickly remove the raised Treg offroad draw bar, or swap it for a dropped 2” ball coupler. The latter extended up to 30” for carrying a canoe or long lumber. Normally it was extended 18” to allow the swinging cargo door of the RAV4 to clear it. John Davies Spokane WA
-
Easy way to repurpose an unused black tank for grey water
John E Davies replied to NCeagle's topic in General Discussion
That pump looks interesting, can you buy replacement impellers and gaskets? It doesn’t have a switch, maybe adding a waterproof one would make it safer. Does it come with silicone grease? BTW we really like to look at pictures😀 Thanks. John Davies Spokane WA -
Easy way to repurpose an unused black tank for grey water
John E Davies replied to NCeagle's topic in General Discussion
Transfer the grey water through a portable pump (with a good inlet filter) into the black tank rinse port (on the left side in front of the tires.) A simple solution indeed, except for keeping hair and food debris from clogging the filter. That could get tiresome....we need pictures please. There is also the problem of venting, the tank connects to the 1.5” black vent pipe that goes out the roof, it tees into it under the sink. If the black tank should get too full, the water will flow into the sink, and then onto the floor, and back into the grey tank via the drain. Hopefully the blade valve is open! What a computer geek would call a waste water Infinite Loop . 😀 That could be very entertaining. Maybe it’s time to revive this thread... https://olivertraveltrailers.com/forums/topic/3213-grey-water-recycling/. It really is a shame that the black tank is several inches higher than the grey one, if they were level you could gravity feed one into the other quite easily. John Davies Spokane WA -
Failed Andersen tension chain coupler - ideas?
John E Davies replied to JRK's topic in Towing an Oliver
I think the Andersen is functional and not at all unsafe if maintained correctly. No brand of weight distribution hitch is zero maintenance and frankly they are all a PITA to use. Applying spring bar tension to one like this is difficult and can remove a finger. The Andersen is however the lightest and by far the easiest to store when not in use. If I were towing a LE1 with a full sized body-on-frame SUV or any full sized pickup, I certainly would not use it. I am unclear as to why Oliver Sales seems to be pressuring every new LE1 owner to buy one.... Just say no. 😀 John Davies Spokane WA
-
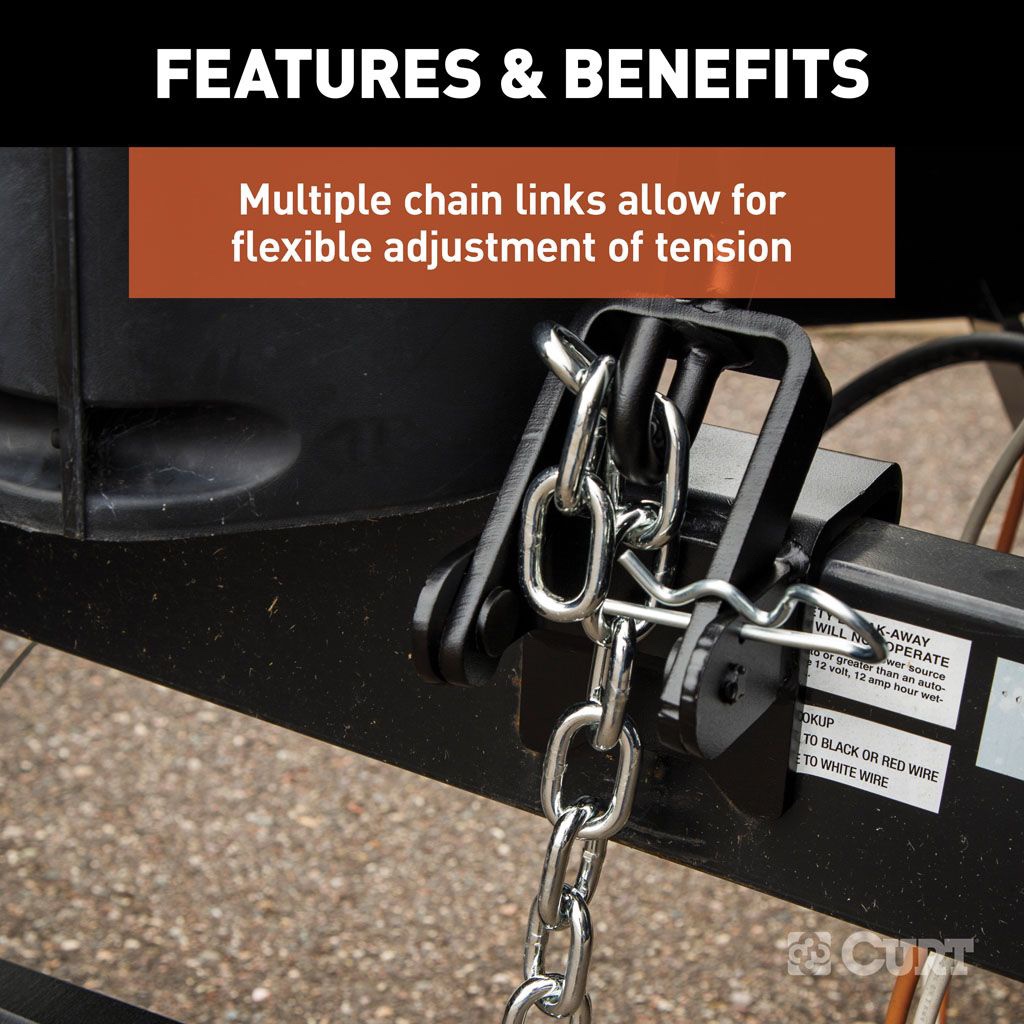
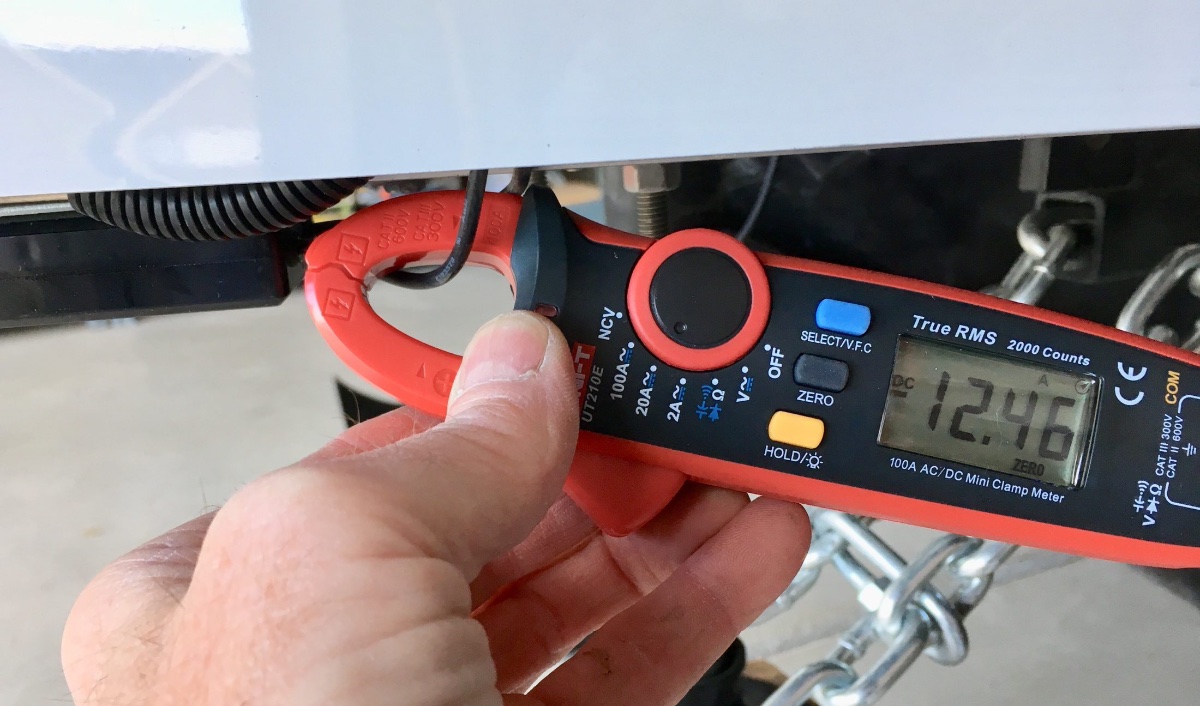
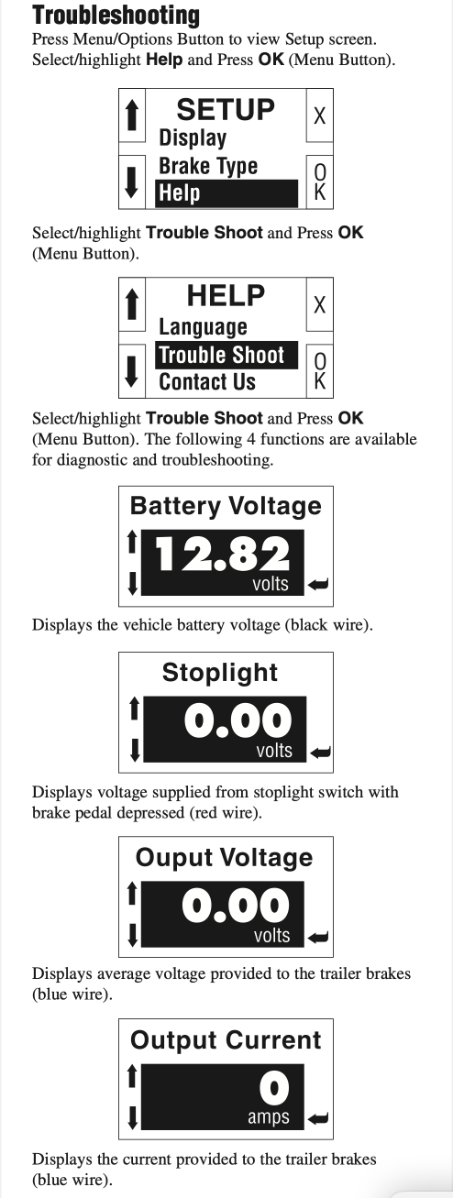
Reposting a pic from the top of the thread.... This is the DC amperage current draw for the entire four brake system, measured at the breakaway switch, with four AGM batteries and no shore power connection, with the BAS switch plunger pulled. (With lithium batteries the current will be a little lower). They are wired in parallel, which is why you see this number - the individual magnet draws of (about) 3 amps each add up. Your brake controller may only be applying 3 amps to all four, depending on how you have it adjusted and the trailer weight, but that is a different matter entirely. Many controllers don't show current, The Tekonsha P3 shows voltage. My (really) old Jordan Ultima 2020 mechanical unit (rheostat with a bicycle-type steel cable that attached to the brake pedal) showed only amps. If you have a P3, you can go into the Troubleshooting menu and get to an ammeter, it shows actual current going through the blue control wire, but this has nothing to do with the full amperage "panic stop" when the BAS is operating: John Davies Spokane WA
-
One more.... John Davies Spokane WA
-
John Davies Spokane WA
-
The granite is simply light weight fiberglass panels that velcro to the top of the standard white gelcoat counter tops. The weight difference is very minimal. John Davies Spokane WA
-
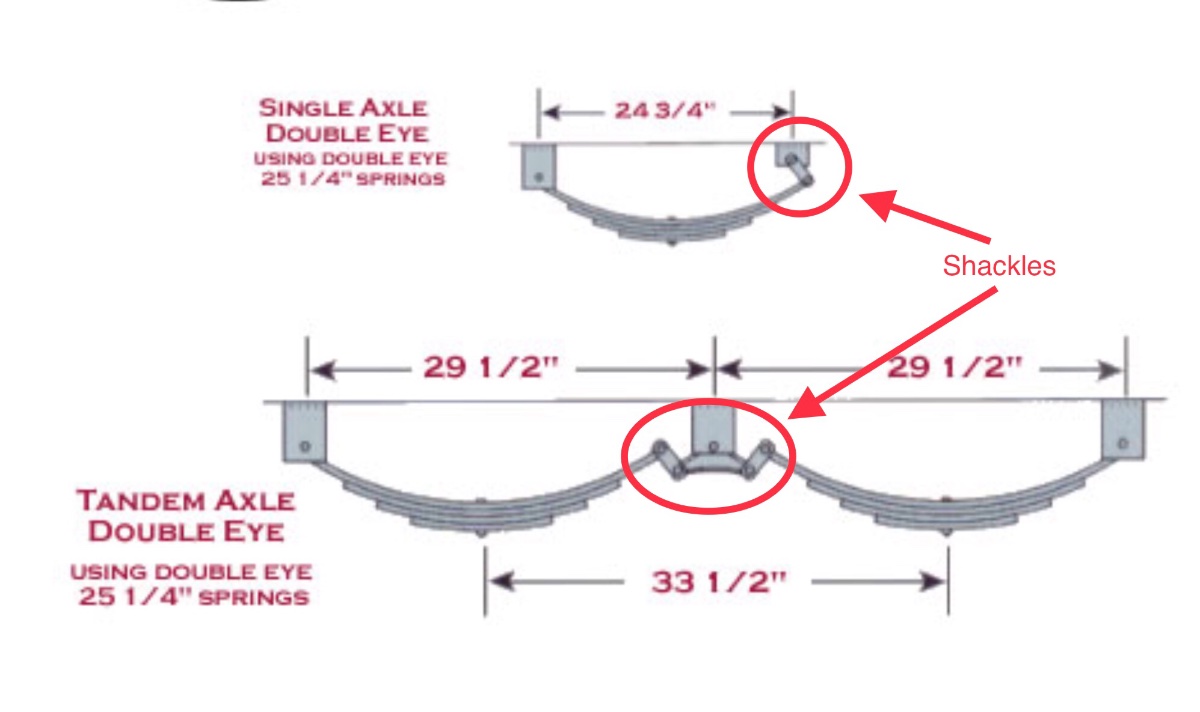
I thought I would post these pics to educate folks who don’t fully understand the suspension.... The shackles provide front to rear motion as the springs compress and extend (since their length changes). On a single axle setup there is one at the back, and it points down from its hanger (bracket). On a tandem setup there are two in the middle at the equalizer unit, and they point up. So on a single axle, if you install longer shackles it will lift the trailer frame up further away from the axle, increasing the clearance, but the opposite happens with the tandem, the clearance would actually be reduced. So it is really important to mention which model trailer you have when talking about this stuff. And this shows what a “spring over axle” conversion does.... The SOA mod provides around 5 “ of lift (using the original axles) and also a huge increase in frame clearance, so it is necessary to install rubber bump stops to protect the springs from damage from travelling too far. When you do the mod, if you instead buy new axles with a 2” or 4” offset upwards, you can decrease the lift without actually altering that wonderful gap at the tube. So you could end up with an Ollie that is lifted 1” or 3” over the stock height, with tall progressive bump stops. John Davies Spokane WA
-
Another set of threads to read concerns gps trackers, so you or the cops can find your “gone missing” Ollie. I don’t feel the need for one, however I just installed a hard wired iPad Mini 2 to use as a monitor to watch over the health and charge status of my new lithium batteries. It is the cellular model which has the built-in gps chip, so it always knows about where it is, and as long as the device is not powered down I can maybe perhaps locate it with Apple’s Find My app. Well, sort of, as long as it is close to a phone that it can connect to with Bluetooth. It is not real likely to be effective if it is locked in somebody’s remote barn (tho it always shows the last known position), but having that capability does make me feel a little better, which is what those external locks and hardware tricks provide: peace of mind. How much of that you require depends on where you store it and where you leave it unattended when camping. John Davies Spokane WA
-
Anyone have experience with this trailer dolley?
John E Davies replied to Chukarhunter's topic in General Discussion
If you get a front hitch that you plan to use just for trailer moving, have a custom one fabricated that is offset to the right by about 18”. That way you can see straight down the side of the Ollie when going straight or to the drivers left. Going right still would need a good camera or at least a human spotter. Here is a UK video showing this setup, obviously you would want the ball mount on the other side of the vehicle..... Watling Front Tow Bar Demonstration (UK) If you also wanted to use the receiver for a bike rack of cargo tray, you could have a second central opening installed. Depending on what TV you have, an “off the shelf” front hitch could be modified by adding the extra offset hole. I am unaware of any USA made units that come that way. Also, adding about 650 pounds of tongue weight to the front suspension of a light duty truck is going to be an issue, even for very short distances. A HD truck would be no problem. John Davies Spokane WA -
Hull 26 had a spring over axle configuration, correct? I agree that it is a too tall, but if it also had a 2” drop axle (with spindles offset upwards) it would be perfect. That is what the LE2 needs IMHO..... then there would be tons of room for soft stops..... Do you have a good pic of the underside that you can share? Thanks, John Davies Spokane WA
-
Source for custom size tablecloth for the dinette?
John E Davies replied to John E Davies's topic in Ollie Modifications
Nancy, can you provide a link to your Etsy page? What fabrics do you offer? Estimated cost for a fitted 24" x 28" one with elastic, in a heavier and/ or padded easy care material? FYI you could post an ad in the Oliver Classifieds with this information, targeted at Ollie owners. The elastic is a great idea, to keep the cloth in place while towing.... it would need to be notched or otherwise adjusted to allow for the tight fit against the cabin wall. Thanks, John Davies Spokane WA -
I actually was told this a couple of years back when I requested a digital owners manual for another RV brand, and when I told them I most assuredly would not release any of the info publicly, they cheerfully sent it to me, diagrams included. This was for an Earthcruiser.... which indeed have very high tech and unusual features intended for around the world travelers, like reverse osmosis grey water filtration and dc air conditioning. They sell a tiny handful of them annually and those cost half million bucks. Nothing in an Ollie is remotely out of the mainstream for a travel trailer. The lithium package is neat, but definitely a work in progress, and other makers already offer one. So......? Keep digging owners. It is time to contact the boss man. A true solution awaits. In your shoes that reply would really get me worked up! 😳 John Davies Spoksne WA
-
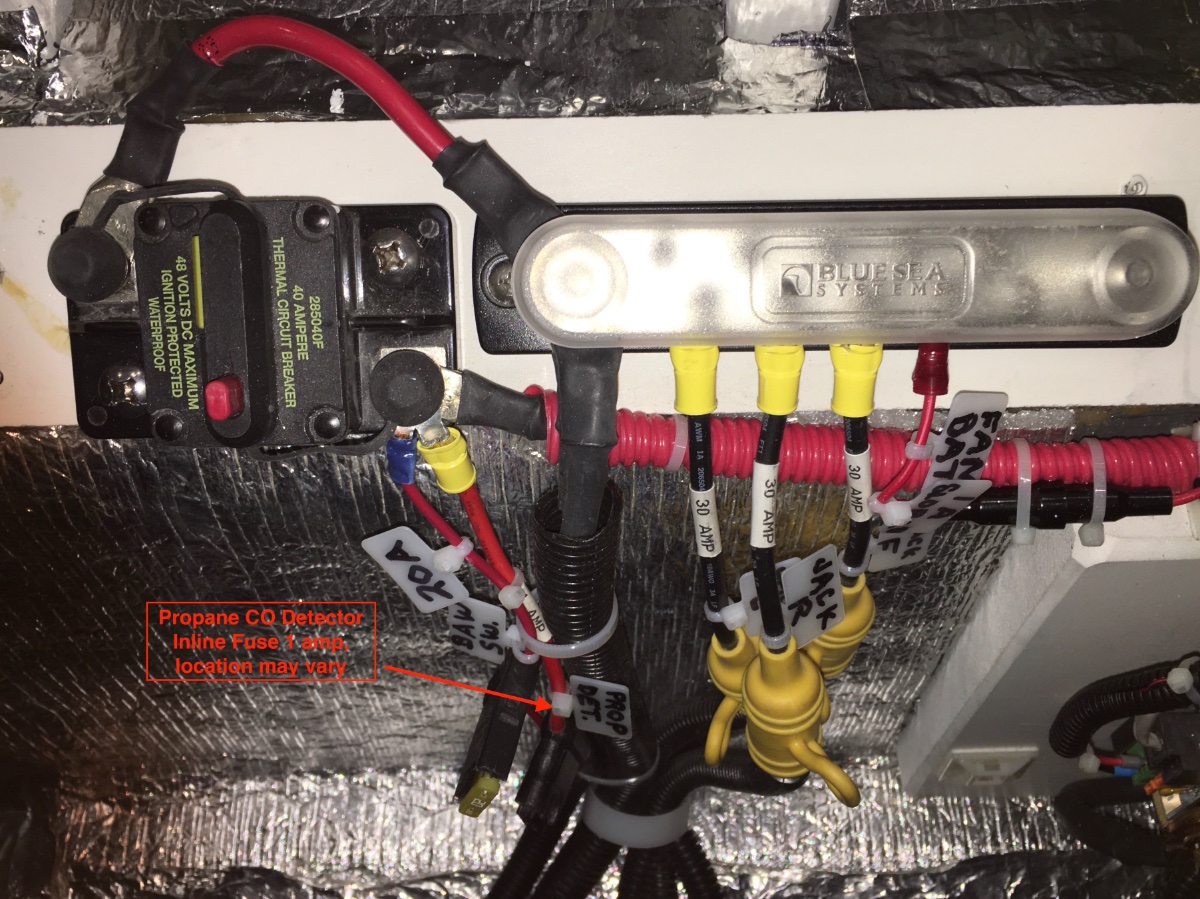
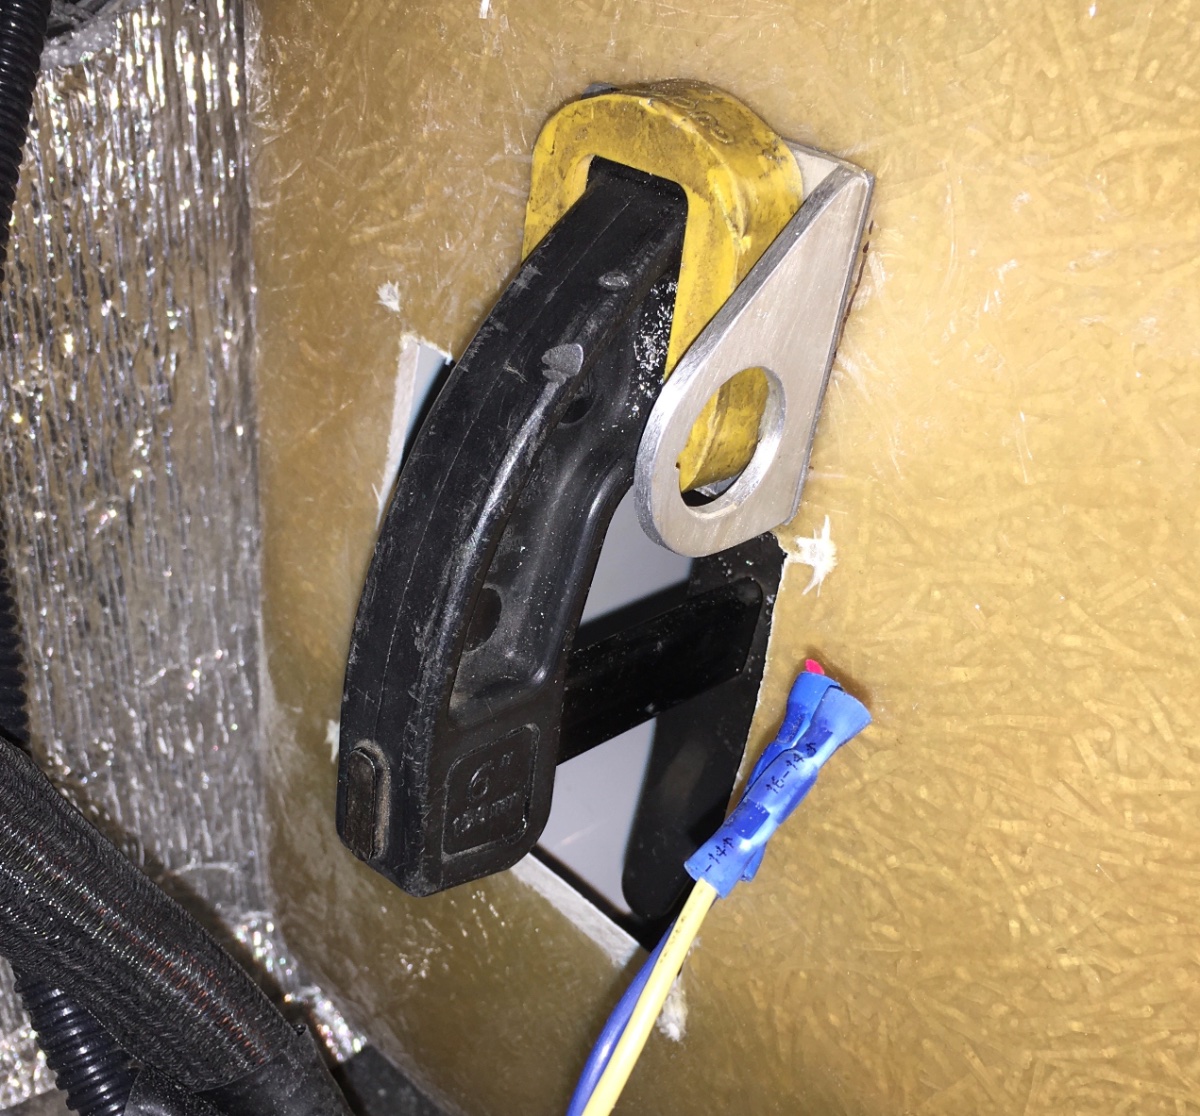
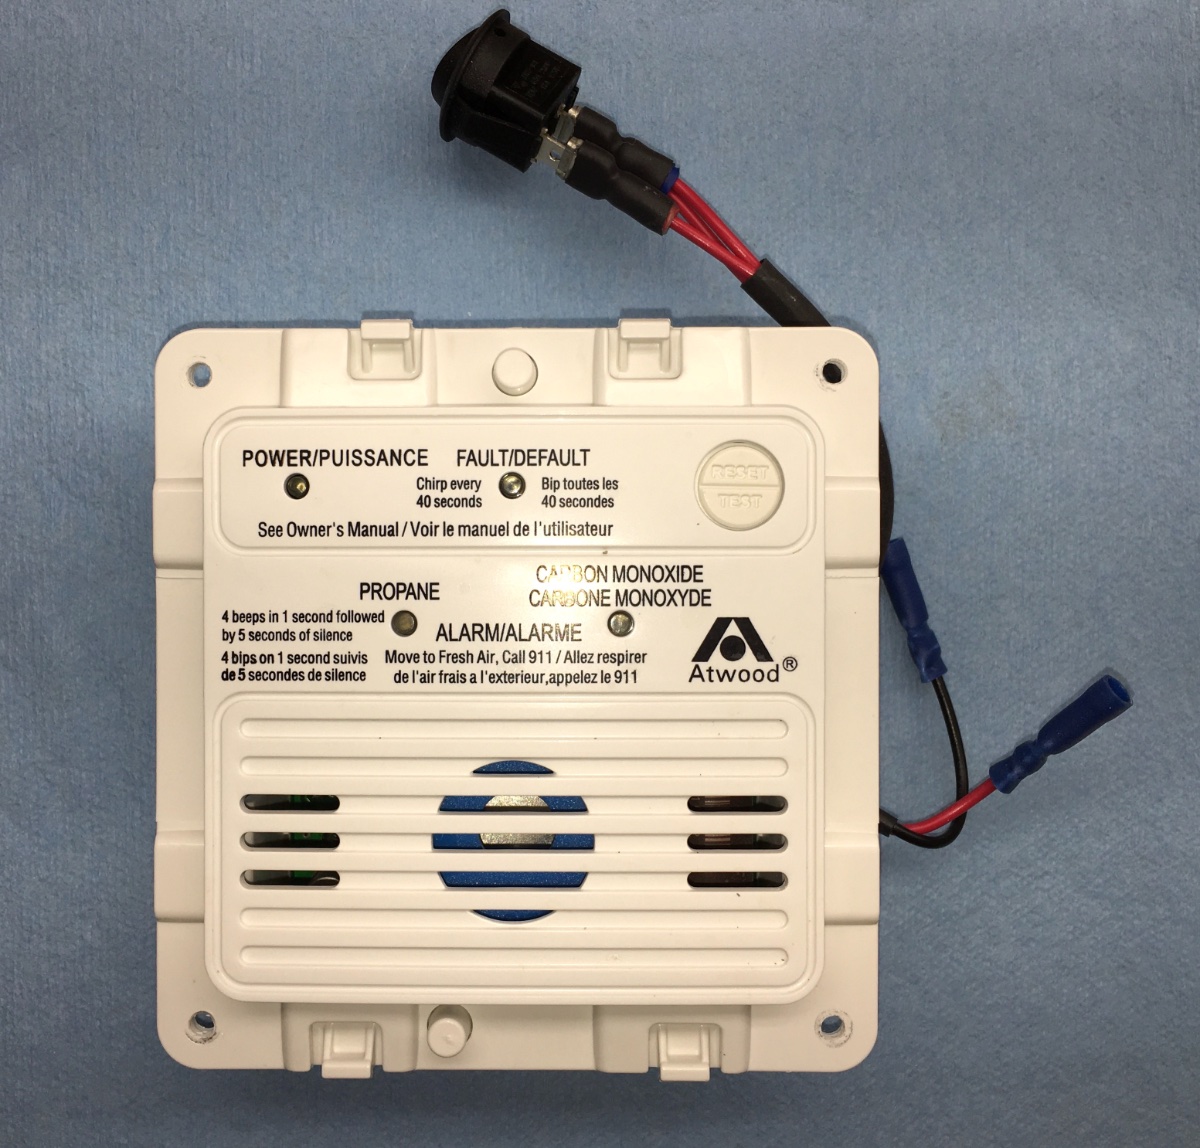
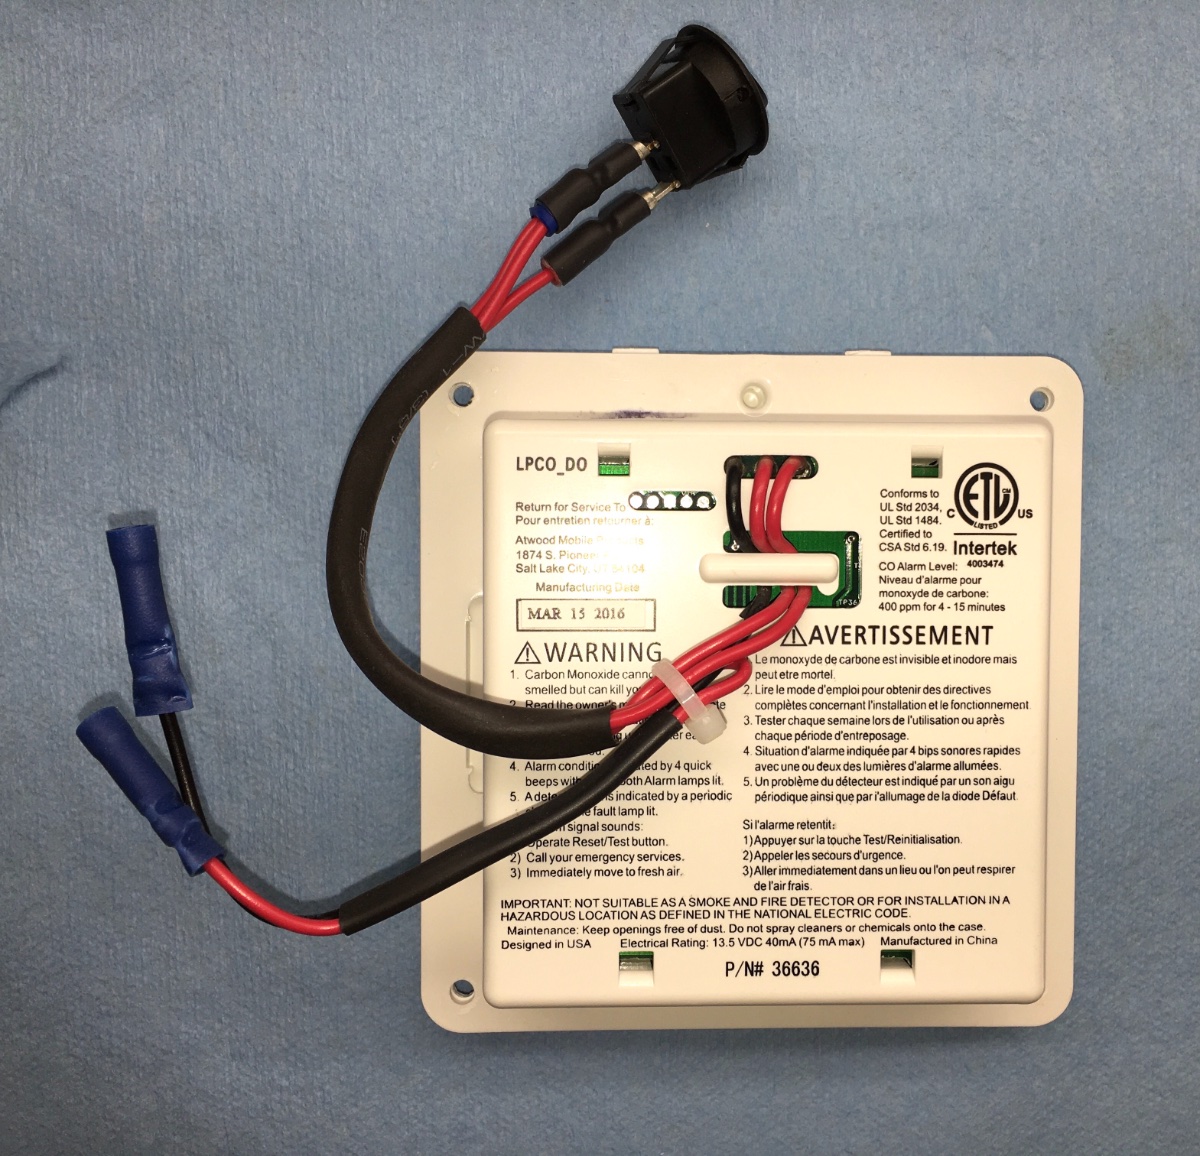
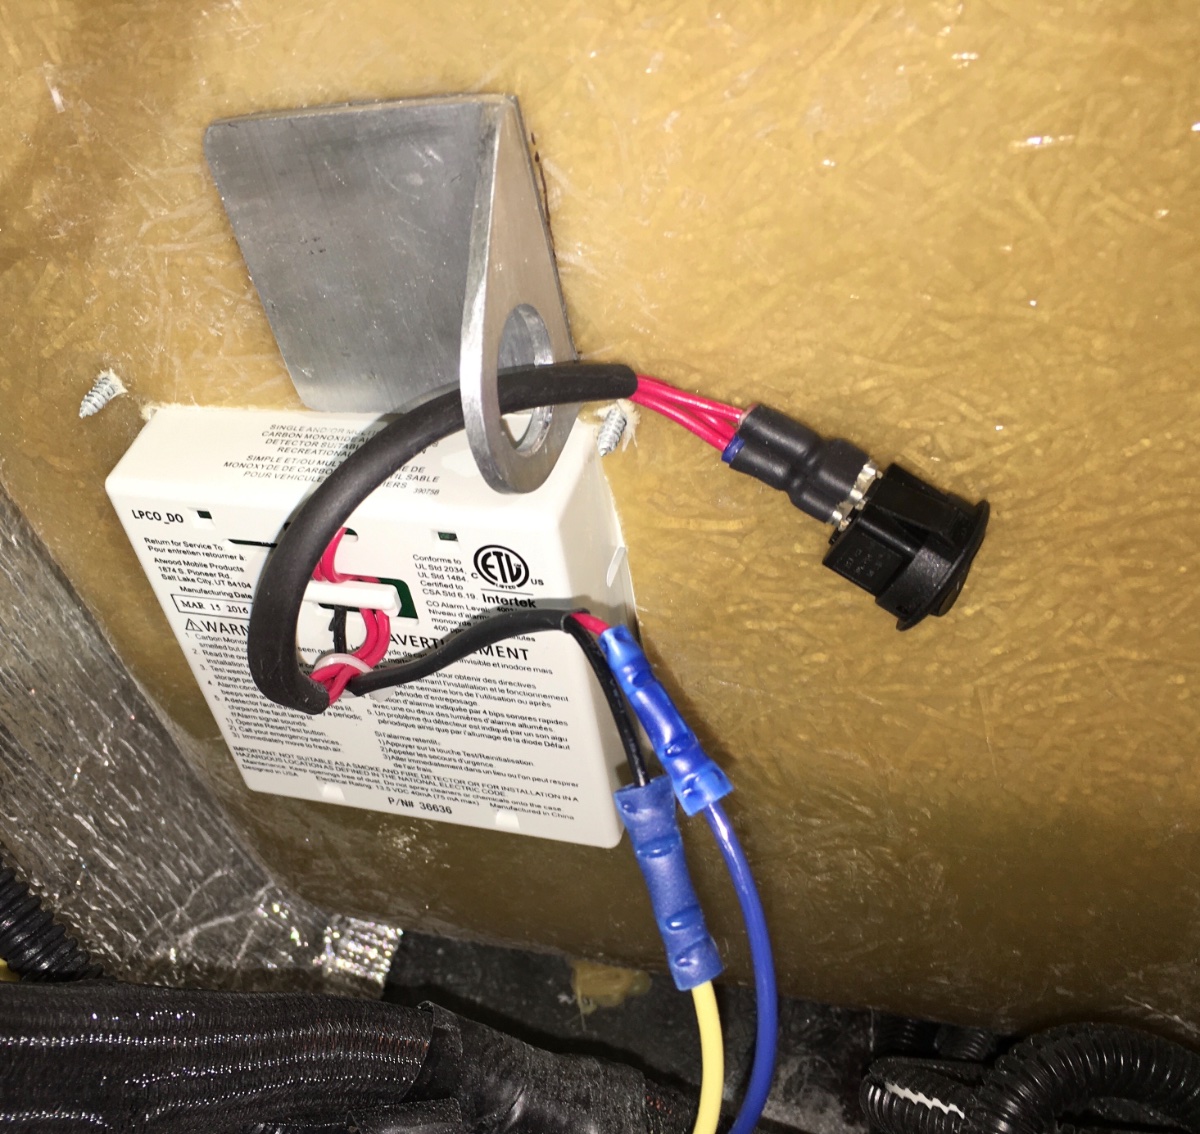
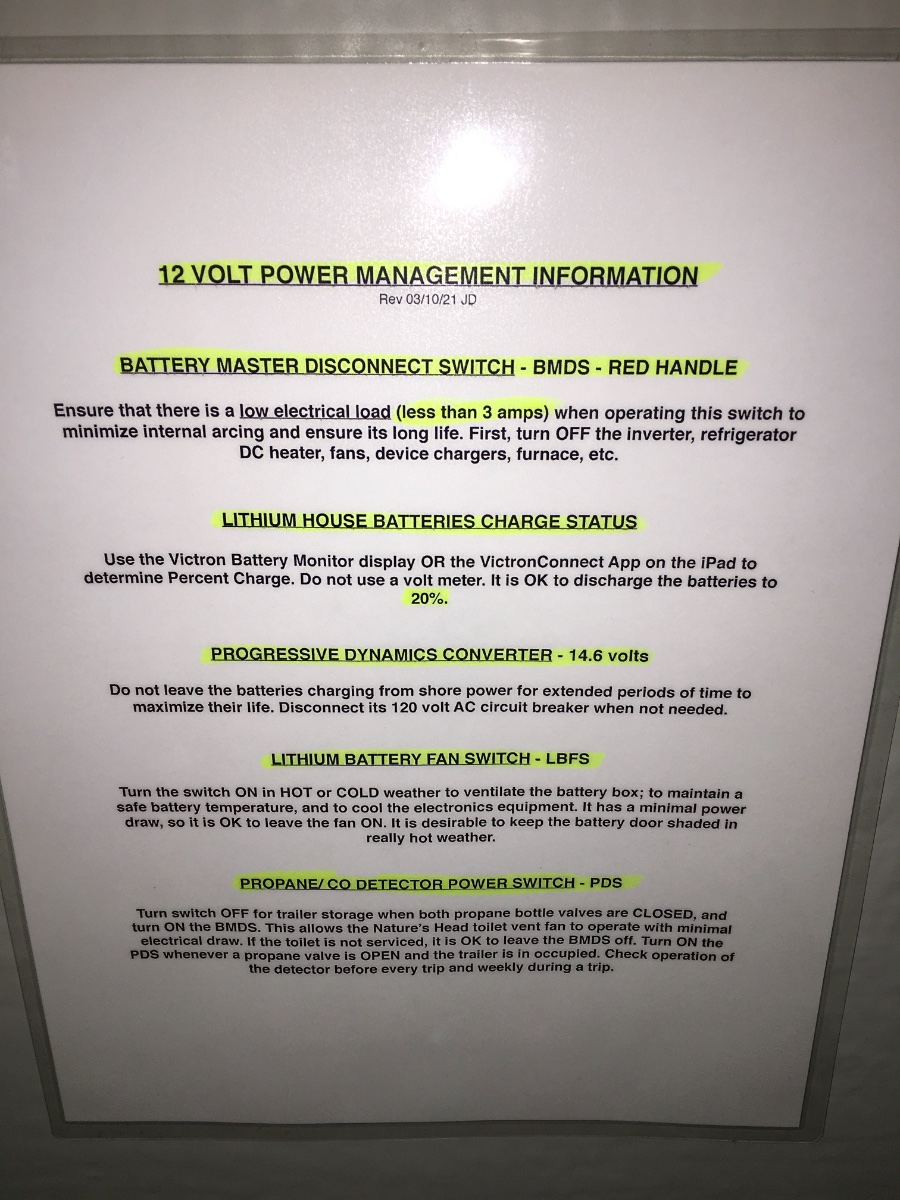
The detector uses a little bit of power, about 0.05 amps, even when everything else is turned off. Normally that isn't a worry, unless you want to keep the batteries connected long term and you are not plugged into shore power. A little drain over many months can flatten a battery bank. Plus it is nice to be able to silence a nuisance alarm or a failed unit by switching it off rather than locating and pulling its fuse (which is at the 12 volt DC bus under the rear street side bed). Here is mine, the location WILL vary because I moved mine to the back a foot, but the wire comes off the manual reset circuit breaker. I added the labels. The Oliver wire does have a factory installed label "1 amp" but it doesn't identify the purpose of the wire! Remove the fuse or disconnect the batteries! Remove the unit (4 screws) and cut the wires. Make a little bracket from 6061 T6 2" x 2" x 1/8" aluminum angle, and secure it to the compartment wall with 3M VHB (Very High Bond) tape. Epoxy would also work fine. The switch is a simple, non-LED On/Off SPST switch that matches the other Ollie switches. It requires a 0.800" hole, which can be made with a step drill AKA Uni-Bit. https://www.harborfreight.com/3-piece-titanium-nitride-coated-high-speed-steel-step-drills-91616.html Any type of switch will work because it is not normally visible. It is similar to this illuminated model: I used the existing Red for positive and Black for ground detector wires. The factory harness has a Blue positive and Yellow ground. Unplug the switch. Splice the new harness into the old one, working outside the compartment (under the table). I was able to discard two feet of extra wires. Install the detector body into its hole. Feed the switch wires through the round hole and mount the switch (it presses in with two retaining clips). Note that it has a little plastic "key" under the lip, that needs a matching notch in the hole, or else just file off the key entirely. Cover the wires with plastic split loom and secure them with cable ties so that they don't flop around. The switch could be located anywhere, but this spot makes it quite simple. A location on the outside of the compartment would work, but it would be possible to turn it off by mistake, which could be dangerous or fatal. Put it somewhere out of the normal traffic flow, and not in a storage compartment where loose gear could bump it! You still need to check the unit for proper operation before each trip and then weekly. Finally, adding a switch violates the RV build codes! Do this mod only if you fully understand its benefits and its potential risks. Because of my extensive mods, I added a BIG information placard under that access cover, it includes information on the Propane Detector switch. Something similar to the last paragraph might be prudent. John Davies Spokane WA
-
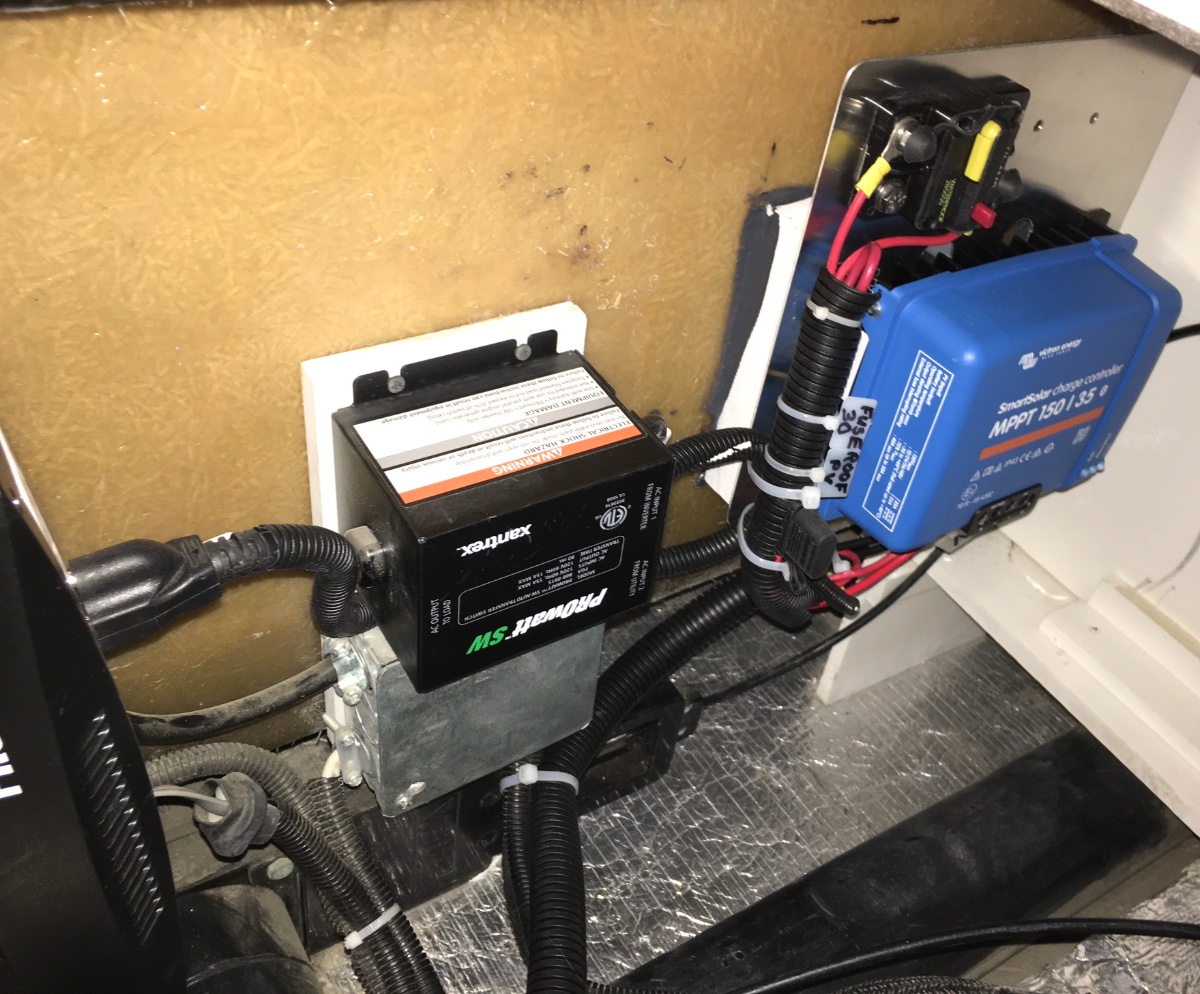
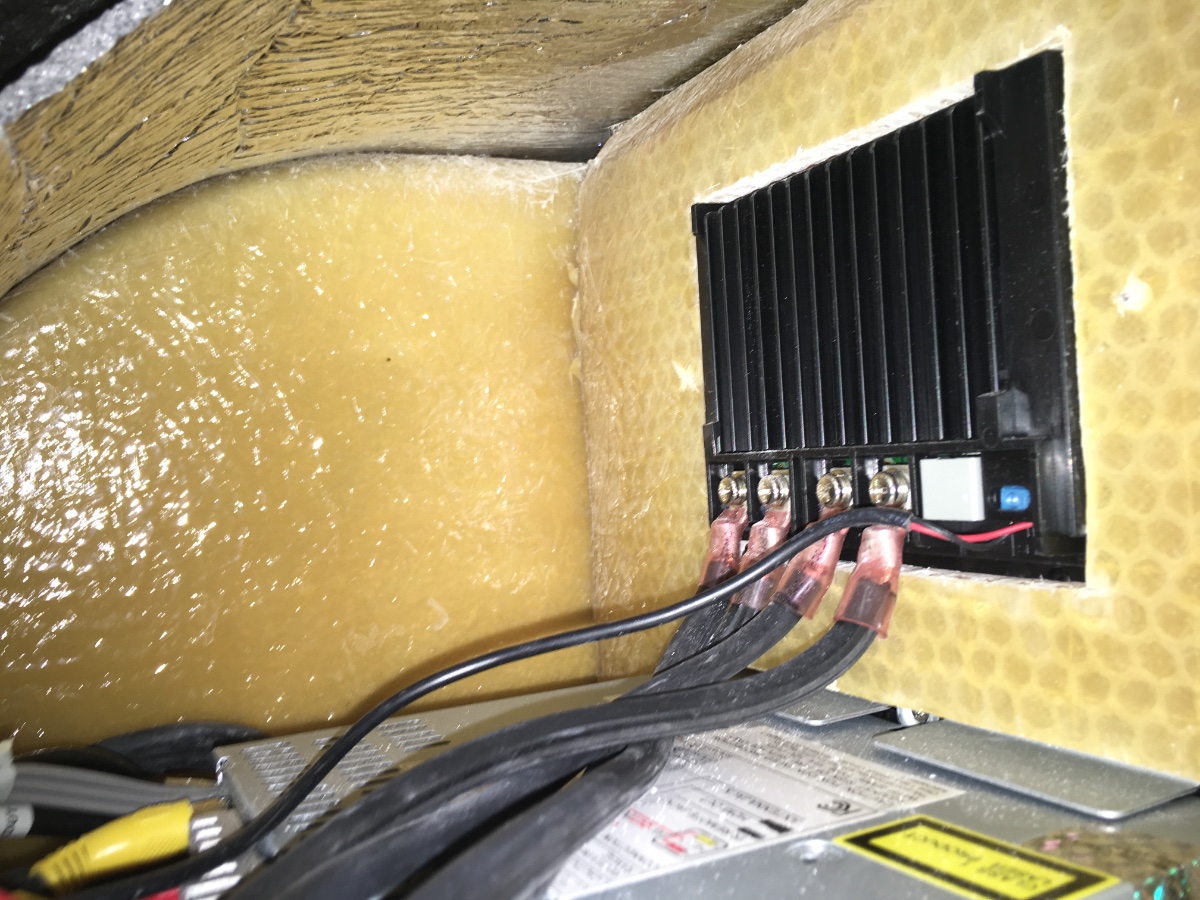
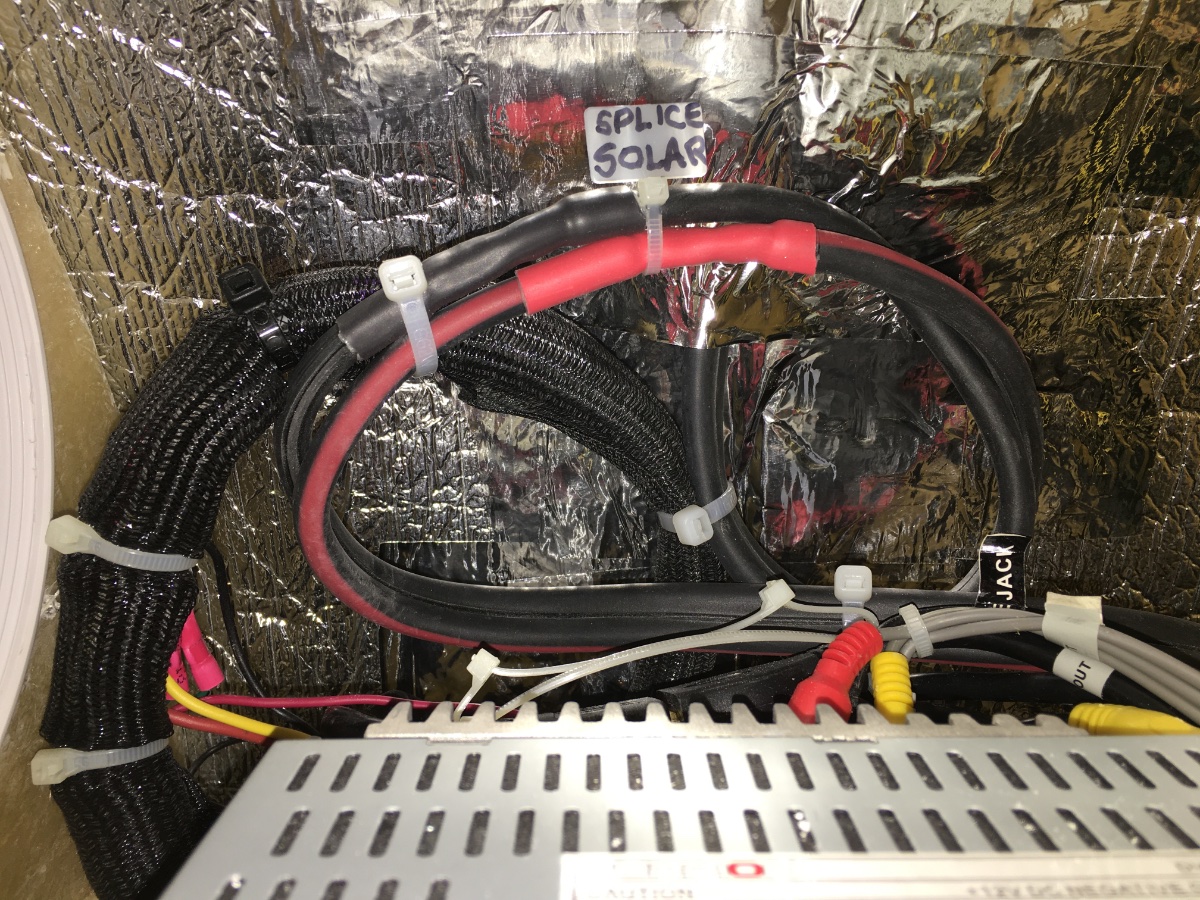
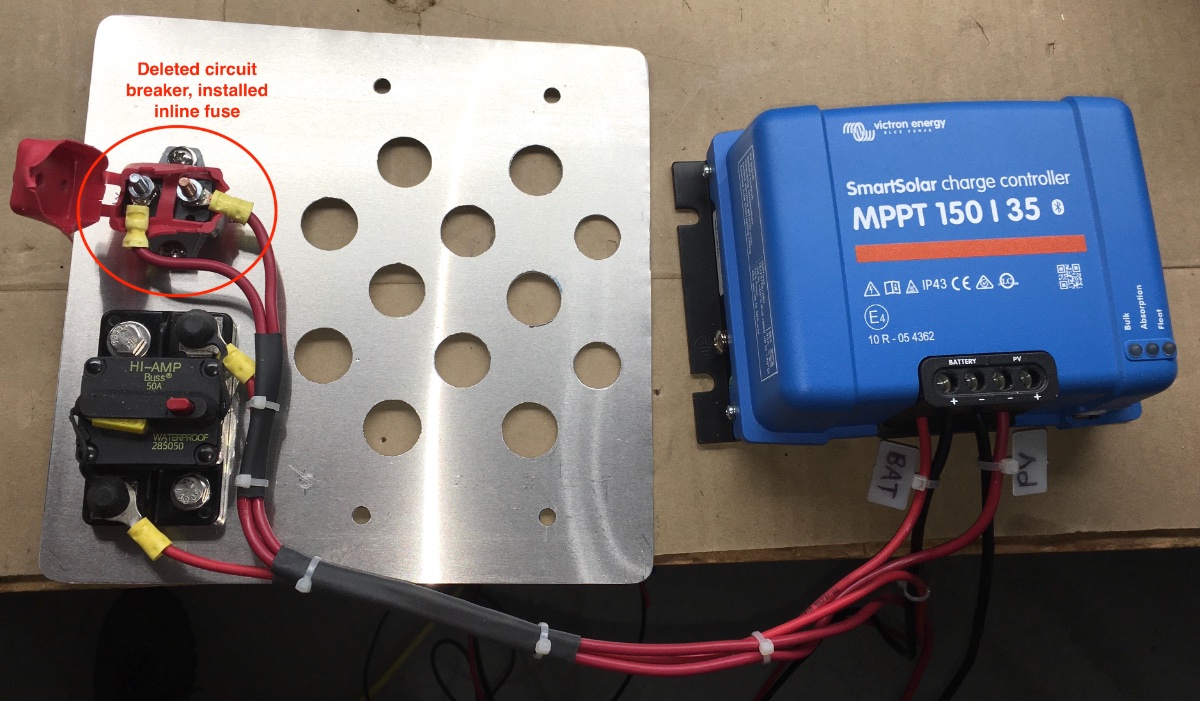
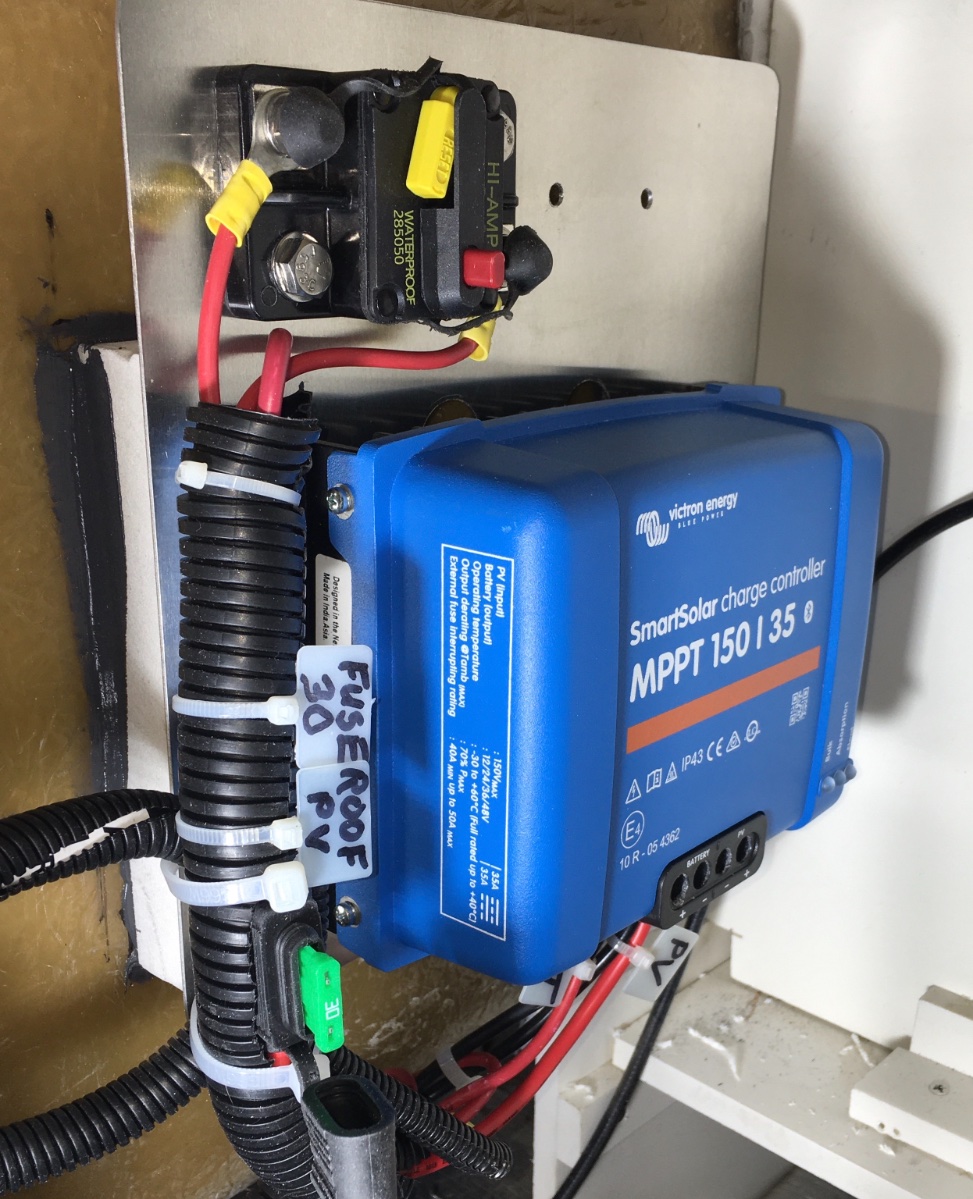
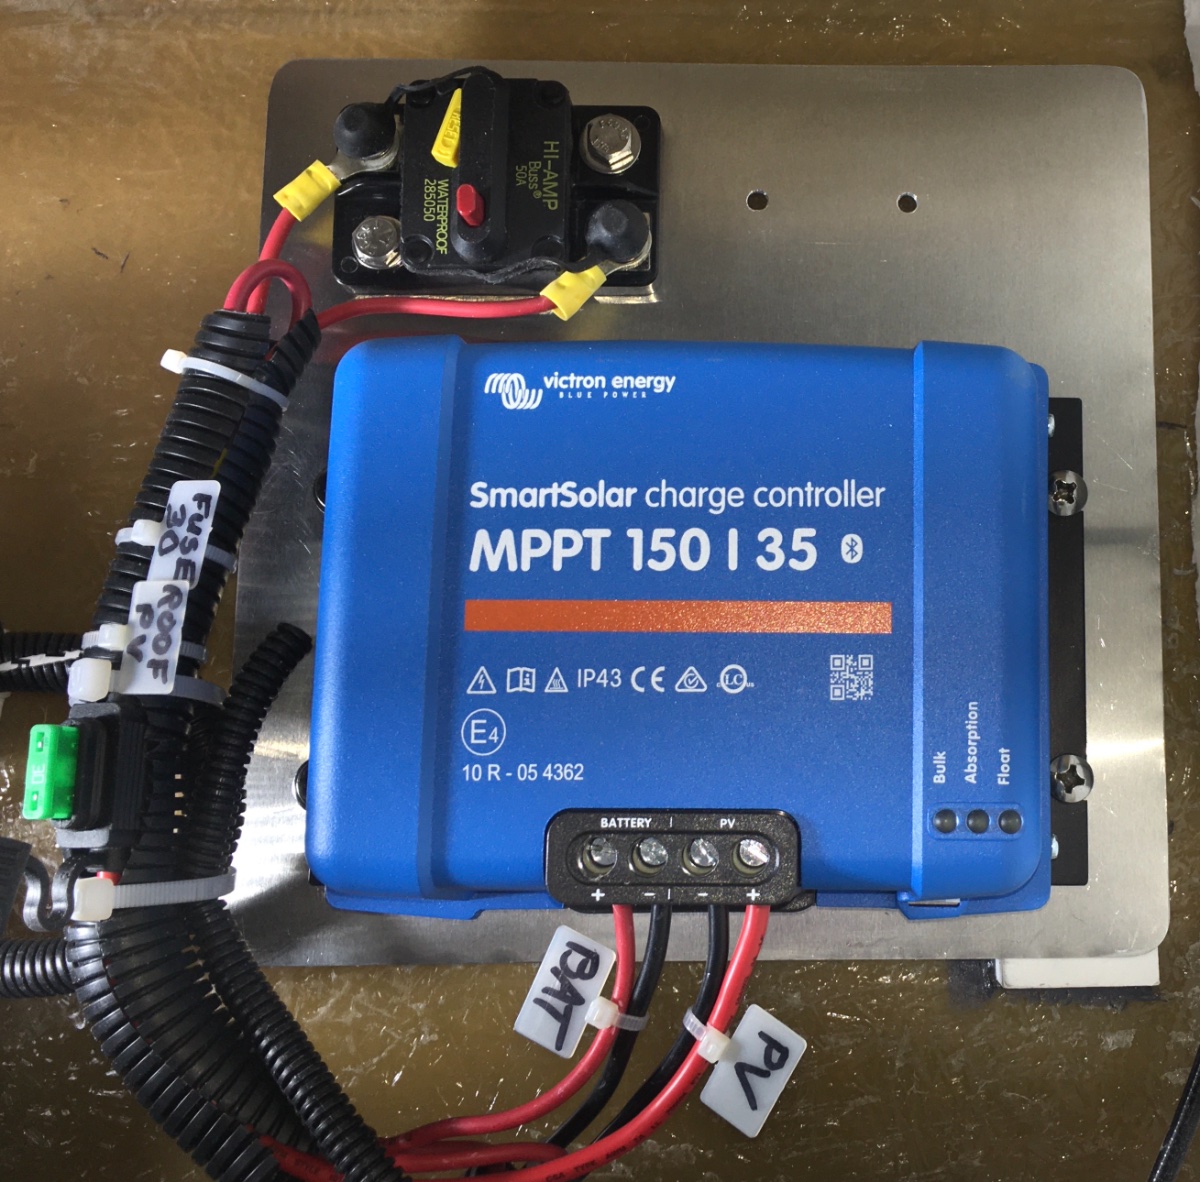
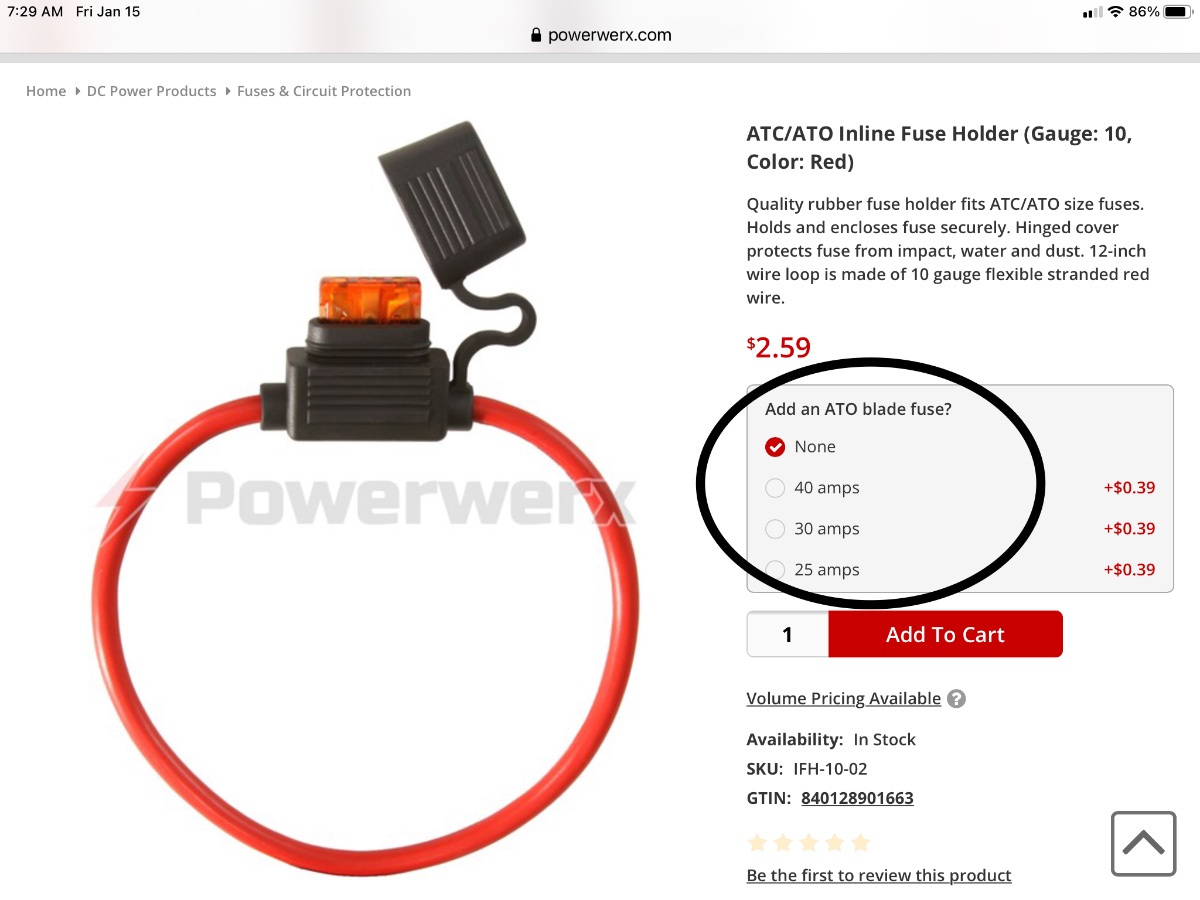
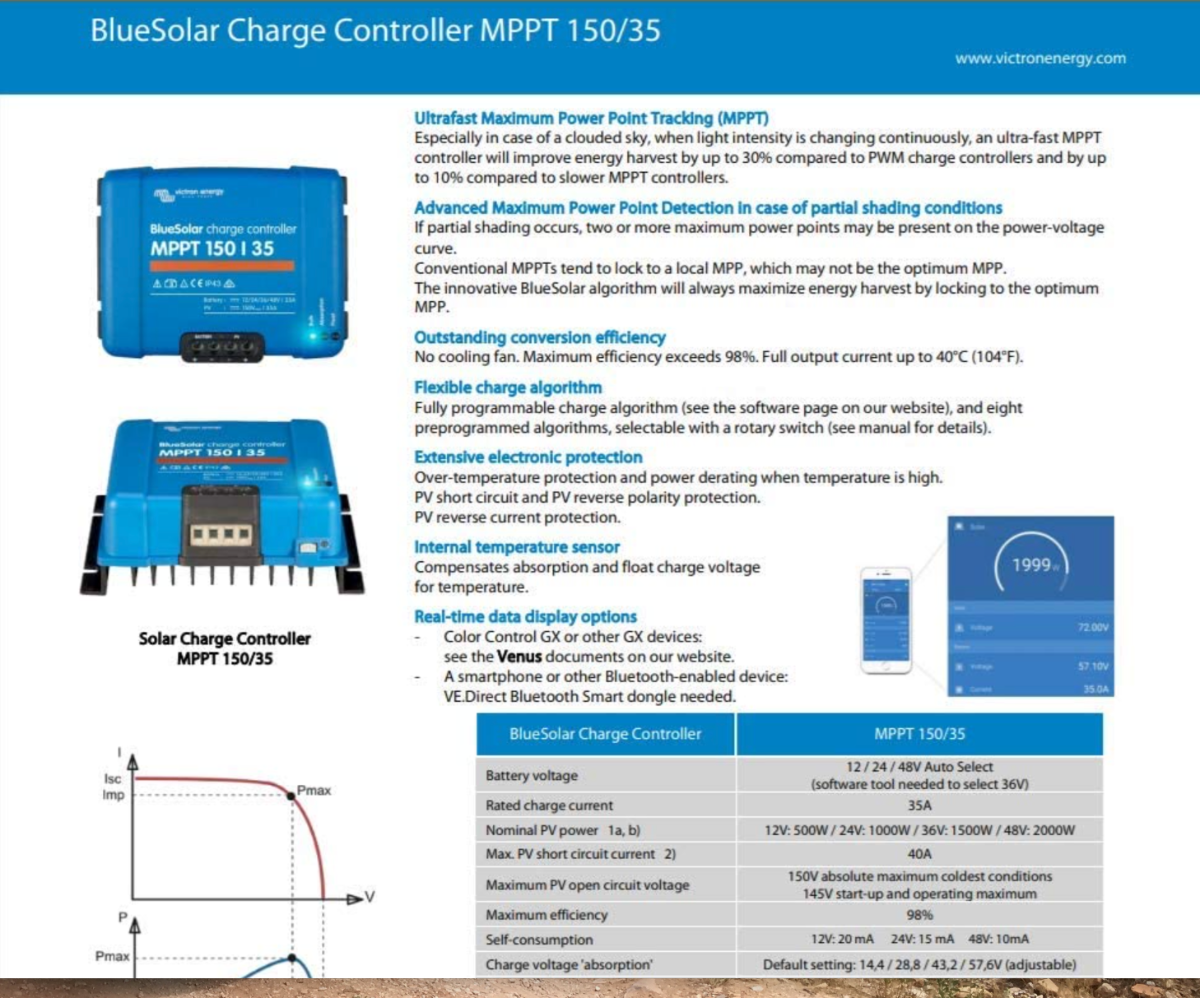
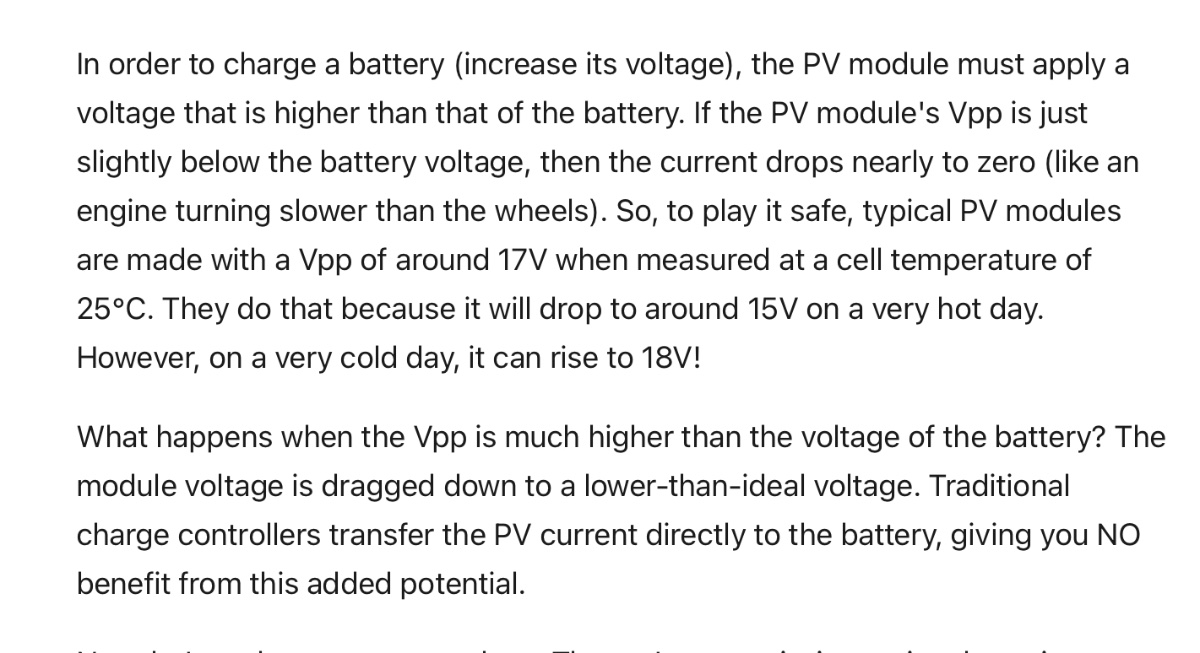
Remove the Zamp unit from over the stereo head - two input wires (from the roof), two output wires (to the battery) and the small temperature sense probe wires Cut off any excess length and then splice the two sets of cables together and secure them. This little cable tie is good for making I.D. labels. Drag the temp sense cable down into the lower compartment, you can sell it with the used Zamp controller. It has a value of about $35 new. Add extra aluminum tape if needed to seal and secure the wall insulation. The location I selected is a great spot for a big ventilation hole, an air intake for my Lithium Battery Box Powered Vent System , so I needed to add 1" thick HDPE spacers to let air pass through, using JB Weld epoxy, clamped overnight: I made a mounting plate from heavy sheet aluminum, drilling holes to allow air to get to the bottom of the control unit. I originally planned to use the Oliver installed self reseting circuit breaker, but decided that an inline fuse would be more reliable. The manual circuit breaker on the output wire is similar to the Oliver one installed across the gap on the DC bus. It allows you to disconnect the solar input by pressing the red button, and it is reset by closing the yellow arm back inwards:: This is the inline fuse, it is very nicely made and has heavy enough wire. It will handle up to a 40 amp fuse, I installed a 30 amp ATC one: Victron SmartSolar Charge Controller MPPT 150/35 brochur:e Victron Charge Controller 150:35.pdf This is pretty technical, it shows the Zamp roof panel charge curve, I added some data points showing where a lead acid and a lithium (LiFePO4) battery open cell voltage would appear. A lithium battery has a higher operating voltage, so a regular PWM controller is not as effective as a more sophisticated MPPT one that is able to alter both output voltage AND output current. A PWM unit is connected directly to the battery, and it simply switches on and off very rapidly to control the current. It is very crude, but inexpensive and reasonably effective under optimal conditions. I grabbed these descriptions from solar website, I cannot remember which. It and the following one offer some interesting comments: Temperature sensing charge control - the Battle Born batteries do not require (nor can they use) this function, it is built in to the batteries' onboard Battery Management Systems (BMS). However, by installing the optional battery temp probe that connects to my Victron BVM-712 Smart bus, the VictronConnect app will connect using its Bluetooth network with this compatible "smart" device. When I look at the app screen, the battery temperature is shown on both the Solar page and on the Batteries page. That temperature reading is very helpful in monitoring the health of the batteries. Settings: using the app you can alter a whole bunch of parameters. The important one is the charge absorption voltage. I set it to 14,.4 volts, a little lower than the Battle Born recommended 14.6 volts. I have read that a slightly lower voltage is healthier for those batteries, while not significantly affecting their actual capacity (percentage of charge). This is the same reason they recommend that they are not left continually "cooking" at 14.6 volts from shore power and a charger like my Progressive Dynamics one, it diminishes their life span. https://battlebornbatteries.com/programming-a-victron-smartsolar-charge-controller/ John Davies Spokane WA
-
It sounds as if somebody dropped the ball in Hohenwald, neither the 2020 nor the 2021 online Owner Manuals have any wiring diagrams (only a battery hookup one)..... but you can look at the 2019 images (starting on page 38) and that will give you a general idea. There are a few mistakes on the Oliver University pages, but mostly they are omissions of little things like a fuse box pamphlet. Electrical diagrams are critical, and needed by any owner or RV tech that is trying to troubleshoot or repair a problem. I personally would be quite upset if I had none, and especially so if I had to wait a couple of years to get them. Maybe it is time to get on the phone and raise a little hell? Figuratively speaking. John Davies Spokane WA
-
Any advice? I found this one, they do custom sizes and will provide fabric swatches. I currently use a small bedsheet folded into quarters. It is 100% functional but hardly pleasing to the eye. https://www.tableclothworld.com/aboutus.asp “Make your own”.... yes, that is an option, I prefer straight seams though. BTW this might be a good side business for an Ollie owner that likes to sew. Thanks John Davies Spokane WA
-
Finally . . . . . getting a generator!
John E Davies replied to Ray and Susan Huff's topic in General Discussion
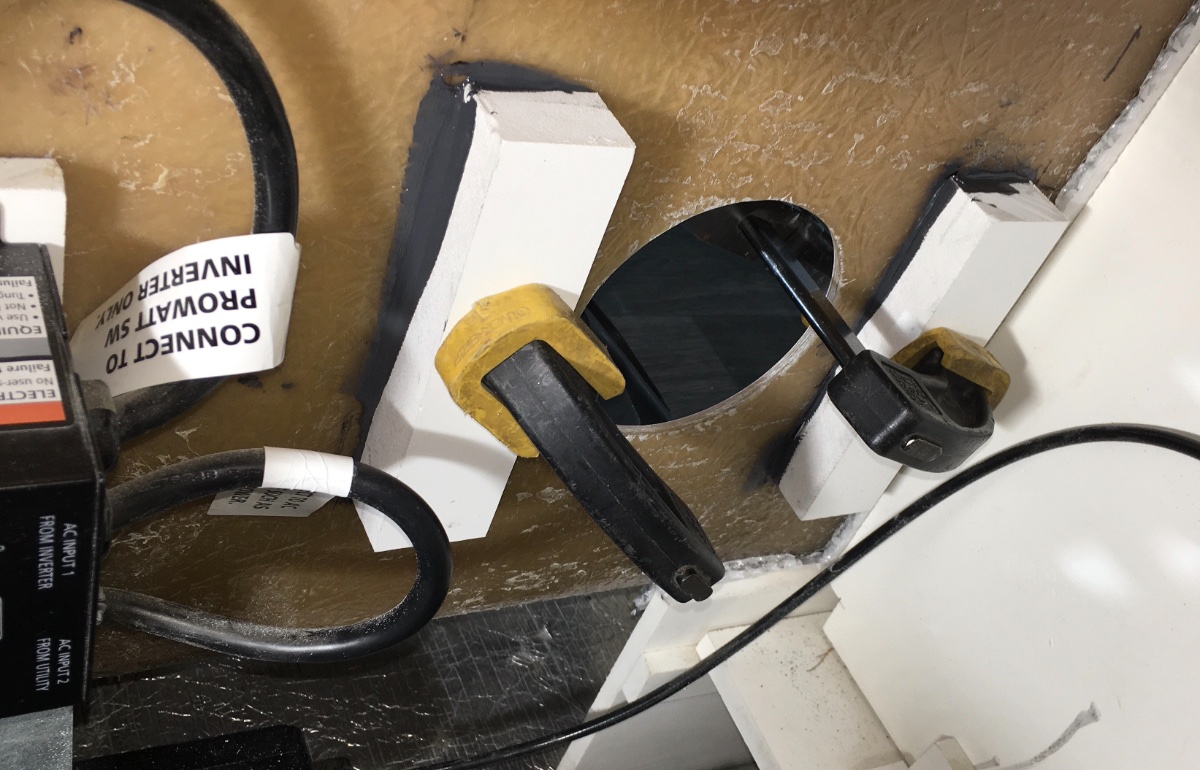
You can turn it off, and it will allow power to the trailer, but then you would lose all of its protection and perhaps the useful features (like the amperage gauge - not sure about this). Leave it on, use the grounding plug, be safe and happy. John Davies Spokane WA -
In regards to axle(s) bumping the frame, it is not just a bother, it is potentially very damaging to lots of parts, inside and outside the hull, including the hub spindles and bearings. A “hard stop” is extremely stressful to bearing rollers. It is also one way that axles get bent, though gross overloading is probably the biggie. Any potholed forest or ranch road will force you to drive dead slow, because a 6” deep hole with only 1 inch of upward travel means the suspension will bottom out repeatedly UNLESS you crawl slowly. Which gets old really fast if the road is more than a couple of miles long. Those owners who never get west of the Mississippi probably will never notice the lack of travel because roads like that are very rare in the East. Where I travel, they are literally everywhere. John Davies Spokane WA
-
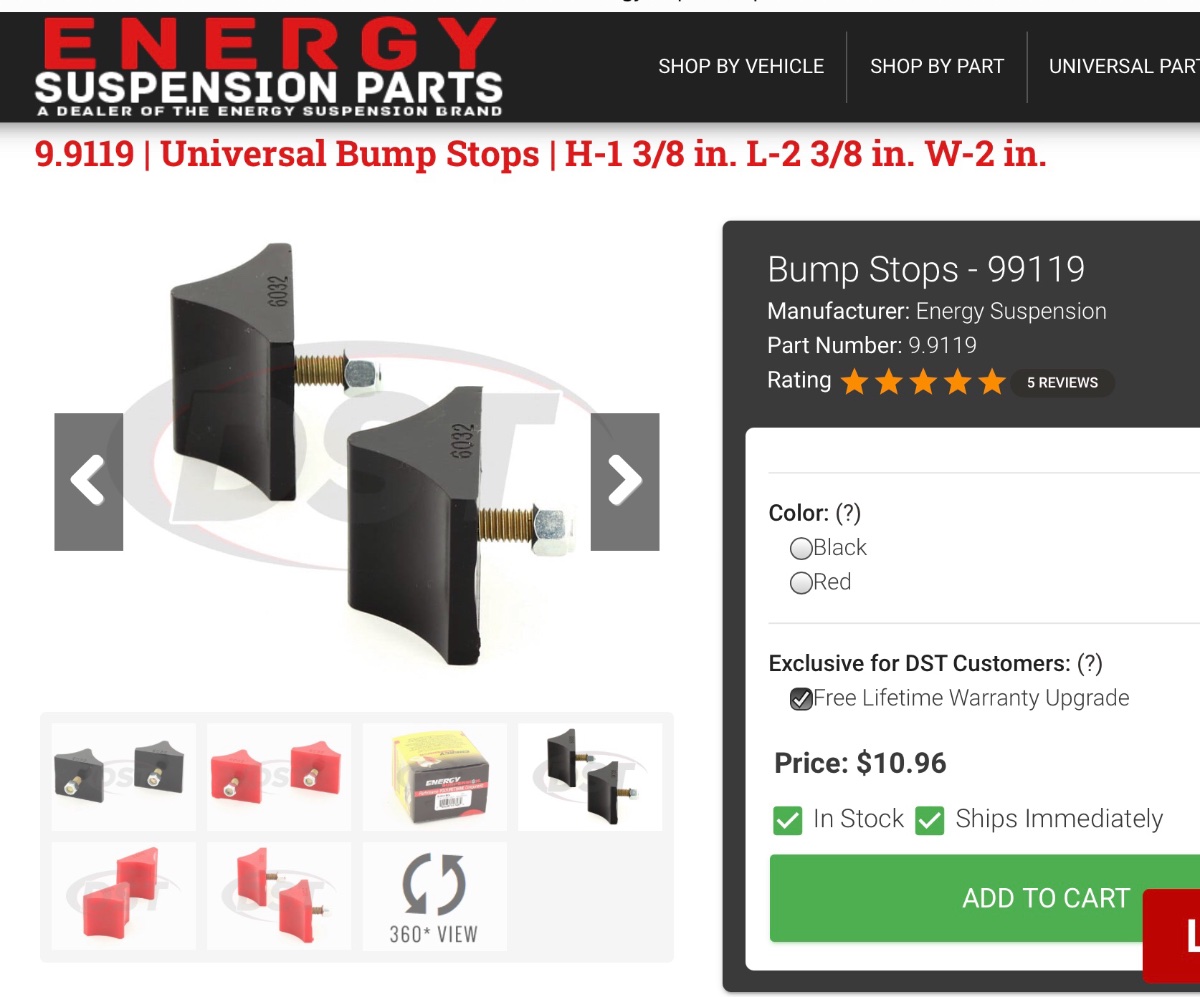
Some sort of progessive (variable force) bump stop would be a great upgrade, unfortunately there needs to be a whole lot more clearance to fit one that would be thick enough to be effective. Just adding a 1/4” pad of dense rubber won’t do it.... If you don’t want to do a spring over axle mod, then installing custom springs with a higher arch is a viable option.... https://www.murphysframeandaxle.com/custom-leaf-springs/ A 2 inch lift would be plenty and would allow enough room for a low progressive bump stop. Most major cities have a company that does custom work this, or you could order them. Then you could easily fit something like this. Lots more types to choose from .... https://www.energysuspensionparts.com/universal-bump-stops.asp John Davies Spokane WA
-
F350 and occupants saved by their safety chains
John E Davies replied to John E Davies's topic in Towing an Oliver
More pics. That is a really narrow gorge. Bad timing, another couple of tenths of a second and they would have been on the normal shoulder, not over a deep slash. John Davies Spokane WA