John E Davies
-
Posts
5,759 -
Joined
-
Last visited
-
Days Won
243
Everything posted by John E Davies
-

HOW TO: Stone Stomper Gravel Guard.
John E Davies replied to John E Davies's topic in Towing an Oliver
Thanks for the kind words FrankC, I see your Rock Tamers are rigged correctly - they should fly back at an angle, not straight up and down, so they deflect rocks down onto the pavement instead of back onto your rear tailgate and bumper. I had Rock Tamers before this mod, and they are OK, but they do not provide nearly enough protection for around here.... this part of the country has a gazillion unpaved roads, Spokane County alone has 4000 miles of them. FYI, an easy mod to help your RTs work better is to add strips of heavy mudflap material on TOP of the bars, trimmed so that they press against the chrome bumper. They will stop the few stones that do flip back up in that direction, and the rubber won't damage the finish. Plus they will dampen any side to side rocking of the arms. John Davies Spokane WA -
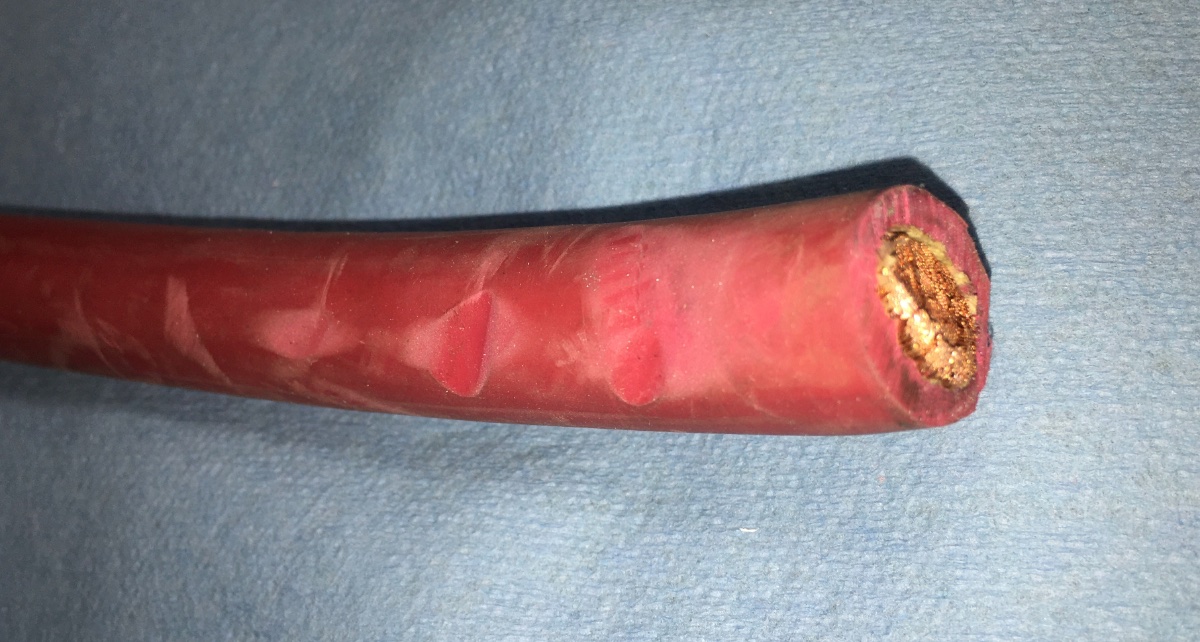
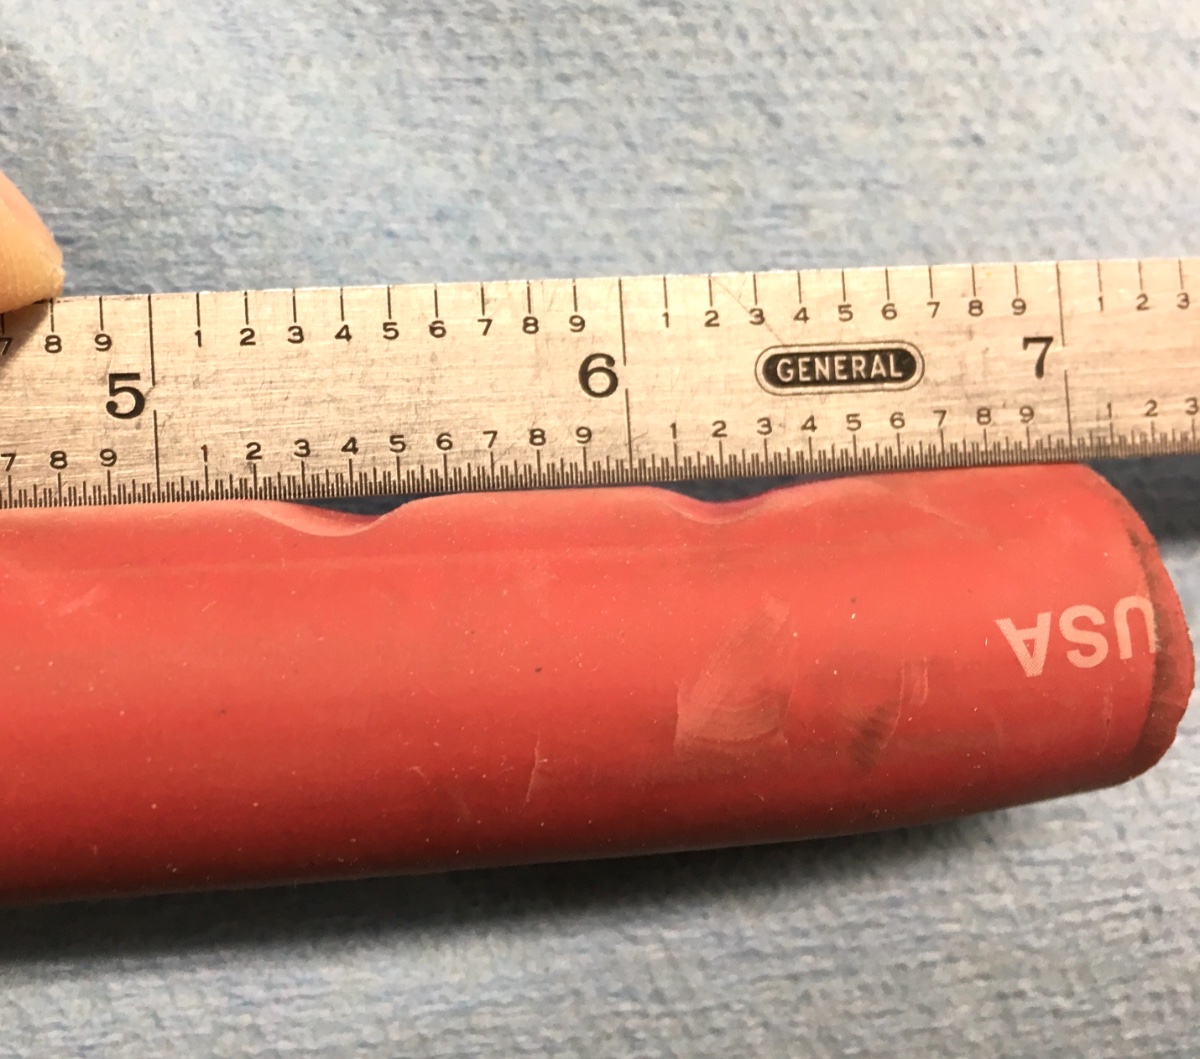
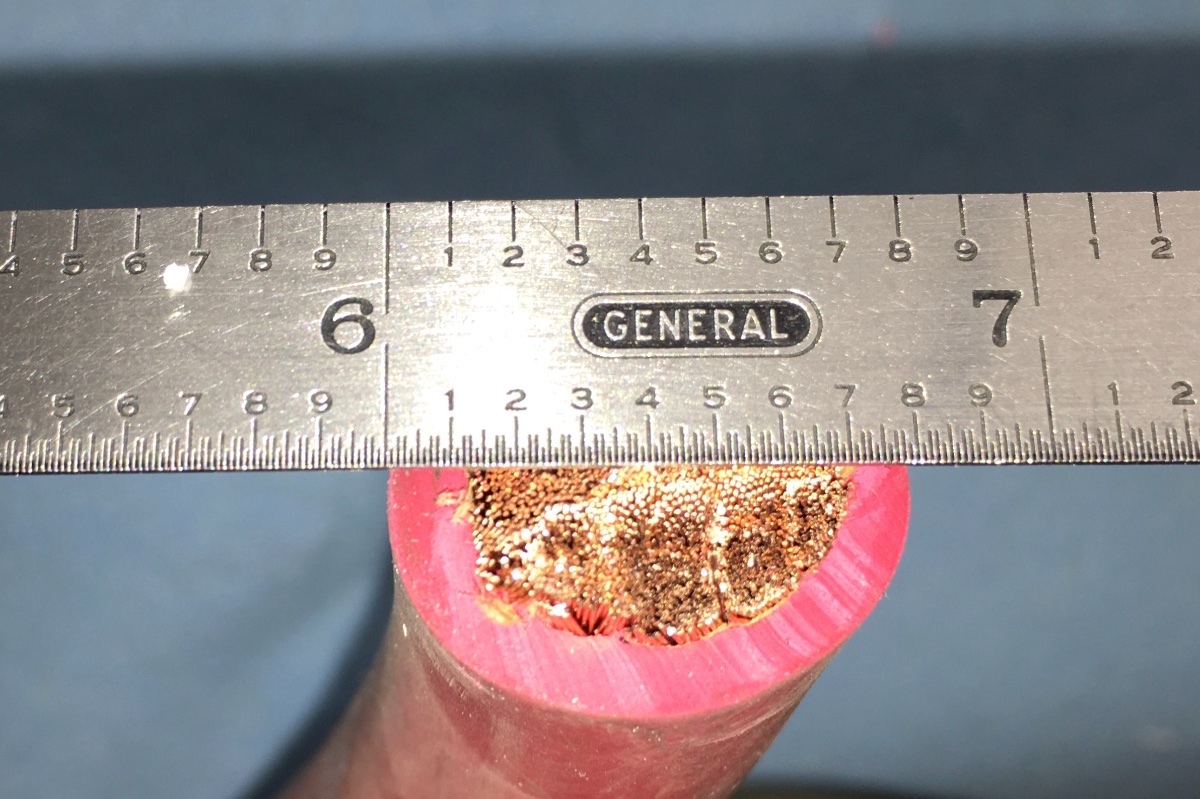
Note, these pics are from Hull #218 delivered May, 2017. The big cables Oliver installs for the inverter are in fact 4/0 ("four ought") welding cable, with an abrasion resistant rubber coating, for dragging around a shop floor. Unfortunately they are NOT very chafe resistant. They need to be covered in plastic split loom to prevent this, which was due to it lying on top off the steel battery tray in back, when everything is pushed tight into its normal position. This particular damage happened after one camping season, and I subsequently covered the cables. I recently removed the cables entirely to rewire the batteries, and I cut a piece to show exactly what is happening. The insulation in the top pic is worn well over half way through! If the RED one wears completely through and shorts out to the tray, you will have a fire - the tray is steel, and it bolts to the fiberglass floor (which has a heavy aluminum liner inside it) and THAT connects directly to the main aluminum frame by way of its support post. If your cables are not protected, inspect them closely, and repair or replace any that is worn more than this one. If the conductor wires are not cut, you could add a couple of layers of thick self adhesive heat shrink tubing. And cover them completely! There is a big fuse (250 amps in my trailer), but it is "downstream" from this area and it won't blow if there is a problem here inside the box. FYI these cables also become damaged simply by hanging in the plastic "pass through" grommets, they are very heavy and they move around when towing, and the grommet compacts and chafes the insulation. The conductor cannot short out there because the surrounding area is fiberglass. NOT so with the main cables and the tray. John Davies Spokane WA

-
HOW TO: Stone Stomper Gravel Guard.
John E Davies replied to John E Davies's topic in Towing an Oliver
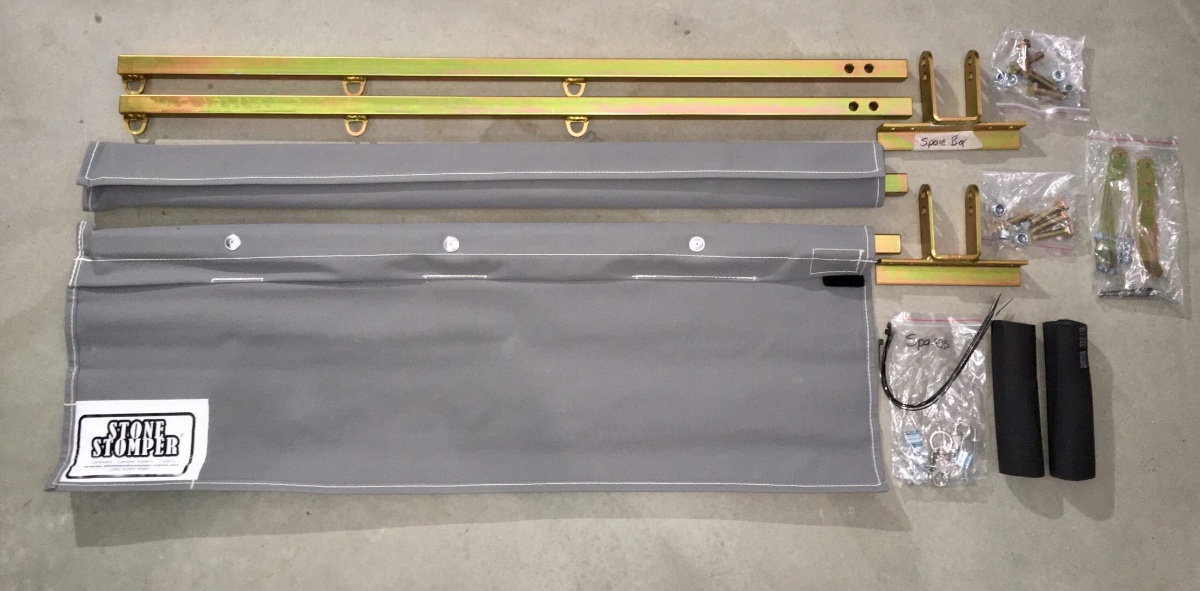
Update, I made some changes when I relocated the tray to the back. This shows how the front corner can be clipped back for truck access: This shows the new aluminum support structure, welded by a local shop. I added pins with clips to retain the plastic support bars, which give anchor points for the fabric. Plus I made new lower support bars with no collars (straight across) and I added stand-off tubes (1/2" white PEX) to prevent the fabric from "walking" out to the side during tight turns. The photo immediately above this post shows the old setup, which did not work well. This will be my fifth camping season, the system has been excellent, no issues except the original support bars were too weak (thin Schedule 40, replaced with Schedule 80), and the left SS flap continues to get scorched by the exhaust when turning VERY hard to the left, in spite of the factory down-turned exhaust tip. I try to avoid remaining in that position more than momentarily. The front of the trailer remains showroom new looking, and the rear of the truck has no rock chip damage. I do still have to remove dried bug carcasses, but they are confined to the very edges of the hull and the top third of the front. I still highly recommend this mod. I try not to tow in hard rain, but if it does happen, the back window of the Land Cruiser stays almost completely dry! And in normal conditions on gravel roads, it stays about 75% dust free. John Daviers Spokane WA
-
Where you tow also is very important, you can get by with a less capable tow vehicle if you never get into really strenuous conditions. Somebody who never left Florida might find the V6 to be acceptable, but the first steep mountain grade would reveal how very bad a choice it is, plus that engine has to be revved really high, the peak torque is at about 4000 rpm. A screaming engine is hard on the passengers nerves..... the 5.7 is perfectly fine for power, you just won’t be able to carry very much of your “stuff”, especially if there are more than two normal sized people. If there are four adults, then you won’t be able to bring ANY gear inside it. John Davies Spokane WA
-
Old batteries, meaning really really really old ones, were made with glass cells inside a wood box! If placed on a damp floor, the wood could absorb water, swell and break the cells. Later they used steel, which conducts. A plastic cased wet cell or AGM or lithium battery does not have this rather serious design flaw. Concrete is fine for very short term storage, such as under the frame where it is out of the way while cleaning the tray or fixing a cable. But if a plastic cased battery leaks, the acid will definitely etch and damage the floor. http://www.todayifoundout.com/index.php/2017/02/storing-car-battery-concrete-floor-drain/ John Davies Spokane WA
-
Which engine? IMHO an SRT would be great, the 6.4 is quite a beast, and that model has a very good payload. The 5.7 would be marginal, due to its inadequate payload, the V6...... well, no. Welcome to the forum. John Davies Spokane WA
-
I use full synthetic 0w20 year round, at 5000 mile intervals. If I were not using the good stuff I would change it more often, but this has been working well. At nearly eight quarts capacity, it is a little more costly. John Davies Spokane WA
-
Enjoy your first trip. Post some pictures please. When you have time at home, consider sterilizing the water system with bleach, I do it every spring to make sure nothing bad has started growing. My friend has a junky trailer and he complained about stinky water from the taps. I asked him how often he sterilized it, and he said “never!” This is on a five year old trailer..... I told him that his fresh tank was probably grey by now.... yuck. We have been having record warm temperatures the last week, but the cold will be returning. I plan to hitch up add bleach, and go for a long test drive before flushing the system and parking “Mouse” for a few more weeks. I definitely have cabin fever..... Those Harvest Hosts can be nice or mediocre, the problem we have is that the wineries we like end up costing us way more in their products that if we stayed in a commercial place. John Davies Spokane WA
-
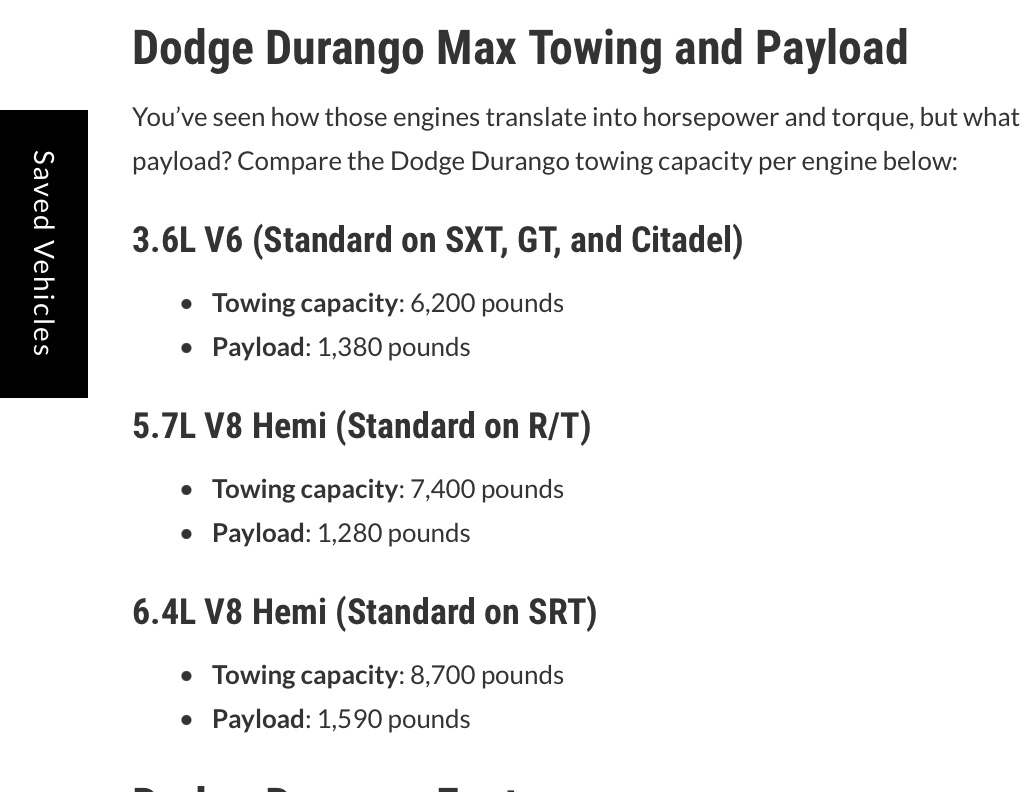
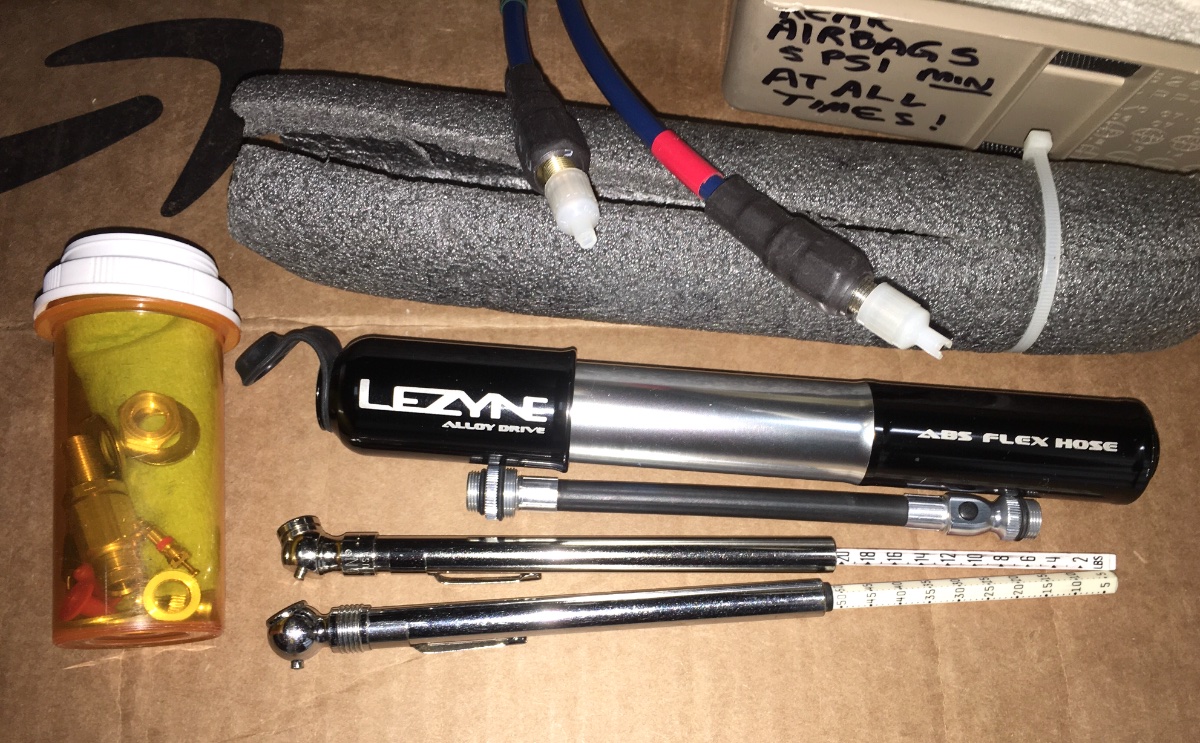
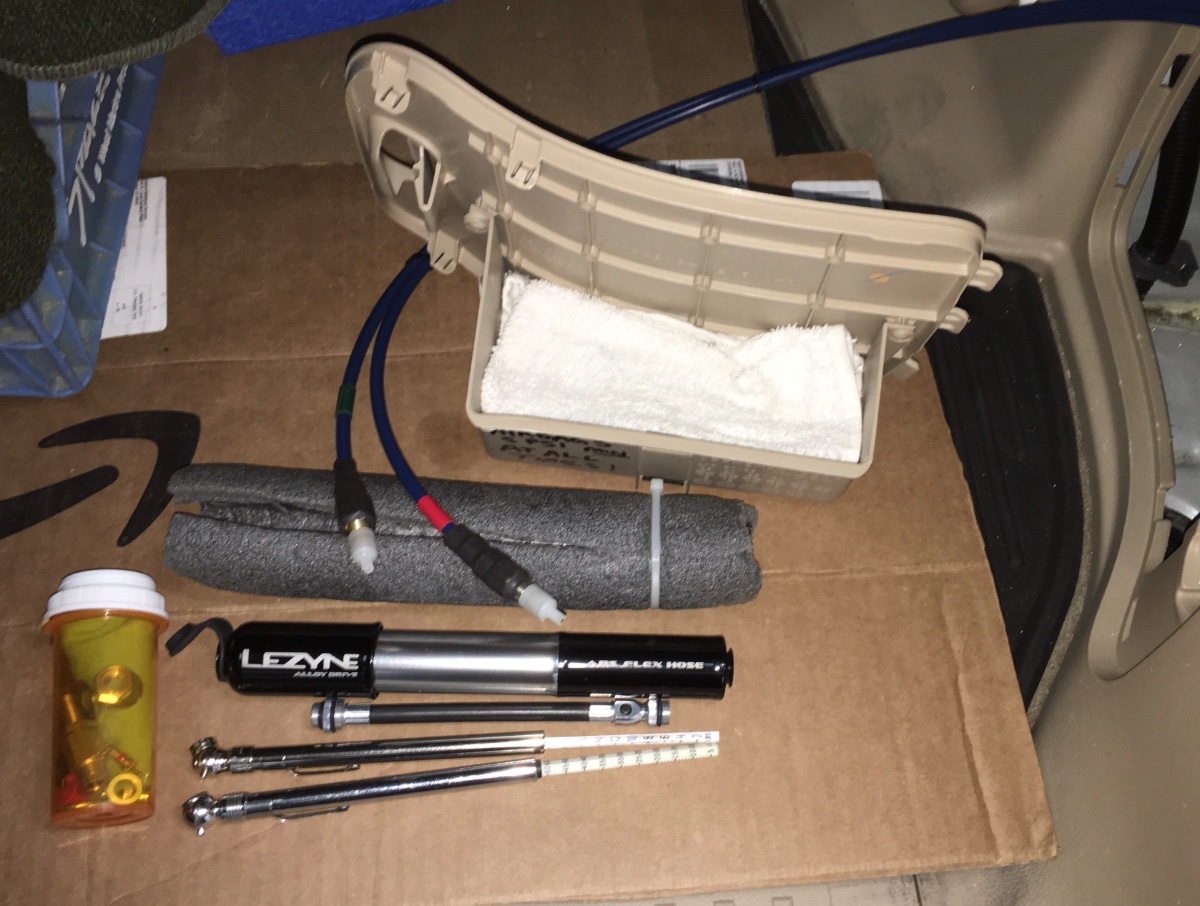
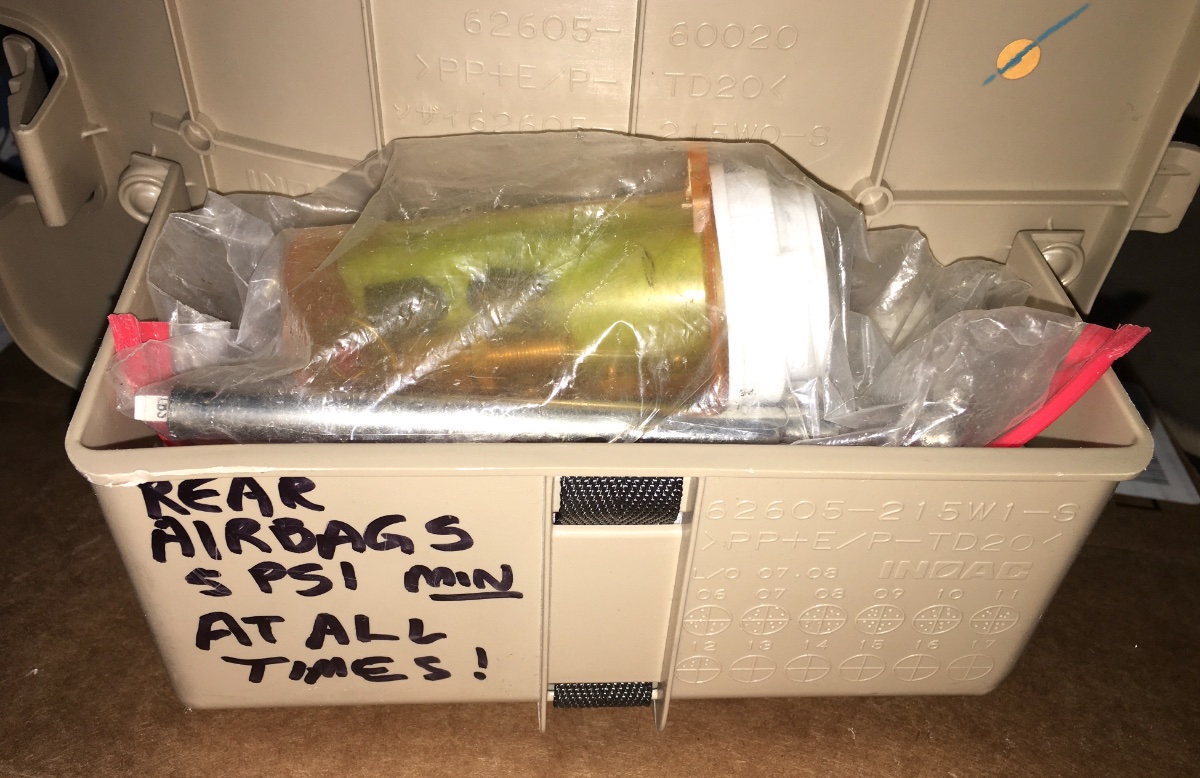
My Firestone airbags came with individual schrader valves that could be mounted externally under the bumper. I asked the tech to run them up into the right rear fender well, at the jack. I added colored tape to ID them, Red Left, Green Right. When not towing, I leave them coiled up in there, when towing I leave that access cover off and run the ends out to where I can reach them easily. There is about two feet of excess length, plenty to allow the valves to lie on top of cargo like my generator. I use a compact low pressure mountain bike pump and two gauges, this one for adjusting at the low end (they want 5 psi at all times to prevent pinching damage). Milton S-917 2 to 20 psi gauge And this one for adjusting the high end: Milton S-921 5 to 50 psi The pressure you need while towing depends on the tongue weight, I was running 12 psi when the trailer had a TW of 620 pounds. and since I lightened it up to 480 pounds, I backed off to 10 psi, and I leave the Andersen chains almost slack. For towing a trailer with no WD hitch like a Uhaul rental it would be higher. The gauges and spare valve caps and cores, and an extra schrader valve, fit in a 1 quart zip bag and when NOT towing, they ride in the little cubby inside the jack cover, and the pump gets covered by some foam water line insulation and tucked in the bottom of that compartment next to the jack. When towing I leave them out in the open so I can adjust pressure without having to shift any cargo. You can drive the truck with 10 psi in the bags and no trailer, but it rides VERY rough and the butt sits high, so if you plan to drive any distance, especially on unpaved roads, lower the pressure to the minimum. They specify 5 psi, but I am actually using 4 psi, a very little change of air pressure at the low end makes a big difference to the ride. Going from 5 to 4 psi is a 20% change. Going from 20 to 19 psi is only a 5% change. An onboard pump and gauges would be very nice, but every connection and splice gives you a potential leak point. I prefer to have a very minimal number of splices. For inflating, the bike pump takes about thirty pumps per side, then I disconnect and reduce the pressure to the correct psi using the gauge. I hope that answered your questions, and more. 😬 John Davies Spokane WA
-
Tank Monitor “sht” error code
John E Davies replied to Moonlight Mile's topic in Mechanical & Technical Tips
OTH, I had a mobile tech come to inspect my inverter chassis (second) ground wire for the recall a couple of years ago, and Oliver sent me a check, no hassles. But for a safety recall, their policy is probably more lenient toward the owner. John Davies Spokane WA -
Bed Sheets or Sleeping Bags... Which do you use?
John E Davies replied to Carl Hansen's topic in General Discussion
I use a light three season (35 degree) poly mummy bag with a microfiber liner. https://www.rei.com/product/850235/cocoon-microfiber-mummy-liner It is really really hard to get in and out of, but I SLEEP much better, mainly because with the narrow bunk mattress and regular cotton bedding I cannot simply roll onto my side, I have to wake up and heave my body to its new position. This slippery bag conforms to my body and I can change position much easier, so that often I don’t wake up at all. I do use both a mattress cover and a decorative cover under the bag. I wash the liner at home after every trip, or it could easily be hand washed in the sink, and I wash the bag at the end of the season. My wife OTH much prefers sheets and blankets.... I normally set the cabin furnace temp to about 60 degrees, but when I am alone it goes down to 50. I try to supercool it in very hot weather and turn off the AC at bedtime. John Davies Spokane WA -
Tank Monitor “sht” error code
John E Davies replied to Moonlight Mile's topic in Mechanical & Technical Tips
I have been here over five years and I never felt that I could not post a less than rosy comment or thread, in fact I continue to be quite critical of a few factory design and build issues, ones that do not appear to be much improved year after year (and also of an occasional owner modification that I felt was dangerous or unsafe.) The Mods have never censored me. Personal attacks or nasty comments OTH are never tolerated. There have been a very few unhappy new owners that go away and never return, leaving unanswered questions - “Where did he go???” I don’t think there is anything that can be done about it in any forum. I participate in many, and this by FAR is the only one that feels to me like close family. As it grows, I really hope that it stays that way. Thank you Members and especially thank you Mods! FYI, after several horrific ownership experiences with boats and RVs, I swore I would never own another one. This forum convinced me to get “Mouse” and I have zero regrets about that investment. It is an excellent product, without a doubt the best RV for its price range, produced by a stellar company that prides itself on trying to make us all happy. Not everyone will be happy, but that IMHO is to be expected. John Davies Spokane WA -
He will need something that will stay on when he washes the cover, before taking it to get altered. That is the main reason I suggested a Sharpie. John Davies Spokane WA
-
A plastic scraper works well, they are used for getting off stuff like window decals. They are also great for removing sealant without scratching the gelcoat. FOSHIO 2PCS Plastic Razor Scrapers Knife with Contoured Grip + 100 PCS 1.5 inch Refillable Double Edge Plastic Razor Blades John Davies Spokane WA
-
How do you store your Oliver?
John E Davies replied to jordanv's topic in Mechanical & Technical Tips
I would be pretty distracted by strippers too...... John Davies Spokane WA -
How do you store your Oliver?
John E Davies replied to jordanv's topic in Mechanical & Technical Tips
Did you just get the one quote? You need three, at a minimum. That will give you enough info to tell what bid is a realistic figure. Make sure each specifies the same product, and breaks down labor and materials separately. I just got a bid on an installed gas shop heater and it just was a flat price, which sucks. I asked them again twice for a breakdown, no response, so that contractor gets crossed out. Once you know the material cost and how many man hours it will take, you should know better. John Davies Spokane WA -
That is a fairly major design flaw, have you mentioned it to their customer service? A local tent/ awning or upholstery shop should be able to fix that for not too much cash. You would need to accurately mark the location with a Sharpie, so there is no chance of cutting the wrong spot. John Davies Spokane WA
-
HOW TO: Rear mud flaps for the Ollie
John E Davies replied to John E Davies's topic in Towing an Oliver
Feasible, but undesirable IMHO. Rust, mainly. It will be very hard to keep looking nice. You could get the parts plated after drilling and cutting. I strongly recommend 6061-T6 aluminum. It is very easy to work with and will always look great unless you tow in winter (salt/ mag chloride). Plus it matches the main frame material perfectly. If you don’t have a nearby non-ferrous metals supplier you can order online, for example: https://alcobrametals.com/aluminum/tube-rectangular/6061-t6-rectangular-tube Thanks for the kind words, they are greatly appreciated. Post some pics when you are done. FYI, Stone Stomper uses square steel for their front skirt arms, those and the hardware are yellow cad plated, it seems to be quite durable and looks fine. No signs of rust after four years. I ordered extra parts in case the got pranged up or started looking bad, but so far they have not been needed. John Davies Spokane WA
-
The 7 wire cable is totally separate from any solar circuits. It is standard equipment on all trailers, while the rooftop solar and side solar ports are add-on options. The only place where they interesect at all, is at the battery terminals. John Davies Spokane WA
-
Ditto, but you would also need to choose three way valves and also install a drain hose leading out the belly. Otherwise the water in the vertical lines and the faucet would be trapped there. If you decide to go to all that trouble, install them on the curb side near the fresh tank drain, so the outside shower water lines going through the back wall of the trailer can also be emptied, using a blast of compressed air. John Davies Spokane WA
-
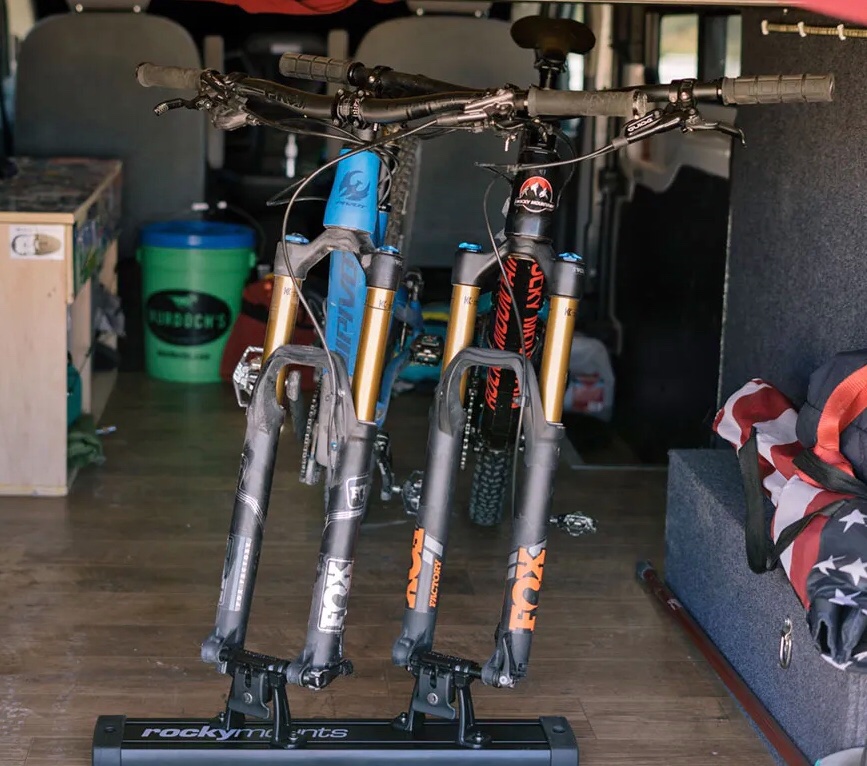
Are these the mounts? Do you intend to remove the bikes every time you stop for the night, or if you want to take a nap? There will be no way to get around them otherwise, the center isle is really narrow even without a dirty, greasy bike or two in the way. The risk of scratching the interior gelcoat and wood drawers, and soiling the cushions, will be very high, especially when you maneuver them past that turn from the entryway to the main hallway.The entry door itself is pretty narrow too. Removing the pedals (or installing folding ones) would help a lot. You need to figure out a way to solidly anchor the plywood to the walls, otherwise during a panic stop or a collision, the whole thing will launch into and through your bathroom glass door. And 1/2” Baltic birch is not strong enough, especially since the bike mount hardware will have to be recessed underneath, 3/4” would be my choice.... There are tanks directly under the floor center, so you can NOT drill through it! Do you really want to deal with all those hassles and risks? FYI I can see this working with just one clean ROAD bike, placed off center to the street side with the handlebar angled and the gears facing the outside, and just ONE person using the trailer. You could still access the free bed, probably, and get underneath to access the valves. You could remove and store the mattress for the other side, and use that big space for storage (with some tie down tracks and anchors). The street side compartment is electronics, so you do not need routine access there. John Davies Spokane WA
-
Ford F-250 crew cab 7.3l SWB 4x4, which tires?
John E Davies replied to fredmin's topic in Towing an Oliver
Too right! Certain tread patterns act like slingshots, but a whole lot depends on the size of the gravel. The typical 3/4” Minus’ crushed rock used for driveways and most unpaved county roads is bad for slinging from most snow and A/T tires. OTH mud tires do not do this, since the gaps are so big the stones cannot get grabbed and released. Plus they grip a whole lot better in turns. For intensive gravel driving, use those mud tires. Or better yet, install proper trailer protection and don’t fret about it. John Davies Spokane WA -
You can try a vinegar flush, to dissolve any deposits; use the winterization port to suck in a weak vinegar mix (1 gal per 5 gal water) through the plumbing and also into the (regular) water heater. Let it sit for a day, drain and flush well. Be aware that the vinegar water going onto concrete will etch it slightly (leave a very clean area). It won’t hurt, but if you don’t want to look at it for a year or two, do this where it won’t matter, or where it will hurt your lawn. John Davies Spokane WA
-
Please post an update, many of us are concerned and very interested to learn how this turned out. Thanks. John Davies Spokane WA
-
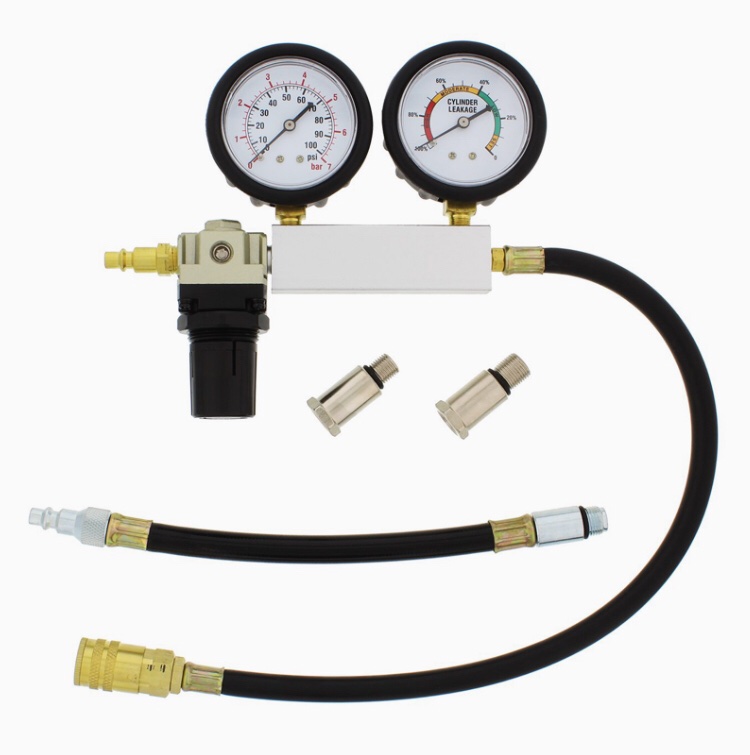
I am sorry, I have to completely disagree with everybody else! After a hard freeze with multiple failures, get the water out first thing! Drain the tanks and lines. Open all the faucets (and toilet flush) at once and blow out the system completely (all four ports) with compressed air set at 20 psi, then after you start to see air at the faucets, gradually increasing to no more than 60 psi. Blow out adapter Starting at a low pressure with all the faucets turned on means you won’t be blasting a lot of water underneath the floor.... Then you can close the taps and start looking for air leakage using soapy water from a spray bottle. Bigger leaks like a ruptured check valve, elbow or flex hose will be audible (hissing or roaring) or you may even be able to feel the leak with your hand. Once you have found and repaired ALL the big leaks, you can connect to your water source and pressurize the lines without worrying about a flood. You really do NOT want to spray a jet of water onto any 120 volt AC equipment, that could blow breakers or electrocute you, so do NOT connect to shore power or turn on the inverter. For an LE2, the rear street side plumbing (shower and ports) and the area around the hot water tank, are the risky spots, they are so very close to the 120 VAC wires. Once you have fixed the big ones you will notice your compressor does not cycle constantly, indicating that it is safe to fill the system with water. Scott blue paper towels are really useful for spotting VERY small water seeps. Unlike a regular one, a blue piece folded and placed under a suspected leak shows it by turning dark blue, it is very obvious. FYI, read this, essentially you are doing the same thing, and you could actually use a leak down gauge set to do the troubleshooting, if you have access to one. Compression Testing vs Leak-Down Testing ..... https://www.amazon.com/ABN-Cylinder-Detector-Engine-Compression/dp/B079P6JJSQ/ref=mp_s_a_1_12?dchild=1&keywords=leak+down+tester+gauge&qid=1614696102&sr=8-12 Good luck, take pics and please post a follow up thread about your experience. I really hope none of your water tanks are cracked.... that would mean a factory repair. 😢 John Davies Spokane WA