
jd1923
-
Posts
3,149 -
Joined
-
Last visited
-
Days Won
229
Everything posted by jd1923
-
These GMC are amazing trucks! My personal problem is having owned 5 Dodge trucks, and for near 20 years restoring a '59 Chrysler 300E. With my history, gotta go Mopar. Hoping it's OK to go on a slight tangent, given the OP has answer and a recent AAA truck purchase! Always looking at everything automotive, I pick this one for those of you new to OTT, perhaps having a new Oliver coming soon... This is a great truck for 40% the price of a new model: Used 2007 GMC Sierra 2500 SLE w/ Convenience Package for sale in American Fork, UT 84003: Truck Details - 695093986 - Autotrader Need a TV? Buy this one! Don't settle for any 1/2-ton or worst yet the SUV. This GMC with only 72K miles, Turbo Diesel w/ 6-sp Allison, 4WD SB Club-Cab, and in white to match your brand new white Ollie! Can't get much better than this!
-

Best Tire and Wheel Sizes on your HD Tow Vehicles?
jd1923 replied to jd1923's topic in Towing an Oliver
Purchased my new tires this week. I went with SIMPLETIRE, after dealing with a young 'know-it-all' at Discount Tire, having upset me with his spiel, obviously on commission, wanting to sell me a house brand nobody has EVER heard of, but of course it's "in stock today!" Should I forego my endless hours of online research, and go with the opinion of a 20-sompfin? No. I have purchased 5-6 sets of tires from this chain, but not this time. I had NO idea that I would buy the Continental brand for my truck. Last year was the first time I purchased this German brand for my '92 Lexus SC400 sport coupe. Need a tire for something sporty, I promise you, go with these: ExtremeContact™ DWS06 Plus | Continental Tire However, we NEED high-end LT tires for our trucks. I went with these: TerrainContact™ A/T | Continental Tire. Sorry you Michelin guys, but I believe their corporate mission is mileage over performance, and I will forego 10K miles on a set of tires for performance ANY day. I was thinking Cooper AT3 to start, and we have these on our GX470 and very happy with them, but I wanted something new, and something stronger higher performing! I have purchased many sets of tires from Tire Rack also. I ordered these from SIMPLETIRE since they have local installers and one of them is a shop we use for service, when I'm not wanting to do the work. Ordered Wednesday, they shipped Thursday from Phoenix, and they arrived on Friday. Too bad their first available appointment is Monday, not too bad. More info coming soon. This guy was the straw. He's just an old-school tire guy and his message hit home with me! The feature that really stuck me with this AT tire is that it has outer treads that are connected inline like a HT tire with extremely large rainwater channels. This is the best of AT and HT designs for your LT tire! -
Good work Ray! 🙂 You'd be surprised what only a little foil tape will do to close off wrong paths, keeping the cold air going where it's supposed to go. I've been into a couple of these, and after being a professional installer back in the day, it depresses me to observe the average installation these days. I spend hours correcting shoddy work on everything I own (now that installs are now more a hobby). Work ethic is needed, but not found less often today. Can't wait (kidding) to tear apart the A/C on our Oliver someday (1-2 years out). Thinking, did OTT seal the 14x14" standard opening, or does air flow into the area between the fiberglass shells. 🤣 I hope not, but we'll see soon. I used this tape for prior RV A/C installations and several other projects since (like for the exhaust duct on a Jenn-Aire down-draft gas cooktop). Love this tape, when you need an air-tight seal: amazon.com/3M-Metallized-Flexible-Silver-109-6/dp/B00A7I5Q0E/ref=sr_1_3?crid=1OW71NIMMYN48&keywords=3m+foil+tape+3350&qid=1697936285&sprefix=3m+foil+tape+3350%2Caps%2C176&sr=8-3 And PLEASE do yourself a favor and do NOT save a few pennies on ANY tape, or most glues for that matter, that is not 3M (Yay! Minnesota Mining & Manufacturing)!
-
Yep, no DEF here either. Still no pics! Don't get me truck shopping again. Yours is a special truck: 2006-2007 GM 6.6L LBZ Duramax Buyer's Guide (xtremediesel.com) Though I doubt Mark with the 2024 would trade!
-
Nice truck and I'm so jealous of the Allison, (not so much the Duramax) but that is a great truck! Pics? Also, not as jealous of the 2024, as we would prefer to make that kind of investment in our home and property (new flooring, countertops...), vs. just a TV! Very hard to afford a new 2500 diesel truck today, though nice older ones can be found as is witnessed here. Some here may likely know, I'm certainly not the minimalist! Why don't we all backpack-camp next time out? Ha Ha 🤣 We'll keep our Oliver at 6K LBs or close to it and that leaves those us with 2500 diesels room enough for another 3/4-ton of gear in the bed. Yeah!

-
CONGRATULATIONS!!! now that's a TV! You truly are starting things off on the right foot! 🙂 I guess you got your answer in your post. A HD Diesel truck is the best option, by far. Pics?
-
Don't be! I promise it doesn't feel your pain. Before I drill, I think "will I ever want to remove this?"
-
Correct 14GA is the most common automotive wire gauge and would be fine for most OTT circuits. Sometimes they use lighter 16-18A for electronics. 12GA perhaps as a relay output, where you need higher amperage. All automotive/trailer wiring should be a stranded wire type. Only household wire is solid copper.
-
Jacks grease type and application process
jd1923 replied to Gliddenwoods's topic in Mechanical & Technical Tips
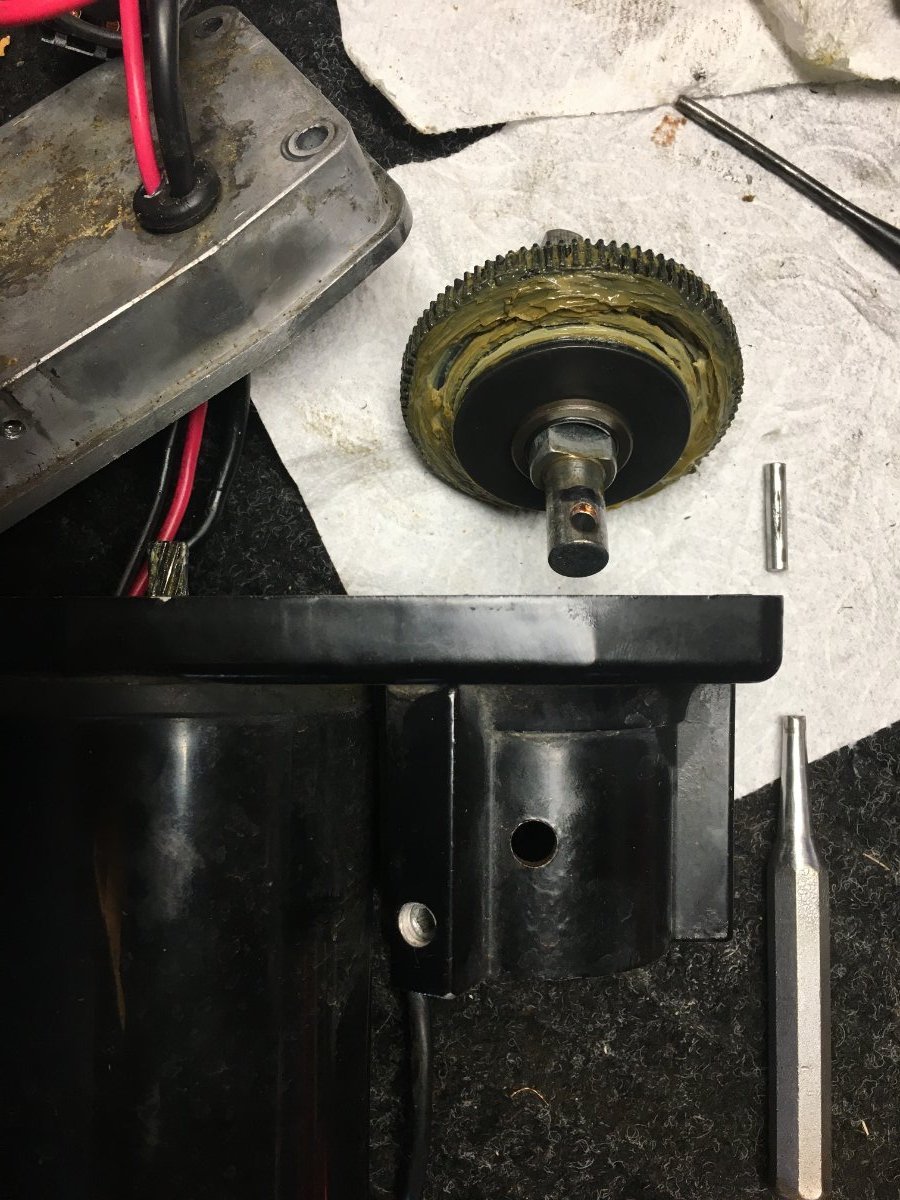
This OTT Service video is just about useless! If that's all you're going to do, don't bother, they would be better off sealed and left alone. @John E Davies wrote a how-to video. Then check page 2 where I added my update. I'm believe I'm the only one who worked the complete service, since where you really need new grease is under the gears and there is another step in removing them (see pic). What it looks like by merely removing the cover is insufficient, as you would not even see the worn grease underneath. Check out this link and when you're done, watch the service video again for grins. 🤣
-
Thanks @SeaDawg I'm not sure re a "barbed grommet" ... I just not a grommet guy. In most of my installs, I go without so I can drill a smaller dia drill hole and instead wrap the wire sufficiently. I removed the batteries today, how heavy are these? My old body can still just lift each, likely 65 LB each. I also cleaned the bay and it came out nice. I will put some toolbox ribbed rubber under these. I'm thinking on the two main cables, coming off the left side, I may check my old supply of automotive heater hose and cut about a 4" length to wrap each cable snug fit the two holes. On the other side, I will epoxy the original grommet. Question for you OTT experts... Check my picture above on the RHS. Please let me know what the 2 smaller + red wires are and the black and yellow ground wires. I know one red is for the stabilizer jacks, but not sure yet on the others. Thanks!
-
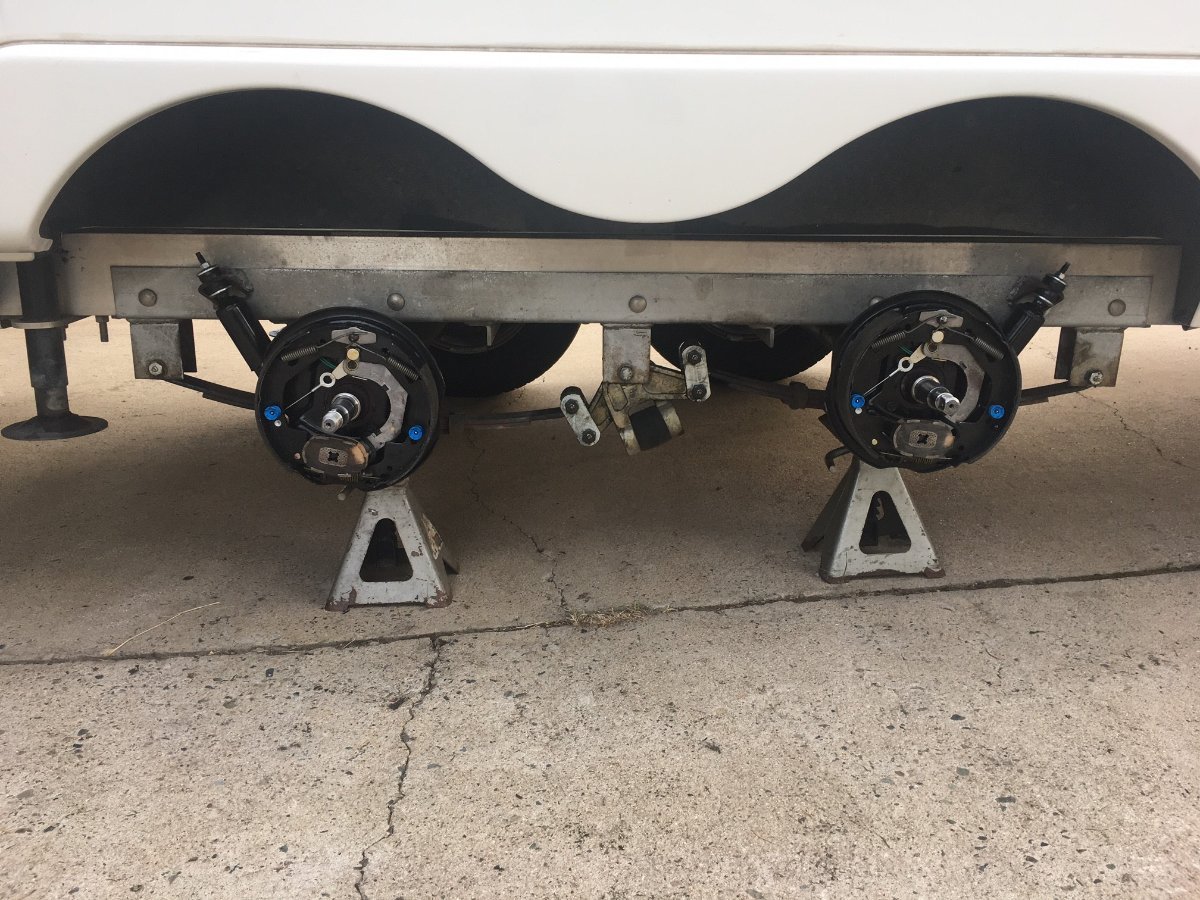
Got it back together Friday. Laying on the ground to get the adjusters close, what a pain! You have to turn the power up on your brake controller when first towing. Pulled the Oliver some on Sat and Sun. Used the controller actuator to get them to kick in often and adjust. Got the brakes nice now. I can't understand wanting manual adjust shoes, not me. And the wheels had quite a bit of up-n-down play before. Not anymore and it's done finally.
-
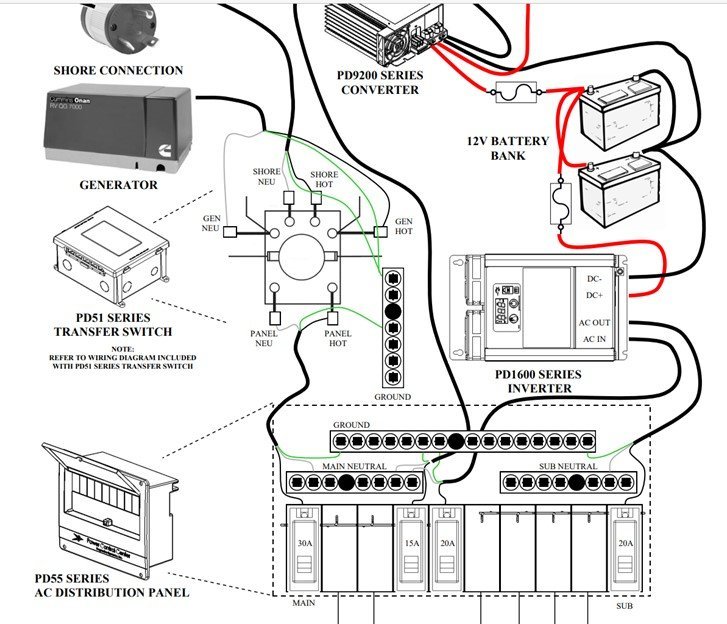
Study, look long and hard at the Progressive Dynamics (PD) interface diagram above. I have for hours and have learned so much from it. I installed their model PD1618 in an RV. What amazing products PD makes for RVs and their user manuals are easy to understand, as compared to others. Don't be afraid to run your inverter long, if your battery bank is sufficient. We have 450 AH now, last time had only 315 AH and would run ours on-n-off, day and night, and always make coffee in the morning, solar recharging by 10 AM. Check out the 120V AC split-bus concept, with main panel (shore/generator) and sub panel (Inverter). This is drawn out, see bottom right corner of the PD diagram, also on page 6 of the PD1600 Operation Guide. PD1600-Operation-Guide-701580.pdf
-
NP Scuba Steve, you're the best and the Guru of all things OTT! Elegant in a way yes, though it will soon be improved to be more shock resistant. Ordered my bus parts and will share soon. I'm going for solid copper busses at both +/- terminals. Thanks
-
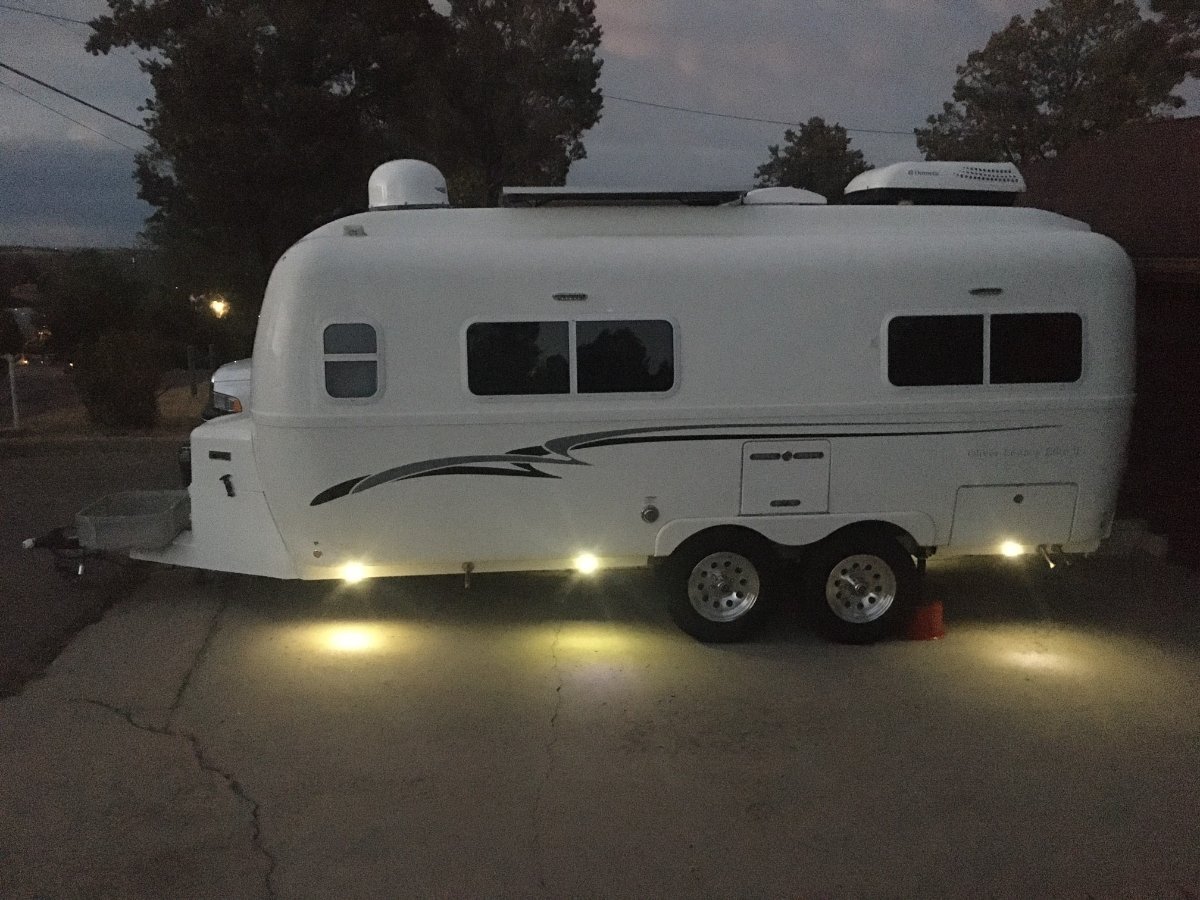
Here's our #113, parked level in our driveway. The front jack must be lowered, and lowered again, until it's less than 4" off the ground! Exterior Courtesy Lights running 24x7 to fend of the Arizona Pack Rats! We love living in the mountains. Was brought up as flatlanders, you can keep suburbia, worth the effort to escape, for us never again living flat and humid! BTW, don't jack up the rear, behind the rear stabilizer jack, for maintenance of the wheel bearings, brakes or ANYTHING else, without first having your OTT level! Working maintenance, I will always be careful as wrtned. However, it totally s@cks that we have to level like this to merely fill a FRESH WATER TANK!!! (or run the fridge, OMG!) Hello OTT, you can install a flat FWT designed with interior baffles, so that it can be filled to 90% capacity at ANY level! Yes, can be done! Ty
-
Thanks Bill, again I can count on the owner of that young girl named Twist #117! This thread goes from a drastic alarmed state, must replace it, to just be aware and keep an eye on it. I have a nose that can smell LP, other fuels, ammonia, any household cleaner in milliseconds. I also hear machine sounds that nobody hears! The only thing I should change is not to park her on our unlevel driveway 2 days prior to leaving. Keep it parked level. Get the longer hose to fill the tank there and pack and get ready on the flat.
-
Our RV parking spot at home is somewhat graded. Five years ago, I installed a TuffShed. We picked the most level spot on our property, still Adam and I moved a lot of dirt downhill to level the 10x20 FT pad. Ordered a full truckload of driveway gravel for under the shed and a 10x30 parking area below it. Later I ran 125' 8GA burial type cable to a new panel in the shed, for lights, outlets and 30A service for RV use. I also built a ramp/platform out of used 2x10s, 3 layers so it's 4.5" tall for the downhill trailer wheels. We park the OTT level. Problem is the parking spot is also 125 FT away from the hose bib on the house. If I buy another 50' length of hose for potable water, it can reach, so I will buy a third hose soon! The fridge is off when parked, with door cracked open. We do start it up 2 days before leaving. Often, I pull it up towards the house for it to be easy for Chris to pack clothes and food, and I fill the water, check tire pressure, etc. It's not level in our driveway. We run the fridge on LP from 2 days before any travel until the day after our return and there is no way to be level. What about the fridge on while driving in the mountains? Not often level in route! That's when you always need LP. Never heard of this issue with other makes, though the Class A and C in my experience had full size fridges. Also, our Bigfoot had a 63-gal tank that we were certain had 60-gal when full. Every RV manufacturer makes bad design decisions. BF put their large freshwater tank behind the rear bed, adding 500 # as far back as possible! I'll have to keep my eye on it. There is a thermostat-controlled ventilation fan added to our unit.
-
Said I needed a day off and then took 4-5! Worked a couple hours each of the last few on this job. One day, jacked up the curb side and tore everything down. Next day cleaned the brake parts and today I ran the pressure washer on the suspension, the brake backing plates and everything I could reach underneath. Been working a bit more than usual, getting in the way of my OTT work! It's nice to line everything up to be ready. I need to install the races; the old ones are out. It's best to mount the shoes first with the spring-pins. Then the adjuster, the magnet and pulley line, and last the upper springs (got a nice tool to pull them). Notice this side has two (2) like designs of the Nev-R-Adjust brakes. The ones with two small upper springs connected in an 'A' shape. My other side had the rear with the long horizontal spring, like @Ronbrink's above. What did a PO do? Smash the rear wheel and have to replace it? Or did Dexter build an axle like this, with different assemblies on each side? The one-off assembly had a thin weak spring in the adjuster. The other 3 did not and in all my life doing brakes on old cars, none of them ever had a spring in the brake shoe adjuster. Both assemblies are equally clean. There is just more shop lighting on the left one. BTW, a little Sil-Glyde grease on the lever and spring behind the magnet helps too.
-
No way to be level at all where we live and travel. Only had our Oliver for 4 months and only went on one weekend trip so far. We left with a "full tank" as it did overflow. The meter was all over the place, before and after, never counted on any tank reading in any RV! Our gray and black tank readings are also not accurate. We ran out of water after two days out. From our past RV experiences, thought we could not have used more than 20 gallons, 25 max. Good thing we have a 35-gal fresh tank in the truck bed. Pumped it into the OTT fresh tank to finish our trip. Will have the electric motorized water ball valves soon, so not to move the bed. Figure we will always have 55-60 gal with both tanks filled (full s/b 70 gal). We fill up at home when going on local boondocking trips. There is no way on our property to park flat, unless I spent time with leveling blocks and I'm not going got do that at home, when packing for a trip.
-
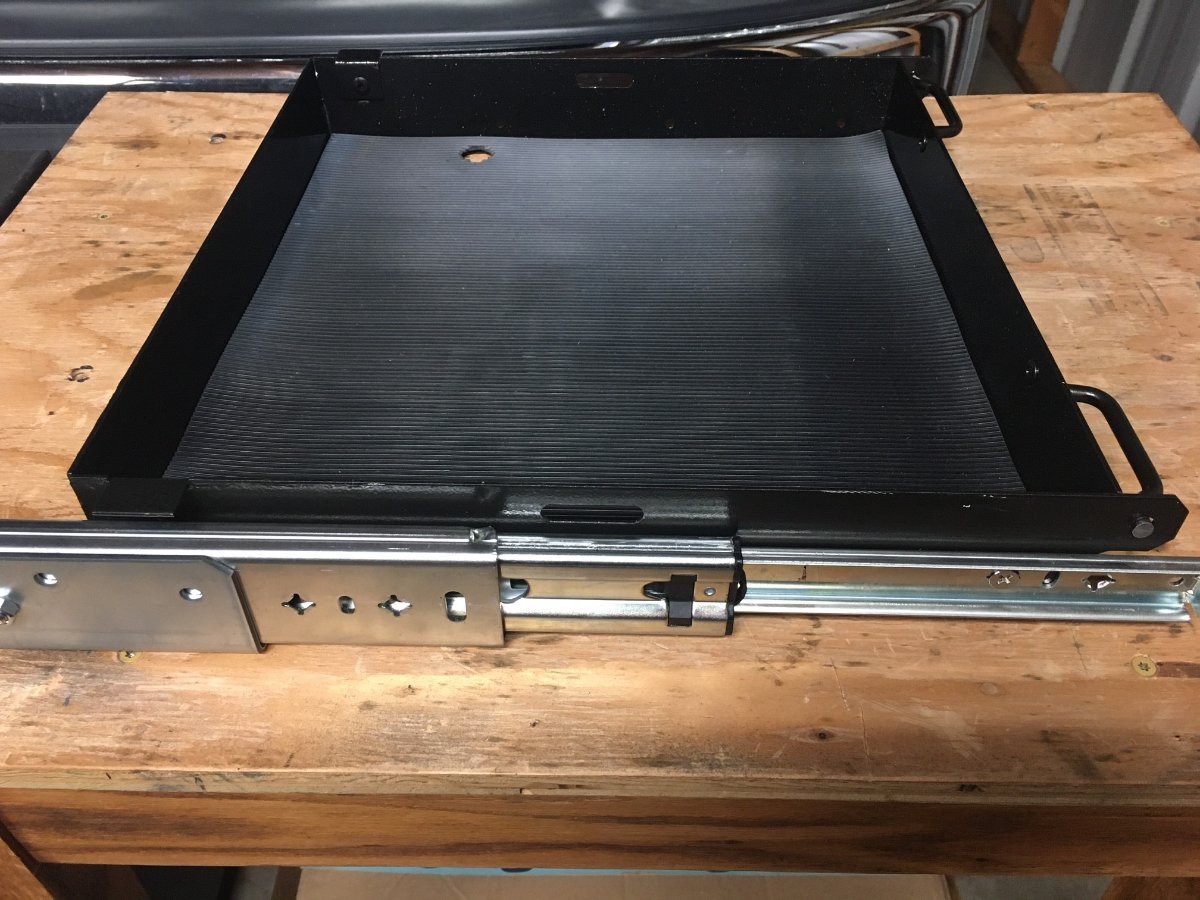
@John E Davies you're going to like this one! Before and after on the battery tray in my old Bigfoot. Other BF owners on their forum purchased a new Kwikee tray $$$, but it was my challenge to rebuild this one with new 20" slides and toolbox rubber lining.
-
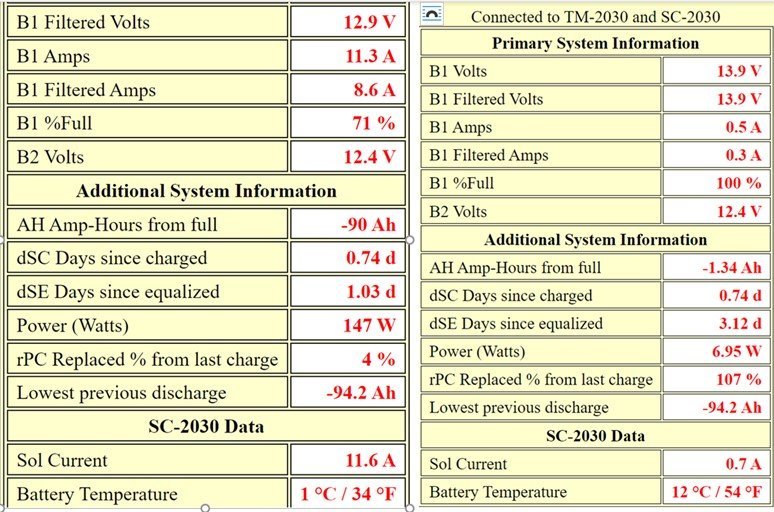
Thanks Steve, for the bit of OTT history! So, I should be happy with Hull #113, vs. #200+. I withdraw anything I wrote bad re Blue Sky. There was nothing wrong with the system, only the knee-height installation! I should move that screen ASAP, waiting for the Bluetooth version that @SeaDawg suggested. Our previous RV had only two old marine batteries on a rusted battery tray! I knew nothing about solar and inverters, but learned as I installed a complete system. Below is the system design I built and a readout of the Bogart Engineering battery monitoring system, Wi-Fi connect to my phone. I cut the power bus in the PD55, to create the dual bus system you see in the bottom right corner of the diagram below. One side for most appliances, shore power or inverter with instant change-over, and the other side for the A/C not powered by the inverter. You could read ALL charging stats, sitting in your warm living room as the RV was out in the winter cold. The lefthand readout picture below shows morning status after running the inverter with TV A/V system on all night, and the righthand picture showing status fully charged after a sunny day. Hopefully the Blue Sky Bluetooth version will display something like this. I can certainly move the smaller cables inside, but that is not the problem. Look at my first picture above in the top right corner. You need to mount two (2) heavy gauge battery cables, in this one position. These short battery terminal posts do not have the depth to do that.
-
I will test each battery separately, when I have them out. My feeling is I have a set of like new batteries, as advertised installed in 2022. I removed the shore power today, turned on the exterior courtesy lights and will run more stuff during the day and night to make these batteries work. Like to bring them down to 60% and then see the solar charger bring them up after a long sunny day. Everyday is a sunny day in Arizona! Good news is the battery bay door seals nicely, none of that AZ dirt inside, that iron oxide red dust that @John E Davies has warned us of. Took the negative battery post apart today. Can see why past owner added these tall posts, as there is no way to mount 2 heavy gauge battery cables. I would have purchased similar batteries with taller 3/8" posts. These are 1/2" short 5/16" posts. I need a battery terminal to add two battery cables and 2-3 8GA cables to each post. Looked for 15 minutes on Amazon, weeding through the cr@p, not much there. With only a few minutes into this, I'm thinking why not just mount a copper bar. I'm interested in @John E Davies input on this. For $18 on Amazon, I can buy an 8" length of pure copper, 1/4" thick, 1" wide. I can cut this into two 4" pieces for both +/- terminals. Drill a 5/16" hole to mount to the battery post and drill two 3/8" holes for the cables and bolt through with copper washers. Love to find a quality prebuild post, but not seeing anything that would work effectively for my need. Please let me know if this idea would work, is a copper bar good, perhaps aluminum is better in the elements, or are there better options? Thanks https://www.amazon.com/dp/B0B9NDVW9J/?coliid=I35ZMYZFHWRUXC&colid=2UU65RMAO0WYD&ref_=list_c_wl_lv_ov_lig_dp_it&th=1
-
Our cable grommets at the rear of the battery bay are loose. They aren't even rubber grommets, but a vented plastic type. Brand new they would not keep battery fumes from entering the areas under the dinette and bed. It appears the only way to correct this is to first pull the batteries out completely. This will be the time to correct the cable angle and connection bolts mentioned above. Any suggestions on a long-term fix for this? I could just glue these back in place. Maybe an exterior quality, minimal expansion, "Great Stuff" kind of product? Let me know if this has happened to your rig.
-
Yep, thanks again @John E Davies and Bill and Sherry! These bolts are going and will get the cables coming from the other direction, so not turning against the wall. Lol yeah, the Prestone was a similar looking tool, made for checking antifreeze concentration. My hydrometer is likely in the same tool drawer. They're both turkey-baster kind of tools!
-
Bill, when you wrote "original" could you mean your batteries are the originals, now 7 years old? If so, this is a testament to life of the 6V golfcart battery! I will certainly remove these tall posts soon. They can't be good, would accentuate any vibration of the main cables down those two extended posts (same thing on the main -neg post). A past owner must have added this for some reason, maybe for better clearance of the cables. I need to remove all four batteries anyway, for a repair to the back of the bay. More on that later...
-
Thanks @SeaDawg everything you have here is great advice. Thanks for the link. Had no idea there are videos available like these and yes, I've been into so much other maintenance that I've been dreading studying the Blue Sky manual. I was really good with our last Solar/Inverter system, because I installed it and understood every component. Not near yet on this one. You asked the question, "is it on or off." @John E Davies asked it first, but it was at the end of so much other stuff that I didn't see it, and after your post @topgun2 wrote it again. Thanks Bill, third times the charm! I hate to have to admit, that I simply had the switch off! What a dumb newbie thing. Sorry to waste everybody's time, but I do have other battery related questions to follow... First thing will be per @John E Davies suggestion, I should move the Blue Sky panel to head height! I remember about 2 months ago, reading a post about Inverter issues, needing a complete power off to reboot and I went out to learn some about this system. I had turned the big red switch off, then found out there is no battery disconnect switch, and after some interruption I forgot to return and switch it back on. It was summer then, connected to shore power to run the A/C when parked, set at 84 degrees. It has been disconnected from shore power 3-4 weeks now and I run the Exterior Courtesy Lights 24x7 to fend off the dreadful Arizona Pack Rat! So, over 3-4 weeks the batteries dropped from 100% to 78% as normal. Back to 100% this morning. Threw the main switch, input from the solar panels. The Blue Sky lights came on and with voltmeter measured 14.42V across both pairs of batteries, showing it's charging as designed. What a dummy I can be at times. 🙃