jd1923
-
Posts
3,277 -
Joined
-
Last visited
-
Days Won
245
Everything posted by jd1923
-
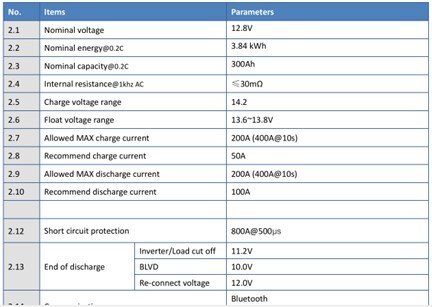
Check your Epoch Manual (see pic). Your app is showing 14.4V to the batteries fully charged. I believe the high voltage settings is recommended at 14.2V. If voltage cannot be fined tuned on the PD charger, it will be fine but do not leave your Oliver plugged into shore power continuously (always a good recommendation). Watch that Blue Sky video when he runs through the programming several times until you get used to the keystrokes. It took me 3-4 times to enter all the strokes correctly. If I had struck out again, I would have asked my son to do it. He is of the video-game generation, and he would have nailed it first or second try. Get the right 13.6V, 14.2V and other settings correct for the Blue Sky and this will be your better Epoch LiFePO4 charging curve. I have solar charging on always and shore power connected only when needed.

-
We went a similar Class-A, Class-C to Oliver route. Now I'm comfortable driving to any campsite in the National Forest! TP NP, as great as the Oliver is, it will need some mods!
-
@ScubaRx gave you the basic math. So you currently have 50% of 368 for 184AH usable. The inexpensive LiTime 230 at 90% is 207AH. This would be a 12% increase in useful capacity. There should be room for two of these in the slide-out tray for future upgrade. Glad to help Gary. There are several members here who have installed LiTime batteries who could chime in on their performance. I went Epoch to achieve 2x 300AH for 600AH in the tray.
-
Hey Gary, money spent on 4 AGM batteries today, you really should just buy one LiTime 260AH for about $470. You can save money and over 100 LBS and remove all those short battery-to-battery cables for the same usable AHs! This is a minor mod compared to work you did in adding your Xantrex inverter. Read through this post. At the bottom @Hokieman mentions a $20 pendant to upgrade your OEM charger for LiFePO4 charging.
-
 I'm with Geoff on most of these points. The Blue Seas switch is the best available but does not come close to running 4/0 cables from the batteries straight to the inverter. Yes, you can connect it by copper bar but resistance internal to the switch is the issue, two more lugs, bolts, etc. By the time I unlock the battery bay and the padlock securing the battery tray, it only takes a wrench on one bolt at the battery ground to disconnect power when servicing. We do not store our Oliver. As Geoff wrote, "I’m in and out of the trailer enough..." Not a good idea adding another switch under the streetside bed either. I spent hours rerouting the rear bus, solar and DC breakers to the area under the rear dinette seat. I removed over 10' of #6 wire and a good 20' of #10 to the 3 stabilizer jack fuses, and much other wiring. It's crazy how OTT added length to the wiring just to put this stuff under the bed. Some wiring removed had two inline crimped butt-connectors. All the extra length and connectors adds to resistance/voltage drop. All cable runs are now shorter, just 5 ft or less. I upgraded the positive bus with one that is made of 5/16" solid copper bar (not hollow brass like the OEM bus). I replaced the neutral/ground bus with a longer heavy-duty bus and doubled the ground AWG. In doing this I also removed four #6 cables that were run directly to the +/- battery terminals. I have mod posts of all this work and less connections are better! On the last point made above. I would not be concerned if the CO monitor was not powered when truly in storage, with LP tanks off, nobody inside anyway. Turning the DC breaker off is a good idea to eliminate parasitic draw. It seems it's all that is needed. Thanks Geoff.
 -
Can’t be much. Haven’t tested but likely about 0.02A. Anybody test it power on then off?
-
Put a gallon or two of water in the black tank, laundry soap or something, and it will last longer than several gray tank fills!
-
Excellent work @rich.dev! Getting bored at Quartzsite?!
-
Excellent work on your part and the price is amazing considering prices today! Thank you.
-
We have Garmin in Kenwood receivers in two of our vehicles. I’ve been getting update warnings and have to figure out how to do so. Hope I don’t have to pay a license fee.
-
Not in our closet! Barely enough room for my few hanging items, if you know what I mean. If we had rain or bugs, less wind… I may consider one. Heck, we don’t even use our awning! 🤣
-
Thought about one. Found really good price Amazon used and ask myself, do I want to carry one? Which led to the answer no. And that was before reading this. @DavePhelps love the windsock pic. Reminds me of a past trip to Moab!
-
Unless there is anything wrong besides the door panel delaminating, you would not want to remove the jamb and do all that work, resealing etc. hope the price of the “core” is reasonable! Yes, let us know and thank you.
-
I no longer trust battery chargers to be on for months in any kind of advertised maintenance mode. Years ago I did that using a Battery Tender on an AGM motorcycle battery and I had to replace it the very next summer! Epoch Batteries states “for long-term storage maintain at least 50% SOC and periodically recharge to maintain battery health.” We never store our Oliver. It’s always outside, solar charger on, rarely connected to shore power, so no supplemental charging. I will only plug in if it gets under 50% but generally stays 80-90% with SC alone. It’s good know the batteries at night are mainly at rest, providing -2A (with Victron inverter and Outside Courtesy lights on), and in winter sun recharging slowly during the day. 😂
-
Route 66 between Kingman and Oatman is not for the faint of heart!
-
Quartzsite -> Parker -> Lake Havasu -> Needles CA -> Kingman -> Peach Springs -> Colorado River, bottom of the Grand Canyon! Heading to Needles is a bit out of the way but you can pickup Route 66 there and take a truly scenic trip through Oatman AZ on the way to Kingman! If you’ve been to Lake Havasu and don’t care to visit again, you can take US 95 from Blythe to Needles CA or jog over from Parker AZ for a quicker route. If you don’t want to tow your Oliver down, there is Grand Canyon Caverns RV Park on Route 66 just 12 miles east of Peach Springs. I’m thinking of a New Year’s Day trip, also weather permitting. I’ll report back if we do it.
-
About 5 miles west of Flagstaff Hwy 66 merges into I-40. Next place you can pick it up is 7 miles west of Ash Fork AZ and 18 miles on US 66 takes you to Seligman AZ. Next town is Peach Springs AZ. If you want a great side trip you can take Diamond Creek Rd, Indian Route 6 a 22 mile dirt road, and drive to the Colorado River at the very bottom of the Grand Canyon! We have not done this trip yet, but plan to do it this winter. Ash Fork btw is just 47 miles due north of our home up AZ-89. I've watched a few videos on this. They drive large school buses down there to pick up people from rafting expeditions, so no reason a solid truck with Oliver in tow could not make it. There are several campsites near the bottom too! You need a Hualapai Indian Reservation travel permit which you can get in town. The road should be fine during the winter. During spring you’d cross running water in the Peach Springs Wash in a few places and the road could get real. This stretch of Hwy 66 circles NE and later SW ending up in Kingman AZ. It’s a beautiful drive that has the look of Route 66 before there were Interstates!
-
Thanks @Steve Morris. I’ve always used the simple Ancra utility strap to tie down dirt bikes and motorcycles (for 30 years) and had not heard of Rollercam before. I’ll check them out! There is the place for ratchet straps, but I prefer a cam-lock for many needs. They’re smaller, quicker to mount and the large ratchet can bang and damage cargo if not placed carefully or wrapped. Two quick pulls on two Ancra straps to the handlebars of my dirt bike and it’s mounted for travel in a minute! https://ancracargo.com/utility-tie-downs/cam-buckle-strap-packs/
-
Then what you have is all you need!
-
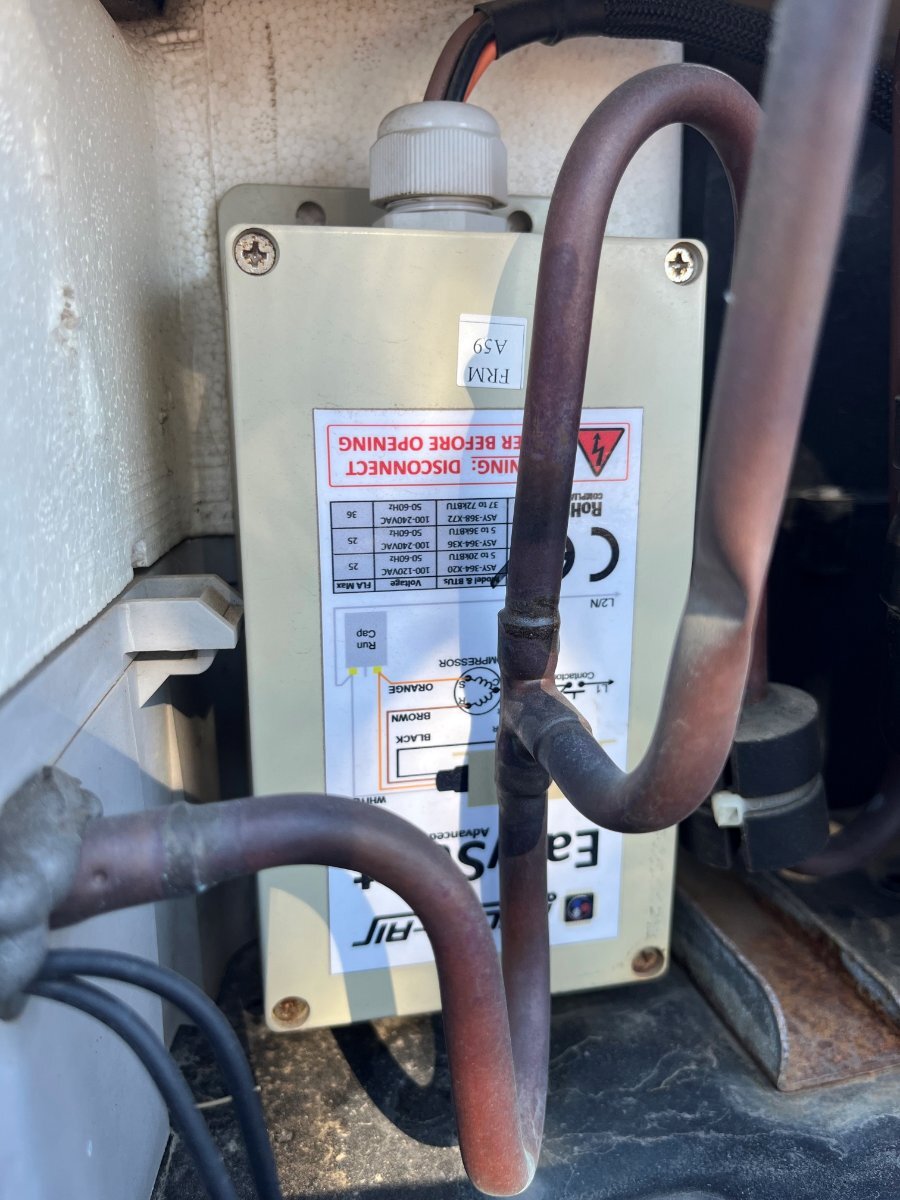
Our Oliver went back to OTT for service with a prior owner (April 2018) and among other service had an EasyStart installed. I imagine, but not certain, it's still working since we can run the 13.5K BTU Dometic Penguin II by inverter, our Victron 3000VA MP2. After startup, the compressor cycles ON-OFF-ON and then stays on and blows cold. Not sure if this behavior is standard and it's always the same pattern. Is it the EasyStart that creates the initial cycling? We will purchase an Atmos early next year and wondering, can I reuse this EasyStart on the new A/C? Is there a way to test it's functionality? Is the EasyStart product equal to the SoftStart? If it still works and is viable, I would be very happy to save $300 on a new one! The way OTT installed this worries me a little. Why would OTT install it upside down (see picture), so that the wire harness is on top? Hoping the wire gland truly sealed the opening and the electronics stayed dry through the years. Maybe they thought the upper area near the cover would stay drier than down below. I will be able to see internal condition when I remove it and will need to know before I order the Atmos, as SDG will install a new one with purchase. I will talk to EasyStart tech support and Kevin at SDG about this soon. I'm sure he would supply a wiring diagram for the Atmos. What do y'all think?
-
Likely not a fair competition! Ron has only had 4 years with his Oliver, me a poor little 18 months now. Steve is the original Oliver Pioneer! 😂
-
You too Tom! Didn't we meet at the dump station upon leaving? Too bad it wasn't a few days sooner! I met Ron at the Rally and what a pleasure to meet this Southern Gentleman! Can I say @Ronbrink is a nut? 🤣 Or perhaps a pack rat?! Love the guy and I know we've learned a lot from each other on this forum, long before meeting in person. There is NOBODY more prepared than Ron, though I must say, I have not yet met Steve! 🤣 @ScubaRx Hoping we will run into each other soon. I have the first week of Feb open to get down to Quartzsite, or points between! I prefer to pack a bit lighter than Ron, and Steve, but their mods are the tops! EXCELLENT well-presented post here. Thank you Ron, for posting ALL your great work! I've copied more than a couple of your mods.
-
To each their own. If I was going to replace the front basket, I would consider paying extra for Made in USA quality, good point. It must fit when turning, steering full-cocked, and be careful when backing up, as the angle can get tighter and even hit the smaller OEM basket. I know, as there's a crease in my rear bumper, whoops! I don't travel with gas cans, period, for the spills and smells alone, let alone safety reasons. Everything we need is connected to the two OEM installed 30# LP tanks. If you must, consider a safety container, one that has less chance of exploding in an accident. Not sure of the safety rating of the gas can above, and I'm not recommending these brands, but this link will give you the idea: 5 Best Off-Road Gas Cans for Overlanding and Wheeling - Adventures on the Rock Then there is also the issue that ethanol-based fuel should be used within 30 days. Learned recently that Stabil doesn't really work. You can buy ethanol-free fuel which lasts somewhat longer. Maverick sells it in our area. LP tanks can be filled and kept in storage for as long as you would need. I'm of the mindset of going high-end inverter, MORE AHs and solar wattage, and leave the ugly (sounding) generator at home! It's not worth the weight and they're heavy, so is the extra fuel. As @Patriot noted, 42 days out west without the need! I imagine he uses LP, but if he carried gas, it would be bad by the time they got home. I'm always emptying the fuel tanks of our dirt bikes, within a few days of returning home, and my yard tools before winter, pouring the left-over gas into my son's old truck (he appreciates it)! Do this in time, or not at all. I also keep a 5-gallon steel gas can for old gas and use it to clean auto parts for my restoration projects. Kerosene or Diesel is safer, but I use what I have. 3 trucks, 2 cars, 3 dirt vehicles and 8 gas-powered yard tools, the last thing I would need is another 1-2 gas cans!!! I understand those who live SE and need to run A/C all day either need shore power or generator. Our remedy is don't travel during summer months. Our usual travel season is late September through May. Next year we will travel early summer, only to visit family in MN and northern states to and from. Chris doesn't like summer, so we stay home where she plays pickleball indoors 3-4 times a week! Me only 1-2 times weekly, since I'm always working on something! If our 720W solar (with Renogy 400W suitcase) will not keep our 600AH LiFePO4 batteries up to par after a week of boondocking, we find a spot with hookups for the night! Next year, after I install the efficient Atmos A/C, we will be able to run the A/C for a couple hours a day off-grid. Food for thought and best wishes to all. JD
-
New Mexico State Parks - Fee increase
jd1923 replied to Mountainman198's topic in Campgrounds & Parks
They were likely getting tooooo many people living in their RVs for 14 days, then another 14 days. There are too many in AZ for sure. The economy is not getting better for many. We just pay for a few days here and there, so it looks like that's just $5 more per day. On our recent trip to Ruidoso NM, we noted there is camping ANY direction just a few miles out of town. If you need hookups, that's an issue, but think BLM vs. State Parks, in most western states for a better experience! Camping | Bureau of Land Management -
Likely not allowed to per their Truma agreement. I found 4 on eBay. Two in the UK for $200+ and two in Australia for $400+!