jd1923
-
Posts
3,425 -
Joined
-
Last visited
-
Days Won
259
Everything posted by jd1923
-
I'm assuming mine was removed by previous owner, replaced with a nice drip edge. Can somebody confirm who knows the OEM "rain seal?"

-
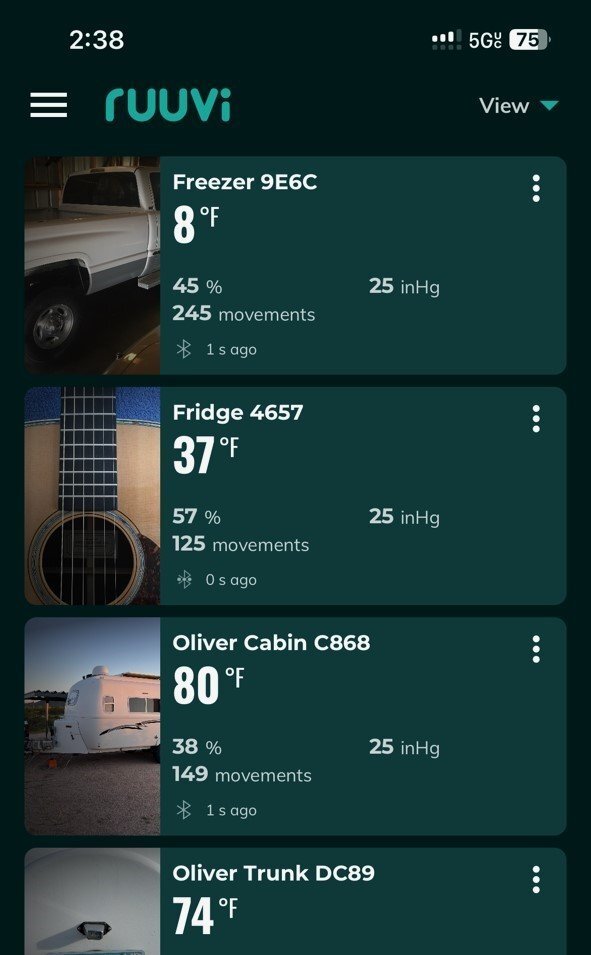
Wow, those temps are almost too good. You should probably run it a lower setting. Ours is set on 4 out of 5. Update on our fridge, now half full of food. I moved the Ruuvi sensor from the far corner of the door to under the drip tray. Read the labels in the picture. I had these in my garage and guitar cabinet, hence the pics. It's been a semi-cloudy day and rooftop solar is keeping up with the fridge on DC mode. Warmer in the cabin than the trunk, cause the windows are closed and no A/C on. Very happy with these temps now.
-
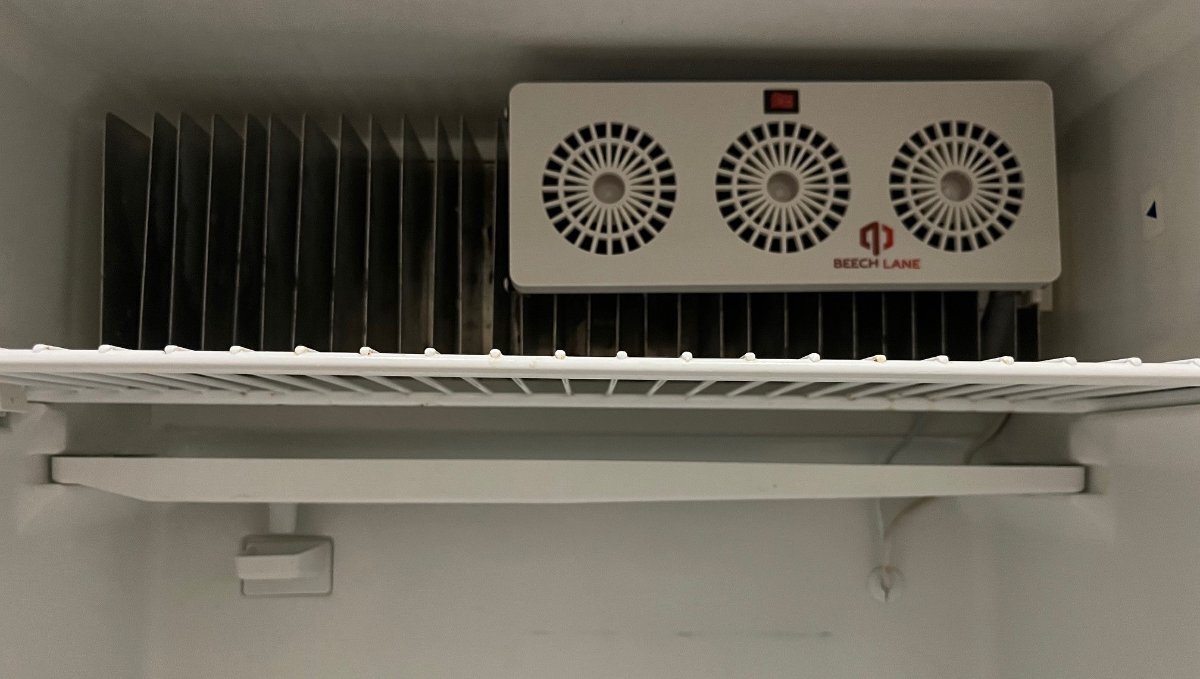
Got ours installed yesterday and with Ron's advice, I now have the same two Beech Lane exterior and interior fans. I had some trouble fishing the wire down. I fed a length of coaxial cable as a fish tape, and it kept getting coiled up and caught halfway. Eventually, I used a mirror and hook to pull it down, and still only about 30 minutes total. I'm not sure of our make/model. It's a 3-way fridge with 5 vs. 10 cold settings and the fin length appears twice as wide vs. the picture Ron shared. Notice the fan on the coils, drip tray below and grommet below that. I used a leather punch tool, to punch a second hole in the grommet just fitting the second wire. Turned it on at 7 PM last night, put a tray of ice cubes to freeze and 6 bottles of water inside. Started it in DC mode and it consistently pulled 15A, close to 17A total with the Victron MP2 running and other peristatic draw. 17A over 15 hours = 255AH. SOC was 99% so I figured I should see 56% SOC now with 600AH batteries and that was very close to the SOC reading at 10 AM today on the Victron SmartShunt. I taped two Ruuvi Sensors in place. One to the interior freezer door and another in the top furthest corner of the fridge door. This morning the freezer was at 10F and the fridge 46F. Turned to interior fan on and off and have not yet noted a difference. It's hard to tell as these temp numbers change slowly. The exterior fan set at 90F has been running regularly at low speed. The fridge sensor was installed on the outer door in the warmest corner of the fridge. I'm going to move it today, tape it under the upper fridge shelf to get a better average internal reading. A proper fridge should get down to 38F or lower, though we do not store dairy products or anything perishable for more than 2-3 days. The temp should improve with the new sensor location and 3/4 filled with food. Chris is filling the fridge with foods today. We're leaving tomorrow morning, starting our road trip to Texas. We'll see some of you there!
-
Even worse April-May. Remember camping near Moab where we could not grill outside, nor want to sit outside. Find campsites with lots of junipers to block the wind. Wind is created from the mix of hot and cold air which is a given out here, where just a few miles away the elevation is 3-4000 higher or lower. We had a calm day today, likely because the stratus clouds kept the heat down. Enjoy the calm days! Was a great day and now ready to leave on our trip!
-
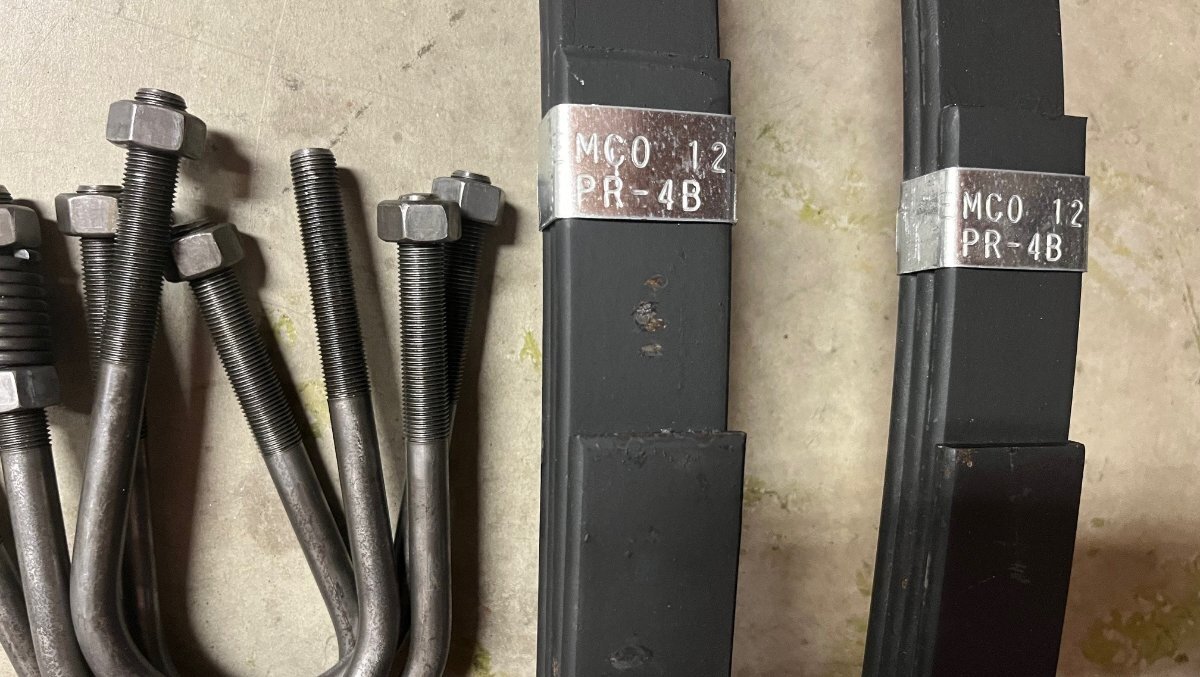
Thank you for the sentiment, but it’s like some politics today, promise anything, deliver nothing. i purchased these to see and needed a backup for upcoming travel. The big EMCO tag was all I needed to see. Soon I’ll submit for return authorization. I will cite one call to Southwest Wheel CS (he said yep, the page says USA!) and 3 calls to TruRyde with no answer. I’ll ask them to prove their claim or return. They’ll take these back as their wheel business is more than Dexter cr@p. I’ll order the Alcan set soon and carry two until I can replace them all next year. Done with mods this year. I inspected below and have Jack, Jack stand, deep sockets, breaker bars, etc. If I could change a freeze plug on a ‘59 300E, on the side of a Detroit Interstate, I guess I can change a POS made in Chin@ leaf spring while Boondocking, Hope not to, do I can send these back soon. Will keep you posted! 🤣
-

The bike rack I see in the Oliver promotional photos
jd1923 replied to a topic in Ollie Modifications
Anybody goin to the Texas Rally want to buy the OEM Oliver bike rack, the 2” receiver model they used to make? (vs. the light duty 1 1/2” receiver of today). PM me in the next 24-30 hours and I’ll bring it along. The dual receivers bolted to the bumper not included. Thx -
That’s an expensive shop tool. This is enough for occasional home use: https://a.co/d/7wrhUwT Earlier when I wrote 1 1/2 hours $200, I was thinking front shocks like we have in the Dodge 2500 trucks, coil springs separate and are not removed to do shocks. Even the Ford E450 Class C chassis has simple shocks (been there, done that. if you purchased full preloaded strut assemblies, you could do the job. I cannot believe that if you went to the Ford dealership that flat rate would be more than 3 hours. At $1000 that’s a $330 shop hour, keep looking!
-
I want me a '59 Buick Invicta!
-
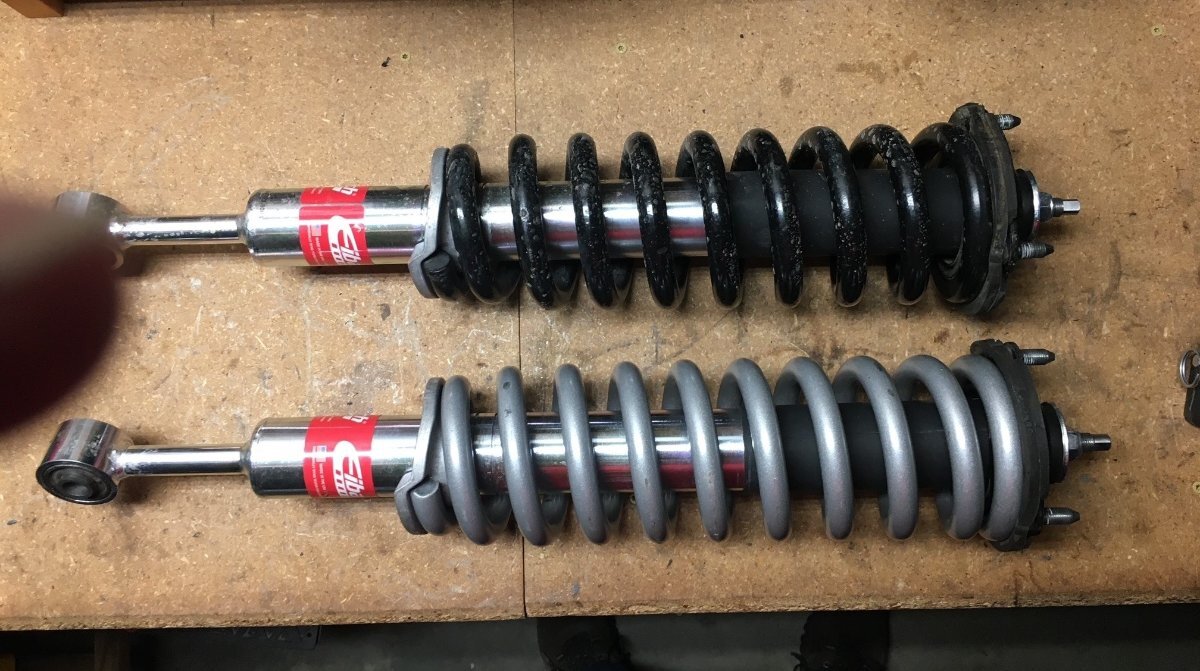
If we were neighbors, we could do this together one afternoon! Just remembered when I did the struts on our GX470. The spring compressors from Oreilly's would not work as they are designed for full size coil springs, like on old cars, not coils on struts. I bought a set for not too much money. Not easy and yes dangerous. As I was torquing them down, I had a HD shield protecting my face and upper body, strut held on vise, empty workbench and bare wall behind it. These are the GX struts. I actually had to do the same job 3 times, OMG! The ride height wasn't right with the Eibach product, so eventually they sent me free springs to compensate (the silver ones). Also used the tool when I upgraded the rear strut on my Honda dirt bike. All went well each time, though you must be patient and extremely careful!
-
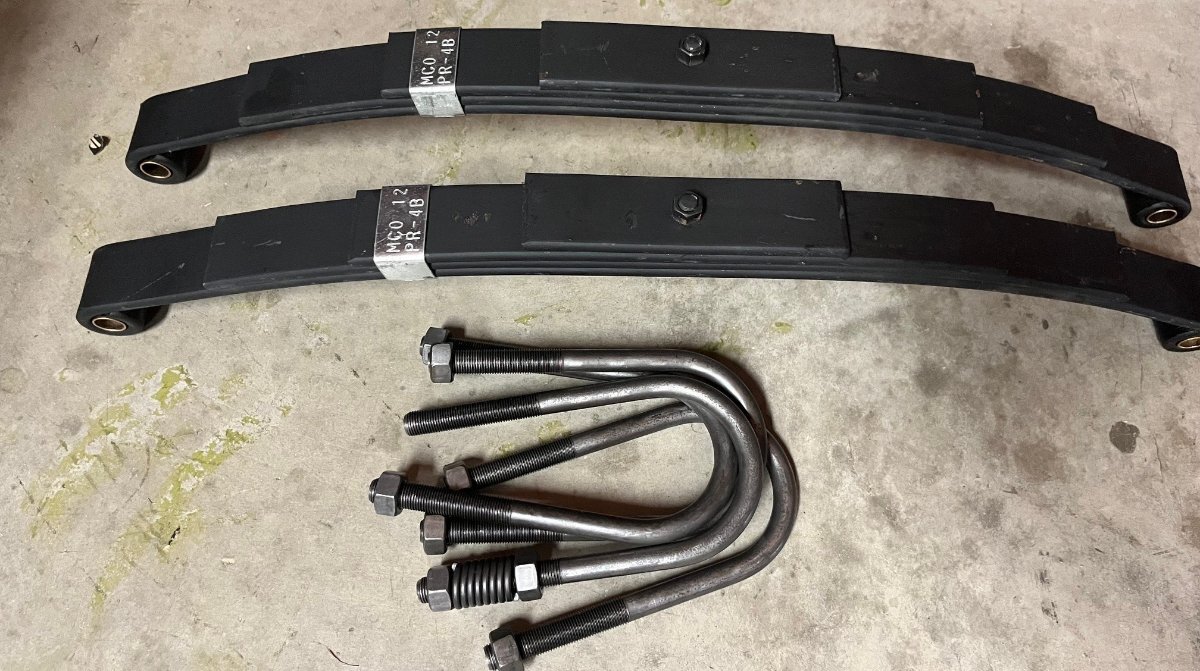
Received these yesterday. Southwest Wheel appears to be a good supplier, but not sure re the TruRyde product! I ordered these after COB Friday and they shipped FedEx 2-day Saturday and they got from Dallas to Prescott by Monday! I generally prefer ordering from Texas suppliers given parts availability. Asking @Galway Girl, @mountainoliver and anybody else who has bought basic replacement springs to post a picture of your label here for comparison purposes. I was warned that TruRyde was bought by EMCO and that EMCO manufactures in China. I see no evidence these leaf springs nor U-bolts were Made in USA! I do see an EMCO label with the PR-4B part number. They do have bronze bushings. The picture above shows nylon bushings. We're leaving this week for the Texas Rally, and I will have these as backup. I certainly hope to not need them. If these are made in China, I overpaid by $70 for the set. On this basis, I should request a return authorization so that I can get this money back towards a set of Alcan springs Made is USA!
-
Sorry Mike, late last night I did not read carefully and focused on the later sentence re the microwave itself. I'm sure you noticed Bill's second picture to see how the frame is attached to the microwave. When the top mounting screws are removed you can pull the MW out enough to remove these. I forgot about these mounting tabs because when replaced our MW with the Emeril Air Fryer I cut off these tabs as they would have had issue with the heat of the oven. Given the top mounting screws are in place, remove them to slide the MW out a few inches to access the side screws. It appears you will have to remove the frame and epoxy it, do whatever so that the 4 corner screws will hold again. I don't imagine OTT still has this part but maybe. Ever had the thought to upgrade to a convention oven or something else, this would be a good time! Convection Oven Upgrade? No let's just replace the MW with an Air Fryer! - Ollie Modifications - Oliver Owner Forums (olivertraveltrailers.com) Bill wrote his was not top mounted OMG, though I do see two holes in his picture vs. the 3 screw holes in ours. Also, unless he removed it no wood piece along the bottom front. If yours has no wood along the bottom, maybe add one as the front of the MW sliding is what likely damaged your frame. Let us know how yours is alike or different! If you need any parts off my MW let me know and I'll bring them to the Texas Rally. Best wishes for a quick repair and see you in a couple weeks!
-
Mike, given our hull numbers and the fact that I removed our microwave this summer and still have it, I'm your guy. Also, we had the exact same model. If your goal is only to secure the microwave vs. removing it, likely you can leave the bezel as-is. If it needs major surgery, the bezel is held by four (4) screws. See the first picture, all 4 corners are the same. The two screws in the bottom corners are not easy to remove. Pull the countertop first to give more room and not to damage it and you will likely need a right-angle Phillips to access these. I have one that drives off a 1/4" impact that worked well. Honestly, I could not believe this installation. More of a backyard mechanic rig vs. a factory installation. Empty the cabinet above, pull the rubber lining and you should find 3 screws (see three holes in the metal plate, second picture). It's likely these have loosened. If so, remove the loosest screw, keeping the others in place and work to replace one at a time. However, they may all be gone. If you're lucky you could install screws of same length, one size up or finer threads to hold. If they are all disconnected, you will need a long thin punch or a nail to something to realign the holes. My guess is the top mount is the issue and remember to check this before messing with the bezel. I supplied two more pics so you can see the other sides. I don't remember any other screws holding it in place. The sheet metal in the rear just rests against the curved cabinet. Note the wood strip along the bottom-front which is designed to keep the microwave from sliding front to back. This should get you started, and you'll likely get it secured quickly. Best wishes, JD
-
If you have front struts yes, just shocks then no. BTW, you can visit an Oreilly's, AutoZone or other national auto parts stores and borrow a spring compressor for the day (they charge your credit card for the tool and refund upon return). Hope you find another alternative. Shops here usually get you in the next week (service shops not RV shops). I should head north and open an auto service shop if there is that much demand! just kiddin'!
-
Rob, special tools make it easier but not always necessary. Fronts are in general more difficult. Any Mobile Mechanics in your area? They would not have issue with customer parts. Shops speel crap re warranty which is BS. In reality they want profit on parts in addition to their exorbitant shop rates! Another point, shocks have absolutely no bearing on wheel alignment. If your truck drives straight down the highway and tire wear has been even, do not align it. Only get alignments done at alignment shops, not general repair shops as they can certainly make the alignment worse. Good alignment techs work alignments daily an it takes more knowledge than reading numbers on the machine. Any alignment shops in your area? They usually install shocks. Muffler shops too. Also local tire shops but not the National chains i advise, find an alternative so you can cancel that appointment! $200 labor with your parts is reasonable, or 1 1/2 hours at the hourly shop rate. Hopefully, I gave you some ideas to research. Best wishes, JD
-
-
Renogy 400W Suitcase Victron MPPT with Custom Solar Port Installation
jd1923 replied to jd1923's topic in Ollie Modifications
Same question answered in another thread. -
I do not know of a 400W suitcase with a built in SC. The built-in ones are usually 100W maybe 200W tops. When the SC is in the panels for a 12VDC system the output amperage is much higher. If you want a 25 FT extension cord 10 AWG may not be enough and a pair of 8 AWG cables that long would be very heavy and expensive. The 400W suitcase is only viable with an internal SC, IMHO. We don't have any information to advise you properly, since you have no signature information re onboard solar, inverter, battery type and AH, travel location, etc. What works in sunny Arizona might not work as well in New England. Read the many great examples here to get ideas. Also, anybody local to you who can splice/crimp wire can install one following a documented example.
-
Sherry, which part of Florida do you live? Prayers to your family and ALL who have suffered Helene. Hope Milton is not as devastating!
-
I believe the Zamp port is rated for 20A and can purpose any suitcase, given you install a Solar Controller (SC) internal to your Oliver. When the SC is built-in to the suitcase or installed externally, the 20A port will be insufficient. Solar panels are high Voltage and low Amperage, but SCs convert to 12V at higher amperage. We went with the Renogy 400W since I felt less would not be worth the time. The 400W is pretty big and 30 LBS. Many go with this model and BTW Amazon used is what I got. It had a scuff on the handles is all saving $80! These are only 16 LBS: Amazon.com: Renogy 220W Lightweight Portable Solar Suitcase, Foldable Solar Panel with Kickstands for RV, Camping, Blackout, Off Grid System : Clothing, Shoes & Jewelry Even the 400W Renogy runs at 10A with 11A being the short circuit current (max current at point of failure, see picture). The highest I've seen on a sunny Arizona day is 366W and often we get 20-23A charging. This means 20AH when that is your hourly average and we get 10+A from the rooftop solar. With 600AH batteries at 50% SOC, an average or 30A charge will take 10 hours to recoup. This is why I went with the max 400W suitcase. Info on my installation here: Renogy 400W Suitcase Victron MPPT with Custom Solar Port Installation - Ollie Modifications - Oliver Owner Forums (olivertraveltrailers.com)
-
We were afraid of that. Too bad you didn't stay up in Prescott longer where it's been low 90s instead (but only in the afternoons). We got a first chance to meet fellow Oliver owners and so much enjoyed our day together! Safe travels, Ken and Mary Kay, and see you at Inks Lake!
-
Battery compartment door lock replacement
jd1923 replied to StillGame's topic in Ollie Modifications
While you have drill in hand, source another padlock, a long-shackle lock for this mod! Mark one end of the paddle nut and where to drill when it's mounted and tight. Then remove both parts, hammer the one side flat and drill both on a workbench vise. These simple deterrents will chase the common thief away, thinking the can pry a battery door or merely lift the LP cover, not prepared with more sophisticated tools.
-
Likely you will just leave the wiring you have at the thermostat and control box. The "telephone" connector has often been used for plug-n-play electronics, so consumers do not have to do any real wiring. It is a 4-wire connector where sometimes just 2 or 3 of the 4 available wires are used. The old "twisted pair" landline telephones only used 2 of the 4 wires (black/red and yellow/green). Four were used only when there was a second line into a home or business. I have spliced these phone cables to change the terminal on one end. If you do the wires are of such fine gauge they should be soldered.
-
I just purchased these as a backup set for travel (links below): WARNING: I was contacted (offline) by a knowledgeable Oliver owner that the claim "Made in USA" may or may not mean made with USA milled steel. Hard to know with marketing copy today. I called TruRyde 3 times this week to get confirmation. Three times I got voice mail without getting a call back. I called again asking to have somebody paged, get somebody on the phone, but the receptionist could not get that done. I decided to take a chance on a pair with U-bolts at $170 OTD. Any Chinese set with U-bolts comes to approx $100 so perhaps I wasted some money if these are not USA steel. At least these have bronze bushings vs plastic. My 4 leaf sets still visually appear to be in good shape, manufactured in 2015, no idea the miles on our hull. TruRyde® 4 Leaf 25 1/4" Double Eye Trailer Leaf Spring with Bronze Bushings 1750 lbs. - SW4B-BR | Southwest Wheel® Be careful is you buy a leaf/U-bolt set as these sets come with U-bolts for 2 3/8" axles. Our hull has 3" axles, standard on 5,200 LB axles: SOUTHWEST WHEEL® Southwest Wheel® U-Bolt Kit for 5,200-7,000 lbs. 3" Trailer Axle - APUBR3BX | Southwest Wheel®
-
I would have kept 1-2 of the old ones still in decent condition, just to have something. If I installed 4 new ones and one of them breaks in the next few years, install the spare to get home. Then study the leaf spring thread and upgrade!
-
Any chance you have a picture of the SoftStartRV installed? I have one installed in our Dometic P2 and would reuse it if possible, given it's in working condition. Another question: why is soft start necessary for this more efficient A/C? I understand you have a 2KW Xantrex. Would it be necessary with the 3KVA Victron MP2?