jd1923
-
Posts
3,278 -
Joined
-
Last visited
-
Days Won
245
Everything posted by jd1923
-
@MAX Burner Art, is it truly cool enough up there? National heat wave lately. I imagine it's beautiful after sunset. Running that Penguin in the afternoons? Keep having fun and keeping us posted! 😂
-
I had written Kevin at SDG a question re the fan modes on the Atmos. He did not answer after being responsive before. Resent the message this morning, was hoping to get written reply I could share but he called me instead. Bottom line, the Atmos runs the fan like the Houghton, meaning whether in cooling or heat pump (all) modes, the fan is always running. Then said he had no feedback on humidity build-up, but the opposite as compared to Dometic and other products. Said because condensate is not collected, but released on the roof, humidity is not created. I would say take his last comment as sales speak! I replied that I was less worried about humidity living in the SW but did not want an AC unit to run all night for no good reason. I don't want to hear it, even a quiet fan, no interest here in white noise! Also, why run the fan all night as a drain on the battery when not needed. We know the furnace fan uses a bit of AHs. There were comments on the Sprinter forum re the heat pump would come on when it got cold later overnight. One mentioned having only one set temp for heating and cooling. Others wrote that didn't make sense, but there was no conclusion. Kevin mentioned the heat pump coming on too. I forgot to ask about two set temps, like for example set at 75 for cooling and 65 degrees for heating. In between these numbers and I want the HVAC system off, no sound, no current usage! It appears regardless of a Houghton, Atmos or other choices, a relay must be installed to turn fan off with compressor may be needed for some. The only good thing about the Dometic Penguin is that in AUTO the fan will stop at set temp. The other option is to click the remote to OFF position at some point when in bed at night.
-
Taping should not be required for a connector designed for automotive use.
-
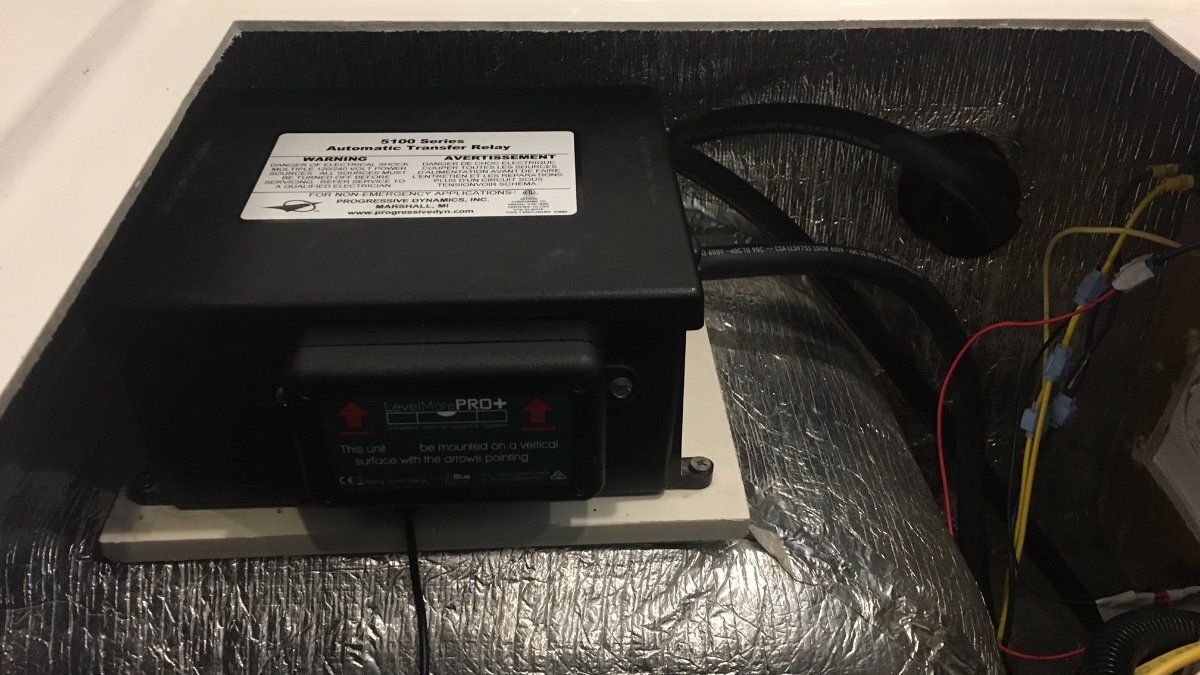
These Wago connectors and OTT also uses SkotchLok connectors which are both substandard re SAE automotive electrical work. Yes, I tape my household connections too, but many electricians do not. Your house ain't bouncing down the road either. There should be NO connections that require electrical tape to stay closed over time. Whenever I run across inferior connections, I will replace with hard crimps or a simple bus with bolted connections, and solder light gauge wires. Check out this photo. I would have already changed these but bigger fish to fry and there's nothing critical in a hardly used USB outlet. Just shows poor installation/lack of design (although in this case, the SkotchLoks could be from a replacement CO sensor). I have seen these connectors elsewhere and they have no business in critical automotive or RV systems. Been working on many repairs and upgrades this summer, so give me 20 minutes and I will fix this too! I hope ours is not like the others here since we have separate fridge and HWH breaker circuits. Thank you for bringing this to our attention!

-
Not exactly! When I've had a bad RV AC unit, after disconnecting the 4 mounting bolts in the interior, we (my son Adam) will climb up rooftop and heave the POS (usually a Dometic unit) to the gravel drive below. I tell my son lovingly, just hit the gravel and nothing else! Sorry @Geronimo John, re your comment, these are closed systems and NOBODY services a leak, you just replace the unit with something better on the market today, as we have ALL been discussing! Truck transmissions are another story! The "Sealed Transmission" 100K+ warranty is merely marketing hype. You better service these, unless you are the guy who trades up every few years (that guy is NOT me). Our '08 Lexus GX 4.7l V8 trans is "sealed" no dipstick, no way to ad trans oil from above... Soon after we purchased of this truck at 160K mile, I pulled the pan, replaced the filter and via the trans cooler hoses, with a funnel/gravity feed, I replaced 98% of the trans fluid. Do this service to yours prior to 100K miles. Toyo gas engines with proper care can last 500K miles, only to be compared to a Cummins diesel! Our GX will outlive me for sure and in another 20K miles I will do the timing belt/water pump service required on all Toyos! most qualified service stations can do this for you, just need to ask! 🤣 We also have a 2000 Lincoln LS (Jaguar platform, bought it 4 years ago with only 11K miles, OMG an awesome small sedan!) with the "sealed trans." I worked that service last fall. It is not any easy service. You need to fill the trans from under the truck, checking level at proper temp at the special drain valve. Use it, maintain it, or lose it. They want you to lose it, so you purchase another. Not me. We don't buy into the deep state of .gov and the companies that are only in it for war and money. Again... 🤣! Love you guys, y'all are great!
-
You got to get a leveling device. Now that we've had one since fall of '23 I would not want to camp without it! Too bad I did not know of this choice, or perhaps its new on the market. I like it made in the USA (even the great state of NC for you locals)! Many of us have already gone with the LevelMatePRO. It is a bit more expensive, though it has two features I do prefer. One is you get all directions on one screen and do not have to switch to Roll vs. Pitch screens. The other is it can be hardwired, installed out of site and out of mind. I have mine under the dinette where it was easy to connect to 12VDC, no battery replacement and 2 AAs makes the Beech Lane product pretty big. Either model is a GREAT improvement. It reads easily from the driver's seat. Love how quickly we find the most level spot and level. Given these details, if this was available when I made my purchase decision, I would go with Made in USA regardless!
-
Follow-up from Kevin and SDG --
-
Update from SDG on the Atmos 4.4 --
-
You all know I'm quite DIY-capable. However, I looked at the value in our older used hull in that it had two solar panels mounted on top, the cabling routed, the Blue Sky solar charger and Xantrex 2KW inverter all integrated and installed in working order. I have not yet had to change a thing there. Someday soon I will add lifepo4 batteries and need to reset the charging curve and perhaps later add another panel and/or a DC-to-DC charger. I did add an EMS that was not standard back in 2016. It's not easy working in the basement area of the Oliver. It's not like working on a truck where you can get it up on a lift to access many repairs. Always leaning into the basement openings is not at all fun. I have sore arms and rib muscles from leaning over that ridge for the mattresses! Think of getting under the pantry and behind the battery bay for this kind of solar/inverter installation, let alone the run to the roof. Buying the right used unit can be very helpful. Recently we had a hairline crack in the LP line to our Atwood furnace. I believe it was due to two frame welds breaking underneath and then pushing them back up to weld (LP lines attached to the frame). I removed the LP T-fitting below, but there was no way to remove the entire line without removing the furnace. My arms would not even fit through the opening behind the furnace. My plan was to cut off 2" of the copper LP line and somehow re-flare it under the body. I had to push the line from above, front side of the furnace and then pull from underneath, repeat that and repeat that until I achieved the required length below. It was amazing that I got my tubing cut-off and flaring tools between bottom hull and the aluminum frame. A whole lot of patience and about 2 1/2" hours later the job was done. (Would have been happy if that was the only thing I accomplished all day yesterday!) Wow, a big to-do is now off my list. 😂 Very happy not to do a solar/inverter install from scratch on our Oliver! I did that in a Bigfoot Class-C in 2020. There I could drill down, standing on a flat roof, down into a wall cabinet, through a race to the battery bank down below. Ran inverter connections under the truck through the chassis frame... Not on an Oliver. You should see how OTT installed the Dish Satellite on our hull. They did not go through the upper hulls front to back (dish up front and TV in the back). They ran the cables down, visible in closet to the basement area below, then runs towards the black tank and follows the drain all the way to the rear basement, then up to the attic. There must be 60 ft of coax with multiple connectors. It's like they added it after the build, not an option integrated to their build process. The Oliver is a great TT that's not real easy to work on for major upgrades (but will keep doing so as needed)!
-

Solar Panel Knob FELL OFF- that Secure's Panel
jd1923 replied to BoondockingAirstream's topic in Ollie Modifications
If mine were to ever loosen (they are likely nicely tight now from some internal corrosion), I would match the thread and replace with automotive Grade 5 bolts. Torque them per the bolt size with thread-locker on them and forget about them going forward. T-bolts are designed to remove easily, but these are fixed panels. -
Our hull has the Dometic Penguin II, and I believe it being an older hull has the 13.5K BTU model vs. the 11K of newer hulls. Our electrical panel has a 20A breaker for the AC. Can we assume my hull has 12 AWG wiring? (14 AWG should have a 15A breaker.) 14 AWG wiring can be an issue re voltage dropat high fan compressor running in any replacement unit.
-
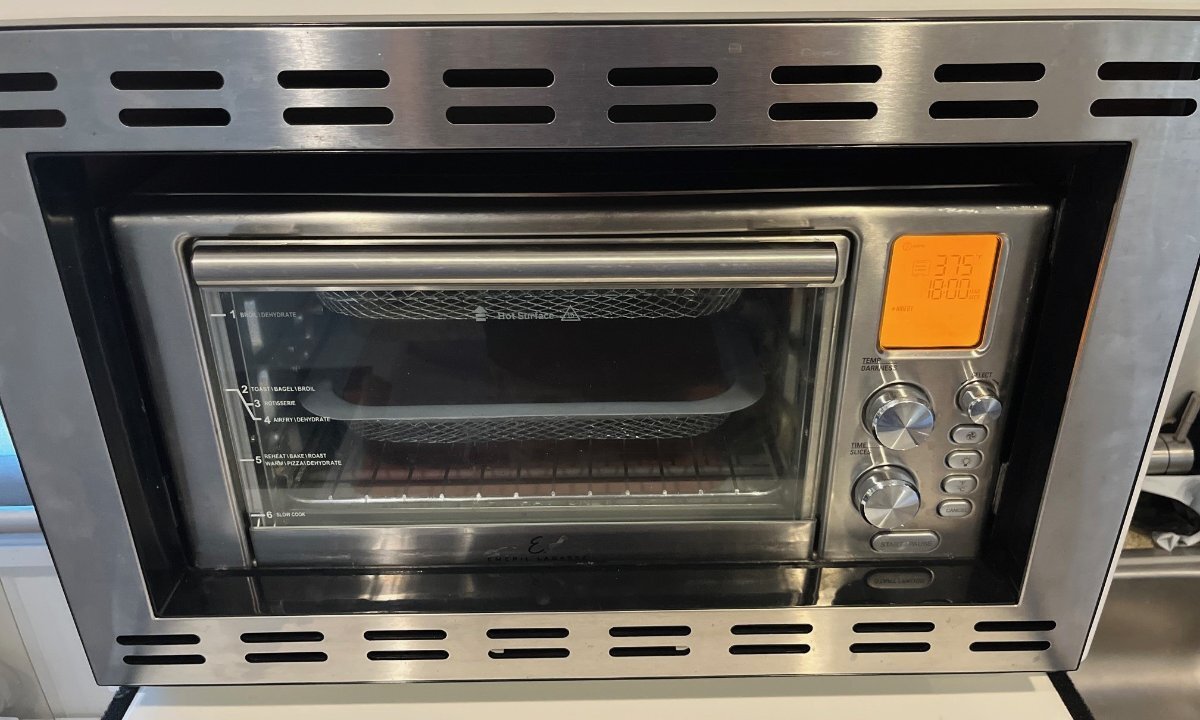
So, we've decided to do this one way or another. Don't need a microwave, as I can reheat my coffee on the stovetop and save the carcinogens of microwaves! Chris says they kill the nutrients in all foods, so she doesn't use one ever in all of her amazing cooking. Measured our small model Emeril Air Fryer and it is the exact same dimensions, all measurements of length, width and height. Yeah, there is a heat issue that I mean to overcome. Yanked the microwave out of our hull in about 20 minutes today. Connected the Emeril and ran the air fryer at 375 for 16 minutes today. It got hot in the end, but there is 4 1/2" above the oven and 2 1/2" left and right (thermostat wiring to the right). I will need to raise it about 3/4" to fit the surround, but otherwise fits like a glove. I will cut some plastic off each side for the heat. I plan to fit the opening top and side with ceramic insulation made for woodburning stoves which comes in many thicknesses. I am wondering re OTT installed convection ovens. Anybody have one? Is there any exterior venting? Hey @bugeyedriver, you wrote on Dec 19, 2023 "The Wonder Egg - Hull #14, has extra vents in the side walls behind the oven, so I have gone to the micro/conv. option." Can you show pics of this venting. This will be a fun mod for me, and Chris will love it when she gets back from her sisters visit! Check out this pic after an hour of work today!
-
The claim is R32 is more efficient. I can give a flying fart if it is better for those who believe in climate conspiracies. I used to buy R12 for $4 a can at any AP store. Gone are the days of freedom in lieu of .gov regulations of those who know better (or not). If it is more efficient, then green science has produced something of value. R410 was never claimed to be more efficient than good ol' R12, cheap and capable.
-
You may be asking for company! Love northern Minnesota, just as long as you can get the fish biting and NOT the mosquitos! We are very likely going to visit Chris' sister in Farmington MN sooner or later. They snowbird down here some winters. We would role that into a Badlands visit, Mt. Rushmore and more. Hugo, you got a hook-up here too (not garaged). For us, perhaps 2025, or 2026 the latest! 🤣
-
Ours is the same vintage as Dave's (see pic). I took this when we first purchased our Oliver last year, so I don't have to crane my neck looking down there. @Steph and Dud B likely has the right reason if they are on the same circuit, what the... I was thinking of this today, after I first read the initial post. Been working on mine a lot lately. Was looking to see if there were any GCFI outlets as a cause, but my Oliver seems to have none. @Ron and Phyllis Does the Suburban HWH run off of 120VAC at this time? I would check that first. And if it were mine, I'd add a breaker, run another AC run and fix the larger issue (what was OTT thinking)?
-
But I really like COOL logo! 🤣
-
The Spec PDF on this page shows R410 for the Gree Eco-Cool: ECO-COOL White Free Blow (premierproducts.net) I wouldn't wait 'til next year, given a white R32 model can be purchased this year. New year price increases are pretty much industry standard. This one is certainly available in R32 with the WHITE version TBD "stocked within 8 weeks."
-
I read on the Sprinter Forum that the Gree Eco Cool used to be R-410a but switched to R32. I could not find a Gree on Amazon, but Tosot was there. Note this listing states R-410A, so be careful with any online purchase. It appears as @Ronbrink stated R32 is preferred/more efficient, less battery amperage. Does anybody understand the relationship between Dreiha Atmos 4.4, Gree Eco-Cool and Tosot? Amazon.com: TOSOT GO COOL RV Air Conditioner 15000 BTU, Non-Ducted Camper Rooftop AC Unit with Heat Pump, High-Efficiency EER 8.5, WiFi and Remote Control : Automotive
-
You went 2.4" lower with your Houghton. The Atmos is only 0.9" tall than the OEM Dometic Penguin II. I guess if you have a 10 FT garage door another 1" would matter, otherwise not. Ours is parked outdoors. I'll trade the inch for a more battery efficient AC system.
-
Just found this 5 months later - thank you @GAP, great idea! (Added to my furnace duct upgrade project.) 😂
-
Solar Panel Knob FELL OFF- that Secure's Panel
jd1923 replied to BoondockingAirstream's topic in Ollie Modifications
A little thread-lock on the bolts. I checked mine last year and they're not movin'. -
First-ever(for us) EscapadeRally -Rock Springs, WY
jd1923 replied to MAX Burner's topic in Events & Rallies
You're the man Art, great pic! Hard to keep up with you, though we love every episode. 😂 -
God Bless America and the fact with our meager means we can have so much in life! Vote 2024. 😂
-
Or you could just fall in love with it! We found ours of all places, on a local Craigs ad after we had just sold a Bigfoot Class-C. I showed the ad to my wife and said, "Let's go look, just to see. There's no way we're going to pay that $$,$$$ for a TT, but let's go look to see." Turned out we put $10K down within 48 hours and had it delivered in a few days! I've purchased near 100 total in old cars, trucks, motorcycles, dirt vehicles, trailers, a half dozen homes and even 20+ fine acoustic guitars... We have LOVED all of them! 😂
-
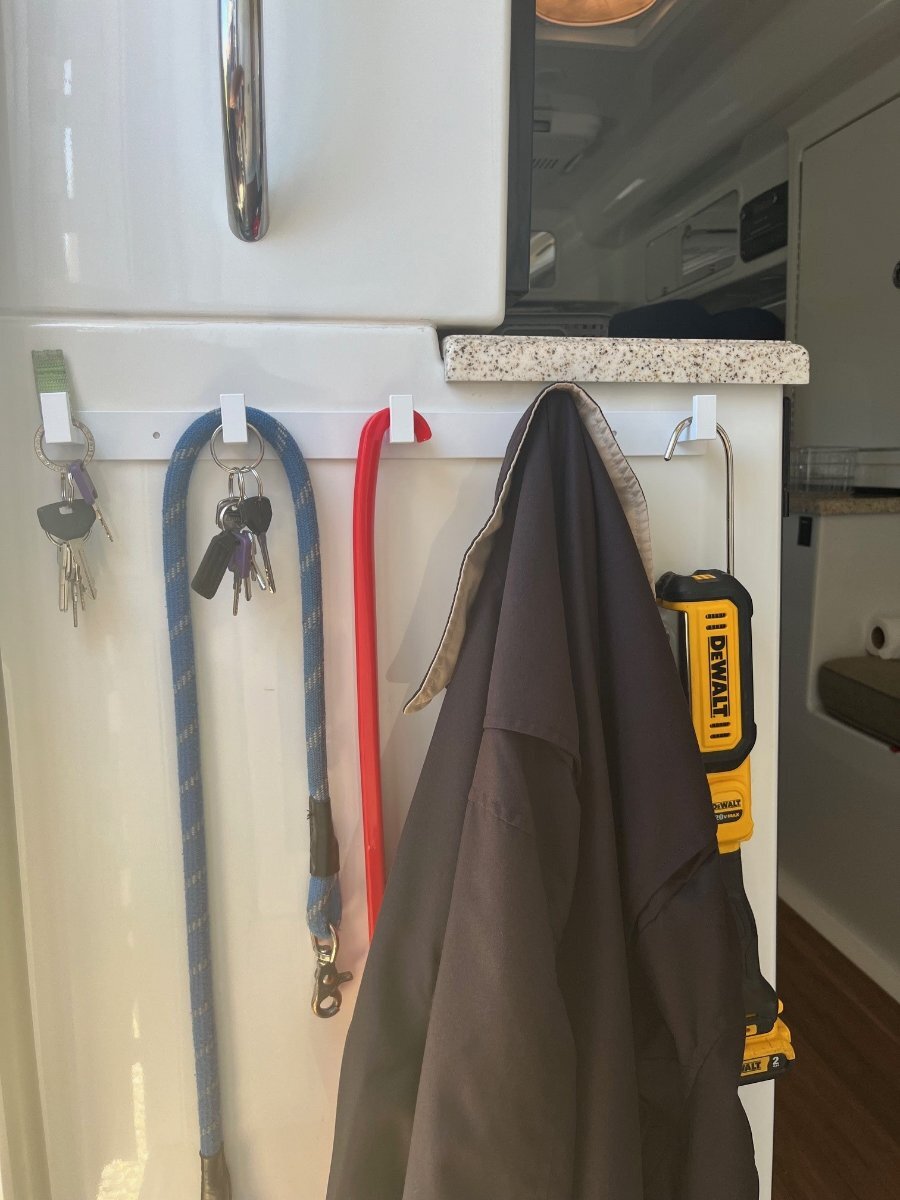
Inexpensive Helpful Modifications
jd1923 replied to Wandering Sagebrush's topic in Ollie Modifications
You guys got me thinking about this. Nice little key rack but for me it was lacking some important criteria. I need a rack that I can reach while standing outside the door. We climb in and out too much already for older bodies! Also wanted a combo key & coat rack, with room for Charley's leash, my long shoehorn, a jacket or two and why not the flashlight! This product turned out great. Five hooks at 15" for just $17 and you can order them in various lengths. It has a flat back, so I ran 3M VHB 4950 the length of it. So strong. We had 3M Command hooks here and there, installed without much thinking to placement, so I just removed all of them. Amazon.com: Vanloory Coat Rack, Heavy Duty Stainless Steel 5 Tri Coat Hook Hanger, Wall Mounted Storage Wall Hook, Rustic Clothes Hook/Key Hook Rail for Bathroom Kitchen Entryway(5 Hook White) : Home & Kitchen