All Activity
- Past hour
-
Before June 2023 I had no idea what an Oliver was! Found ours 4-sale locally and a few days later I brought it home in time for Chris' birthday. Another four days later, I joined "The Forum!" 😎
-
You gotta love this forum! Frankly it was a primary reason we bought our LE2.
- Today
-
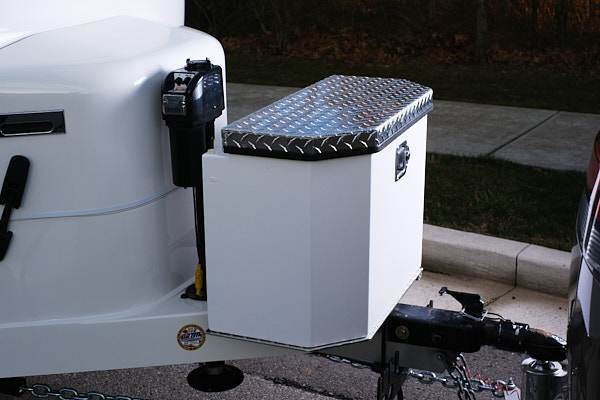
Barb and I have had our LE I for about 18 months now. We fancy ourselves minimalists, but truth be told, we viewed the LE I as a bit of an experiment knowing that it would be a challenge getting all of our gear in the trailer and the Pathfinder. What helps is that we are both perpetual organizers and efficiency nuts so we welcomed the challenge. The game changer for us has been connecting with the folks at Sea Biscuit. Knowing we needed a little more storage one of the first accessories we added was the rear basket from Sea Biscuit. We weren't quite sure what types of containers we could put in the basket, but we knew it gave us lots of options for adding storage. After looking at the myriad options of storage containers, boxes, etc. that could go in that rear basket, we settled on the rear storage box from Sea Biscuit. The locking rear box is home for our hookups, a large tool bag, our outdoor carpet for under the awning, and several other items that immediately come out when we land at a destination. Our sewer hose for draining the gray tank (we have a composting toilet, so no black tank hose) is still in the bumper and it is surprisingly easy to store and deploy when needed even with the box over top. The expanded storage we gained from the rear basket and box combo was our first game changing moment. It allowed us to move several items out of the Pathfinder permanently. Shortly thereafter we noticed the front box that many of the LE II owners had added. To our disappointment, the box was not compatible with the LE I, but we started a conversation with Dave and Kristine at Sea Biscuit about our options. Fast forward several more months and we are one of the first to acquire a front box unit designed specifically for the LE I. The front box is deeper than the rear box and fits neatly between the front jack post and the bull dog coupler. It sits on a steel platform making it super stable, and when opened leaves plenty of clearance for the jack post. The front box now holds our DC to DC charging cables, wheel chocks, and several other necessities that also formerly rode in the back of the Pathfinder. This was game changing moment number 2. One of the final accessories we added to compliment our storage accessories from Sea Biscuit was the rooftop basket from Rhino Rack. The rack holds our chairs and camp table that were also - yes, you guessed it - in the back of the Pathfinder. (Low and behold, I can now see out of the back window.) Barb and I are huge fans of the little Ollie having put over 15,000 miles on it, visiting 21 states in 2025. Our travel style is such that we rarely spend more than a couple of days in one spot so the flexibility of the smaller LE I, and smaller tow vehicle (17 mpg with the Pathfinder) is the perfect combination for us. For anyone who is considering an LE I, or who has an LE I and is looking for quality accessories to expand your storage, we cannot recommend the folks at Sea Biscuit highly enough. The products are top notch and the Hess's are awesome folks. See you on the road!

-
- 2
-

-

-
Strange, is your bumper not flush to the rear deck? I’ve slid ours off a half dozen timesI The bike rack mounts are removed on ours, but unless they changed something, the bumper is flush and could not be in the way. It should wiggle off after the center nut and washer are removed.
- Yesterday
-

Tire Minder power source.
Against The Wind replied to Against The Wind's topic in Ollie Modifications
Thank you, friends for your inventive and informative responses. I can always depend on the Oliver community for THE BEST HELP! Happy Travels! -
 @2008RN I belive the answer is yes. See the youtube video below on how to set it up.
 -
@HDRider Jeff: I do not think the bumper needs to be removed. On my OTT, Elite II, the trailer hitch receiver needs to be removed.
-
I am too. What usually gets me to actually read the instructions is I run into a brick wall. Just as you did. Then I'll post it to the forum. Just as you did. So no worries. Please do post a pick, one of us out here will figure it out. GJ
-
Yep, that's the way it's done by about 1500 of us. (1500 is my guess as to the number of us with 16" tires.) Some thoughts come to mind. With the downsize of the tires from 16" to 15" was the design changed for the tire removal that would cause your difficulty? If it was, if you were to reduce the pressure in the spare tire to allow a slight reduction in the diameter would that make a difference in your situtation? Was your spare tire changed to a larger size? (Not likely with a 2023 OTT. I believe that from about 2018 to the rim size change, the spares were the same tire as the 4 on the axles. But that is just an assumption.) Best of luck. GJ
-
I am terrible when it comes to reading instructions, especially when it seems like a simple task. I just checked the Owner's Manual. No mention of the bumper.
-
I'm past the picture taking. It is not the spare tire in the way. The bumper is in the way. I'll take a pic when I put it back together.
-
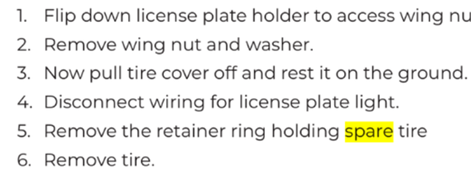
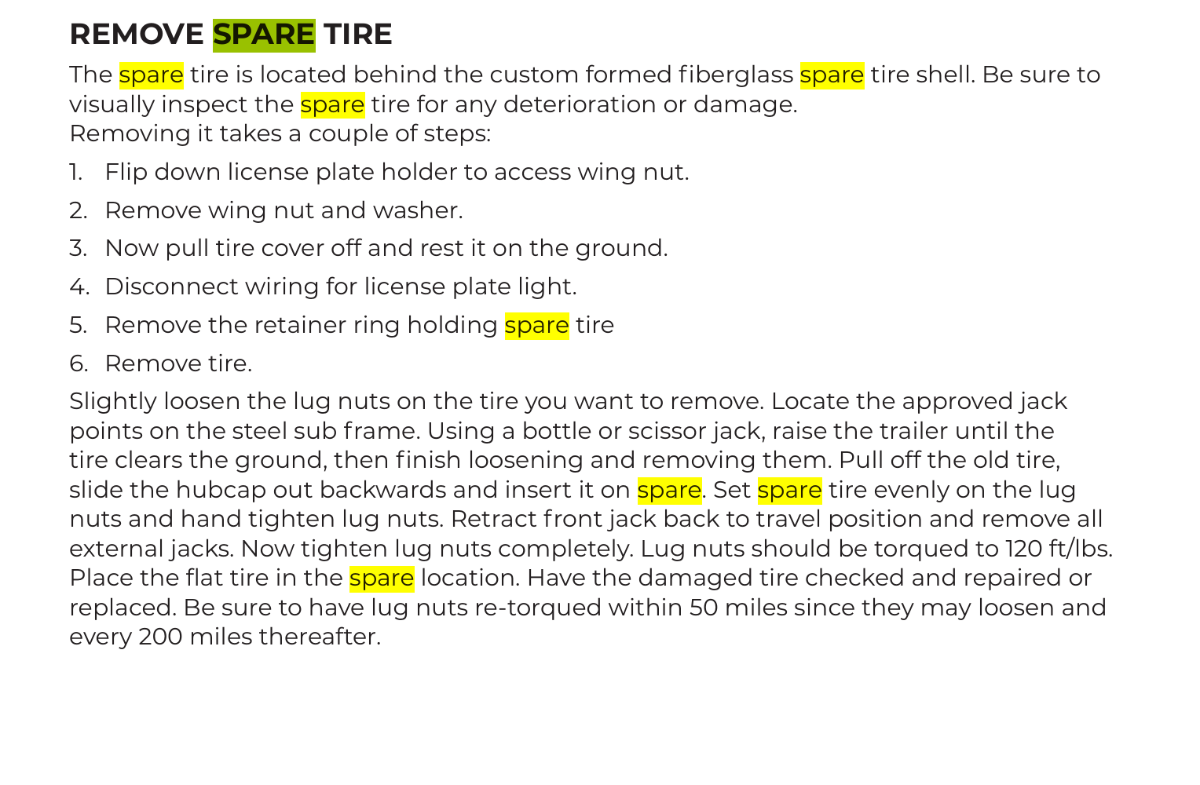
That's a new one. It certainly was designed to just lift the license plate and remove the big nut. The cover can then be removed with the spare tire still attached to Ollie. Kindly post a picture. GJ
-
I learned something today. You have to take the bumper off to remove the spare tire cover. I sure am glad I am home on a cool sunny day, and not on the shoulder of I40 in the rain.
-
 I have another question related to upgrading to Lithium. My 2020 LEII came with a Xantrex Freedom XC 2000. Can the Xantrex Freedom XC 2000 be used with lithium? The 2000 watts has been sufficient for our life style although I would like extra capacity with the batteries that lithium would give.
 -
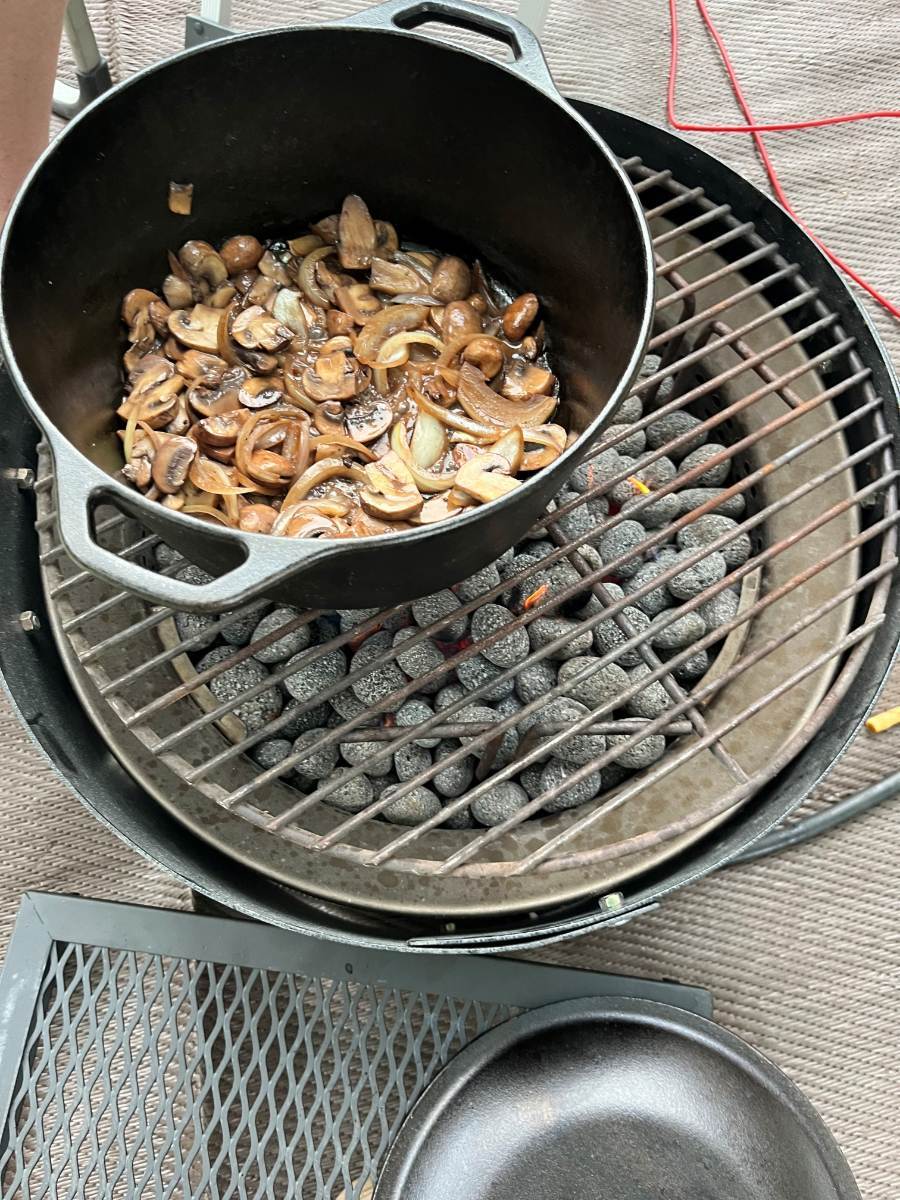
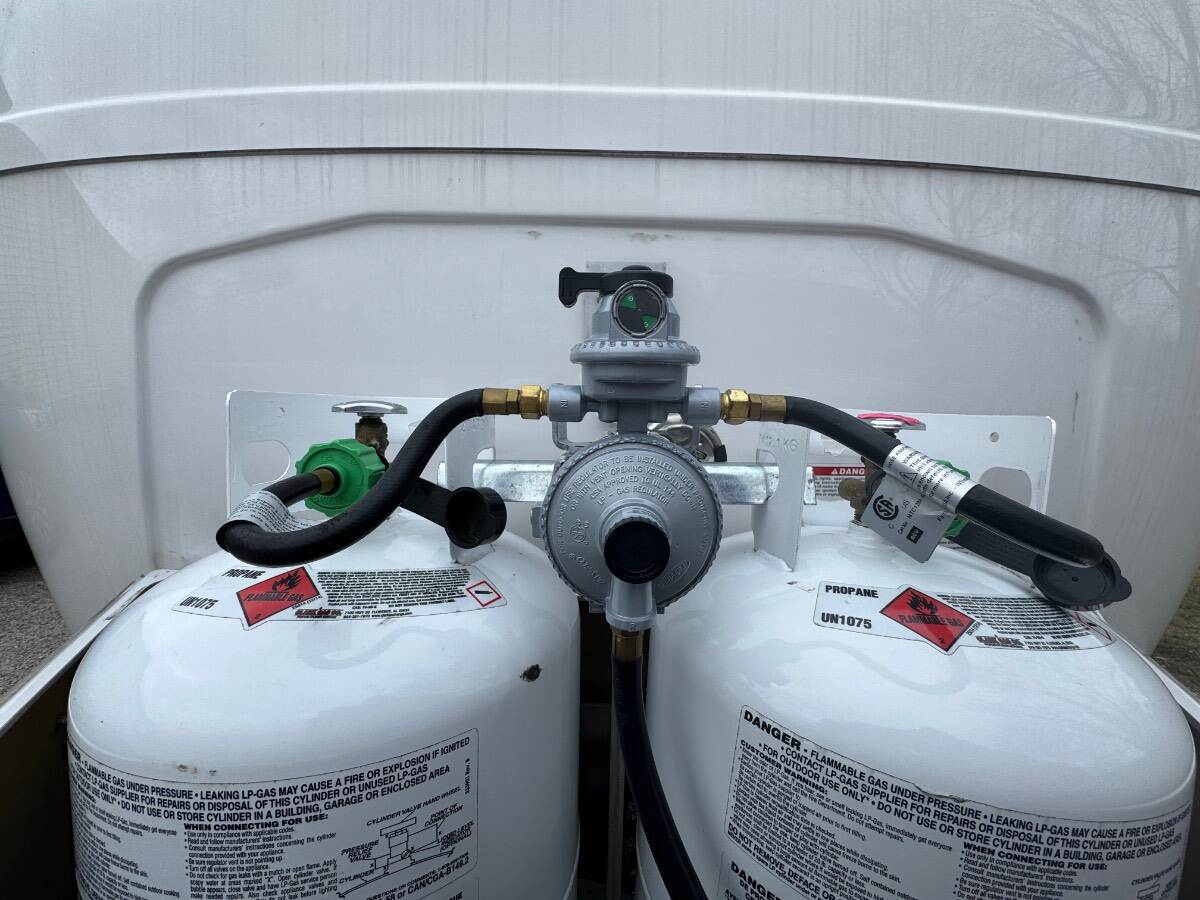
Sounds like a great setup! You do need high pressure if you want an outdoor cooktop requiring high pressure. I thought about adding a high pressure outlet, side-by-side to the OEM LP outlet front of the Oliver, but realized we don't need a high-pressure cooktop. For our Napoleon grill, or the Weber Q many use, Blackstone grills and our fire ring that we use everyday it's a simple plumbing fix to remove the regulators from all this equipment, then use the Oliver LP plumbing as-is. Chris can cook almost anything on the fire ring. That's a good use of LP, since we run it anyway for campsite warmth! I built a steel surround for the fire ring to allow it to run well in the wind and we have a grill top for high heat and a taller tripod to simmer foods (see pic). We replaced our OEM installed Marshall Excelsior MEGR-253 in January with the suggested Fairview model that I believe OTT installed in later hulls. This regulator failed immediately! First trip out it made whistling noises. Second trip out, making noise again, it shut down in some odd way. The fire ring kept burning, but no indoor appliance would start (HWH, furnace or cooktop). Then after 20-30 minutes, we could see the fire ring burning weaker and weaker. I had to disconnect both tanks and do a sort of pressure reboot and fortunately we did get the furnace and other appliances to work for a couple days to get back home. I wasn't going get stuck again, so I re-installed our original regulator for our next trip. I had trouble finding Marshall Excelsior products online except for Amazon, so I contacted the manufacturer. They suggested an authorized reseller that would back the 5-year warranty named Tweetys from Bulverde TX: https://tweetys.com/marshall-excelsior-megr-253h-excelaflo-automatic-changeover-regulator---high-capacity.aspx I went with the Marshall Excelsior MEGR-253H model, H for high output. Their tech support explained there is nothing wrong with running the H model and it would allow for running more LP appliances simultaneously. This is a well-built regulator and the one that's been working 10 years is now my backup. I tossed out the Fairview model since warranty claims on a $50 part is not worth my time, the return shipping costs and I would not want to chance installing a replacement. On occasion having a rear connection would be helpful. OTT installed one, but why in the bumper?! I'm not going to lower the bumper, push the waste hose out of the way to use it. We only open that at the dump station! I thought of moving it so to be accessible, but so far not worth the effort. OTT should redesign this, mount it like they did the front outlet. We added a 12' LP extension hose with a Y-adapter to run the fire ring and grill.
-
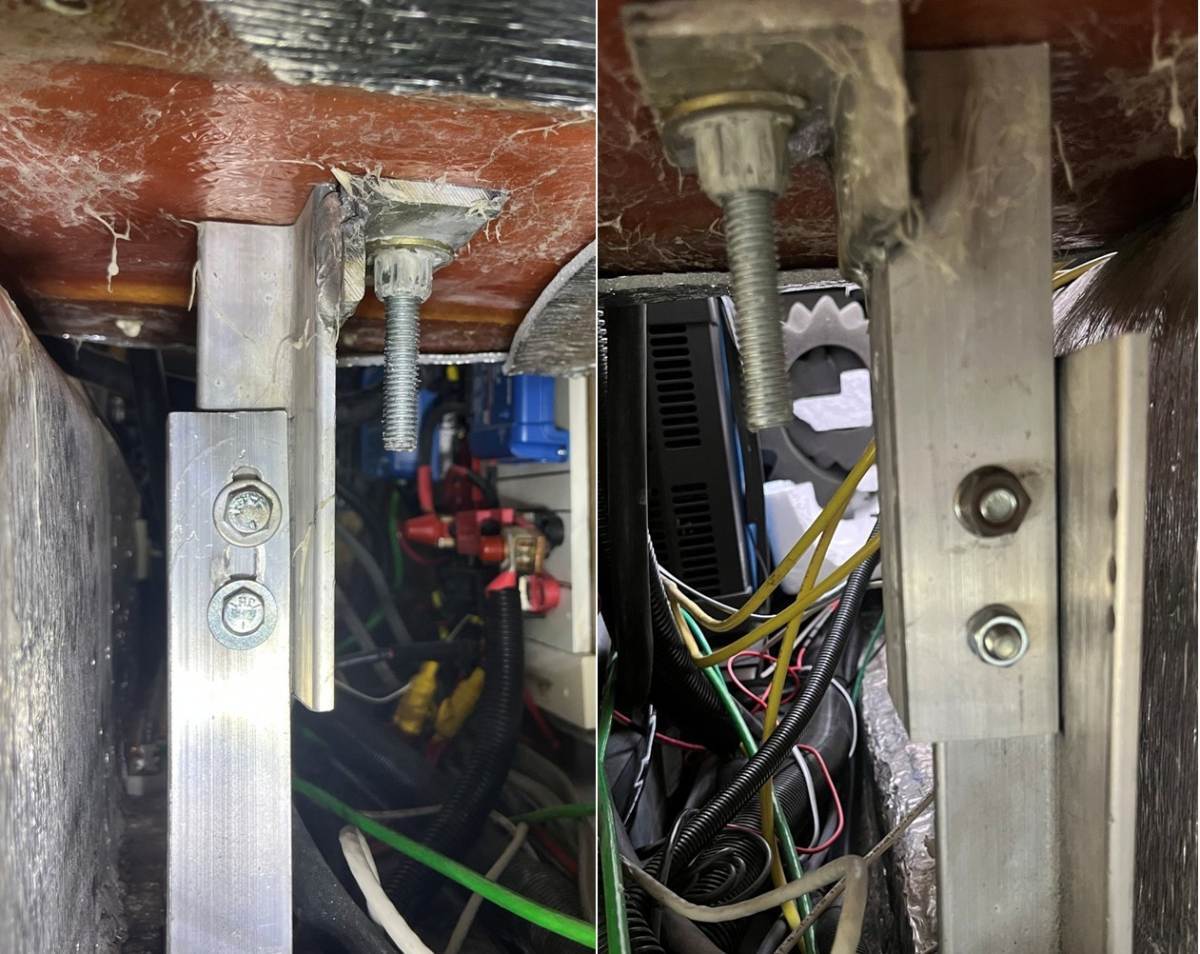
Highs in Prescott are 65F this week. Most of the year I can be outside working. I understand the East has been hammered this year. I hope spring comes early for y'all this year! 😂 Spent the whole day getting everything straight that I noticed during our recent trip, while getting ready for our next trip to St George UT, just 4 weeks away! I corrected the battery support issue and installed our new LP regulator. I did a full inspection of the battery post. The single bolt was in place, the nut was there but loose, with only one thread showing. The two angle-irons seemed to be aligned at a good angle. The base mount has two bolts screwed horizontally and firmly into the frame. The two large upper bolts holding the battery platform were solid. The battery base is square, the door flush, and everything looked good. I decided there was no need to raise the post, since the one bolt at the bottom of the grove was were it was when installed 10 years ago. The original bolt is a 5/16" bolt 1/2" head and since the groove was wider, I added a second 3/8" #5 bolt 9/16" head. I drilled about 3/8" below the top of the groove which would allow for raising the mount if ever needed. Drilling though both angle-irons, with a sharp drill bit, drilling slowly took some patience! Then Chris held a ratchet with a double-long socket extension under the streetside bed opening, as I tightened from the rear dinette opening with my favorite DeWalt 3/8" impact! I first tightened the original bolt, with a short burst of the impact and it now has 5 threads showing. It certainly was loose, still hanging on! Then we tightened the other bolt which has thread sealant and a Nylok nut to boot. This is done now, likely no need for future maintenance! 😎
-
@jd1923 if I can get a weekend that's not freezing and I'm not working, I'd love to get started on that fix. I agree with everything you said.
-
Great post, Craig!
-

Inspectable Item: Propane Area
Steve Morris replied to Wayfinder's topic in Mechanical & Technical Tips
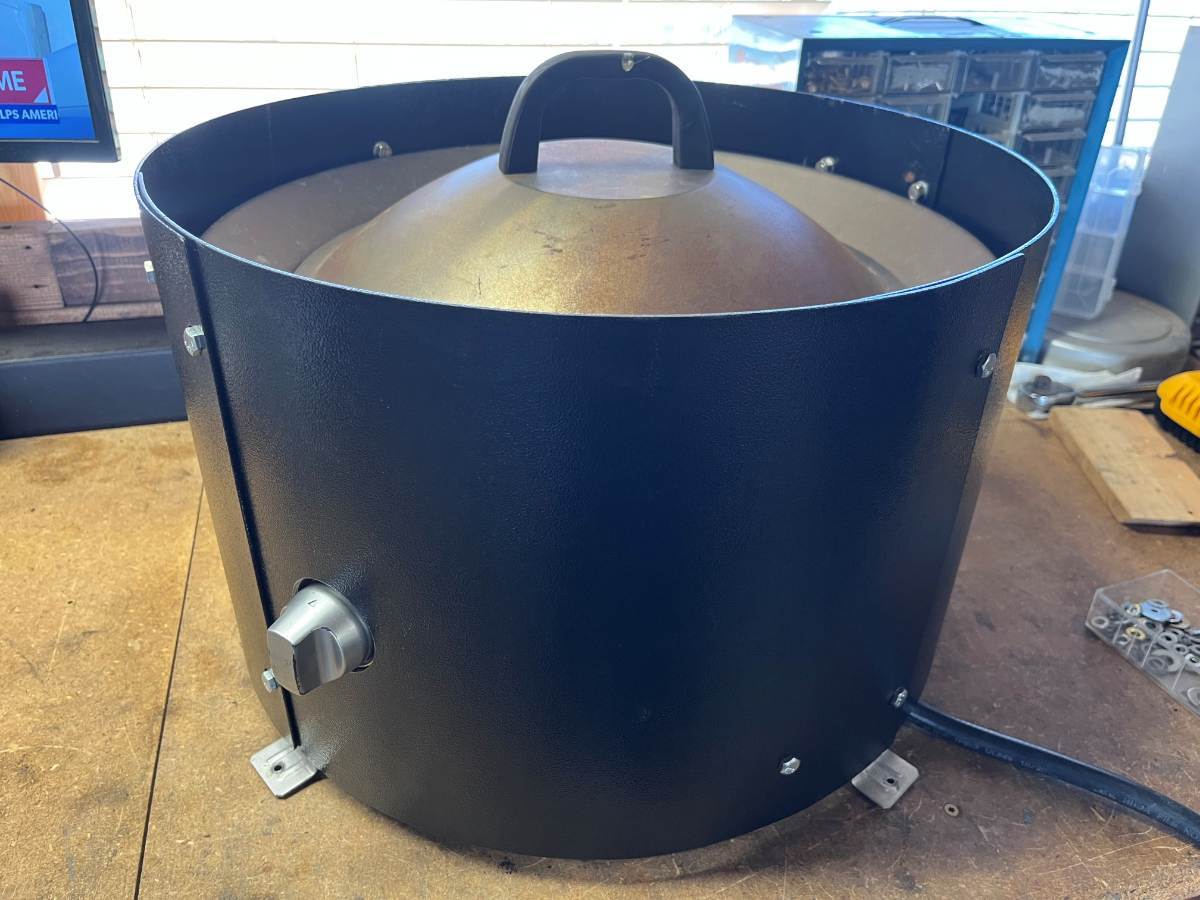
Hank White has made some fabulous modifications to their Oliver, including the propane setup. He’s mounted a block on the inside wall of the housing where a manifold and regulator are located. Stainless covered hoses go to each tank, eliminating the need for the OEM regulator mount on the threaded rod. Low pressure gas is sent to the two LP ports, and two full pressure lines go out; one to the Oliver’s interior and one to a high pressure port for devices that have inbuilt regulators such as a fire pit or grill. I didn’t take any photos… -
I spliced a male cigarette lighter plug to my Tiretracker signal booster. When I tow, I just plug it into a 12 volt plug in the rear of my tow vehicle and temporarily attach it with a piece of adhesive velcro. One could also plug it into one of the 12 volt receptacles in the trailer. When I am finished towing I unplug it, lift it from the velcro and store it away until the next trip.
-

Inspectable Item: Propane Area
Ollie-Haus replied to Wayfinder's topic in Mechanical & Technical Tips
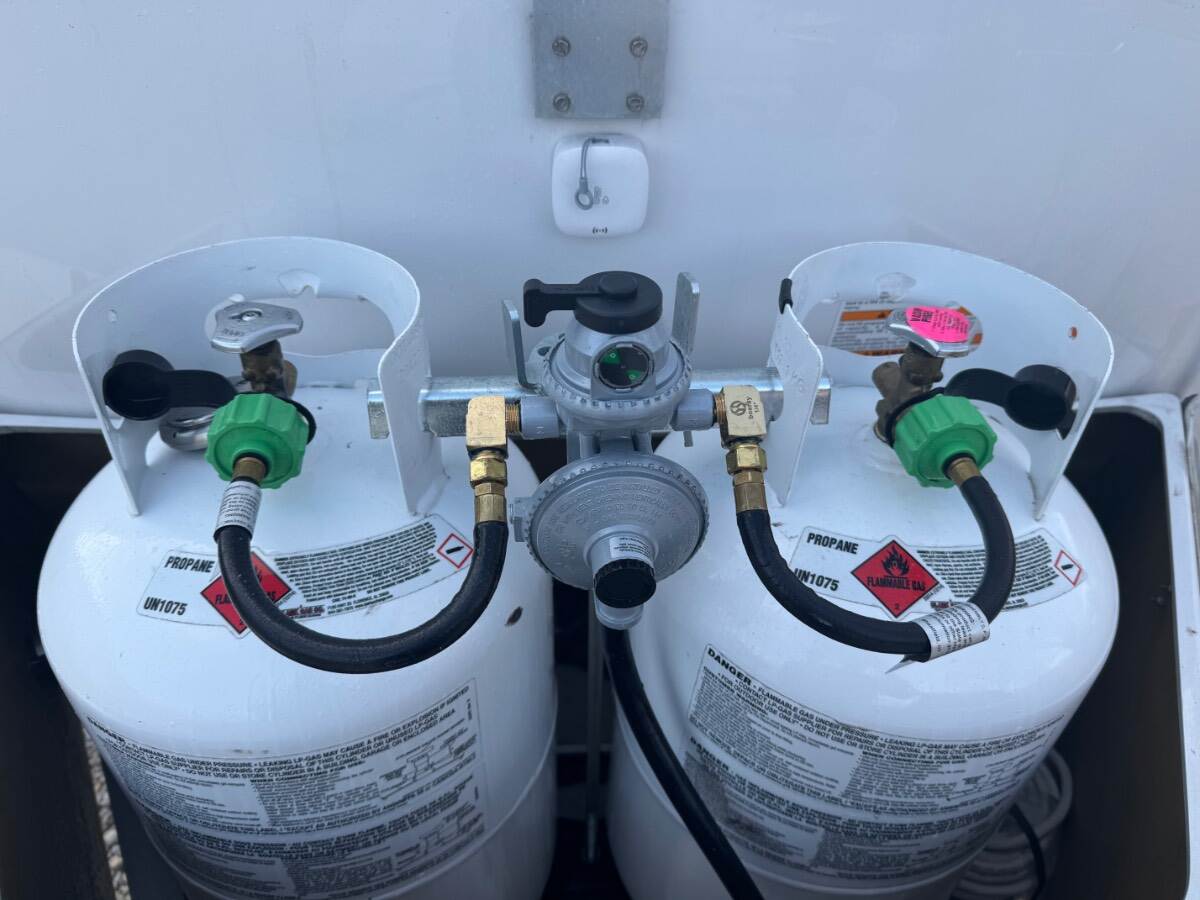
Well we had a “warm” day today so I decided to do one final upgrade that several others have previously done to their propane systems. I got the right angle fittings for the regulator connections a few weeks ago and finally decided to install them. It only takes a few minutes to do in place. The adapter fittings that come on the regulator have check valves built in, so I purchased standard 1/4” street elbows and reused the original adapters to make the connection. One little trick to make the installation easier, with the cold temps, the hose is stiff and feels like it will split if you try to reshape it into the new configuration. If you take the hoses into the kitchen and immerse the rubber part in a pan of boiling water for a minute, the hose will naturally straighten out, and while warm can easily be installed on the tanks and regulators with little tension in the process. There’s a much gentler bend in the hose when completed that should make the hoses last much longer. Before: After: Thanks to everyone who previously made this upgrade and for sharing on the forum.
-
Additionally you may want to consider replacing your valve stems to the metal variety as opposed to rubber. Rubber ones can fail when sensors are attached.
-
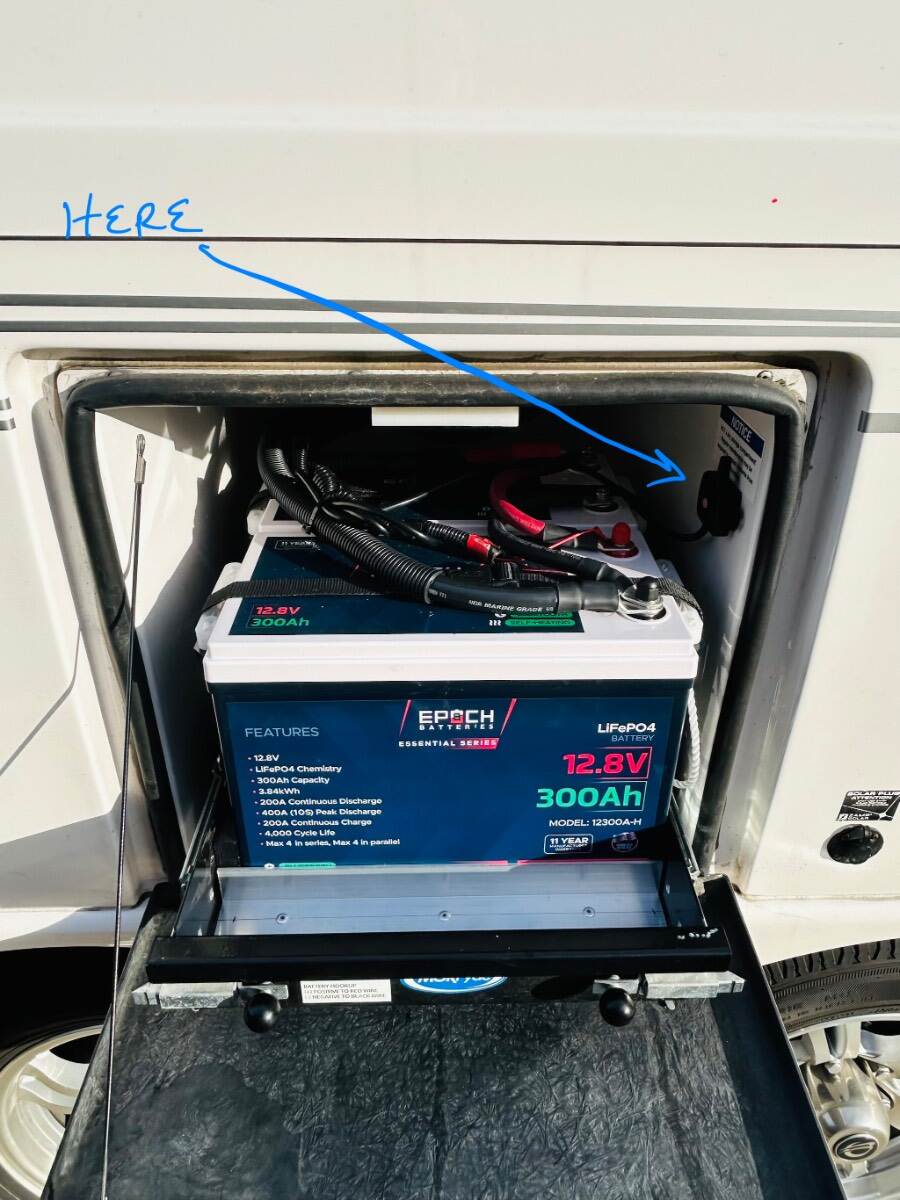
@Against The Wind We have been using a TST TPMS for several years. I opted to mount our TPMS relay out of the weather and UV exposure inside the main battery compartment with tiny strip velcro. It has worked flawlessly since installation. All I did was attach it to my battery terminals. Keep in mind this relay creates a very low parasitic draw on your house batteries. Not an issue in my case, as XPLOR is parked at home and always plugged into 30 amp. Have fun and mod On! Patriot 🇺🇸🇺🇸
- Last week
-
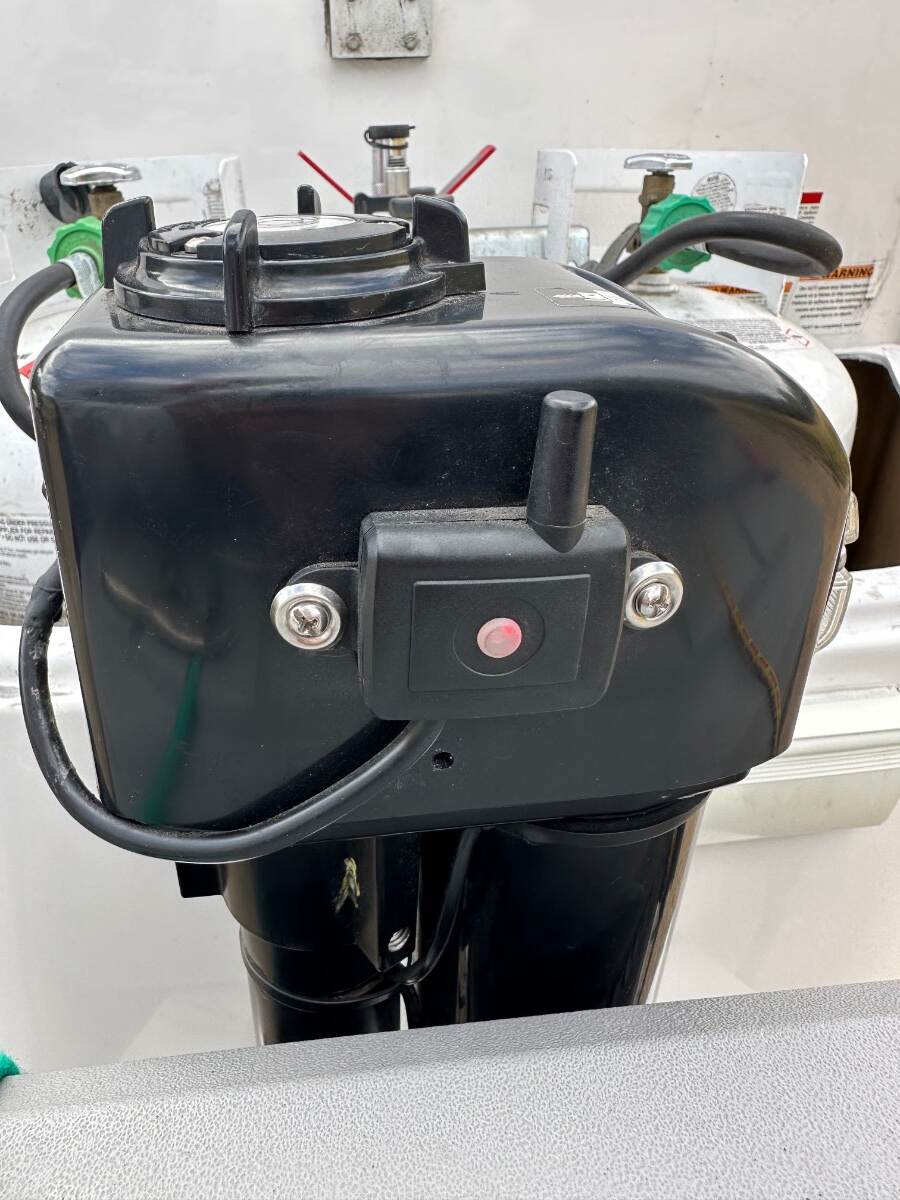
Saw this post from another user...quite detailed. I mounted the sending unit for our system (not Tire Minder brand) on the outside of our front jack power head. You can easily pull 12V from the inside of the power head and decide if you want/need an on/off switch for the circuit. * I just leave mine on all the time...as the draw is minimal.*
-
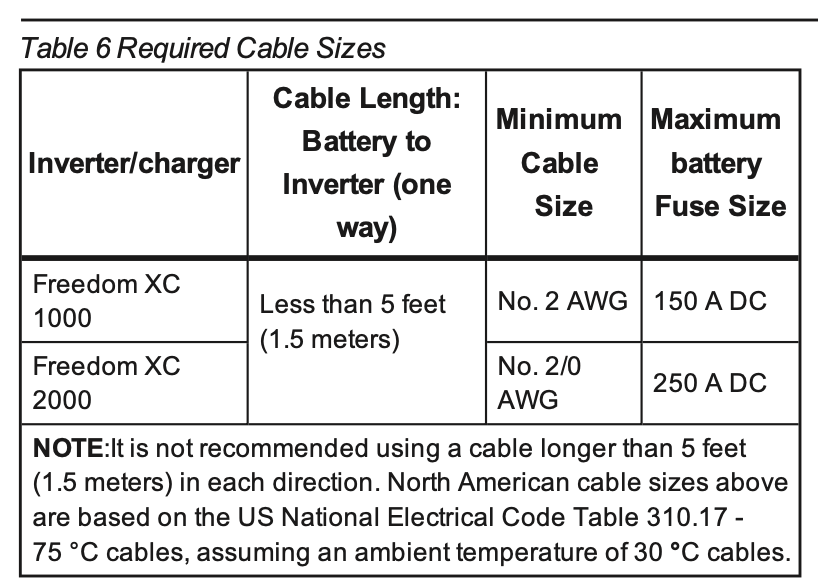
For those with the Xantrex Freedom XC2000 inverter here's that same table. These XC2000 was the unit used put through 2024 with the lower tier battery configurations. Also these units don't allow running the AC off DC. (So these are configurations other than the "Platinum" or dual 320AH Lithionics)