All Activity
- Past hour
-
 Whistlerjohn joined the community
 - Today
-
We left for a trip yesterday. No Cat Scales where we live, but our city dump has scales. I go there often to recycle engine oil. With both Oliver axles on their scale, it came to only 5700 LBS. I’ve measured hitch weight separately at 580 LBS. We are packed light for a 3-day trip, so I estimate we’d pack another 220 LBS in food and clothing for a long trip adding to 6,500 LBS Max. So she’s sitting at only 5700 LBS on two axles! Shouldn’t 7,000 springs be enough? The Oliver is more top-heavy than most trailers, with its upper double hull, tall body, multiple cabinet storage at head height, rooftop A/C, solar panels and other rooftop accessories. We dropped 4000 FT in elevation yesterday! Coming down steep, hard turns, exhaust brake on, descending smoothly! The top of the Oliver stayed put, maybe leaning left or right 2” going into a hard turn. Look out your mirrors when towing to observe this. Our hull used to lean over a foot vs. just inches! Original springs, the Andersen WDH was a must! Not anymore, since the Alcan springs keeps the Oliver weight centered over its axles. This is why the OEM suspension is undersprung. It’s not only the weight it carries, it’s the total body weight it must control while towing in various conditions! 😎
-

Automatic Leveling for the Oliver Trailer — DIY style!
dkeen replied to Snackchaser's topic in Ollie Modifications
Very impressive! My head hurts.😉 -
We like all of the Maricopa County parks, too!
-

Haloview BT7 Touch Rear Camera installation on 2022 LEII
FloraFauna replied to dhaig's topic in Ollie Modifications
I just upgraded my Furrion S rearview camera with the S+ and a 7-inch display. Huge improvement in resolution, features and display brightness over the original S and 5-inch display that was OEM (and basically worthless)!! The S+ camera slips into the old S housing so no mounting of the new housing on the exterior of the trailer and no rewiring needed. Since my TV is GM with the trailer camera functionality, I seriously considered going the way of this original thread instead, but my GM screen is small, and I can mount the 7-inch Furrion screen partially over the rearview mirror which isn't useful when towing and retain my TV display for the TV cameras. And again, no rewiring was necessary. (I thought I saw a prior thread where someone else did this upgrade but could not find it.) -

Alcan Springs Quote for Jan-2026
Ronbrink replied to Wayfinder's topic in Mechanical & Technical Tips
Do you know if he Dexter PB4’s raised the height of the trailer? Is yes, by how much? -
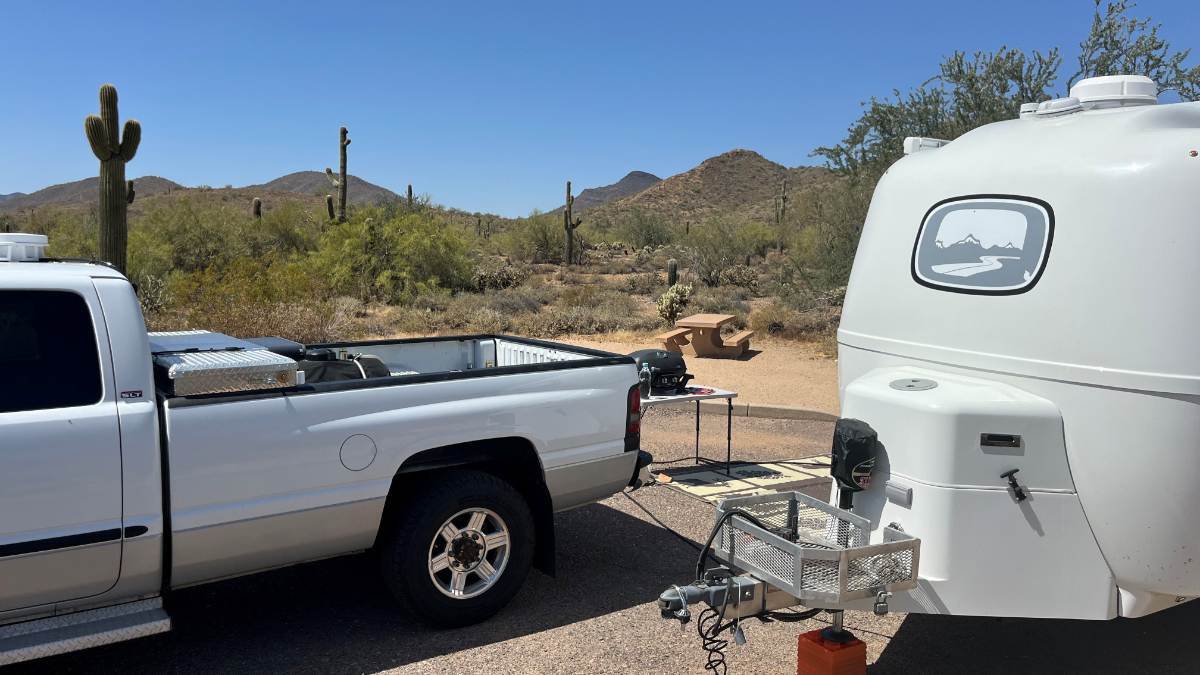
Cave Creek is our favorite of the Maricopa County Regional Parks. Often our first night away, just 90 min from home! There are currently 5 county parks, all excellent camping with hookups, around the perimeter of the Phoenix Valley. We've stayed at all of them! https://www.exploremaricopacountyparks.org/maricopa/facilities Snowbirds are gone, so the campground has lots of availability and it's not hot yet (high 80F today). Staying at campsite #9 for a few nights, the best in the park. It's like you have your own 5-acre campsite! 😎

-
 Phil Luis joined the community
 - Yesterday
-
.thumb.png.fbbde3486e933f990ff511bff8d6bda0.png) CGI Detailing: We’re planning our trip for this June to attend the mini-Oliver rally in Boothbay Maine and have some openings for a few more coatings after the rally. If you are in the New England area and your Oliver is due for ceramic coating maintenance, new coating treatment, paint protection film or oxidation removal this is the easiest time to get on our schedule without making the trip to Tennessee. More information about how pricing works while we travel and what areas we are covering is available on our website; there is also a contact form you can fill out if you would like us to contact you. If you’d rather bring your trailer to us in TN, we have openings in July! Oliver Ceramic Coating Travel Schedule www.cgidetailing.com
CGI Detailing: We’re planning our trip for this June to attend the mini-Oliver rally in Boothbay Maine and have some openings for a few more coatings after the rally. If you are in the New England area and your Oliver is due for ceramic coating maintenance, new coating treatment, paint protection film or oxidation removal this is the easiest time to get on our schedule without making the trip to Tennessee. More information about how pricing works while we travel and what areas we are covering is available on our website; there is also a contact form you can fill out if you would like us to contact you. If you’d rather bring your trailer to us in TN, we have openings in July! Oliver Ceramic Coating Travel Schedule www.cgidetailing.com-
- 2
-

-
 Bob and Maribeth joined the community
 -
Carrying this thought out in comparison, Alcan to Dexter Leaf Spring packs: Dexter 4 leaf-OEM1750 LBS x 4 = 7,000 lbs (-20% = 5,600 LBS) Alcan 4 leaf-pack 2250 LBS x 4 = 9,000 lbs (-20% = 7,200 LBS) Dexter 4 leaf-SW4 2400 LBS x 4 = 9,600 lbs (-20% = 7,680 LBS) per @Geronimo John Alcan 5 leaf pack 2750 LBS x 4 =11,000 lbs (-20% = 8,800 LBS) Keep in mind besides this 20% “wiggle room” there should already be safety margin in the manufacturer’s spec capacities. But I like the additional 20% per Alcan! 😎
-
Mr. Jim Oliver told me personally that the frame was engineered to support 3X the GVWR. He stated that it was good to 21,000 pounds. Actually Oliver's GVWR of only 7000 pounds is due to their continued use of the underrated four leaf spring pack (the same ones that are breaking). This causes the otherwise 5200 pound Nev-R-Lube axle to be de-rated to 3500 pounds each.
-

Made in USA leaf springs
John and Debbie replied to Mountainman198's topic in Mechanical & Technical Tips
I agree with you. That fifth spring is not very long. I am not an expert on springs, but I am more concerned and happy that Alcan went with the overlap on the first two longer springs. My logic, maybe flawed, says that the short fifth spring is not as important as those first two longer ones. John -
I sure like that core heating system that was described on here. I can't recall his name. That should be offered by Oliver.
-

Made in USA leaf springs
Geronimo John replied to Mountainman198's topic in Mechanical & Technical Tips
Wow. The first three statements encapsulate my position of opposition for 90% of OE2 owners to the 3,000 pound springs. For most owners they are "Over Sprung". But the 1750's for all of us running in the 6,000 pound class I have advocated long and hard that those springs are "Under Sprung" as they are loaded 100% of the time and are failing. For a new trailer, I would monitor the rear ends of the OEM 1750's and push their replacement out 4 or 5 years. If you see any flattenng of the rear ends, time to replace them. Also as a 50 Year Mechanical Engineer here and 3 independent Dexter Tech's determined that the middle ground between the 1750's and the 3,000's... The 2400 Dexters was a logical choice. They have been doing just fine for the last 20K miles or so..... WIll be putting another 9K this summer. For every one, it is wise to inspect your springs at the end of each season. If any flattening is observed, you would have the off season to replace them as you see fit. GJ - Last week
-
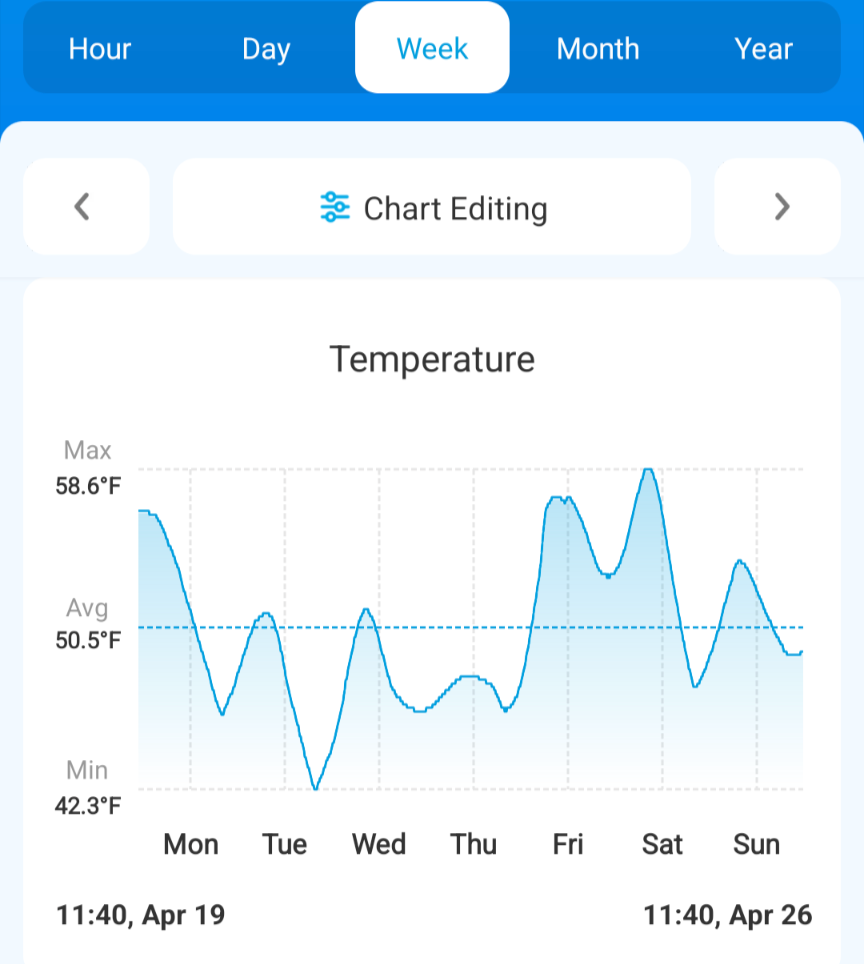
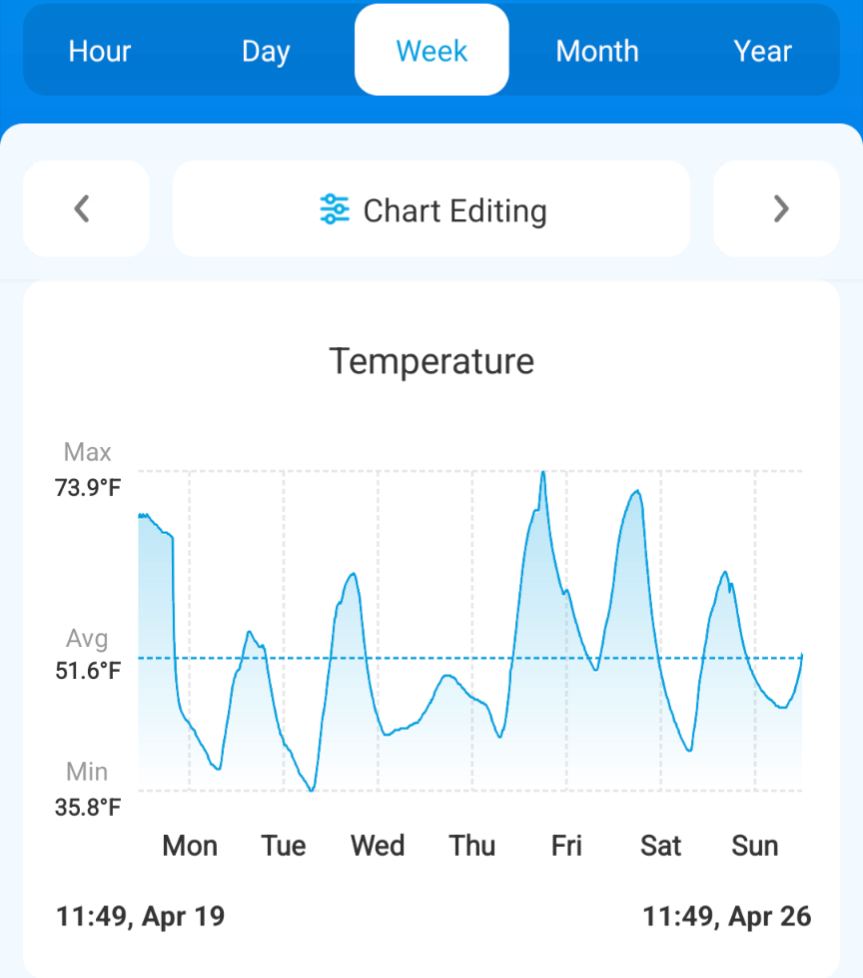
Yep, that’s why I wrote “over time.” To me that interesting data is that outside the temp swing/range was 38 degrees, while indoor the temp range was only 16. This shows the difference in the insulated space. The averages should be close over daily cycles. Thank you@Steph and Dud B, many of us love seeing some performance data of our Olivers!
-
That’s exactly what I used to think!. However, equalization requires a constant outdoor temperature, but that never occurs in a natural day/night cycle. The 57% swing shows that the insulation is effective enough that the interior can't track outdoor changes fast enough to equalize. You're right, it could be better, but it's way better than some drafty old trailers that I used to own.
-

Automatic Leveling for the Oliver Trailer — DIY style!
Snackchaser replied to Snackchaser's topic in Ollie Modifications
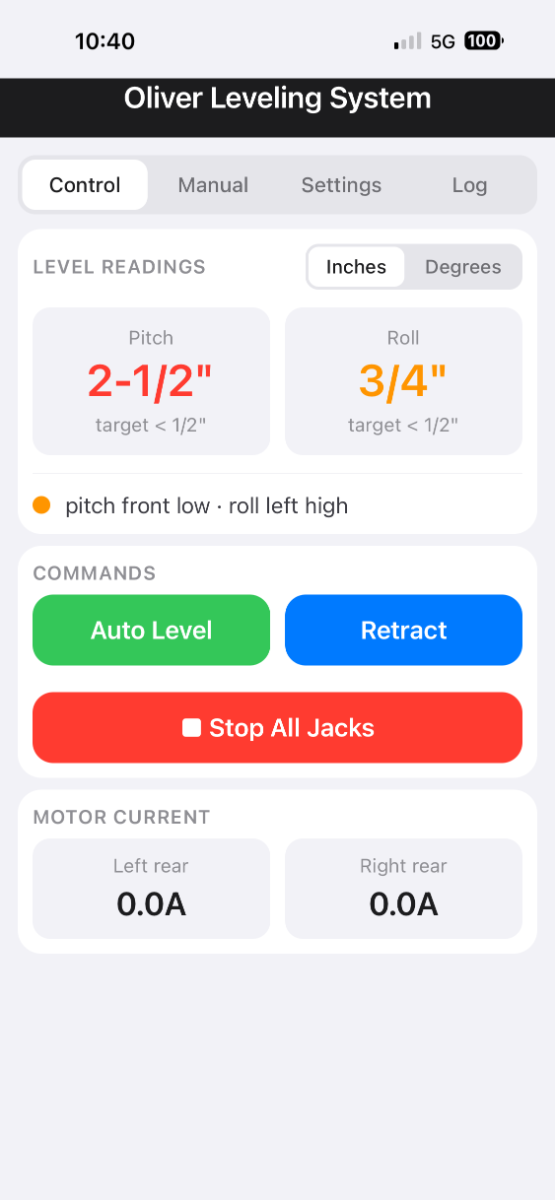
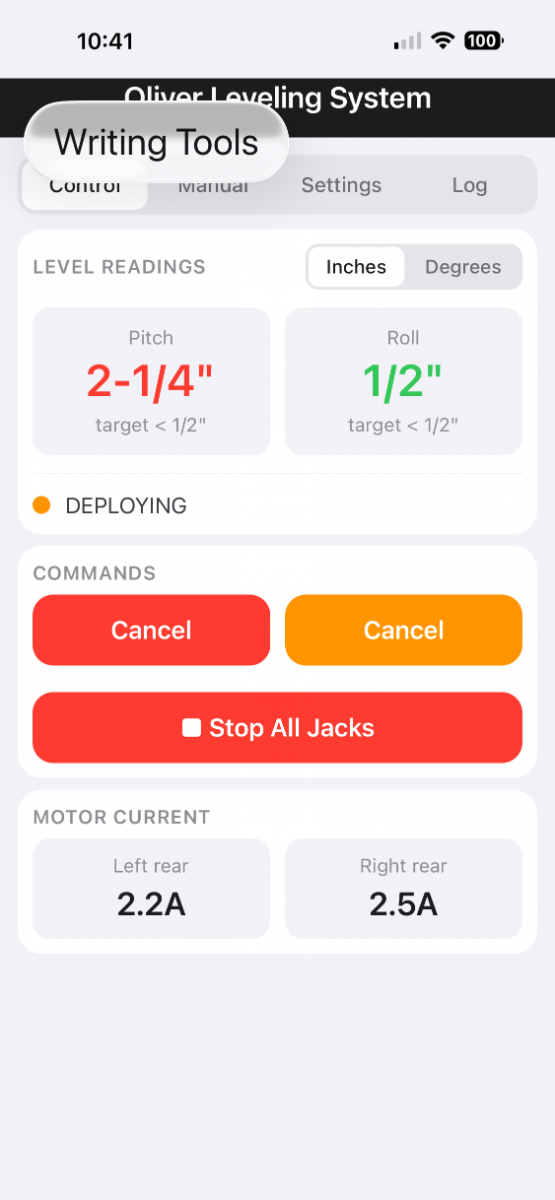
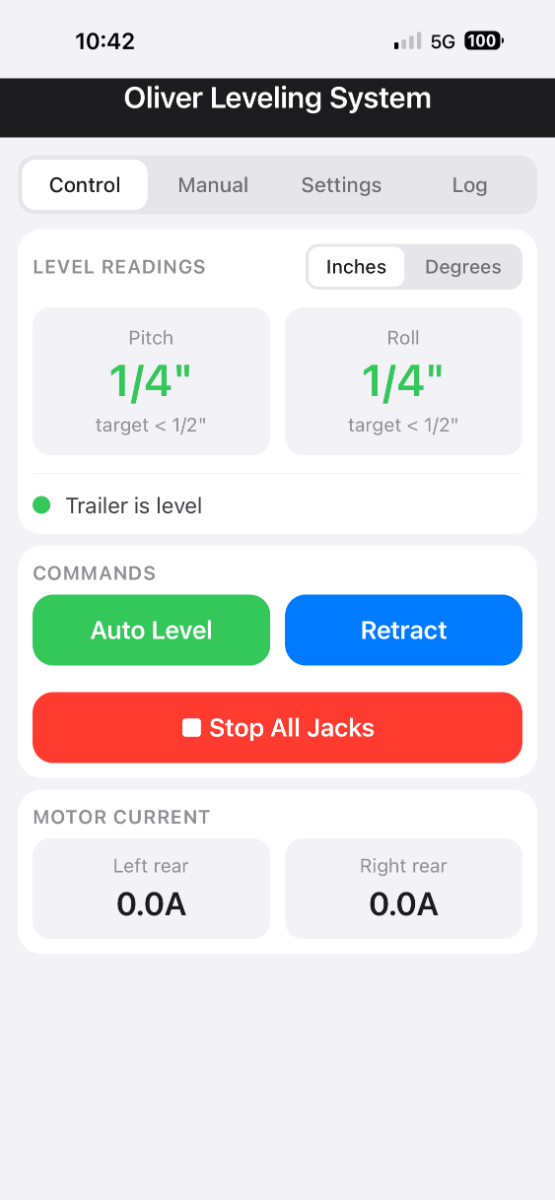
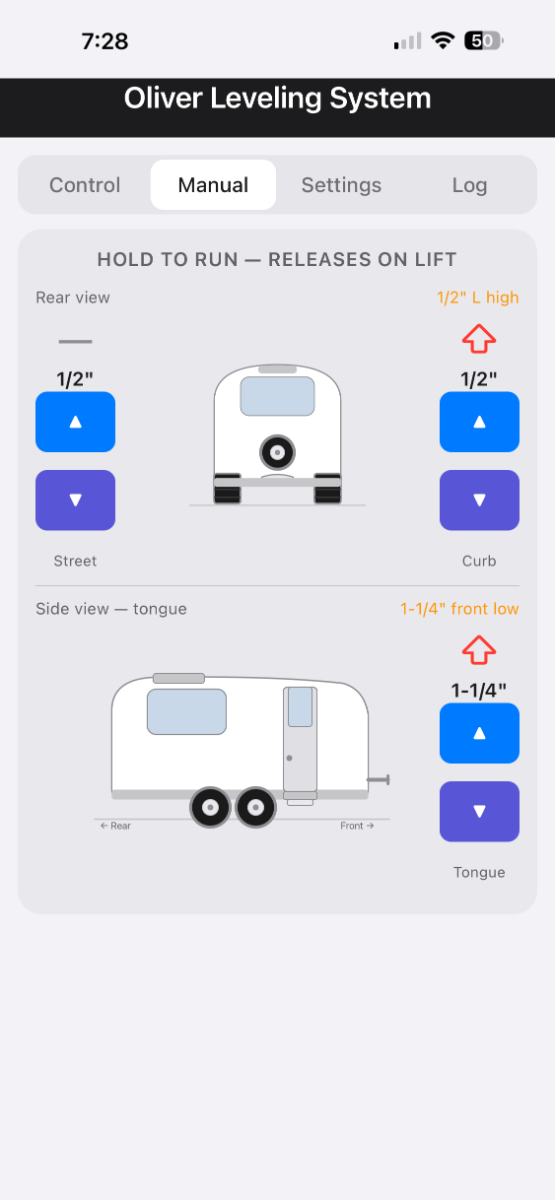
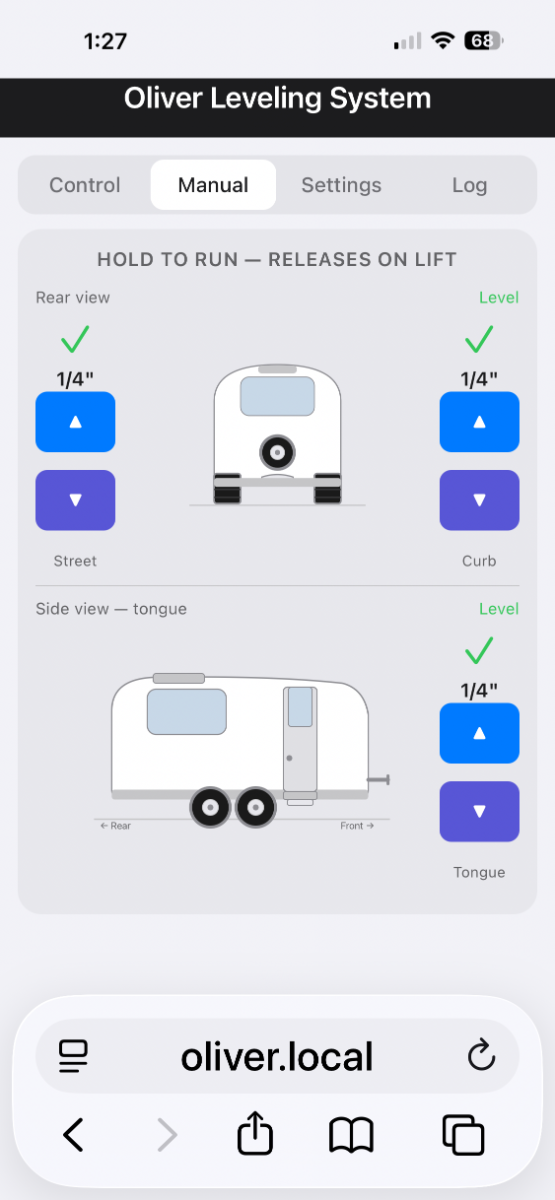
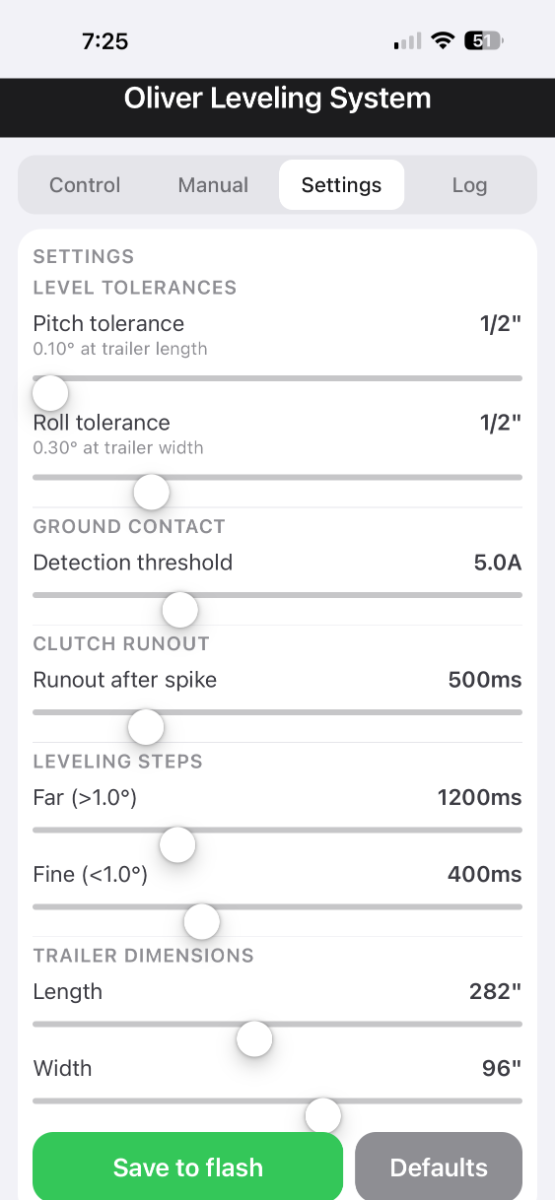
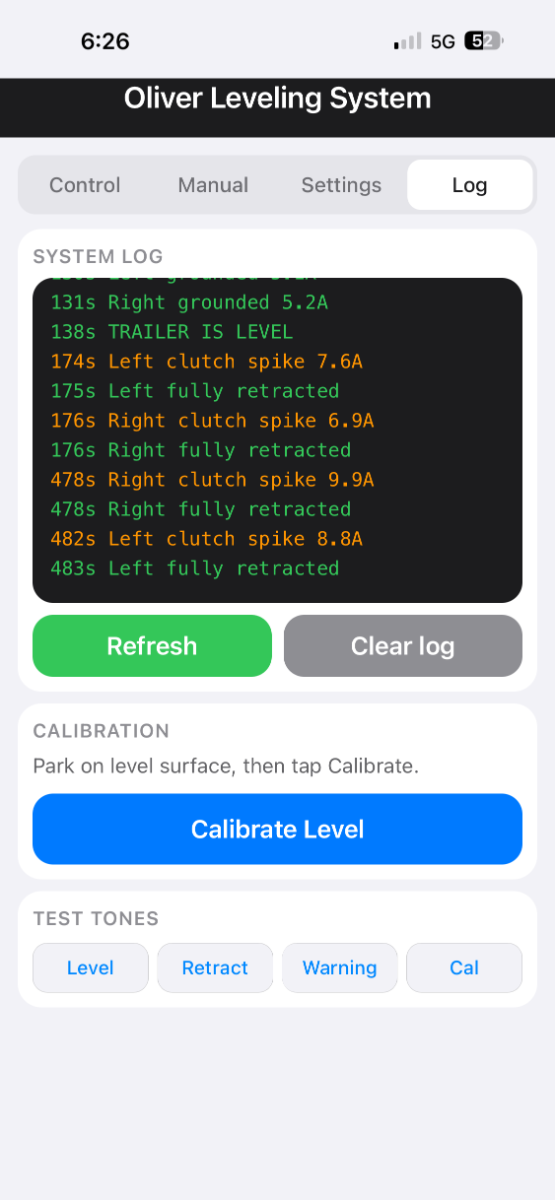
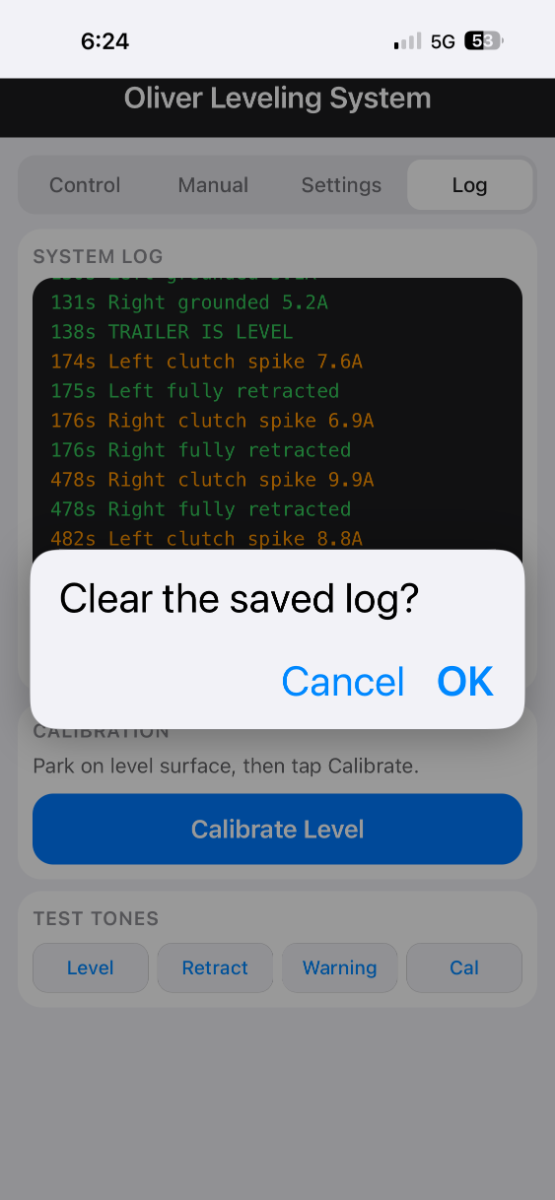
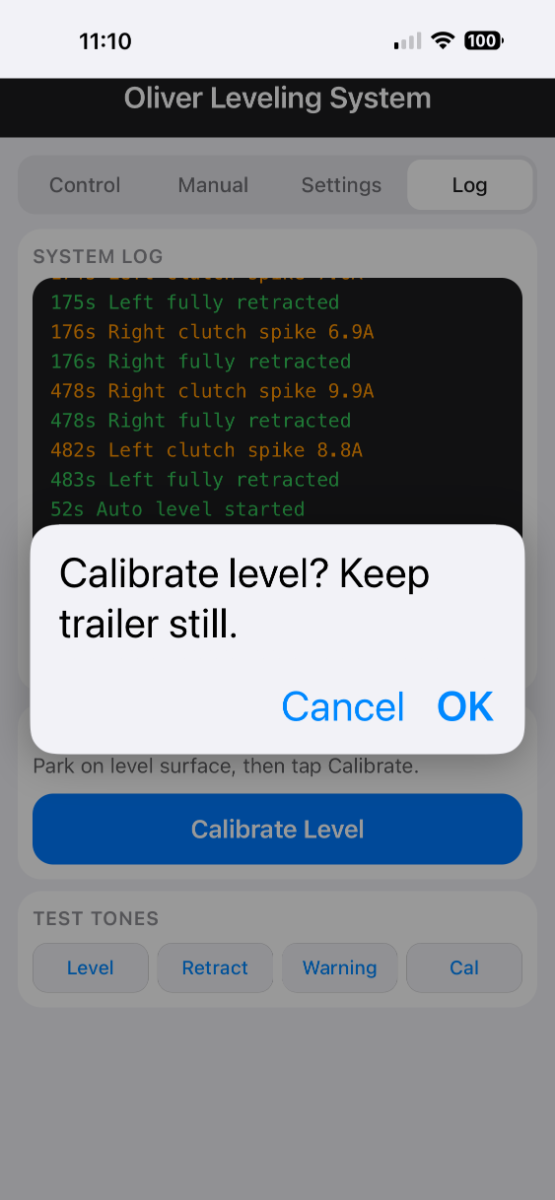
Part 4, Custom Automatic Leveling — now with a phone app! The automatic leveling system is finally done, and it works fantastic! Although it was convenient and satisfying with just the control board switches, I made it even better with a phone app. The app works with the ESP32 microprocessor’s built-in WiFi, rather than Bluetooth, and the range is excellent. Besides better range, there were advantages of using WiFi over Bluetooth. Primarily for ease of development. An iPhone Bluetooth app must be developed with 3rd party software and managed through the app store. It’s tough for a hobbyist, especially with custom graphics and controls. With a WiFi app, it lives in the ESP32 firmware and it’s fully customizable with AI help, and easily revised. The app consists of 4 tabs, or pages, with the primary controls on the main page. Extra controls and features are in the other 3 pages. The pages are laid out as follows: Control — This page has the main Auto Leveling, Retract, and All Stop buttons. To prevent accidental activation, the buttons must be touched and held for 3/4 of a second (except the All Stop which is instant). The as-left readings (variance from target level) can be viewed in either inches or degrees, and the tolerance can be adjusted on page 3. The jacks motor current is also displayed with the idea that it could indicate jack degradation, but that feature is going away in the next revision because it’s too hard to correlate. Manual — This is an awesome feature on its own! The screen is similar to a LevelMate with graphics of the Olivers back and side, only it has manual jack controls too! The touch and hold buttons will raise and lower the jacks while showing the distance from level. I’ll probably use this feature a lot, especially for uneven terrain or if messing around with leveling blocks. Settings — This page contains settings for fine tuning. Any changes are temporary for the current session, but they can be flashed to the memory. There is also a reset to defaults button with a protective confirmation step: Pitch and Roll Tolerance — when set to 1/2” tolerance, the level usually gets to within 1/4” Ground Contact Detection Threshold — this determines how firmly the jacks are footed on the ground for stabilization. Default is 5 amps which closely matches where I used to set it by ear Retract - Clutch Runout — this shut-off delay determines how many clack-clacks are heard when jacks are parked. It’s set at 1/2 second, which is two clacks Leveling Step Durations — sets the jack’s incremental run time during leveling. It has 2 adjustable steps that decrease as the trailer nears level. This is important for accurate level sampling and coasting. Too little time increases timeout risk, while too much impacts accuracy. Finally there is the trailer width and length setting that’s used in the conversion formula for level degrees to inches. The longer pitch default distance from bumper to ball requires a wider tolerance than the width. Log — A summarized log of the Serial Monitor shows which jacks were activated and the different steps of automation. A Test Tone legend plays examples of tones for successful leveling, retraction, unsuccessful leveling, and calibration, although the tones are obvious and don’t really require a legend. This information has limited value and may get cut in next revision. The most important feature of this page is the calibration button. It has a secondary confirmation to prevent unintentional calibrations. This is used to reset the target level after maintenance, or if the front needs to be higher for tank drainage, etc. This concludes this project and I hope you found it interesting! Cheers! Geoff
-
Regardless of the R-value of insulation, interior and exterior temps will become equal over time. Also, when temps are in the 50s it's not the same test as when ambient temps are in the 20s, the teens or worse. What matters most is when we add furnace heat, will the temp rear of basement by the water lines be kept above freezing? Say it's consistently below freezing outside, what should interior temp be set at to keep the rear basement above freezing? We also keep a Ruuvi sensor in the same rear basement location (and 5 other locations), including one outdoors. Rear basement temps will not drop below freezing while camping, with our thermostat set to 63F. The rear basement temps is always above freezing a good +10 over outdoor temps. Generally we do not store and winterize, since we "winter" camp often (but no real winter down here). Winter overnights are often down to low-mid 20s by dawn, but then it will always warm up to 50F +/- in the sunny afternoons. If it's cold just a night or two, I do not worry. If we are to have multiple consecutive cold nights, I'll set the furnace to 50F if I had not blown the water lines clear. The Oliver could have better insulation, but it is certainly sufficient for our use. I like how it's thin so that we have room in the basement for mods. I would add more if we lived north. I did the battery bay door already. Good reminder to add some to our basement access door. 😂
-
Of course, when towing fully loaded, run the specified PSI listed on the DOT label which is calculated to be safe at the full GVWR. But for example, when driving a pickup around town, no cap installed and empty bed, and I know I won't be towing or carrying a load for days on-end, I’m certainly not running the rears at 80 PSI! I'll bring them down to 60-65 PSI so the rear axle won't be bouncing down the street without a load to carry! On my sports cars, I run higher pressures, because I like a slight skid into a hard turn! I owned a 1975 Alfa Spyder during my 20s, through my 40s and learned over many miles. Now I run my 1992 Lexus SC400 a few LBS over spec and the car handles like a dream. 😎 There is a reason tire pressure is adjustable! And Yep, we air down our AWD GX470 when we have a bit of weather or washboard dirt to travel. But on this truck, I upgraded the OEM P-rated tires to LT tires C-Load Range. (didn't want the harshness of E-Load tires for this application). The DOT label states 32 PSI, but LT tires don't stand up nicely at pressure this low (also 32 PSI is below the lowest level on the Cooper load table for this A/T tire). For around town and highway driving, I chose to run 44 PSI, but we air down as low as 24 PSI for a day out playing in the dirt. I put a bit of thinking in what works best for the situation. Engineers and manufactures often wrongly use the "one size fits all" approach, and when lawyers get into the mix, they just throw physics right out the window in lieu of Indemnification! 😒 The DOT label on our relatively light TV, a 2WD long-bed capless truck is 55/80 PSI at 8800 GVWR. Our 2WD truck is hundreds of LBS lighter than its 4WD counterpart. After we setup camp, the truck is only 6800 LBS with all passengers and tools. Add all our camping stuff, the 35-gal tank full of fresh water, the bed fridge pretty full, plus 580 LBS measured tongue weight and we’re still 500 under the GVWR, fully packed for a long trip! I regularly run slightly lower than the GVWR at 52/72 PSI for our combination of state and county highways, dirt and gravel roads. At 80 PSI, when our TV rears hit the bottom of a dirt wash (think 2WD), they could spin some, but less likely with a little less pressure. When we traveled more on Interstates, like our Minnesota trip last summer, I increased the rears to 78 PSI, while 80 PSI is the stated MAX. Dan, I do agree that engineers should speak their mind. I too often get accused! 😎
-
Interesting data! I ran the numbers through AI trying to get an R value, but there's not enough information. However, it determined the swing insulating value was 57%, which is about right for Olivers claimed R-18 value. Most RV's are lower than R-10, 20 to 30%. Good stuff!
-
Here's some data that I found interesting. Our Oliver is mostly stock, with only a little extra Reflectix insulation added to the external basement door. I have a remote thermometer in the Oliver belly, near the fresh and city water inlet lines, and another thermometer hanging inside the garage near the Oliver. I collected data from a week from both thermometers. The was no heat running in the Oliver. You can see that the average temperatures were only different by 1.1 degrees. There was a difference of 38.1 degrees from the highest temperature to the lowest temperature recorded in the garage: and only a 16.3 degree difference recorded in the belly of the trailer: I couldn't tell you if that's any better or worse than any other RV would perform, but those are the numbers from an unheated Oliver sitting in an unheated garage.
-
The towel rack/soap dish on our 2015 LE2 was originally installed with silicone sealant. Don't know what year Ollie you have, later model LE2s towel rack/soap dish is installed with screws, but we had to remove sealant to get to the loose heat outlet hose and water pump LED where the shower hose is also located under the sink. We installed a U seal around the towel rack/soap dish and four screws when the towelrack/soap dish was reinstalled without using silicone sealant.
-
Thanks all for your tips!
-
I had the same problem after lengthening my hose to reach the toilet for better rinsing. This was done by sliding the hose return weight further down, but it also caused kinks. I used a spring from ACE hardware to prevent the kinks and haven't had a problem since. The spring was 1/2" x 10", not a perfect fit but just narrower that the width of the kink, That modification is described here: Cheers, Geoff
-
The hose is kinking under the sink when you pull it out. Be careful not to pull it out too far. It only just barely reaches our shower holder. I find it best to turn the faucet toward the shower holder before pulling the hose out.
-
Has anyone had this issue: When the faucet is in sink mode, the water pressure is fine. But when I place the faucet on the shower hook, the flow sometimes reduces significantly or shuts off completely until I pull the hose in and out a little. Is there an easy fix or do I need Oliver service?