Leaderboard


Popular Content
Showing content with the highest reputation on 01/22/2019 in Posts
-
I call those puddle lights, like the ones in some cars that illuminate the ground as you exit the door. They are exactly the same lights as those inside the cabin down low, and they are LED with two dinky wires coming out the back. If you have a dead one it most likely has failed internally and you just need to replace the assembly. OTH maybe a spliced connection has failed, you could remove the light and test the power wire with a voltmeter, and check the ground wire with an ohmmeter. Use a flat screwdriver to CAREFULLY pry the steel cover off the light, don’t damage the gelcoat. (Put some duct tape or a few layers of masking tape on the gelcoat if you want some protection.) Take out the two screws and the light and wires will slide out of the hole. Good luck.. John Davies Spokane WA2 points
-
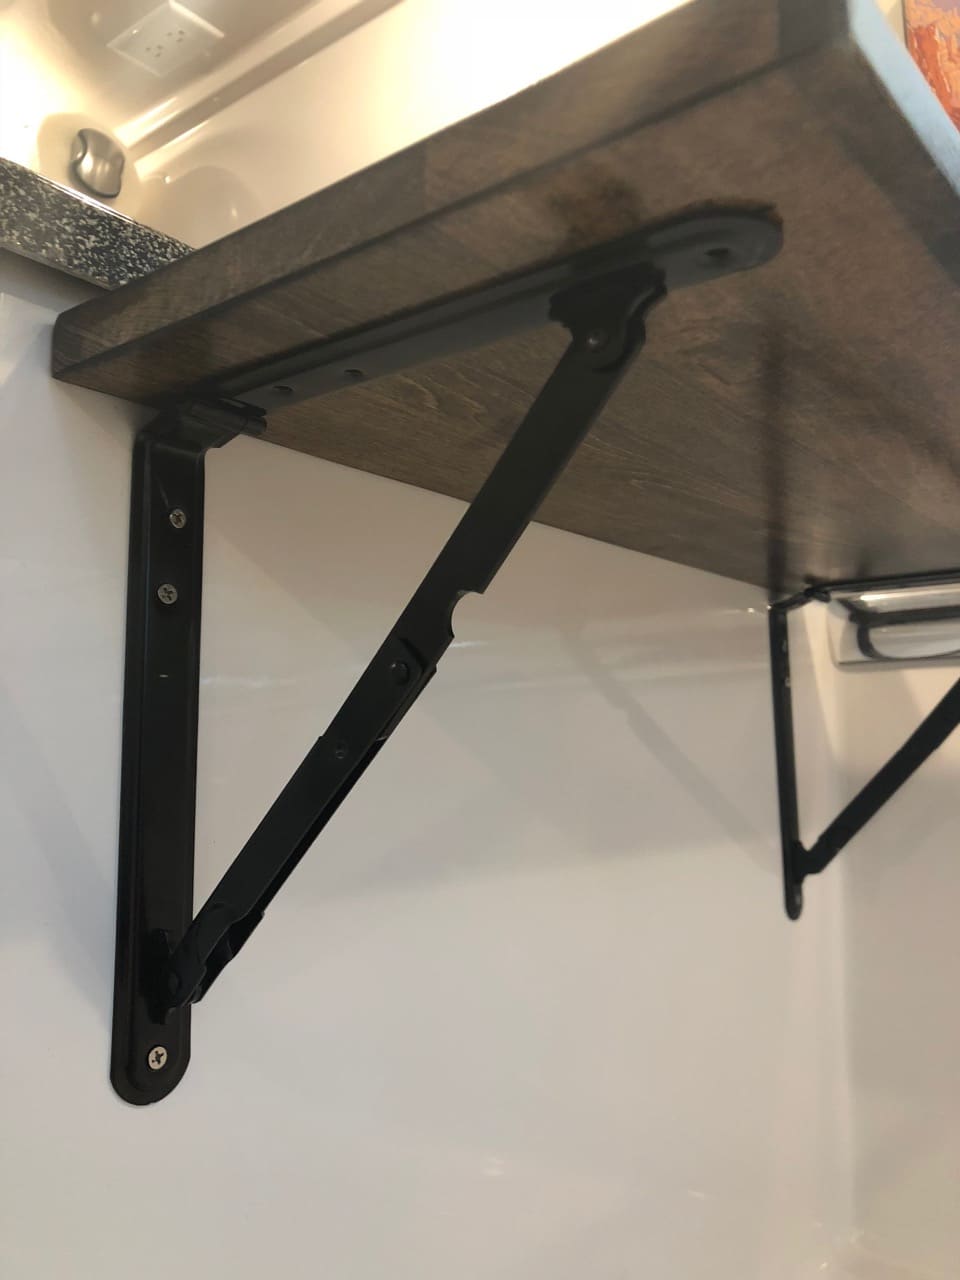
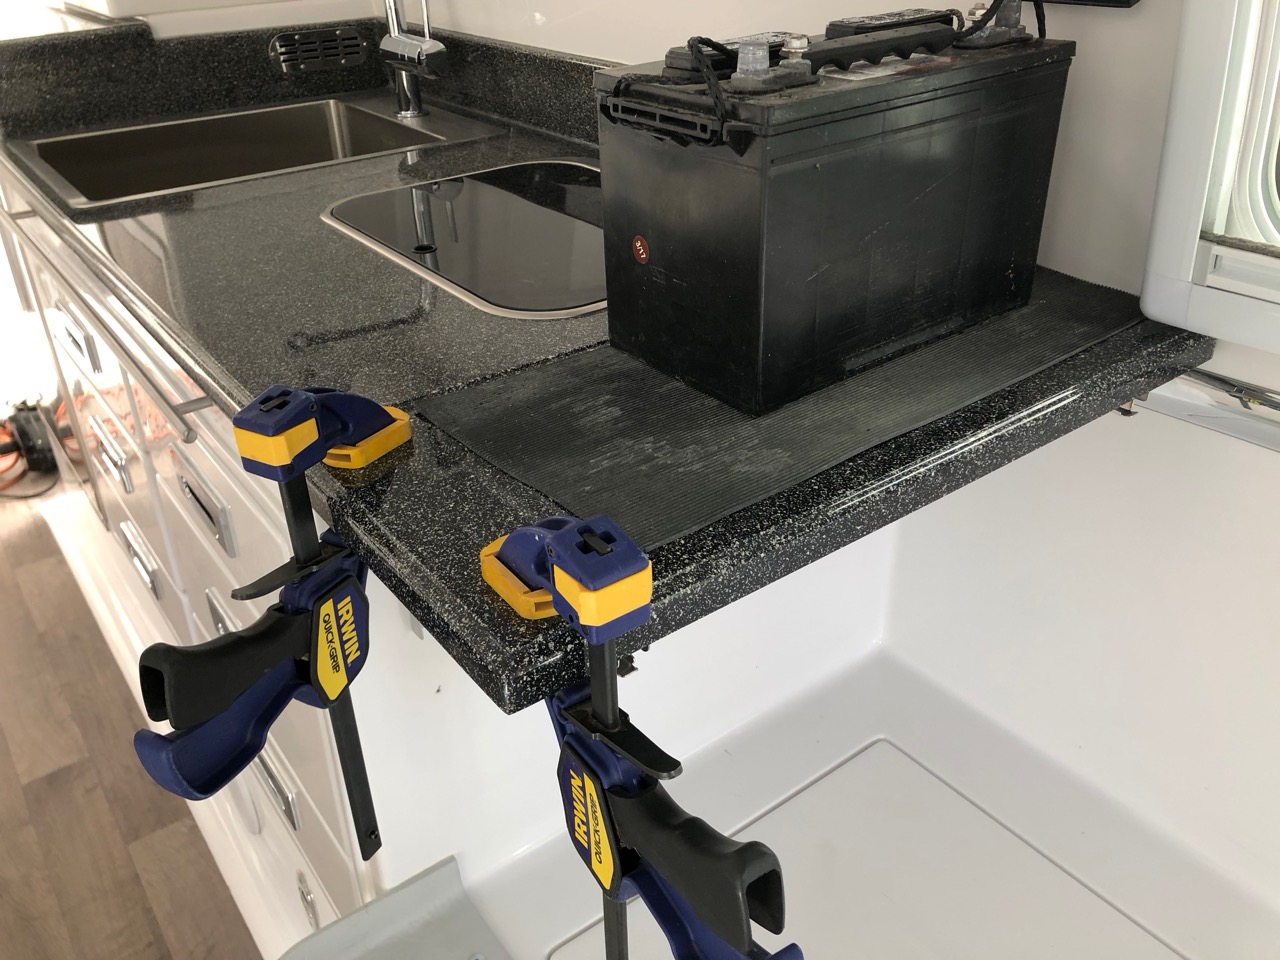
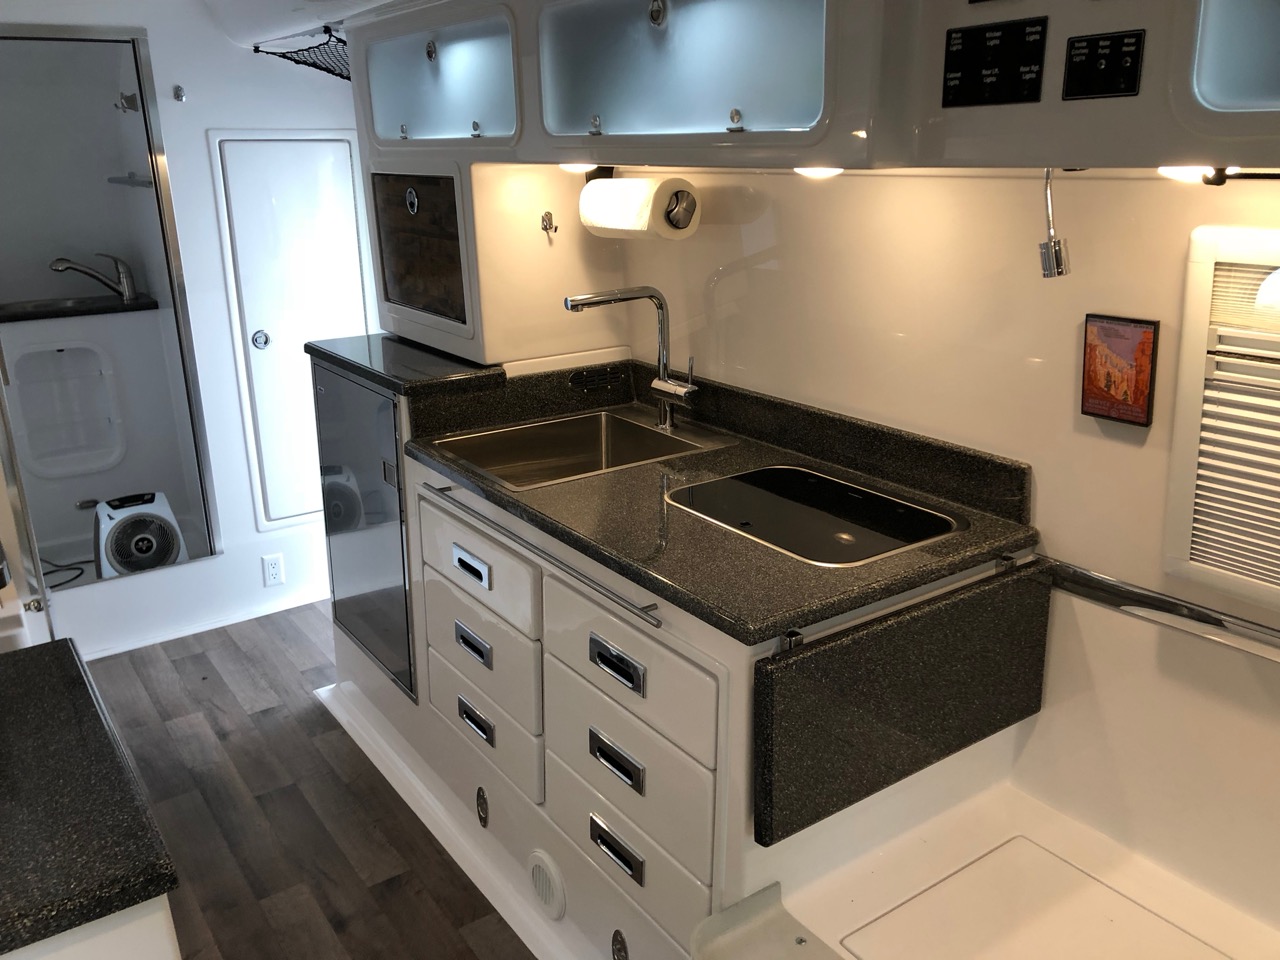
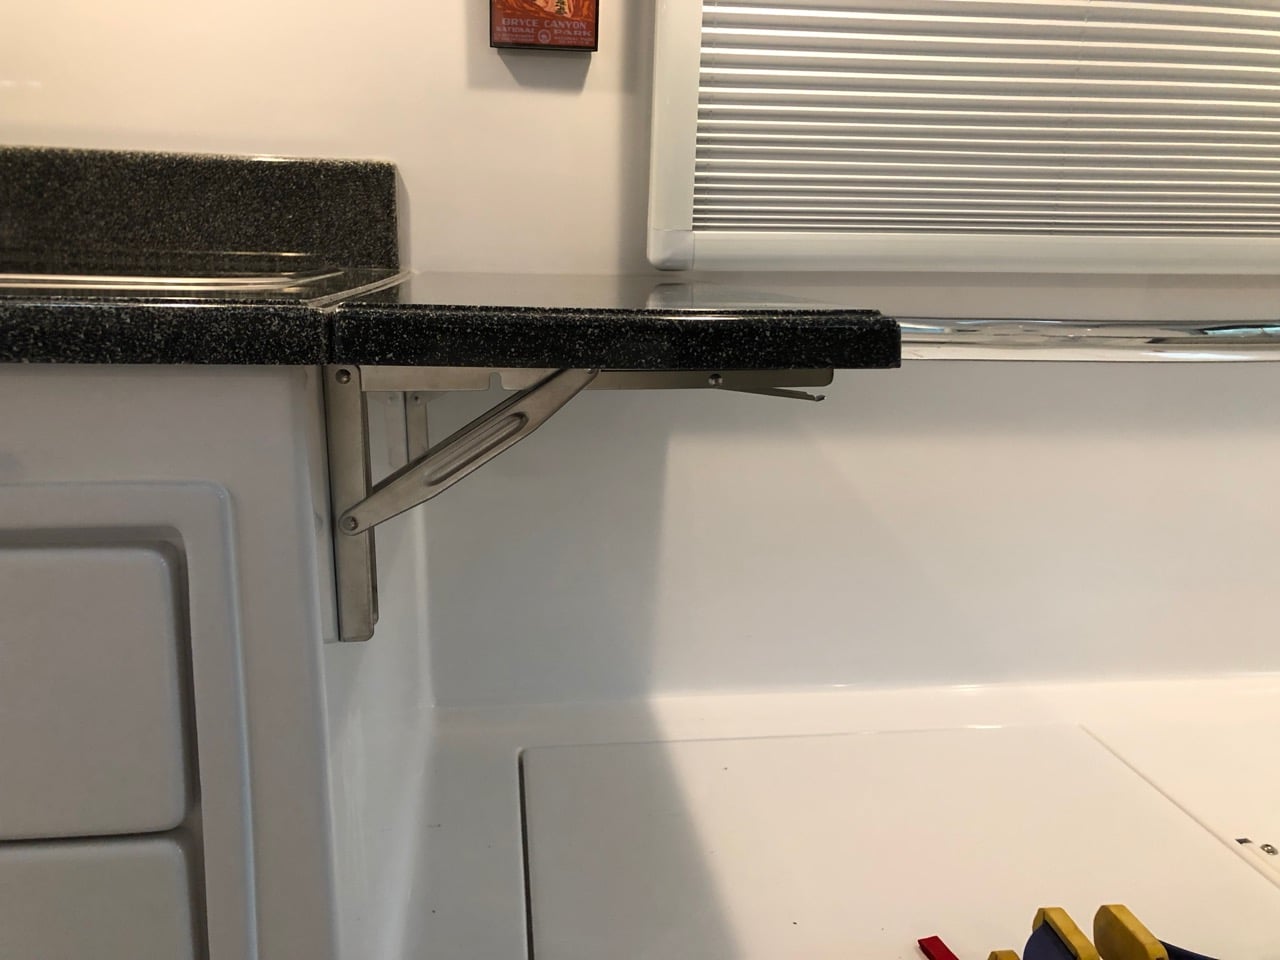
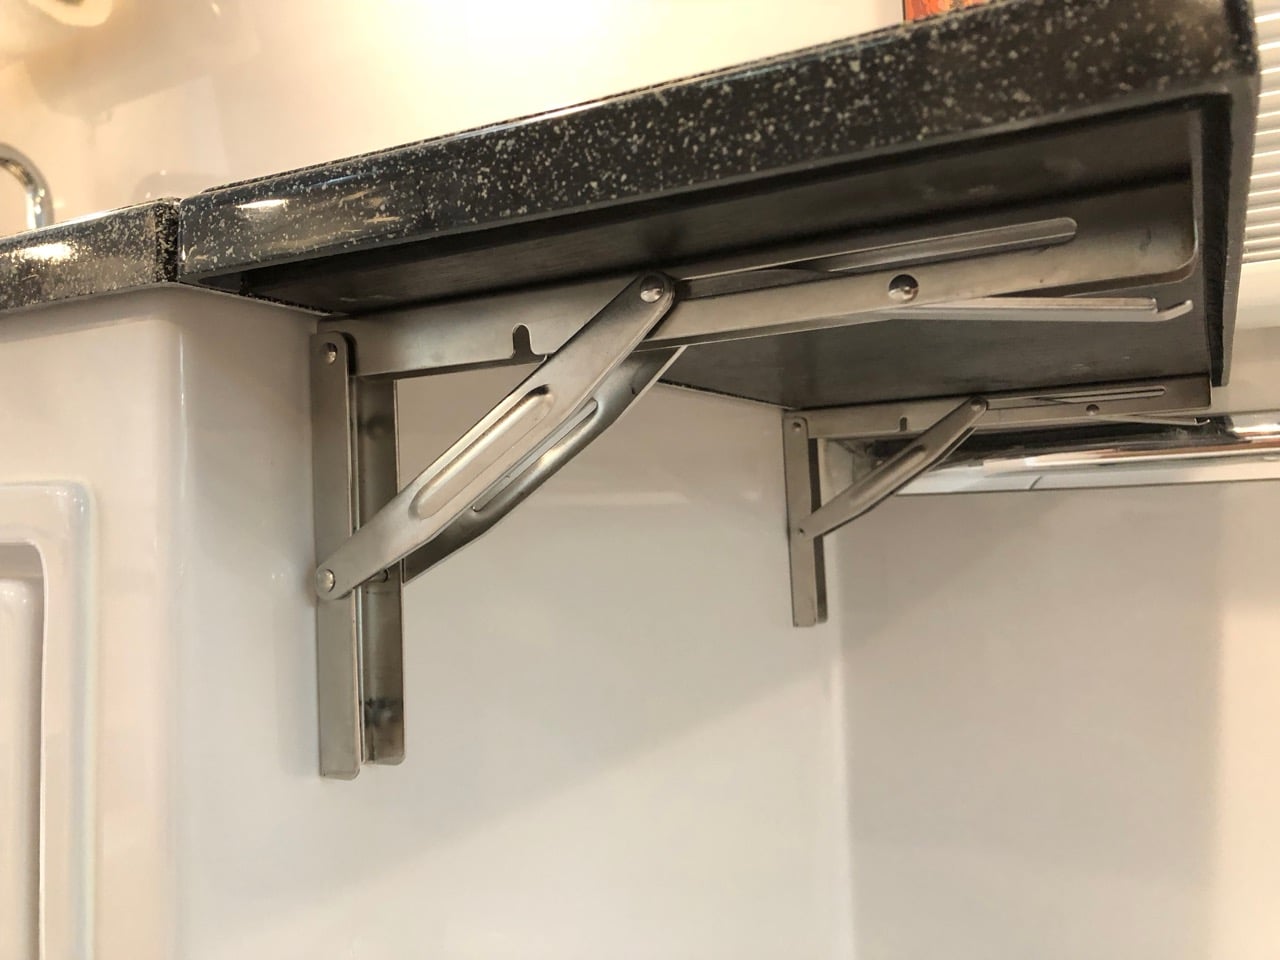
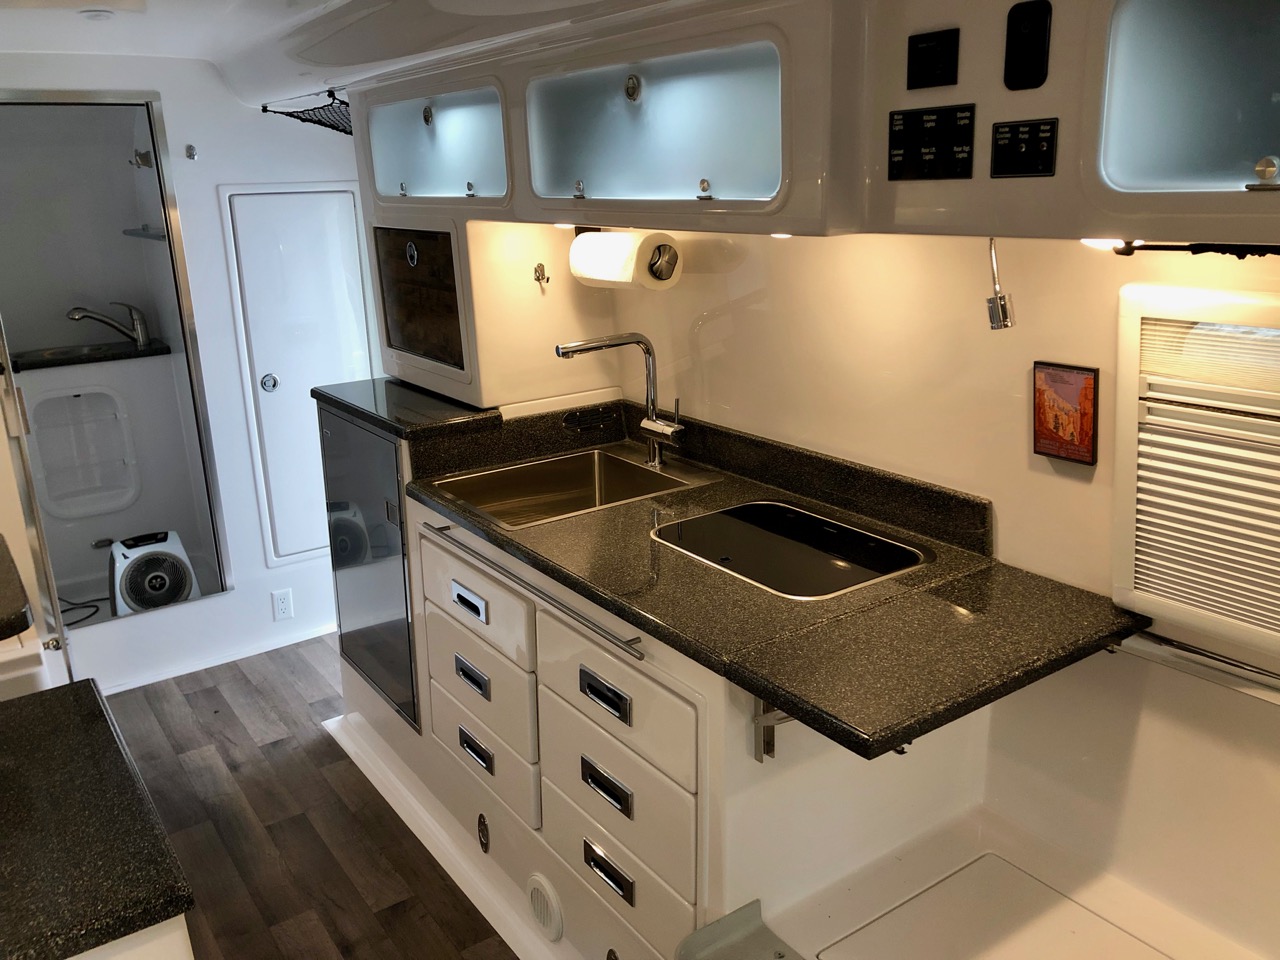
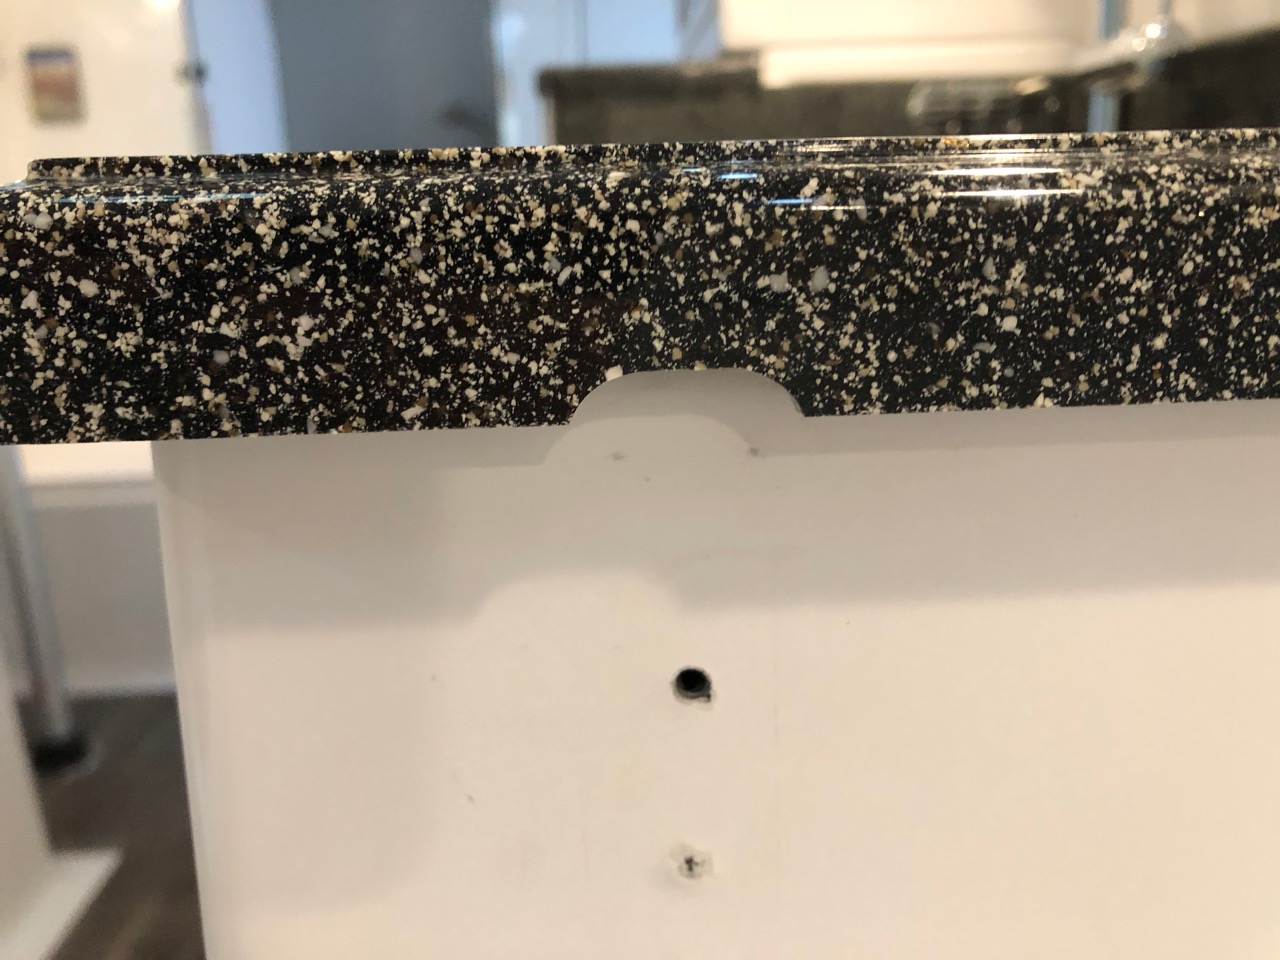
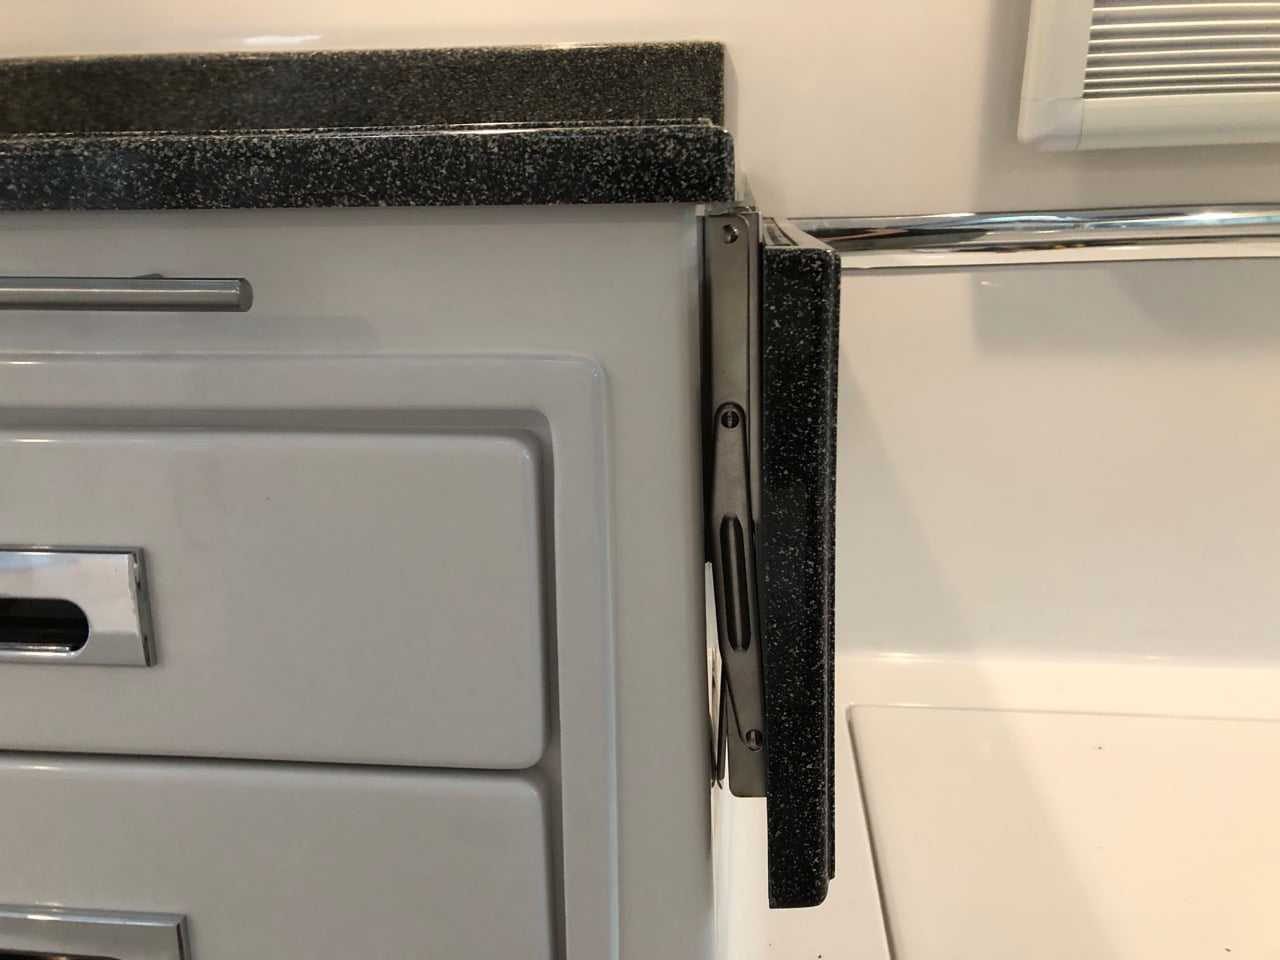
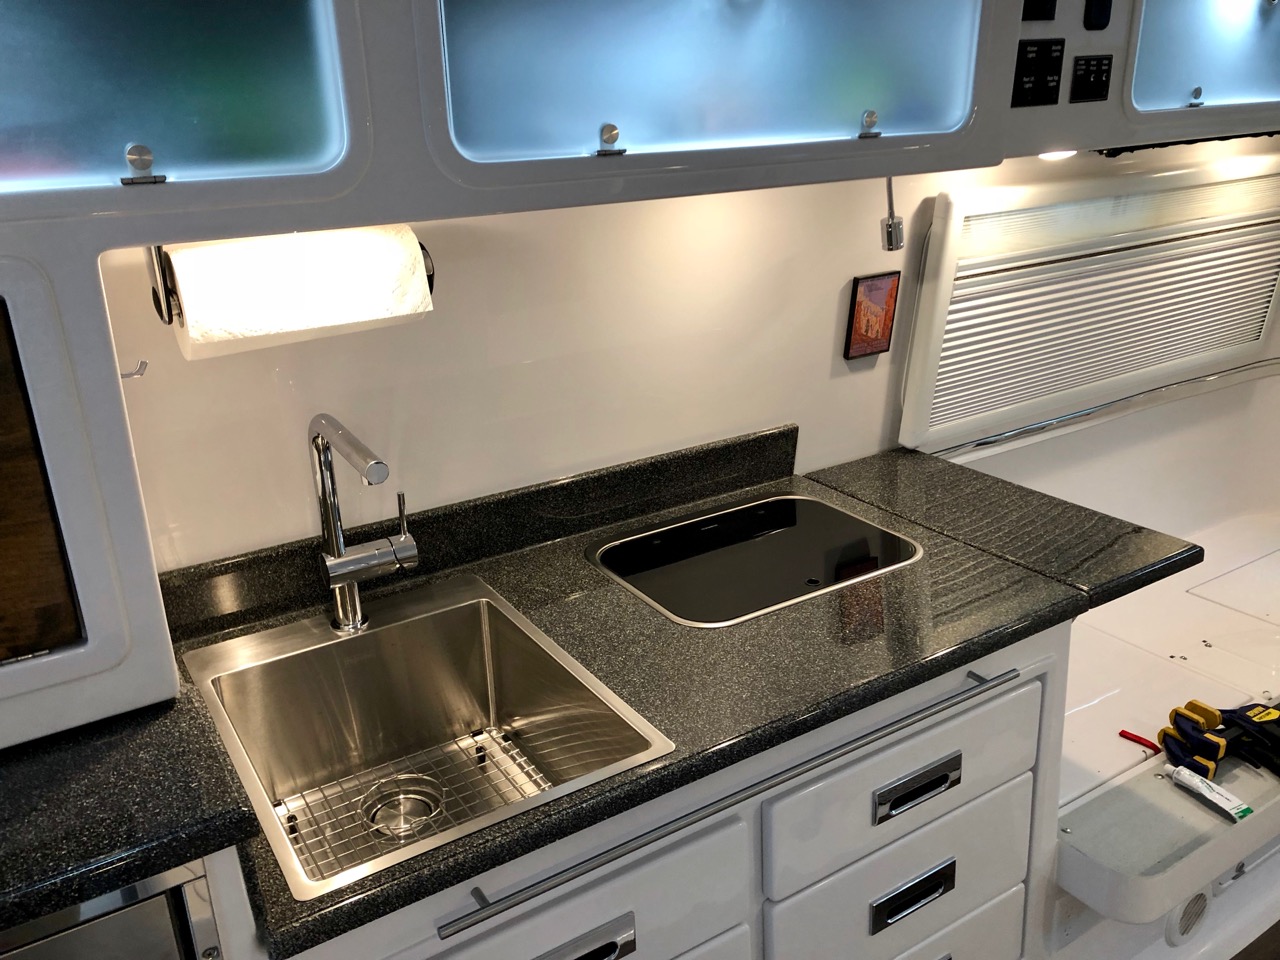
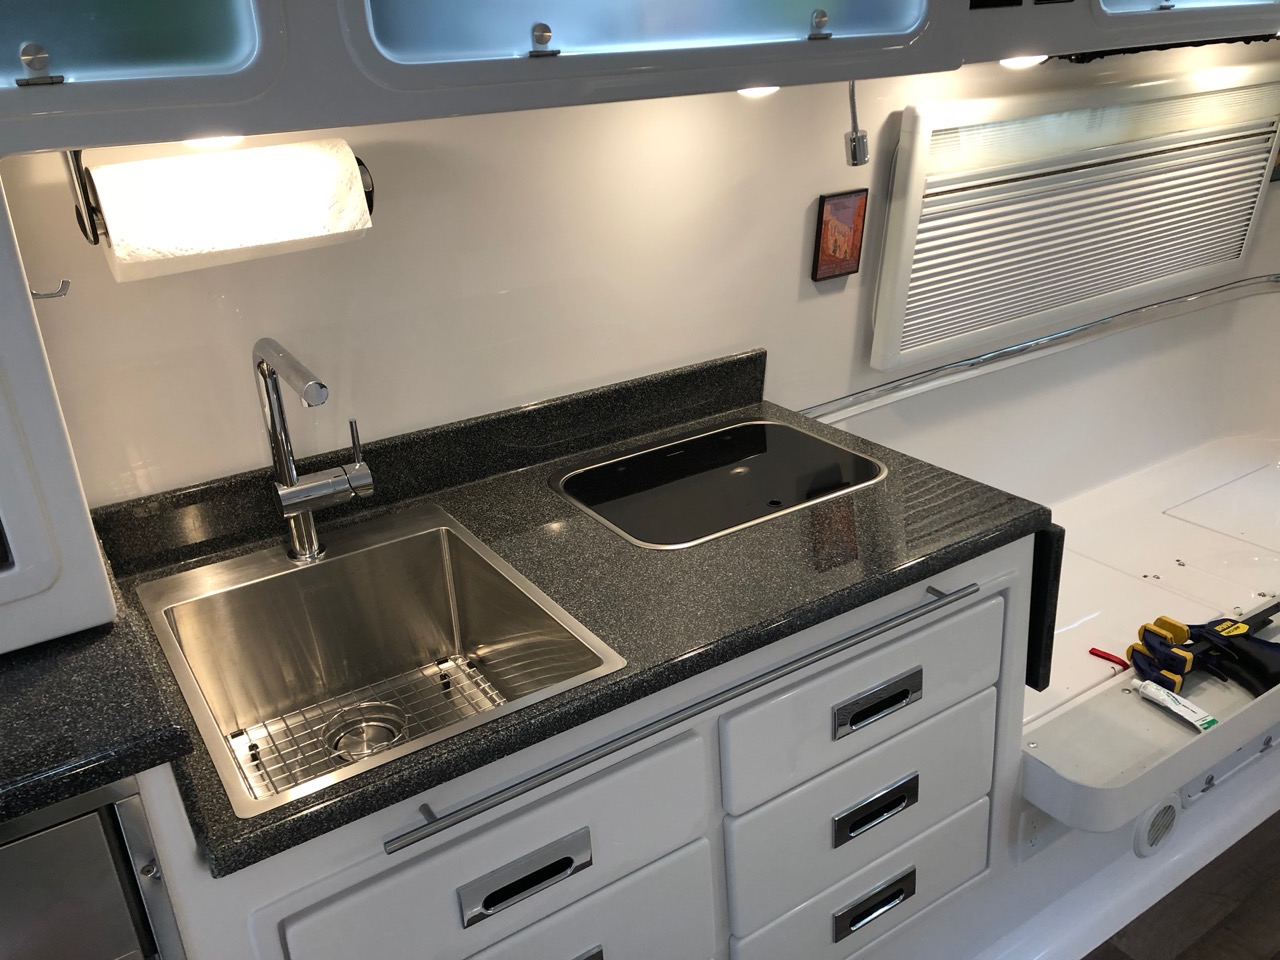
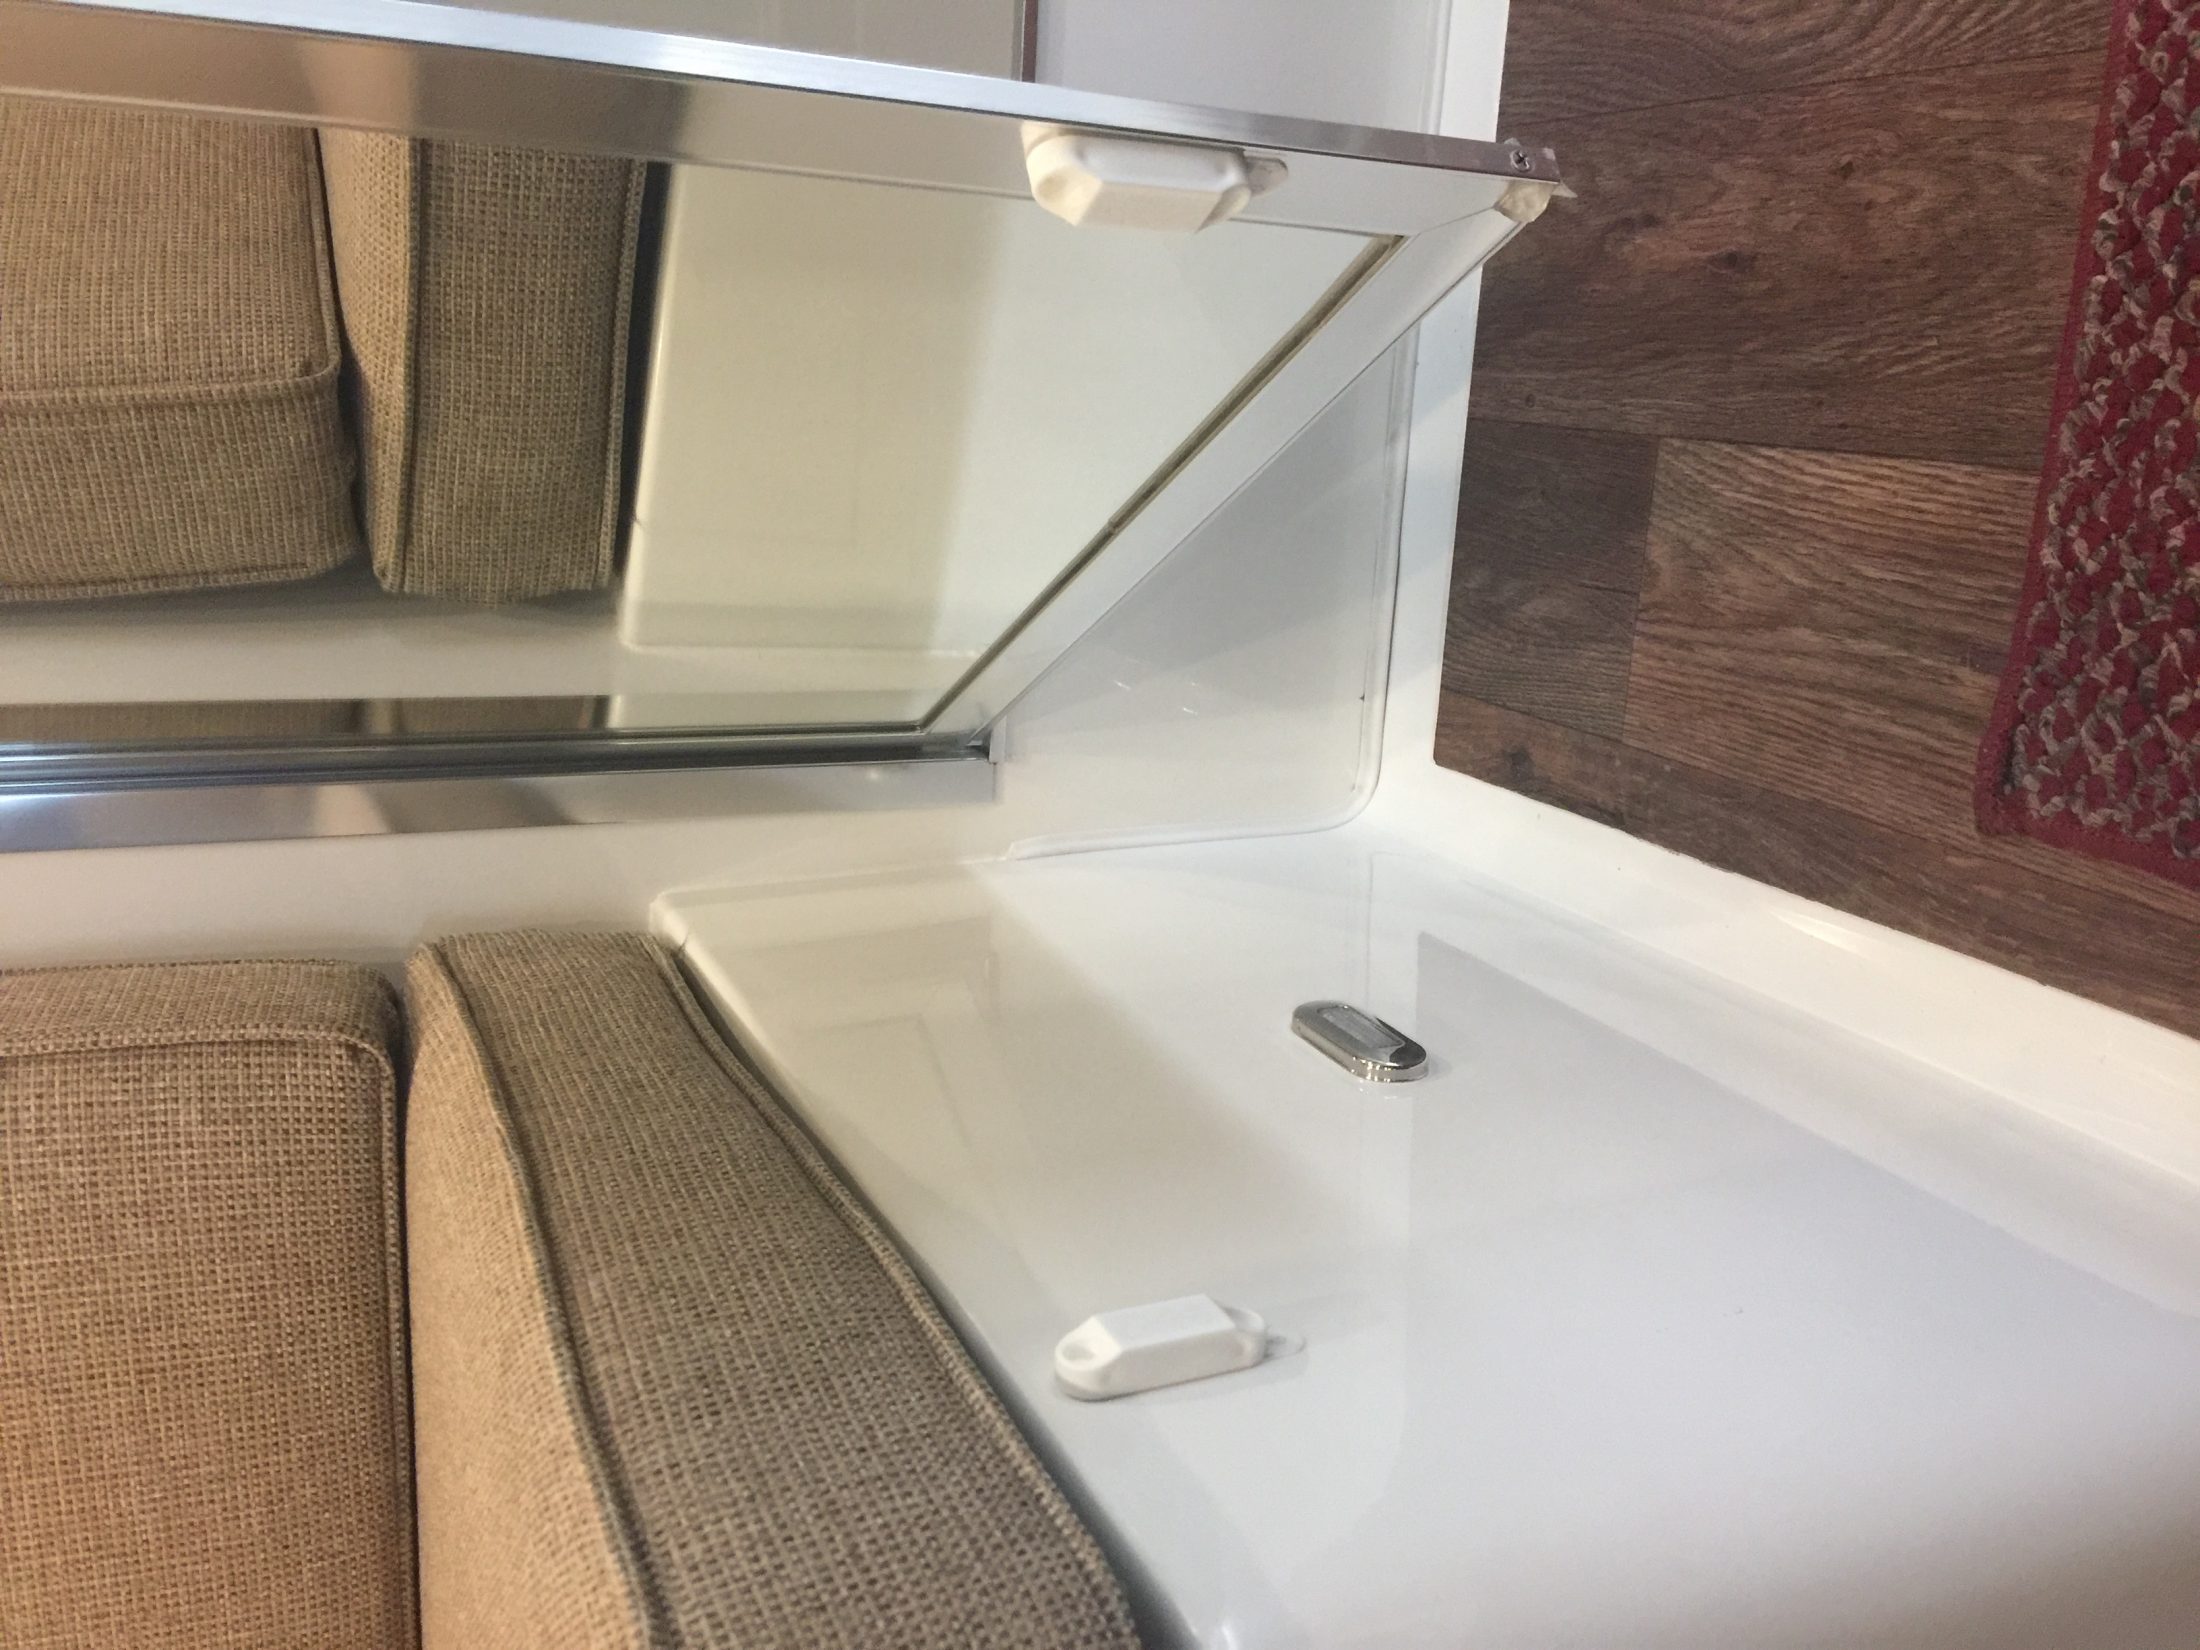
One of the things I asked Oliver to do for me was to install a 12" counter extension to the right of the cooktop that could be folded down when not in use. I figured we could use the extra counter space, plus I wanted a buffer between the cooktop and beds for splatter. This is what they came up with - This was perfectly fine and exactly what I was expecting, and we've really enjoyed using it. The only thing I didn't really like was that the hardware was finicky and just didn't work well. And the top ended up about 9" rather than 12", so it was a little small. And we had asked if they could make a piece of fiber granite to match, but they'd have to make a new mould for it so that wasn't going to happen. It also would have been nice if the extension were flush to the counter. So maybe a lot of problems. But we were happy with it nonetheless. But one day when I was running some wires through the pantry, I had removed the countertop beneath for access and just naturally set it down on top of the counter extension. Well, it fit perfectly; and thus, a new project was added to the list. I asked Oliver if they would sell me an extra top and picked it up when I got my trailer out of service a few weeks ago. I believe they charged $150 for it. Since I was redoing the top, I figured I'd search for better hardware as well. I found several options, but the ones that stood out were these from Amarine. They're super heavy duty and stainless steel. They work much better than what we had, and look nicer to boot. The only problem was that they were about a half inch too long for the countertop, so they'd have to be cut to size. But worth the trouble, so I ground the ends off a half inch. If you don't want to go through that trouble, my second choice was these, which are small enough to fit without modification. I cut a ½" piece of plywood that I could screw into to use as the base for the top. A ½" sheet will sit flush to the lip of the counter, which is what I wanted, but to make the countertop flush to the existing counter, it meant the hinges had to be high enough that I had to grind out a small notch for each hinge to clear. No big deal - btw, a Dremel with a small sanding cylinder works really well on the fiberglass, and leaves a smooth edge and no chipping whatsoever. Wear a mask. Here are the notches - The brackets are easy, just mark the holes, drill, and screw. I used ¾" #10 stainless on the bottom legs and ¼" #8's on the top. And 3M 4200 along each leg and on each screw going into the fiberglass to prevent it from backing out over time. Since none of the surfaces in the trailer are perfectly 90°, I needed to shim something to make the counter level. I considered grinding down the latch that holds the brackets at 90°, but that would have been difficult and if I ground off too much, I'd have to buy another bracket. Instead, I decided to shim between the plywood and fiber granite and then glue the top to the plywood with more 3M 4200, which I'm using so much that I've started referring to it around the house now as Snowball Glue. It's only about ⅛" max to shim - I used some stainless washers that I had lying about and just glued them down in each of the corners. I found that the top was a bit warped, so I had to weigh it down while the glue set - See, I knew lead acid batteries still had a use. I let it sit overnight and in the morning, I had what's in the photo above. Cool. BTW, if you want to do this and have mattresses, then you'll want to check their thickness to make sure the extension will clear when folded. Measure down 12" from the bottom lip of the counter. If your mattress is below that, you're good. If you have cushions, then no problem, but you'll need to move one of the back ones out of the way when raising or lowering the top. More pics -
 1 point
 -
Absolutely agree with topgun2's assessment. Oliver's first priority must be to ensure a consistent flow of the production of a quality product for their own survivability. I think we can all agree they build a superior product as evidenced by our purchasing them. They in fact offer several factory options when ordering to tailor to the needs of most folks. I personally wanted a 2 5/16 inch Bulldog hitch on my trailer and was told that they wouldn't do that as a factory item during production but I could have them do it as an after-the-fact speciality item. It cost me $261 to have them remove the factory 2" coupling and put on a larger one that they purchased separately. (Now I will have both as I paid for the original one and therefore want it too.) I have zero need for it, but I did pay for it. (Anyone need one?) I have noted too, that Oliver is VERY careful to research from an engineering aspect, any and all changes or upgrades they make to their trailers. I am sure due to the litigious society we live in today, if they added (for instance) a custom shelf extension or a different appliance and it failed for some reason, or someone cut themselves on the bracketry, they would potentially find themselves liable for damages. Not necessarily from the Oliver owner but perhaps from someone visiting the trailer. For a small time operation like Oliver, one such lawsuit could be financially devastating. I can fully appreciate Oliver setting a single standard and sticking to it for production efficiency. In 1909 Henry Ford advised his production and management team that the consumers could have “any color - so long as it is black.” Kind of what we're seeing here. Can't wait to take delivery of our unit this spring and take advantage of all the great ideas the current owners have offered up as upgrades and additions. Hobo1 point
-
Officially, per the manual, you can't. They used to tell everyone that you could, and everyone did, but then I'm guessing a lawyer showed up. Whatever the reason, the manual now says don't. Anita has been with Oliver for forever, so maybe she missed the memo, or maybe she's a member of a secret organization of rebellious pirates, the existence of which I cannot confirm, who still use their jacks however they d.w. please.1 point
-
There is a phone app. Bubble level it has bubble level, surface level, gyroscope, plumb line, metal detector.and compass all work great and are very accurate.1 point
-
those are some good ideas.1 point
-
That looks like a great way to hold the door open! There are a couple of other ideas at the link below. http://olivertraveltrailers.com/topic/how-to-bathroom-door-hold-open/ I did add a couple of stick-on bumpers to decrease the magnet strength.
1 point
-
Frank, I know you asked for a regulator with a gauge, but this unit has worked very well for me. It is simple, bombproof, and as far as I can tell, has a much higher flow rating than the cheaper units: https://www.rvwaterfilterstore.com/Fixed.htm If you still need or want to have a gauge, this store also sells those, although they are expensive. I've been very happy dealing with this outfit and their products are top notch. Dave1 point
-
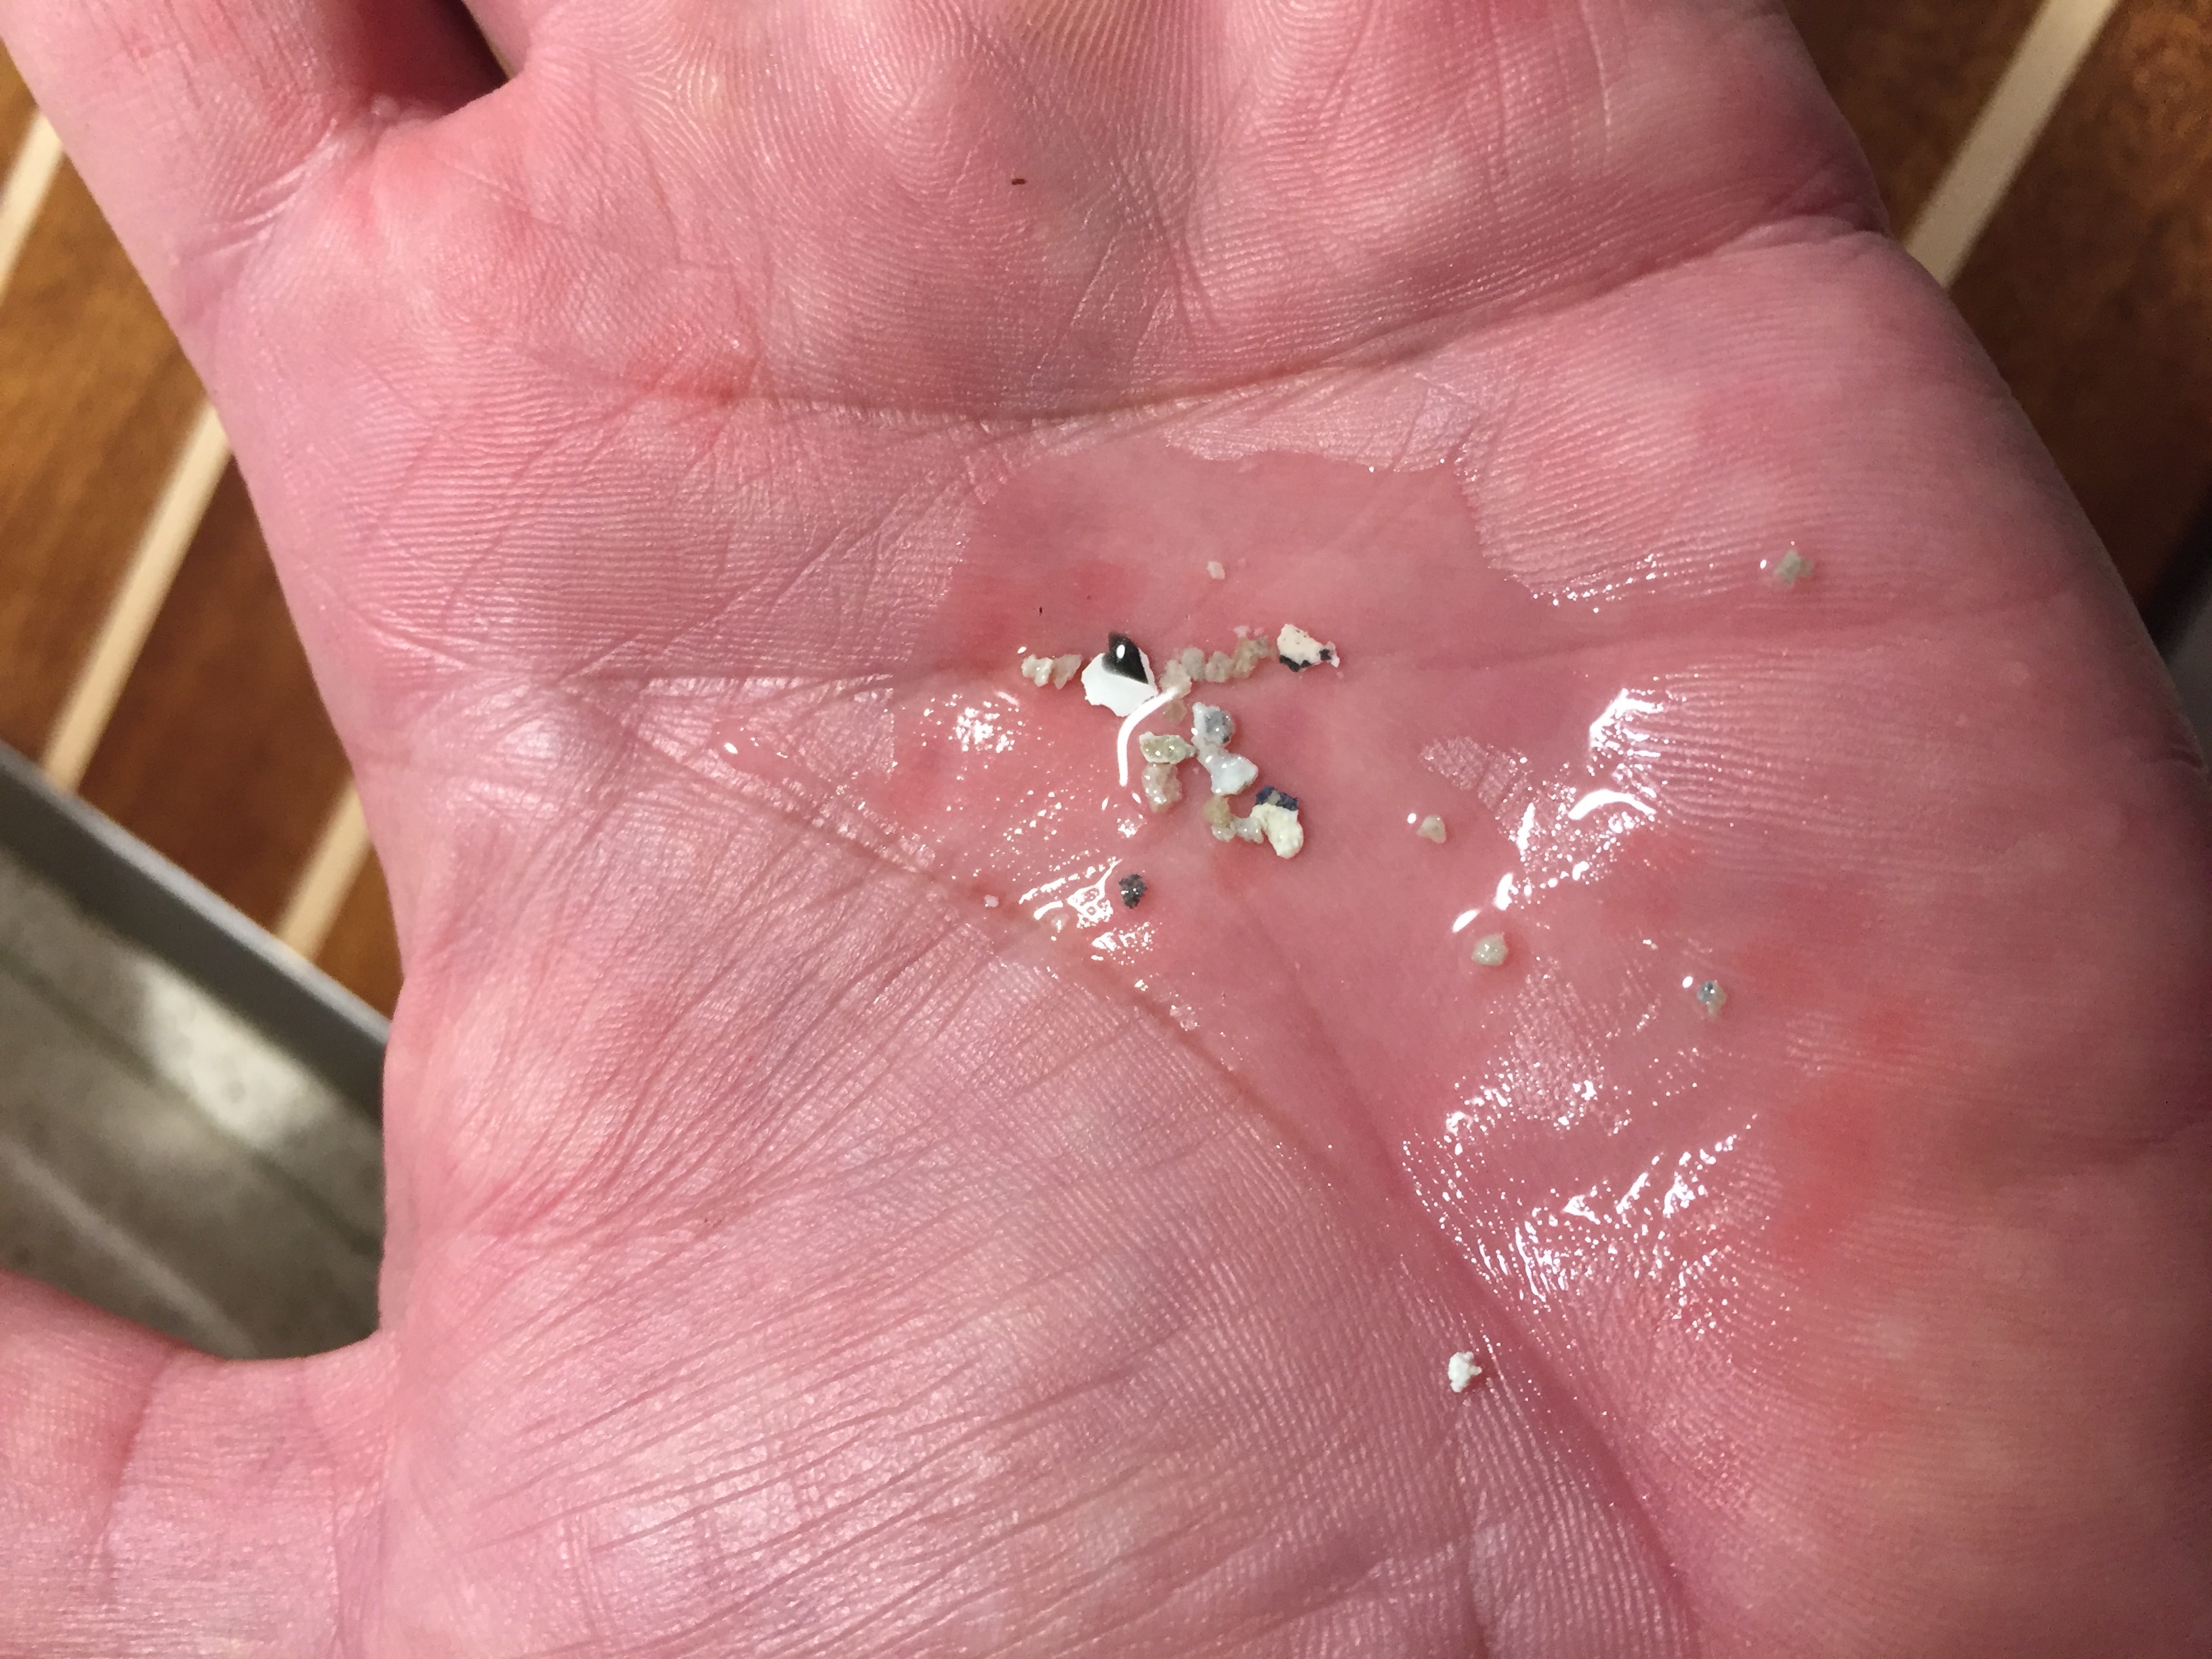
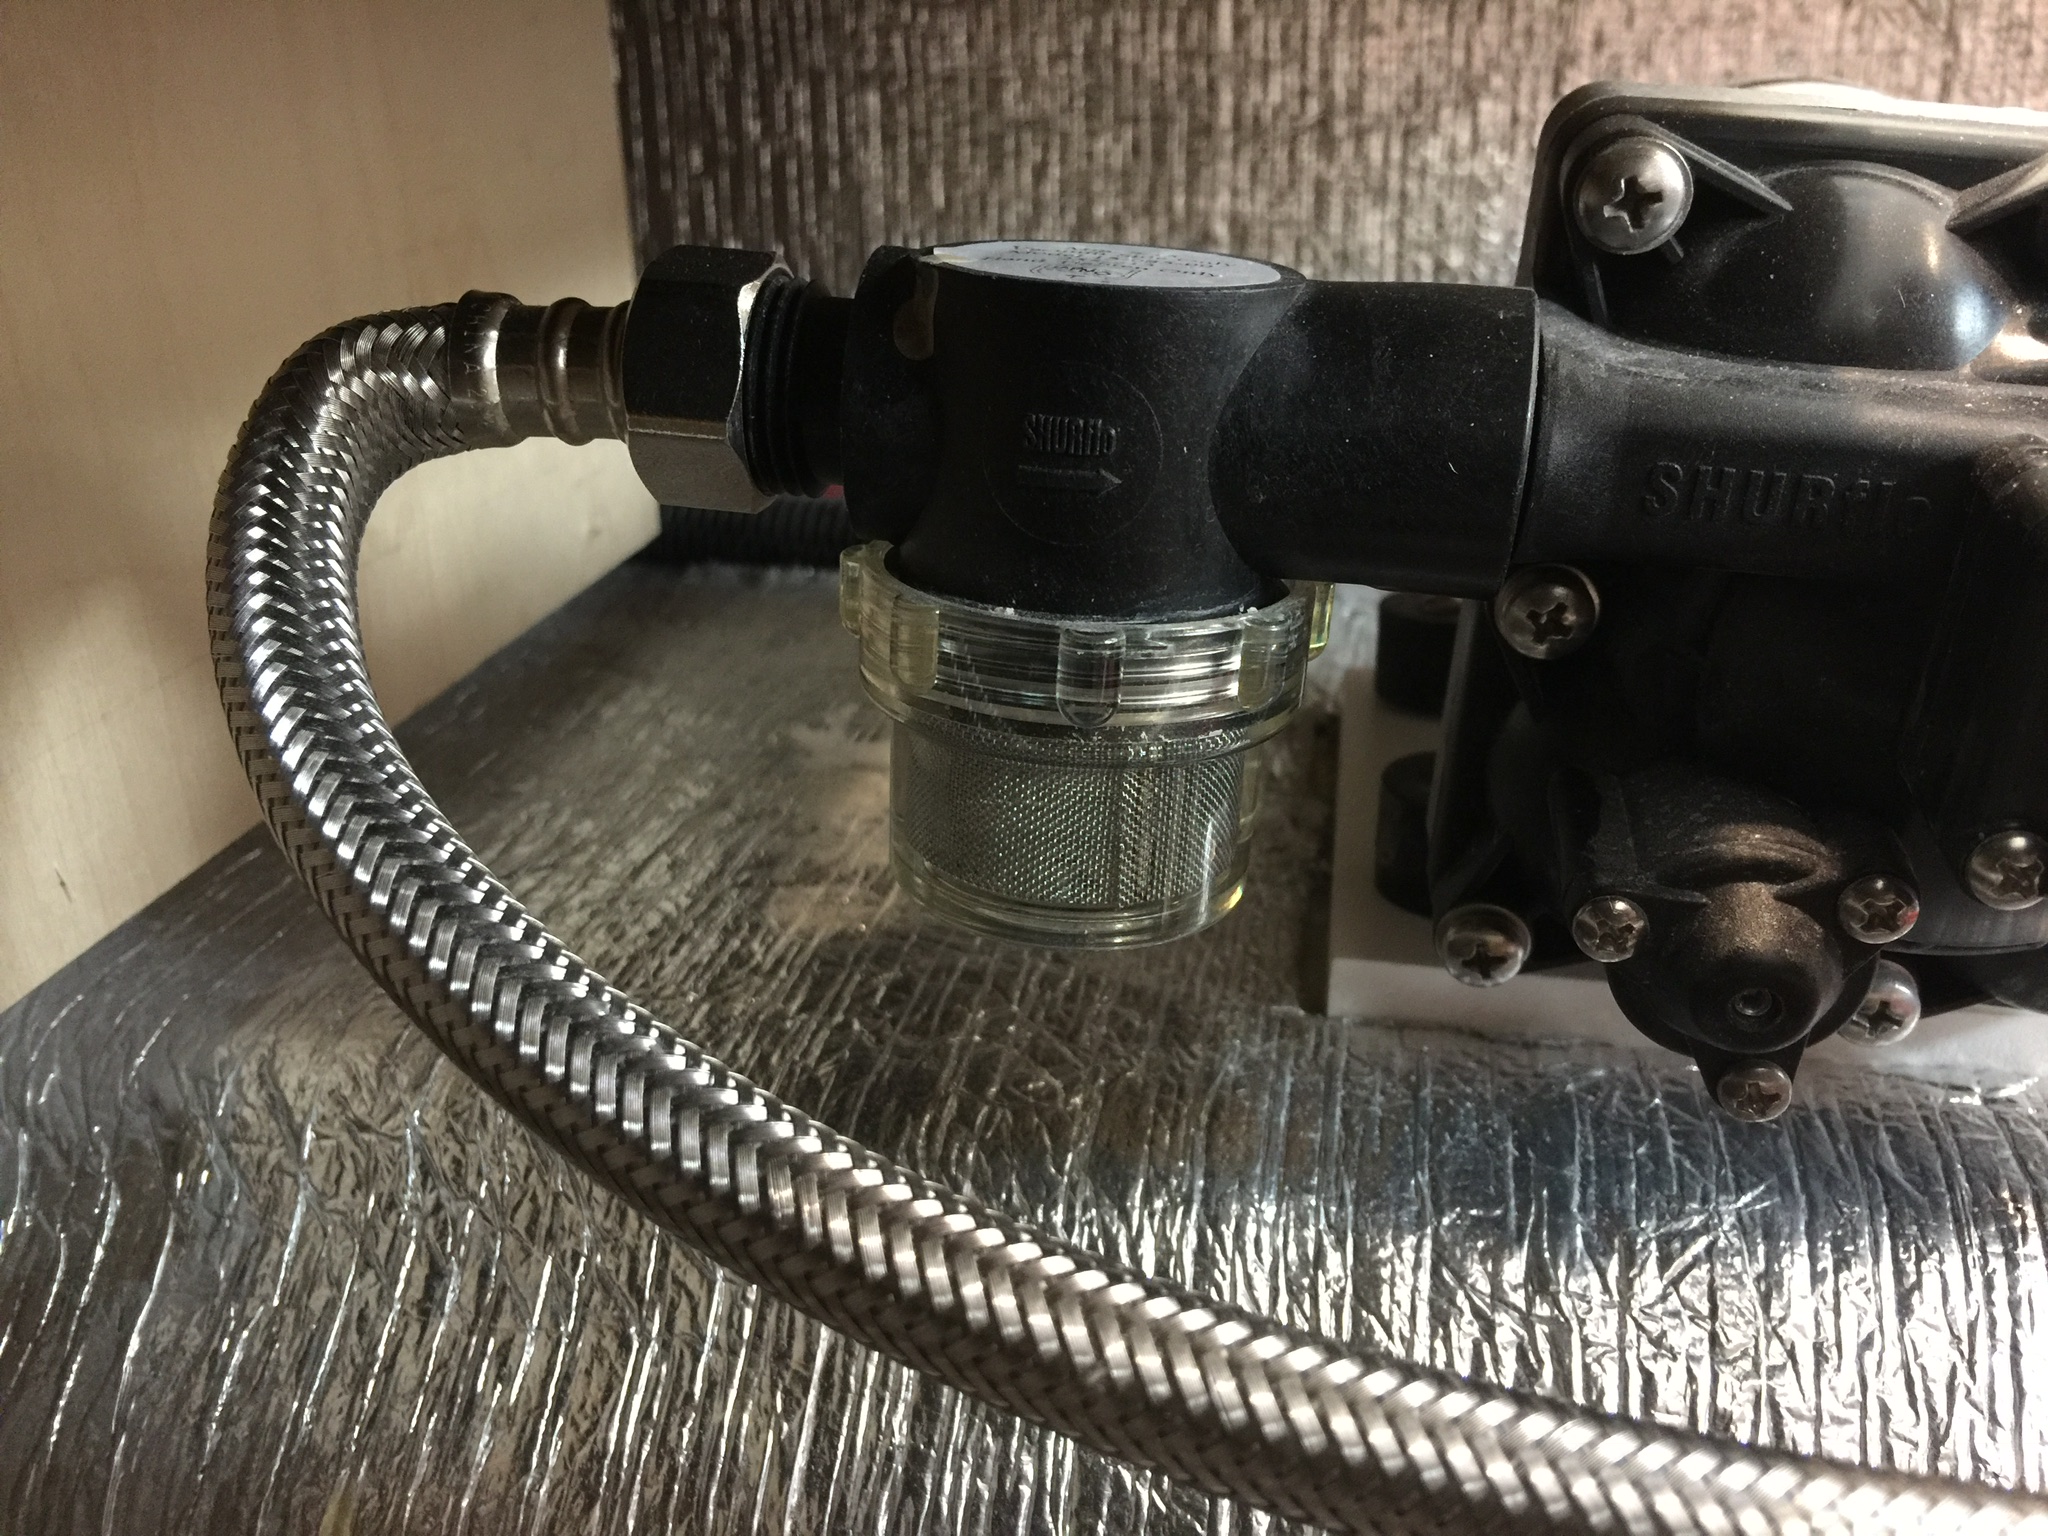
Update: Had time today to work on the plumbing and got to the problem. First, as big thanks for all of you who helped me trouble shoot! I started from the toilet and work back to the city water hook up. The shut off value for the toilet was clean with plenty of pressure, but the hose connection to the toilet was full of what I can only call plastic chips. A lot of them. (SEE IMAGE) I opened the toilet shut off value and used the hose to wash all the derby out on the connection. That fixed the toilet. Next the bathroom sink shower, I started to remove the four screws that hold the towel rack to the cabinet but stopped when I noticed it was clacked in place. Being a day from home I will do this when I get back to the shop. I look forward to seeing the cartage I have heard so much about. Next the kitchen sink, same thing - plastic chips. Cleaned and flowing better now. Last was the water filter on the water pump. Shut the value so no back flow and took off the filter trap. Full of hardened glue strings and bits of black plastic. (SEE IMAGE) How or why this got into my system is an mystery to me. I have had the trailer for a year and always used a water filter on the city water or water tank fill line.
1 point
-
Yes, that's the filter. A good tip when emptying it is to first shut the valve leading to the fresh tank before unscrewing the clear bowl. This will prevent the water left in the line from sucking anything that was caught in the bowl back into the tank as you release the seal. Have a towel handy as it will always spill a bit. The city water bypasses the pump and fresh tank, so there's no reason to turn it on when connected. If you haven't already, I would disconnect the city water, add some water to your fresh tank, and then test the pressure with the pump on. That will help narrow down where the blockage may be. And if it does work, then you at least have the option of filling your tanks and working from the pump. You can actually use the onboard pump to flush out the city water line, same as you would compressed air. You just have to remove or reverse the check valve at the city water inlet and then turn the pump on. Since I always forget to check the obvious things, have you checked for kinks or a blockage in the hose? Also, how is the hot water pressure relative to the cold? If the hot is fine and the cold not, then likely there's blockage at the second tee. If it's the same, then the blockage would have to be at the first tee or in the line between there and the city water inlet.1 point
-
After I had the accumulator tank added I was having water pressure problems, too. They moved the water pump to the left to make room for the tank but used the old hose which wasn’t quite long enough causing a kink. I went to Home Depot and got a hose 2” longer and the problem was solved. Here’s a picture of the kink.
1 point
-
Certainly I feel your pain. When one reads the story about the Outlaw Oliver and the "custom" work that was done there (and elsewhere) and compares that to what appears to be the current situation, I'm sure that it can be a bit frustrating. Even what appear to be fairly simple requests are met with the same response - "no". However, it seems to me that this looks like a case of "be careful of what you ask for". We, as a group, clamored for better quality and subjected the Company to a fair amount of abuse/criticism (justified or not) over these types of issues. Then, when the Company decides to concentrate on quality by limiting the number of deviations from the norm (custom work), once again we find ourselves in the position of not liking the result. Hopefully, one day, the Company will once again find itself in a position where they can accept custom work. I believe that I have a better, more comfortable and enjoyable camper because of the suggestions of the owners that came before me. But, in the final analysis, I'd rather have a quality unit that I can then modify and or customize later than a lesser built unit with a bunch of bells and whistles. Bill p.s. cool logo!1 point


-
Recent Achievements
-


")


")


")


