Leaderboard


Popular Content
Showing content with the highest reputation on 03/23/2025 in Posts
-
Steve has a reasonable question about why there is any liquid in the fresh tank at all. Best to have no fluids there at all . . . nothing to freeze. About the slow drainage, well yeah, you do have a tiny drain pipe exiting the trailer from the fresh water tank. The tank is many feet long, but only several inches tall. Not a lot of pressure in the line is available from this configuration, resulting in a puny discharge rate when the trailer is perfectly level. To fix this, raise the nose of the trailer as high as possible, thus giving more depth to the column of water and resulting in a higher pressure at the discharge port and a higher flow rate. It will still take a bit of time, but not as bad as a perfectly level unit. As Steve states, opening the drain while driving is a good tactic, but be prepared for all of the folks passing you, honking and pointing to the back of your trailer as the tank empties. Ha! Good luck.5 points
-
Open the drain while driving to your destination. But why does your fresh water tank have any water in it if it’s supposed to be winterized?3 points
-
I wondered why there was water in the fresh tank if it was winterized also. I think the OP may be flushing the small amount of rv antifreeze out of the lines and freshwater tank when dewinterizing. I usually do with the fresh water drain open, and even if you fill the tank up a little bit, it takes a while to drain. That would also explain why the OP states it isn’t allowed at the campground. I usually don’t worry about the small amount of rv antifreeze draining onto the campsite. It’s mostly alcohol and just like breaking a good bottle of bourbon at the campsite wo the profanity.2 points
-
++++++++++++++++++++++++++++++++++++++++++ Actually IF I were Dometic, with all the really bad publicity they sadly have received about A/C units that owners have despised so much.... I would wait about 5 years before introducing a new one in the USA. After that we all will have totally forgotten about our mutual bad experience and they will come out with an inverter unit with internal drainage, a fan selector switch tied to the AC Compressor run, and a remote T-stat/thermistor. In a lower profile unit using a brand new even more efficient refrigerant and sold at half the price of their competitors. GJ
 2 points
 -
I’m thinking we’ll pick one up as well. My son has SL for his camper and they love it, both he and his wife do a lot of remote work, email and video calls, it checks the block. We’ll be traveling west to northern CA, OR and WA in August and September, looks like some sparse cell coverage in some areas. Mike2 points
-
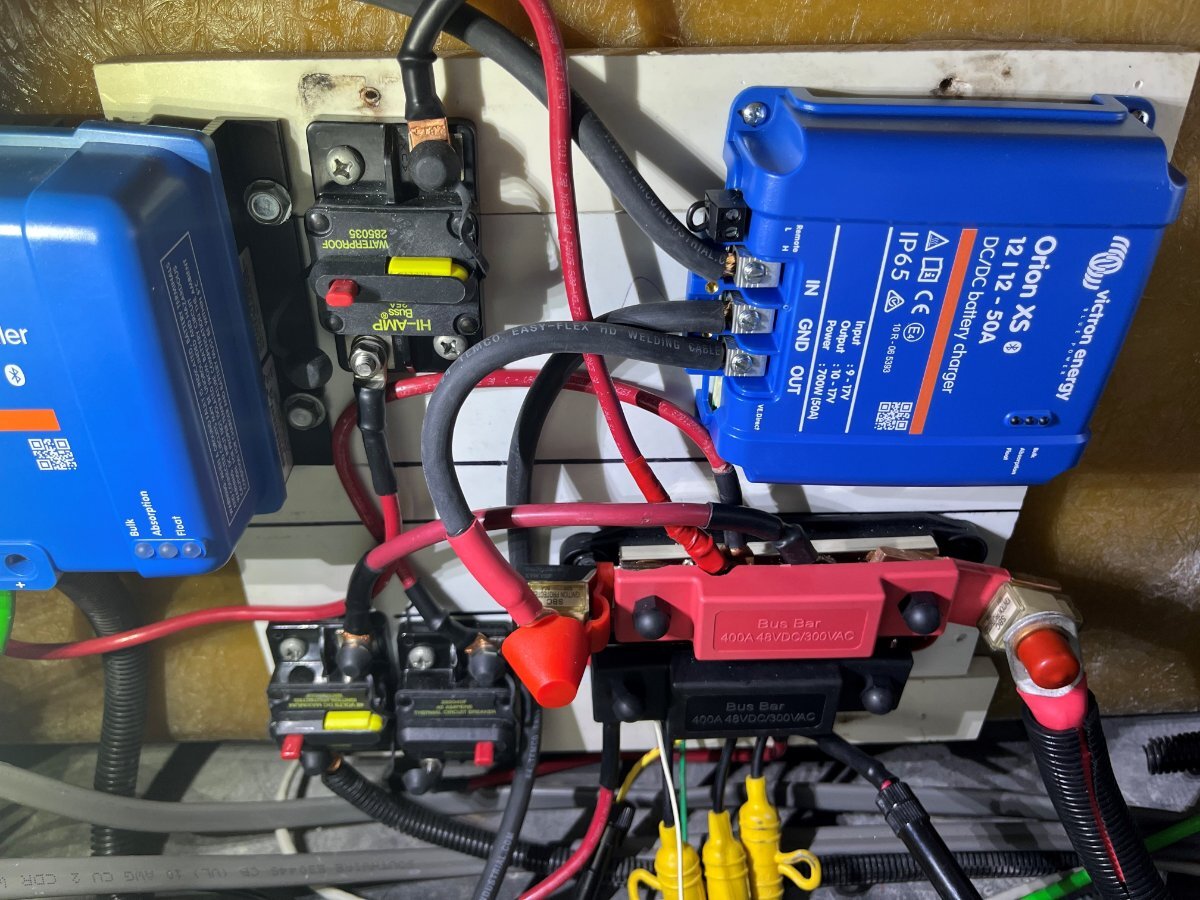
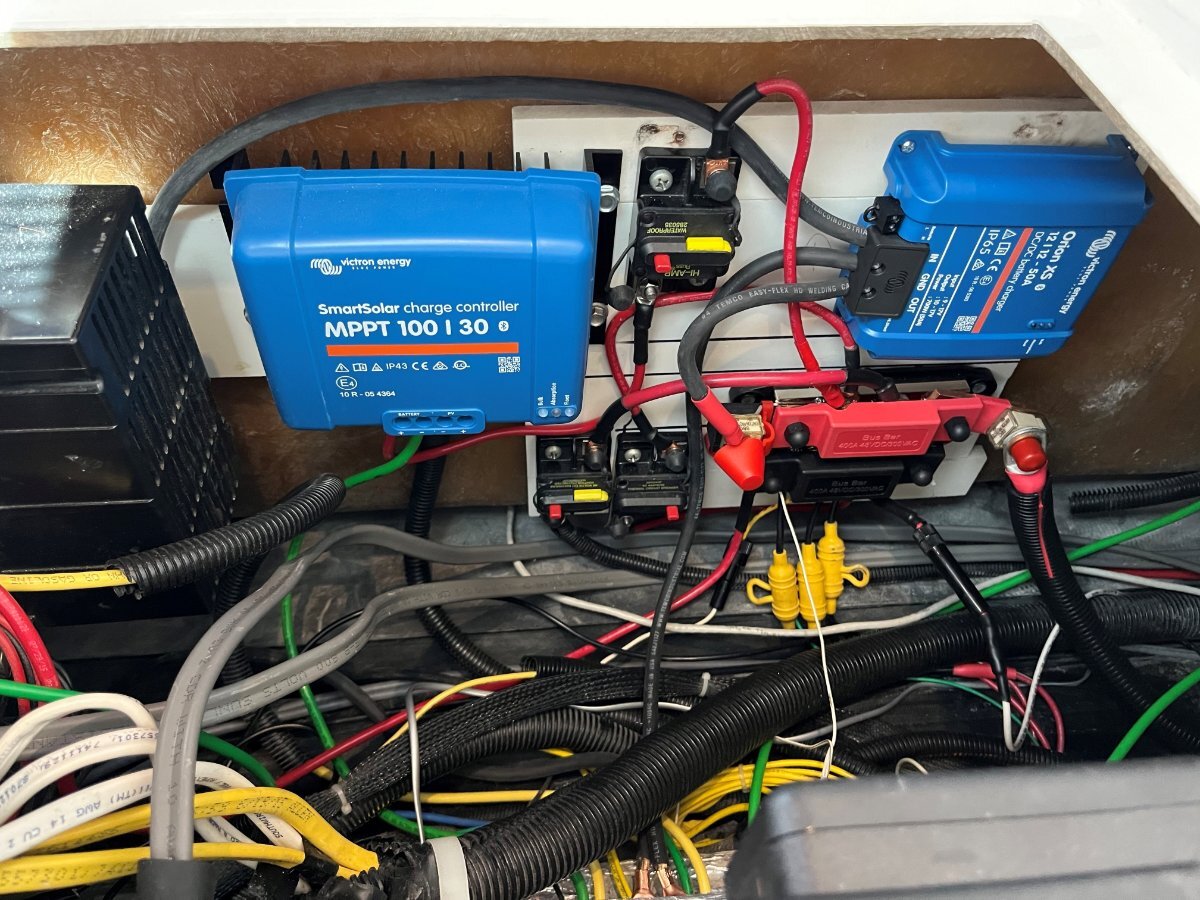
I’ve had the parts forever and between work and some travel, a list of injuries (that made it extremely difficult to kneel in the basement or crawl under the truck) I finally have this done, fully installed and performance tested! The bottom line is, “this charger is awesome!” A month ago, I was working on waste valves under the front dinette seat when it occurred to me to run the charger cabling in the Oliver since I had everything opened. I always drill the smallest hole possible, no fancy cable glands for me. Two 3/8” holes would been enough, but I had grommets in a parts box 1/2" OD and 3/8” ID which were the perfect size. I glued them in place and afterwards caulked all of the cable openings front of hull (no pics taken). It makes sense to wire the charger before mounting the board (pic1). The wiring is rather simple but the 4 AWG wire barely fits into the terminals. The 4 AWG wire will not fit into the Oliver ground/neutral bus, so I crimped on a lug and cut it to fit the opening. I installed the two grounds side-by-side (the other coming from the tow vehicle) (pic2). When I worked my earlier inverter upgrade and rewiring projects, I had saved room for the new Orion DC-to-DC charger (pic3 close-up and pic4). The main + bus (in red) is protected by a 90A Marine Rated Battery Fuse (MRBF) that connects by 4/0 cable directly to the Victron Inverter-Charger bus and then through a 400A ANL fuse connected to the batteries (400A Victron Mulitplus spec). All major circuits are connected to the main bus; the 40A breaker OTT installed for all the Oliver 12VDC circuits, two solar chargers (OEM Blue Sky for rooftop panels and a Victron 30A MPPT charger for a Renogy 400W suitcase) and the new DC-DC charger circuit which is connected through a 60A MRBF (see center of pic3). The secondary +bus (in black because I purchased a set) is protected by the OEM 40A breaker which connects to the 12VDC panel, the 3 jack fuses, etc. These are 8mm thick solid copper buses for minimal resistance. A considerable upgrade compared to the original OEM installation. I attached the Anderson connection, front of trailer, and then got under it to see all the many zip ties that OTT installed. OMG, they should have better cable management! I replaced a lot of these because of age, but I did not want to merely zip tie this new heavy dual cable harness! Instead, I used the u-bolts that hold the front basket and cut brackets to support the cables including the trailer harness in two places, in front and rear of the basket. The picture shows the front bracket (pic5). And after taking this picture I hammered both ends of the bracket to curve them up almost touching the upper bracket to create a D-shape. I could have purchased pretty brackets, but these were on hand, fully functional and can only be seen while lying on the ground! The trailer side installation was then done! When I finished and reconnected the house batteries, the blue light on the Orion started blinking and it was listed as a device on the Victron Connect app. So before even working on the tow vehicle installation, I was able to update the firmware and configure the Orion charger. I reduced the output charge to 30A for safety concerns and initial testing. The battery settings were close enough, within 0.1V of the specs for Epoch LiFePO4 batteries.
1 point
-
Yes John, you and Susan, and your wonderful, infamous Jolli Olli, please come see us on your 2025 western trip! We have power and water hook-ups for those who are off-grid challenged 🤣, and a dump station just down the steet! It would make our day, no, it would make my year to see Y’all in Prescott Arizona! God bless1 point
-
JD, This is way overy head. I'm actually having a good chuckle I want to see all of this when we see each other next. 😊👏👏1 point
-
Where you live Derek, you need something good and cold to travel during summer and some of the shoulder seasons! We’ll make it through our June trip and next plan is north rim of the Canyon Sept-Oct, no A/C required.1 point
-
I believe I will be next. I've read the $100 sale may end for awhile after Mar 31st. I found out that Home Depot is a reseller for Starlink and I have a 10% coupon also ending 3/31. These Mini's should get cheap at some point, but net $450 may be the best price for 2025, at least until Black Friday sales late in the year. I'm thinking the Trio Mini Speedmount with magnet mounts for doing a fixed installation on the roof of our tow vehicle, integrated to the Pepwave router. And for the case where we need to get out from under trees, etc. I will get a battery setup and not use a power cord. This way, we would use the Starlink vs. the Pepwave Wi-Fi. I found several $20 kits that use the 20V DeWalt tool batteries. We always bring 3-4 DeWalt batteries with us, for a flashlight, an impact tool, a vacuum and leaf blower, and we have an extra charger permanently in the attic. https://www.amazon.com/dp/B0DM1T6VX2/?th=11 point
-
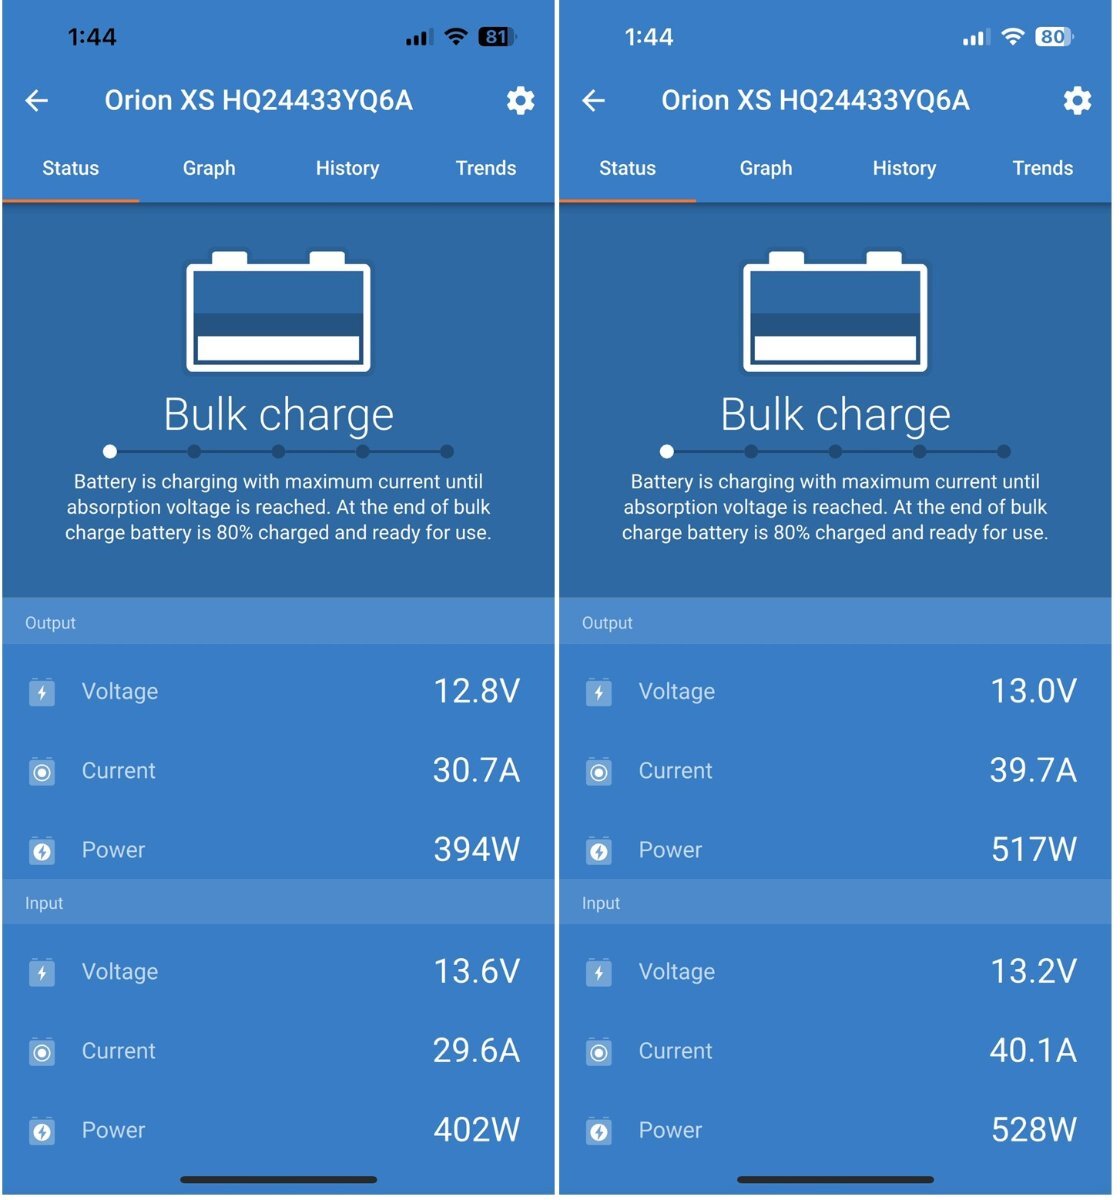
Last test for now... What if when boondocking, far from hook-ups and other campers, you're needing A/C on a HOT afternoon, and your batteries getting low? You could start and connect the tow vehicle to the DC-DC charger. Diesels can idle forever using little fuel. The truck alternator via the Orion charger could supplement inverted power to the A/C for some period of time. The approx. +40A noted before at idle should offset the AH used by the A/C system. These readings (pic1) show this to be true, +39A were being supplemented by the charger at this point in time - nice! Also notice, the Time Remaining stat increased from 2 1/2 hours to 4 hours given the lower AH usage. I will eventually install an A/C that uses much less power than the Dometic PII. That's all folks.
1 point
-
I needed to verify numbers showing for the Orion Charger are relative to what the Victron Smart Shunt was reading at the batteries. The screenprints (Orion vs. Shunt) were as follows (pic1). Why does the Smart Shunt showing 10A more? Because the Blue Sky solar (pic2) was adding +12A and the remainder -2.3A is used for inverter standby overhead, exterior Courtesy Lights (always on) and some parasitic. These numbers add up nicely!
1 point
-
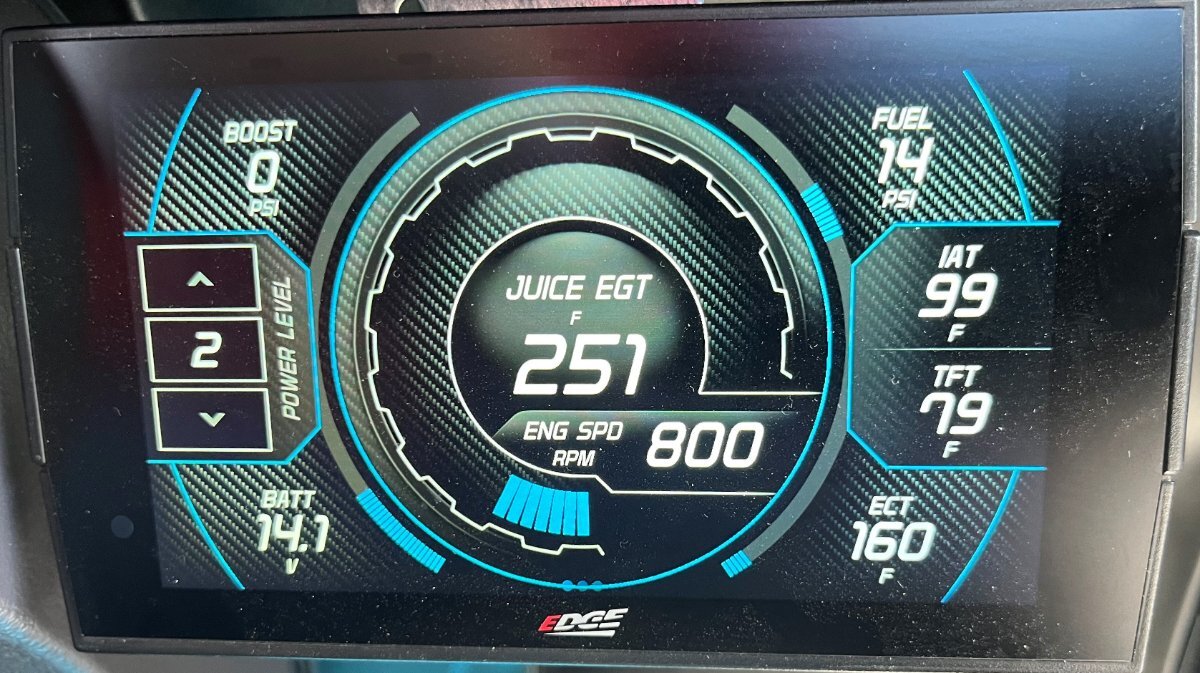
At start of the performance test, the 600AH Epoch Essentials LiFePO4 batteries were at 100%, rooftop solar sitting in the midday Arizona sun. So, I started the A/C on inverter. It was a mild day low 60s. I set the thermostat down to 55F, opened the windows so no cold air would collect inside and just 34 minutes later SOC was down to 86%, with the old compressor of the noisy Dometic PII running continuously. I also warmed up the tow vehicle and after 25 minutes idling the gauges looked like this (pic1). Engine Coolant Temp (ECT) was up to 160F (190F is fully warmed up). The idle engine speed at 800 RPM and battery voltage held steady at 14.1V. I did not take a second picture but when the truck was connected to the DC-DC charger, voltage read 13.8V on this gauge. At first I had configured MAX charge to 30A and took a reading and quickly reconfigured it to the default 50A max charge. Below are the two screenprints, shown left to right (pic2). Set at 30A MAX, 30A was received and 30A also in output. Set at 50A max, the charger output was 40A. This must be due to the 800 RPM idle speed. At highway speeds, the Cummins is generally about +/- 1900 RPM so the HD alternator should produce both higher voltage and amperage. Again, voltage measured at the truck was 13.8V and when the charger was set for a 30A it read incoming voltage at 13.6V, a -0.2V voltage drop. When producing 40A, the Orion read 13.2V, a -0.6V drop. Is this voltage drop along the wiring? And I do not understand the lower voltages produced on the output side, as I would think the Orion charger would output higher voltage in the range of 13.6V to 14.2V to the batteries. Maybe Geoff @Snackchaser knows, how does this makes sense? The 30A charge looks fully efficient. Set at 50A I got 40A idling at 800 RPM. The final test, I will run start of your next trip, will be to test the 50A charge setting at highway speeds. All this was done sitting at idle in my driveway. More to come…
1 point
-
After reading all of the positive comments about using the SL Mini, Bosker insisted we up our game. We now have one, with a waterproof case, the Anker Prime Power Bank, an extra 50' power cord for the mini for when the Bison chomps the old one, and a USBC to DC5521 adapter cord. Bosker and I are ready to rock-n-roll, with continual connectivity this summer, on our trip from Texas to Yellowknife, NWT, Canada!! (according to SL, Yellowknife has connectivity all way up there at 62.4N) Thanks, everyone, for blazing this trail and informing the Ollie family about this great accessory.1 point
-
Excellent write-ups on your DC-DC install! Looks like you have it dialed in for peak efficiency, waiting to learn more on its awesomeness! I too ‘home shop’ for spare parts and materials to complete any given project, definitely saves time and money. When I did the alternator upgrade on my former TV (Mechman 320 Amp High Output Alternator) I installed the Big 3 wire upgrade, which substantially improves grounding at the alternator, engine and frame using 1/0 cables. However, I have since stripped said alternator and cables from the Silverado 1500 for future install on the Savana 2500, which has a 150 Amp stock alternator that will suffice for now. I’ve already done the same with the formerly installed DC-DC cables on the Silverado and the Savana is now readied with the rear bumper Anderson SB120 connector and Source Side Environmental Boot/Cover.1 point
-
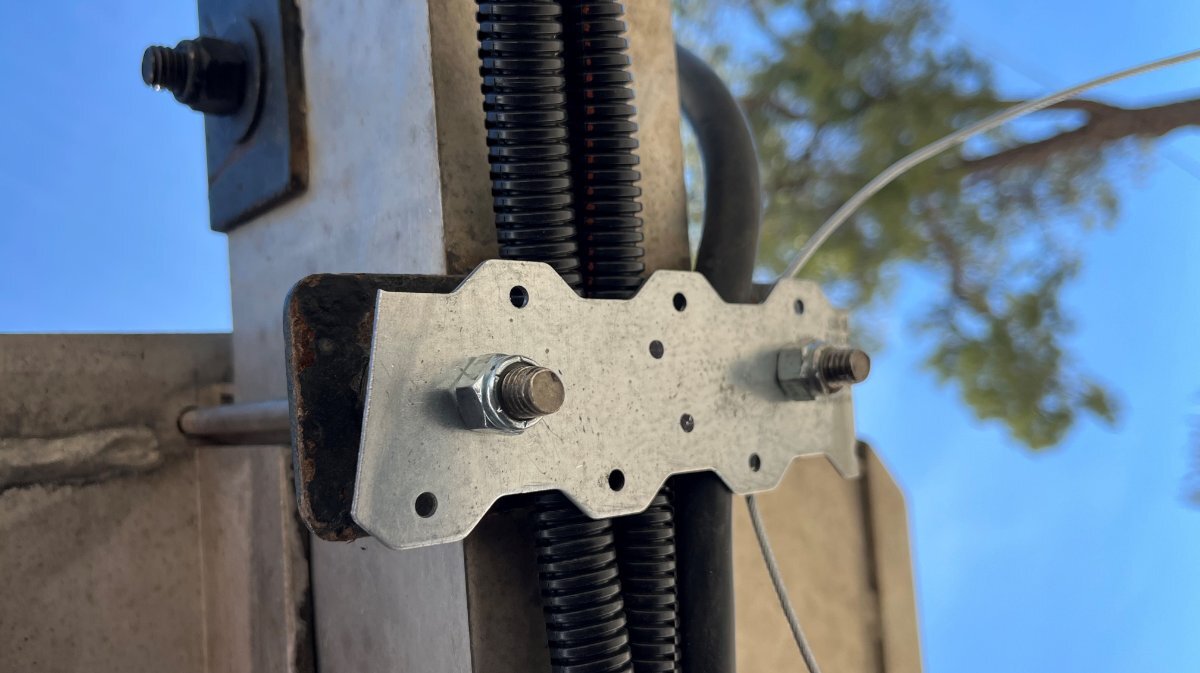
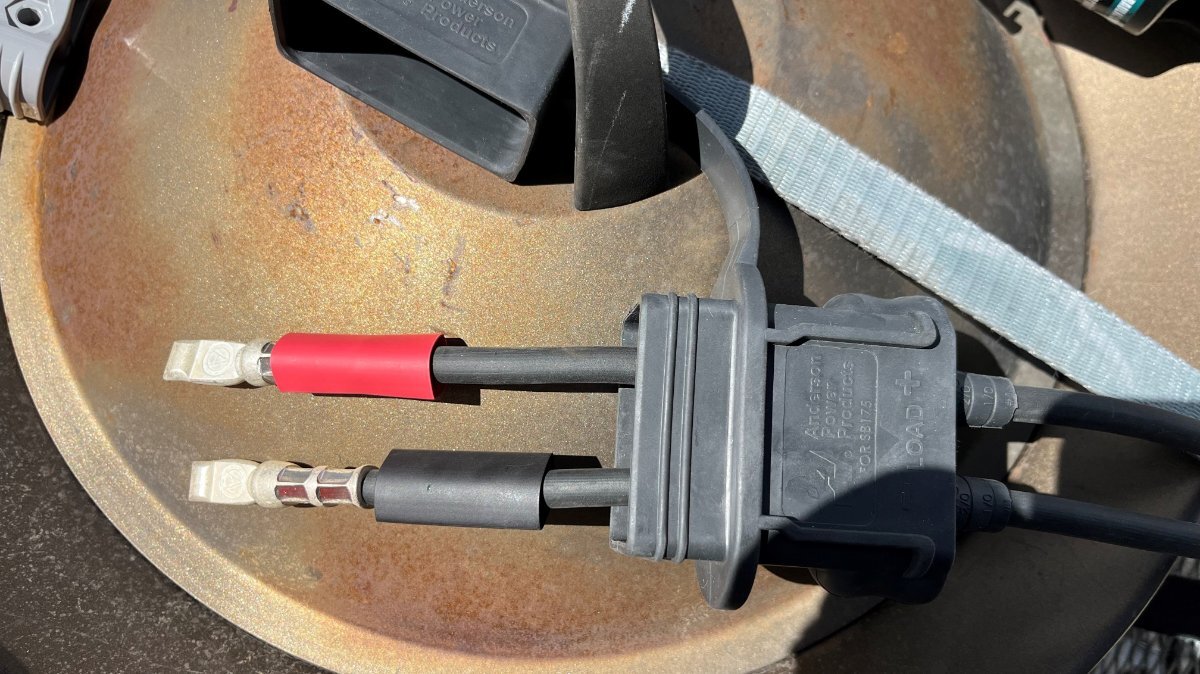
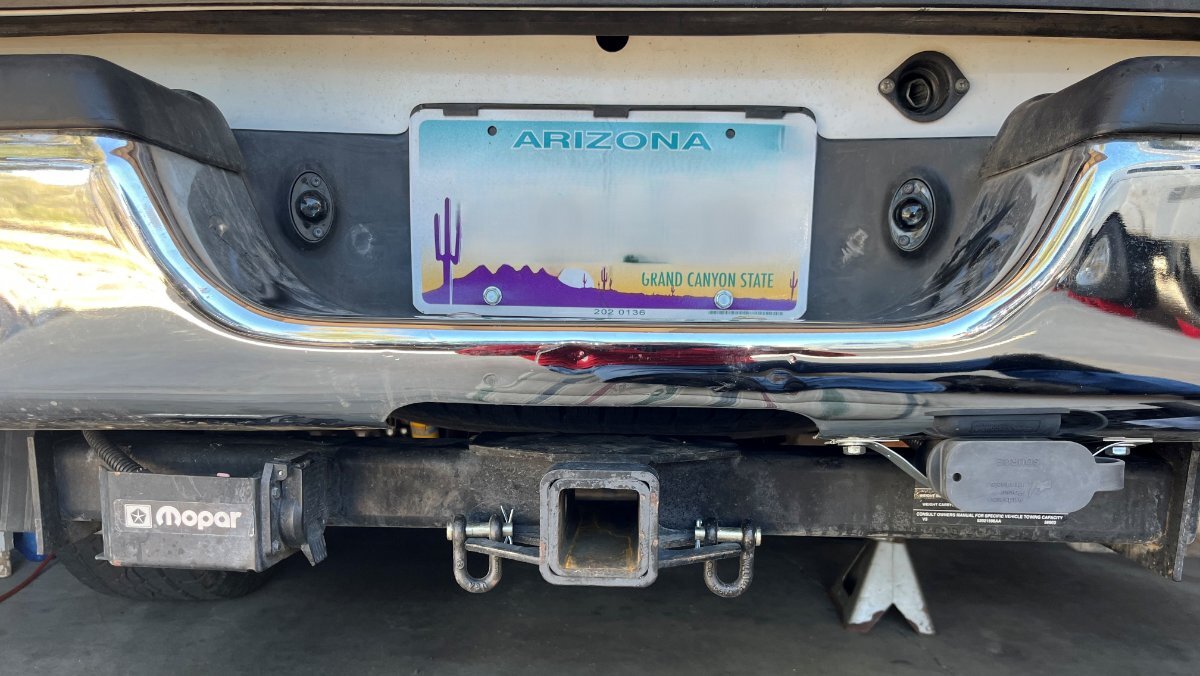
Next is the tow vehicle side installation. The Ram Cummins and most diesels have dual batteries. I chose to connect to the RHS battery since there are less connections, because its proximity to the alternator, and because I wanted a straight run down the frame to the RHS of the rear bumper. Looking ahead, last year I installed a custom Nations 180A HD alternator. OEM rating on our truck is 130A, thus gaining 50A for charging ampacity! Starting at the battery, I ran the B+ cable along the fender rail to keep it away from the heat of the exhaust manifold and entered the main frame member just behind the engine. Conveniently, there are two holes in the frame just behind the front wheel (pic1). The RH opening is where it comes from the engine and the LH is where it continues all the way to the rear wheel. I had 100’ of 1/2" automotive loom from a past project which made for a clean installation! I removed the RR wheel for ease of access in running the cable. It took a couple of wire ties to get up and over the rear wheel-well but mostly the 4 AWG cable just lies nicely inside the frame beam, very well protected. I decided it should come out below the rear bumper yet above the trailer hitch. The Anderson SB175 connectors are huge (pic2). A full inch or more of bare wire is required inside each pole connector, so I crimped each in two places. There are a series of holes across the bottom of the rear bumper. I used the two holes closest to the center, fabricated and simple bracket to hold the heavy environmental boot in place (pic3). This worked out great as you can push in and pull out the trailer side connection with one hand and it does not budge! So, I have the trailer harness connection on the left and the DC-DC cables on the right (pic4). It looks clean, nice and balanced. Many on this forum and elsewhere believe you need both B+ and B- 4 AWG (minimum) wire running all the way end-to-end! This is certainly true for the B+ cable. For the B- cable, I merely ran a 2 ft length from the Anderson coupler grounded to the rear frame. I believe an 8” section of steel frame will produce less electrical resistance than 4 AWG copper and testing showed this to be either true or “good enough!” I ran another short 4 AWG ground wire from the B- battery terminal to the front of the same frame member. Last step was to connect the B+ charger cable and reconnect the battery terminals. I used another 60A MRBF for the main run (pic5). I also ran short cable from the B+ terminal to the alternator (for redundancy, this connects the charger B+ to both the alternator and batteries with new 4 AWG copper). I’ve never seen anybody take these extra steps, but I believe it will provide better charging performance. You’re running 4 AWG everywhere else, but OEM cables from battery to alternator are usually only 6 or 8 AWG and solid grounds are often an automotive issue. BTW, OTT only installs one 6 AWG ground wire for everything running on DC! I added a second 6 AWG ground cable from the negative bus in line to the batteries in a previous upgrade. This should work great, I really liked how it turned out. I measured carefully and purchased only 65 ft of black 4 AWG wire (not bad for wiring an extended cab long bed pickup truck tow vehicle)! I used all of it, and every run has slack on both ends and the trailer side connector is 6” longer than the standard hitch coupler cable. I ran thorough testing today and I'm getting 40A charging output with the Cummins diesel running at idle! Yes, engine running at idle. I captured pictures of all the Victron Connect screens showing Orion and Smart Shunt data. I'm getting rather tired tonight, so to do this reporting justice I'll get all my data together and add another post tomorrow. As I opened my thread above, "this charger setup is awesome!"
1 point
-
Yes - I have. Only once but it did happen. The little ball at the end of the zerk seemed to be virtually welded in place. After changing it out I took the offending zerk into the workshop and it took several "pops" with a small punch and hammer to get it loose. After that I've always used caps on zerks in order to keep "stuff" away from the operating area. Bill1 point
-
Thanks John I really appreciate the complement especially from you. I also appreciate the reminder of the use of safe practices around potentially dangerous areas. Especially when putting up pictures that the rest of the Oliver commuity will see, a person needs to show good example. Thanks again Paul1 point
-
Beautiful, I really like it. Thanks for posting. As an ex A&P I can appreciate the fine craftsmanship. But you gotta take off the steel watch and band. Please. It doesn’t belong around potentially very high DC current. When I became an aircraft tech I gave up a necklace and a wedding ring.... Too many stories of guys with burns or missing fingers.... and screwed up equipment. And don’t leave conducting tools just lying close by. On top of the open battery door would be better.... John Davies Spokane WA1 point
-
Yep - or at a minimum - design sheet, specs, etc. A really nice job. One I will have in mind in a few years. RB1 point
-
You should seriously put a package of the those parts together, mass produce them and sell them. I would be first in line to buy one!!! John1 point
-
I want to thank my friend @Derek B again for making us aware of this new A/C technology. I'm also hoping for more action on this thread, others here finding additional inverter A/C product offerings! Maybe I should custom install a mini-split in the Oliver! 🤣 I really wanted the sound level of the Turbro Greenland to be better. Both video reviews mentioned noise while Turbro writes, "as low as 45 dB" (likely at lowest fan and compressor settings). Though I love how the inverter compressor is always-on variable-speed and manages power so efficiently. I contacted Kevin at SDG last week to ask a few questions. The Atmos with SoftStart, LTL shipping is required this year at $150 (UPS was damaging units, go figure) and they do charge for out-of-state sales tax! I was not expecting all this which comes to near $2,000 total. I have decided to wait on the Atmos (even though @rideadeuce just posted a rave review) and any A/C purchase, at least for now, in hopes that a new inverter model will become available. The Greenland is a first production model and should get better soon. I wanted it for a summer trip though we leave late May and will be home by the 4th of July, heading to Minnesota and coming back through the Dakotas and Wyoming. We'll hope for the Jet Stream flying low early summer of this year!0 points


-
Recent Achievements
-


")


")


")


