Leaderboard


Popular Content
Showing content with the highest reputation on 11/12/2025 in Posts
-
The First place to start is the driver side door of the Colorado. The payload of the truck will be listed there. This is the maximum weight allowed to be carried by the truck. Next... Start adding the weight you will be putting into / on the truck. Start with the tongue weight of the Oliver (650 lbs.) Next would be the passengers (be honest). Then account for anything you have added to the truck as an aftermarket accessory.... Bed Caps typically weight about 300 + lbs. Finally any camping equipment that will go in the truck... stove, generator, camp chairs, tools, etc. Subtract that number from the max payload capacity limit. If you still have a positive number, you have passed the first test. (you still have more math to do) I would be interested to see how your numbers work out if you would be kind enough to share. Also would strongly advise against the Chevy Colorado ( or any other medium size truck ) as a TV. Best of Luck, Scotty3 points
-
The $345 quote was for the 2 rear decals that has the Oliver name and the front decal on the nose. Just the 3 decals. They didn't quote for the big swish on the sides that you see on some trailers.3 points
-
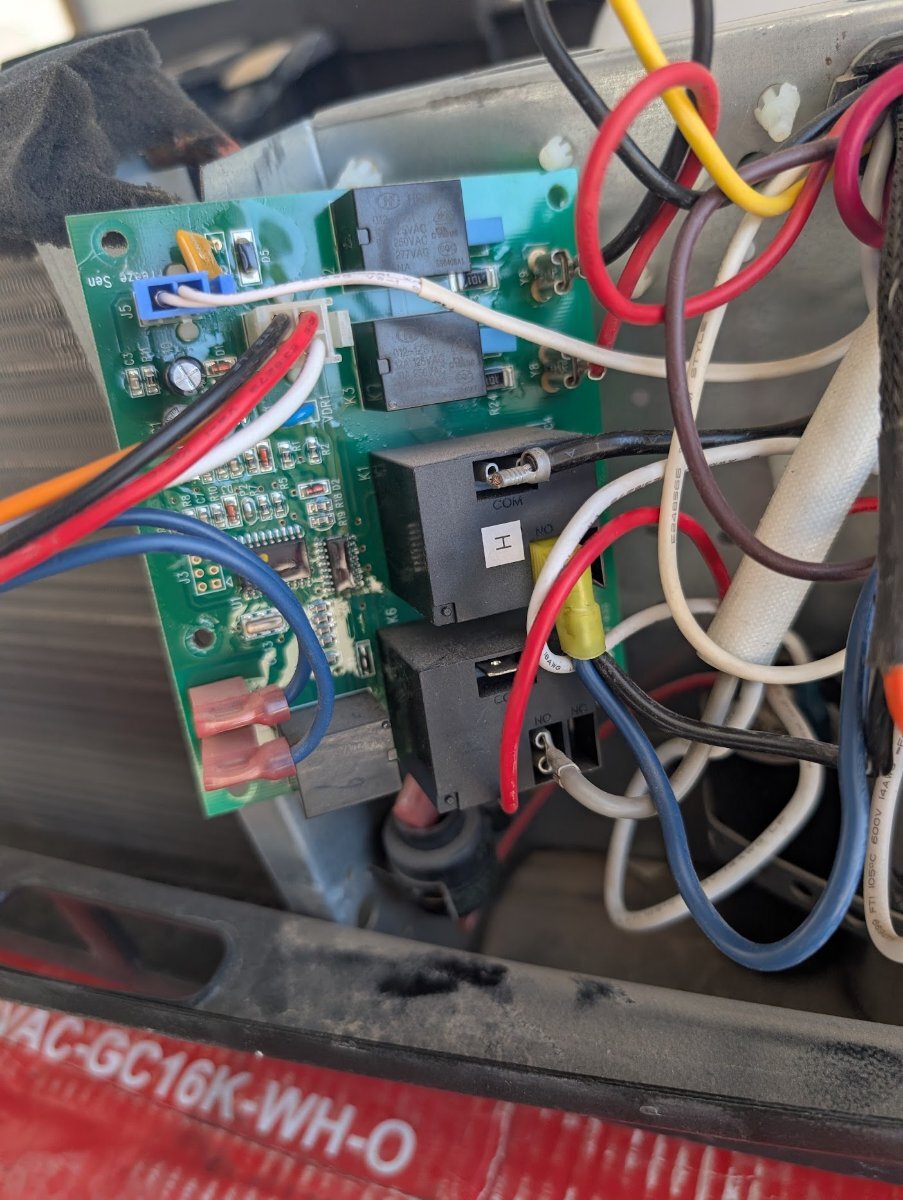
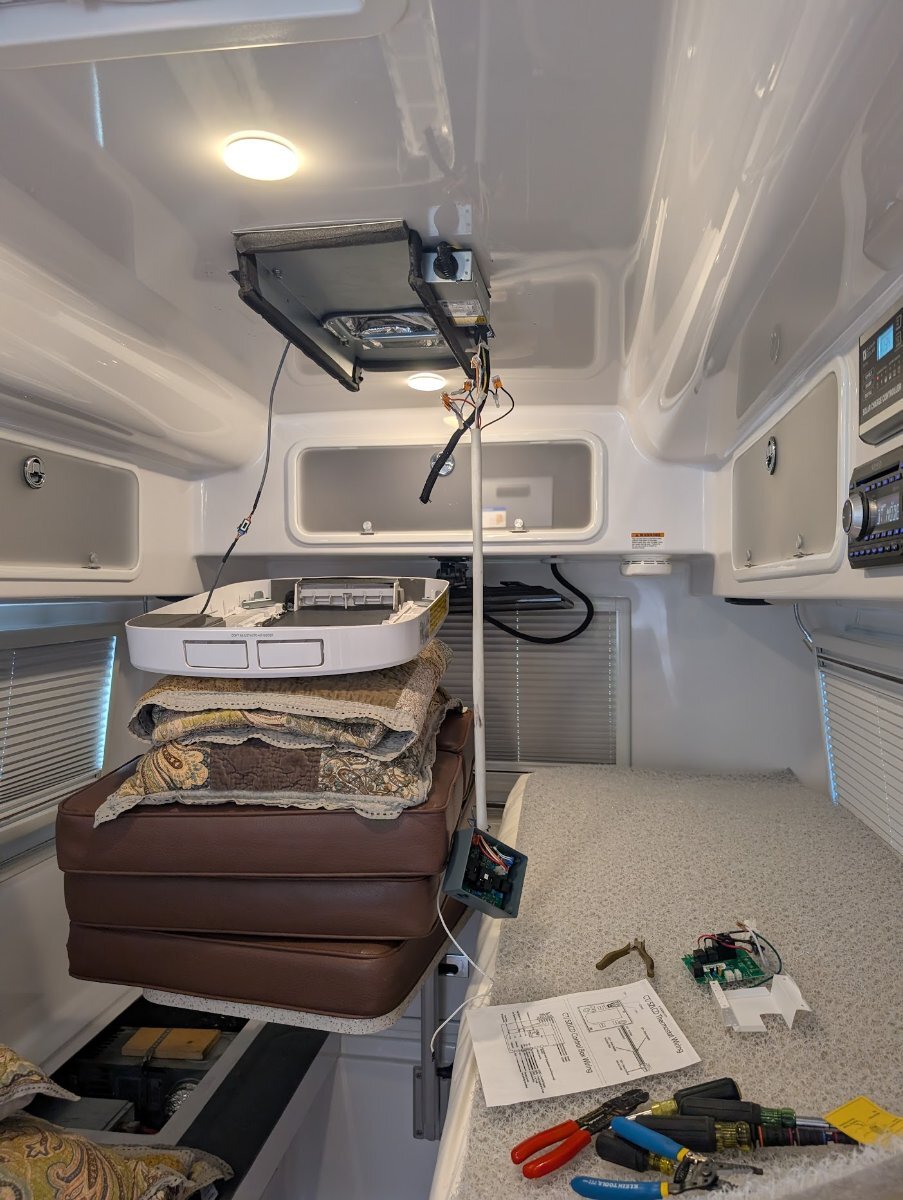
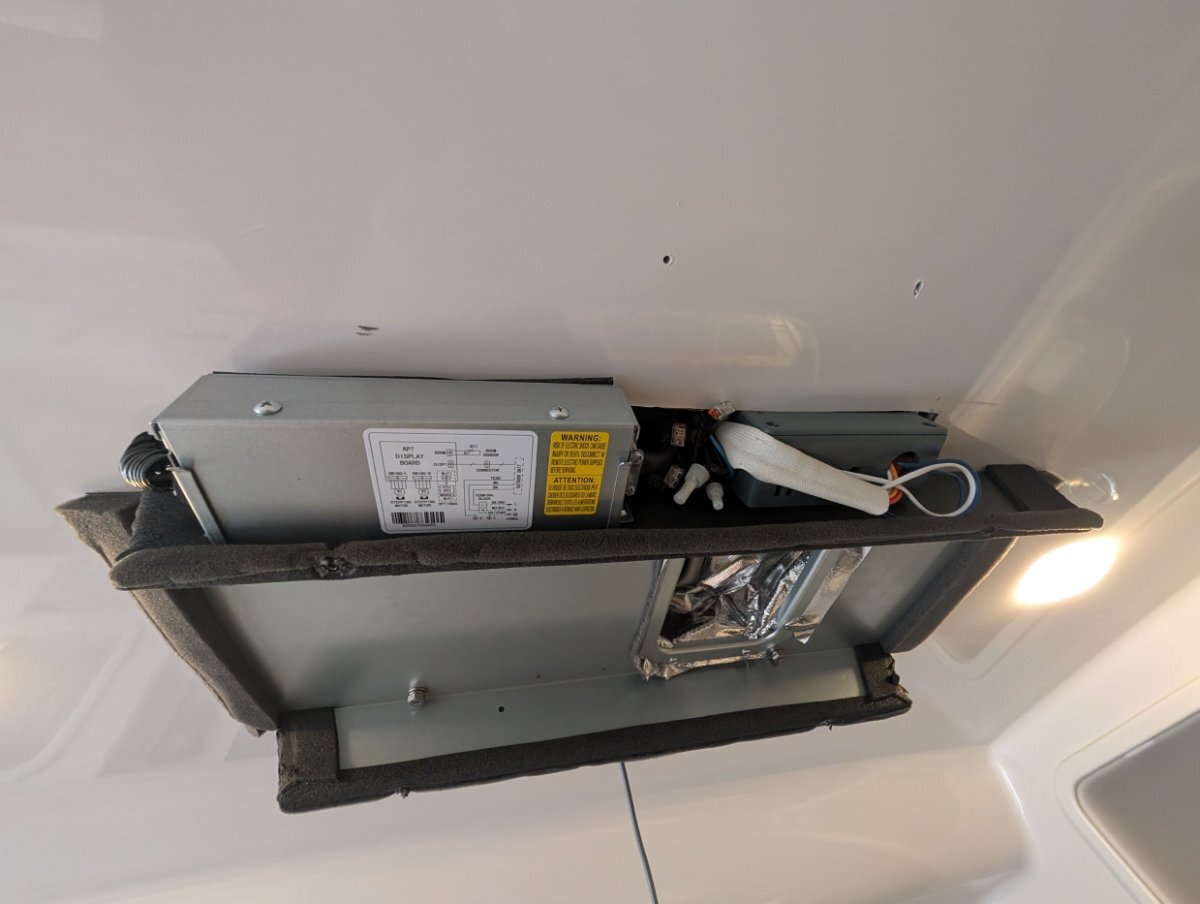
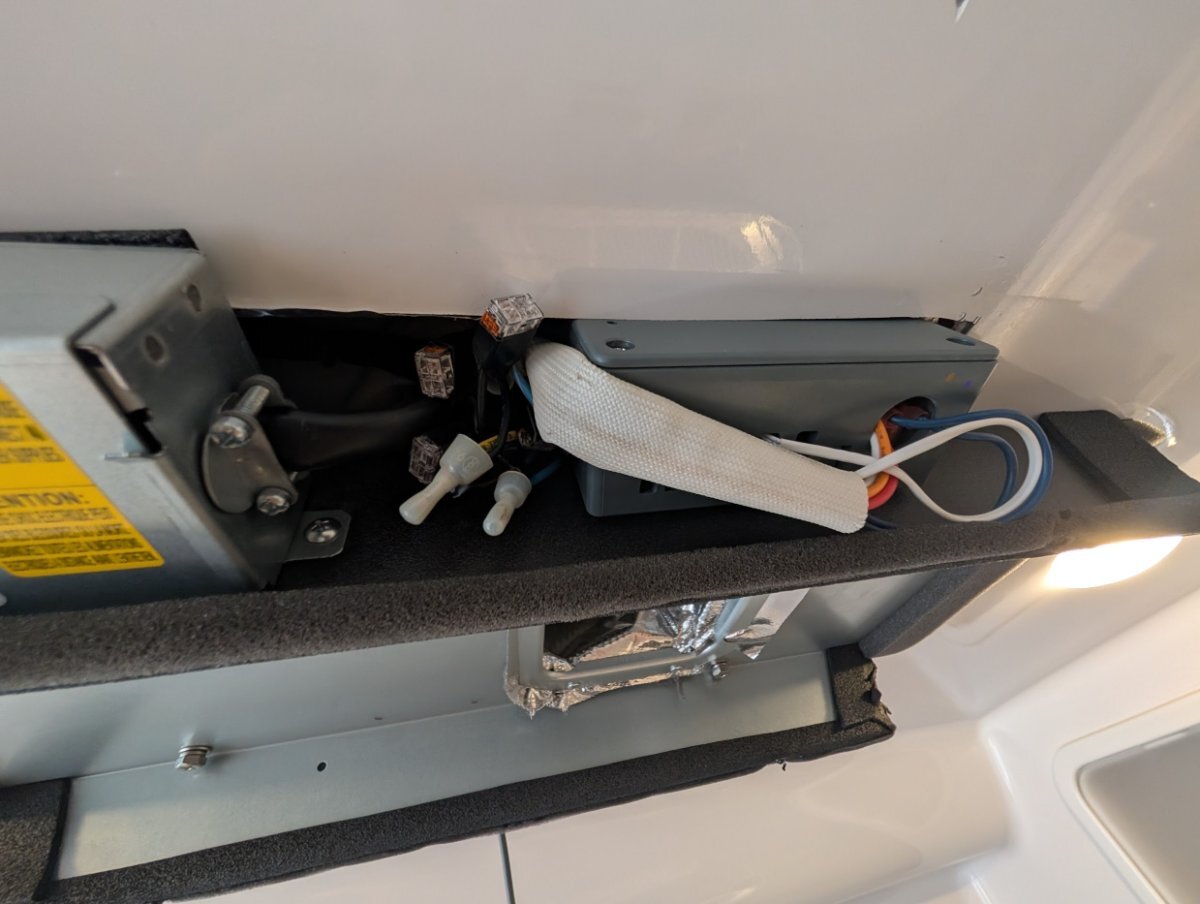
✅ Successful Furnace + CT Thermostat Integration After A/C Swap (Tosot Unit) Hi all — following up on my earlier post where I mentioned trying the Dometic controller from RV Surplus. Turns out that board was not the correct one for our Oliver furnace setup, and it would not communicate with the Dometic CT thermostat (kept throwing E1 code (no communications with the board). TL;DR: If you replace the factory Dometic A/C (mine is now a Tosot), the only way I found to keep using the Dometic CT thermostat to control the Suburban furnace is to reuse the original Dometic control board from the roof A/C. The CT thermostat did not run the furnace without that board in the circuit. 🚫 The Wrong Part I Initially Ordered I'd edit my previous post about this part, but I don't appear to have edit access to my older post. For clarity, the controller I first tried — which did not work — was: Dometic™ OEM 3316230.700 (9600024570) / 3313199.000 Single Zone CT Thermostat w/ Control Board (Cool/Furnace) – White Even though it says Cool/Furnace, this is a Single-Zone CT control board, not the CCC2-style logic board used in the Oliver. It will not communicate with the Oliver’s Dometic CT thermostat → results in E1 error. This board also lacks the correct communication architecture that the Oliver’s factory wiring uses. So if you're replacing your original Dometic roof A/C with a Tosot and want to keep your CT thermostat to run the Suburban furnace, this part will not solve it. I only had success after re-using the real factory control board pulled from the original rooftop A/C. ❌ What did not work Purchased a Dometic “furnace controller” from RV Surplus Installed and wired it per previous guidance CT thermostat would not see it → E1 comm fault That part was a standalone freeze/temp sensor board and not the actual Dometic furnace logic board the CT needs to handshake with. At least that's my understanding of why it wasn't communicating and turning on the furnace. ✅ What did work Removed the original Dometic control board from the old rooftop A/C unit Installed it in the ceiling cavity where the wiring drops down Connected the original Oliver comm wires (blue/white) and 12V power leads; basically connected all the wires I cut back to the wires on the original control board. Connected the furnace R/W from the Dometic board to the Suburban furnace leads Plugged in the original Dometic freeze sensor (or you can use a 10k resistor) to avoid E5 Thermostat rebooted, initialized properly, and now Heat mode functions just like factory. The Tosot A/C runs stand-alone on its own remote — the CT thermostat now just handles the furnace. 🔧 Mounting Notes There was no enclosure around the board in the original AC, so I repurposed the housing from the incorrect RV Surplus controller. Trimmed two corners of the board to fit and secured all wiring. Everything is clean and protected behind the interior ceiling shroud. 🎉 Result CT thermostat works in Furnace mode No more E1 or E5 errors Oliver interior remains OEM-clean — no separate thermostat needed Tosot A/C runs independently on its own control system 💡 For others doing a swap: If you want to retain your CT thermostat for furnace control: Do not discard the original Dometic A/C control board. It must be reinstalled to act as the furnace interface. The Oliver wiring uses the Dometic bus — not simple furnace contacts — so the board is required for the CT to communicate. Thanks to @RonBrink and others who paved the way on this mod — his wiring was slightly different, so I'm sharing this as a variation in case it helps the next person who uses a Tosot (or any non-Dometic) replacement A/C. Pics attached below. Let me know if anyone wants a wiring diagram or parts notes.
 3 points
 -
Happy Veterans Day As a veteran myself I understand at least a bit of what fellow veterans gave to our country and I certainly thank them for the time and sacrifice they spent/gave on behalf of all of us. We should all give at least a few moments today to reflect on what time and sacrifice means to all of us. Bill2 points
-
I just heard today that Norcold is entering bankruptcy and intends to liquidate all of its assets. Apparently the sale of these assets will not cover their remaining liabilities. If this can be confirmed and you have a Norcold fridge (or anything else for that matter) now just might be a good time to stock up on any spare parts you think you might need for the future. Bill2 points
-
About 10 minutes ago I sent Mike Sharpe in Oliver Service an email requesting that he (or someone at Oliver) take a look at Service records on these Norcold fridges in order to see if there is any insight into possible repair parts that might be useful to stock. I'll post back here if Mike (or someone else at Oliver) has the time to do this for us. Bill2 points
-
Our 2022 LE2 has a Norcold Absorption fridge. At one point there was a switch from Dometic Absorption to Norcold. We had an issue diagnosed as an AC Element failure. It was covered by Norcold's warranty and replaced at a Norcold approved RV Dealer. We were able to use DC when we were plugged into shore power or LP, so it didn't affect or use of the fridge. This topic will hopefully provide some good suggestions. For now, I will be interested in what others have to say. I would have no idea what to stock up on. Will RV Dealers be able to stock items? Norcold would only ship the AC Element to an approved Norcold Dealer that I selected. They let me know they had the part and scheduled an appointment back in 2023.2 points
-
Perhaps this is a dumb comment - but I assume that you both cleaned the areas that the "spark" is likely to travel and that the distance between the burner and the electrode that gives off the spark is close - certainly within a 1/4 inch? Bill2 points
-
Happy Veterans Day! Sincere Thanks to All of Our Veterans!2 points
-
We just moved up to a F-350 and really enjoy towing Ollie with it. On our previous 1/2 ton tow vehicles I added rear suspension systems to reduce rear end sag, these modifications are not needed with the F-350 when towing Ollie. Really like the increased payload with the F-350, a couple of our past TV had to monitor the TV weight with Ollie connected to be sure we did not exceed the TV axles & gross weight.2 points
-
T & R - Absolutely no reason to be hesitant replying to any question. Specifically, your response to the question asked is right on the mark. Indeed, there have been many discussions here on the Forum concerning this exact subject (and with other similar tow vehicles to the Colorado). The tow rating is not the only limiting factor on these "mid-sized trucks". Heck - even 1/2 ton trucks tend to run up against limitations due to payload capacity. Thanks for your reply. Bill2 points
-
Probably not. I'm not seeing that control board easily available for less than $150. If I happen to come across one for cheap I may pick it up though. My research shows it's Dometic part number 3312022.000 If I can't find it cheap, then I may pull the Micro Air out of it and motor and shelf them or sell them off separately.1 point
-
One can hope that the potential Norcold successor, Dave Carter & Associates, will take over production facilities and will keep making replacement parts. That said, I still would like to know what parts have failed in the past that may be worth buying...1 point
-
Me too. We have a Norcold refrigerator in our 2022 Elite II. What parts have failed in the past, that I may wish to buy, just in case?1 point
-
The ignitor not working is a useful feature of the Oliver.... It explains why you always need to keep a lighter in the kitchen drawer. If anyone has an explanation of why a cigar cutter needs to be in that drawer too... I would appreciate your passing the information along. Scotty1 point
-
FYI, the ignitor is polarity sensitive and can be damaged if the 12v power wires are connected wrong. The part number for a new one is 50804 and they are around $40. Check with one of the on-line RV parts stores, and don't trust them if they don't have a contact phone. Or you can try calling Dometic directly. I once had trouble identifying a part for that stove, and Dometic was also unsure of the part number. They ended up sending a box of various parts for free! I think I called them using one of these numbers: 📞 Please contact our support team: 1 (818) 253-1322 Toll Free: 1 (866) 840-0321 📞 Please contact our support team: 1-800-544-48811 point
-
I think that race has happened on Youtube, Diesel Wins! Retired from the railroad, never met an unhappy Diesel Locomotive Engineer! 😁1 point
-
Short answer - YES1 point
-
We tow our Elite II with a 2019 SR5 Double Cab Toyota Tundra, which is technically a 1/2 ton truck, but has many features common to 3/4 ton pickups, like oversize disc brakes. We opted to try to make the Tundra work, as we already owned it when we bought our Elite II. With an Andersen weight distribution hitch, the Tundra is an adequate tow vehicle for two of us, with gear, towing an Elite II. I don' feel like "the tail is wagging the dog" when towing--with the Andersen hitch. As noted by Topgun 2, a more important limiting factor is payload capacity, not listed "Towing Capacity." Towing capacity is calculated with nothing but an average-sized driver in the tow vehicle. If you plan to drive alone, with minimal gear, you might barely squeak by with a Colorado towing an Elite II. Another important factor is the curb weight of the tow vehicle vs. the trailer. If trailer weight exceeds tow vehicle weight, the "tail" may "wag the dog" in some conditions--not good. The curb weight of our 2019 Tundra SR5 Double Cab is roughly 5600 lbs. An Elite II weighs just over 5K lbs. empty. We put more of the gear and people weight in the Tundra than in the trailer, to increase our tow vehicle-to-trailer weight ratio. As noted above, this is just adequate, in my experience. The curb weight of a new Chevy Colorado is listed at between 4164 and 4827 lbs. Had I already owned a Colorado when we bought our Oliver Elite II, I would not have been comfortable "getting by" with one. I would have chosen to "bite the bullet" and trade up to a 3/4 ton. So, I recommend at least a 3/4 ton tow vehicle. You will be much safer, and I expect, enjoy the towing experience much more.1 point
-
Just to bring everyone up to date on this running subject - As per my posts in this thread from October 25, 26, and 28), I'm still working on getting answers from the "houses mouth" on the current status of these decals, digital artwork, etc.. And, as I also mentioned in these posts, this investigation just may take a bit of time due to the availability of staff and other duties that they may have. I will post when I have further information. Bill1 point
-
I second everything Tony says. I had an F150 with a 10,000 lb. towing capacity. I never had any issues with it. Early this year, I upgraded to an F350 and I must say pulling my Oliver is a much better experience with the F350, especially when going downhill.1 point
-
I'm hesitant to reply to this since we're new Oliver members/owners but the rule of thumb I've been told is trailer should be no more than 80% of your TV's rated tow capacity. For your Colorado that's 6000#. I think towing right at your rated capacity is also going to cause more wear and tear on the TV. Another consideration is your towing experience. If you're crawling up hills at 45mph in a 70-80mph speed zone it's not going to be pleasant. Lot's of questions on this forum on towing so try the search function, or better yet search with Google. Tony1 point
-
Reading your post peaked my curiosity about the Truma, particularly from the mention of a Temperature Sensor. . . which is typically part of the thermostat. So I looked-up the Combi and sure enough, there is a Temperature Sensor that is separate from the control panel. Accordingly, there is a temperature off-set adjustment in the control panel to account for temperature variances depending on where the sensor is mounted verses the room temperature. Perhaps that was inadvertently reset, which could account for your temperature miss-match. I’d check that first. Review your manual for instructions on how to change the off-set. I don’t know where the sensor could be mounted, but it shouldn’t be too difficult to find by following the wire from the unit. It’s probably a simple thermistor, basically a resistor that changes resistance with temperature change. These are easy to test with a multimeter in the Ohms setting. If the resistance value changes with a little heat applied from your fingers, then it’s probably okay. Let us know what you find and good luck. Cheers! Geoff1 point
-
It was at this cost that I reacted that a discount was in order to encourage owners to renew them when faded. From $345 to $73 now that's a discount. I want to hire you as my lead negotiator. There are several decals "on the side" and one on the front. I suspect the $345 quote was for a full set on three sides complete inclusive of the "Sort of Niki Swish" down the two long sides. And the $73 was just for the decal over the storage area hatch/water heater. Can you kindly clarify? If the $346 quote was for a flll set on all sides, that seems really reasonable. Or was there a scope change for the labor to be provided? Thanks GJ1 point
-
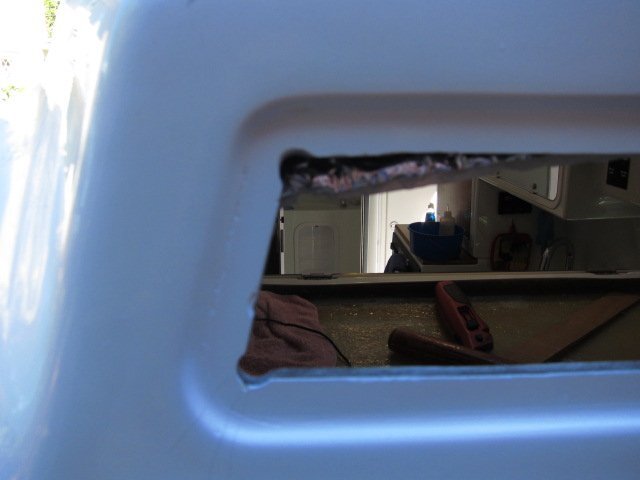
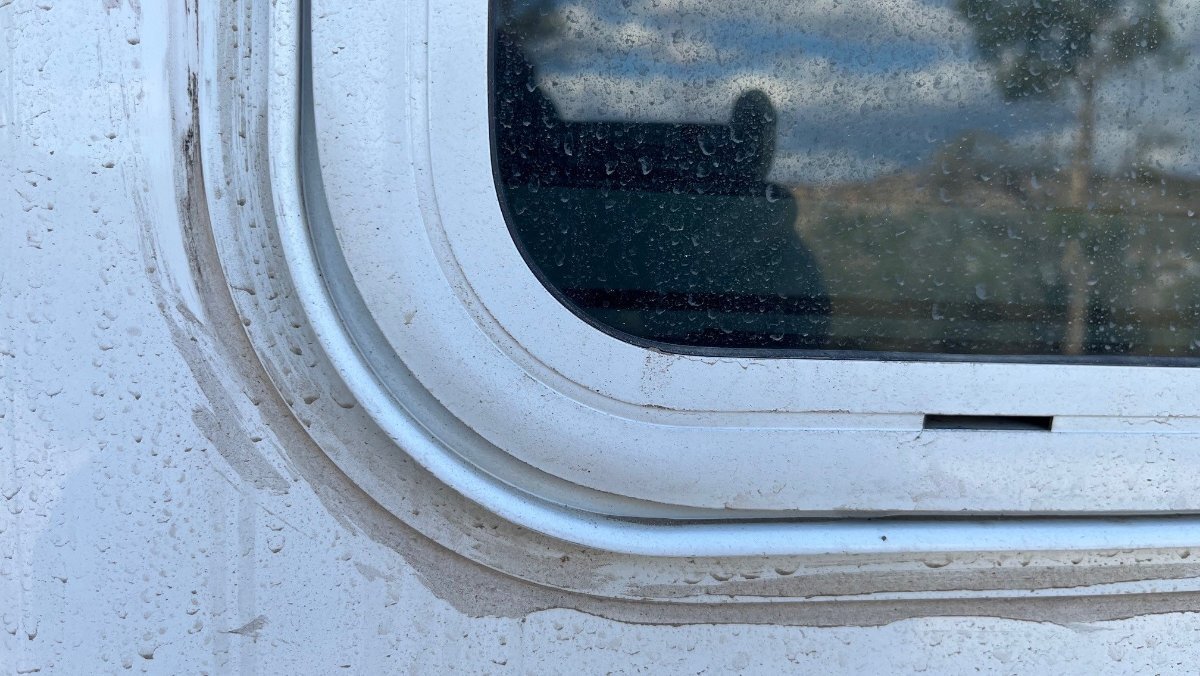
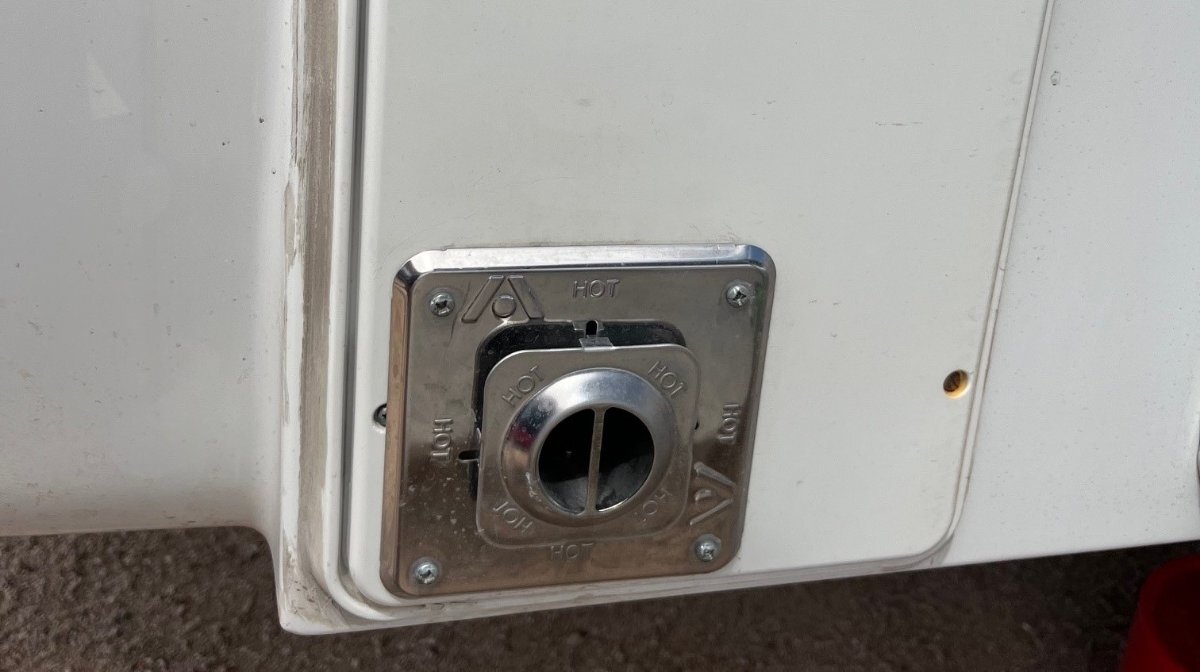
OK, I will give you my 2 cents on this. I have a 10 year old hull, so don't know how Oliver is currently dealing with their hull cutouts. But I can say with some certainty that square inside corners in a fiberglass layup is just poor detailing. Especially in a RV that is subject to all kinds of stresses and vibration. All corners at the very least should be drilled out with a hole saw to a diameter that is compatible with the appliance (or whatever) being installed. Then the straights can be cut out with whatever tool: angle grinder, router, jig saw etc. seems best. The hull on my rear Oliver lense had square cutouts, and I have similar spider cracks at two of the corners. I checked my HWH yesterday and the hull was also square cut under the rounded metal flange. Last year my friend had to pull his HWH and his hull was also square cut (pretty badly as we recall). No spider cracks yet on ours but.... Look up in your attic at the back side of the Oliver light. If it was square cut, then that is a good indicator that your HWH is the same. You can also look from the inside at the HWH and see what the corners are like. If it is square cut, then the only repair I know that will last is to create a radius at the corner to spread out the stresses that concentrate there. This is what I did on my rear lense in the pic. For you, that will be a real PITA as the metal trim ring has to be removed and who knows what else. Mine is set with butyl tape and pop rivets. As I mentioned, your crack is probably just in the gelcoat and not structural. But it shouldn't be there in a trailer of this caliber. Any repair that doesn't address the root cause, will be wasted effort and money IMHO. Wandering Sagebrush's idea to drill a hole at the end of the crack could work. I have used "stop drilling" to stop cracks in fiberglass layups from migrating, but then you have a hole that needs to be gel-coated and polished out. Not sure if it would work for just a gelcoat fracture. Maybe a good solution? It could be! In the end, a good fiberglass technician will know what to do. But I think it will not be a quick and easy fix. Please post up what you find out. Good luck. Dave
1 point
-
With respect to the crack. You might want to consider stop drilling the upper end to help relieve the forces in play. To be safe, it would be best to run this by Oliver.1 point
-
Thank you, Jim & Chris. Good advise! When I sprayed some the first day, I followed up with soap and water per the instructions. Day two, I sprayed the marine solvent at a sponge in a container and sponged it on the surface only. I've always believed this and never have seen it written so clearly. Thank you again. I've spent too much of my life removing what others think "improve cosmetics" which in essence just collect DIRT! If you're going to caulk (not me), trim back the old caulk first! Caulk on old caulk is not cool. There is no reason for this silicone caulk, period! The sealant is under the mounting frame. They even caulked the refrigerator vents on our hull, OMG! These vents allow highway speed rains to run right through them! Go figure? These pictures show an ugly mess, that btw is no longer there! 😎
1 point
-
I believe it's OK when the OP broadens the scope of the thread. @Steph and Dud B can reword the title to, "Found a Crack - Defect #21!"1 point
-
Seems like we have some serious thread drift going on here.... Dave1 point
-
Having been in the sealants business for years I would like to share one thought. I have seen many instances where adhesive removers were used to clean up old adhesive and caulks. This is fine so long as the adhesive remover is completely removed or neutralized. The methods to do this are product specific and I won't attempt to go into them here as there are many new products on the market since my retirement from the adhesive and sealants industry. An adhesive remover is not bright enough to know when its job is done and will attack new sealant or adhesive just as happily as the old. This can be both a mess and terribly dexpensive ... to the point where I have seen folks bankrupt their businesses unwittingly through the use of adhesive removers. The butyl caulk / tape holding the window frame to the hull is your primary moisture barrier. The externally applied silicone caulk is secondary and is there primarily to keep dirt out of the joint and improve cosmetics. If you must use adhesive removers do so carefully using only as much as is absolutely necessary. If you soak an existing adhesive joint excess adhesive remover residue is likely still down there doing its job.0 points


-
Recent Achievements
-


")


")


")

