Leaderboard


Popular Content
Showing content with the highest reputation on 01/08/2026 in Posts
-
Ron and JD: The above 23.5" to 25" recommendation was for our older trailers with the larger wheel diameter. Sam's 2025 trailer I believe has 15" rims. So likely the target is not the same as those with 16" tires. I also agree that a bit low on the front of Ollie is also advantageous, especially out west were speeds tend to be higher. I agree with both JD and Dave that for setting up the systems for travel.... Stand back and take a gander. For those of us with older F-150's, we have found that a pair of Bilstein 5100's shocks and air bags on the rear axle have made a wonderful improvement in our driving experiences. GJ3 points
-
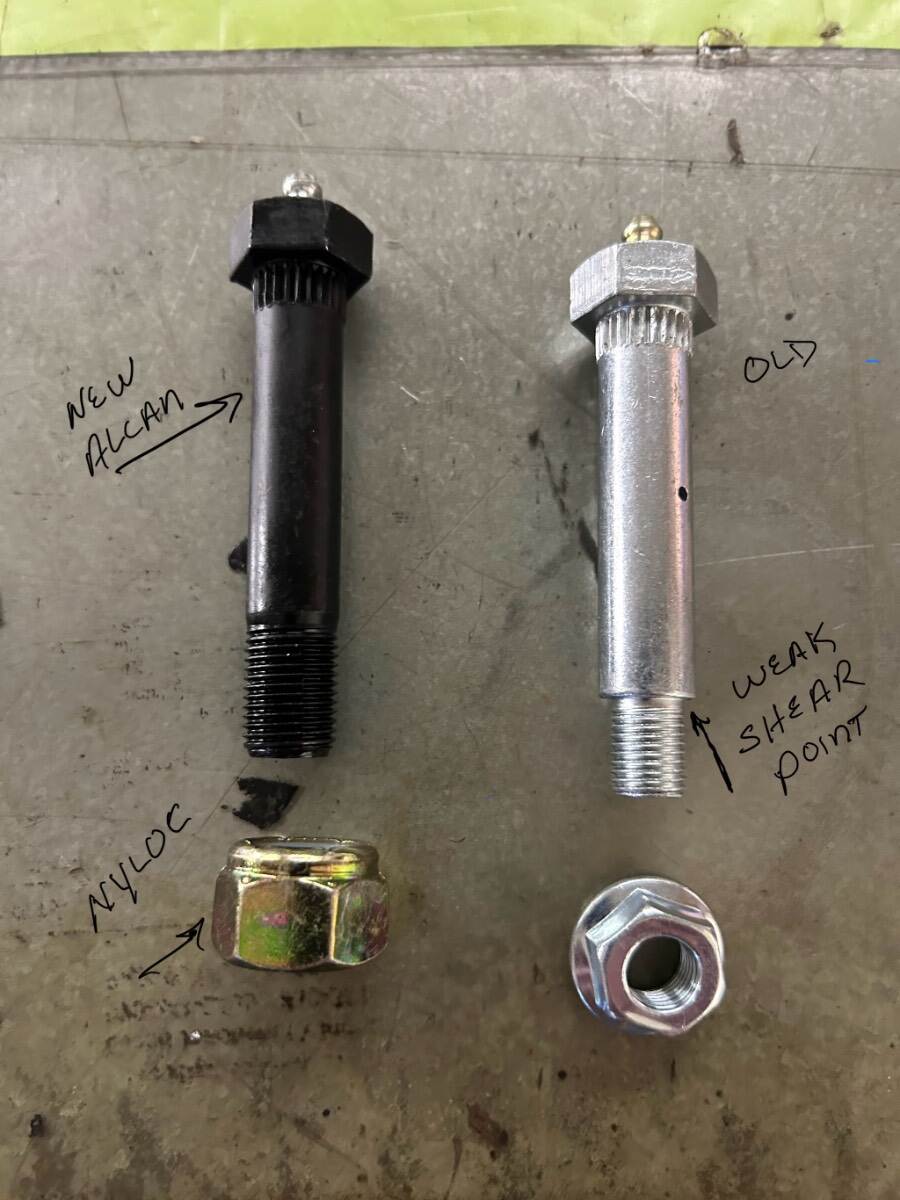
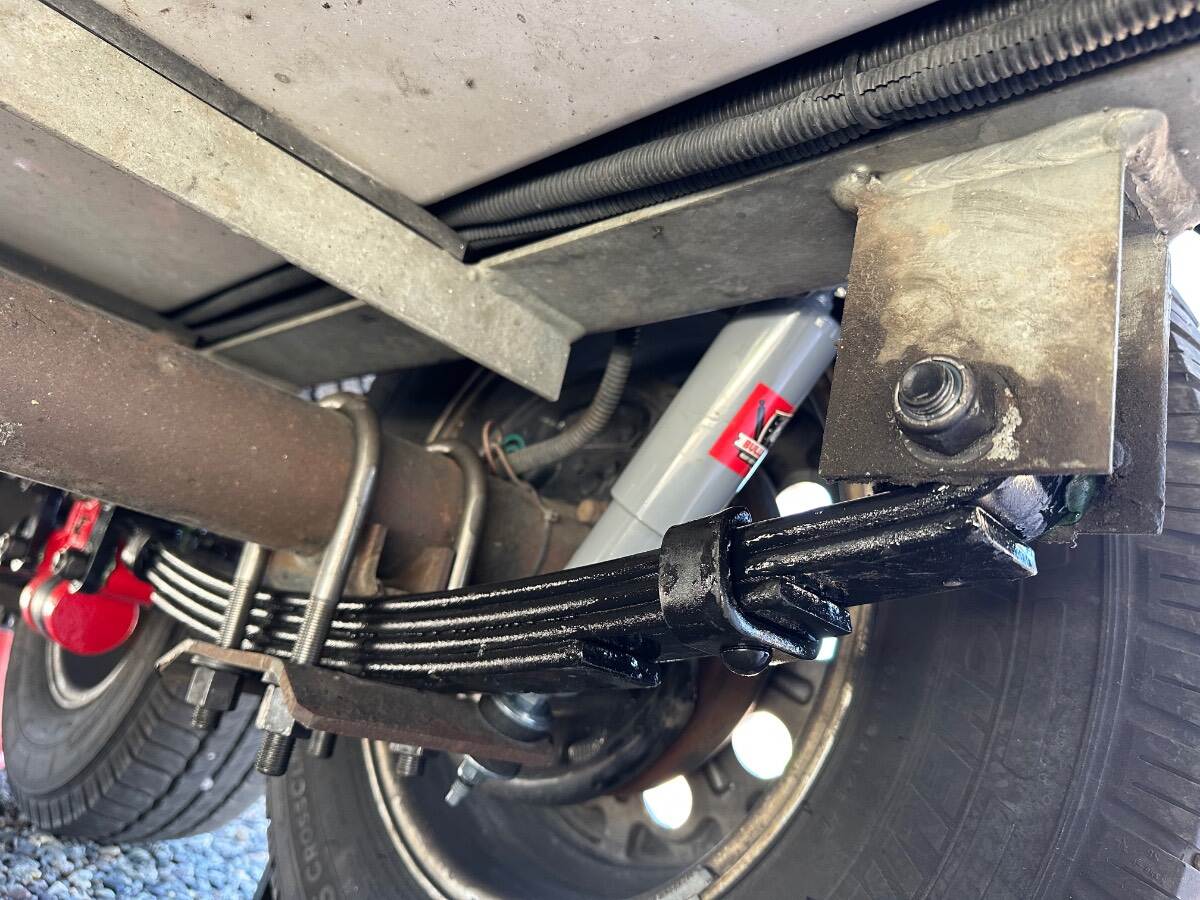
Here’s a pic of the HD wet bolts. Hopefully you also ordered the HD shackles. I had Alcan install the wet bolts with the grease zerks facing under our Oliver for easier access when greasing the zerks.
 3 points
 -
I upgraded to the beefier ALCAN springs and larger axles last year. That means I drove about 100K miles over 9 years with the smaller 3500lb axles and Dexter 4 leafs. That mileage includes some rough roads/off roads. I’d say you don’t need to rush to upgrade, do it when the timing/budget allows. My only exception might be if you are planning a trip to Alaska, the upgraded suspension might be a good idea. Mike2 points
-
Alcan has already shipped the springs. Shipping was $175 via UPS. Final cost was $1291. I suspect that would be nearly the same cost having them installed by Alcan themselves. Give or take a few bucks. Can't wait to get started. I love the experience. This will be my second install of Alcans. It also keeps this "aging" body moving more. Too much desk work as a career in Information technology. 😜 PS: Lew did confirm that their shackles are NOT splined, but the wet bolts are. I'm not sure why they have decided this, but as we did Steve's camper, I will mark the bolt ends with a scratch, in order to know where the grease hole orientation is upon installation. It's the best we can do I think, in this situation. I explained that to Lew, and they don't seem to see an issue with splineless shackles. Just FYI.2 points
-
Many thanks. Great points. I'll learn and tune with the current trailer suspension and upgrade if needed in the future. My history is 17 years with a single axle Casita Freedom Deluxe (w/bathroom). Tandem axle and Andersen is a learning experience. I will investigate the signature as you suggested - thank you. Sam2 points
-
Yes it does! And it is good you are taking the time to figure it all out. Traditional towing wisdom is that it is always best to have your trailer "level" (parallel to the ground) while towing. One can err a little having the front slightly low, but front higher than level is to be avoided for stability reasons. If you have a long flat surface to hitch up your TV and trailer, "level" just means that they are in plane with each other and the ground. You can measure the Oliver seam joint fore and aft to the ground (as you did) to see if they are equal (or check by measuring the frame to ground). Then check your TV to be sure it's not squatting in the rear. It should be sitting parallel to the ground as well. Trailer adjustments are made at the hitch, TV adjustments can be made by adding airbags or adjusting your WDH. Best to start getting your TV level. Just standing back and looking at the TV/trailer hooked up will tell you a lot. Just a caution that adding airbags to your TV does not increase your rated payload capacity! Make your trailer and TV so they are on parallel planes, that is the goal, with a slight nose down being acceptable if that is all you can tune into the system. It is never perfect, but getting it as close as you can goes a long ways to increasing your safety, and others around you on the road. Check out the Robert Pepper video. He has many videos on rigging and trailer setups that are extremely valuable. https://www.youtube.com/watch?v=JeEEC5eVNCk Good luck, Dave2 points
-
We're new Oliver owners, 2025 E2 Hull #1590. We purchased MeriWether in Florida before Christmas and towed it home to Texas, about a 1,200 mile run. TV is a 2025 F-150 PowerBoost with the 5' bed, 4WD and tow package. I've read so many helpful, and sometimes confusing posts on this forum, but I want to reach out for some additional information and yes opinions. I installed an Andersen WDH before the journey, in the configuration I thought was correct. I did use CAT scales for independent weights/distributions as well as with/without the WDH connected. Weights were well within all published weight limits for trailer, TV, TV receiver, etc. My initial observations during the trip were, TV almost level, bow high on the trailer and the rear axle tires ran 5° F warmer than the front axle tires after a couple of hours on the road. The overall towing performance for this trip was acceptable, but I wanted to fine tune the hitch setup.....level the trailer while being towed, optimize the steer axle weight transfer with the WDH, and allow the tailgate to fully open without hitting the top of the Bulldog hitch. Based on the premise the trailer undercarriage should be reasonably level for even loads to the springs, bearings and tires, I began my journey of what does "level" mean to an Oliver E2 and where do you measure it? First stop, the Mothership, tech support indicated - if the bubble on the front jack is level, the Oliver is level (I did try to understand what datums that was tied to, but was unsuccessful). I found a level portion of my driveway, centered the front jack bubble, fore and aft (which I know is adjustable) and measured using various levels, the interior floor, steel undercarriage, exterior seam of the top and bottom halves of the shell, aluminum tongue and frame. All were reasonably consistent and "level". I also measured the distance from the front and back sections of the frame to the driveway and the measurements were within 1/16"....frame parallel to the ground. With a 8' framing level beside the tires, the driveway also indicated level. The Bulldog coupler dimension, where the top of the ball seats, is 19-1/2". I understand as the trailer gets loaded and the TV gets loaded that dimension will change but the other "level datum" locations should help me adjust the WDH, air bags (don't have any yet), as well as redistributing any loads in the TV or trailer to achieve a level trailer towing condition. I have made several adjustments to the hitch height and preload of the weight distribution hitch urethane 2" puck (translated to threads exposed). An interesting point in discussing setup parameters with the Andersen techs, they indicated the towing dimension of the puck should be compressed by 1/8" to 1/4" from the relaxed its state. So here's my question to other owners, does a level trailer (in the towed condition) this really matter?1 point
-
"The other thing is ALL Oliver Owurchase is the LevelMatePRO" I agree. It's a great item to have. We once used it to find the most level pull through in a nearly vacant state park. Why not? I think we drove through ten sites and just found the most level one. It makes set up so easy. John1 point
-
Thanks for the comments. I'm adding all to my "level" and "towing" mental database. I'm early in the game and each comment/recommendation/opinion make me peel the onion another layer. I am indeed riding on 15" wheels. The eye is quite discerning....looking reasonably level, is indeed critical.1 point
-
We watched the Morton's video again (with Chris) and she said "buy one!" So I did. I have not seen a review that does not report this is the most efficient and quietest RV A/C unit in the marketplace! I will install ours this weekend and hope to get a chance to test it some in Quartzsite! 😎 The standing height and no heat pump doesn't bother me at all. I think it has a cool shape and should look cute up on our Oliver! After reading what @CRM had to do with his Turbro, the fact that it's not very quiet, and what Turbro Support put me through, my broken unit will be sold for parts or junked. Lost my patience with it, where normally I would be first to repair it to save $$$. Here's another positive review and he's testing the Ducted unit. The Non-Ducted model is even more quiet and efficient. Can't wait!1 point
-
Hope so, not always, but much more often since Chris and I have lived life together! 😂 Of course, very little rain down here, but my HD 3000 PSI pressure washer likely creates more direct pressure than most thunderstorms. I don’t wash the Oliver often, but more than 6 times I’ve pressure washed it and every time I hit the windows at a few angles and observed each weep hole draining and flushed clean. Never a drop of water inside! First two times, I asked Chris to watch inside, but stopped doing that. I’ve replaced the outer rubbers and all tracks are good and supple (considering our heat and always parked outdoors). They work as designed. I’ve got to think if your windows leak, you have a defect of some kind. It could be from manufacturing or installation. Maybe for some, cleaning was ignored for a period of time and the path to the weep hole exit is blocked. Perhaps some have damaged interior tracks or seals in their cleaning process. Who knows, but if it was my issue, I’d be working to correct it, not mask it or tip-toe around the issue.1 point
-
GJ, I bought a ShopVac along with some microtools. Today I took a gardening water can with a narrow spout and put water into the inner track and then suctioned it out. After flushing it a few times and suctioning the water out of those 1/4 inch holes, I saw the white again under the black glide track. It emptied quickly too so I think the weep holes are cleaned out. Thanks for your comments. John1 point
-
I use them into all the weeps, and then along the trough's both ways. To get to the inside weeps, for most of them you have to go "fishing" thru the outside weep and left and right to find the inner weeps. Finally I cut some of the 18" into 4+ inch small pipe cleaners bend them and stuff one into each weep. I for years thought it was bogus, but now believe it does help with drainage. Something like capillary action. Since they look a bit dorky, I use them when expecting Texas sized "Turd Floating Gully Washers". After the storm I pull them out and they are stored in a zip lock bag for the next time. Got the idea here on the forum by a wiser than I owner! GJ AI Capillary action (or capillarity) is the ability of a liquid to flow in narrow spaces, like tubes or porous materials, against gravity, driven by the forces of adhesion (liquid sticking to the surface) and cohesion (liquid sticking to itself), combined with surface tension. This "wicking" effect allows water to move up plant roots, colors to travel up paper towels, and liquids to fill tiny crevices, making it vital for plant life and everyday tasks like using a sponge1 point
-
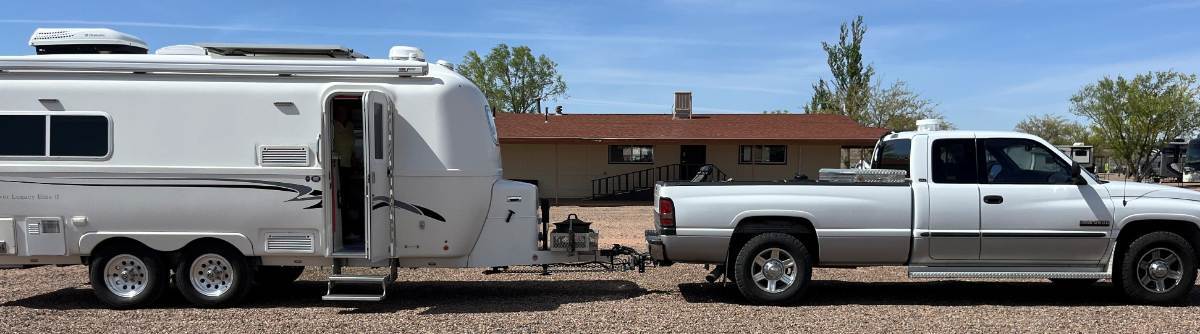
Welcome Sam! Please add a signature, when you have the time, and we all would love more of your input on our great OTT Forum. I went through similar thoughts when we started towing our Oliver a couple years ago. Our tow vehicle is borderline on requiring the WDH, but the user manual does state to us one when hitch weight is >500 LBS or trailer >5000 LBS. I believe set the Bulldog at the height OTT recommends as Ron stated above. When I hitch the Oliver, the rear of our truck drops 2". Checkout my pics. First is hitched and second is adding the Andersen WDH tightened correctly. You can see in the second pic a good level front bumper of TV to rear bumper of TT! But yes, the WDH does add lots of stress at the ball for sure and likely elsewhere. In two years, 135 overnights and 15K+ miles, I've only felt comfortable with WDH attached. Without it the under-sprung Oliver will waddle through intersections and porpoise over bumps and dip. Until... Recently, I upgraded adding Alcan Leaf Springs rated at 2750 LBS each vs. the OEM 1700. The difference is night and day. I haven't beefed up the TV rear suspension at all, it's just that now the trailer suspension is handing the trailer and not moving the TV all over the road, like the tail waggin' the dog! 🤣 Our Andersen WDH is now in storage, until somebody wants to buy one. Better springs will likely give you what you want. It's not whether your hitch is up or down an inch or tension +/- on the Andersen. The other thing is ALL Oliver Owners should purchase is the LevelMatePRO (get the PRO model which can be wired directly, no battery changes needed). Find the most level place you can park, set the 3 stabilizer jacks and get as level as possible (us a sight level in many places like you've down). Then you go through calibration steps on the app. I wired my PRO model out-of-sight, under the rear dinette seat where 12VDC is easily available. We use it every time we're parking the Oliver. I turn the app on from the driver's seat to get the best possible spot. Then Chris get's out and places the Andersen Rapid Jacks under the correct side (when needed). I roll up, set the parking brake, and we're done! 😎
1 point
-
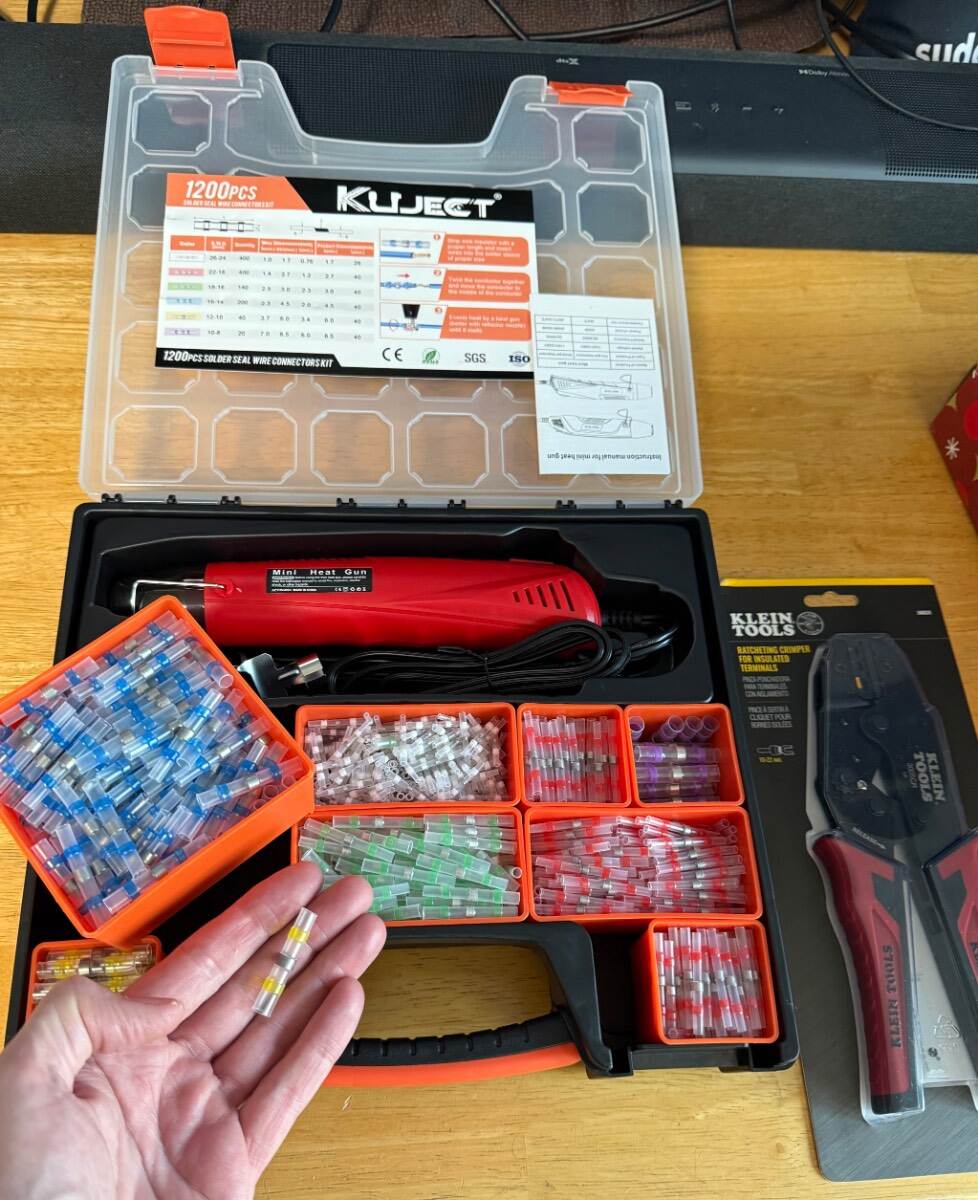
Darn it. As others have had before, finding the intermittent voltage issue with trailer brakes and newer trucks can be frustrating. I still have a bit of an issue. So, the only thing I have not checked or changed are the brake assemblies and the brake wires inside the axle tubes. I’m pulling them out this week before my Egg rally in live oak, FL. I just received my new 12 AWG wire from eTrailer and new higher end crimpers, for non-solder connectors. Adding to my tool supply. Also got some new toys. Solder seal wire connectors, just a few, (1100 count). With a mini heat gun with deflector. I will find the voltage issue. I did check, clean, and improve any and all grounds in the trailer this weekend. The test drive didn’t reveal any brake voltage issues, but I’m removing the axle wires anyways.
1 point
-
We still have the original black molding that was installed on our trailer when new. After long trips when I am cleaning the window tracks I pull those rubber moldings out and put them in a bucket of soapy water. After I’ve cleaned the tracks and the screens I clean the rubber moldings with a sponge and dry them well. I apply some 303 protectant before I put them back in. They show very little wear after 10 years. No mold or discoloration. I think black looks much better than the white, not sure why Oliver switched.1 point
-
The consensus is go BLACK! IT does not show stains and the window is black anyway.
1 point
-
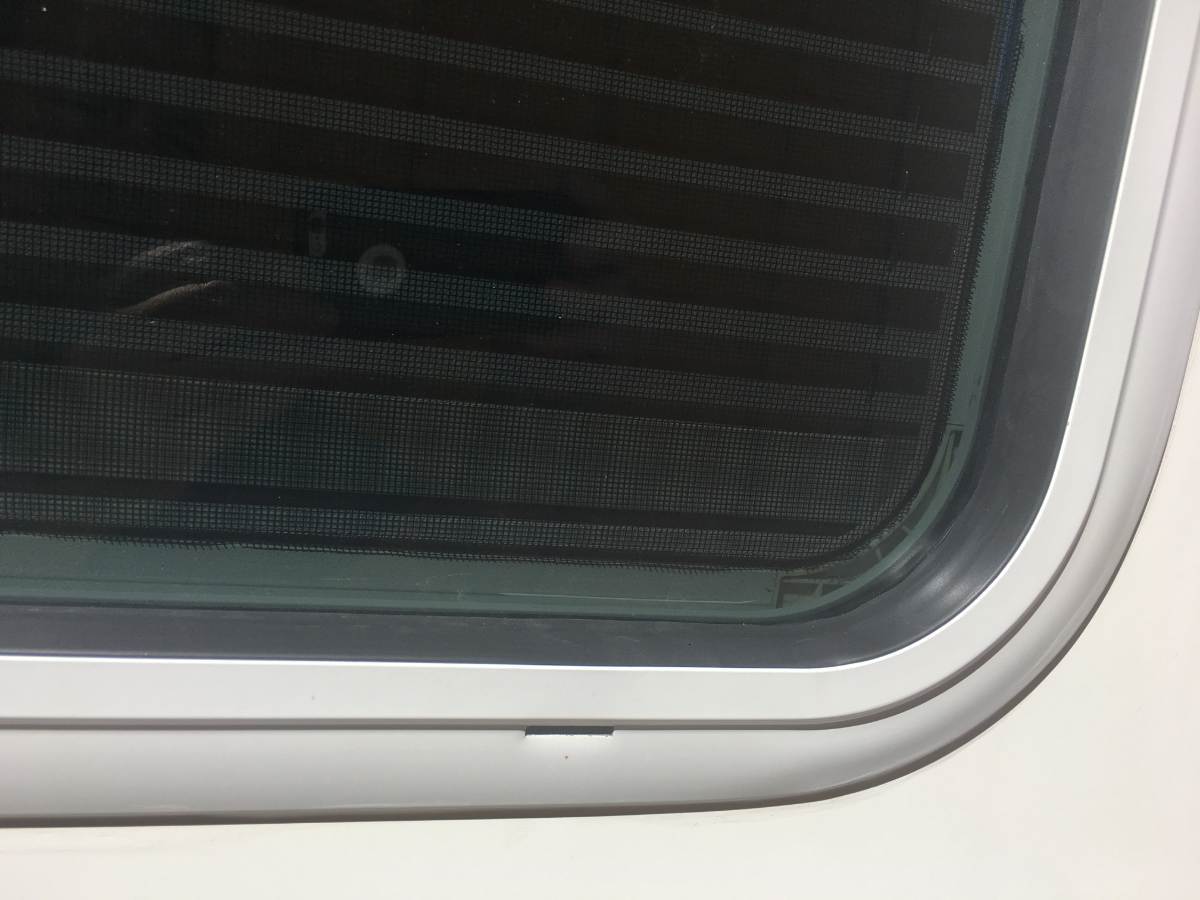
John & Debbie - Below is a pic of the black window molding. Please disregard the black "louver" in the pic since it was/is a mod done by another owner and is not available for sale (that I know of). Note that one pic is from the outside while the other is from inside the trailer. Bill
1 point
-
Sam - WELCOME! It appears that you have already done a bunch more than many owners in researching, thinking, weighing, etc. and adjusting your hitch setup. As with a number of things regarding towing and RV there tend to be a number of different opinions and/or approaches to the subject. And, virtually no matter how you setup the rig, many of the factors that went into the setup depend on what the "current situation" just might be. But, as a starting point, leveling the tow vehicle and the trailer (as close as possible) is a good thing. Then as you load, unload, have different levels of fluid in your tanks, different amounts of food and drink, different amounts of cloths and related items, different selections of tools, etc. both the amount of weight and the distribution of that weight is likely to change. Also, the type of terrain that you will tow over will likely change - possibly even during one trip. Within reason, your initial setup would appear to cover the vast majority of circumstances. But, be prepared to make adjustments if you encounter off-road situations, very uneven and/or rough roads , or your weights in either the tow vehicle or the trailer change (i.e. you carry another couple of passengers with you, buy that really sweet big (and heavy) grill/fire pit, etc. Yes, I believe that the work you have put into your setup does matter and will make your towing experience safer and more pleasant. But, if you encounter the rough terrain I mention above and feel uncertain about it then it don't hesitate to temporarily loosen those Andersen chains in order to take some of the strain off the frame (but, if you do this, be sure to put them back to your "normal" setup after you have resumed your "normal" towing). Bill1 point
-
As @topgun2 and @John Dorrer mentioned the compressed air and regular cleaning has always worked well for me. I also apply a little coating of spray silicone or WD40 on a rag and wipe down the exterior black rubber seal before reinstalling. This helps to keep it supple and clean looking.1 point
-
I pull mine up everytime I clean the window tracks. I can only pull up what isn’t underneath the window when open and they go back down pretty easy.1 point
-
I had some flooding problems of water coming through. I had always cleaned the out track, but never cleaned the inner track. I cleaned the track out as good as I could. I still don't know if I made a difference yet. I also put J channels around the window hoping that will help. All the problem windows are on the Street side where the is more water draining down the sides. I did poor a small amount of water in the track and it slowly seep out very slowly. My felt track also is covering some of the weep holes which might not help, I do not know how much the felt wound stop the drainage. I totally agree about the felt tracks being fragile. I started to try to pry part of the track out, but quickly stopped because of the amount of force to pry the sides back and the chance of breaking the felt track. I also considered buying new rubber track covers for the outside. They do not contact the window any more.1 point
-
We had the 4 leaf alcans put on in October and they are a great upgrade. They also gave me the extra leaves in case I wanted to add them in the future. I also replaced shocks and equalizer at the same visit an it only took Alcan 3 hours. Craig
1 point
-
Oh yeah, I forgot to mention, I changed my forum profile name from Wayfinder to my Name, so Facebook folks can make a better correlation.1 point
-
Yes - I'd try all of the other possible solutions before going down this road. But, it you have mold under there you might try spraying a bit of diluted bleach in order to kill it. Bill1 point
-
Are you absolutely sure that your rig didn't come with a charger?1 point
-
No, it looks fragile to me so I haven't done that. John0 points


.jpg.7b63b3730455cad12a49e3188c772c3f.jpg)
.jpg.e396c96b5483550d2ab92916d8a1c049.jpg)


-
Recent Achievements
-


")


")


