Geronimo John
-
Posts
2,322 -
Joined
-
Last visited
-
Days Won
65
Everything posted by Geronimo John
-

Made in USA leaf springs
Geronimo John replied to Mountainman198's topic in Mechanical & Technical Tips
Thanks Mike. That's the one. Sometimes it is nice to plant happy thoughts. I sent this to June:
-
Made in USA leaf springs
Geronimo John replied to Mountainman198's topic in Mechanical & Technical Tips
SERVAL owners have done the same thing. We also have the first appointment of the day and will follow the lead. Where's breakfast there that seems to be a hit? -
Made in USA leaf springs
Geronimo John replied to Mountainman198's topic in Mechanical & Technical Tips
From all the posts about Alcan, I don't recall any of their installs taking more than two hours. Likely your two additional food storage boxes will not warm up all that much if you just keep them in the shade. GJ -
Maximizing amp hours for boondocking
Geronimo John replied to Olive2Roam's topic in General Discussion
LOL! Never is a really long time to NEVER run a generator. BTW great posting on how to increase power density of an OE trailer. Can't believe that just a few years ago 300 AH was tops. Wow how things have changed in the world of RV's and boondocking power. Glad to read your post. But NEVER? Really. 🙂 GJ -
The average vintage of RV owner's is such that Dragon Fly should be worried about just such a tragedy.
-
I just love happy endings! GJ
-
Your previous post about all storage being well utilized and some weight gain over the years (for the trailer not you!), plus this post leads me to ponder your miracle of physics. Maybe: Was your board warped? With the new tires maybe they are not as tall? A run to the scales to verify weight, but with the D52 and 5 leaf Alcan’s, you surely would be taller than spec. With the Cube being behind the axle, possibly you had the nose high? Maybe your Cube has melted a bit? Real low tire pressure? Your tape measure is so old it has stretched out three inches.? Glasses Rx needs renewal? Just having fun on this one. Knowing you, it is assured that your trailer is exactly as you measured it. Good news. GJ
-
Made in USA leaf springs
Geronimo John replied to Mountainman198's topic in Mechanical & Technical Tips
Yep, it was John D's post that caused me to "ask the question". Thanks for crediting him as the first finder on this topic. GJ -
Chris: So sad to read about your spring failure 40 miles in the boondocks with your 5 year old Ollie. Your situtation was very close to a discussion in early 2024 on how to deal with two flats. In April 2024 I posted a DIY for a simular situtation and over time reposted that a two flat situtation and a spring failure. Both likely could be handled by the process discussed in the attachment below. I would love to hear you thoughts on probability of success it would have had in your out-back situtaiton. Also any suggested edits would be greatly appreciated. Now back to whimpy springs......No matter how an Oliver is used, springs should not be an issue for at least a decade or two of use. Certainly not in a trailer less than ten years old. At this point well over 200 owners have gone with the Alcan springs, and about ten with the Dexter 2400's. Regardless of which higher rated spring replacement one uses, they are a problem that can not be ignored. We are now aware that well over 200 OE2 owners have replaced their undersprung 1750's with either the Dexter 2400 or the Alcan's, I am thrilled that OTT is now using the larger braked D52 axles, but disappointed that they are still using those 1750 # rated springs. I strongly suggest that OTT provide an option for the Dexter 2400 and/or the Alcan equivalent springs. They would well compliment the D52 axles. Geronimo John
-
New member introduction – excited to learn more about RV systems
Geronimo John replied to molin's topic in Introduce Yourself
FOR SURE ON THE TOUR! It is THE best way to understand "what's under the sheets". And that of course can be a lot of fun, and standing there with the upper three hull layers you get a chance to ask some really good questions! GJ
-
Made in USA leaf springs
Geronimo John replied to Mountainman198's topic in Mechanical & Technical Tips
Was it done at Alcan or DIY? I'm thinking of bringing to Alcan a pre-cut section of 1/2" CPV, and some zipties and a tube of clear silicone to seal it up. And a clear sketch of where "on the back of the front axle" is. 🙂 For previous Alcaners, were they amenable to such an arrangement if they knew about it ahead? Any better ideas would be appreciated. Thanks GJ -
Made in USA leaf springs
Geronimo John replied to Mountainman198's topic in Mechanical & Technical Tips
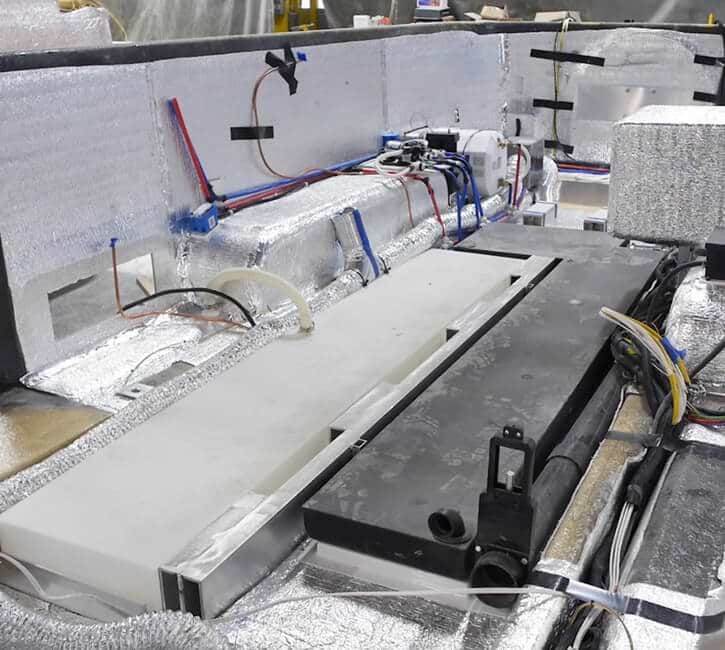
I recall they are: D35 Axles have 10 X 2.5" shoes. D52 Axles have 12" X 2" shoe. Both magnets sets pull a nominal 3 amps each drum = 12 amps for LE2. Wiring per above is the same (Run thru the axle) GJ -
Made in USA leaf springs
Geronimo John replied to Mountainman198's topic in Mechanical & Technical Tips
Thanks guys. I sort of suspected as much. But was wishing the other way. GJ -
Made in USA leaf springs
Geronimo John replied to Mountainman198's topic in Mechanical & Technical Tips
When getting the D52's does Alcan run the brake line in or along the outside of the axle? Do they use "high dollar" water proof connections? Do they check what wire gauge was used before connecting to the new 12" brakes? GJ -
I assume those are these.... From their web sigte: "Ground planes are not required for this antenna to function properly making it ideal for fiberglass roof installations." And also F-150's with aluminum bodies I may add . GJ
-
Just for grins question as most of my miles are solo: But, could a passanger successfully use the internet while traveling in the flatlands? GJ
-
I'm a Wannabe and have been for awhile
Geronimo John replied to TravelWell's topic in Introduce Yourself
Hope you don't want to boondock in that kind of weather.......I can't even imagine! Welcome to our forum! Good luck on your quest. GJ -
And for sure this is the place to get the best options on how to do them. Especially now that we have a great search engine at our fingertips! YEA!
-
Double ditto!
-
The Saga of corroded brake wires on older trailers
Geronimo John replied to Wayfinder's topic in Mechanical & Technical Tips
Only if you needed them to work..... 🙂 -
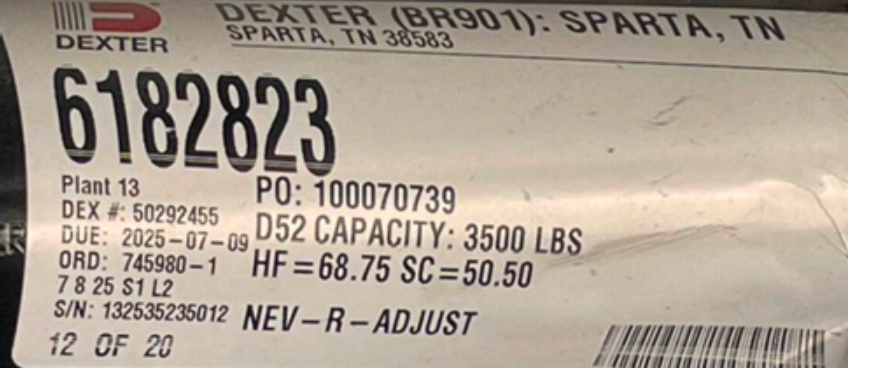
Yes with a minor edit. I copied this axle below: It IS the desired D52 axle which is designed for 5200 or 6,000 pounds of load depending on use. But it is also showing that it was derated for this use with the Dextre 3500 spring rating. With two per axle that tells us that it has the Dexter 1750 springs on each end. GJ
-
I think it would fit, but not when doing a minimum radius turn. Would also need a stone guard as the tank is made from PE. Will ponder this when I get back to Ollie in June. Thanks for the idea! GJ
-
I do as well, and would like to have the extra space and security over the OEM basket. At the 2025 Ralley I spoke to the Seabiscuit Team and suggested that they consider an enhancement for the Olivers. My suggestion was to increase the box depth (Fore and Aft) to include jack inside. That would gain about 5" of additional space less the volume of the jack. My only problem, and reason for not following your lead is that without massive solar and a nuclear power plant (600+ amp Litho's), I have to carry a gas can. Not good in a sealed box with stuff that could spark a leak. For safety reasons I would not be safe carrying one in my TV bed (with a sealed cover), in the cab of our TV,or on the back of Ollie. With your set-up would it be realistic to mount a 2 gallon fuel in front of your box in mini basked with a stone guard? Another mod could be to address the gas can issue dirctly. Since gas fumes are heavier than air, maybe having a wire mesh for part of the bottom of the box to keep the box fume level below the lower explosive limit should there be a gas can leak. What do you think? GJ
-
I would not bet my life on it, but I would bet a beer... especially if it one of Art's home brew's! Each magnet pulls 3 amps, or close to it. You should have 12+ volts at each Dexter drum brake. Measure current flow when energized. Start with measuring all four of them with a clamp on amp meter on the wire going back to the brakes. With the brakes energized, they should be pulling close to12 amps and have around 12V. If so, all is good. If not start inspecting current flow and voltage at each magnet. PS: An easy way to do the above is to just pull the emergency break away to activate all four brakes. But don't leave them locked up for long...... Somebody check my brain on this one. GJ
-
Well, I was waxing Ollie and had the spare tire cover off. Crazy Horse rode by and thought I was rotating the trailer tires. He asked "Will you be rotating the spare in the process". I stared up at him and with a serious face said "Well of course everybody does that!". He asked "Where will it go". I replied right where it is now, but I'll rotate it 180 degrees so the rubber does not sag". He rode off pondering that further. GJ