Geronimo John
-
Posts
2,305 -
Joined
-
Last visited
-
Days Won
64
Everything posted by Geronimo John
-

Houghton Retrofit Process & Questions
Geronimo John replied to Geronimo John's topic in Mechanical & Technical Tips
Some testing by an OTT owner indicated the best place to run the thermistor sensing end is where the Dometic T-stat is/was located. Once in that area just need to poke the end of the thermistor out the street side. Why here? it is out of the direct air flow from the unit and as such gives a truer temperature of the cabin. This install was done by others on SOB's, but not yet to this location that I am aware of. I will be doing mine in July and will post up the method that ended up being successful. There are three different approaches in my quiver and I have a thermistor that is 10 feet long to get me there. My goal is to have no wires showing inside Ollie and extending as stated above. More on this in July.... Try running the unit on low fan speed and drop the temp down until it maintains a more comfortable temp. GJ -
I battle it on my white outside window trim. Some day I'll go black. GJ
-
Replacing corroded tail light bezels.
Geronimo John replied to KenB's topic in Mechanical & Technical Tips
That's a lot of corrosion. Salt is bad. If replacing would some clear coat or gel coat help extend their life span? GJ
-
Mini Dyson Humdinger Frankenstein
Geronimo John replied to rideadeuce's topic in Mechanical & Technical Tips
Crazy Horse is getting up in years and is misplacing his hair. So he has to take care of the floors daily.
-
I thought the same thing this morning. Aussie Math I guess... 🙂 GJ
-
Answered on the Houghton Install thread.
-
Houghton Retrofit Process & Questions
Geronimo John replied to Geronimo John's topic in Mechanical & Technical Tips
I was first to suggest on our forum to use a relay to solve the humidity issue by controlling power to the fan by piggybacking on the power to the compressor. Several months later the Air Stream team working the same issue executed with the idea. GSM Bear posted the below DIY guide to do so in an Air Stream. Here it is: GSM BEAR V2 RecPro Houghton Interior Fan Mod v2.pdf I will be executing it in July. I also will be doing the Thermistor Relo hack as well. My DIY for an OE2 is in draft state. But running the thermistor wire between the hulls is a theory and I have three options. The best one was documented to me by. AndrewK. He provided some specific guidance on how he and now others have run rooftop solar wires between the hulls from the buried solar port on the roof in front of the MAX Fan. But this has not been done from the A/C area, As such, I'll hold onto my DIY guide until I have done so later this summer. GJ -
Houghton Retrofit Process & Questions
Geronimo John replied to Geronimo John's topic in Mechanical & Technical Tips
I installed the 13.5 KBTU heat pump. It already has a soft start program that ramps up the start. Some folks have the Soft Start installed in addition. No need for it with my Honda 2200. The 2.5 KW and Soft start I believe was a knee jerk reaction to the Yamaha 2000. That unit has an undersized motor and will not pull up most AC's. I ran my old Dometic, which pulled a lot more power than the Houghton, on my Lead Acid batteries with a 2,000 watt inverter. Worked fine. BUT... did not last more than an hour max. I strongly suggest adding a separate A/B switch for the AC unit. Here is my DIY guide for doing so. DIY - Add Air Conditioner Power ATS.docx I also recommend installing a 3,000 watt inverter when your factory 2K one dies. DIY - Renogy 3000 Watt Inverter Upgrade Thoughts.docx The max current draw of the smaller Houghton is well below the Honda (as well as the 13.5K unit) generator's surge AND running amps. Several of us are running the larger units on 2K Hondas. I suspect the smaller would as well. Now for the 800 pound gorilla question: 9,500 or 13.5K Houghton's: With the RELAY & THERMISTOR hacks, the larger unit works exceptionally well as the recycle time and humidity issues are fully resolved. So no worries once hacked. Our 2018 OE2 has a single layer of Reflectix insulation. We camp out West in very hot almost zero shade areas most of the time. We are not in the trailer much during the day, so we may cycle on the unit occasionally, but boondocking it is never left on all day or night. (No shore power and only a Renogy folding suitcase solar). For our use, when I want A/C, I don't want to wait 50 minutes for it to cool down Ollie. Combined the above usage characteristics lead to our getting the 13.5K unit. I have heard, but still do not fully believe, that at some point after our unit OTT doubled the Reflectix insulation. (VERIFICATION REQUESTED). IF VERIFIED, and if your camping is not generally in extreme conditions, and you have solar or shore power, then I would go with the 9.5K unit. Hope the above is beneficial. GJ DIY - Add Air Conditioner Power ATS.docx
-
Bill: I would press on if your are under 29K. But would for have towing on both TV and Ollie! Would also not go boondocking where the two insurance would not cover. GJ
-
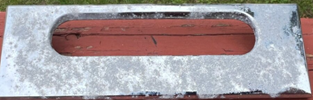
I am thinking JB Weld it. GJ
-
Houghton Retrofit Process & Questions
Geronimo John replied to Geronimo John's topic in Mechanical & Technical Tips
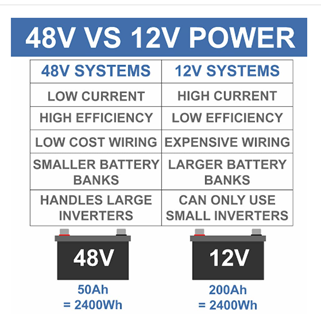
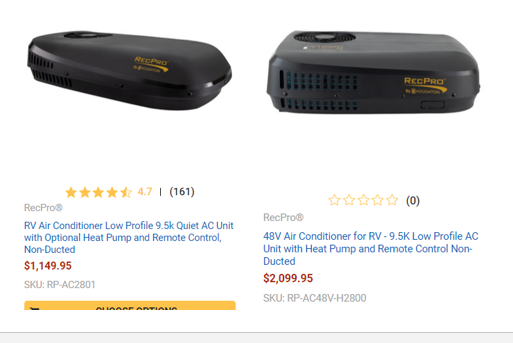
JD: Four considerations to ponder: . +++++++++++++++++++++++++++++++++++++++++++++++++++++ 48V vs. 12V EFFICENCY: Here is the Recpro graphic: 2400 watts vs. 2400 watts. Yep physics and math do not lie. Conclusion: Per their graphic, there is no efficiency improvement other than the efficiency of the cost of copper wiring. +++++++++++++++++++++++++++++++++++++++++++++++++++++ COST: Here are the RecPro graphics for the 48V and 12V models: Conclusion: Why pay $950 more for a 48V for the same capacity? +++++++++++++++++++++++++++++++++++++++++++++++++++++ AVAILABILITY: I would bet an Art beer that the availability of 12 volt parts is significantly greater than the 48 volt ones. +++++++++++++++++++++++++++++++++++++++++++++++++++++ OTT ELECTRICAL SYSTEM COMPLEXITY: Setting up your batteries for 48V is easy. But also needing 12V for lights and other components will require at least a transformer. Changing all 12V electrical to 48V is next to impossible due to the scarcity of options for 48V components. Having a 12V system, and a 120V system and a 48V system will for sure complicate life as well. Conclusion: Lots of extra cost and headaches! +++++++++++++++++++++++++++++++++++++++++++++++++++++ RECOMMENDATION: If you are buying a new Class A, sure 48V is a good thing to look into. But for anything smaller I just don't see the benefits out weighing the negatives. GJ
-
Houghton Retrofit Process & Questions
Geronimo John replied to Geronimo John's topic in Mechanical & Technical Tips
Install was a breeze. I ended up with the EZ RV gutter approach as well. Will be doing the Thermistor relocation and fan control relay hacks this July. Will keep you posted. GJ -
Yes, to your question. A friend of mine could not get his 6 volt Trojan's to charge up. I asked him if he had checked the distilled water level in his. OOPS. Had not. several cells were near dry. Basically lack of maintenance can fry serviceable type batteries. Not being familiar with your batteries, if they are the serviceable ones: Have you checked the water level in all of the cells? If one was low, then a very easy check with a hygrometer of the acid in each cell will tell you the serviceability of the battery. If you find one defective it is generally felt that you would need to replace them all. If you are leaning towards Li's, but are not ready to start the project this season, you could get a couple of COSTCO deep cycle marine 12V batteries and swap cables around to your loads. That could buy you another season to plan out your game plan. GJ
-
No that is one fine breakfast! Oh and the kitchen is exceptional too! Compliments to the Chief!
-
Concerning the Battle Borns: Free shipping on the batteries. Military discount. Three fit very nicely in the existing tray. Using exotic and highly technical machining skills, four can fit. But for the vast majority of us OTT DIYers, three is the limit. Over the phone support as Art mentioned is exceptional. Ten year guarantee is also amazing. GJ
-
Bulldog coupler recall for some LE2s
Geronimo John replied to Steph and Dud B's topic in Mechanical & Technical Tips
Their records will reflect who has the 2 5/16 versions. I just signed it myself as I could use "Russell Engineering" for which I am legit to use. I don't think those with OTT upgraded ones should be worried that the feds will track you down, it's just to cover OTT that it has been done. I wonder if the Bulldog folks are picking up the tab as OTT just ordered the larger ones? GJ -
You can use your microwave with the 2,000 watt inverter. I did for 5 years. Since your hull is only a few years old, those batteries should last several more years. Many owners also went "less expensive" when purchasing and then when their LA batteries die, they upgrade then. That's smarter use of money already invested. It would also give you time to study the technical issues of conversion. GJ
-
Short answer: Not really. Kindly create your signature block with your TV and Ollie hull number and I am sure many responses specific to your Hull will be forth coming. Expanding on the not really part: You'll need a shunt so as to monitor your SOC. Also a master cutoff switch as well. Suggest 350 amp BlueSeas. Likely some cable work would be beneficial. Many of use Battleborn 100 amp hour batteries. Mostly three of them. Others go with a higher dollar version and much higher capacity. To run AC, you'll want a 3,000 inverter with a second A/B Switch. All can be DIY if you have the tools and skills. I would recommend first searching for Lithium on the forum. There are a bunch of different ways to do it. GJ
-
Bulldog coupler recall for some LE2s
Geronimo John replied to Steph and Dud B's topic in Mechanical & Technical Tips
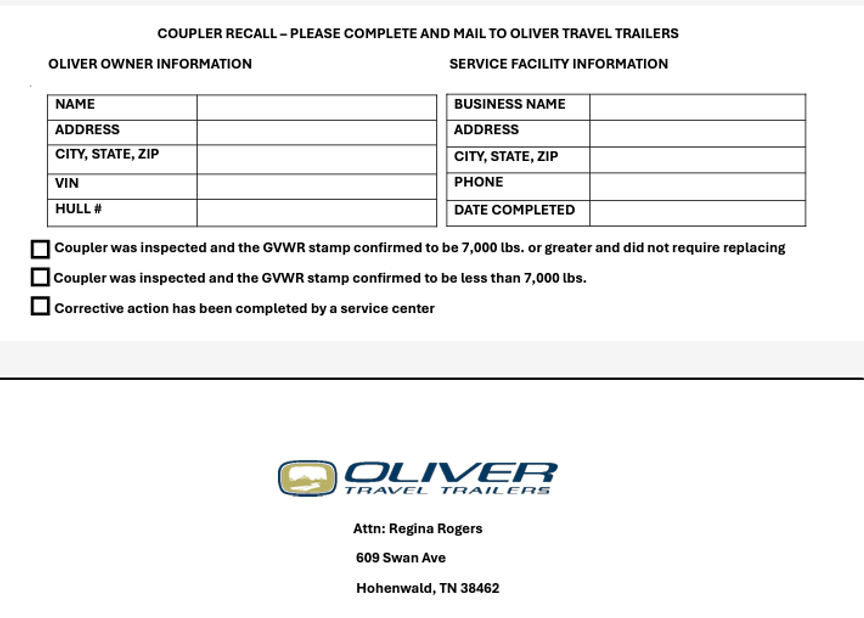
This response to inspection was included in the recall notice info. Would be helpful if we could just E-mail them to OTT. But sadly, the Government does not generally accept E-mails as legal documents. GJ
-
Bulldog coupler recall for some LE2s
Geronimo John replied to Steph and Dud B's topic in Mechanical & Technical Tips
More info here: https://www.nhtsa.gov/recalls?nhtsaId=24V322000 Then download additional documents at bottom. chrome-extension://efaidnbmnnnibpcajpcglclefindmkaj/https://static.nhtsa.gov/odi/rcl/2024/RCLRPT-24V322-5775.PDF GJ -
Bulldog coupler recall for some LE2s
Geronimo John replied to Steph and Dud B's topic in Mechanical & Technical Tips
If it is a recall, I wonder why it is not posted here: GJ
-
Norcold Refrigerator Not Drawing off Solar?
Geronimo John replied to Cort's topic in Mechanical & Technical Tips
I much prefer your approach. Would love to see some pictures of your approach! I looked at trying to stand-off the fan in the hot air section, but on the road did not have much to work with. Using some hose material as legs would also kill the small amount of vibration. For sure snaking the wires between the hulls there would be a challenge. I was thinking of mounting the controller on the fore outside wall of the Refer unit, just before the door, but pretty low. I think that a long drill bit from the Refer side aft direction would make the wire run much easier. Would for sure need to seal the holes. But this is a "C" project when I have several A and B's ahead of it. -
Norcold Refrigerator Not Drawing off Solar?
Geronimo John replied to Cort's topic in Mechanical & Technical Tips
If you are in a high density tunnel, yes most places require you to do so. But for 99% of us who are not, I would submit that the vast majority run LP when on the road. One precaution I suggest on low or no wind days, that we turn off the refrigerator when under cover and refueling. Like at COSTCO. GJ -
Norcold Refrigerator Not Drawing off Solar?
Geronimo John replied to Cort's topic in Mechanical & Technical Tips
Not all that difficult. Below is some from the one I did. You may need to get creative on the attachment in the louvers. For simplicity I kept the controller next to the electrical. When I have time, I'll remount the controller inside where I can get to it easier. GJ DIY - Titan Refrigerator Fan Install.docx -
with SOB, I had those buggers in places that made no sense. That trailer was stored under shade, but with no cover. If mud dobbers are prevalent where you store your Ollie, you may want to consider at least covering the AC with a form fitting cover or better the whole trailer. ADCO make a "relatively inexpensive one. PM if info desired. GJ