Geronimo John
-
Posts
2,391 -
Joined
-
Last visited
-
Days Won
67
Everything posted by Geronimo John
-
If it does, then the higher flammability of R-32, "Confined Space of an Ollie, and higher Toxicity of the R32 likely will require AUTOMATIC mitigation systems. For residential units, they are talking about leak detection and auto exhaust/circulation fans to mitigate these known concerns. Until all that happens, then likely we'll run another generation of the R410a units. Unlike R-12, there will be service availability of R-410 to at least 2030 one source indicated. Regardless if you have the training and several machines using R-410A, you can still purchase it without an HVAC License. However, some things are best left to those that do. GJ
-
Please translate. Is it your TV with a class 5 hitch? If so, that's serious good!
-
2 X 6 equivalent's. Metal siding. Originally only rafter bracing in the corners. They fight torsion of the whole barn. His problem did not show up for 15 years. Then I noticed it buffeting just a 1/4" in flanking wind gusts. Five years later it had loosened up to an inch movement. It was setting off his alarm system by then. PM me and I'll send pictures. You are correct on the OSB sheathing helping. In time it will do less so. But cross bracing, even if it only steel straps in an X-Pattern is your best first investment. Then All four corner posts both ways. Ditto for the trusses. Then Simpson Strong Ties for the rafters to the walls and walls to the foundation. Over Kill? Ten years ago - Yes. Now with all the severe weather it is now NO - Almost every place. So what would it cost you in time and materials with the scaffolding handy? Consider it as cheap insurance. Consider the cost of loss of your Ollie and Tractor? GJ
-
Buying anything that increases the trailer height would not be a positive move for many of us. Weight, width, length all to a point, would be less so. GJ
-
My friendss barn where I park my OE2 is of the same construction design. Even with lean-to wings on both long sides, the barn was showning high wind instability due to not having cross bracing. Summer 2023 we corrected that with a significant amount of them at every corner, and also with horizontal under cross bracing of the trusses above. Easy to do now with the scaffolding! Great barn design otherwise. Your Ollie and you will love it! GJ
-

Milwaukee M18 tire inflator
Geronimo John replied to rideadeuce's topic in Mechanical & Technical Tips
Where I come from, we call yours a "Stump Grinder". LOL. Seriously, you do have some tough weeds out in the desert. But this is a long way from air compressors. -
With a dead battery, or a Master Battery Switch "OFF", we should not move our trailers. I believe that all the OTT trailers have the Dexter Emergency Brake magnets connected to the OTT battery bank. GJ
-
Outdoor Shower faucet is cracked
Geronimo John replied to Wayfinder's topic in Mechanical & Technical Tips
That's exactly what came to my minds-eye. I remember seeing one of these when I was very young. Upside down it would work great as both a pull out limiter and a support for the plastic. It's called a shoulder yoke. For ease of install way back there, one could use some Gorilla Tape around the ends. GJ
-
Milwaukee M18 tire inflator
Geronimo John replied to rideadeuce's topic in Mechanical & Technical Tips
But I bet my weed Mil Spec weed killer tool is MUCH faster than yours! Wait for it! GJ
-
Milwaukee M18 tire inflator
Geronimo John replied to rideadeuce's topic in Mechanical & Technical Tips
JD: You take the cake with a "Real Man's" weed wacker!
-
Milwaukee M18 tire inflator
Geronimo John replied to rideadeuce's topic in Mechanical & Technical Tips
An unbiased review from a dire hard Makita guy. If I were servicing on a daily basis 55+ PSI tires, I too would get the Milwaukee, despite its much higher price and being less versatile. But my use is just for my 40 PSI TV & Ollie. So, I'll keep my five year old and still going strong DeWalt team.
-
In my SOB previous camper, I had a B.P. A friend suggested your approach and I learned just how fast S*it can travel. Definitely needed a change of cloths. Instead, pop three or four dishwasher pods into the tank and take it out for a bumpy twisty turney road for 20 miles. Then try again. I'll bet it works.... Unless your B.P. is ancient, like from last year. The refer to Steph's approach. But be faster than I was.............
-
You recommended the Nitto's some time ago. I put a set on my TV and LOVE them! Good tire all around. 🙂 G Thank for the in-depth on the Wildpeak tires. I like the no stone tossing tread and super sidewall design. For that reason I would not put the Nitto's on Ollie. Like mentioned, I want my TV to Tow and my Trailer to Follow without hurting Ollie". And the price is reasonable for E-rated tires.
-
You recommended the Nitto's some time ago. I put a set on my TV and LOVE them! Good tire all around. 🙂 GJ
-
Jim: Several of us run with 500 pound tongue weights on the OE2. Last year Art and I weighed my tongue weight on a really neat scale for this purpose. Mine was 540 pounds. I travel out west in significant truck and cross winds with never a problem with sway. And with your F-250 why worry about yours in the 600 range? I would not. GJ
-
No Cold Water to Toilet or Bathroom Faucet
Geronimo John replied to csevel's topic in Mechanical & Technical Tips
Claudia: For sure not a first timer! Good work on the water issue. Thanks for telling us about the HWT issue. A good tip for sure. Have a great trip. GJ -
Houghton Retrofit Process & Questions
Geronimo John replied to Geronimo John's topic in Mechanical & Technical Tips
Sorry for the slow response. Getting ready in Hawaii for my 2024 Summer in Ollie trip. Running warp speed for next week or so. So bullets on my end for a while... Don't have or need soft start with my Honda EU2200. Will let others with the older Honda EU2000 comment. Don't need thick roof kit for OE2 and Houghton. Get a manual thermostat for heat. Use old furnace wires and double up on existing Dometic wire to control heat post Houghton install. Requires two mods: Thermistor Mod and Fan Relay Mod. doing mine in July. GJ GJ -
No Cold Water to Toilet or Bathroom Faucet
Geronimo John replied to csevel's topic in Mechanical & Technical Tips
Sorry JD, but I strongly recommend changing your process. Especially to a first timer using high pressure air! Way too much risk for "water hammer" damage. The reason is that with some air and water already in the lines and up to 80 PSI, the air compressor will blast air and water slugs down the lines at high velocity. When they hit a fitting or a closed valve, the inertial forces of the water slugs can cause significant damage. If using air, start out with 15 psi and flush out all the water. Then move up to 20 PSI repeat working up to 30 PSI MAX. I strongly discourage any air connections beyond 30 PSI. In fact I would never choose to use air pressure at all in my system unless I was blowing out lines that are disconnected at both ends. Just too risky. GJ
-
No Cold Water to Toilet or Bathroom Faucet
Geronimo John replied to csevel's topic in Mechanical & Technical Tips
Could read this two ways. There may be cases where an annual anode replacement is necessary. But for the vast majority of us, we get 3-5 years service from our anodes. Assuming you winterize annually 🙂 The "vinegar de-calcification process" is normally not needed every year as well. I do mine every even numbered year (2022, 2024 etc.). Others with soft water use can go years between de-calcifications. The following will not help you now, but certainly will be useful as a reminder on how to keep foreign stuff out of our water systems: Do you flush out your hose to eliminate spiders and other friends before hooking up to Ollie or the water filter? . Do you install your water filter at the trailer and never at the faucet? Do you use a water filter EVERY time you fill tanks or hook up to city water? All of these are good practices all owners should take note of and remember to not do. -
Using a Foy support for a Foy (Overland) Laguna Table
Geronimo John replied to Doug S's topic in Ollie Modifications
Amazingly there is a high percentage of us that also do so, and drive our spouses nuts in the process! I love watching the craftsmanship that you and the team produce. It is absolutely amazing. GJ -
What else for the Renogy suitcase?
Geronimo John replied to GlacierGirl's topic in Mechanical & Technical Tips
Ok. Not going to look like those pictures. One of the owners who is familiar with the Solar/Litho system of your vintage trailer will need to take over. Good luck. GJ -
What else for the Renogy suitcase?
Geronimo John replied to GlacierGirl's topic in Mechanical & Technical Tips
The Z-amp solar port likely was installed by a previous owner. If so, you'll want to follow the leads inside the trailer and see where they lead you. If you have a Victron 712 Smart System installed, you'll have a display (on left) and shunt (on right) that looks like these. Very high quality gear. If the solar port wires go: A. DIRECTLY to the Litho's battery terminals, then you'll need to rewire them. B. To the trailer side of your Battery Shunt, then you are golden in two ways. First, your previous owner was a smart person. And You don't need to rewire anything. Regardless when you get your folding suit cases, you'll want rewire them to both mate up to your solar port. Not hard to do, but there are several ways to do it. GJ
-
HELP! Bad smell from under dinette seat
Geronimo John replied to NHBoomers's topic in Mechanical & Technical Tips
Dead mouse? -
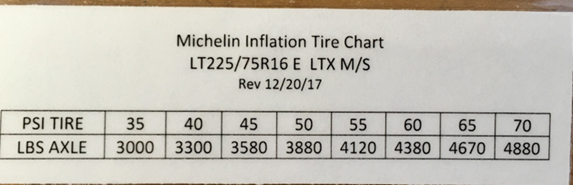
I would consider the MFG recommended pressure chart. For our OE2's at 6,000 pounds less tongue weight divided by 4 OE2 tires the weight is below the chart. That means Michelin is saying use the minimum number listed or 40 PSI. However if you are running TMPS, and you want a bit more warning time and a tad firmer ride, then I would go with 45 PSI as a Max. The same logic line for the Defender tires. Here is the Michelin tire pressure chart for ours: One would deducet using the same logic that 35 psi is their recommended pressure for the Defenders, 40 if you want more TMPS head room. Less off road like going to Tec at Denali AK. GJ
-
Good news. Its not likely your batteries. Write down this a a 100% SOC with X amp draw. Then start powering up the individual fuses, letting things stabilize a minute or so and record the event's data. By having the fuse size, what it serves and the change in amp draw, we can all look at the data with you. Even if you run across a monster draw, continue the process for all fuses and circuit breakers with everything off. This will become a reference for many down the road for sure.