Galway Girl
-
Posts
784 -
Joined
-
Last visited
-
Days Won
25
Everything posted by Galway Girl
-

How Comfortable are you in Your Elite II ?
Galway Girl replied to JPatrickJ's topic in General Discussion
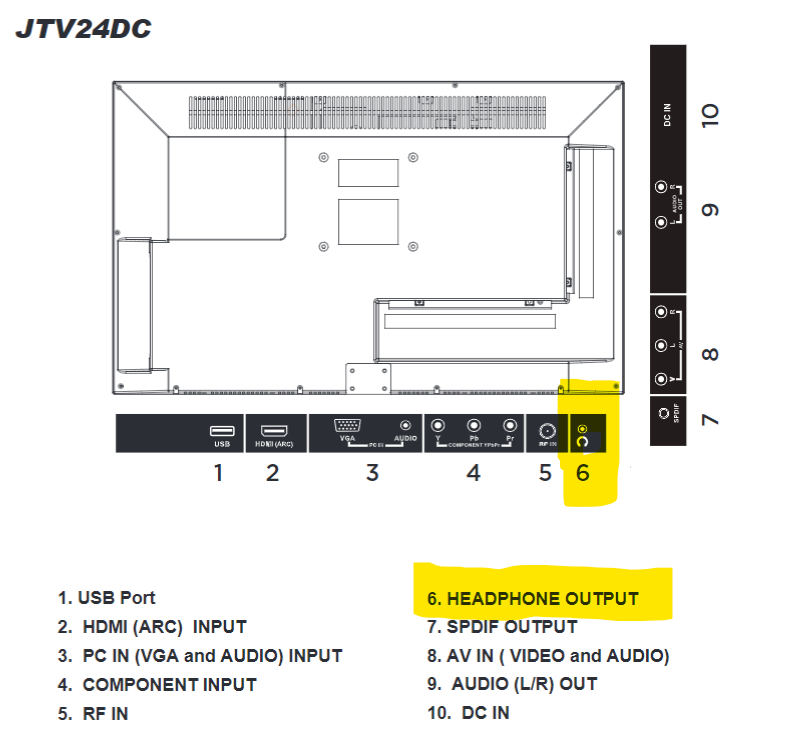
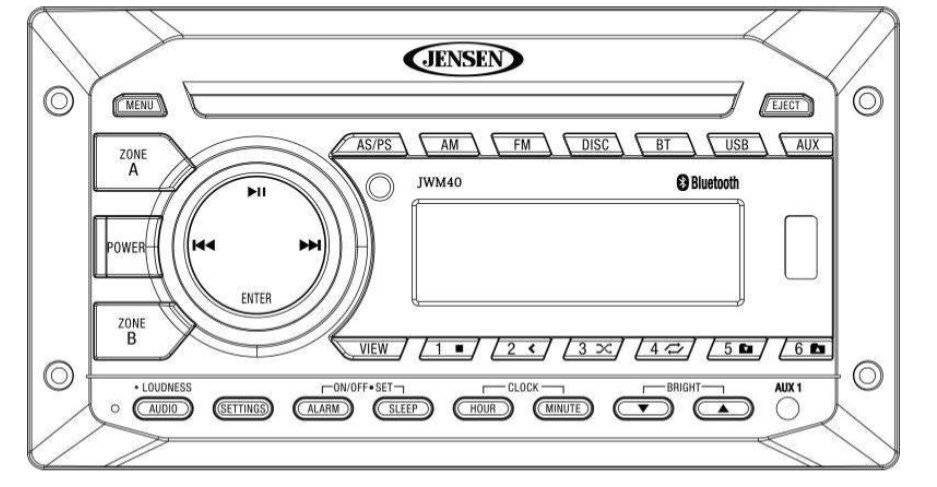
There are two parts to the system, the TV and the Audio Receiver. In our Elite II the audio system has cables connecting the in/out from TV to the Aux In (on back panel) of the Jensen Receiver. That receiver has zones for speakers A and B. You can turn off each zone (or both) from the Jensen Audio Receiver by simply pressing the Zone A and Zone B buttons. Next - To listen to the audio on headphones there are a couple options: 1) There is a 1/8" mini stereo headphone jack on the TV if you wanted to simply hook up wired headphones. Look for the user manuals for these both in the Oliver University for more details. 2) You might be able to also use Bluetooth Headphones with the Jensen Receiver. The problem typically found is that Bluetooth has a slight delay so lips aren't sync'd. (I don't see a control in either the TV or the Jensen Receiver manuals to account for this skewing. ) An earlier discussion on the topic is below shows some "bluetooth" transmitters that can be hooked up to the speaker out's on the TV to make use of wireless headphones without those skewing errors possible. Hope this helps. Craig Short Hull 505 - Galway Girl
-
Truck Shopping and Cargo Weights
Galway Girl replied to Mike and Carol's topic in General Discussion
WDH transfers some % of the trailer tongue weight forward to the front axle of the tow vehicle and some % of that tongue weight back to the trailer axles. So using the WDH gives you back some of the dead tongue wt. that you can use as cargo weight. In addition the WDH helps recover some of the 'rise' that happens to the front of the truck when you drop the trailer on the hitch. Normally the instructions for WDH's say to adjust the hitch so 1/2 of the total rise on the front fenders is recovered. For example if you drop the loaded trailer on the truck, and the front fenders raise 2", then they want you to try and adjust the WDH so you get back to only 1" rise on the front. This also gives you back load for steering control. Second - it's important to note that the physical receiver hitch assembly on the tow vehicle typically has has a rating for both "WITH" and Without a weight distribution hitch. For most Elite II's the loaded tongue wt will be >600 lbs...and in the case of my specific F150 hitch sticker...that means I must use a wt. distribution hitch as the "dead weight" it can carry in "WEIGHT Carrying Mode" is 500 lbs.
-
Trailer: Elite II = Loaded trailer wt. 6400 lbs. Tongue Wt: 740 LB => requires an Anderson Wt. Dist. Hitch Tow Vehicle: 2018 F150 4WD Super Crew with 3.5 EB & 3.55 rear end Mods: Have a canopy and installed SUMO Springs for overload/squat reduction and they work. Tow Experience: Grade B+ ( I'm sure a 3/4 ton would be an A+) Feels stable in all but the most extreme conditions. 3.5 Ecoboost has PLENTY of power due to turbo...but ....it has a turbo which can be a big ticket repair in future. Mileage: Towing from Tennessee to Everett (2500 miles) and in Western Washington have averaged 11 mpg overall. In mountains typically got about 6-9 MPG, on Flats as high as 14 mpg. Without the trailer but loaded with gear on the way out to pickup we got 20+ MPG on the highway. Most extreme towing scenario: High wind gusts (50MPH) through I-90 passes in Montana last summer. Felt a sideways wiggles and felt concerned for about 3 seconds, but the hitch + towing controls of F150 kicked in quickly. I remember thinking...I wish the truck was heavier than the trailer during that situation. Truck Stats: GVWR = 7000 lbs. Actual Curb Wt: 5200 lbs. Cargo Capacity: Calculated GVWR-Curb 1800 lbs Door Sticker Cargo Capacity: 1557 lbs door sticker for tire rating. Hitch: F150 Factory Installed Receiver/Hitch as rated below: with Weight Dist. Hitch..... Max Gross Trailer WT Rating 12,200lbs has 1220lb Max Tongue Wt. without Weight Dist. Hitch..... Max Gross Trailer WT Rating 5,000 lbs . has 500 lb Max Tongue Wt. Hope this is a helpful post.
-
Truck Shopping and Cargo Weights
Galway Girl replied to Mike and Carol's topic in General Discussion
Previous post on truck ratings: -
Truck Shopping and Cargo Weights
Galway Girl replied to Mike and Carol's topic in General Discussion
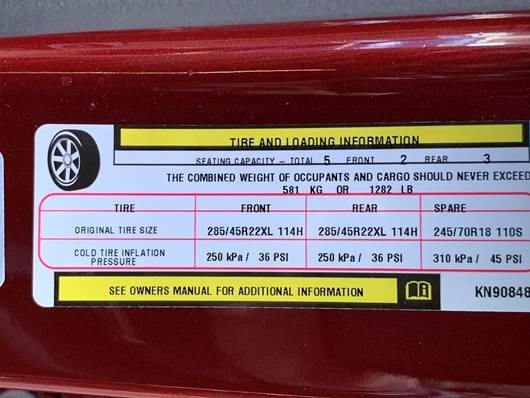
As we know, payload decrease from advertised number is something new truck buyers need be aware of before buying the truck. Rule of thumb..…Payload Decreases as the Trim Level and Options Increase.. Example from our visit to RAM dealer *(2019 model year data and it may change for this 2020 year.) · Dodge Ram 1500 – Vin 1C6SRFHT8KN920407 Advertised Max Tow Rating – 12750 lbs Advertised Max Payload – 2300 lbs. (that's for the most stripped down option set with maximum payload package) Payload from the official RAM Configuration Website – 1780 lbs -- when we looked it up at the dealer. Go here to look up payload by VIN # https://www.ramtrucks.com/towing-guide.html Then...the actual Payload on Door Sticker at DEALERSHIP See Below : 1282 LBS That even caught the dealer by surprise...1780-1280 is about a 500 # decrease. Now for a use case: That payload of 1282 Lbs needs to include all items that are added to the truck, including people, accessories, camping gear and “trailer tongue wt.”. For your use, know that payload stickers according to JSAE assume a full tank of fuel. Let's use a specific case for an Oliver Elite II with a loaded trailer tongue wt = 630 lbs Other options - New Spray In Bedliner & Canopy – 250 lbs. Three Passengers – 450 lbs Camp Stove, Lawn Chairs, Bikes, Tools other Gear – 300 lbs Payload left for 630# Tongue Wt = 282 lbs…. and a 348lb gap! So while there is plenty of "TOW" in this Ram1500 there isn't plenty of Payload....
-
Truck Shopping and Cargo Weights
Galway Girl replied to Mike and Carol's topic in General Discussion
Oh the joys of payload shopping for a RAM. I recently was helping a friend who is shopping for his first trailer and a new RAM 2500...(but we also looked at 1500). I went to the RAM website, where you can put in a VIN# and get the "payload" number. We found the ideally configured unit at the dealers website. Got the VIN # for the unit on the dealer lot, We then put in that VIN number and got the FACTORY payload # from the RAM website and drove over to the dealers. At the dealer lot we found that exact VIN, and opened the door and the payload sticker was off by about 250#. They said the same thing that it was a tire rating sticker....but they said that there was no way to get that changed. So my friend told them I can't buy this truck to tow my trailer because I'll have no payload left for gear and family. They suggested a more stripped down model...or go even bigger to a 3500.... He's scratching his head and very concerned about having no way to know "exactly" what the payload sticker will say...even if he custom ordered the truck... -
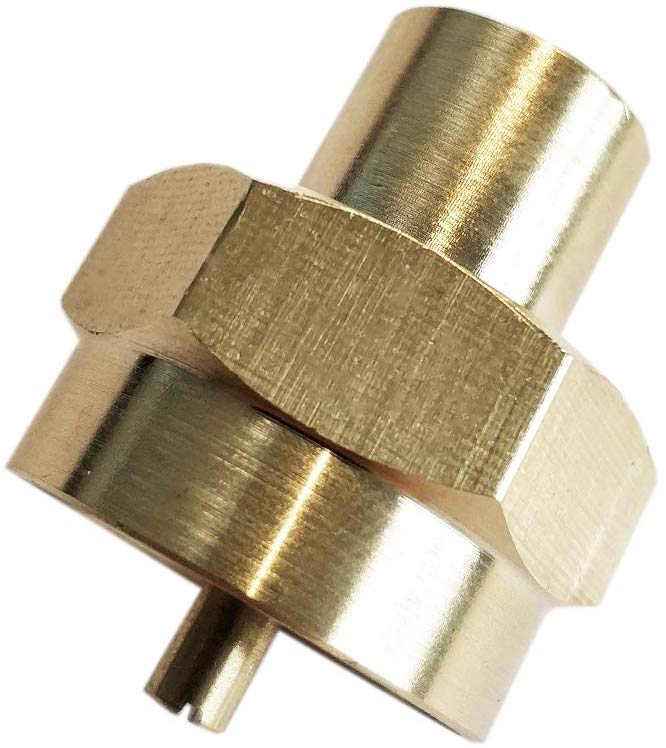
The external Zamp SAE Plug on the side of Oliver directly connects to the Batteries. That means the suitcase (portable) solar panels will need their own controller as it doesn't connect to the Zamp Controller inside the trailer and used for the solar panels on the roof. If you were to use one of the Zamp suitcases the waterproof controller is included with the panel, and they come with the cable for connection with the Zamp SAE connectors and/or battery alligator clips. The Zamp branded Solar Ready sidewall port (SRRV) found on the Oliver are completely compatible with any Zamp portable solar panel. Not all SAE wired ports and portable briefcase solar panels have the same positive and negative connections. The polarity may be reversed when the solar panels connect with another brand of SAE quick connection extension cable or solar charge controller. Shown below is a ZAMP connector. This is this one is used to connect between the wall of the trailer and a Zamp Solar Battery Maintainer panel. (I'm including it so you can see what the SAE connector looks like and see that in a ZAMP connector they have RED wire the rubber covered connector and the black wire going to the exposed lug.) This protects users from contacting a + lug if they plug the connector into the Solar Panel first. The typical SAE plug (below) is reversed, and has the RED wire connected to the Exposed LUG, and Black goes to the rubber covered lug. As others mentioned, it's possible to find adapters from the Zamp SAE sidewall connectors to other brand connectors so it's not a huge issue...just a bit of research. In fact, Zamp sells the polarity reversing plug below for $9.99. (On sale for $4.99 at this time). So ...if and when you select the external panel...just make sure to get one that has it's own waterproof controller, and the proper connector/polarity adapter.
-
Elite II - Has a front closet will fit that Guitar Case and leaves more room. The front closet is really quite deep and wide...and tall enough under that mid-shelf. There's about 14" of space between the back of the closet wall to the backs of the hanging clothes. In my case, I have a big guitar case, which has exterior dimensions of 45" x 19" x 7" in that space. From the Oliver Dimensions Guide in Oliver University: Overall Closet Dimensions - 72" H x 28" W x 34" D Key is Depth, Floor to Top of Bottom Shelf - 49-1 /2" (Behind the Clothes Rod is plenty high for a 45" case) Bottom Shelf to Top Shelf - 9-3/4" Closet Door Opening - 49" x 16"
-
Galway Girl - due to family connections and a "naming contest" with our 3 adult daughters... Back Story: When we ordered our unit, we had to wait from April to August for pickup date. We decided to have a name the Oliver contest during a family summer vacation. We setup a 4 night competition...sort of like the final 4 in basketball. We had 4 couples and started with each couple providing 8 names....next night cut to 4....then to 2...finally a vote off. We had some really funny names provided...but in our case the number one name was Galway Girl because of our family history/connections...and the fact that all 3 of our children were girls!.... Our second place name 4-ever-hitched became the name for our blog post...and if you want to see our trip to pickup our ollie...it's here... https://4-ever-hitched.com/
-
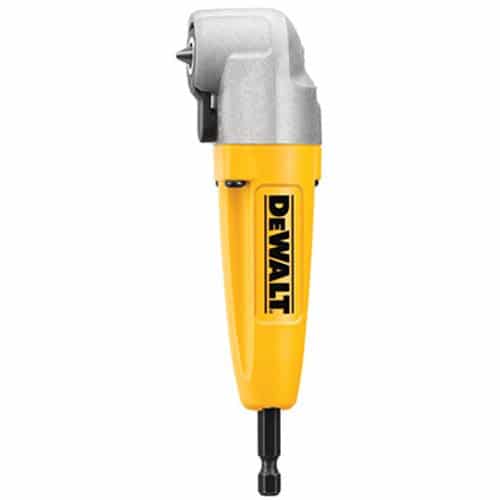
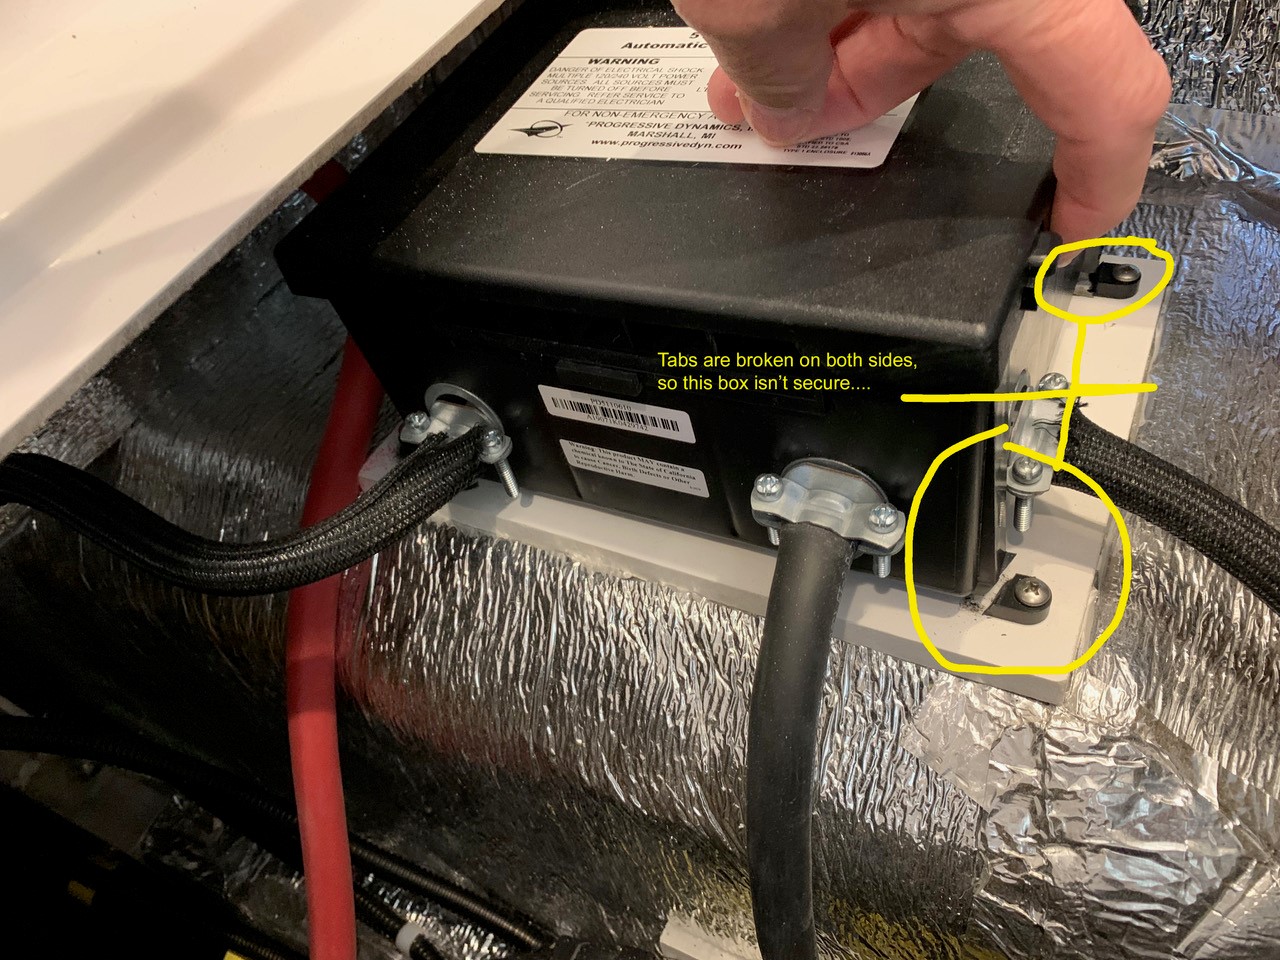
Update: Warranty Repair Completed. I received an immediate reply from both Jason E. (Oliver) and Progressive Industries the same day. Progressive sent me a new transfer switch, along with a return shipping label for Fedex Ground. It took about 5 days for the part to arrive, and it took me about 30 minute to replace the switch. The only tricky part is that removing the actual switch requires that you remove all the cables first, then remove the screws holding the box down. You can only reach the back left screw by rotating the box counter clockwise to reveal that screw in the back. (Normally you can't reach that screw.) I also used a right angle bit for my power screwdriver.
-
Outdoor propane grill and griddle recommendations
Galway Girl replied to hobo's topic in General Discussion
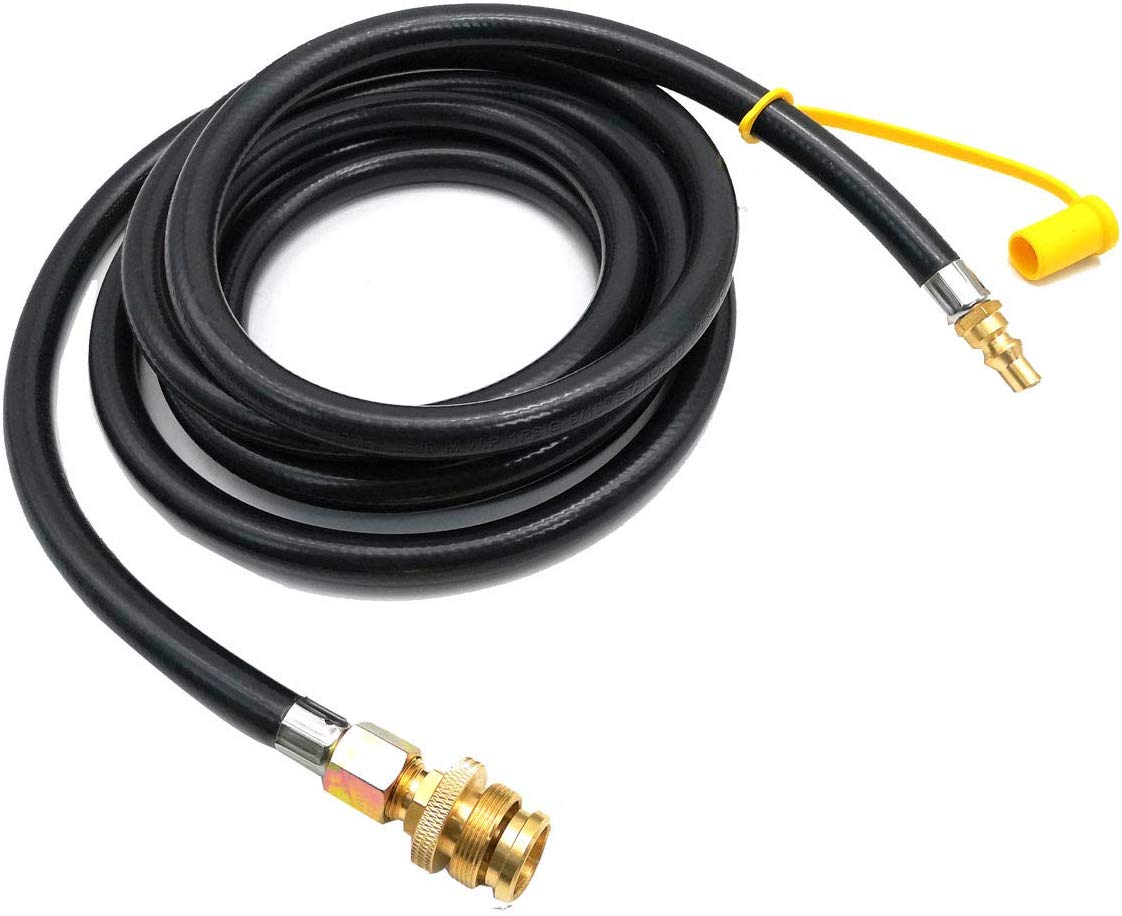
Something like this is what I've used with my trailer and a simple conversion from the "bottle" style connector to quick connect. From Amazon: And I would be using this type of bottle to NPT connector. https://www.amazon.com/MENSI-Propane-Adapter-Accessories-Connection/dp/B07MTZW866/ref=sr_1_19?keywords=1%2Blb%2Bpropane%2Btank%2Badapter&qid=1570546407&s=lawn-garden&sr=1-19&th=1 In this case you would replace the connector on the end of the extension hose, with this "Small Tank" connector.
-
Schematic for Inverters and Auto Transfer Switches?
Galway Girl replied to Galway Girl's topic in General Discussion
Actually I was unclear. I have the Inverter from the factory...all I was saying is it doesn't show up on the schematics, I suppose both the inverter option, and the extra "external generator" connector are both missing in the diagrams. Thanks for explaining where the in's and out's from the inverters go...that's what I was looking for. By the way...I'm supposed to be getting a new "transfer switch" for the Generator/Shore Power as the mounting tabs were broken from the factory. I'll be taking pictures of the repair and putting them on the forum for future references. -
Schematic for Inverters and Auto Transfer Switches?
Galway Girl posted a topic in General Discussion
In all the manuals and online schematics, I seem to be missing diagrams for the two automatic switches that are on board our Elite II (2019) 1) The auto-cutover switch which is in place when a front connection ports optioned into the trailer. The switch inputs appear to come from Shore Power Input or Front Option Input. From the inputs the switch makes the choice which is powered and the output goes to the load center. 2) When installing the Xantrex Prosine Inverter I see a switch, but I'm trying to figure out input/outputs. It looks like one input is FROM the inverter, the other input I can't tell....the OUTPUT of the switch I assume goes to the load center? Am I interpreting this correctly? Thanks for any inputs. -
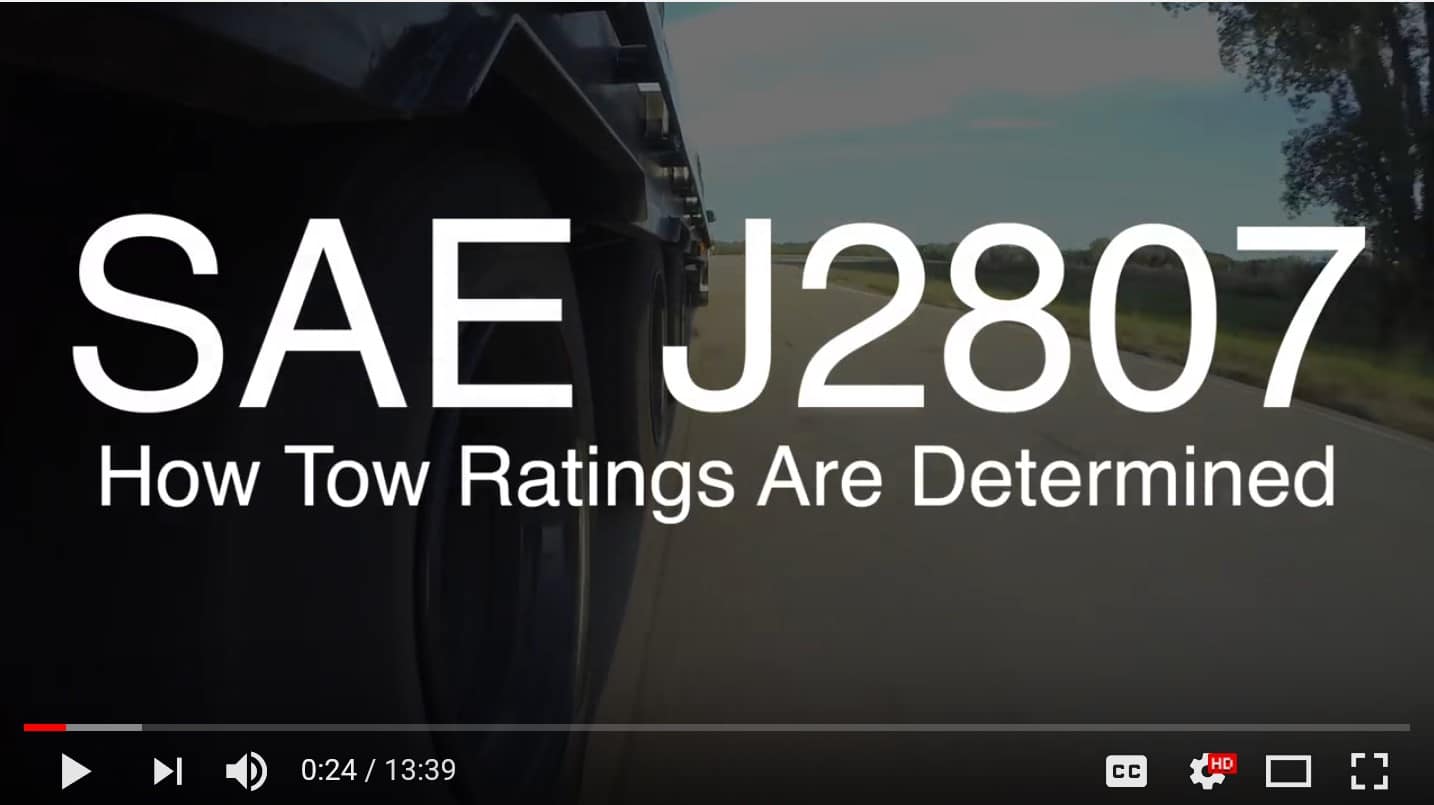
Here's a youtube video from Engineering Explained that describes the actual requirements for Truck Tow Capacity Measurements per SAE J2807. This video explains how all truck manufacturers now test their vehicles to the same standard for tow ratings. It also shows actual results for a RAM 3500 dually in fully loaded conditions. Link1: - This is the description of the tests and real calculations. Link2: ...Takes you to TFL Trucks web page showing other tests at the proving grounds and RAM Engineers describing the industry requirements. Enjoy...
-
- 2
-

-

-
Fantastic...inspirational! Thanks for posting.
-
I picked up my Oliver Elite II in Aug 2019. I noticed yesterday that the Transfer Switch case was a bit loose. It turns out two of the plastic molded tabs that are used for mounting the case had broken, so the case would not be secure for travel. I alerted Oliver Service, and contacted Progressive Dynamics. They immediately agreed to send me an exchange switch unit...and I'll ship back the defective unit. Here's a picture showing where the tabs broke. I don't know why/how those tabs broke, but when I put in the new switch, I'm considering also using some 3M 4100 to hold the switch case down to the mounting board...(along the edge so I can cut it with a knife if needed.)
-
Truma updated their website and they are starting to post how to's...using an Oliver as their model. Here's the youtube link: My 2019 Instructions are still the "corrected" version.... Is the final story now set? I wait to see if Truma posts an updated winterization video.
-
I thought I would share the BLOG my wife and I created showing the trip to pickup our Oliver Elite II - (Hull 505). We did the trip in early August 2019. The way the blog is setup you can click on the links at the top of the page to see either the "Trip to Hohenwald" ...or..."Jump to the trip home" (The pickup is on the first page of the "Trip Home" section. This should work on either a computer display...or a phone... I give this link to prospective buyers when they come visit to see our Oliver. Here's the link... https://4-ever-hitched.com/
-
Glacier National Park, post season
Galway Girl replied to John E Davies's topic in Campgrounds & Parks
Thanks for the excellent posting and the info on Glacier. We plan to go there next year about the same time. What dates range did this trip cover? I'm trying to figure out how late into September this trip can be executed. -
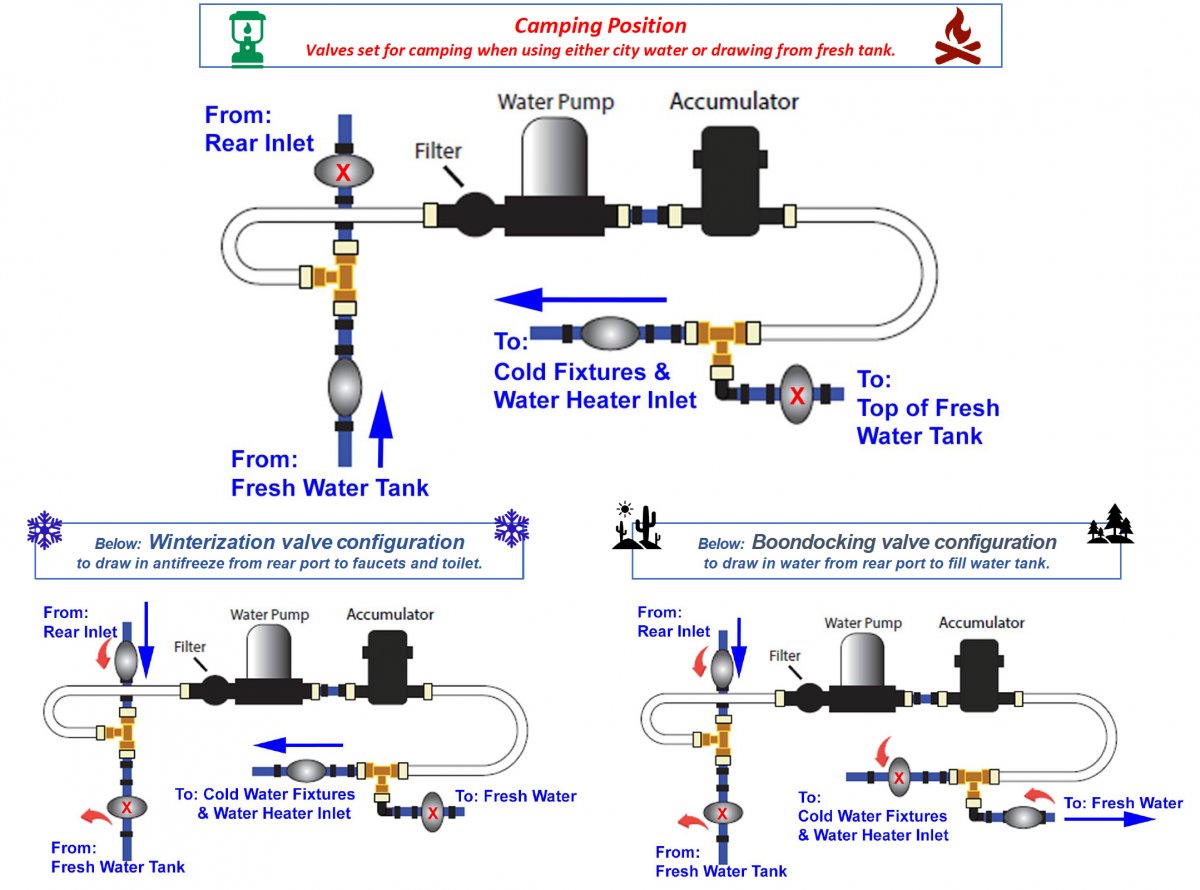
2019-Elite-II-Augmented-Plumbing-Diagrams.pdf I had been trying to figure out the same thing as both Cedar Forks and GeronimoJohn...so I combined together the works from GeronimoJohn and Cedar Forks along with the original 2019 Elite II Factory Plumbing Diagrams into a complete PDF. (I also have this as a powerpoint , .ppt file) Submitting for your use or comments. Repeat ...I think this only works for the 2019 Elite II.
-
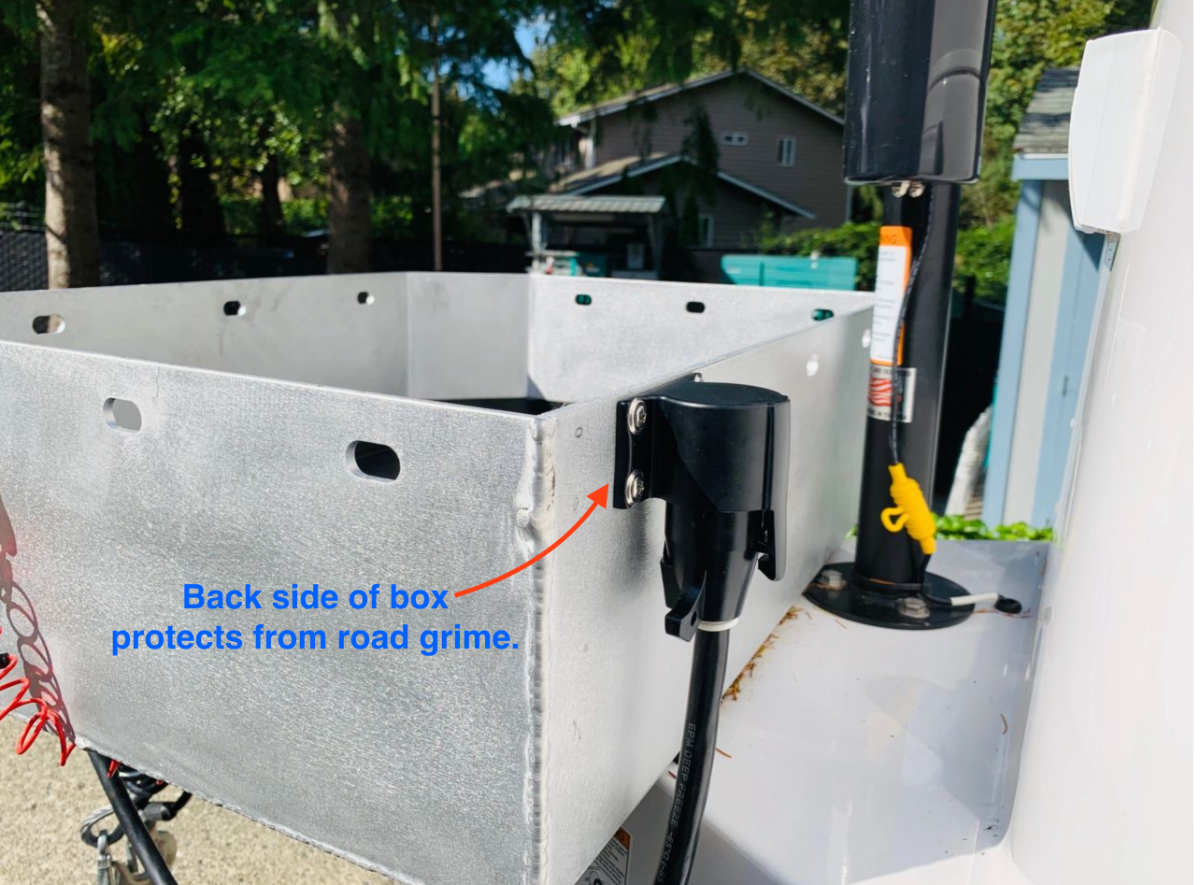
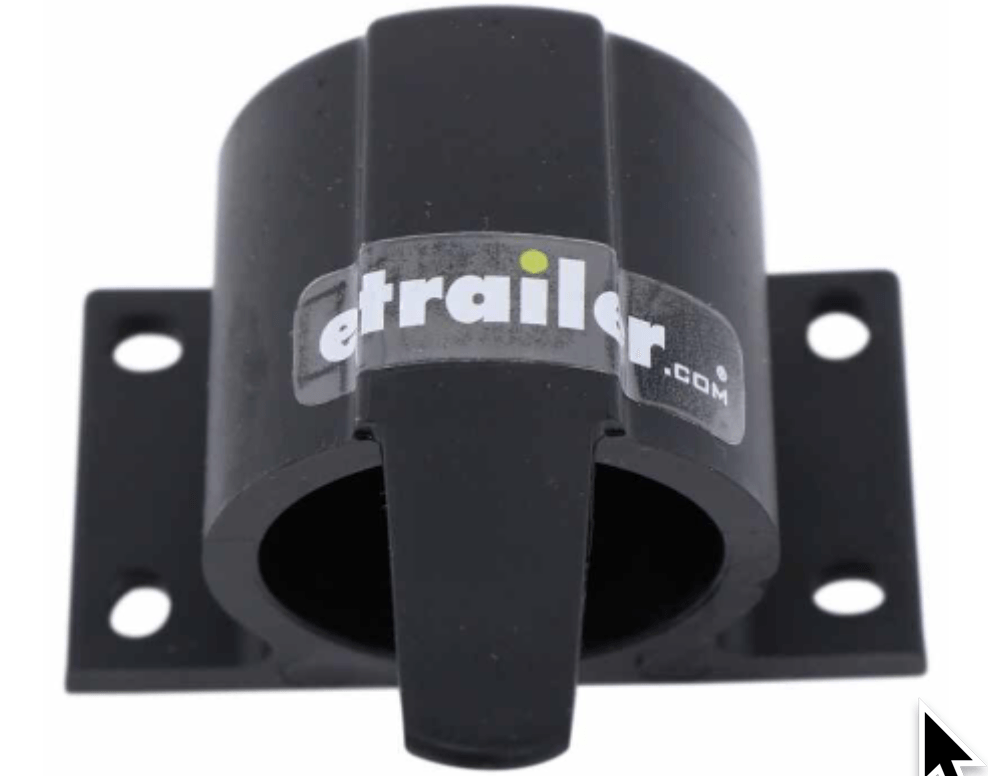
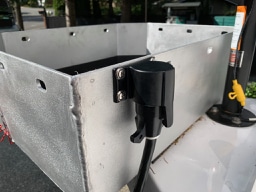
I’ve done a modification to add an Optronics 7-Way trailer harness plug protector. Here’s the link to the part I used from e-trailer.(Including shipping and tax < $10 https://www.etrailer.com/Trailer-Plug-Covers/Optronics/ACP7B.html 7 Way Plug Protector - by Optronics And here’s where I mounted it…on the back of my Tongue Box. I used stainless #10 bolts to mount the unit. It could be mounted with zip ties to the bottom of the tongue as well if you don’t want to drill holes. The cover is a semi rigid type of rubber material but with enough flex to make it easy to insert or remove with one hand. In any case, I switched to this after my original “rubber cover” leaked.
-
I've done a modification to add an Optronics 7-Way trailer harness plug protector. Here's the link to the part I used from e-trailer.(Including shipping and tax < $10 https://www.etrailer.com/Trailer-Plug-Covers/Optronics/ACP7B.html And here's where I mounted it...on the back of my Tongue Box. I used stainless #10 bolts to mount the unit. It could be mounted with zip ties to the bottom of the tongue as well if you don't want to drill holes. The cover is a semi rigid type of rubber material but with enough flex to make it easy to insert or remove with one hand. In any case, I switched to this after my original "rubber cover" leaked.
- 24 replies
-
- 4
-
-
- 7 pin
- tail lights
- (and 2 more)
-
John, Thanks for the tips...I'll clean and seal it later today. I'll also be using a couple zip ties to make a simple holder on the tongue under the "basket" so I can stow the plug our of the rain.
-
see Updates below Update: some have reported back that the holder now shipping doesn’t fit the new 7pin plugs Oliver now uses. The plugs a MM bigger than the holder. An alternative is to tuck your 7 pin up under the fiberglass cowling on the tongue. The 7 pin fits snugly there out of the rain for storage. This afternoon my wife said.... "I noticed the tail lights of the trailer on this morning. It's not hooked to the truck. Are they supposed to be on?" When I went out to look and sure enough the rear tail lights were on. I went immediately to look first at the "emergency brake" switch and then at the front 7 pin connector...which has a "rubber cover" on it to keep water out. We had 2" of rain in the past day and that rubber 7pin cover did a much better job of keeping the water in. I drained the connector, blew it out and dried it with air. Then cleaned it and lubricated it with electrical silicone grease. The lights are no longer on. I'm assuming this was a draw from the house batteries through that connector. Passing along if of any use to folks in the future. If there's a similar post somewhere I didn't find it in a quick search. Craig Short
- 24 replies
-
- 4
-
-
- 7 pin
- tail lights
- (and 2 more)
-
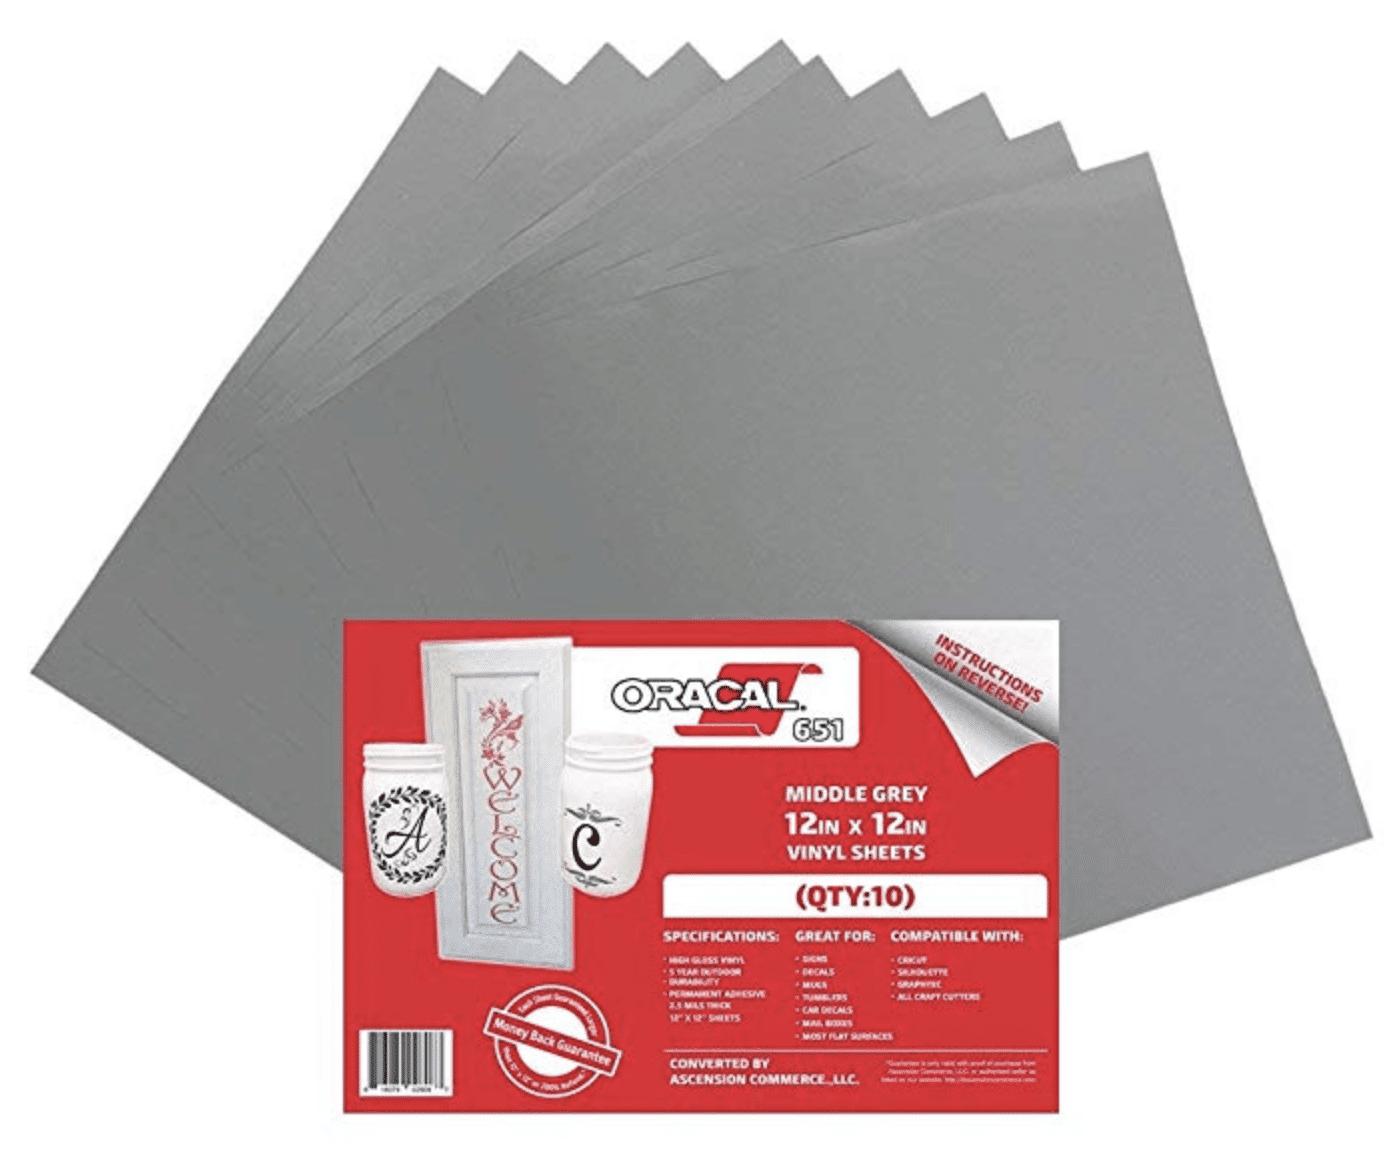
Hull 505 - First 2500 Miles Completed
Galway Girl replied to Galway Girl's topic in Delivery Day Photos
Here's the link to amazon for the Oracal I used. https://www.amazon.com/gp/product/B071W2CVJB/ref=ppx_yo_dt_b_asin_title_o00_s00?ie=UTF8&psc=1 Amazon sells it in sheets or rolls. I chose sheets as it fits exactly in our Cricut machine. I've learned to only use fonts that are a bit wider and be careful to use a new blade and set pressure to 5-6 (high). Then to remove the letters in one sheet, it's easier to push them through the cuts, leaving them on the cutting mat (removing the bulk of the material). After that it's easy to use remover sheets on the top of the cutouts. I've also added this using the Middle Grey color on the back tire cover for our future travel v/blog page.