Galway Girl
-
Posts
779 -
Joined
-
Last visited
-
Days Won
25
Everything posted by Galway Girl
-
David, Very good reminder... I'll check mine again before my next trip. CS
-
I'm working with Oliver and Lithionics. Lithionics doesn't sell direct to consumers. Xantrex is used because that's what Oliver Factory is using and supported by Lithionics.
-
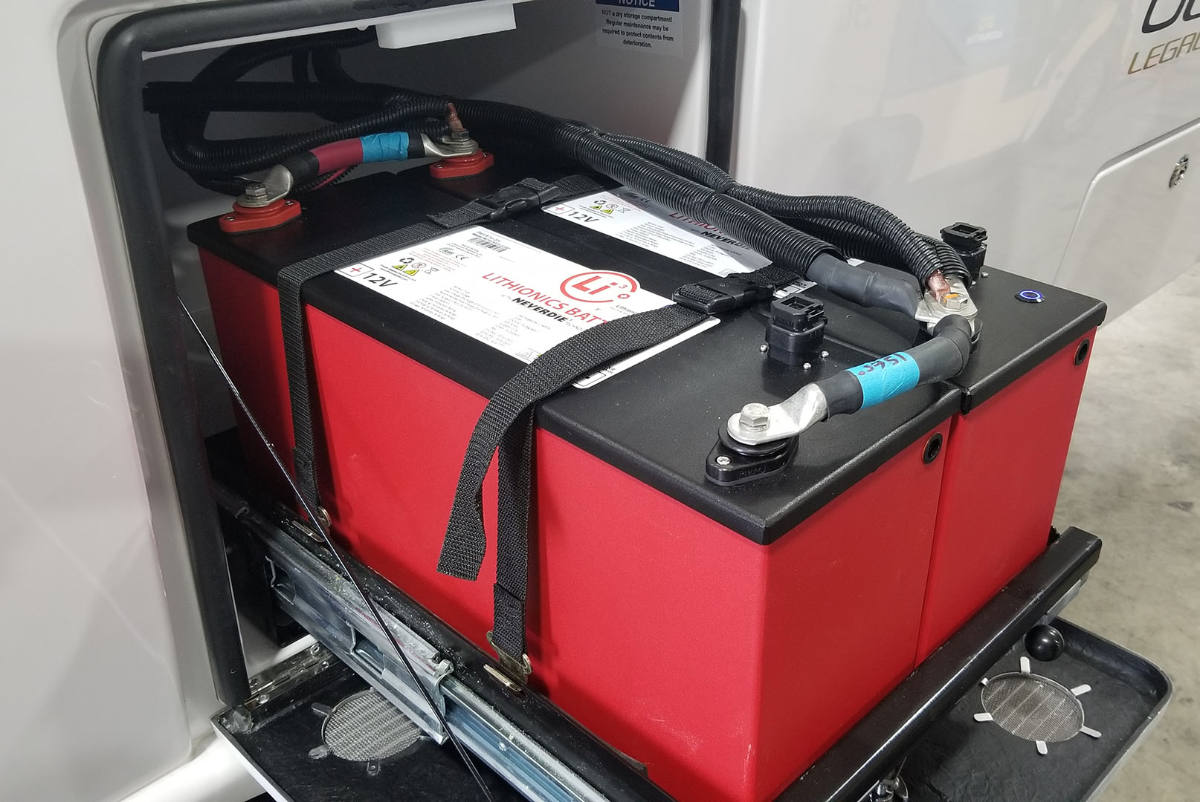
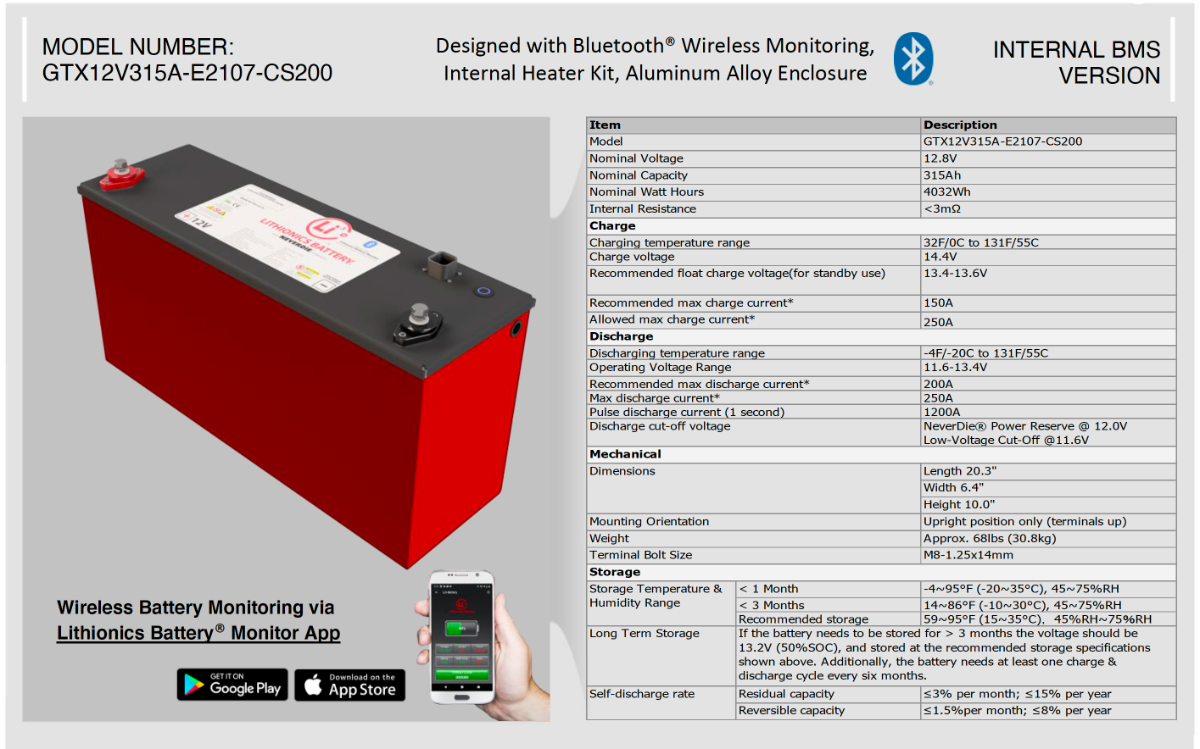
John -- So having the ability to turn on or off the charger is useful...and that I should let the lithiums drain down further before recharging. Does that mean while connected to shore power I should turn off the Xantrex 2000XC Pro charger until the batteries are down to 50% ? FYI: The batteries I'm using come from Lithionics and are internally heated with embedded wireless BT monitors. They also have integrated ON/OFF switch for cutoff of power for safety and storage. They are now being offered by Oliver as part of their new Lithium Platinum Package. Attached is the full data sheet on the Lithionics GTX 315A battery. Two of these batteries will perfectly fit into the existing Battery Tray. Based on the dimensions, and Oliver testing they have ~1/2" space each side for spacer blocks to keep batteries tightly secured along with the strap system. Once I get the batteries in hand I'll be doing a set of schematic drawings. I'll be taking pictures of tear out, and reinstall and any other mods I need to make along the way. I'll also be adding a Xantrex XC 2000 Pro - Inverter Charger with BT Monitor/control panel. ********** Picture and text below from the Oliver Website including the picture of batteries in the existing tray ***************** https://olivertraveltrailers.com/travel-trailers/legacy-elite-2/upgrades-add-ons/ The 2022 Oliver Lithium Platinum Package includes... - 630 AH Lithium Batteries Package (2 Lithionics GTX315A) - 340 Watt Solar Package with Charge Controller (Zamp PWM Controller) - 3000 Watt Inverter - Xantrex XC 3000 Pro - Micro-Air soft start capacitor for the A/C GTX12V315A-E2107-CS200-R7.pdf

-
I'm starting a Lithium upgrade on a 2019 Elite II Hull 505 - I've reviewed many other posts and projects (thanks for your postings) and decided to start this one to document my project to install new Lithionics batteries. Comments from those of you with experience very welcome: Overview: Lithium Upgrade Project: Reason I'm upgrading: My 4 AGM's finally died this spring. I've got some time now to do this project now before a 9 month road trip later this year. There are three ways that batteries get charged in hull 505: 1) From Alternator/7PIN 2) From AC Shore Power 3) From Solar: 1) Alternator or DC/DC CHARGING: Our Oliver's batteries get charged through the 7 pin connector while driving. This is considered Alternator Charging or DC/DC charging. For Lead Acid Chemistry this charging method works fine as the amount of current drawn by AGM's or WET Lead Acid's is relatively low because they have higher internal resistance. Many of you know that you can't rely on that 7 pin connection to fully re-charge your batteries but they can keep them from declining. Hull 505 was built with a 20A breaker in this 7 Pin line to protect the wiring and Tow Vehicle alternator. For Lithium batteries with very low internal impedance this current draw can be many time higher, and result in overloading the tow vehicle alternator or cause wiring overloads. To make charging more consistent and protect the alternator a DC/DC charger is the preferred choice for LI batteries. My Plan: I will be adding a Victron DC/DC 30A Charger on board the Oliver. Installation Research and feedback from Oliver Service says that I need to: Carefully inspect the existing 7 pin wiring and do load calculations. Worst case I'll be running a new pair of dedicated 6 AWB charging wires from engine bay of Truck all the way back to the DC/DC charger. Figure out my location to mount for the Victron DC/DC charger. Must be near the batteries and have some cooling space and dissipation plate under the charger. Run new 6AWG wires from my Truck Engine Bay all the way back to an Anderson Connector on the Rear Bumper of my truck. On the Oliver, run 6AWG wires back into the same bay as the DC/DC charger. 2) AC Shore Power Charging - Upgrade to Xantrex XC 2000 Pro Inverter/Charger - provides 100A Battery Charging In my specific hull 505 I have a Progressive Dynamics 4000 load center. This houses the AC Breakers, DC Fuses and a converter section for battery charging. In my PD4000 there is a PD 4065 Converter section (65A) with Lithium Jumper for Battery Charging. In normal operation that charger is set to WIZ (or Lead Acid) position and it follows a profile that's perfect for lead acid batteries and AGM's. If I move the switch (or jumper) to the LI position, it now has a constant output at 14.6V which is OK for Lithium but not optimum for the Lithionics batteries. Lithionics prefers that I use another charger with a programmable LI profile. My Plan: I'm upgrading my current PD converter charger and separate Prosine 2000W inverter to an integrate Xantrex XC2000 Pro Charger/Inverter. Note: I don't plan on running my AC off the batteries so the 2000W inverter is plenty for my needs. In the Platinum Package Oliver installs the XC3000. Installation Research and feedback from Oliver Service says that I need to Disconnect the existing PD4065 converter charging leads that go to the batteries and tape them up. Leave the charger block in the PD4000 load center cage - just in case I need to downgrade later back to AGM's. Remove the existing 2000W Inverter and Auto Transfer switch. (The load and AC wires go back into the new XC2000 along with the 4/0 B+ and GND leads) Mounting issue: I'll need to figure out how to attach the new inverter to the same spot under the street side bed. 3) Solar Charging - No Change at this time In my Hull 505, I have a Zamp 30A PWM Solar Controller. This controller isn't as efficient as an MPPT controller, but it is already installed and works. In keeping this first install simple, I'm leaving that in place. My Plan: I'll be leaving Zamp 30A Charger in place for now, and will upgrade to a higher power MPPT controller in the future along with more solar panels. Installation Research and feedback from Lithionics says that I need to: Install a breaker on the solar + line so I can Isolate from batteries. 4) Decluttering the battery box - It looks like many of you have moved all the loads and negatives to common bus bars as a way to declutter the battery box area. I want to do the same...I've read the posts so far but wonder what's been the most difficult part of those change overs? I plan to wire in a cutoff switche for the main B+ power (Big Red Knob) and a breaker for the Solar Inputs so I can cut all power for winter LI battery storage. Comments welcome before I get to the start line. Craig Hull 505
-
Just for fun you can look at the Oliver Outfitters List on Amazon for all kinds of electrical adapters, testers, hoses, filters etc. For most items there are comments above and to the right of each item that are specific to Oliver use cases. See it here: https://amzn.to/2mAAgPO Check out reviews of campgrounds we've had our Ollie here: https://4-ever-hitched.com/around-the-northwest Craig Short Hull 505 - Galway Girl
-

HOW TO: Fabricate battery hold down straps and anchors
Galway Girl replied to John E Davies's topic in Ollie Modifications
Very great job again! I'll look for the main post for the project when it arrives. I'm starting my designs for a Lithium Upgrade so I'm drafting behind you. Loved that you used what I assume are MBRF fuses on each lug. Great space saving safety feature. I can wait for the main posting but I'm curious, how did you mount those red and black through terminal studs? Is there room on the backside of the battery enclosure to reach up and put on backing plates for the hole down bolts etc? When I looked under the seat of the dinette (red stud side) inside it looks like you would need to reach a hand up inside quite a ways to be where your through studs are mounted. Haven't looked under the bed side yet. CS -
Look for WD 40 - Specialist Dry Lub with PTFE (which is teflon). That works great and is available at most parts stores, amazon etc. This also can work on the legs of the Electric Jacks without attracting dirt etc. It sprays on a bit like any other wd40 but drys to slick teflon clear finish.
-
2,000 watt inverter vs 3,000 watt inverter
Galway Girl replied to Fritz's topic in Mechanical & Technical Tips
I thought one difference is how the Batteries get charged and what "unit" in the Oliver is doing the charging: In our case: 2019 EII Hull 505 2019 EII has a 2000 W inverter....but that inverter doesn't have a DC charging output. DC Battery charging is taken care of by the Progressive Dynamics, PD4000 Energy Center embedded DC Charger. (It's a 45Amp DC charger for both AGM or Lithium, with a jumper to set it to either "Lead Acid" or "Lithium" chemistries which will be good when I upgrade from AGM to Li. When in the LI setting, the DC charger outputs 14.6V for Lithium.) Newer Olivers with factory installed Lithium Packages are using the XC Pro 3000 inverter which ALSO has a much heftier "DC Charging Unit inside". (In other words, they aren't using the DC charger within the PD energy center, instead they use the DC Charger within the XC Pro 3000.) See the table below excerpted from the XC Pro Spec Sheets - 150 Amps will help charge a Lithium Battery much faster. Also the programmable voltage level will help users set it specific to the Li battery installed. ELECTRICAL SPECS - BATTERY CHARGER FREEDOM XC PRO 2000 FREEDOM XC PRO 3000 Min Battery Voltage for Charging 0.0 Vdc 0.0 Vdc Max DC Output Voltage 18.0 Vdc (custom battery type) 18.0 Vdc (custom battery type) Selectable DC Output Current User Selectable: 5 - 100 A User Selectable: 5 - 150 A Full Load Max AC Input Current 24 Arms 25 Arms Max DC Charge Current 100A 150A -
Post a pix when you're finished. Depending upon how you mount the Zamp Connector and the Switch....pay particular attention to where the "case closures" need to be in their fully closed position. The switch position was something I messed up the first time, when I was "finished" the case closures couldn't fully engage, had to move the switch down a bit and plug the hole I had drilled. Measure twice, drill once! CS
-
Are you getting ready for camping season?
Galway Girl replied to SeaDawg's topic in General Discussion
Yes, just took the cover off this week as we hosted a "Oliver Visit" today. Got her all cleaned up inside and out looked great because it was under the cover all winter. We sanitized the fresh tanks and flushed it twice. Also learned a quick way to "drain" the fresh tank is to open up Truma water dump spigot in addition to the lower tank drain and turn on the pump. It quickly evacuated down to 6% of water then I shut off the pump and let it dribble over night. We're prepping for a set of trips soon. Best wishes for a safe, healthy and fun camping season. -
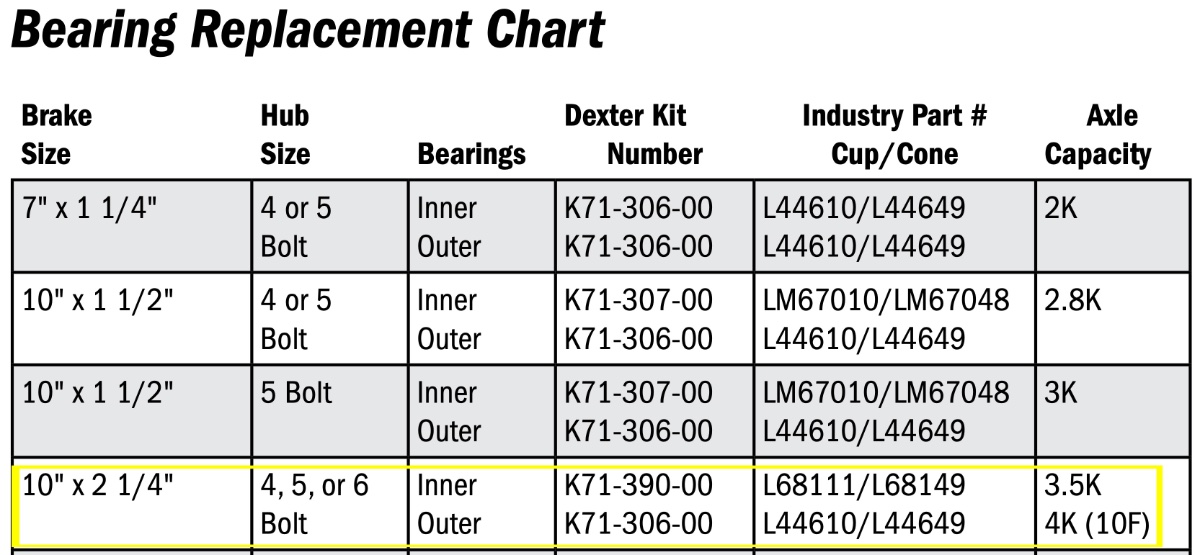
I'm planning on buying kits for our 3.5K axles as well to have spares on the road. Looking for part numbers I found this...but I'ld like confirmation from the forum members. This is a pix of the Axle lable for our Elite II - 2019 Found t Below in the table is the replacement chart from the Dexter User Materials. The last row I believe has the part numbers for the 3.5K Axles. Can anyone here confirm the part numbers for our 3.5K Elite II axles are Named as "set 4" - L44649/L44610 Named as "set 17" - are the L68111/L68149. I'm thinking of buying the kits. Craig
-
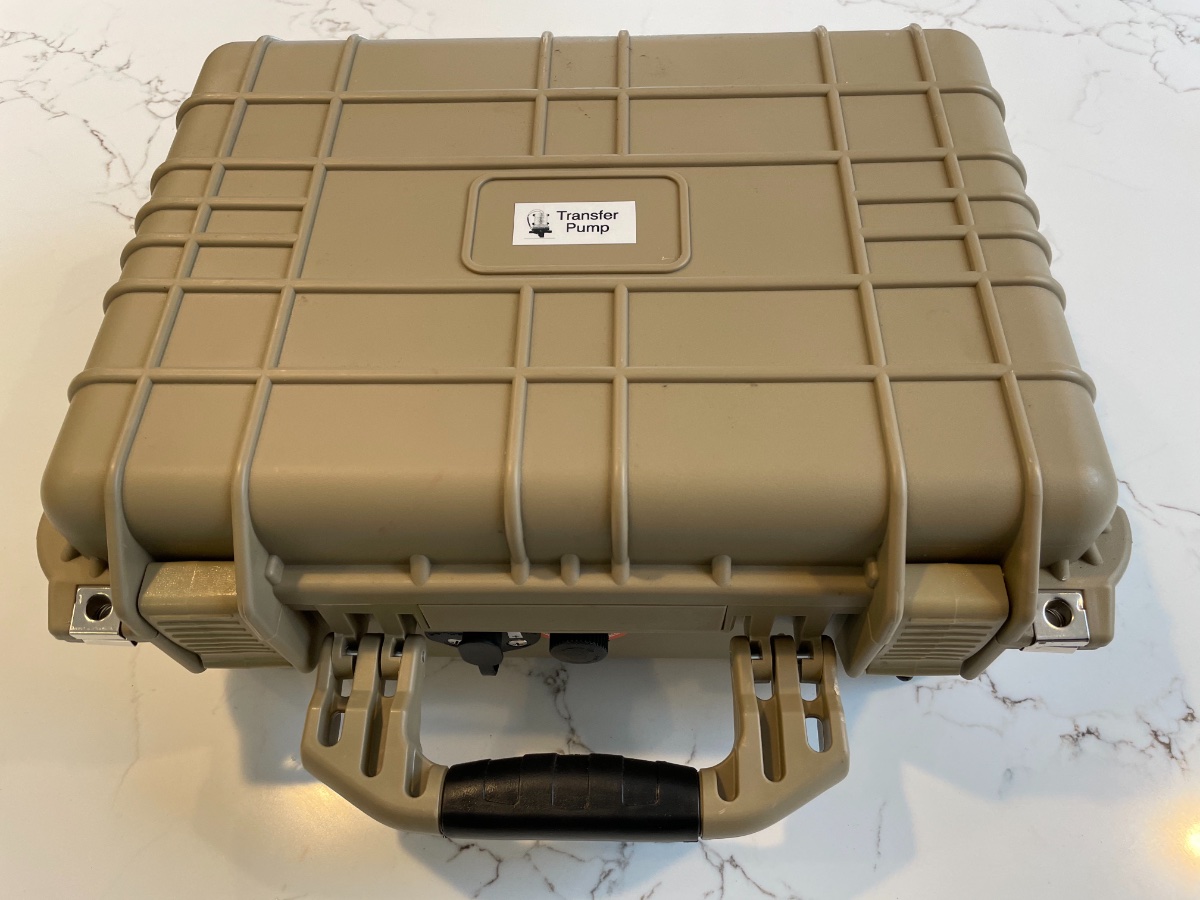
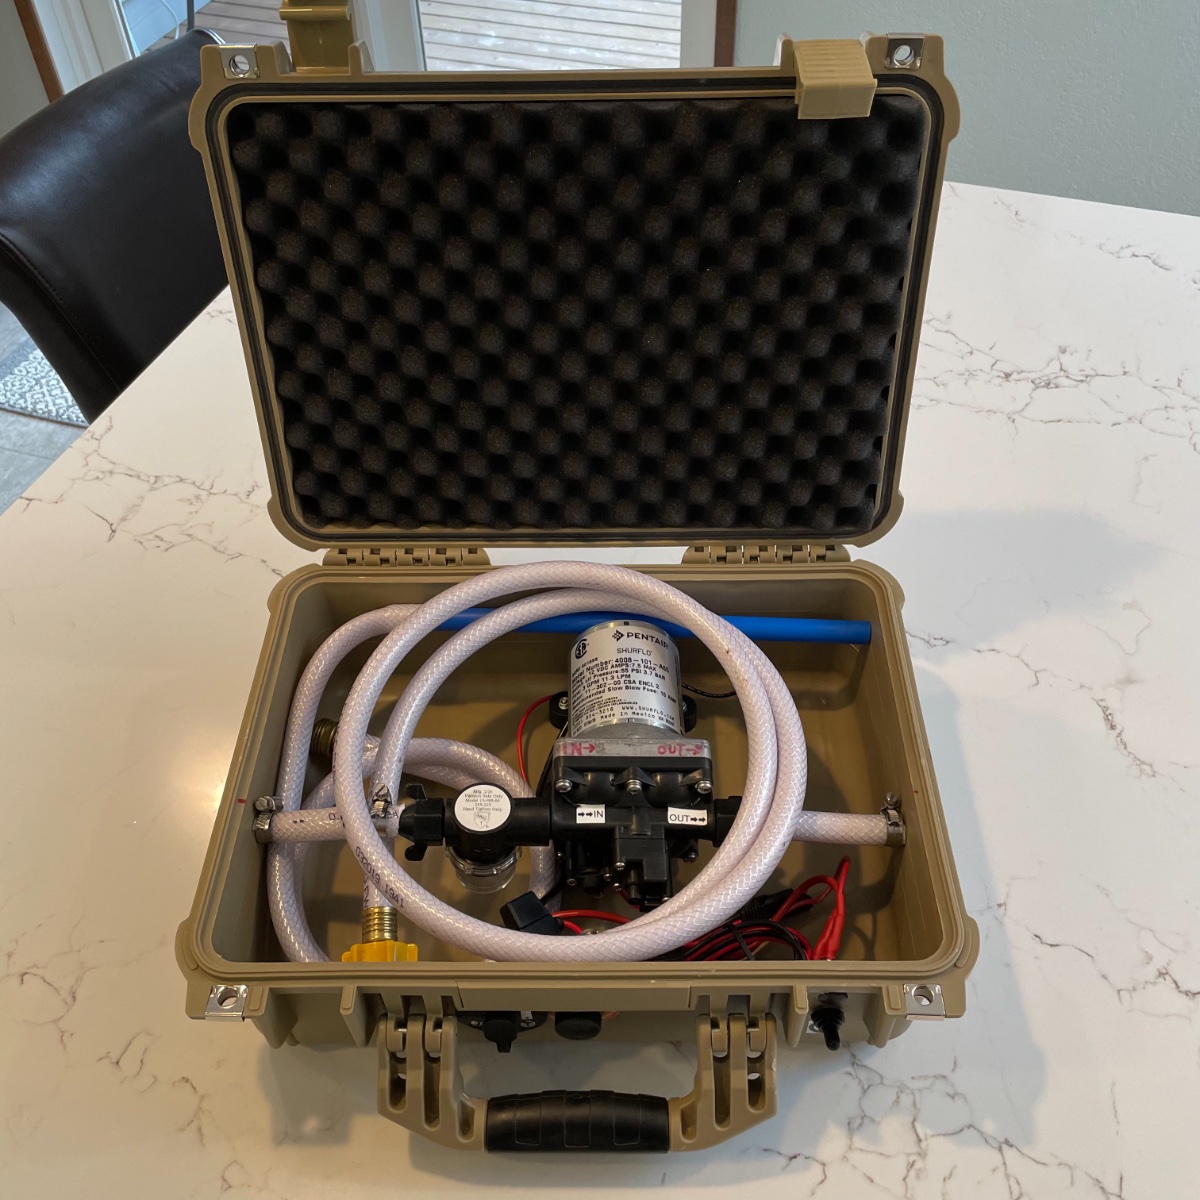
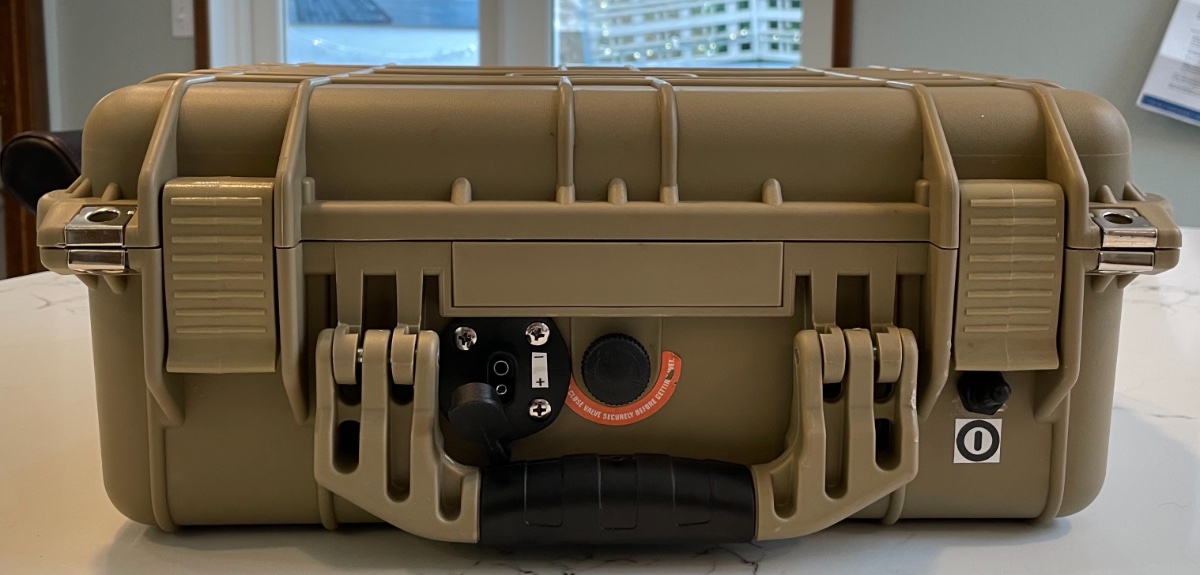
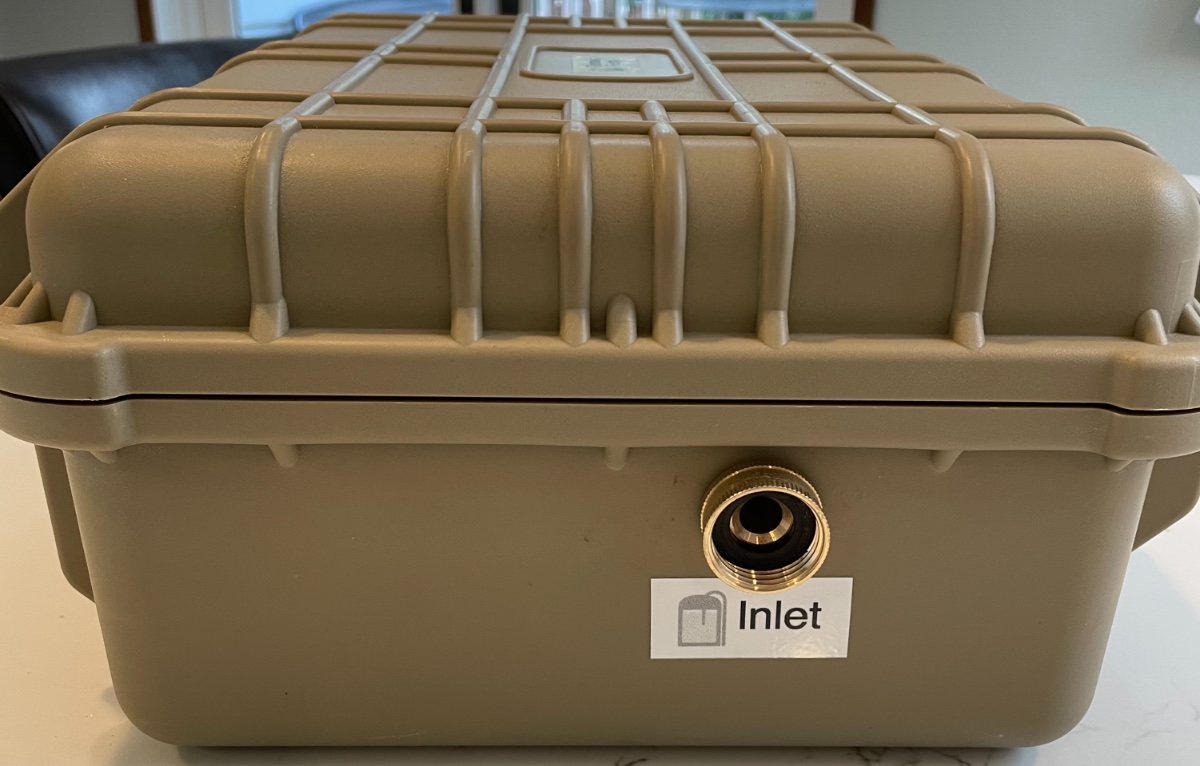
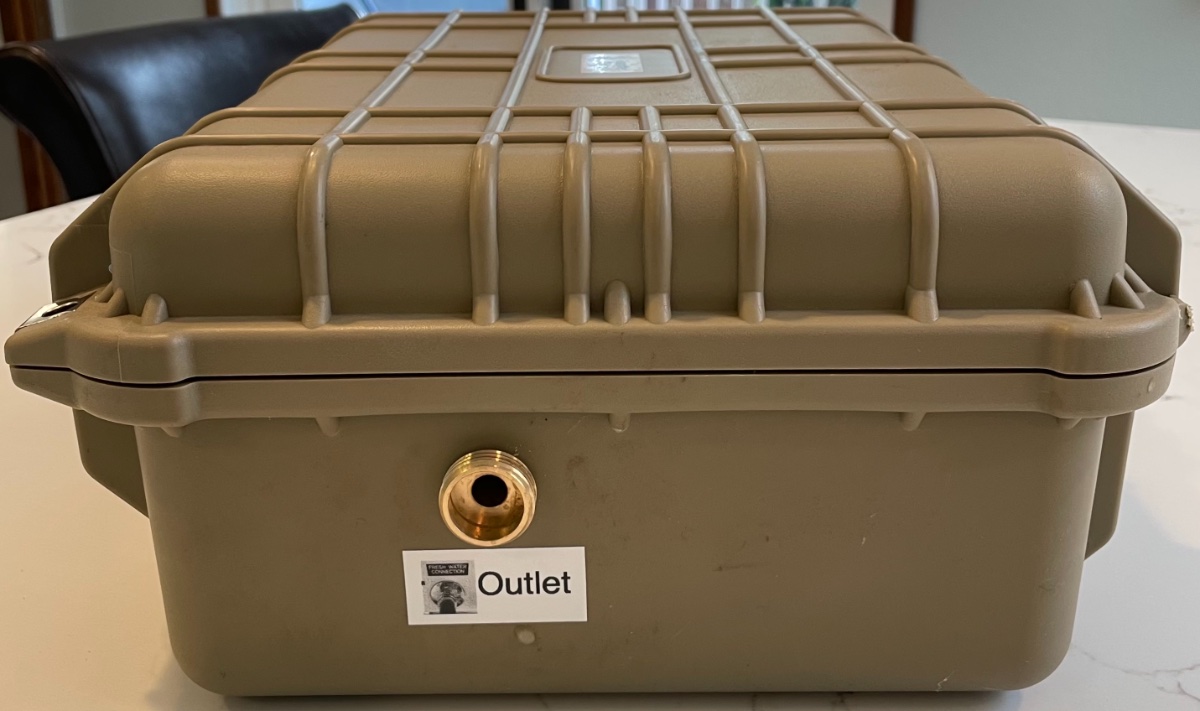
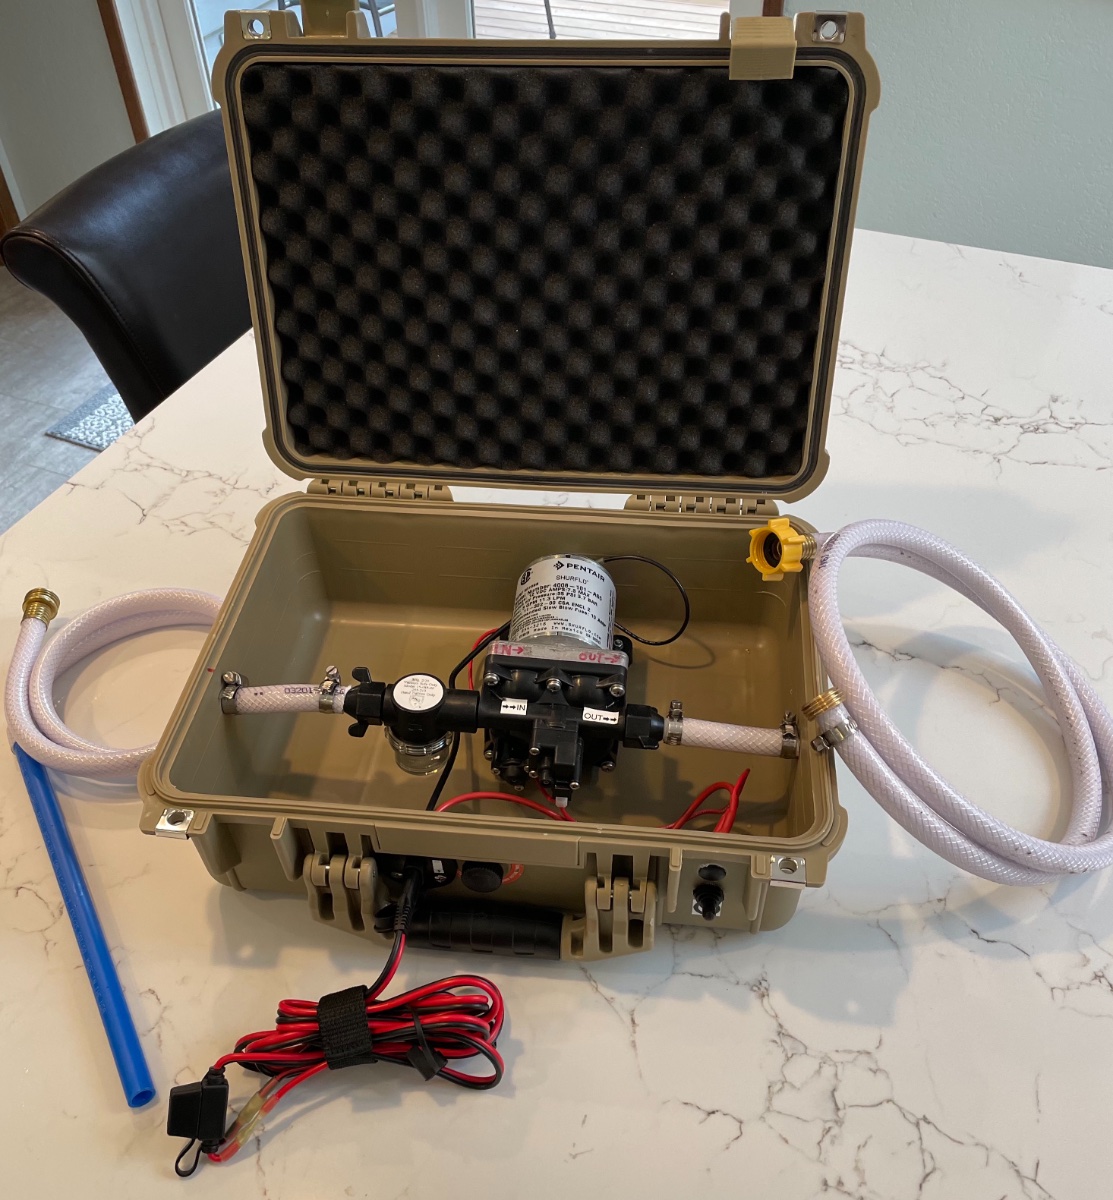
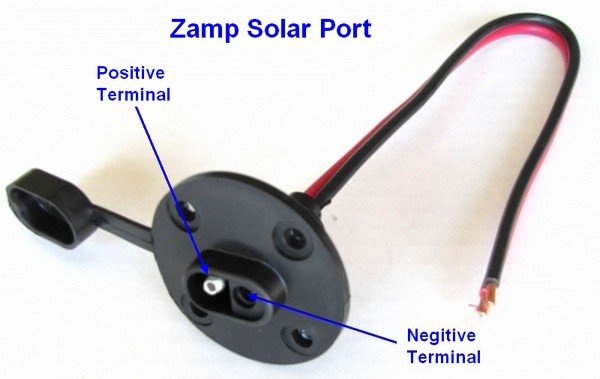
Here'a a fun project that provides you a backup 12v Pump for your Ollie. I bought a spare 12V Shurflo water pump to carry with me on our coming long long adventures around the US. I decided to build it into a water transfer pump that I could use for multiple uses and still have a backup pump. Some ways I can use this transfer pump: Transfer fresh water from portable tanks and bladders directly through the Oliver fresh tank port. (This is without using the boondocking port.) Use as a pusher pump for a bladder to the street side water port on the Oliver Use around the campsite as a portable pump for wash stations etc. Use as a backup pump should my main pump fail. Electrical Consideration: I designed this so it can hook it directly to the Zamp Solar Port on the side of the trailer as the 12V source. That SAE Zamp port has direct connection to the batteries in the Oliver. I wanted to make sure to create a fused connection, and also be sure to wire it to match the Polarity on the Zamp port. I put a matching ZAMP port on the pump case, and build the fused connection cable out of a pair of fused SAE solar cables. The fuze is closest to the Oliver's ZAMP port for safety. (Zamp also sells an excellent "replacement" cable that could be used for the project.) ZAMP Solar Port Polarity is reversed from typical SAE Connectors: Zamp wires their solar ports in a way that the + lead on the solar cable coming from the solar array is into the plastic covered end of the cable. (That's opposite normal SAE use. They do this to protect users from plugging into the solar array and touching the male exposed connector.) Here's a basic material list (if you want specific part numbers of connectors etc. PM me on the forum.) I bought all of the material from the combination of Ace Hardware, Harbor Freight and Amazon. Total cost $190.73 1) Case: $39.00 Apache 3800 Transit Case - : Harbor Freight ( Interior Dim: 14 7/8"x10 5/8" x 6 1/8") Fits pump perfectly bolted into the case without the bottom foam. 2) Shurflo Pump model 4800, $72.00 - : Amazon/RecPro 3) Inline Shurflo Filter Model 15-085-00 included with pump - : Amazon/RecPro 4) Basic Fresh water hose (white) - $17.00 : Amazon cut to use short pieces for pump connections and used the other pieces as the input side hose (with a rigid piece of 1/2" pex as the drop lead) and outlet hose with repaired male end connector. 5) Qty 1 - Inlet side Female Swivel Garden Hose Connector (barb connector style) $1.50 ea - : Ace HW 6) Qty 2 - Male Garden Hose Connectors (barb connector style) one used on outlet, one to repair the outlet hose. 7) Qty 4 - 1/2" stainless pipe clamps - $4.00 : Ace HW 8) Qty 2 - SHURFLO (244-2926 1/2" x 14 NPT x 1/2" Barb Straight Wingnut Swivel Adapter - : Amazon 9) Qty 1- Zamp Waterproof Solar Port - : Amazon 10) Qty 1 - SPARKING 6' SAE To Ring Terminal Harness Quick Connect/Disconnect Assembly & 10A Fuse + SPARKING 2' SAE Quick Connect Harness (this is to make the other side of the cable) - : Amazon 11) Qty 1 - Fastronix SPST HD 20 Amp AC/DC Toggle Switch with Weatherproof Neoprene Boot - : Amazon So here are some pictures of the finished project in the transit case. Case in closed ready for travel position: Case opened to show hoses and electrical connectors stored inside: Contents removed so you can see the pump connection setup: Hoses and electrical connectors shown beside case: Handle side shows DC connector (that matches the ZAMP port wiring) and on/off switch: Inlet side: Outlet Side: Assembly comments and learnings: 1) Pump body - originally I was going to mount it onto a pvc board but found that the depth of the transit case and height of pump worked out better if I could simply bolt into the case. I used 4 bolts with baking washers to secure the pump into the case. 2) Port locations - I tried to figure out a way for the ports to exit out the handle side of the box, in fact I bought some elbow connectors for the pump, but quickly found that they interfered with the closure clasps. As a result I went for a simpler straight side to side flow. 2) Electrical Switch Location - My initial hole for the switch ended up interfering with the closure clasp once the switch was installed and in the ON position. I decided to plug that hole with an automotive plug and move the switch mounting down a bit further. (See handle side view.) Pump Performance: 1) I used the pump yesterday to pump a 6 gallon container of my tank sanitizer solution into the fresh tank. The pump operated smoothly and the 6 gallons were pumped into the tank in 58 seconds. (The pumps spec is 3 GPM ...so it met that spec.) 2) I also tried the pump on the street side water inlet, and the pump would cycle on and off as I turned on and off the sink faucets. So another use is to hook it up to a bigger bladder tank external and use it as the main water supply. (*Note - The pump has a 55PSI max, and is factory set for 45 PSI working shutoff pressure.) The case stores nicely run the Oliver Elite II basement on top of my water filter holder. Possible upgrades: 1) I might add a stainless vent pair on the box so I can run the pump with the box closed. The vent would allow for airflow in/out and adequate cooling space around the pump body if running for a longer time. 2) Build a Zamp (SAE) to Anderson Connector so I can plug this into my truck power port's that I'll install this summer. 3) Try running this pump off of a small rechargeable 12v Lithium Battery bank. Make up appropriate 12v connectors. Questions and comments welcome. Craig Short Hull 505 - Galway Girl
- 9 replies
-
- 18
-

-

-
Remind us what sensors you have for all this spaces? Craig
-
The tank upgrade is in prep for an Alaska trip in the future...and will save us having to more than one jerry can for backup.
-
New Trading Cards - Hull 505 - Galway Girl
Galway Girl replied to Galway Girl's topic in Introduce Yourself
Trainman, Thanks for the feedback. When I started, I was thinking of examples from older QSL- ham call sign contact cards. They often show ham's gear, sometimes the antenna farm and in other cases a pix of the operator and the call sign. This is my first attempt at a card aimed at establishing a more email / web contact. I kept personal pictures off the card and focused on our contact info and "web page" access up front. In the web pages, you'll find we are in some of the camping photos in the website, so if the person goes to look at the blog pages, that will help them remember...and they'll see all kinds of extra detail about the trailer as well. CS -
We also use AccuRite 3 zone as stated above and as shown in our blog here: https://4-ever-hitched.com/ggs-blog/f/keeping-gg-safely-warm
-
BlueHighways> From experience, yes indeed, make sure you back up a set of .ABT files before you do anything. Also you can to to the Ford Support Pageand get the "AS Built" .AB file for your truck by VIN #. https://www.motorcraftservice.com/AsBuilt That .AB file can't be directly imported in total on one go, but it can be imported at the module by module level in Forscan to perform a reset back to original if things for each module if things out of whack. For example, you would go to the Instrument Control Panel module, load and write from the ford .AB file, and Forscan will parse the data and load just the Ford Original ICP data. (I had to do that because I fat fingered some data on a line.) Also be aware 2020-21 was a key year when Ford changed the formats for the As Built codes. This was because starting in 2020, they added MORE computer/control modules...so the line numbering changed in the file structure for official Ford .AB files. Now we must be careful to look for the appropriate year AS BUILT spreadsheets. Some of the older 2017 lines still work, but many other don't in 2020/21 models. Craig
-
New Trading Cards - Hull 505 - Galway Girl
Galway Girl replied to Galway Girl's topic in Introduce Yourself
John, Thanks for the tip, I just removed the pix with the detail...left one with the QR code. CS -
We are one of the registered Oliver owners who show our trailer to those thinking of buying an Oliver. We created new "trading cards" to hand out as appropriate to visitors and for friends we meet on the road. In this instance we've also included a QR code, which when scanned with a smart phone or tablet will show the link to our blog page where we review various campgrounds, and list some of the many accessories Oliver owners find useful. Please give it a try and see if scanning the QR code takes you to our website: https://4-ever-hitched.com Craig
-
Seems like a great idea John. I assume that the current grill is essentially the cold air return for the furnace? CS
-
I recently upgraded from a 34 gallon stock fuel tank to a 60 Gallon S&B Fuel Tank. The install was into our 2021 F350 6.7L Crew Cab/Short Bed. It fits in midship as shown in the image below from the S&B Tanks Site: As part of the upgrade process, I needed to use Forscan to update the "fuel tank size" so the dash display correctly displayed distance to empty. I now have a scanner, and the Forscan software and have learned quite a bit on how to "safely" make modifications to things like the display settings (added TEMPs to gauges) and the features. Now with the upgraded tank we're ready for the long road trip planned for later in 2021. Here's how the updated range looks on the Ford app...and that's after a 50 mile drive. Any questions just ask. Craig rs=w-1280.webp
-
Jensen TV/radio audio cutting out from HDMI input
Galway Girl replied to nrvale0's topic in Mechanical & Technical Tips
Very creative solution....Thanks for posting. Hull 505 - 2019 EII - Galway Girl C.S. -
Winter heating with a small electric heater
Galway Girl replied to Carl Hansen's topic in General Discussion
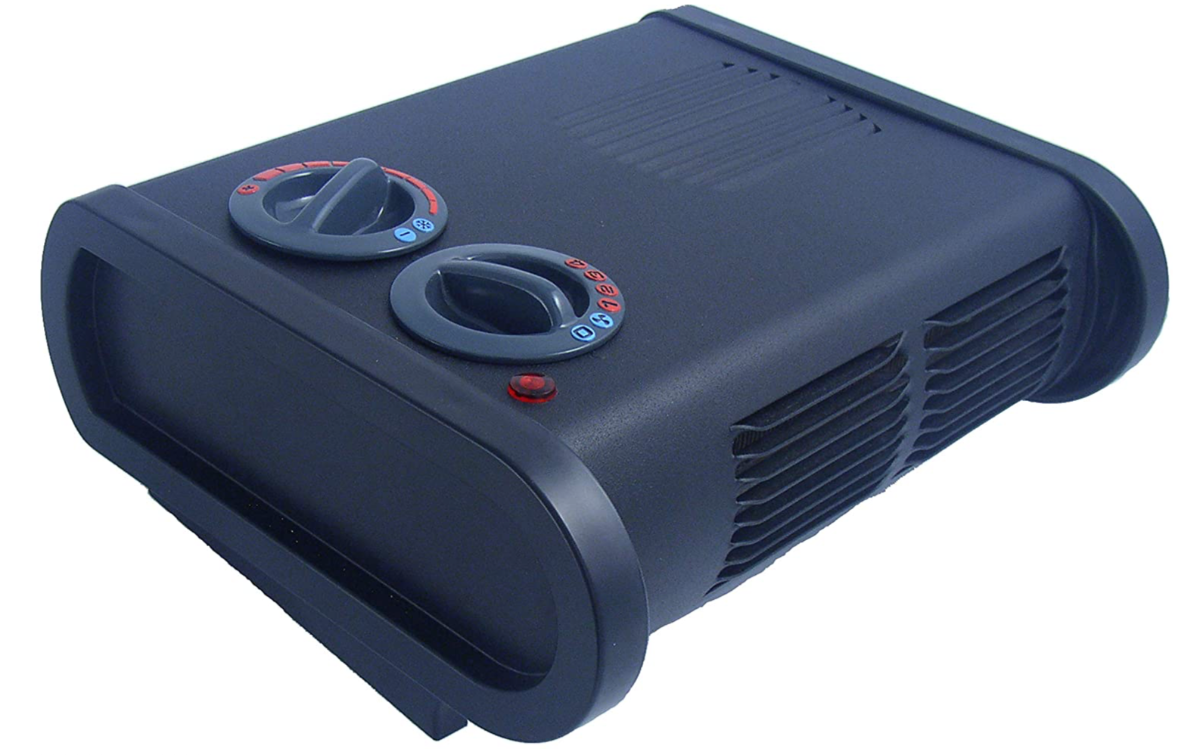
FWIW- We use this low profile electric heater from Caframo - True North model 9206. Caframo is a Canadian Manufacturer typically you see their products like fans and gear in the boating world. True North is a small low profile heater, and that means it doesn't get tipped over (but has a shutoff if it does). We find it's pretty quiet even at higher speeds. (Not as quiet as our Vornado, but we find this heater puts out more heat as well.) It also has a setting for long term storage. If set to the temp dial to the blue "Snowflake" setting, when the temp drops below 34F it comes on to warm back to 40F automatically. That's how we used it in our boat to keep it dry in winter. We've used it for 2 years...but had one in a boat for about 5 years and they worked flawlessly. You can see a bit about it in our blog post here: https://4-ever-hitched.com/ggs-blog/f/we-love-our-caframo They are on our Oliver Outfitters list on amazon as well. Craig
-
I have confirmed that Disney uses Lithionics batteries in their ride vehicles and other attractions as they are one of the safest, rated battery makers in the US. For example, their new ride, Rise of The Resistance vehicles are using custom designed Lithionics batteries and they are run all day long, and recharge at a docking port. I'm excited to see them coming in 2022 models and would consider doing a Oliver Service upgrade if they come available.
-
Outside we use a 3 stage outboard filter from Clear Source which includes: Stage 1 Sediment, Stage 2 Block Carbon and Stage 3 a 2 u finisher. Inside we're using a Burkee Travel size.