Ollie-Haus
-
Posts
456 -
Joined
-
Last visited
-
Days Won
16
Everything posted by Ollie-Haus
-
BTW if anyone is interested in adding solar to a tow vehicle, camper or even a portable system, Renogy is offering pretty big discounts this week on everything they sell. Also most of the name brand lithium battery bank manufacturers are offering big discounts on Amazon.
-
Well fortunately for me Oliver did most of the thinking. My DC-DC will simply allow direct charging of my factory lithium batteries while the truck is running. It does require a heavy gauge Anderson connection be added from the trailer to the truck, but that been a planned addition to the truck from the time I ordered it. The charger install and connection to the batteries is pretty straight forward. The solar panel connection from the truck to the camper would be another connection at the bumper to the camper, probably just a simple SAE plug on each end with a 4' tether that would make the connection if and when I need to use that capacity. Obviously while at the camp site a longer tether would allow parking the truck in the sun and connecting to the trailer for a boost in solar output. The trailer side of this would be connected to the batteries the same as the factory supplied aux charge port, with the solar charge controller mounted in the truck side of the system. The portable panel connects through the aux port Oliver provided, which also is a simple SAE plug. It's a direct connection to the batteries and requires a charge controller on the portable panels. The Zamp suitcase panel we got with the trailer has the charge controller built in. To answer your question, all this sounds like a lot of stuff, but it's really very plug and play and each part of the system has it's own charge control that monitors battery condition, preventing any part of the system from overcharging the house batteries. Each part you connect and or turn on just adds to the influx of charge until the bats are topped off and the control meters back to a float output. The internal Victron monitor just indicates battery status without seeing the other sources of charge input, but that has little effect on daily system usage. As mentioned above I have yet to install much of this so there's no pics for the stuff listed out yet. As for the truck solar charging the lithium pack in the back of the truck that runs the cooler in the back of the truck, and has a direct connection from the solar panel to the battery pack. I use a Jackery and it like most off the shelf lithium battery packs has the charge control built in. BTW if the Jackery is plugged into the truck for charging while running the truck, the Jackery receives charge from both the truck and the solar simultaneously. I love the Jackery in the truck because in addition to the cooler, we can use it to power almost anything from the back of the truck while out remotely away from the camp site. You just have to decide how big of a lithium pack you need. We went with the middle of the road 1000w Jackery. It's enough to power the cooler for more than a day without taking up too much space in the back of the truck, about the size of a small drink cooler. The Truma fridge is on 24/7 with little attention required. I do monitor it if there's perishables inside and that's through a bluetooth app connection. All in all its a lot of stuff and Money spent, but like you I want multiple options when we are out camping, most of all in anticipation of remote dry camping, "glamping" in the case of an LE2 fitted with all the tech you can get. 😉🍻
-
 I like the idea of keeping the camper cool during hot weather while traveling to the next stop. With the DC-DC charging the bats from the truck, we can leave the inverter on and run the AC on low while driving and when we get to our destination, the camper is cool and the batteries will likely be 100%. No sense letting that alternator capacity go to waste.
 -
That's my long term plan as well. I've yet to install my Victron DC/DC charging system, a project for next summer. When I do that I'll add trailer front connections as well for the truck solar panel to supplement the Oliver solar. And ours came with the solar port at the battery compartment and we got the portable panel so we would be able to charge at ~800 watts on good days. Can't wait to get it all put together and run some tests.
-
Hi Steve and welcome to the forum. Although the company designs the campers to withstand colder temps, they are by no means designed for arctic temperatures. But if you are in temps in the teens or above, the camper is going to do fine with a few precautions. Of course that's providing you run the furnace continually and are prepared for the unexpected. Propane supply would be critical and a back up generator and space heater would be a smart idea. There are some slightly vulnerable points in the basement utility space on the street side that need to be monitored. Other than that, they actually do pretty good. Of course if you choose a composting toilet and winterize your water system, you can actually do just fine in colder temps without worry. One thing you will learn with research is that there's very few if any mass produced RVs on the market that are designed for continuous use in frigid temps. And even the opposite weather conditions can be a challenge for many RVs on the market. We camped in north Texas late this summer and temps were in the 100+ range each day. Most of the campers in the park were struggling to maintain comfortable temps inside their RVs, many of which had 2 or three AC units on the roof. Our LE2 with the Truma Aventa stayed comfortable inside regardless and the AC compressor would cycle like normal when it reached temperature. We have yet to need the higher fan speeds to maintain comfortable temps inside the camper. A nice thing about the Elite 2 with the Lithium Platinum package is that with the large battery capacity and the 3000 watt inverter, you can still run the AC for an hour or two before bed to sleep in comfort even when dry camping, provided you have good sunshine during the day to recharge. We've experimented with this several times this summer and the system works great in that way. Few other campers have a factory available system that compares. Anyway you're in the right place to get honest feedback from owners regarding their experiences. Most of us are just ahead of you on the same path. We wanted one good camper that would fulfill our needs with as little trouble as possible and not look back. Stacie and I are convinced we made the right choice. Good luck in your research.
-
Of course each manufacture will have mounting recommendations for their particular panels, so obviously do your homework first. Not meant to be a correction John, just caught me off guard and had to go back and double check my method. 😳
-
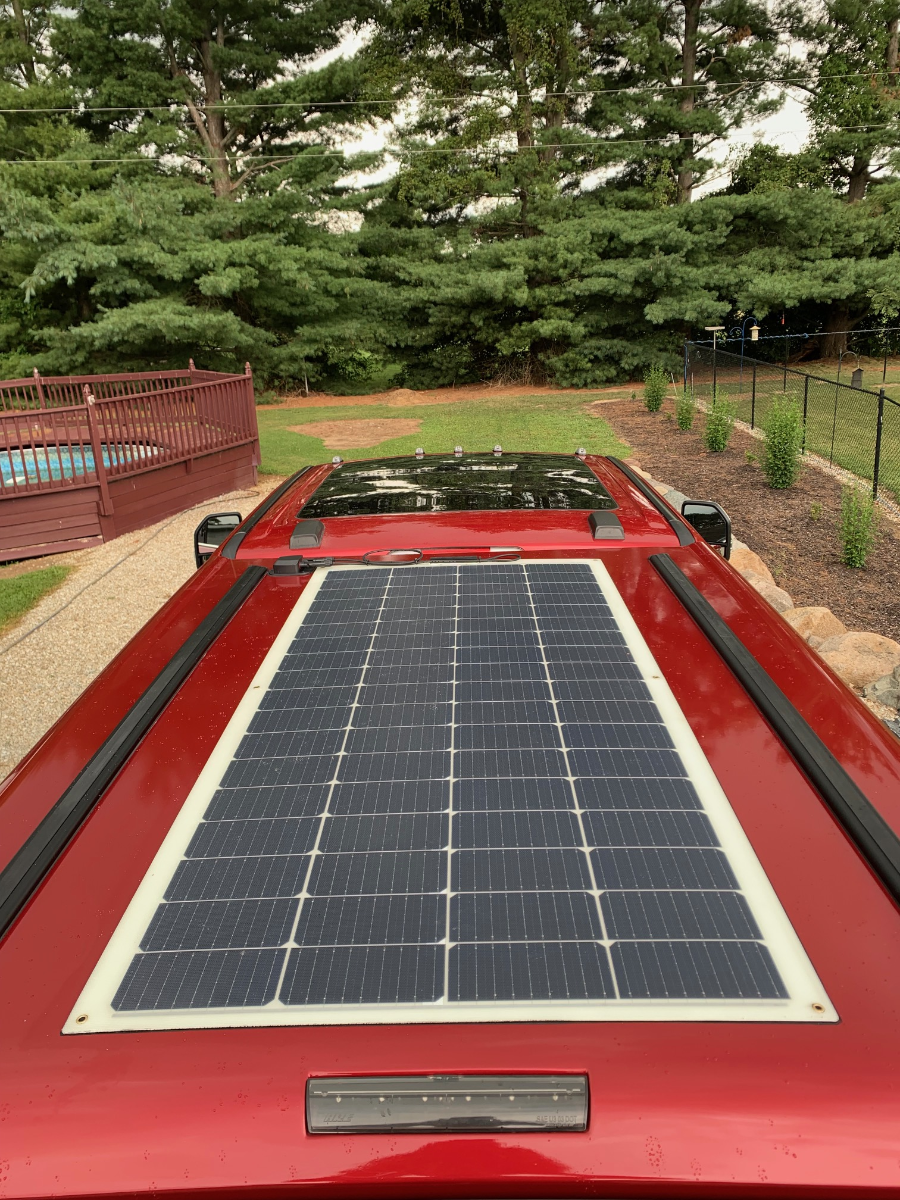
That's interesting because Renogy recommends mounting with silicone adhesive directly to the roof of the boat/RV. And they recommend this to eliminate the need to drill holes in the structure. They also say they are designed to operate normally up to 176 deg. and carry a five year warranty under these recommendations. I'm not saying they're impervious to heat damage, but according to this company, there flexible panels were designed for exactly this type of application. I purchased the 200w 12v Renogy Flex panel for my charging needs for a lithium battery pack in the truck that runs my portable fridge/freezer. I'm quite pleased with the installation and function so fare. My biggest worry was whether the panel would come loose with thermal expansion and contraction. Time will tell on this front but since the camper shell is fiberglass resin construction and the Renogy panel is as well, the rate of expansion and contraction should be similar. And the silicone adhesive remains flexible when set up so it does allow a margin of flex. We'll see. I only used a 3/8" bead around the perimeter. Once rolled flat it probably spread around and inch wide squeezing out to for a nice bead around the perimeter. I think flexible panel technology has come a long way like so many other types of technology. I may be a test case for direct mounting but at least I have a 5 year warranty backing up the experiment. Here's to trusting the manufacturer's recommendations. 🍻😉

-
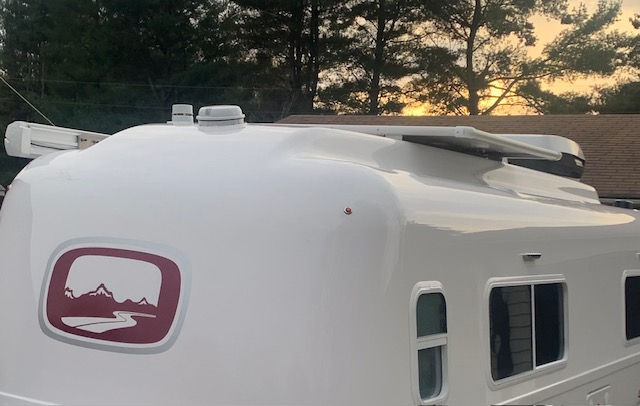
One area in ours that appears to need extra "R" value is behind the fridge. With the new Isotherm 2 way fridge, there's no need for ventilation to the outside, and yet the '23s just have a thin plastic cover behind the upper vent on the outside. Depending on outside temps, the fridge can have some pretty big temperature swings because of the fact this space behind the fridge is pretty much subject to outside temps. This morning the fridge was off and yet the sensor inside read 20 degrees. This was with a cabin temp of 63. I know it would be different if the furnace was running, but in the summer this space gets quite warm and on some days the fridge struggles to get below 40 deg, and that's with the AC keeping the cabin at around 72. It wouldn't take too much to bring that space under a better level of control.
-
We hit 17 deg f. last night in central Indiana, with a high of 26 today. Checked the sensors in the Oliver on my phone and cabin was 63 with the space heater working fine. Glad I winterized because both basement spaces were reading in low 20s this morning. Before we winter camp with water in the systems I will install provisions for circulating warm air through these critical areas and set the sensors up to notify me when they hit the 40 deg mark. Without the furnace heating the cabin we have no heat being produced in the basement spaces. But in case of a failure you still have to have a plan. At the very least we would want to have time to drain and pump some anti-freeze through the system. I think a decent amount of addition insulation in key areas will be a summer project next year, followed by an air circulation system to draw cabin air into critical spaces. I do love the Yolink monitors we installed in various locations. It's nice to be able to monitor temps inside and out in a moments notice from anywhere.
-
Show us your furry traveling companions..............
Ollie-Haus replied to Ollie-Haus's topic in General Discussion
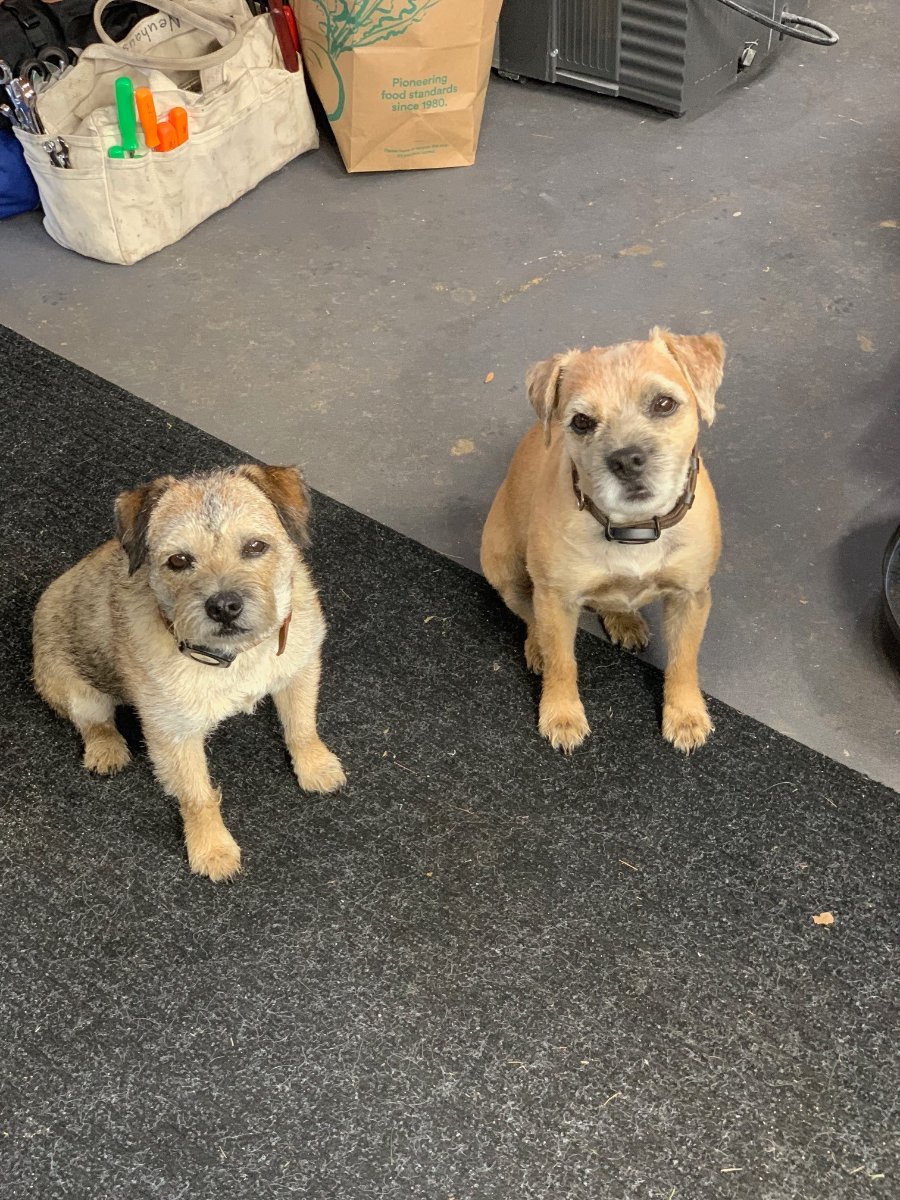
Looks like a Terrier/Papillon mix.?? Cool little guy! Thanks for sharing. -
Black Friday and Cyber Monday deals for campers
Ollie-Haus replied to SeaDawg's topic in General Discussion
Still time for Cyber Monday deals. I put this kit together today for emergency tire changes and more. The little 1/2" impact is amazingly powerful, and the sockets will work for most tow vehicles and trailers. The kit stows nicely in the back corner of the truck bed. Plenty of juice to change multiple tires or just for general use. I had to use a pipe cutter to trim about 3/4" of the plastic guard from the 19mm socket to make it work on the Oliver rims, but that piece can be left on as in the picture for other uses. https://www.northerntool.com/milwaukee-m12-fuel-cordless-stubby-impact-wrench-kit-1-2in-drive-250-ft-lbs-torque-2-batteries-model-2555-22-72955 https://www.amazon.com/gp/product/B0C98ZHKQX/ref=ppx_yo_dt_b_asin_title_o01_s00?ie=UTF8&psc=1&tag=fordtremor06-20
-
"Starlink-Mobile" Project Proof of Concept...
Ollie-Haus replied to MAX Burner's topic in General Discussion
Love the flag pole mount concept, we have a similar pole configuration. How is the coax routed up the pole? Just wonder if the flag will get caught up in the wire. I was considering the same type of mount only for a shortwave/GMRS base antenna setup. -
I can absolutely appreciate the durability of the panels, but my original intent was to create a permanent solution to protecting our Calmark cover from the sharp edges of the panel frames, and make cover installation easier. Turns out both were accomplished and the aesthetic improvement was a bonus. But by no means does every owner need this. I thought if it worked for us maybe others that use a storage cover would want to have the option. The whole project cost under $100 with the Formufit brand furniture PVC ordered through Home Depot. It does take a little patience and carpentry skill to cut and fit the assembly to the panels, but once complete, it only takes a few minutes to install or remove if you ever need to.
-
We just adopted Ollie hull #1147!
Ollie-Haus replied to Heather and Eric's topic in Introduce Yourself
Welcome to the Oliver family. Sounds like you guys have lots of fun times ahead. Hopefully you can plan to attend the annual Owners Rally next May. You’ll meet lots of other owners and have a lot of fun. It’s the week fallowing Mother’s Day. -
Black Friday and Cyber Monday deals for campers
Ollie-Haus replied to SeaDawg's topic in General Discussion
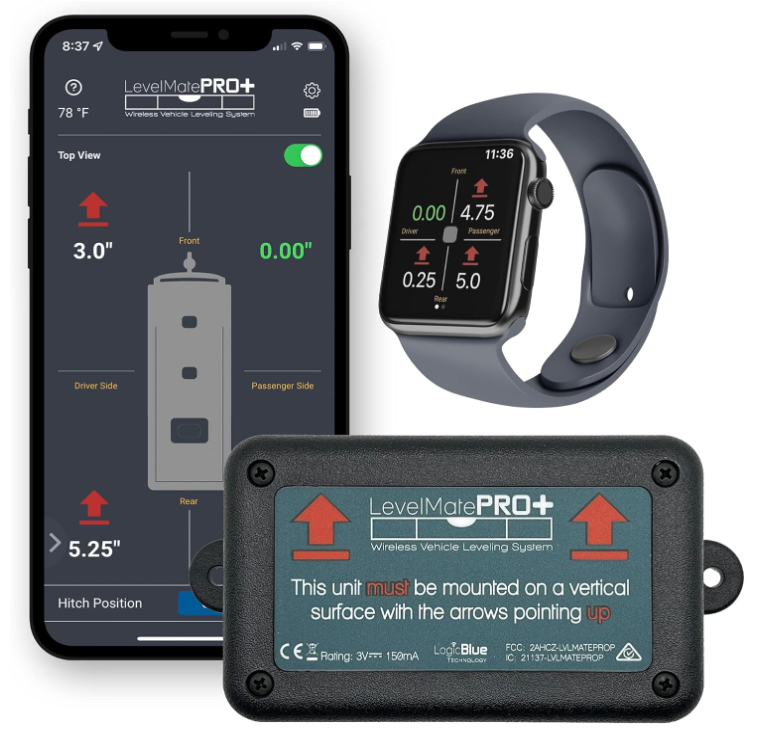
Of course one must have the required tools to actually accomplish the level condition, but the Levelmate Pro tells you exactly what you need to achieve level. We shoot for at least marginally level sites to start with and use the leveling wedges to accomplish the job. Sitting in the cab and rolling into the wedge you know exactly when you are at level. Chock the wheels, unhitch and level the tongue the same way and done. Love it. -
Black Friday and Cyber Monday deals for campers
Ollie-Haus replied to SeaDawg's topic in General Discussion
If anyone has been considering the Levelmate Pro+ Amazon has a great deal going. Love mine, takes minutes to level up the camper when setting up. https://www.amazon.com/dp/B083ZMZPR8/ref=syn_sd_onsite_desktop_0?ie=UTF8&pd_rd_plhdr=t&aref=E1D817237BBAC56D29C60E0FB0F93BD6FAAB932FB1C7E241DD083DED270EED39&th=1
-
Funny you mention the mother ship reference. You'll find a lot of folks have an appreciation for the Olivers, but don't get what kind of folks would spend so much on a "small camper with no slides". All I can say is if you haven't owned one you will never understand. It is a camper designed for a certain kind of camping couple in mind. That's why when you watch the testimonials, those that have an Oliver usually knew from the first sight of one that it was the camper for them. Just an FYI, you will find that some of the manuals posted on the Oliver University have updated versions available from the manufacturer web site. Just a few, but the few revisions contain import information. I wouldn't go looking at this point, but when you have your camper, if something doesn't make since in a manual, just look to see if there's an updated version available. Much of the tech equipment on board gets updated regularly by the manufacturer, so just be aware.
-
welcome to the family. I'm sure you will be pleased with your experience with Oliver the company and the camper they are building for YOU! That's the hardest thing to realize when going through this process, that you placed and order for a camper and Oliver has your name on it from the moment you sign your agreement, and that lasts for as long as you own your Oliver. This is hard to grasp especially if you've had multiple poor experiences with campers and dealers in the past. Either unfortunately or fortunately most Oliver owners have had many of the same experiences, or know of them first hand, and that's why they are now Oliver owners. They didn't give up on camping and their dreams, they just figured out the best way to make it a rewarding experience. BTW, if you have paid your initial installment and they have you on the build schedule, you have a VIN and a Hull number. Ask your sales rep to get that information for you. We worked through Josh White and he forwarded those numbers to us as soon as we were added to the build schedule. This is useful as you can get insurance quotes and other important information if you have the VIN. It's easy to get caught up in the excitement of the moment come delivery day. Just try to stay focused, there's actually much to do now until that date arrives. And go in knowing that these are still built by people trying to keep up with a production schedule. Mistakes happen and flaws get missed during QC processes. Oliver will make anything that needs attention right, and you will be their priority when you are there to pick up your camper. Try to allow time in your schedule to go through a good shakedown while in Tennessee. And anything that is found later is still important to them. Also remember its a high quality camper but they still have to rely on the quality control of their suppliers. Things still break. Oliver will help make it right if it does. Congratulations and enjoy the experience. It's unique to the industry just as the camper is unique in every way. Make sure to sign up for the owners rally in mid May. It's a great experience and you will make a lot of friends.
-
I ordered a set of parts from Formufit and I may assemble the frame with the materials as received and than make my cuts. If you cut the material first it collapses slightly and then probably wouldn't solvent weld very good. My first frame I built with screws only because I recognized the the changes after cutting as the joints fit very loose, requiring a few more screws than I had originally planned. Now that I know the precise dimensions for my tubes I could solvent weld up the frame, let it set a day or so and then add a couple flat head screws at each joint with the nylon locking nuts on the back side, then make all my cuts. I haven't determined in my mind if this is the best approach but may give it a go. If I do I'll post a more detailed account of the build and installation.
-
Show us your furry traveling companions..............
Ollie-Haus replied to Ollie-Haus's topic in General Discussion
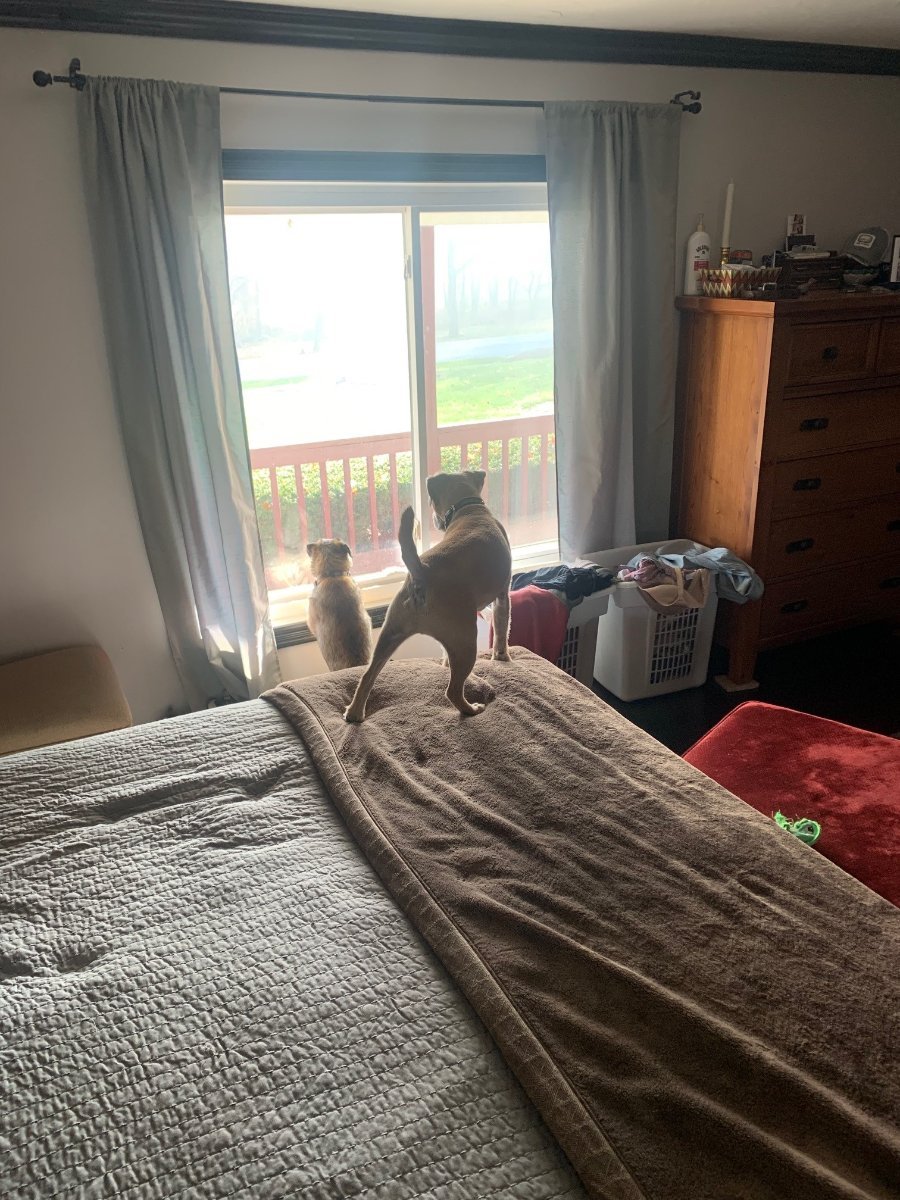
Love all the great pics and stories folks are sharing. Keep them coming and everyone jump in and share your pet joy! Morning squirrel watch currently: Freshly groomed for the Fall season the other day:
-
Correct. It was a simple channel jig 60" long and the space between the 2x4's was the width of the pvc. I clamped the pvc on each end with a small C-clamp and used a simple battery circular saw with a carbide blade and a rip guide set to the right cut position. It cut the pipe like butter and very clean. The front and rear pieces need a 1/8" deeper cut on the bottom side to allow clearance for the panel mounting frame/legs. The corners I actually cut with a hand held oscillating cutter. I laid the corner piece flat on the table and held it firmly with one hand and used a spacer to hold the cutting blade the correct height off the surface of the table. The blade cuts the pvc easily. I realize this is just bits and pieces of information but it's the primary information you need to get started. There's more than one way to go about the fabrication and I already know I would approach it a bit differently if I built another one. If you have more questions, just pm me and I'll try to fill in the gaps.
-
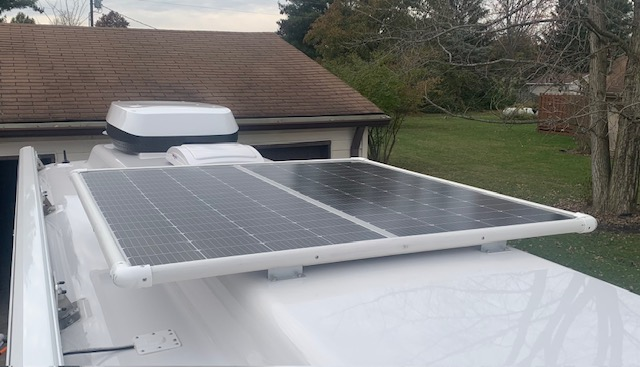
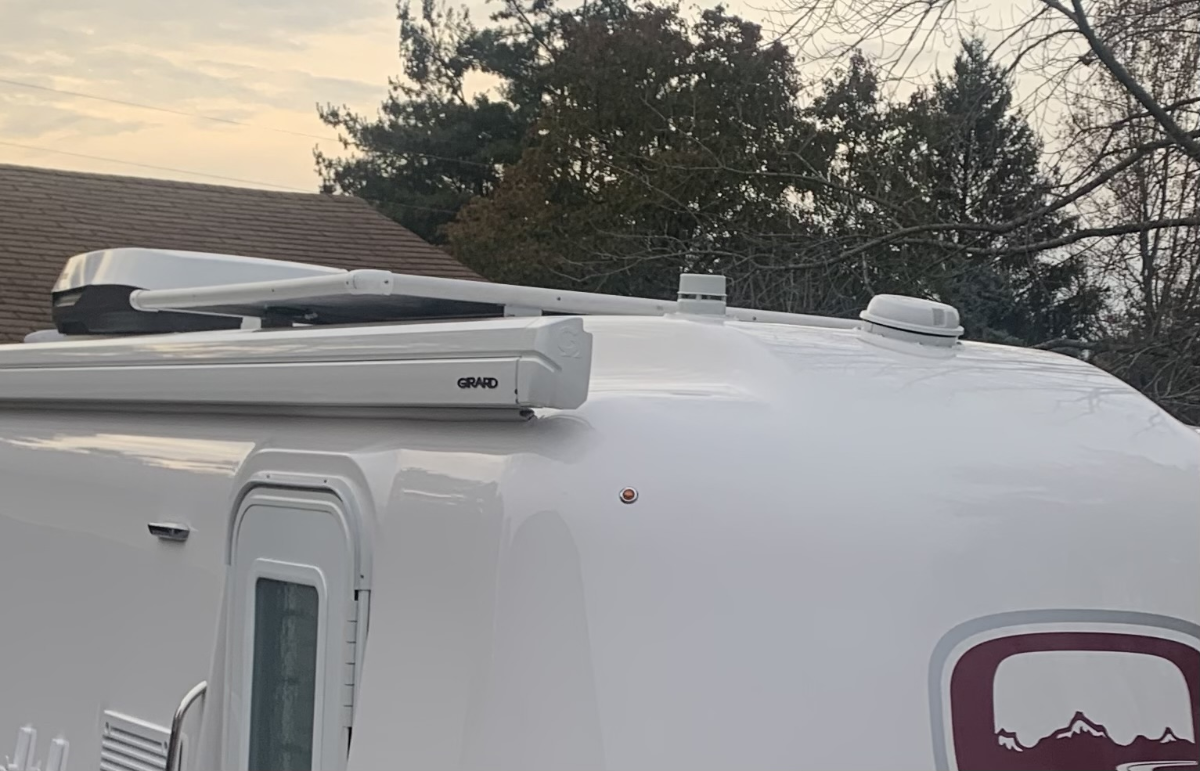
So I've spent a little time researching this evening and there's clearly a product that's perfect for this project if anyone is entertaining a pvc guard to your solar panels. Formufit is an American made furniture grade PVC product line that's UV inhibited and has a much higher strength than standard PVC pluming pipe. It has a nice glossy finish that matches the fiberglass on the camper. You can get it direct from the company, Home Depot or even Amazon. For this project you would need 4 pcs 1-1/4" tube 60" long and 4 pcs 1-1/4" 90 deg. elbows. https://formufit.com/
-
Along with a fresh wax job, that pvc frame made installing the caver very easy. Started at the back and unrolled towards the front. Then stood on the bumper and pulled the cover back and down until it was centered on the camper. It was so smooth and slippery the cover just glided into position.
-
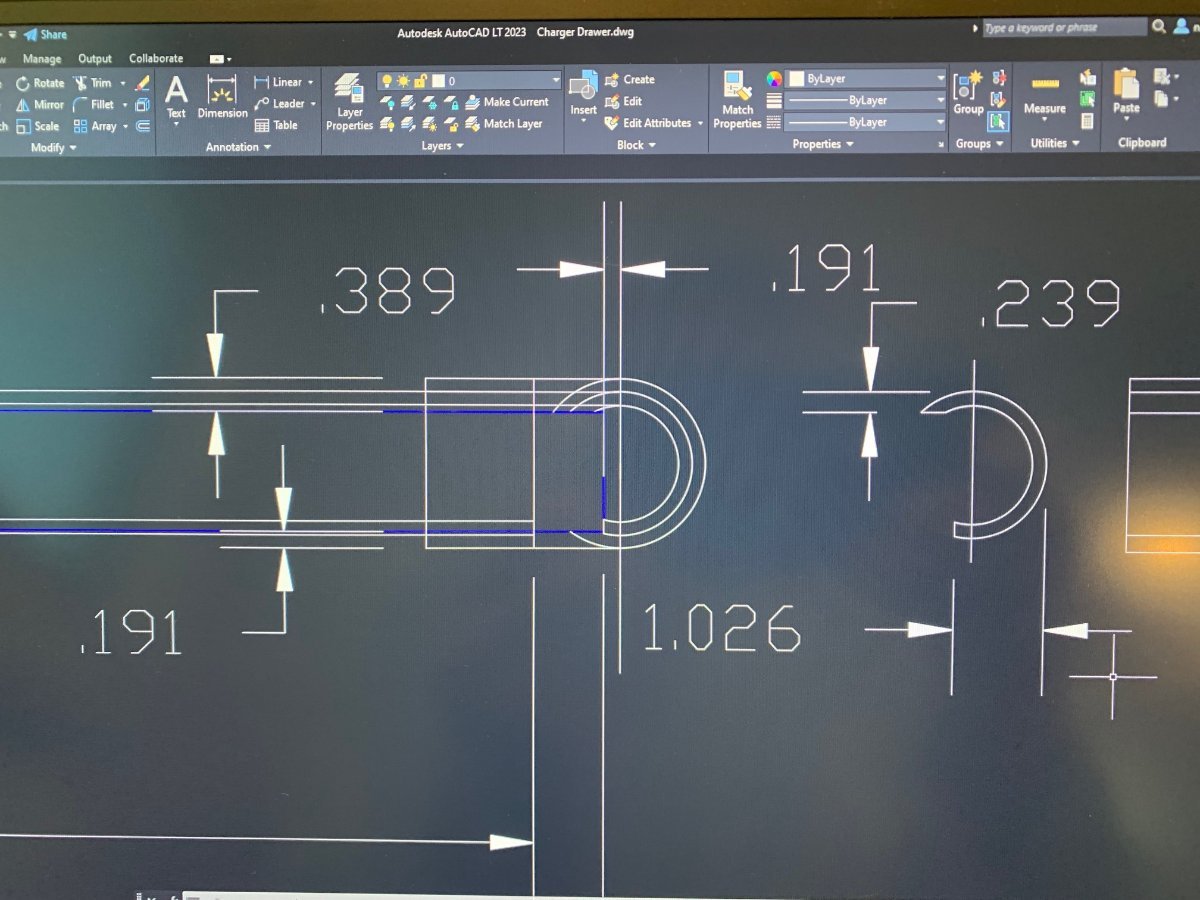
Thanks John, and I appreciate the tip on preserving the integrity of the material. Per the link you provided I think I’ll paint the frame with a PVC furniture paint. Like any PVC you buy at the big box store, this has scuffs and stains on it so it’d look better painted anyway and would shield from the sun. Regarding the CAD software, I subscribe to AutoCad LT. I believe it’s around $400 if paid annually and there’s no contract. If you let it expire you retain your account and can renew at any time. You also have the option to pay monthly at a slightly higher cost if you only want to use it occasionally. I don’t know if it’s Mac compatible. There are other 2D and 3D software products out there that are cheaper but being an old dog I didn’t want to have to learn a new system. It works for my needs. Oh and you can transpose the image colors when printing.
-
In the interest of making the solar panels much more cover friendly, as in Calmark storage cover, and to just add a touch of finished look to the panels to match the color of the Oliver, I fabricated a permanent guard from 1-1/4" PVC pipe. It's notched out such that it just sits over the perimeter of the solar panels and fastens through the panel frames in 6 locations. No need to remove, but if the panels need service it takes about 10 minutes to remove in one assembled piece. I'm sure not everyone's cup of tea but I think it serves the purpose well which it's intended. I made a straight jig out of a 12"x60" piece of plywood with two 2x4's attached to hold the pvc rigid. I used a guide on the side of a circular saw to cut the pvc into the needed profile.
- 17 replies
-
- 10
-