DavePhelps
-
Posts
403 -
Joined
-
Last visited
-
Days Won
21
Everything posted by DavePhelps
-

Cold weather camping and traveling...
DavePhelps replied to Mike and Carol's topic in General Discussion
Mike and Carol, these are good questions and I hope other more experienced Oliver folks will chime in as Winter can be a great time to be out traveling so long as the roads are in good shape. Driving home last March from Tenn. we encountered mid 20's temps between New Mexico and Eastern Oregon. At RV camps w/hookups, we always disconnected the water hose each night and switched to the on-board tank and pump. This is best all around as even with a heated hose, the base of the frost free spigot will freeze and that could potentially damage it. At night, I always left the water heater on as well as it is more exposed to the exterior. In fact, it is very well insulated on the interior side, by design, to prevent heat loss. But the flip side of that is that no interior heat from the trailer will keep it from freezing if it is turned off. The legality of driving with the propane turned on varies state to state. I tried it for a while but finally decided it just was not a safe practice. That's something you need to decide for yourself. When driving, I turn the fridge to DC and let the batteries keep it cold. Since you are driving, and not in the trailer opening it very often, and it is COLD outside, we had no issues. This worked well even in the summer when it was hot out. When driving, the DC power comes from the Tow Vehicle and we always arrived at our destination with full on board batteries. As far as the furnace goes, that's not an option for us, but it would have to be really cold out for a moving trailer to freeze up in a days worth of driving. What with everything sloshing around, the tanks being enclosed, and the trailer being somewhat insulated. How cold is really cold? HaHa! I suppose one of us will find out someday! But I would dare to say that you would have no problem with the temps you described. We had no troubles in the mid 20's at night. Although daytime temps did warm up to the mid 30's, so that is potentially warmer than what you will be experiencing. Use your laser temp sensor ( you have on right?) to spot check the tanks and vulnerable fittings like the brass backflow valves, etc.. Hopefully, the more experienced will have something to say about this because it's important to know the limits of your equipment. Chains??! Man, that would be awesome but I'm not quite there yet! Have a safe trip. Dave -
Steve and Tali, This is a pretty good description of the conversion I stumbled on to: http://roadslesstraveled.us/trailer-electric-over-hydraulic-disc-brake-conversion-fifth-wheel-rv-upgrade/ I would much rather have disc brakes myself but may wait a while and see how the stock drum brakes work out. So far, they're just OK. The hard part will be finding a good mechanic to do the work and of course coming up with the extra $'s. But they would be so sweet to have, especially for traveling in the mountains (actually, everywhere now that I think of it!). Good luck with your quest, and if you get them, be sure to let us know! Dave
-
Dexter Single Axle Suspension Kit Legacy Elite
DavePhelps replied to rideandfly's topic in Ollie Modifications
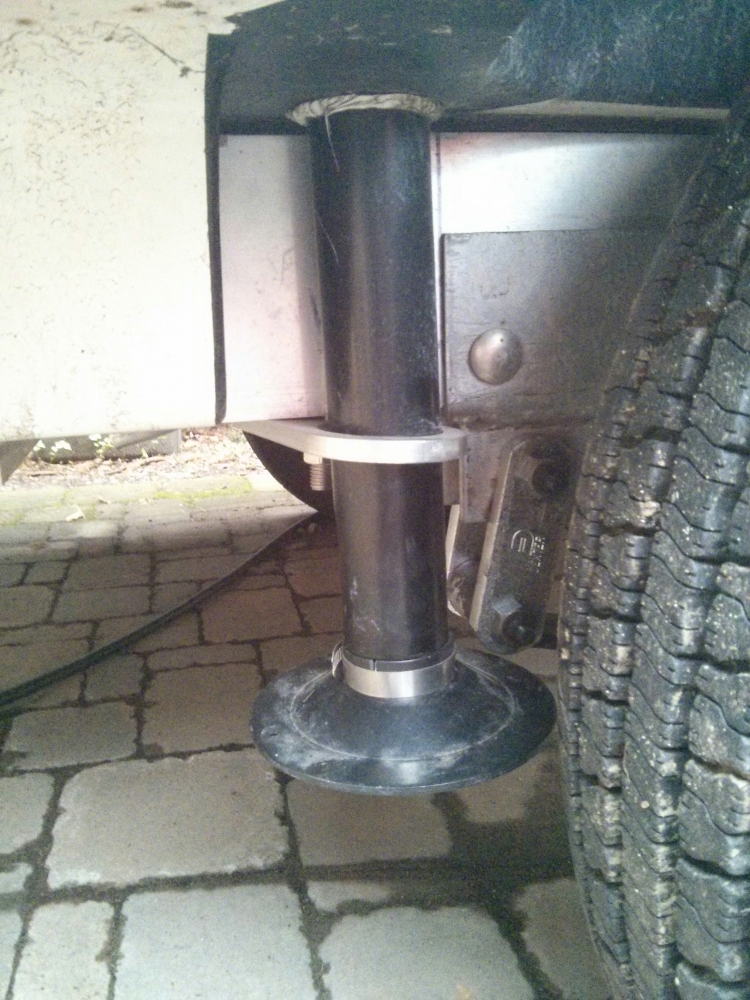
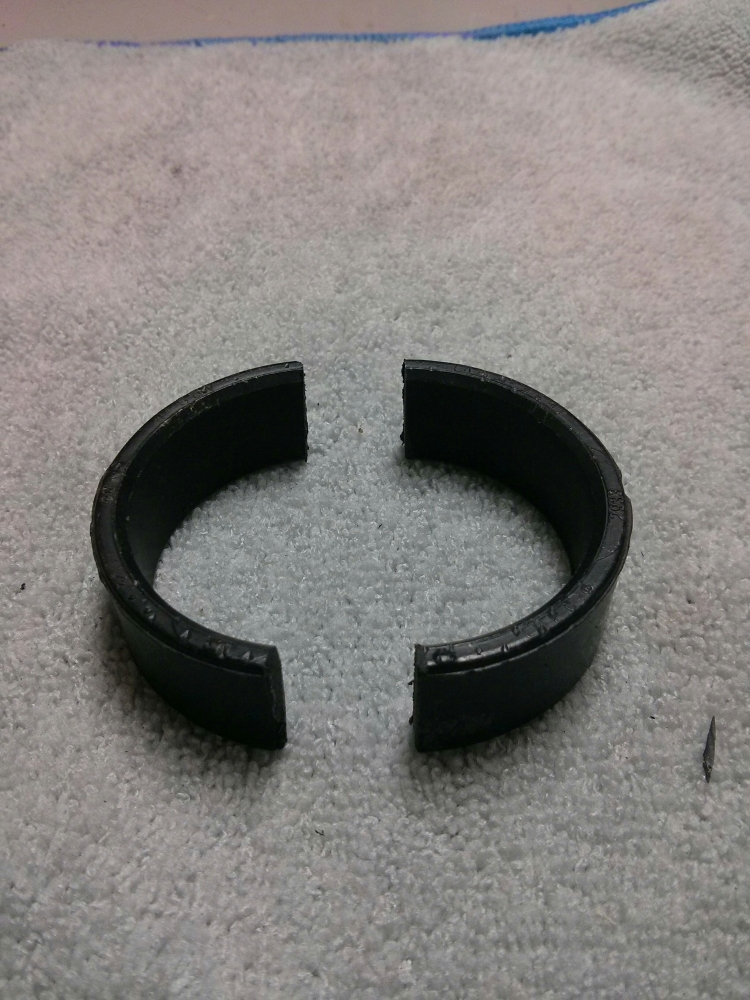
Coy, I finally took a 1-1/2" ABS coupler and cut it in half, which gave me two rings about 3/4" wide. I then clamped the rings in my vice and cut each into two pieces. The ID of the coupler is a bit more than the diameter of the jack rod, but when you cut them in two, the saw kerf reduces their diameter when clamped together on the jack rod. Fine tune with a belt sander or file. I actually made the rings just a bit smaller than the diameter of the jack rod to get positive clamping when I tightened down the hose clamps. The ABS is flexible enough in those small pieces to conform to the jack rod. My jack on the door side of the trailer was installed crooked. Wish I would have caught that during pickup. It leans in towards the tire a bit. Making an already tight situation even tighter.Maybe you can see it in the pic. It is a close fit with the spacers, but I think it will be OK. I've tried to visualize how that shackle will move but don't see how it would interfere or contact the jack pad. If they move at all it would be in a very shallow arch as the springs compress (and lengthen), and the swing length would be pretty minimal. If someone else has a different idea about that, please, I'd sure like to hear about it! Right now, with the spacers installed, my jack pads are 11-1/4" off the ground. I finished off the job by capping off the zerks with a rubber snap cap. They worked great and hopefully will keep the grit out of my zerks. https://www.amazon.com/Brake-Bleeder-Grease-Fitting-Rubber/dp/B01DAVCD3M/ref=sr_1_1?s=automotive&ie=UTF8&qid=1479081388&sr=1-1&keywords=brake+bleeder+screw+caps Not the best pic. The jack pads are actually about 1-1/2" away from my tire! Clearance between jack pad and shackle is 1/4" to 3/8". Pic of the "split ring" made from a 1-1/2" ABS coupler. Hope this helps. Dave
-
Dexter Single Axle Suspension Kit Legacy Elite
DavePhelps replied to rideandfly's topic in Ollie Modifications
Bill, That is a great idea! Yes my jack rods are also 1-3/4" diameter. The stainless split collars are very expensive in that size. I may cheap out and use SS hose clamps on a split piece of black ABS pipe if I can find the right size. It sure will make raising the jacks a lot easier not having to keep looking if I have enough clearance with the shackles. Thanks again. Dave -
Dexter Single Axle Suspension Kit Legacy Elite
DavePhelps replied to rideandfly's topic in Ollie Modifications
Thanks for the links Bill. After all the effort to get the Dexter kit installed, I think I will leave it as is. I really like how heavy duty the setup is. Since the longer shackles that came with the kit probably lifted my rig 1/2" +/-, I'm hoping that will somewhat balance out my levelers not being able to be fully raised. Time will tell! Dave -
Dexter Single Axle Suspension Kit Legacy Elite
DavePhelps replied to rideandfly's topic in Ollie Modifications
Bill, the new shackles have a center to center measurement of about 3-1/8", with an OAL of 4-5/8". The original shackle has a center to center measurement of 2-5/8" with an OAL of 3-7/8". It's a pretty big difference. I was going to measure to see if the new, larger shackles gave my Ollie some extra ground clearance but forgot to measure before the install. I wonder how much those shackles move around while traveling, I can't imagine too much. I want to be sure to give my jack pads good clearance. Those shorter shackles you mentioned would be shorter than the original ones. The new ones are part 018-022-01. Thanks again. Dave -
Dexter Single Axle Suspension Kit Legacy Elite
DavePhelps replied to rideandfly's topic in Ollie Modifications
Well I just installed this kit on my single axle Elite and all came out very well, but it did take some fussing around. The hard part was getting the mounting holes to realign with the spring eyes. There is very little play and everything has to line up just so. Took some messing with the jack and a pry bar to get everything to go together. I cleaned out all the openings in the spring eyes and spacers/bushings with a wire bottle brush, and pre-greased everything before putting it all together. I didn't need the ball joint press noted above, but instead used a 9/16 x 4" bolt with a washer to drive the bronze bushings home. A couple I could almost push in with my hands so this was not a big issue. It's pretty sweet and way heavier duty than the stock setup. I also went with the standard zerk setup as I could get my grease gun on them without going to the 45 degree zerks. I plan to get some zerk covers (little snap on rubber caps) to cover them up since they are so close to my tires and all the dirt and crud that they will be subjected to. One thing that was a surprise is that the shackles are quite a bit longer (as well as twice as thick) than the factory ones. As a result of this, I can not raise my rear leveling jacks all the way as the jack pads will hit the shackle. It is a matter of only 1/2" or less from being completely raised so I'm not too worried about it. I think there is still plenty of clearance back there. Everything is pretty tight on the little Elite! Very glad to have done this. Especially as we will be on a lot of rough unpaved roads. Dave -
What you are seeking is a horizontal alignment between your TV and trailer. Level is nice but hard to achieve in the field. What you need is a flat surface (does not need to be level) between the front tires of your TV and the furthest rearward tires of your trailer. When hitched, look at your setup and sight down the middle seam of your trailer (or any prominent horizontal line) and compare it to the same on your TV. The lines should be parallel or very close to it. Both should also be parallel to the ground. You can measure or just go by eye. If you have to measure, level your trailer as you mentioned, stick the dumb end of your tape measure up in your hitch (where the ball would go) and measure down to the ground. This is the same measurement as the top of your hitch ball should be on your TV. Be sure to allow for your rear end dropping when the trailer is hitched up (tongue weight). My E-250 drops about 1-1/2", half tons will probably drop more. Sounds like you may need a ball mount with a shorter drop. Important to note however that if your TV is really squatting (low in the rear) under the load of the tongue weight, you need to address this first, as your TV should be parallel to the ground , or close, while hitched. Only then can you proceed with the rest of the process. Hope this helps. Dave
-
Raspy, I have a 2015 Elite, and it has the 5200# Dexter axle. My trailer has about 4000 miles on it and I recently did a bearing repack and brake adjust (that's a different story), so I think the brakes should have worn in by now. When I picked the trailer up at Hohenwald, I could not get the brakes to lock up there either but I didn't understand enough of how they worked to bring it up, and no one asked either. Now that I understand how they work a little better, I was hoping the brake adjust would help, but it hasn't. I also had to get a new controller as the first one was defective! Ugh, it has been a process! Since I don't own a multimeter, I can't measure the voltage arriving at the magnets while braking, which I assume should be the same, or very close to what my controller is set for. There could also be a grounding issue somewhere. That tester John mentioned does sound good, but I think I need to find a friend who has a meter to do a more thorough diagnosis. Either that or take it to a brake specialist and let them look at it. Though I'm still searching for a good RV mechanic I can trust with my Ollie. Dave
-
John, Thanks a bunch, I'll be ordering that Tekonsha tester. Dave
-
Thanks everyone. John, would not a multimeter tell me everything that this tester would? I know that a multimeter is more $, but it has the advantage of telling me the voltages that are present. Don't have a meter yet, but maybe now is the time to get one. What do you think? Thanks. Dave
-
I have been feeling that my brakes could be much more assertive when braking. I am using the Tekonsha P3 controller. Since this is my first experience with controllers, I have been learning on the fly. According to the setup instructions that came with the P3, by incrementally increasing the voltage from the controller to the brakes, I should eventually be able to lock the brakes up using the controller's manual control lever. Then, I am supposed to back off from that voltage for best effect. My problem is that even at the highest voltage, I cannot get the brakes to lock up. So I'm wondering if any of you have gone through this procedure and were able to lock up your brakes during the setup phase of your controllers. I have not yet taken a multimeter to the brake magnets to see if they are getting the proper voltage but I suppose that is the next thing try. Someone mentioned that some brakes are designed to never lock up and I'm wondering if the Dexter brakes are like this. Thanks for any advice. Dave
-
Don, Perhaps this is not vital to do, but after having the 'city water' back check valve freeze and break while at the factory (luckily we discovered it before leaving), I would not take any chances. Any air you blow through the black tank rinse port will just blow any collected water in that line into the black tank. No need to open the gate valve as the air will just exhaust out the vent on top of the trailer. Shouldn't take but a few seconds to blow that out. Dave
-
Grayson, since the water supply outlet of the water tank is set slightly above the bottom of the tank, it is very hard to completely drain. Certainly it will never drain completely when the trailer is level. I have to tip mine up quite a bit to get most (but not all) of it out. See the pic I too was told not to use the onboard jacks for extended periods of time, so I'm going to make some wood ones from scrap. I believe the best place to locate them is directly under the spring/axle connection and not just on the axle tube. You guys with the dual axles might have some more figuring to do. Don't forget to blow out the black tank rinse inlet. I will probably also unscrew the exterior shower head and blow those lines out as well. Luckily here in Portland, we don't get the prolonged freezes that you folks up in the NE get. Thanks to Buzzy for getting this thread going. You've put down a lot of good info and it's appreciated and a great help to all of us new to trailering. "Belt and suspenders"... it's a good thing! Dave
-
I don't have a cargo door on my Elite, but on my battery box door there is a cable. One side is riveted to the trailer body and the other has a small aluminum plate that has been tapped for two screws to hold the steel 'catch' to which the cable attaches to. The aluminum plate is then glued to the door. Sounds like your door has insulation on it? That could be a complication but if you have an aluminum plate like I do and it has come off the fiberglass door, then I would use this adhesive to glue it back on: http://www.westsystem.com/ss/convenient-repair-packs-provide-a-quick-fix/ All this may or may not apply to your situation, but just in case.... Prep the area well. Get all the old adhesive off, sand the area well including the back of the plate, and wipe down with MEK. I would also drill a few extra holes in that plate to act as keys for the epoxy when you glue it back on. You could even countersink the holes just a bit (on the unglued side) for a dovetail effect. Use the adhesive filler that comes with the kit when you mix up your epoxy. West System epoxies are great products and are available at West Marine if you have any in your area, or probably even on Amazon. It is kind of a difficult design problem having the door drop down like that. What Oliver need to do is glass that aluminum plate right into the door when they make it. Relying on adhesives after the fact is not so great a long term solution. Good luck. Dave
-
Does anyone know if the black tank rinse has a built in back flow preventer? Should this be a concern? I'm not as worried about my water hose, as it's dedicated for the task, but I am concerned about the water supply where I hook up to. Also regarding the sewer hose (the big 3" hose). I am getting rid of the supplied hose for a better quality, and longer one. What length hose do you all use? The factory hose was just barely long enough for more than a few times, but I don't want miles of the stuff either... Thanks. Dave
- 1 reply
-
- 1
-

-
Thanks for the list Buzzy. I've been thinking about this for a while now. Questions, if the lines are well blown out with compressed air (awesome tip about blowing out the toilet with the peddle down btw), is it still necessary to add anti freeze to the system? For sure all the traps and toilet need to be treated, but I am leery to add the stuff to my fresh water tank as it is near impossible to completely drain as far as I can tell. This would make it hard to get all the chemical out in the future. Also wondering about the final winterized state of the black/gray tanks. Should they be left dry, or should maybe some antifreeze be put in there to keep things from drying out? I can see an argument either way, but I'm new to this game. How about interior heat? I'm thinking of getting a small electric heater of some sort (radiant, forced air, heat lamp like for reptiles??), along with a small fan to keep the air moving inside. I'll probably pull up the fabric seat covers for our dinette and rear table, then remove the fiberglass seat covers underneath to expose the plumbing and tanks below to some of the conditioned cabin air. Oliver really needs to get their winterizing video back up. But thanks again for your tips. Dave
-
Delivery preperation suggestions
DavePhelps replied to geokeg's topic in Mechanical & Technical Tips
Late to the game here, but thought I'd throw in my two cents. Lots of good suggestions, some I will probably repeat. We took the trip in March and live in Portland, OR. We stayed in a wide range of places from remote BLM CG's to friends' driveways, to a couple of RV parks to do laundry and dump tanks. The Ollie comes pretty well equipped but I was glad to have brought these extras. Everyone develops their own list over time... -Locks. You'll need a Hitch lock (attach your ball mount to your hitch, and a Coupler lock (lock down the lever on your Bulldog hitch) https://www.etrailer.com/Hitch-Accessories/DeadBolt/40107.html https://www.etrailer.com/Locks/DeadBolt/RC2SS.html I purchased the Stainless Steel versions and glad I did. Also got them both keyed the same so much simpler. These locks have worked great. - I also like to use 4 chocks for our trailer, just makes me feel better.... - Definitely get an extra hose (25") for black tank rinse and cleanup. You don't want your potable water hoses anywhere near that business. A good spritzer bottle with a bleach/water mix is also nice for final slinky/fixture cleanup. - While at friends, I was glad to have picked up a 10 gauge, 25', extension cord along with a male 15amp to female 30 amp adapter https://www.amazon.com/Conntek-14200-1-5-Foot-Pigtail-Connector/dp/B002IZKDHK/ref=sr_1_32?ie=UTF8&qid=1476463583&sr=8-32&keywords=15amp+to+30+amp+adapter I also use the adapter at home until I can wire in a 30 amp plug outside. - An extra 25" potable water hose also came in handy while staying at friends. I still have yet to purchase stuff on my want list like a portable electrical management/surge protection system, but they are expensive and since we most often camp with no hook ups, it's down the list a ways. Just depends on your camping style. We also got an external water filter system which has worked great. It's a two filter system, the first for sediment (keeps tanks, water lines, valves and fixtures from silting up) and then a carbon filter that filters to .5 micron. Probably don't need it for your trip home but I'd put it near the top of the list for later. Regarding the refrigerator. I hear it is illegal in some states to have the propane turned on while under way. This makes sense to me. The refir is most efficient on propane so that is what we use while camping. But as soon as we are hitched up and ready to roll, the propane is turned off and I switch the refir to DC. The charge wire from your TV will keep it cold and I have always arrived at my next camp with 100% full batteries. You're going to like those AGM's by the way. They are a great match for the solar system. You'll probably be selling your generator unless you plan on spending summers in the desert. ;-) Congrats on your new trailer and have a safe trip home! Dave -
Wow thanks for posting that!! I would really like to get down that way eventually as I hear the birding is excellent in the Park. It's 5 days from my place so will have to blend it in to a larger trip. I'm wondering if you stayed at the Chisos Basin CG. From your hikes that would seem the case. The Park recommends trailers no longer than 20 feet on the road to the CG, so I am wondering how your Elite 2 navigated the tight turns. Our Elite tows so tight to our TV that it just amazes me. I feel like I could take it anywhere, and I imagine that the larger Elite 2 tows just as well. Obviously you made it out to tell the tale! Thanks again for the pics and reminding me of this great place. Dave
-
Dexter Single Axle Suspension Kit Legacy Elite
DavePhelps replied to rideandfly's topic in Ollie Modifications
Bill, Thanks, that looks like a very worthwhile upgrade. So it looks like you replaced the all stock grease fittings that came with the upgrade kit with the 45 degree ones? Also, is there a torque spec for the bolts? Did you also loc-tite them? I'll be doing this upgrade for sure. Dave -
Great idea Marc, I never have liked the color of those shade frames. Why they aren't available in white is just a mystery to me. I hope the paint holds up for you. Looks like you also painted the channel bars which you use to raise and lower the shades? Kind of tricky there but a careful masking job should do it. Was the Krylon Supermax too hot for the plastic or what was the issue there? It looks so much better, I may have to paint mine now. Thanks. Dave
-
Well I talked to Tommy and I will be moving that copper line on the other side of the water lines and next to the water heater. Further protecting it with split loom is a great idea John, and that same thought came to me as well. I do feel that Oliver is trying to build the best units they can for a certain price point. These issues that do come up along the way are a good opportunity for them to up their game and refine their construction process. And in this particular case, the change would not cost Oliver a penny, just move the line over. I'm glad that no one else seemed to have this issue. It seems like most Oliver owners are pretty detailed oriented folks so I hope Oliver takes advantage of our combined input, as it is positively given. Overland, as far as I can tell, from the propane regulator there is a short length of rubber(?) gas line to the underside of the trailer. From there, it converts to copper covered with split loom and runs down the center of the trailer above the top of the aluminum, cross bars. It T's here and there to the various appliances off the main trunk line. As to the best material for the line I can't say, except that copper has been used for years and has a well established safety record. And... that really is a pretty yanky pic of that cabinet back! Being a retired carpenter, I could only shake my head when I saw that picture! LOL. Oh well, not only are dull blades unsafe and create a rough end product, they take more time to cut as well! So there is no reason to use them. No doubt after reading this they will be getting some new blades, or sharpen their old ones.... I'd also probably put a 1/4" roundover on that bottom edge as well with that copper running under there. If you have room, you may want to slide some split loom over that section of tube. Dave
-
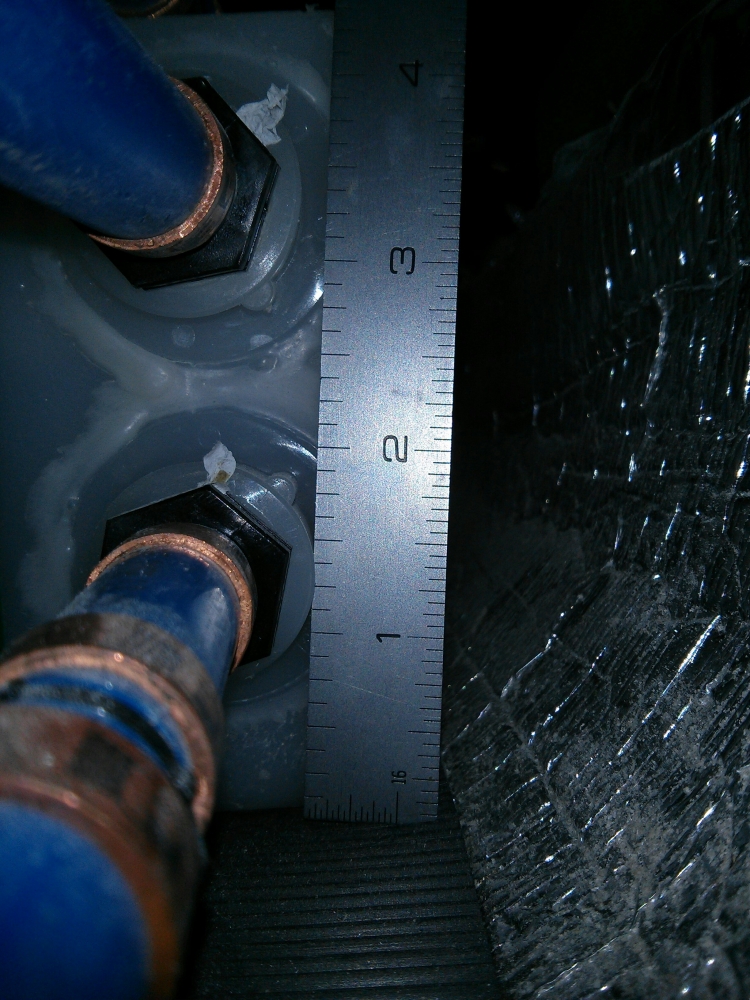
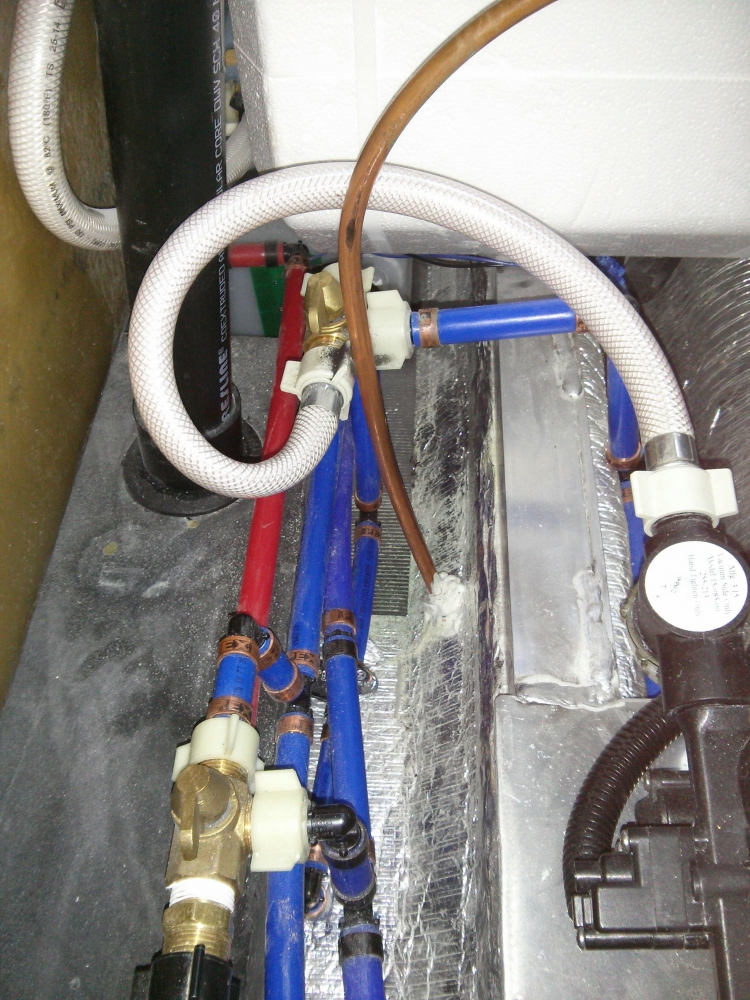
While messing with the water pump and learning how to siphon water through the winterizing inlet, I noticed that the copper propane line to my water heater had been noticeably abraded by the drop in bin that it sits next to. The bin had worn a slight flat spot on the tube, it's the dark spot in the photo. This is not a desirable situation! I'm not sure why Oliver routed the copper propane line where they did, but I plan on moving it over closer to the heater housing and wrapping it with friction tape. This bit of abrasion happened in just the 2500 mile return trip from Hohenwald. I have the Elite and don't know about how the Elite2 is plumbed, but I would highly recommend that everyone check their propane line in this area, or in any area where it may come in contact with the bins or anything else that could rub on it. Those bins in particular are very abrasive on the unfinished side. Dave
-
Tire Pressure Monitoring System
DavePhelps replied to hardrock's topic in Mechanical & Technical Tips
Does anyone have a feeling about the TSP flow thru sensors (available on the 507 only)? Might be convenient, but is it that hard to remove the standard sensor to air up? Great thread, I'll be getting these for sure. Dave -
Furrion Faultsmart 30A Electrical Cable Plug
DavePhelps replied to rideandfly's topic in General Discussion
Bill, when we park at home, I have the same setup as you do. We plug our Furrion cord provided by Oliver into a 30 amp/110V to 15 amp/110V adapter and that plugs into a standard 15 amp/110V home receptacle. When plugged in this way, the blue LED light on my Furrion plug does indeed come on, as should yours. You should check your house plug for irregularities, ie. open ground, cross polarity, etc.. There are simple, inexpensive plug in testers that will do this for you: https://www.amazon.com/Klein-Tools-RT100-Receptacle-Tester/dp/B005GYBFA4/ref=zg_bs_14244461_13 If all is well there, then check your adapter while plugged in to the house receptacle in the same way. If these both check OK, then you may have a faulty Furrion cord- it could be just a bad LED(s). My guess is that it's the Furrion cord as I think if there was an issue with your power source as mentioned above, then the red LED should be lit up. That's my understanding of it at least. Dave