Ronbrink
-
Posts
1,191 -
Joined
-
Last visited
-
Days Won
38
Everything posted by Ronbrink
-

Legacy Elite II with 3000w Inverter - Generator Setup
Ronbrink replied to EurekaJ's topic in Mechanical & Technical Tips
Many praise the addition of a DC to DC charger, more is better! -
Gorilla compact 25’ hose for marine and RV use
Ronbrink replied to Patriot's topic in Mechanical & Technical Tips
I’m a zero-G guy, carry three for dedicated purposes; freshwater fill, black tank rinse and general wash hoses. I find them easy to roll up and stow; they are very flexible and durable. Each are setup with quick connects and accessories for their respective applications. -
I replaced mine with a Blue Seas System breaker, much better quality and no recurring issues.

-
Replace Colorado Carefree Awning
Ronbrink replied to chuckstovall's topic in Mechanical & Technical Tips
Aftermarket sunshade kits are readily available for a variety of awning makes and models. One would want to turn off the switched power with use on an auto retract unit. -
Humidity is definitely an issue in hot climates, especially when outside relative humidity levels are high. The Oliver’s interior can become muggy feeling if the HVAC is inefficient in removing excess moisture and thus, dehumidifiers are subsequently used with varying degrees of success. Proper ventilation practices can help alleviate this issue, as well as other moisture management measures within.
-
Weigh Safe 180 Aluminum hitch with 3” shank, 10” drop
Ronbrink replied to Patriot's topic in Towing an Oliver
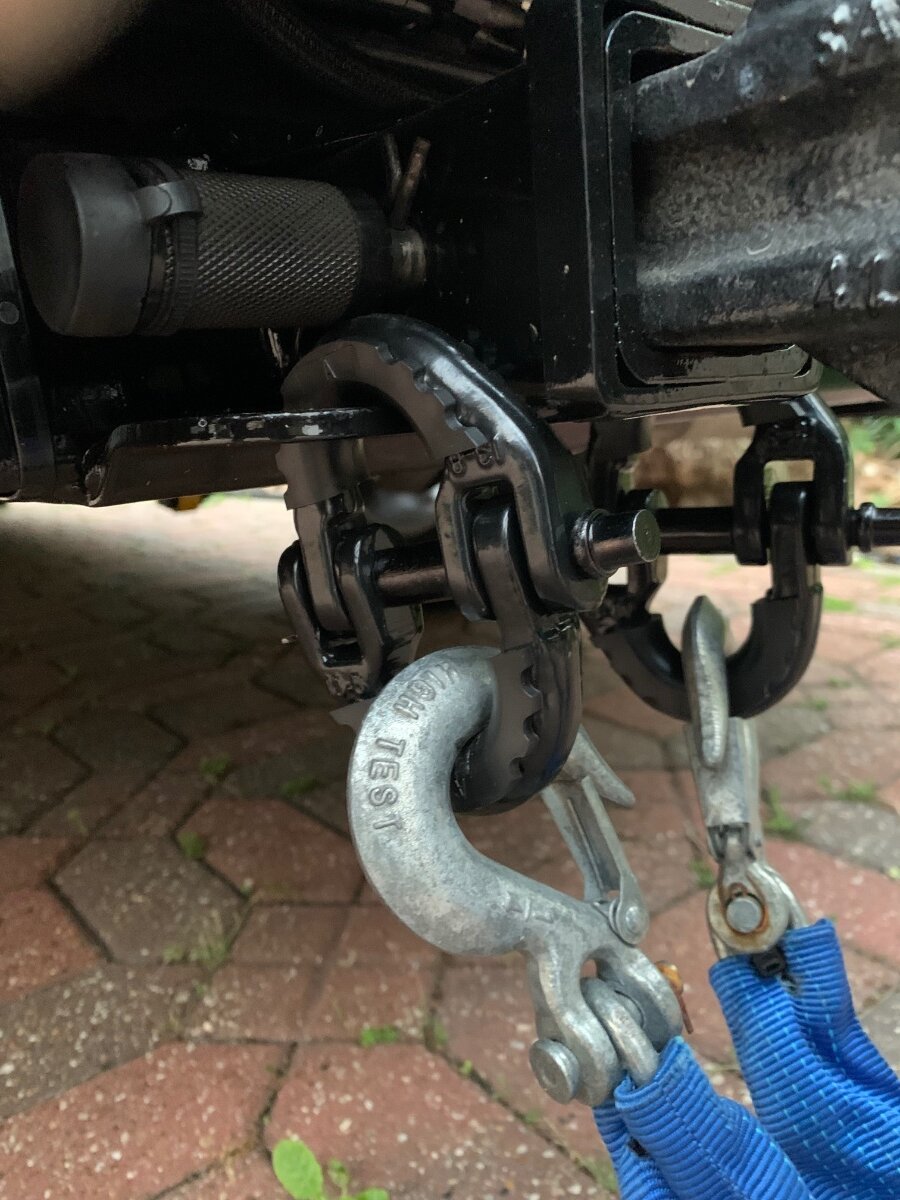
You had me concerned since I purchased my hammer locks some time ago and just now got around to installing them on the Savana. These have a stout cotter pin for an easy install and removal, if necessary. The rubber boots are a nice feature, but do add thickness to the chain connector link. However my stock chain hooks had good fitment, but the locking hitch pin was a close fit. You may want to consider replacing the chain hooks on your setup in order to make use of the hammer locks.
-
In preparation for next week’s trip, I thought best to test out our ebikes on the bike rack setup I recently retrofitted on the Savana. All went well and pleased that my vision from behind the steering wheel was even better than with the former TV. The front receiver hitch and bike rack rode solid around a neighborhood excursion. As a reminder, the folding ebikes are transported inside the van when underway to a destination then staged on the QuikrStuff bike rack once in camp. I do drive around with them mounted while inside a CG, to trailheads of proximity or nearby attractions.
-
Looks like you have the Orion dialed in! Good to see how it and your rooftop solar play together.
-
Another Andersen WDH idea
Ronbrink replied to Nick and Linda Stratigakis's topic in Ollie Modifications
@dmtaylor2, you my be on to something! I have zero experience with the Anderson WDH, but have used the lever load binders in the past and still have some at the house if a need arises. I strongly suggest you secure the level arm, for ‘peace of mind’ if nothing else. -
Okay thanks! I’m only concerned with the forward-facing dash cam capability and not trying to incorporate a rear camera. Was the “cut in and out” with the dash cam, rear camera or both?
-
I need to check out the dash cam feature on my Garmin GPS RV785. Anybody have experience with their’s to share?
-
The Garmin inReach Explorer+ is my ‘kitchen pass’ to travel solo! I wear it on my person, to the extent possible, to ensure it is within reach if needed. Pic of me off-trail in remote West Texas in the heat of summer, daytime temps were 100+° during my stay.
-
The Garmin inReach service can be suspended when not in use as a cost saving measure, can be used to summon help to others in dire need at no risk of costs for their emergency/medical response, weather forecasts are available, and they offer very reasonable and affordable SAR plans.
-
I’ve nearly completed Phase1 of the swing rack builds. The rear receiver hitch was removed from the Savana to enable some preliminary modifications, specifically welding reducer inserts in each end of the hitch’s cross tube, drilling holes for locking hitch pins and repositioned Air Lift auxiliary fill lines, and repainting. Once the paint is fully cured the hitch will be reinstalled in readiness for Phase2, actual fabrication of the individual swing racks. Unlike a pickup truck having a dropdown tailgate where a single swing arm would span the width of the vehicle, the van has two rear half doors and thus, separate swing arms for the custom racks. Also, unlike conventional installs where a vehicle’s rear bumper is either modified or replaced to accommodate a swing out carrier hinge, I’m making use of the stock receiver hitch to support the pivot points from below the bumper, whereby avoiding inherent door operation and clearance issues. The receiver hitch, as removed, plus preliminary holes drilled at each end for additional locking hitch pins. Reducers to transition the 3.5” OD square hitch tube to a 2” ID receiver. Reducers welded into hitch tube at each end. Matching .75” holes drilled in hitch tube for use of locking hitch pins to secure pending swing racks. Modified receiver hitch primed. The two hitch tube ends with installed reducers will now serve in like manner as the hitch ball mount receiver with locking pins. Final topcoat of paint applied. Modified receiver hitch ready for installation pending paint cure. Note the two small holes drilled in the support arms next to the voids where the Air Lift Schrader valve fill hoses will be repositioned. And that is it for now!
-
I made the above comments on April 18th, at which time I played around with the Sleep Mode on the Atmos. Upon departure of these routine visits I always check to be sure everything is turned Off, except for the dehumidifier. Admittedly, there have been a few times after locking up the Oliver and then the COW Barn when I question whether or not the dehumidifier was turned back On, or the closet light and water pump turned Off and thus, back inside to check all again. I recall everything to be in good order so back to lockup and departure. Well, when I went back on April 24th to pay rent I was baffled to see a puddle of water upon entering the COW Barn; my first thought being somehow the roof developed a leak from recent heavy rains. However, when entering the Oliver I felt the cool and comfortable 73° interior and noticed the Atmos’s fan was On, then realized the puddled water was condensate. YIKES, it was SO QUIET I didn’t even realize upon last departure it was still running! Now this isn’t a testament to how wonderful the Atmos is and pleased I am with its performance, but rather that of the Hughes Autoformer I permanently installed. Fact being, the storage facility only provides 15A service and with recent severe storms that device’s surge protection may have prevented damage to my Oliver’s electrical system or even the Atmos. More importantly, upon checking the Autoformer was boosting voltage, which I have observed a few times since the install during storage. This occurs when line input voltage drops to 116 volts or below, wherein the unit’s output is automatically boosted 10% over the input. It is a known fact that insufficient voltage, both spikes and surges, can cause irrepairable damage to sensitive electronics and RV air conditioners, and the primary reason for having this extra layer of protection the Hughes Autoformer provides. There is comfort in knowing that if I inadvertently leave the Atmos On at the COW Barn, given the minimal service, or run it at a CG where service issues may occur that my electrical devices and Oliver are fully protected. ‘Nuff said!
-
The above response to your question from @Steve Morris is a very practical approach to ensuring adequate power to a TV-staged fridge/freezer unit, especially taking into account longer run durations with use of the OTT’s battery bank. My approach was somewhat similar, however my former TV had a 200W solar array atop the bed cap for the specific purpose of helping to keep a homemade 100Ah LFP power station sufficiently charged for extended use. I can get 33 hours of continuous run time on the PS alone, and as much as 48 hours when the solar input was optimum. But at some point the PS would need a supplemental charge and thus, an AC powered battery charger came into play either upon reaching a campsite with shore power or via the OTT’s inverter power. I installed a forward-facing AC outlet on the propane tank housing for the same purpose @Steve Morris plans to install a 12v Anderson, but in my setup I utilize the inverter when underway to supply AC power to my Dometic CFX 75DZ, as needed. Since I have yet to install solar on my current TV, supplemental charging of the PS is provided via an extension cord from said outlet into the van to power a Victron 30A Smart charger connected to the PS. Although this setup works great when the Oliver is in tow, pending install of solar on the van rooftop is needed for other lengthy travel times or when venturing away from camp and AC power is unavailable for supplemental charging. Remote charging of PS:
-
I did install one up front under the cover with a hose that reaches outside via the screw port and one at the rear, as well, inside the bumper at the usual position. As for my particular fire pit arrangement, it was best to not alter the hose/regulator assembly due to inherent issues. Also, I like being able to use the fire pit away from my camp on a spare tank with group gatherings and thus, another reason for keeping the stock hose. 10’ propane supply hose coiled atop tank for convenient use, as necessary, and tapped into OTTs regulated line:
-
Understood, I’m one to fully protect important outlets, especially with my fridge. Potential power disruptions from a wet/compromised 12v circuit is hard on a compressor and the unit in general IMO.
-
I simply isolate one of the onboard propane tanks and connect an extension hose directly to it for use of my outdoor fire pit; primarily the street side tank accessible via the screw port whereby the entire cover doesn’t require removal.
-
I don’t recall Anderson offering a water tight 12v outlet for smaller connections. You could run the fridge wire inside the cover from the bottom where any connection within would be better protected when underway in inclement weather.
-
I came across the following post by a member of the iRV2.com community, by CC220 and dated April 2024, which may be of interest to some. Yes it is very lengthy but interesting, so if so inclined give it a read. As an owner, I concur with this author’s overall assessment of the Drieha Atmos 4.4 and look forward to furthering my personal experiences this coming summer. I just returned from SDG in Elkhart, IN ...after having the Dreiha Atmos 4.4 rooftop AC installed in place of the Dometic Penguin II our Coach House Platinum 220TB had been equipped with. Floridians and others living in the southeast, know full well the sweltering heat and oppressive humidity these climate zones generate in the summer, and their demand for consideration when scheduling outdoor activities and travel plans. Reducing the palpable humidity and creating a light breeze, immensely improves the air quality and comfort coefficient ...even when the temperature is lowered by just 2 or 3 degrees. The prospective ability to mitigate the steamy southeastern summertime 'misery index'...is what originally captivated my interest when reading about the Atmos 4.4 on the LTV FB owner-enthusiast forum. The unit is amazingly quiet, and I could envision an owner mistakenly leaving the unit powered on ...believing it had been turned off. Apparently, there is an 'LED light function' but appears available only when the unit is installed in a ductless configuration. (No part of the actual unit is exposed in our rig's ducted system mounting ...just a flush mounted filter cover. Admittedly, there are some 'unknowns' pertaining to the Dreiha corporation and their products, but obviously not of the type that dissuaded me from purchasing. Dreiha isn't (yet) a household name in this country, and in like fashion; Truma, required several years to attain brand recognition within the RV industry and amongst RV shoppers. Possibly adding to consumer name recognition challenges, is my understanding that the Atmos 4.4 is marketed and sold under another name ...as a virtual twin. We don't yet have access to sufficient user feedback in this country to evaluate long term reliability, but SDG owner; Kevin Searer's commendable reputation and the very favorable impression I received from him, leaves me confident that product warranty support won't be a problem. I'm glad to see Kevin and his great crew receiving well deserved recognition from the LTV community, and seeing more partnerships developing through which Dreiha brand HVAC products can be distributed, installed and serviced. To my knowledge SDG has expanded their dealership distribution network into Florida (CTM Customs) and if I recall correctly, a Solar-RV systems company in Texas. I thought it worthwhile to share some test results which compares operational efficiency of the Dometic Penguin II against the Atmos 4.4 AC. When using the Atmos AC function in either 'Dehumidifier' or 'Auto' mode ...its compressor and fan will alternatively cycle on and off during preset work intervals, greatly reducing an otherwise, constant high amperage power draw. The alternating compressor/fan cycle, seems in principal ...somewhat similar to variable speed compressors used in mini-split HVAC systems. That work/rest interval also explains the mind-boggling 'time remaining' estimates (shown in screenshots) produced by my Victron Multi-plus II inverter-charger, when the Atmos 4.4 is operating it's fan cycle in 'Dehumidifier Mode' on battery power. (I only tested using the Dehumidifier Mode, as that is most relevant to my climate zone, while also rendering the longest operational off-grid run times) 28 July 2024, 12:00pm Elkhart, IN (SDG HVAC parking lot) Ambient temp: 80 degrees, partly cloudy. Battery bank State of Charge: 100% Dometic Penguin II, Set point: 75 degrees 151 amps: High setting, 130 amps: Low setting Time remaining on battery @ present rate: 3 hrs 52 minutes 1 August 2024 8:48 am Columbus, GA Ambient temp: 77 degrees (With humidity: "Feels like 84 degrees" Weather Channel) Battery bank State of Charge: 100% Atmos 4.4, Set point: 75 degrees ** Dehumidifier mode Between 77 - 111 amps (compressor cycle) Between 4 - 7+ amps (fan cycle) Time remaining on battery @ present rate: (compressor/fan) Between 6 hrs 27 minutes - 3 DAYS 10 hrs!! Testing initiated with a 4-5 minute compressor cycle, followed by a fan only cycle. ** When compressor kicked off, and circulation fan was activated, amps decreased from 8.55 to 5.21. Just over half an hour into the test, the projected 'battery discharge time remaining' topped out at over 3 DAYS ... while the battery bank State of Charge REMAINED at 97 percent. I documented an unbelievable 35 minutes of AC cooling, with only 28.3 amps used. That current rate of efficiency would extrapolate to over 90 minutes of AC operation ...for less than 90 amps expended. INSANE! At 1:42 pm. Temperature was 94 degrees (With humidity: "Feels like 108" Weather channel) At 4:40 pm. Temperature was 97 degrees (With humidity: "Feels like 111" Weather channel) Mid-test number crunching & predictions: If the theoretical efficiency deviates little from operational expectations ...my 600ah battery bank would provide 9 hours of CONTINUOUS dehumidifier mode AC run time. The increased ambient temperature clearly altered the rate of energy expenditure, with compressor operation rising to a peak of 111 amps (40a less than the Dometic on 'High' setting) and fan cycle amps at 7+ ... with the alternating cycles appearing to occur in shorter intervals. ** Batteries finally died at 7:15 pm TOTAL run time was approximately 10 hours 15 minutes ** Cost vs performance analysis: The conclusion of testing revealed that the Atmos impressively exceeded the projected run time by more than one hour ...with the battery bank finally signing off after approximately 10 hours 15 minutes. A commonly cited 'AC on battery' energy formula, suggests that a 100ah lithium battery will yield approximately 45 minutes of AC operation. Thus, my 6 x 100ah battery bank would only be expected to provide 4.5 hours of continuous AC runtime. Consequently, the 10 hours 15 minutes of Atmos 4.4 AC run time ...appears roughly equivalent to having added SEVEN more 100ah lithium batteries. At a cost of $970 each ($6790 for 7 x 100ah Battle Born units) ... OR Installation of the Atmos 4.4 AC, for approximately 1/3 of the cost. I'm no electrical engineer, and therefore unqualified to say with certainty how much impact the three 200w rooftop solar panels may have had on the Atmos' operational longevity, however ...since the 'fan only' cycles of several minutes duration usually required less than 80 watts, I'm led to believe that the solar panels did contribute to the run time. Bearing in mind that the 3 hour 52 minutes of Dometic Penguin II run time was attained while connected to the same 600w rooftop solar array augmenting the 600ah powerbank ...clearly, no advantage was ceded to the Atmos. The Dometic's 'always on compressor' state, imposed significantly HIGHER power demand penalities of between 20-40 ADDITIONAL amps (versus the Atmos') while switching itself from 'low' and 'high' compressor settings. ** It's vital to consider that the Dometic AC did in fact, have the benefit of operating with the SAME SoftRVstart module (that greatly reduces the inrushing power spike imposed upon the battery bank) as did the Atmos, when demonstrating its superior energy efficient design, by operating in excess of 6 hours longer. The heat pump function on the Atmos not only operates to lower temperatures, and is quieter ...it also reaches set temperature much faster. The bonus feature from my perspective, is the Atmos' remote control interface, providing the ability to function independently from the problematic Firefly system that Coach House has discontinued use of. True, the wall mounted remotes and bluetooth phone app are viable workarounds for the Firefly's tempermental touch-insensitive main screen interface ...but I prefer the stability of decentralized, direct control of Coach systems. Truma's Aventa and Houghton rooftop AC units offer better performance than the Dometic, but I determined the Dreiha Atmos 4.4 to be the better value. SDG does also sell and install 12v HVAC units and mini-split systems, however ...their increased complexity/mounting space required and lack of a dehumidifier mode, were reasons for me to disregard consideration. Last Saturday, I was surprised to find HVAC technicians at SDG working on the weekend ...they were installing 12v mini-split HVAC systems in 3 Ram ProMaster vans that would soon be serving as ambulances. Beyond installation of a lithium battery bank/3K inverter-charger/optimized DC DC charging system, I now believe that fitment of a substantially more efficient HVAC system (mini-split or next-generation rooftop unit, like the Atmos) ...to be the next most significant systems upgrade one can make for conservation of their rig's vital battery bank power.
-
Just an observation. I went to the Cow Barn last Friday to check on the Oliver and run the Atmos on the LFPs in order to drop the SOC below 75%. I do this routinely when in storage for lengthy periods to cycle the batteries and exercise the charging system, which has dual chargers kicking in at that specified level of charge. As the Atmos was running to cool the interior, I referenced the User’s Manual and learned how to operate the Sleep Mode. The unit was whisper quiet and I could only tell when the compressor was running by watching the VictronConnect app as it kicked in. During the interim however, I was also watching the humidity levels as the Atmos cycled in this mode. I observed a 5% fluctuation in the humidity between compressor cycles, which remained steady for the duration of this Sleep Mode test. As it may relate, the interior temperature inside the Oliver was 87° upon arrival (stored inside a totally enclosed storage facility), outside temp was 85°. Because the dehumidifier had shut off due to a full reservoir, a reading of 58% was observed, outside relative humidity was high (>70). During initial operation in Cool Mode, the interior temp dropped to 76° and humidity to 50% in 20 minutes. For the remainder of operational time in Sleep Mode the compressor cycled with a 3° fluctuation in temp and humidity range of 49-54%.
-
Did you ever post a pic of the TIG welds? Seems a spot weld could be done without crimping, what think you?
-
Just curious why a new burner was even needed since it too had ends in need of crimping. Was there a reason the original burner could not be crimped and made use of?
-
One of the last ‘must have’ transitions from the former TV to the Savana is the DC-DC charging cable setup and rear-mounted Anderson connection. The full length 4 AWG dedicated cables running from battery to rear bumper off the Silverado required no alteration with this retrofit. Admittedly said cables, rear bumper connection, a solenoid and ANL 60/fuse box were installed a few months ago, but activation was delayed pending install of the Mechman 320A alternator. The solenoid serves to energize the cable connection via a fuse tap trigger wire from the under hood fuse box and thus, requiring keyed power ignition for use as a precautionary measure. Current fuse taps include the solenoid trigger wire, as well as one for the alternator and Air Lift power. Solenoid and ANL fuse locations. Rear bumper-mounted Anderson connection with Environmental Boot. Now that the Savana is readied for towing and other operational needs, there are a couple of other ‘wants’ in sight; van rooftop solar for the portable power station that runs my Dometic CFX3 75DZ, and custom swing away racks for my two Wavian Jerry Cans and spare 30# propane tank. Stayed tuned!