MAX Burner
-
Posts
1,681 -
Joined
-
Last visited
-
Days Won
68
Everything posted by MAX Burner
-
We're looking forward to trying out manual shifting at altitude on our upcoming trip to Hopewell Lake in northern NM. The last half of the trip is a 75-mile run above 6k'MSL up to the campground at 9.8k'. I'm thinking keeping the RPMs above 2100-2000 in the highest possible gear might be a starting point to determine best MPG. Thoughts?
-

Dometic thermostat not showing Bluetooth icon
MAX Burner replied to StillGame's topic in Mechanical & Technical Tips
OK... So, "D" and I are "dog-folks". This feature is exactly why we installed a Micro Air Model 351 last week. So long as we have a wifi signal and Magnus is bannished to the Ollie (on rare occasions only) - we can monitor his environment. What we do for our 4-legged family members.... right? Piece of mind. -
Welcome! But hey? Where's the Command Master Chief for this crew? HA!
-
Welcome!
-
Try some CRC Brake Parts Cleaner - then hit the Bulldog mechanism with some high quality spray lube... There should be no "sticking-up" - you'll know when you're done when its all smooth in every direction!
-
Guys... don't do the following: ...everyone in the Ollie's asleep, dark-out, freezing cold, blowing rain & wind: MAX wakes up, sez to D, "Hey, baby - I'm thinking Magnus needs to pee - how about switching over the tanks while you're out there, eh?"
-
We're wondering if there's there a 12VDC recirculating pump available to install at the water heater output? One could switch on the recirc pump for a dozen or so seconds before turning on the hot water valve in the head... just a thought.
-
Friction Hinges - Lippert - Another quick mod.
MAX Burner replied to Ty J's topic in Ollie Modifications
Same here... Just ordered, free shipping - same price point. Thanks for the vector, @Ty J -
Blue Tooth, brother! Blue Tooth!!! HA!
-
Replacing Xantrex Freedom XC Pro 3000W Inverter
MAX Burner replied to Sak's topic in Mechanical & Technical Tips
We made the same run into Chaco Canyon WITH our AS tires aired-down to 20psi - we spent a half-day replacing popped rivets. We would not consider either the north or south approach to Chaco in the OTT without airing WAY down and keeping the speed below 15-20MPH. -
Nice RACK!
-
Cricket noises from the lights
MAX Burner replied to Going Coastal's topic in Mechanical & Technical Tips
It's sounding like PD is suggesting an upgrade of the converter section of the converter/charger: Or are we missing something? Our Ollie is a '17 also, but isn't behaving as @Going Coastal has described... it appears to function correctly without crickets.
-
Black Tank Flush Backflow Valve
MAX Burner replied to Mike and Carol's topic in Mechanical & Technical Tips
OK, guys - FULL DISCLOSURE: When rigging this flush system yesterday, we were discussing where the displaced air from the waste tank is venting... So about 8 or 9 gallons into the first "flush", I have the brilliant idea to inspect the commode ball valve. After a "mini-Old Faithful" shooting up a foot from the ball valve, I realized it was NOT a brilliant idea. All good in the "end" - so to speak... Whew! -
Spotted a really old Ollie in Tillamook OR
MAX Burner replied to John E Davies's topic in General Discussion
Not only fully Off-Road capable, it would probably have no issues dragging an OTT around the area - albeit not very fast, and not with stellar fuel mileage... HA! -
Black Tank Flush Backflow Valve
MAX Burner replied to Mike and Carol's topic in Mechanical & Technical Tips
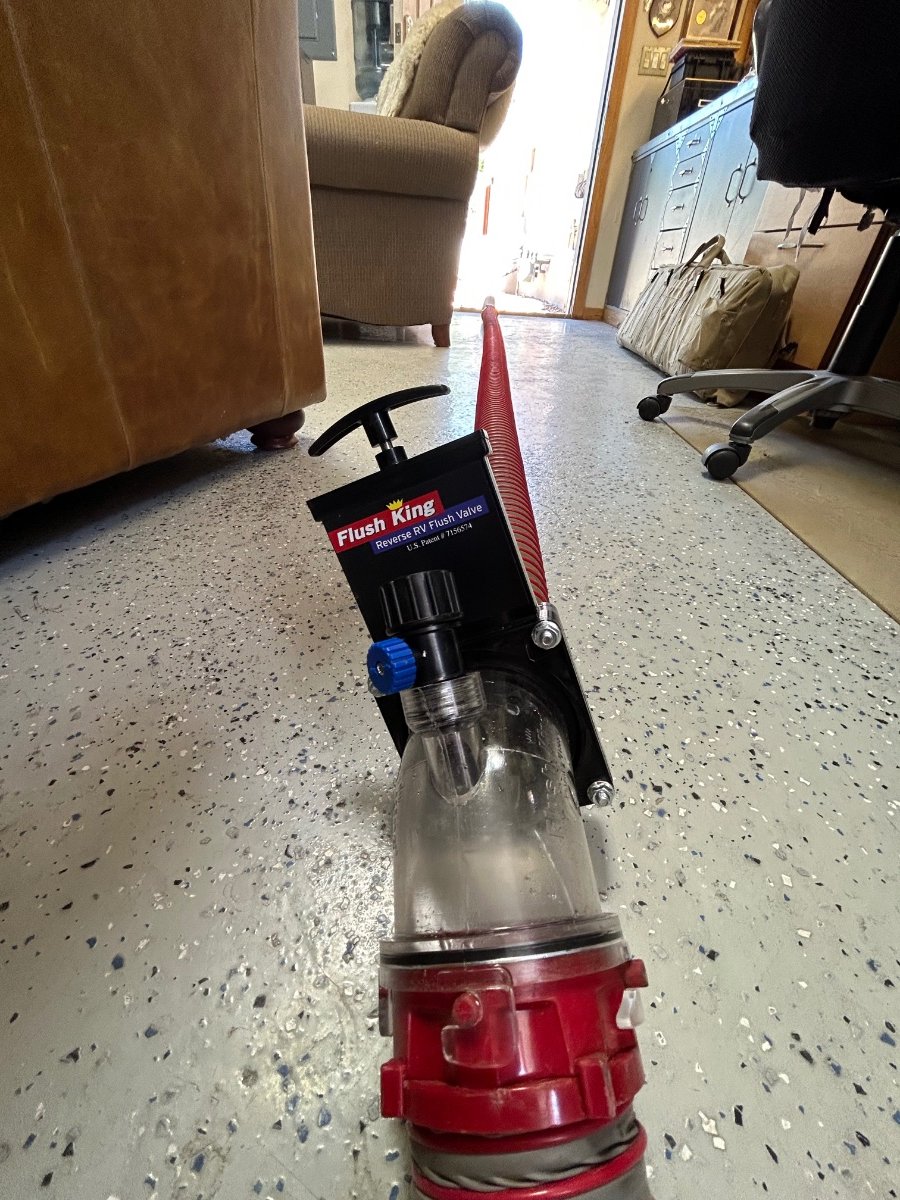
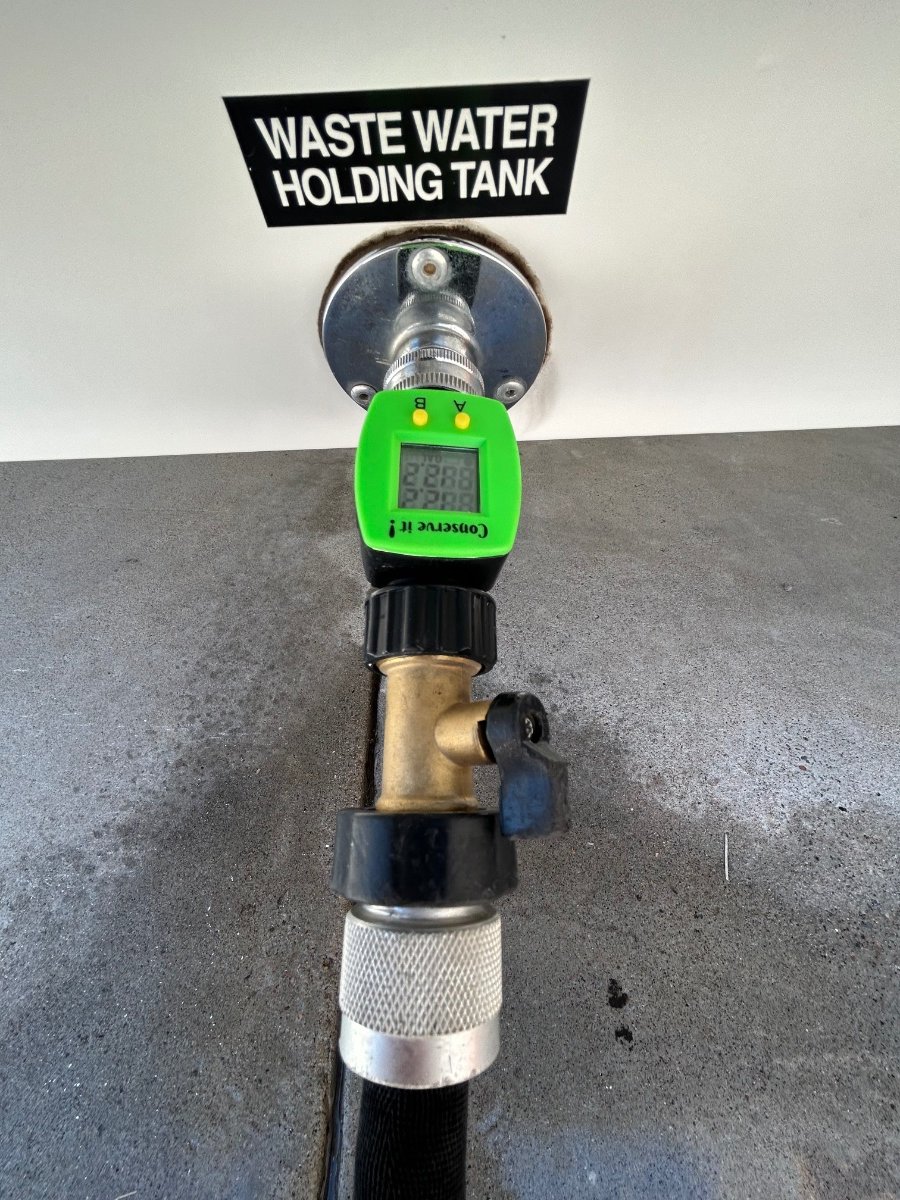
IMO, this post "sort of" fits the thread, and would fit others just as loosely, but we picked this one anyway because the posts were well thought-out and germane to what follows... 1. A few weeks ago, we ordered and received a "Flush-King" gate valve assembly to aid in determining the quality of the black water tank flushing operation. There's other assemblies available that provide the same function, but this one seemed to better fit the OTT dump system. Since our first stage dump hose stays permanently connect to the OTT dump exhaust flange, it's a simple procedure to place the Flush-King between the first and second stage hoses. Final phase dump hoses connect to the downstream end of the FK and then over to our dump station. The FK has a ball-valved garden hose attachment that is upstream from its gate valve (see above pic). We didn't believe this attachment was necessary for Casablanca since the OTT has the "Waste Water Holding Tank" fill attachment discussed ad nausium in several threads. The FK located close to the Ollie makes it convenient for us to observe the color of the waste because of the 30+ foot distance to our dump/septic connection - in other words, we no longer need to run back and forth from the dump connection to the trailer to control dump valves, water flow, tank fill progress, etc. 2. We attached a digital flow meter to the waste water holding tank fill inlet to monitor the amount of water flowing into the tank - also monitoring the See Level gauge for comparison, so as not to over fill the tank. The See Level digital readout closely agreed with the digital flow meter as the tank was filled - this added a level confidence with the See Level system. Upstream from the flow meter we attached a brass ball valve to control the fresh water flow from outside the RV and provide an additional safety check for potential interior check valve failure and subsequent back-flow of effluent into our fragile fresh water system. 3. The waste water system took 3 flushes (54 gallons) to observe clear discharge at the FK assembly. The discharge was clear and without debris when complete. We filled the waste tank with 2 gallons of fresh water to keep from drying out until our next adventure. Any thoughts of other steps that we're missing or have omitted? Cheers - even though this is a "S**TY" job...
-
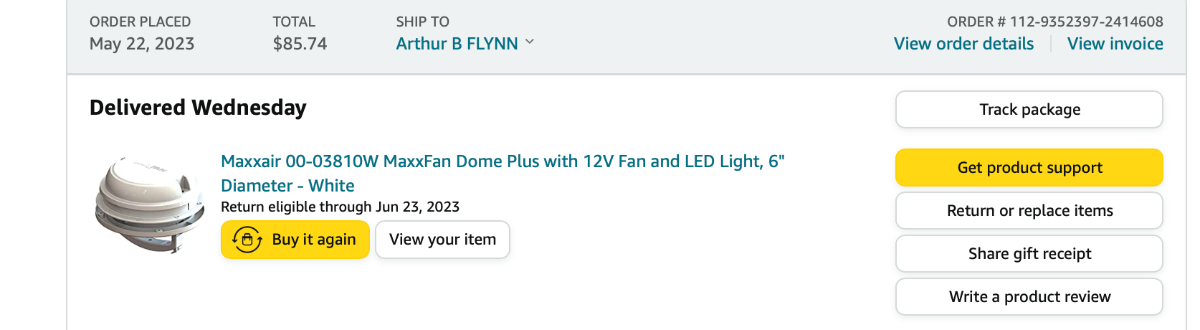
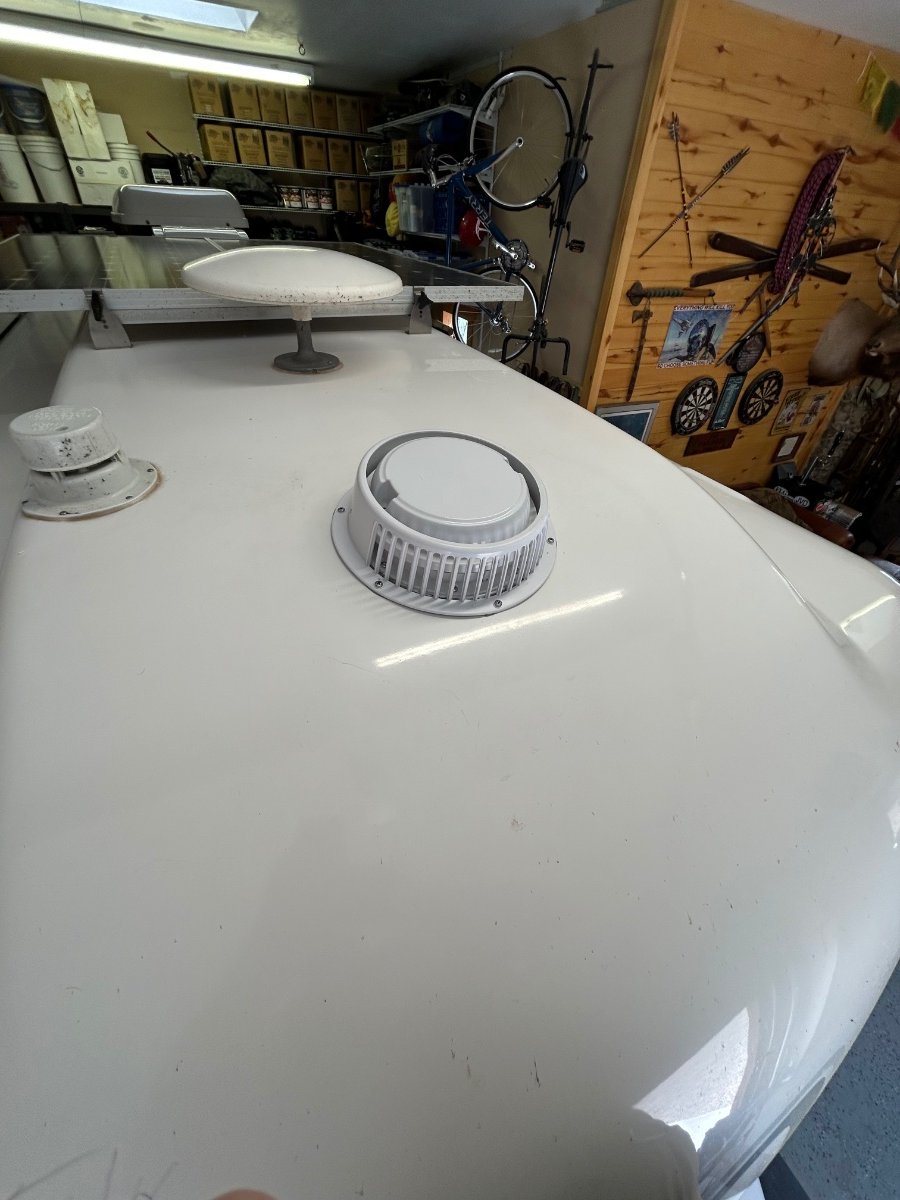
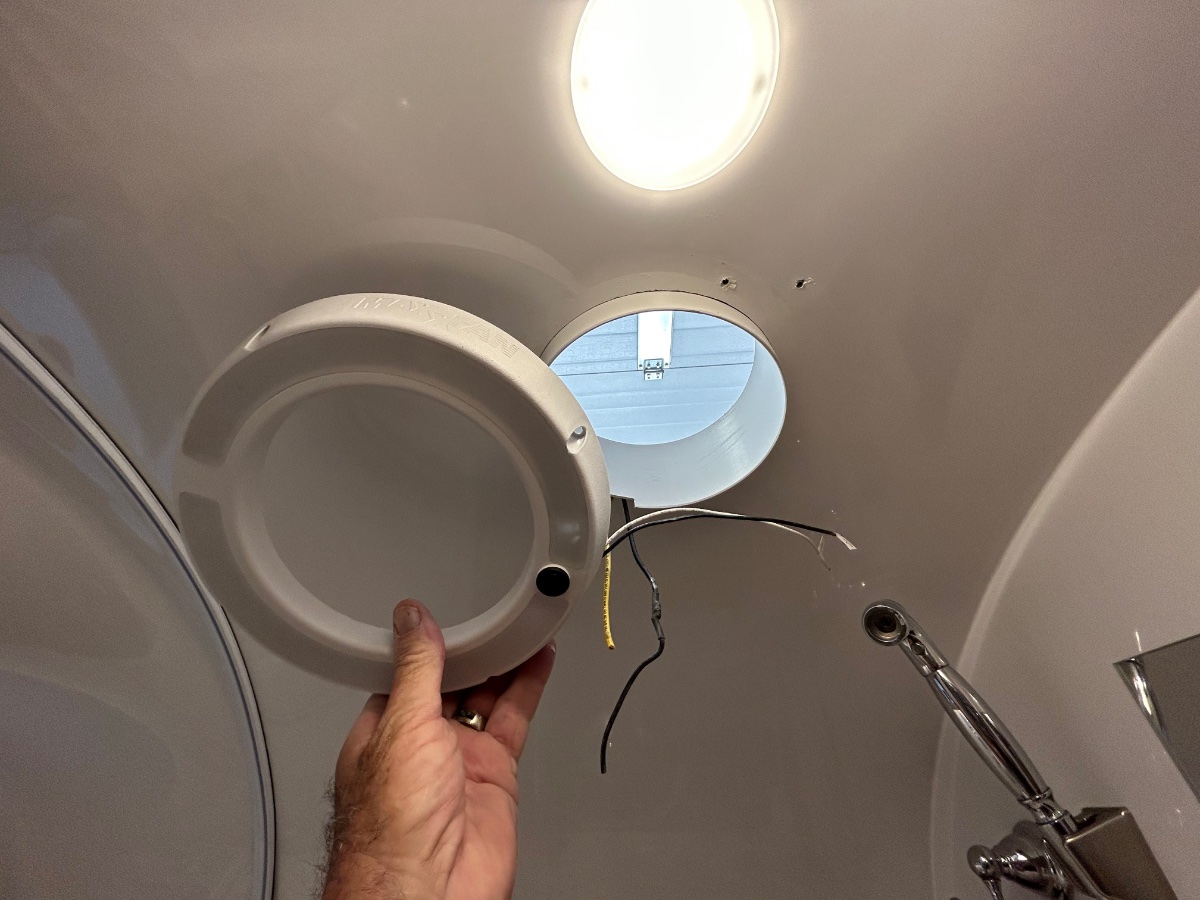
Here's the model number from our Amazon order receipt: The unit comes with a 6" extension sleeve. You will need to trim the sleeve to your roof thickness. Our OTT roof thickness at the 6" diameter vent hole is 2 1/4". We placed the 6" sleeve inside the hole, allowed 3/4" to protrude inside for the trim piece/LED housing, and marked the exact thickness so as to determine how much needed to be trimmed. The length of the sleeve needed was 2 7/8". We used clear silicone around the upper sleeve circumference and roof vent hole for additional waterproofing. Fitment was good - especially considering that the fan hole location is not flat, being slightly curved - be very careful when torquing both the upper housing screws and the decorative trim piece/LED housing screws because one could (IMO) crack the housings if over-torqued. The housings will "bend" slightly to match the interior concave curvature of the ceiling and the exterior convex curvature of the roof. We washed Casablanca after the install and heavily watered the area around the new vent for several minutes - no leaks detected/dry as a bone in the head. Hope this helps, brother! Cheers... PS: 1. The old Ventline unit is spoken for by another member and will be shipped today. 2. This model MAXXAIR has the conveniently accessible inline fuse that @SeaDawg mentioned above, FYI.
-
We rode through Craters of the Moon during our annual "Spine-of-the-Rockies" Tour (MCycle ride) last AUG - absolutely beautiful geology. We'll go back with Casablanca, for sure. Very special destination, IMO.
-
(...not to highjack the thread) But, HA - this comment cracks us up! We get the "camping withdrawals" after 7-10 days of being home, too! We find ourselves occasionally sharing a cold one while sitting at the dinette table, the shades down, and imagining we're at some of our fav camping sites... (from inside w/shades down - same view, right?)
-
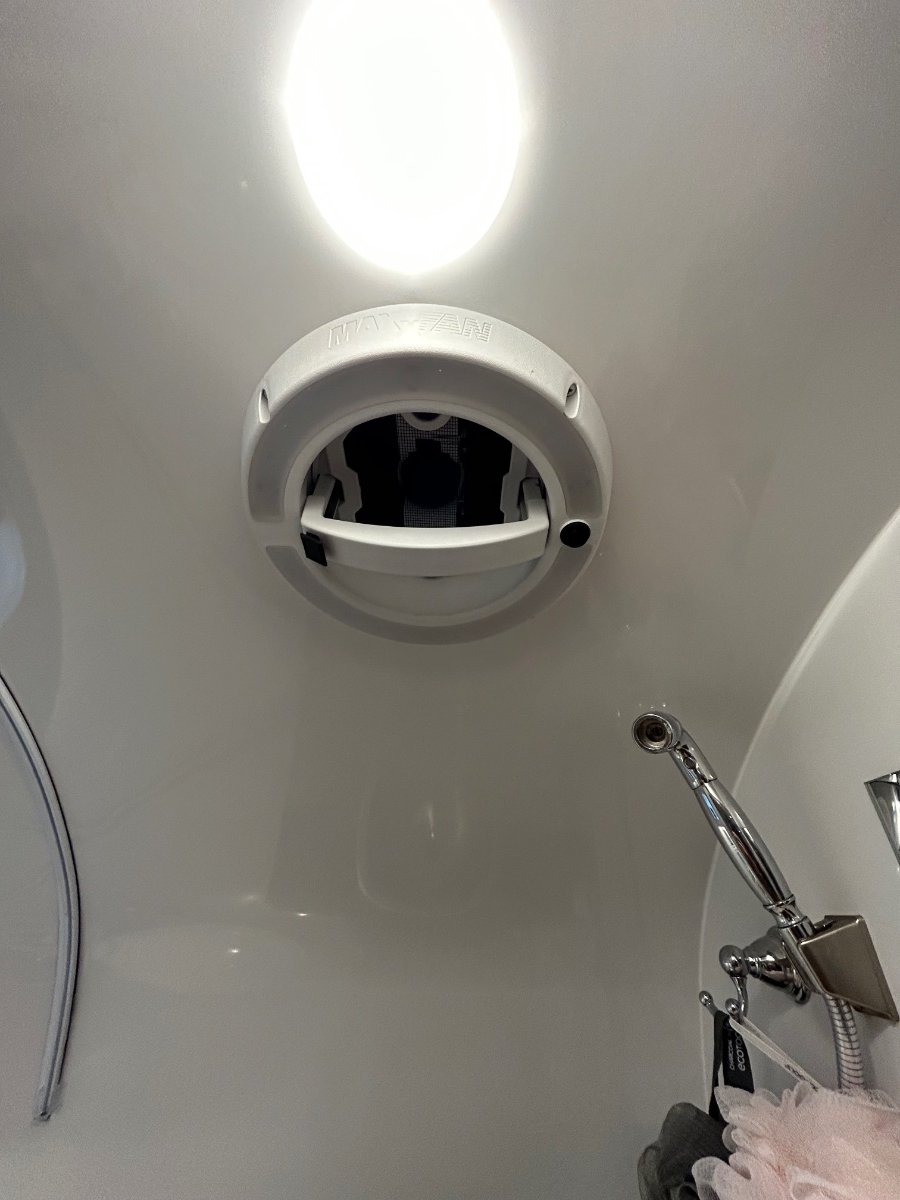
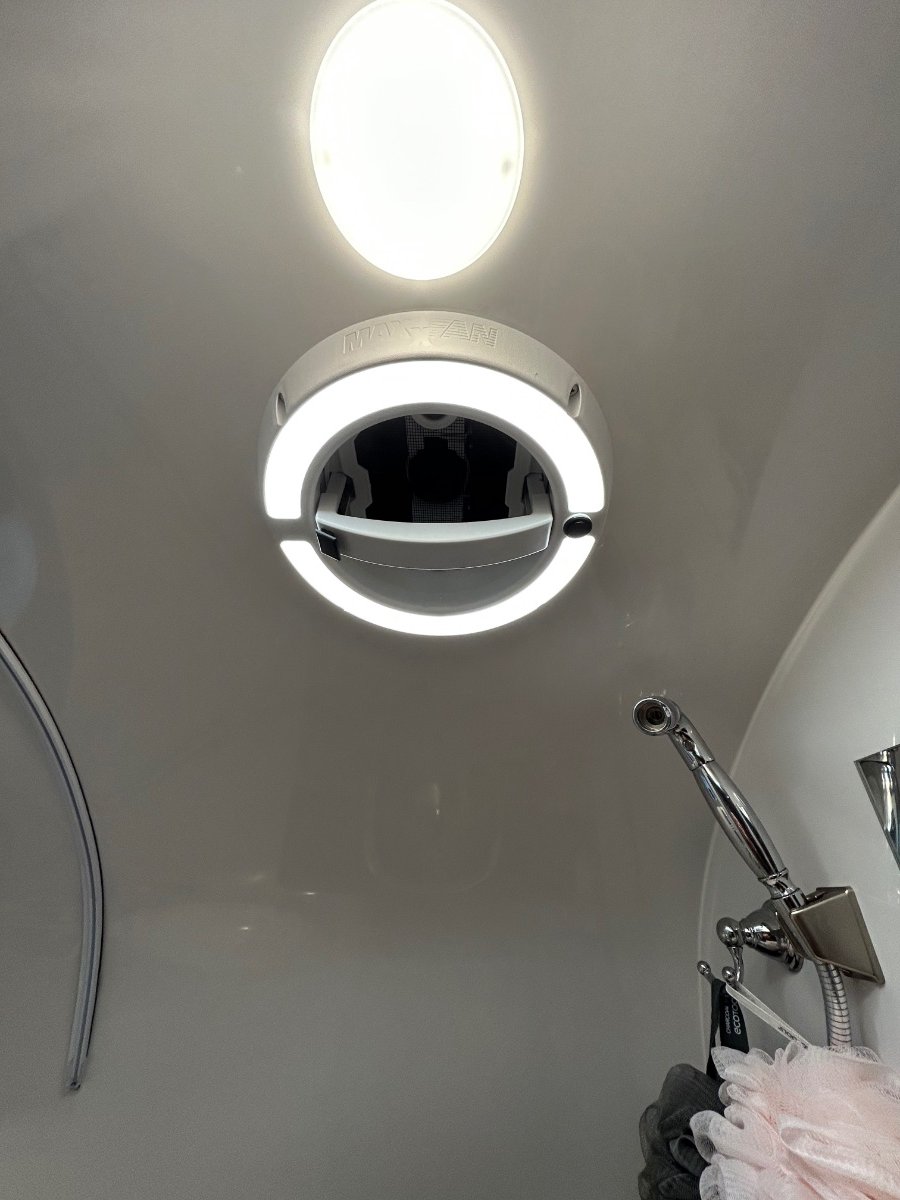
The LED is surprisingly bright - 50 to 60 watt equivalent? I'll check the box it came in for the model number.... MAXXFAN Dome Plus w/LED - WHITE. Cheers!
-
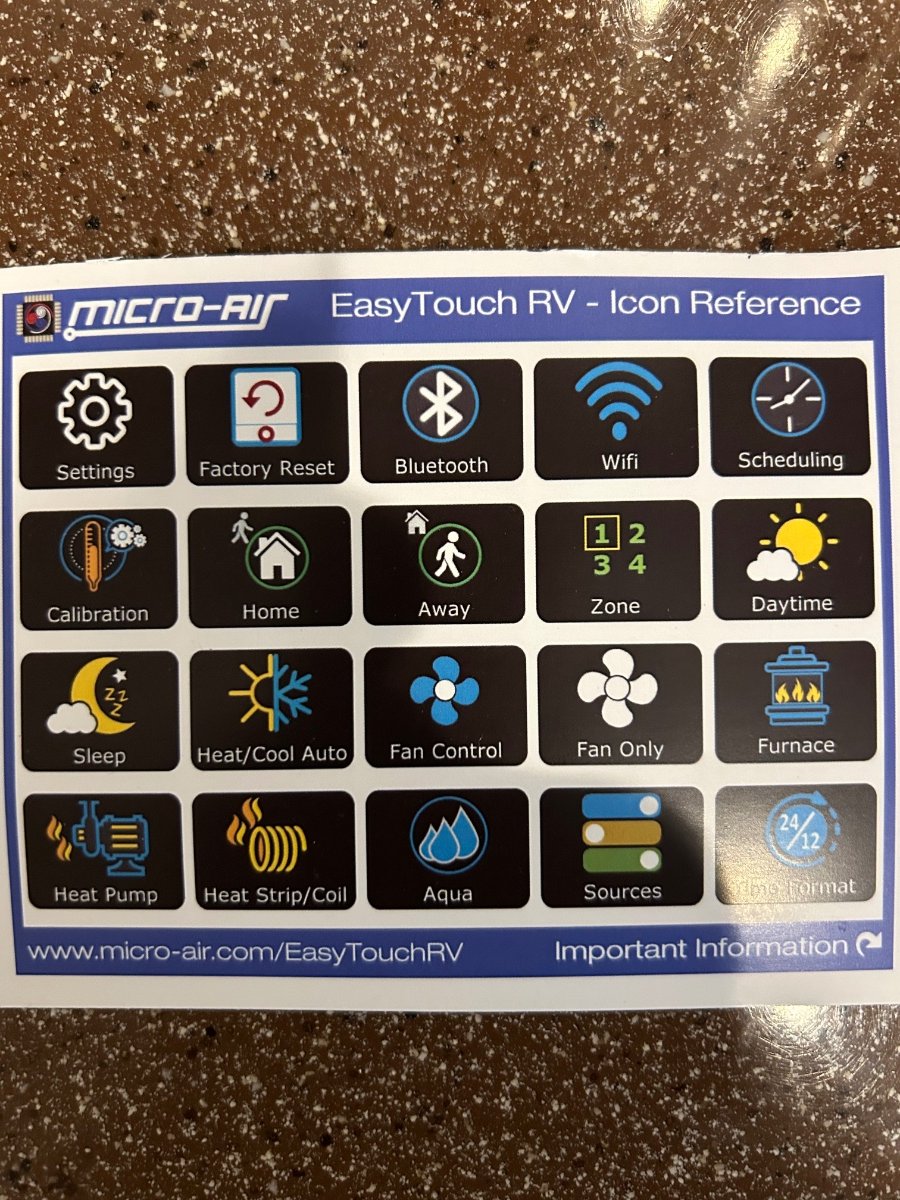
The Dometic unit still wouldn't behave itself... So, the 357 model arrived in a few days from Hutch Mountain, up in Utah. Ordered the wrong unit, so they sent the correct model (#351) next day air (my bust). The Blue Tooth connection works great, the iPhone app allows control of AC only, furnace only, heat strip only, or any combo of all three. Icon reference: Nice touch-screen on the Micro Air wall unit. We decided to use velcro attachment points on each corner to avoid drilling into the gelcoat (original holes didn't line up). Thanks to @Chukarhunter for the vector over to Micro-Air.... Cheers!
-
Amen to that, brother! Sempre Fi
-
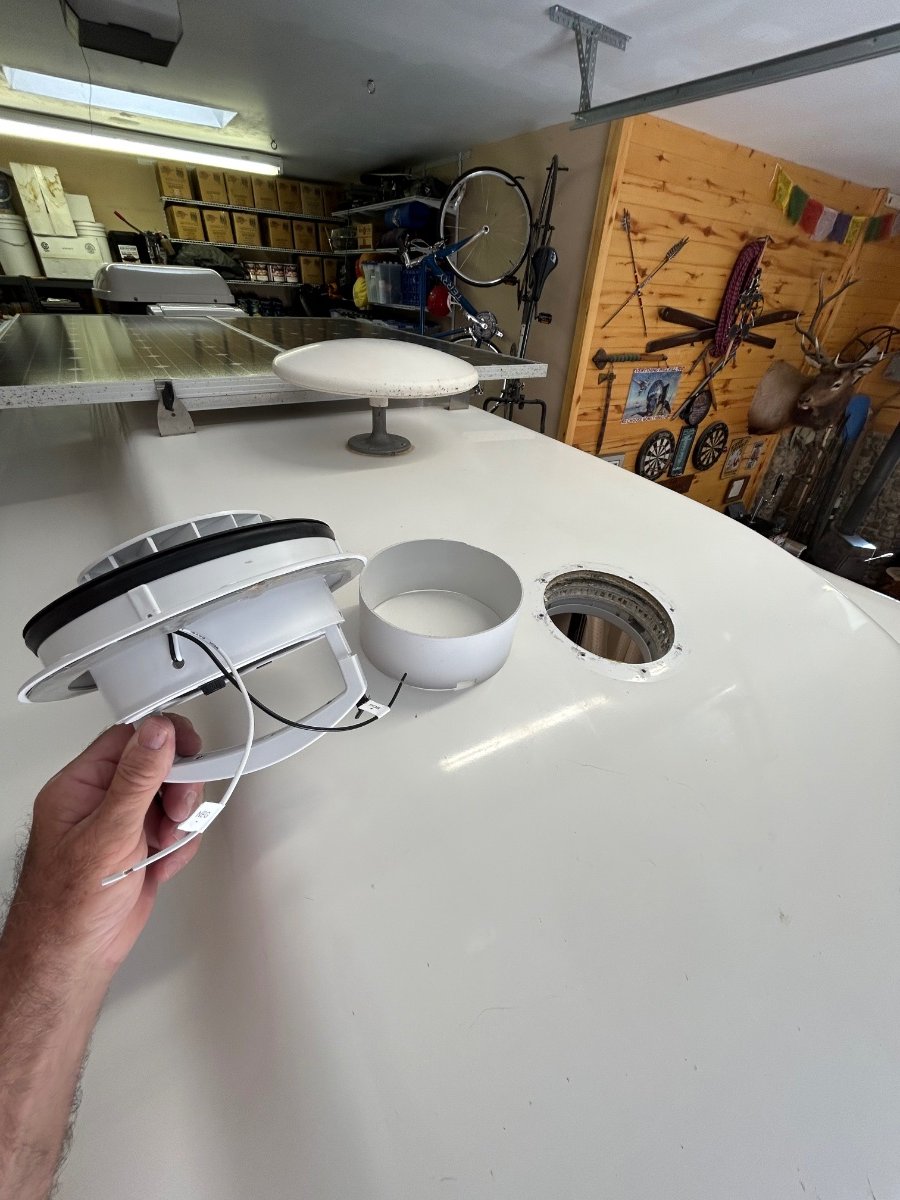
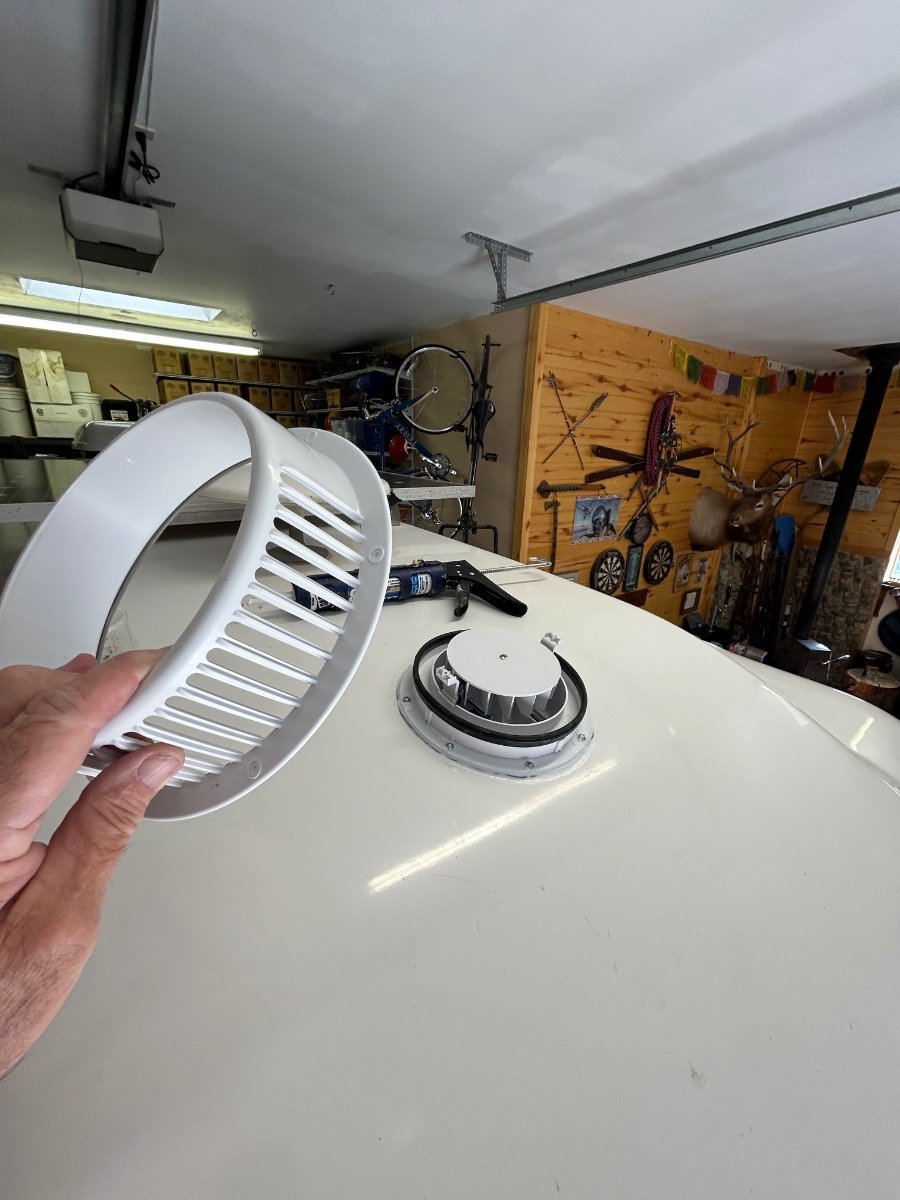
Ok... I love these forums! Nothing like great ideas shared by a group of common minded OTT owners. I'm thinking I stole this one from a comment that @SeaDawg mentioned a while back regarding his "LED-lit" Shower Fan. Well, Diane read his post and thought it would be a good upgrade - so, the new MAXXAIR w/LED unit arrived yesterday via Amazon (Happy Wife - Happy Life category). This would be the short story of its installation... First off, the original VANAIR Ventline fan assembly operated perfectly - no leaks, no bearing wobble, smooth actuation, but alas, no LED. It's the exact unit we had in our previous SOBs. BTW: Its up for grabs - a "freebee", I'll cover any CONUS shipping costs for anyone needing a Ventline. There was major brain cramping involved to plot-out a list of instructions for the R&R drill, especially the Removal phase. The first "R" was straight forward - using a plastic "razor" scrapper to remove the butyl tape from the gelcoat. Cleaned gelcoat with a fresh microfiber cloth doused with an ounce of rubbing alcohol. 2. Filled original mounting holes with clear silicone, they will be further sealed with the butyl tape attached to the new fan housing. 3. Cut-to-fit the included plastic sleeve that fits between the top flange and bottom (shower side) trim piece. Applied clear silicone around circumference of plastic sleeve and upper gelcoat. BTW - the OTT factory fan hole was exactly the correct diameter - no additional cutting was needed (WHEW!). 4. Mounted new assembly up top, carefully pre-drilled/chamfered 8 new holes in exterior gelcoat. Lightly torqued-in stainless screws enough to "push" butyl tape out from flange. Trimmed tape and applied clear silicone around perimeter of flange. 5. Rain guard: The new unit included a "rain-guard" which may be helpful if operating the fan in a heavy downpour. Applied butyl tape on the RG flange and carefully pre-drilled/chamfered 6 new holes for the RG. Trimmed tape after torquing screws in and then applied clear silicone around perimeter of RG. Attached fan cap with the provided 2 white screws. 6. Applied clear silicone to the trim piece groove where plastic sleeve seats. Carefully pre-drilled/chamfered 4 new holes for the trim. Connected 12vDC power to fan motor and LED - used solder and heat-shrink for connections. Tucked wires inside trim piece and mounted it with 4 screws. 7. Unlike the Ventline unit, the MAXXAIR has a locking mechanism when depressed allows the fan lid to open/raise. Its raises/lowers smoothly. Fan and LED each have separate switches. And as, I believe, @Patriot has recently said, "Let there be light!" One and done... Happy Wife.
- 67 replies
-
- 22
-

-

-

-
US NAVY, '76-'86, 3 Persian Gulf WESTPACs
-
Happy Memorial Day! "ALL GAVE SOME, SOME GAVE ALL!"
-
Rear Air Bags: QUESTIONS: 1. Anyone with experience using rear air bags on their Tundra or other TV - how helpful? 2. How would installing air bags affect the ride while towing/not towing? 3. Any change in cargo capacity after installing bags? Inquiring minds are wondering.... Cheers!