John E Davies
-
Posts
5,759 -
Joined
-
Last visited
-
Days Won
243
Everything posted by John E Davies
-
I agree about the water heater. It has foam insulation on the inside, to keep the water warm between cycling on and off. But outside, under the ventilated cover, there is ZERO insulation. Which seems to me to be a pretty major design flaw. When you drain the tank, remember to turn off the electric heating element switch outside, and also flag the inside propane switch so nobody will try to turn it on when it is dry. I use a strip of blue masking tape across the rocker..... John Davies Spokane WA
-
Thanks for the info. I have to comment on your furnace venting...... the combustion air comes in from outside and goes back outside. The cabin air recirculates all the time, the two parts of the furnace are completely separated, unless you have a failure.... So you may need to crack a vent and or window to reduce condensation. Humans respire about 300 ml of water daily, and that doesn’t include moisture from washing and cooking. Or alternatively run an electric dehumidifer. John Davies Spokane WA
-
Great info, thanks for taking the time and effort to collect the data. I love your graph! What was the thermostat temperature setting? 68? I set mine at 55 overnight and it doesn’t use so much propane, and it definitely saves the batteries, but it also doesn’t provide as much heat under the floor. But as warm as your underfloor areas are, I think you could safely lower your stat a whole lot. Just bundle up. Did you have any windows or vents open? Did you have the bathroom door open? Do you have adequate airflow to the bathroom air register? How did you determine propane use -weigh the tank? It is interesting to see how warm your battery compartment stayed. I am sure your extra duct on that side of the floor was doing that. With no battery compartment vents, do you think your lithiums will be too warm in summer, on a 100 degree day in direct sunlight? Have you added any extra vents there, inside? I am working on that mod.... to warm it in winter but also to cool it in summer. Minimal cost, around $60, but you have to drill a bunch of big holes😳😳 Thanks again. John Davies Spokane WA
-
Here is a chart (one of a gazillion out there) showing how much power in watts or amps various appliances consume. Since it is winter you do not have to worry about the air conditioner, it is a huge energy hog. Your water heater electric heating element, if you have one, and the fridge electric heater both use a lot of current. If you are hooked up to 30 amps, don’t worry about them, but if you are on a 15 amp circuit, you need to make sure both of those units are running off propane. Trip those breakers and make sure the propane is turned on and working. https://optingoutofnormal.com/wp-content/uploads/2020/04/PDF-RV-APPLIANCE-POWER-CONSUMP.pdf John Davies Spokane WA
-
3 D printing is most useful for a one-off prototype, or for making repair parts in the field (military) or in outer space, where a supplier is not readily available. it is way too time consuming and expensive for mass produced parts, that is what injection molding, die cast metal, and other methods are for. If the company wants to sell us Ollie trailer models in the future Ollie Store, they will have to have them mass produced in China by a toy manufacturer. An order of 100 would probably get the selling price down to a reasonable figure, I am guessing less than $100. A 3D printed one, with many hours and final hand trimming, unless you can do it yourself, would be way more than that. My son had a number of false starts before they got to this final version. John Davies Spokane WA
-

Battery Cut-Off Switch - Positive or Negative Terminal
John E Davies replied to mjrendon's topic in Ollie Modifications
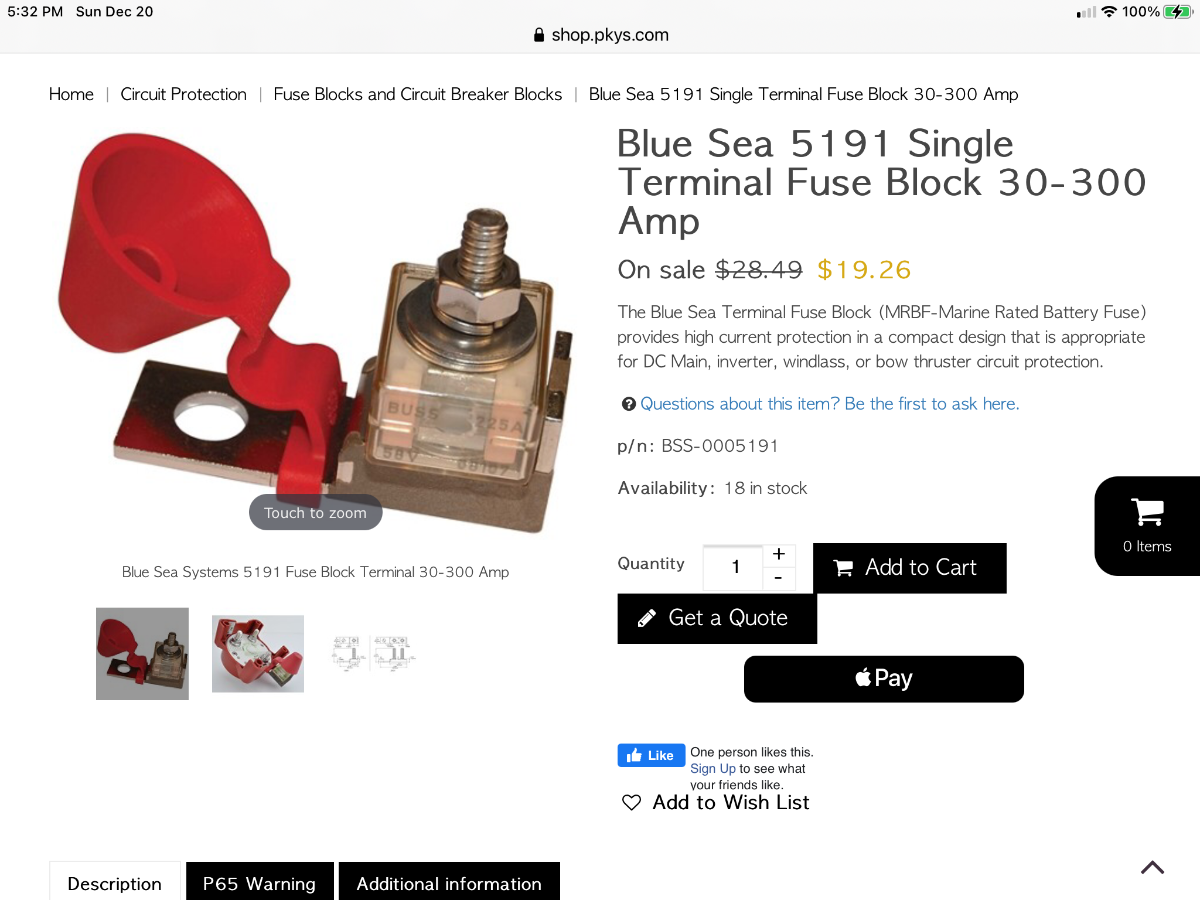
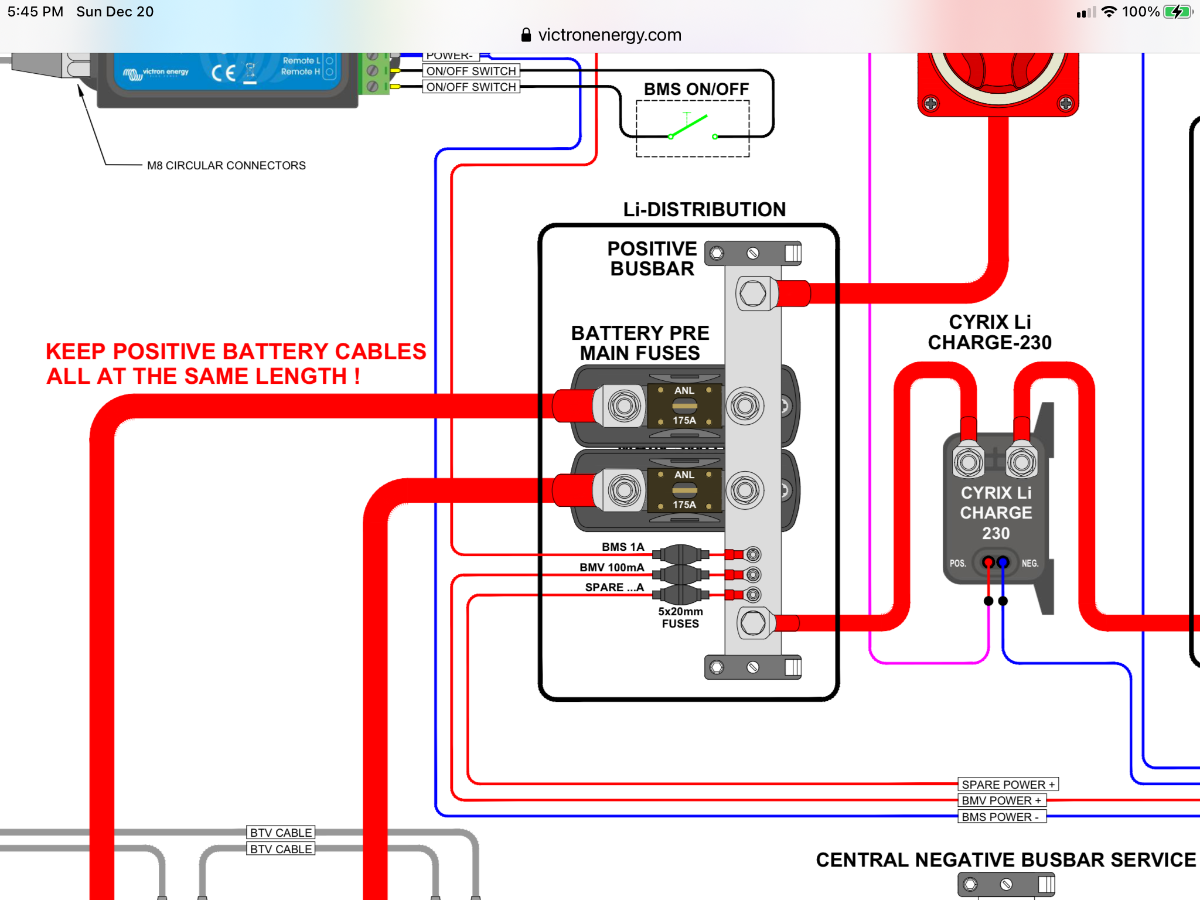
I don’t know the exact reason, but why would you not simply follow accepted practices? Guessing here, in a multiple battery installation (bank 1, bank 2, starting, bow thruster), like in a yacht, you have separate systems connected to a common ground. Most of the diagrams you see from makers like Blue Seas are what is recommended for a more “strenuous” marine environment. How many folks individually fuse their batteries? Hands up. Hmmmm. Nobody, not even Oliver, even though it is strongly recommended, especially with a lithium battery installation. I am going to be wiring my new lithiums with terminal fuse blocks. Otherwise there are several feet of completely unprotected large gauge cable. Victron mandates individual battery fuses, though they show them downstream a ways, which is not as safe, since it leaves some of those cables unprotected. John Davies Spokane WA
-
Bikerabbi... You need to go to some of the insurance company sites and fill out the “give me a quote” page. There is no other way to get a very meaningful answer. Prudential charges me $450 annually, with the Ollie stored inside a secure garage in a small city. Experienced RVer. No roadside assistance. Full replacement for five years, then after that, what I paid for the trailer. If somebody here says $1500 or $2500, how can that help you to get a price for your particular situation? And mine is not for Mexico, that is for sure! If you want trailer security there, make sure it comes with a full auto selector. Get a quote.😀 John Davies Spokane WA
-
The furnace fuse could be blowing for several reasons, the most likely IMHO is a bad motor or a jammed fan. Do you have insect screens on the outside vents? Wasps can get inside and block the burner can. If the combustion fan is jammed by a nest, that would sure do it. Or the motor has simply failed. Or the positive wire has grounded out somewhere, or broken and shorted. A simple next step might be to disconnect the power wire at the furnace, see if it still blows the fuse. If it does, then you know the motor is (probably) OK. Lots of possible reasons. None are real easy to isolate. You need a multimeter, and then you can start troubleshooting the wiring. If you are not comfortable with that, get some help. You may need to do a resistance measurement through the motor windings, and maybe “ring out” the actual wires to see if they are attached correctly at each end. Whatever happens do NOT replace the 7.5 A fuse with a higher rated one. The repeated fuse blowing is telling you that there is a serious problem. The purpose of a fuse is to protect the wires, not the part at the other end. Put a great big fuse in that slot and you will have a fire as your wire melts..... Good luck. John Davies Spokane WA
-
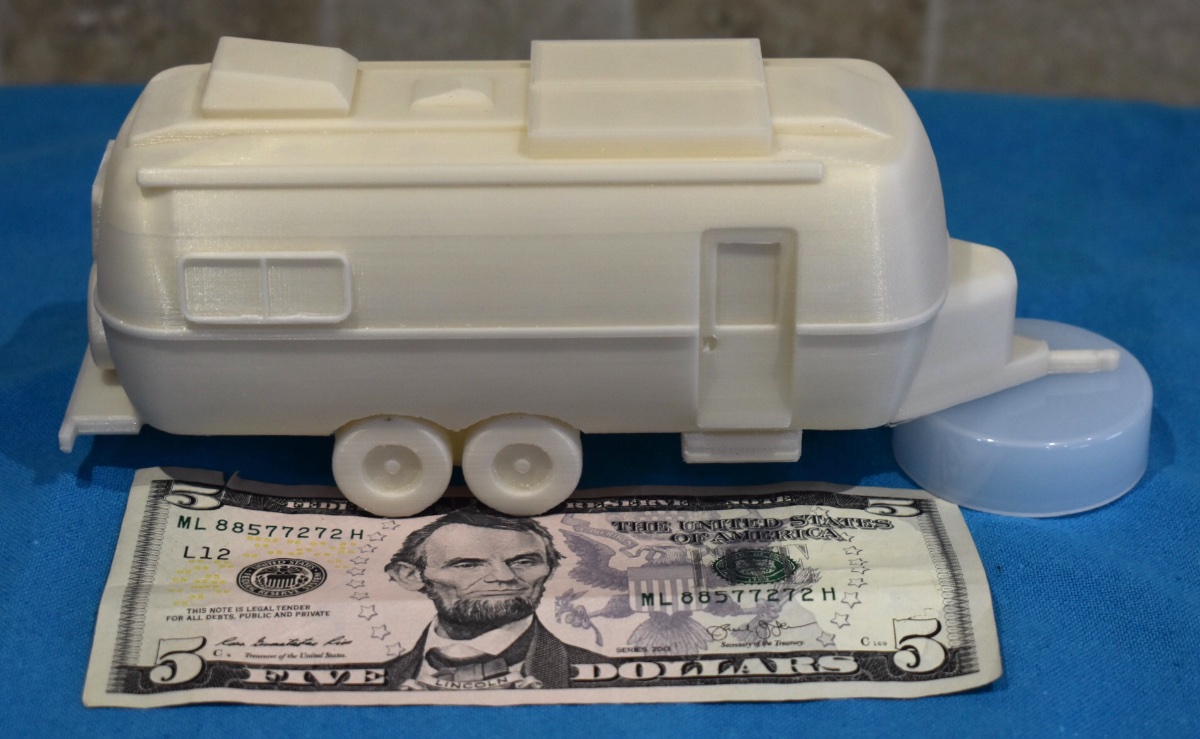
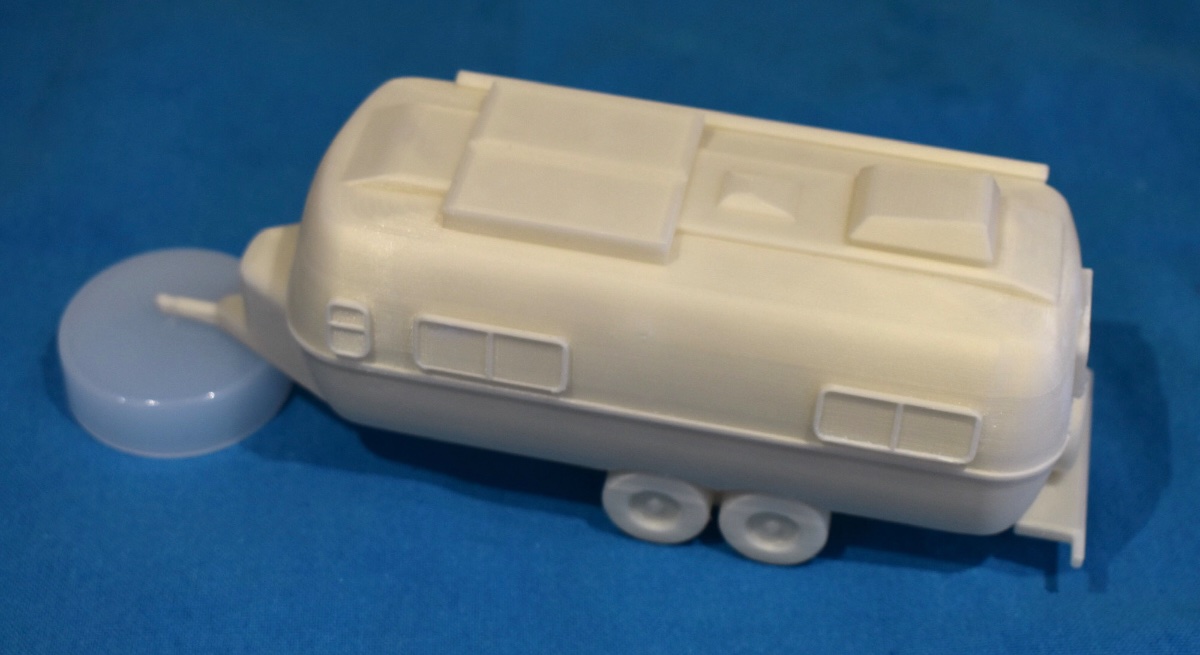
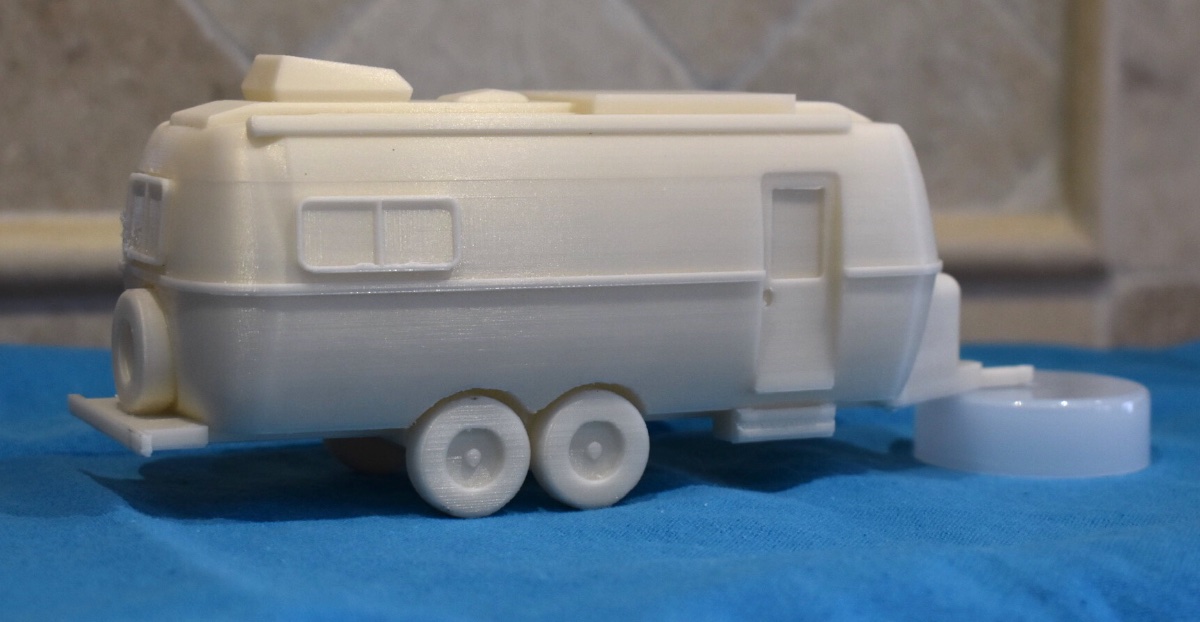
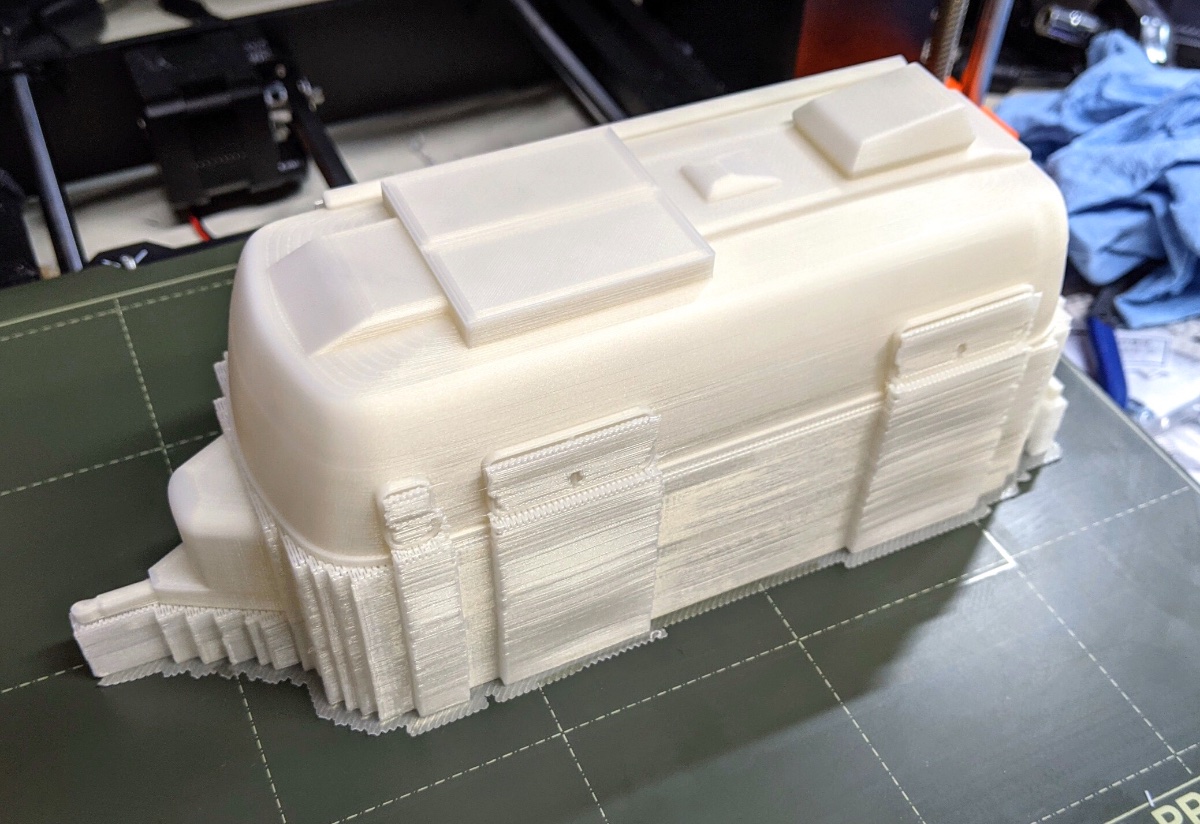
My son is a computer game programmer and they recently got into 3D printing. Here is what arrived for Christmas...... It was a total surprise. The $5 bill is for scale. The hull is exactly 6” long, the LE2 hull is 18’, so this makes the model 1:32 scale. There are lots of truck models in this size, my Land Cruiser 200 would be 5.9” long at this scale. ..... https://www.ebay.com/itm/Toyota-Land-Cruiser-4x4-1-32-Scale-200-VX-Wagon-SUV-Diecast-Model-Mini-4wd-Car-/362667098231 And this is what the model looked like before final trim “processing”, I have NO clue how that is done. They were not able to find an actual data file online, they did this completely from scratch using photos. They are willing to share the print file if somebody wants to try this at home. They are thinking about dividing the build into layers, so you could print the tires, frame and hull in different colors and then join them.... but it would not be too difficult to prime and paint the all white version. And no, they do not want to start mass producing these. That would be something for the much rumored, never seen Ollie Store in Hohenwald. Happy Holidays. John Davies Spokane WA EDIT: FILES AND BASIC 3D PRINT INSTRUCTIONS. NO GUARANTEES, THIS IS NOT PLUG AND PLAY EASY. If you cannot download these files directly from this thread, let me know and I will try another method. Thanks to my son Ian! oliver legacy elite 2 trailer davies.stl oliver legacy elite 2 trailer davies.3mf “Provided as is - this shouldn't be too hard of a print, but you'll probably want to have a basic handle on printing. The print specifics below are what I used to print it. They're not required, but might serve as a starting point. Print specifics: Printer: Original Prusa i3 MK3S, 0.4mm nozzle Slicer: PrusaSlicer 2.2 Filament: 1.75mm Prusament PLA (stock profile in PrusaSlicer) Perimeters: 3 Layer Height: 0.1mm Infill: Gyroid, 5% Supports: On Raft: 2 layers (not necessary, just makes it a bit easier to get the tires round) Model print scale: 850% (~200mm x 66mm x 82mm) Total filament (including supports): 143g/48m If you slice it yourself, you'll probably want to put support blockers in the wheel wells - cleaning supports out of there is a pain. This will require some postprocessing - mostly just removing supports from small gaps. If your printer isn't precise enough, or if you're printing with a larger layer height, you may want to do some sanding to get the curves more fluid.” I. D.
- 21 replies
-
- 26
-

-

-
Grease Gun for Dexter EZ Flex Maintenance
John E Davies replied to BBandJ's topic in Mechanical & Technical Tips
The Stone Stomper fabric keeps both dust and water off the front of the trailer and off the back of the truck. But it does so by directing it down along the road surface. So in effect it makes that water blast underneath the Ollie even worse. What you would need is some kind of angled flaps that directed the water sideways. I can’t imagine what they would look like..... I did mount additional fixed rubber flaps under the trailer to deflect some of the debris away from the underside of the body and from the suspension; they work exceptionally well for hard objects, not so much for massive amounts of water. Some thick rubber flaps mounted directly in front of the springs would help, for sure, to reduce the impact force mainly. It will still be pretty damp back there if it is raining.😬 https://olivertraveltrailers.com/forums/topic/2505-how-to-subframe-gravel-guard/ John Davies Spokane WA -
Grease Gun for Dexter EZ Flex Maintenance
John E Davies replied to BBandJ's topic in Mechanical & Technical Tips
I do not grease every 3000 miles, but OTH I NEVER tow in heavy rain. Wet roads, sometimes, but never when there is lots of standing water.The two massive rooster-tails of water coming off your truck tires will wash it out of the joints. Nor do I blast them with a pressure washer, except before servicing them. I grease them about every 6000, and I would not hesitate to do a long 10k trip without lubing them. As long as they stayed dry. So no, I don’t take a grease gun with me. Call me a wuss, but when conditions are nasty like thunderstorms, I will wait them out. I especially avoid mixing with heavy semitruck traffic in those very marginal conditions. John Daves Spokane WA -
I don’t know anything about your disconnect switch, my trailer does not have one. Just try flipping that switch see if your other 12 volt stuff like lights and fridge go dead. All the fuses inside that box are fed by the same source, if one goes, the others do to. If that doesn’t do it, take off the negative cables coming from the inside of the trailer to your batteries, there are several. You don’t need to remove any of the jumper cables between batteries. John Davies Spokane WS
-
Grease Gun for Dexter EZ Flex Maintenance
John E Davies replied to BBandJ's topic in Mechanical & Technical Tips
Once you use an air powered one you will be much happier. You still have to deal with the initial airlock, when you first install the cartridge, but once that is cleared and it starts moving grease, you no longer need to find room to swing that huge lever, and you can simply hold it one handed while your other hand maneuvers the tip into position on the zerk. Then a few taps of the trigger. Done. And that Alemite swivel tip truly is a wonder, buy it now, don’t look back. You won’t need to change any of the Dexter zerks with that adapter. I serviced my suspension recently and had no problems getting to them. Have fun. John Davies Spokane WA -
That is why I suggested using pointy pliers with an insulated tip, so you won’t short something out. If you have a plastic fuse puller you can use one of those for getting the fuse out. Unfortunately those clip onto the fuse to remove it, you can’t push one back into place with it, and it is too easy to cock it sideways when doing it with your fingers. And you still need to be able to get in there with pliers to squeeze the ears a little. Here is what it looks like, you can see the row of double ears that hold the fuses. Sort of hold them.... I have no problem doing this, but when in doubt, disconnect the battery negative cable. Then, no worries. It is low voltage so not a danger to you, OTH do not remove the entire cover like in that picture without shutting everything down, the stuff on the right side is 120 volts and very deadly. Something like this with electrical tape or heat shrink tubing works. If the battery is disconnected you do not need to insulate it at all. John Davies Spokane WA
-
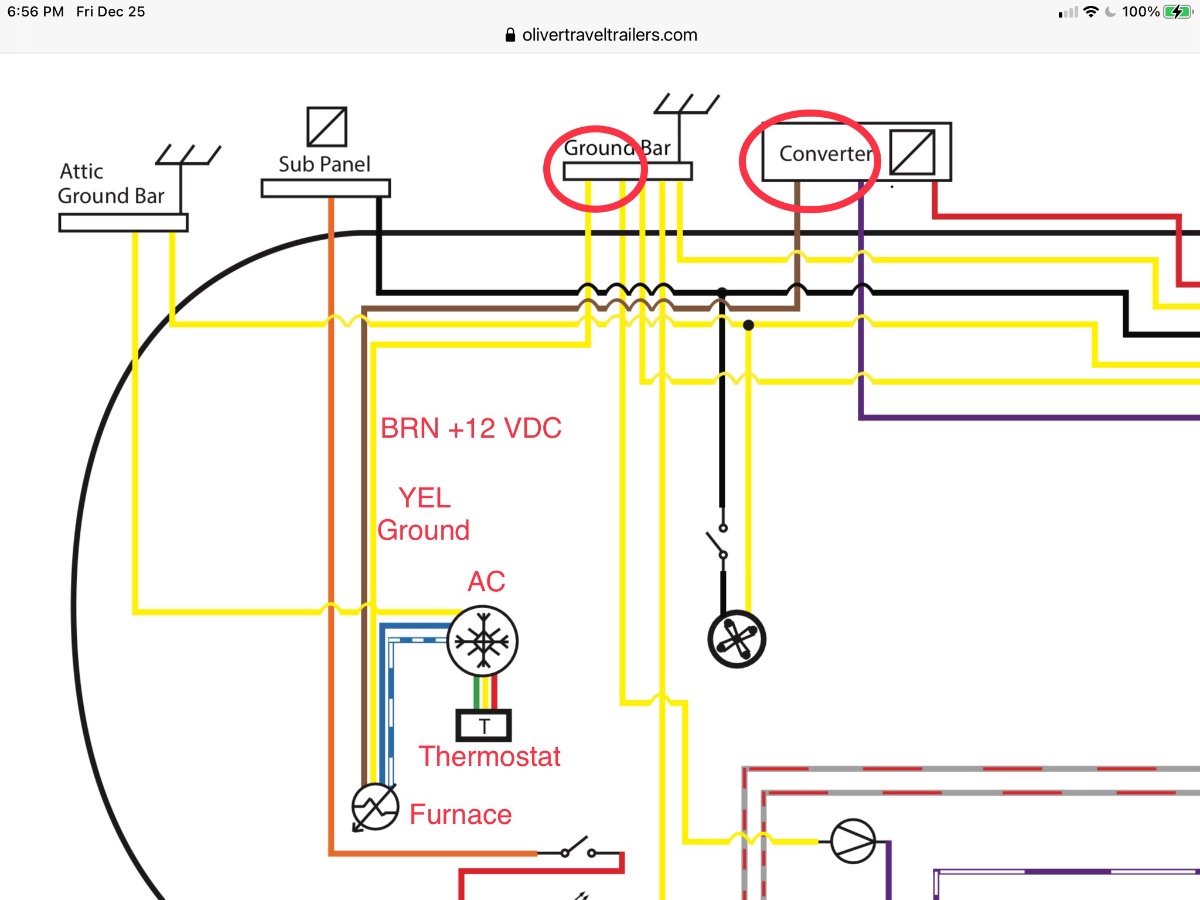
Your Owners Manual shows this.... I highlighted and added some comments in red: The brown wire feeds power to the furnace from the fuse at the Converter under the dinette. There is also a yellow ground wire for the furnace under there, in a long ground bus (strip) on top of the frame, to the rear of the converter. You will see a bunch of yellow wires going into its screw terminals. You can check to see if they are all tight. The thermostat control wires (small gauge) go to the AC unit and then to the furnace, where it gets its power. Most likely you have no power because the furnace fuse has gotten loose in its clips, or ears. They are really soft copper and can be bent out of shape easily. Remove that fuse and carefully squeeze the “ears “ a little closer together with a pair of needle nose pliers covered in electrical tape. Replace the fuse using the pliers, straight in, do not rock it sideways. Check the others while you are in there! There is also a ground wire from the air conditioner to the ground bus in the “attic” cabinet (street side), that could be loose. The drawing is not at all clear about where the thermostat ground connects to the others...... If the fuse appears to be OK you will need to get a volt/ ohm meter and start doing some checks to see where there is voltage, and a ground, and where there is not. And there is always the possibility that the stat itself has failed, or a wire or connector has broken. You are going to have to do some exploring..... Good luck. John Davies Spokane WA
-
AGM Battery Mount Problem
John E Davies replied to Mike and Carol's topic in Mechanical & Technical Tips
Bill I am referring to the fasteners that attach the supports to the fiberglass. On mine (Hull 218) there are two 3/16” steel pop rivets in the area circled. (The inner fasteners are 1/4” bolts and nuts.) That is where the fender well is, there is no way to access the bottom unless you drilled all the way through and put a nut up underneath, from above the tires. I am OK with blind rivets IF there is metal for them to grab onto.... John Davies Spokane WA
-
AGM Battery Mount Problem
John E Davies replied to Mike and Carol's topic in Mechanical & Technical Tips
For those who have removed the entire tray...! ... Do the two outer blind rivets go into just the fiberglass. or are there metal backing plates so the fiberglass does not tear? On my trailer, the four inner through bolts have no large area washers between the nuts and the glass - 🤬- I will fix that, but I worry some about those outer pop rivets “popping” out. There is a tremendous amount of vertical leverage going on when you hit undulations like bridge dips at highway speeds. Not to mention when you bottom out the suspension witha BANG in a deep pothole. Thanks. John Davies Spokane WA -
Replace 12v Port With a Dual USB Port
John E Davies replied to QuestionMark's topic in Ollie Modifications
https://olivertraveltrailers.com/forums/topic/2600-how-to-install-a-dual-high-output-21-amp-21-amp-usb-charger/ I never use those round sockets for anything..... John Davies Spokane WA -
Yeah, I saw that. The size is good but it is zinc instead of brass. I thought Oliver uses only stainless fittings on the outside, but it appears not to be the case here. But Perko makes good quality boat parts, regardless. John Davies Spokane WA
-
I changed my mind about the round upper vents, I am going to mount three of these Perko vents (used in the battery compartment door) directly below the join seam with the pantry, to exhaust the heat out of the battery area. It is a complete dead end heat trap otherwise. https://olivertraveltrailers.com/forums/topic/4843-help-me-id-this-battery-door-vent-i-need-three-but-preferably-in-a-bigger-size/ John Davies Spokane WA
-
Found it.... Perko SKU 51840, chrome plated brass. The other products I have found are either plated zinc ☹️ or stainless and many $$$$. I will order some of these. $14 plus shipping. https://www.go2marine.com/perko-ventilator-vent Sorry for your time..... John Davies Spokane WA
-
I want two that are a little larger, with larger holes, and no more than 10 or 12” long. I did find this louvered one ..... https://www.amazon.com/dp/B002IV6PD0/?coliid=I2BOYQ3KRAV24E&colid=1X5H11EH41351&psc=1&ref_=lv_ov_lig_dp_it .... but I really want a design with a smooth “no snag” surface, since they will be located near the sleeping areas and might get bashed by a wayward arm. Plus these are way prettier! Somebody who has installed a compressor fridge, what air vents did you use in the galley? Thanks. John Davies Spokane WA
-
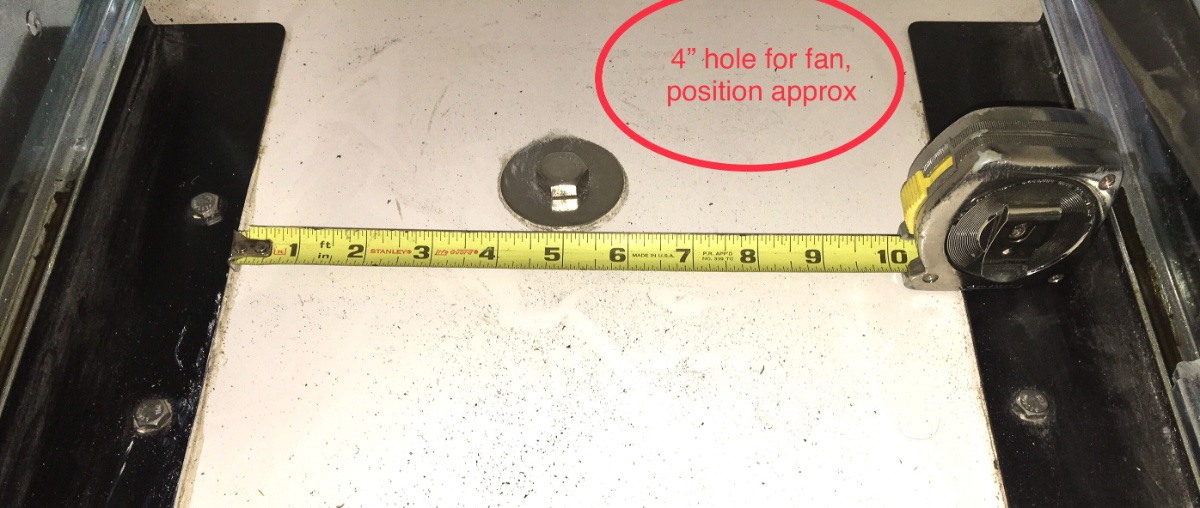
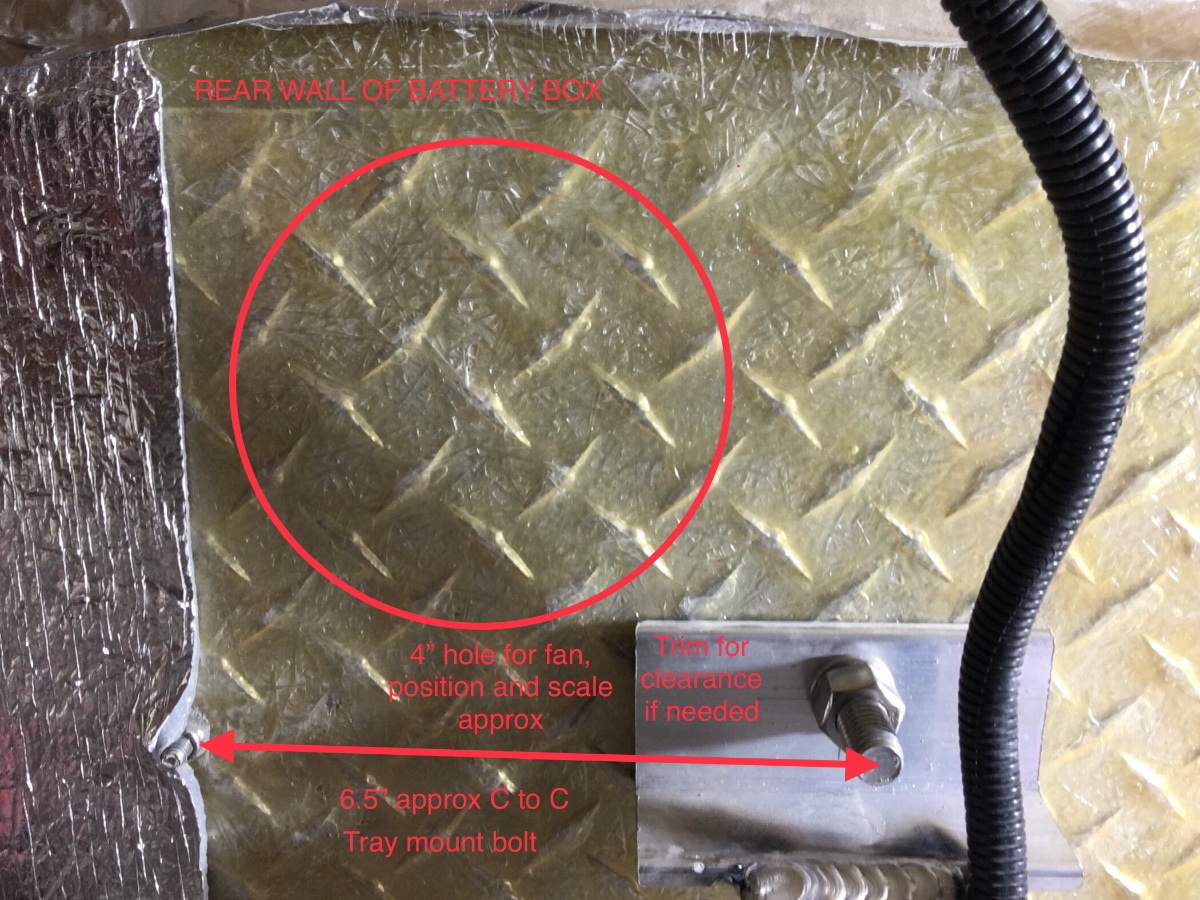
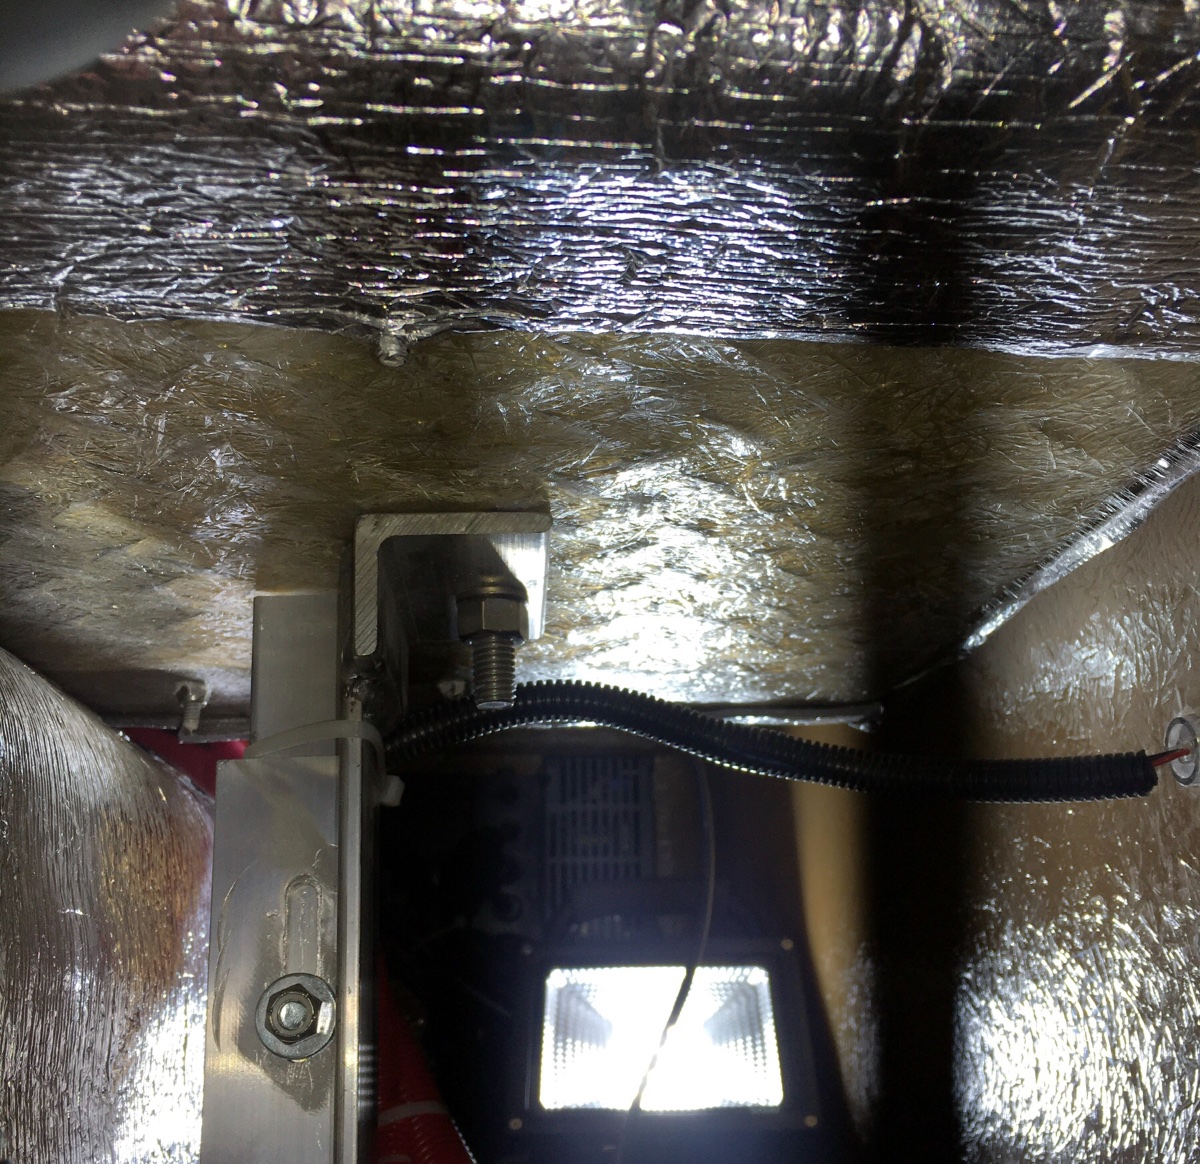
I took some measurements, and on MY hull #218, I can mount the fan as shown. I might have to trim the corner off the support angle for the floor. The support assembly comes out easily since it is adjustable with a bolt or bolts (I added a second one already, they forgot to install it.) There is no room further outboard from there since the floor sits directly on top of the wheel well. Note the lack of large area washers under the tray mount bolts to distribute the load. Grrrrrrrr! 🤬🤬🤬🤬 John Davies Spokane WA
-
Grease Gun for Dexter EZ Flex Maintenance
John E Davies replied to BBandJ's topic in Mechanical & Technical Tips
Bill, I know you are being humorous . OTH the mess I was referring to was that with cheap lithium grease, the oil seeps out of the wax carrier inside the spring bushings, especially in hot weather. It spreads out all over those areas, and runs down onto the rubber EZ Flex pads. The first is just unsightly (dust sticks to it). The second can eventually ruin the rubber. I haven’t used the CV-2 long enough in my suspension to verify this 100%, but in the can or in wheel bearings, the oil loss over several years is none to very minimal. Not like the huge mess I find under my grease gun with cheap lithium grease. I used to store it with one end inside a gallon zip bag, so I could dump out several ounces of oil from it before the next use. You still get a bunch of manly work each time you service the zerk fittings. But in between they should remain looking a whole lot less gross. Plus it is a MUCH better lubricant and will cut down on how often you have to do this. John Davies Spokane WS -
I need to look closer before I order a fan, but I think it will fit under the fiberglass beside the aluminum support structure. If so, then just drill a 4” hole at that location, mount the fan under the fiberglass (blowing air upwards), run wires to a nearby switch. Drill a bunch of big holes in the sides near the top to let the heat escape. Obviously the compartment door vents should be covered and the door itself well insulated. This is still in the planning stage. Even without a fan in the bottom hole, there should flow a good bit of airflow through natural convection, but only if there are openings inside the cabin for it to enter and exit. Cool air in down low, warm air out higher up. Without those, the heat will remain trapped in the box. I have already located some aluminum screened 4” grills to use there. These are aluminum and should withstand a light kick. .... https://www.amazon.com/gp/product/B000BQM5EC/ref=ox_sc_act_title_2?smid=A2JIG2D2ZKIQO8&psc=1 John Davies Spokane WA