John E Davies
-
Posts
5,759 -
Joined
-
Last visited
-
Days Won
243
Everything posted by John E Davies
-

AGM Battery Mount Problem
John E Davies replied to Mike and Carol's topic in Mechanical & Technical Tips
This works: Mine were actually a little loose. John Davies Spokane WA
-
HOW TO: Progressive Dynamics PD4045 LITHIUM upgrade
John E Davies replied to John E Davies's topic in Ollie Modifications
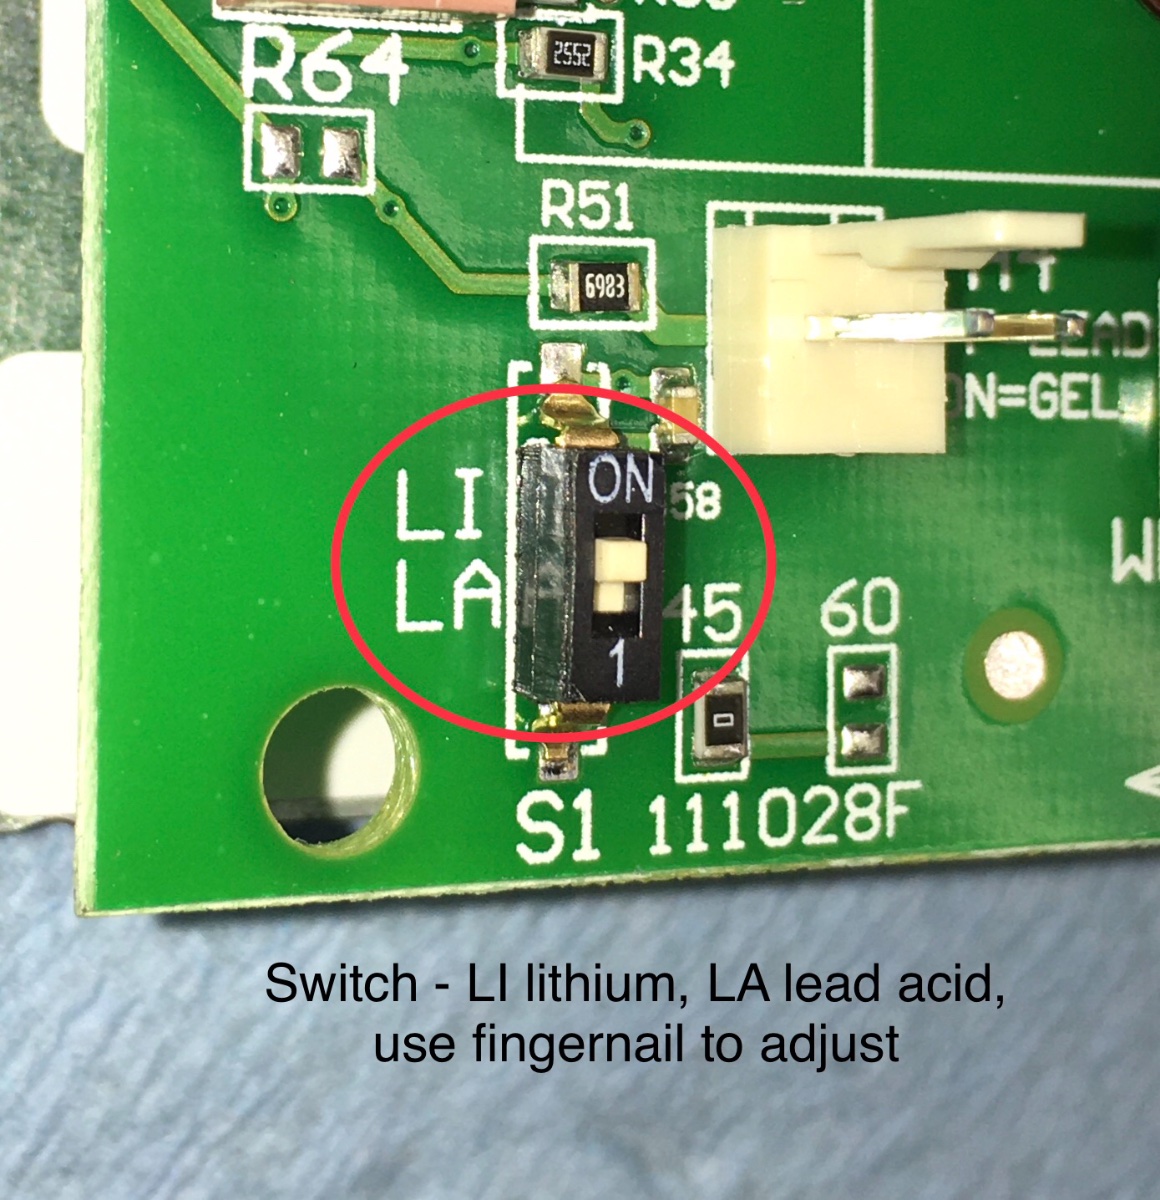
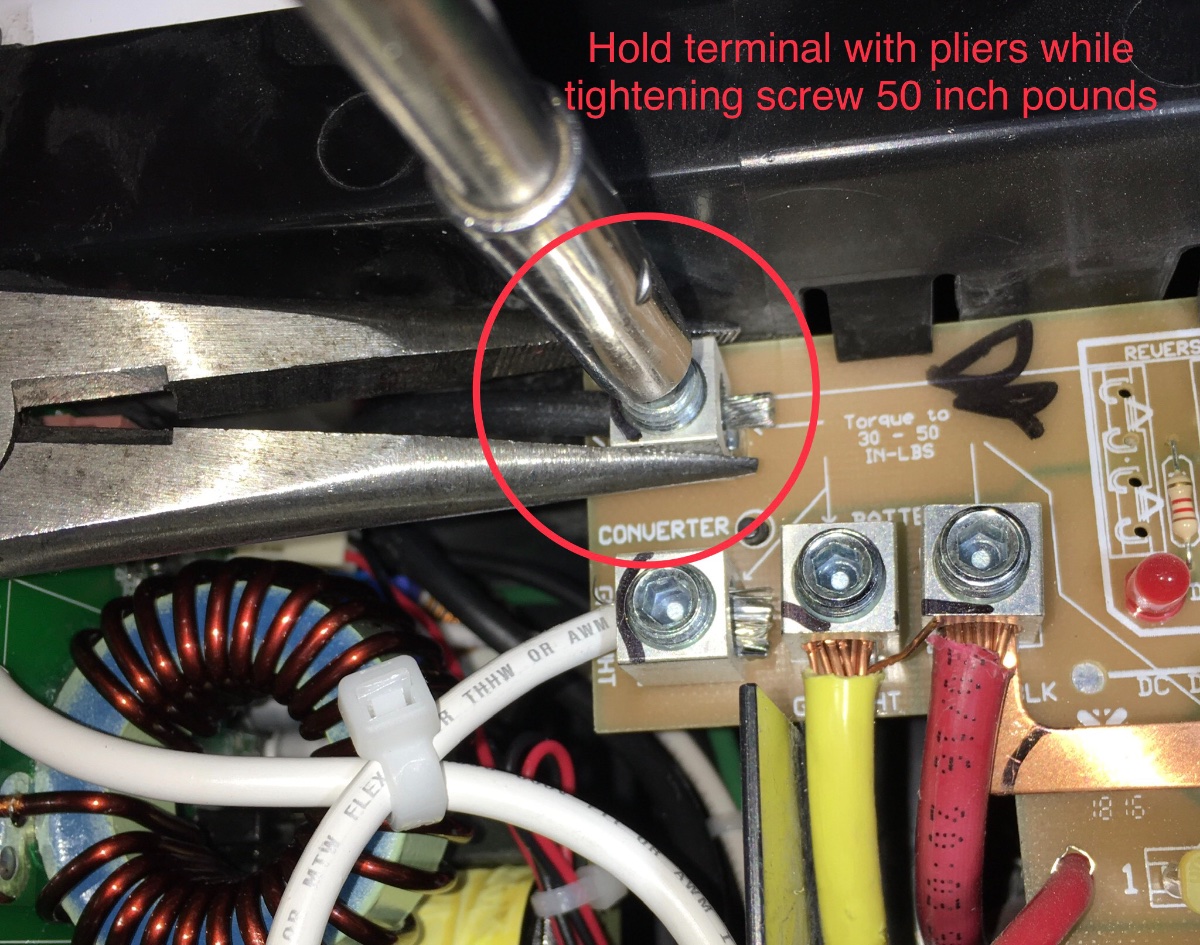
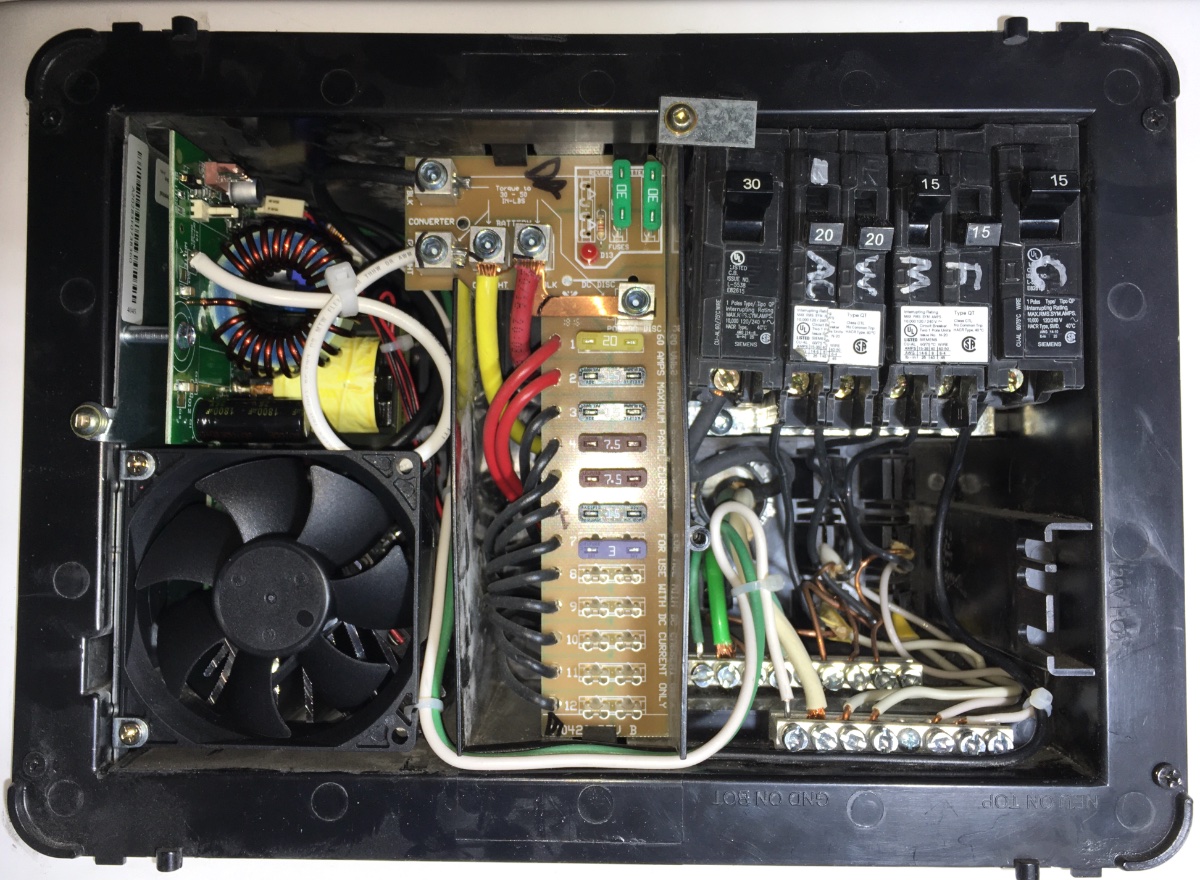
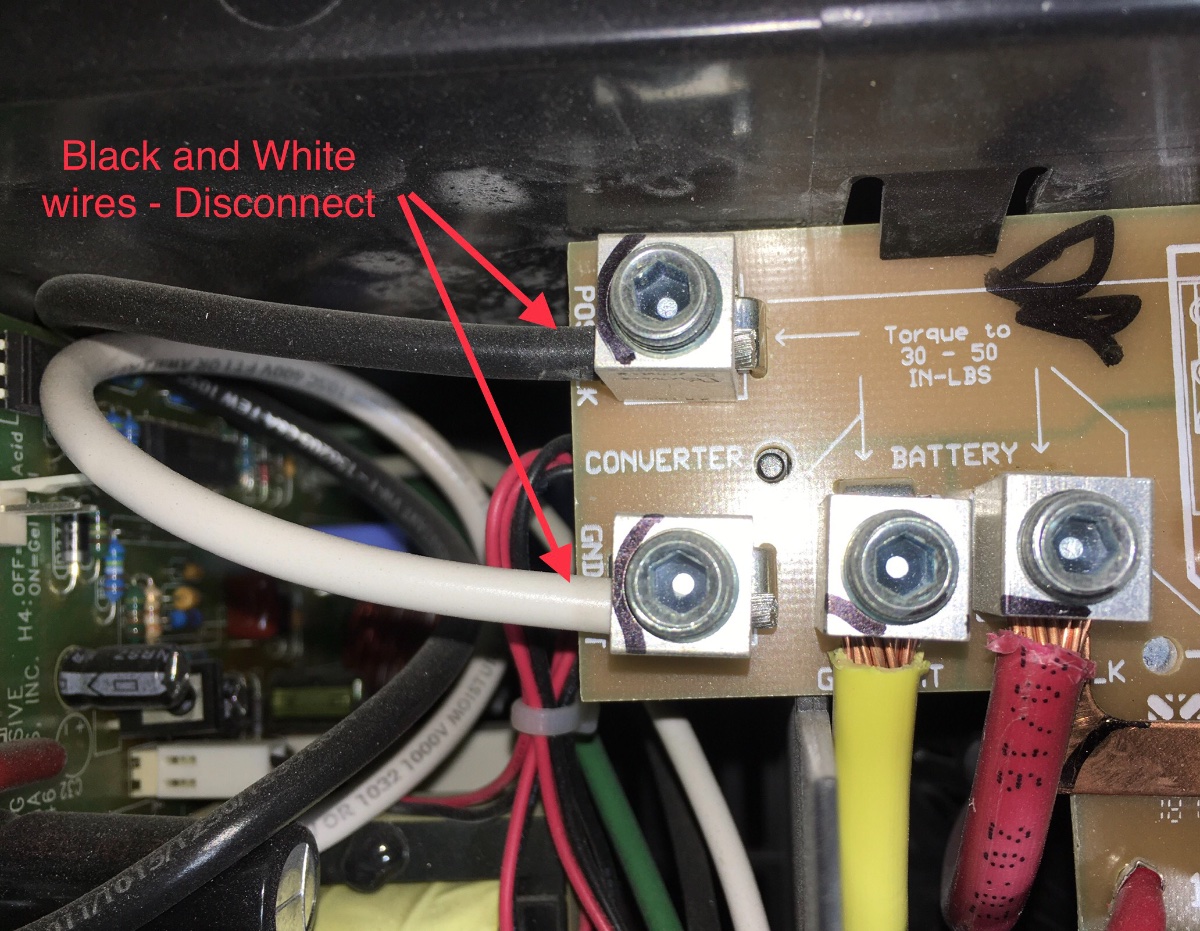
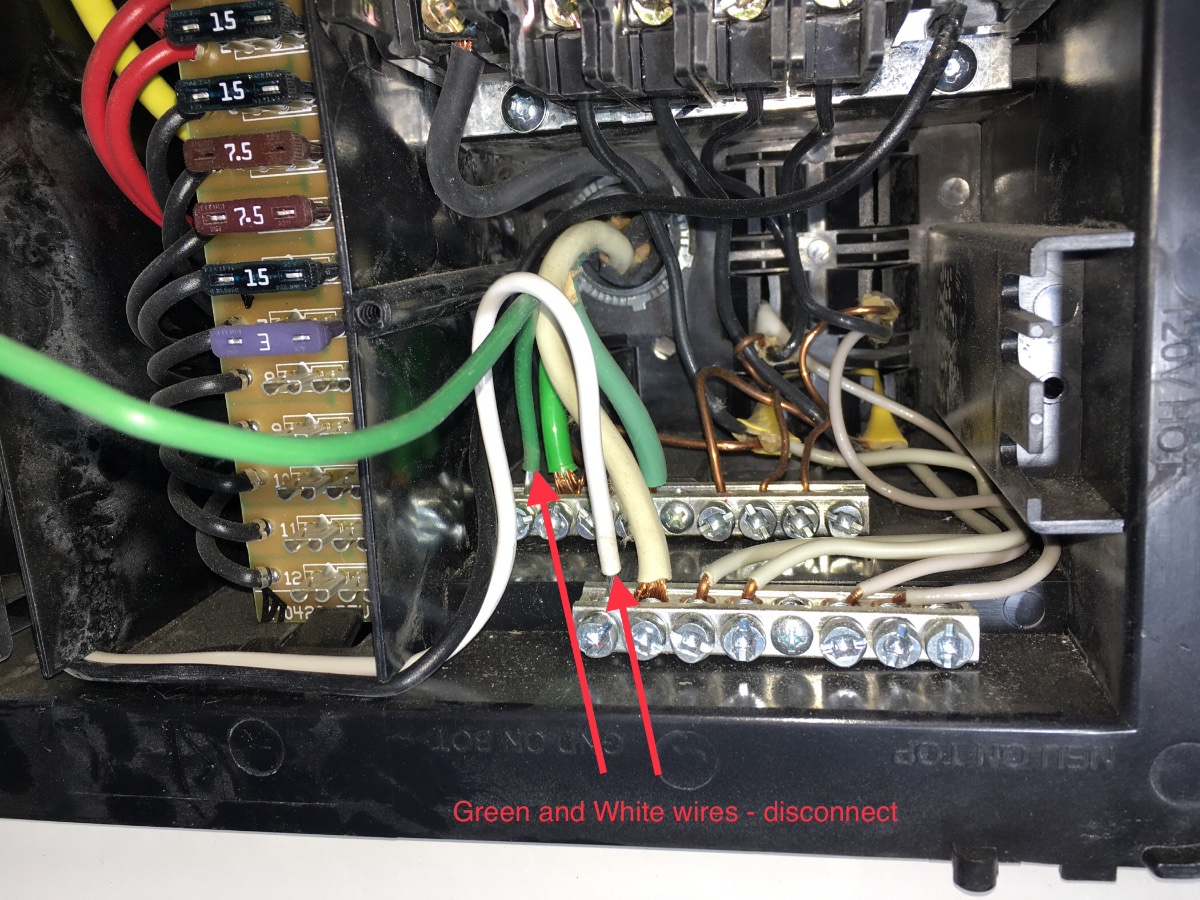
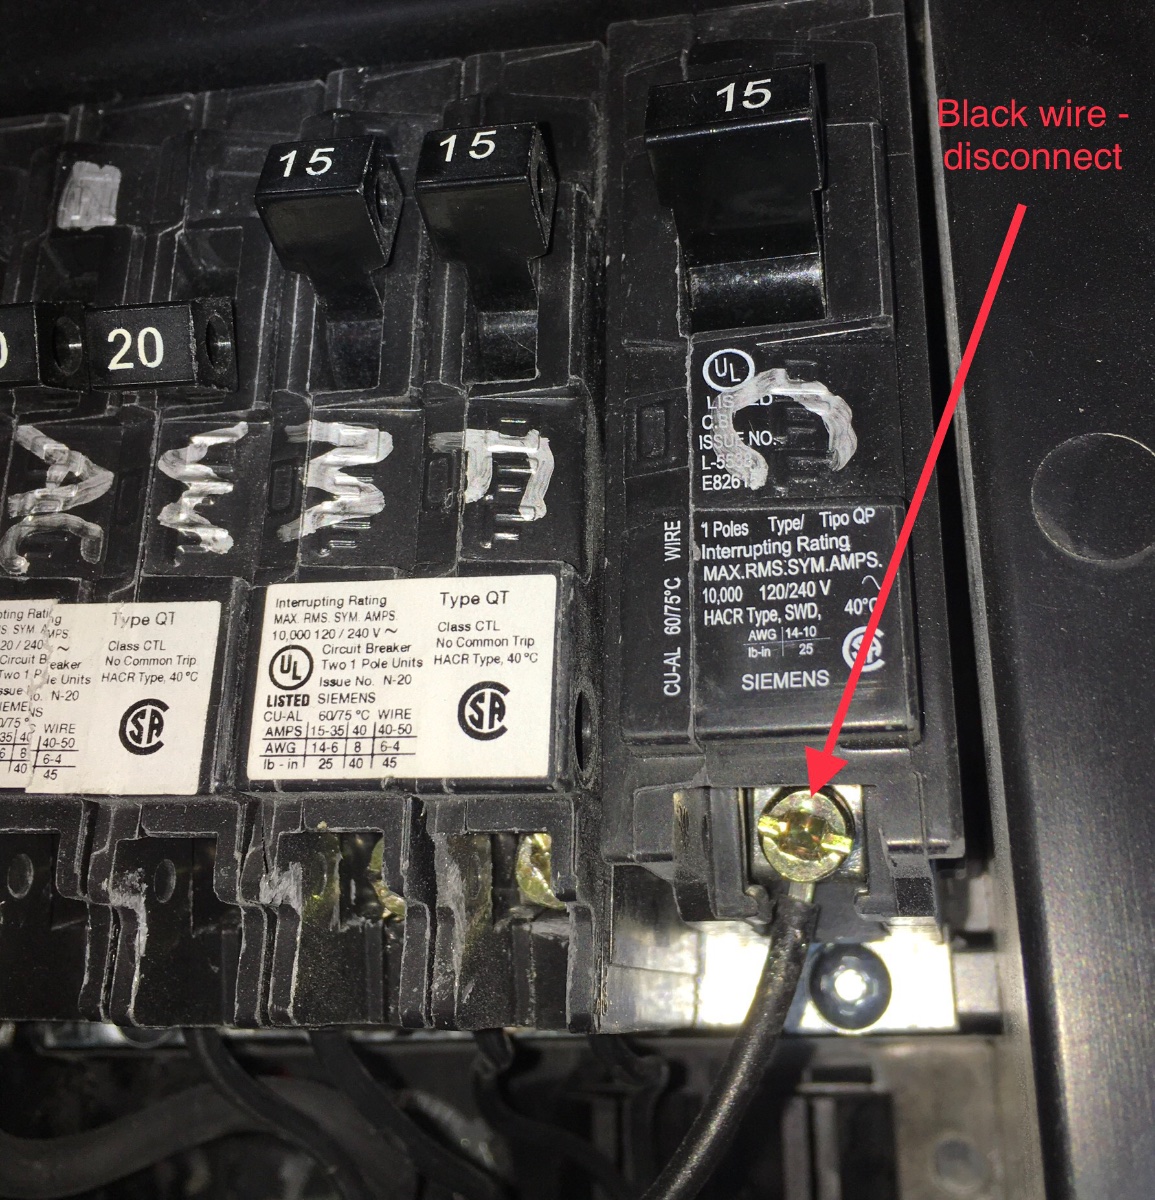
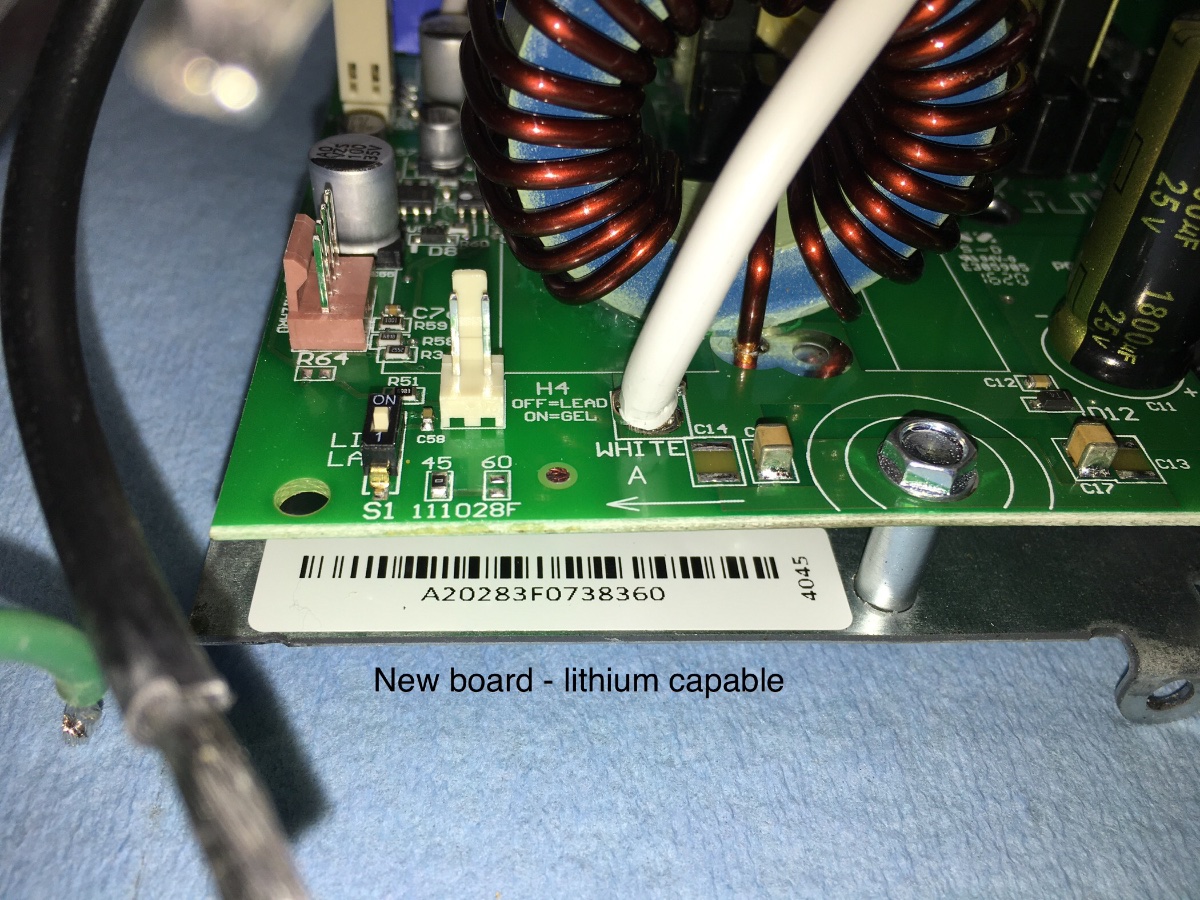
Prep the new unit. Secure the three small 120 volt AC wires with nylon ties. Also secure the black and red fan wires if necessary. This provides "strain relief" for the soldered joints and reduces the chance of damage from rough roads. Plus it looks a lot better. Here is the Lithium/ Lead Acid selector switch which alters the charging parameters to allow a 100% charge. It is an actual microswitch, you slide it back and forth with a fingernail or tiny screwdriver. Make sure it is in the upper ON "LI" position. Slide the new unit into place and install the retaining screw and washer. Connect the wires. The two big wires need to be tight. Mine were actually a little loose. Hold the terminal block with a pair of pliers to reduce strain on the circuit board. You don't need a torque wrench, hand tight is fine. Secure the white wire in a loop as shown. You can't get access to the black one. Add some ties to secure the AC wires. Done: BTW, the circuit breakers just snap into place, I tried to align mine so that they were close to even, but had no luck. The silver letters are lables I added with a Sharpie: C converter (charger), F fridge (or use R for refrigerator), M microwave/ outlets, W water heater, AC air conditioner. The big 30A one on the left is the MAIN breaker that shuts off power to all of the others. BTW also, each 12 volt fuse in the center is held held in place by little brass clips. The "ears" are very soft and can be distorted easily, causing an intermittent connection. (My fridge kept shutting down due to this.) Always be careful removing or installing a fuse, do not rock it sideways or the connection will be loose! You can very CAREFULY squeeze the ears together with mini pliers to make a tighter fit. This is a poor design. Reinstall the cover. Reconnect your NEW lithium batteries and shore power, and make sure the system is charging. I plan blow the dust off my used unit so I can sell it on here or on eBay. I hope this thread is helpful. John Davies Spokane WA
-
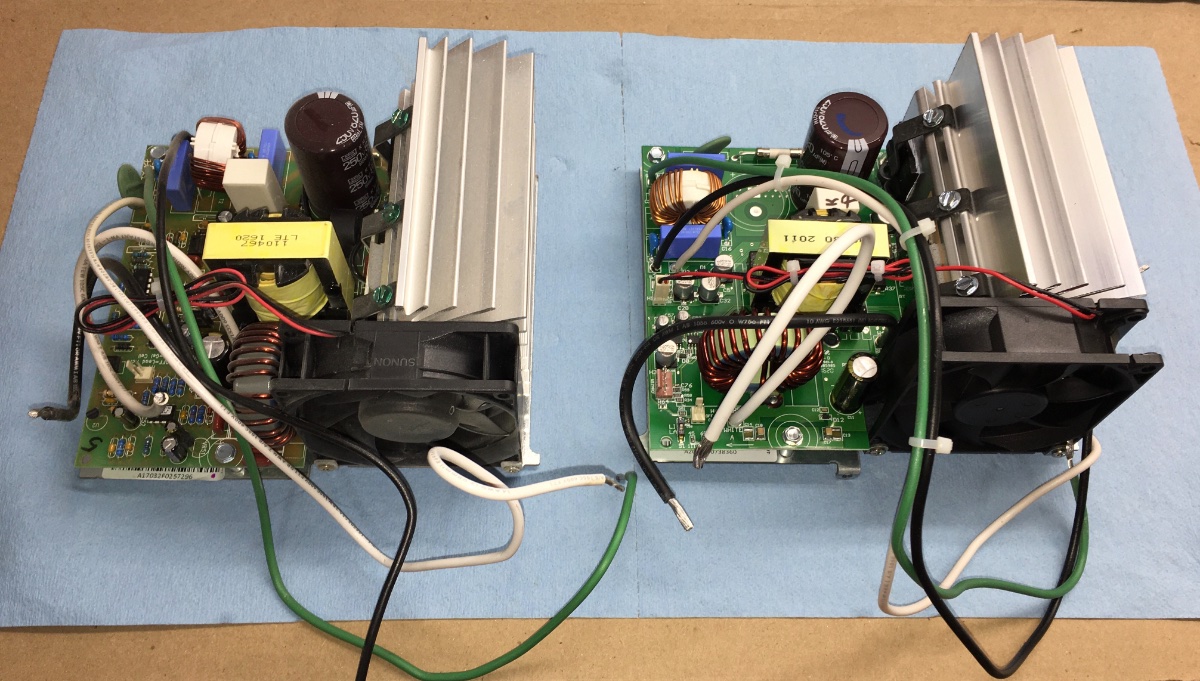
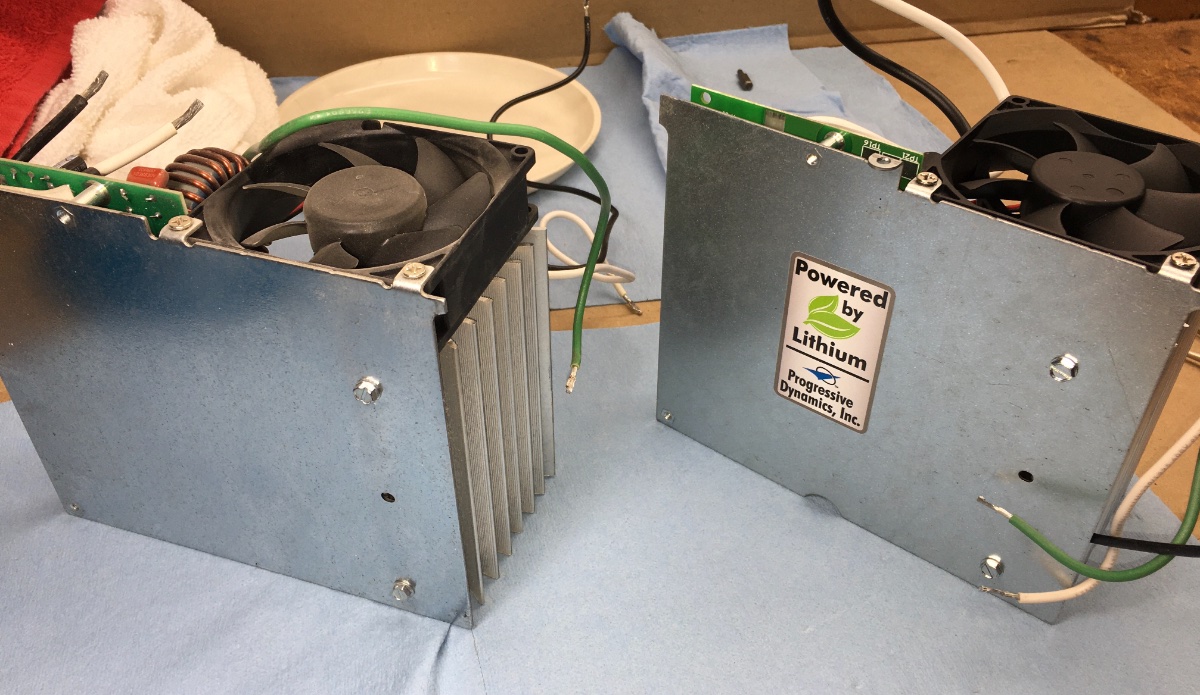
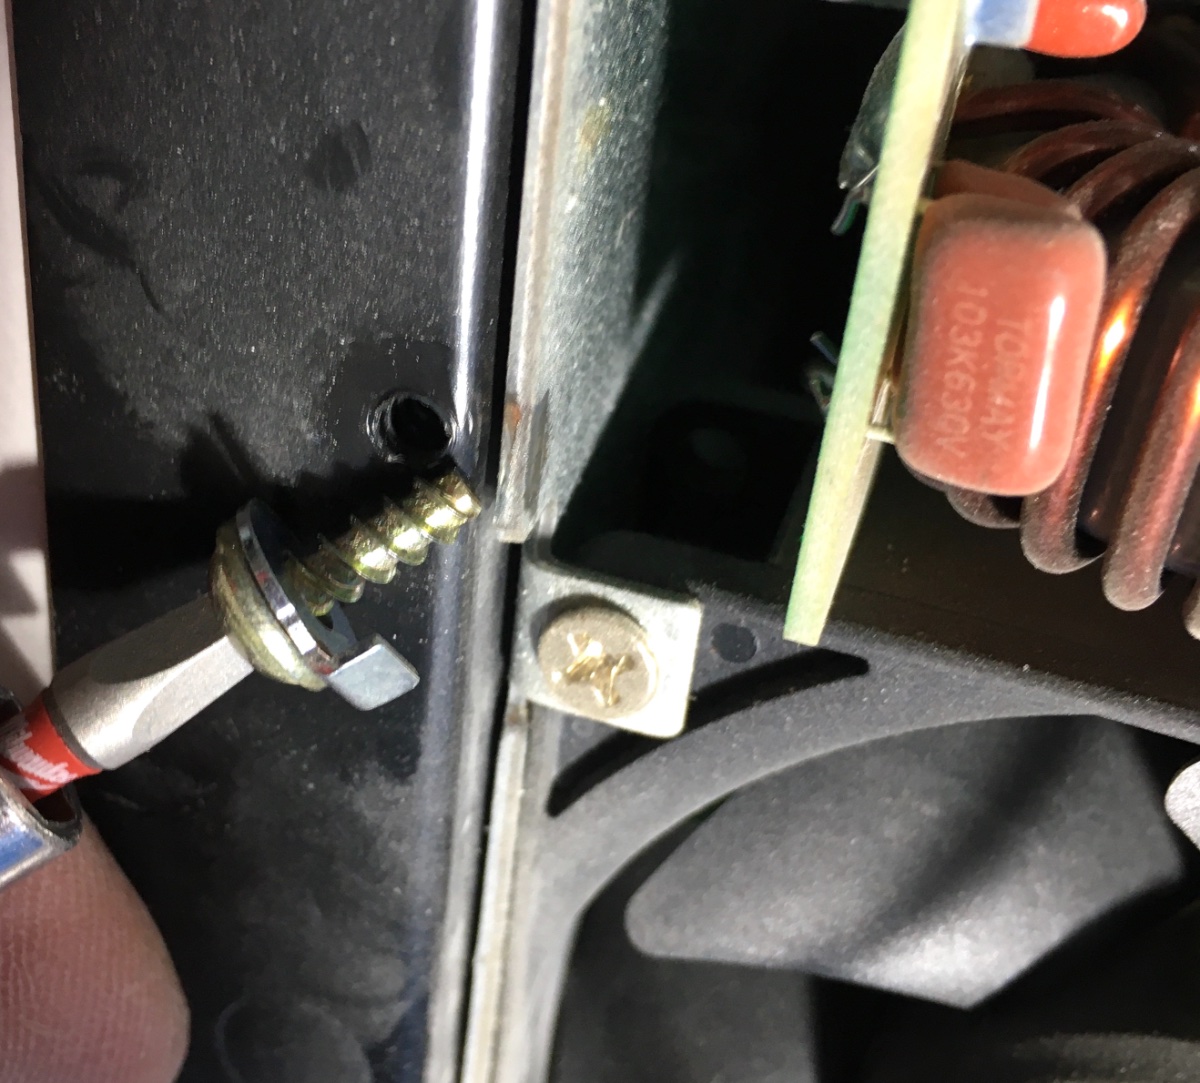
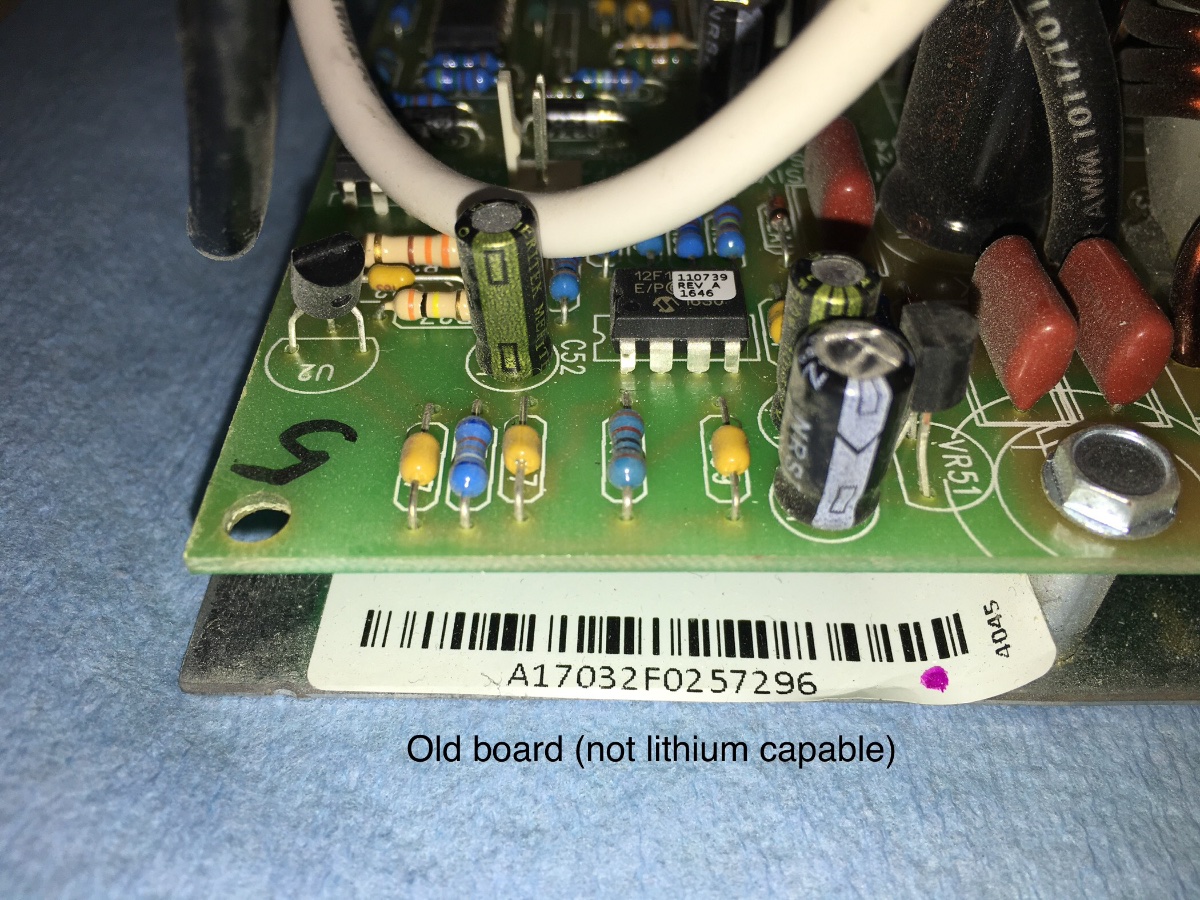
See this thread first: ... https://olivertraveltrailers.com/forums/topic/4743-upgrading-to-lithium-batteries-source-for-cheap-“lithium-charging-section”-for-your-older-pd4045-converter/ Read this: .... PD4000 Series Troubleshooting Guide ... The last page discusses swapping the converter charging section. This isn't at all difficult, but like any electrical mod, be careful, make sure you understand each step, and double check your work. Disconnect the shore power and also disconnect the batteries when doing this mod. You would be working around live wires otherwise. Tools needed: Allen and square drive screwdriver tips. If you don't already have these, consider buying a set that has all types - these are excellent and come with a dandy case: .... https://www.homedepot.com/s/Shockwave%20Steel%20Impact%20Duty%20Driver%20Bit%20Set%20(74-Piece)?NCNI-5 Needle nose pliers Wire cutters Nylon tie wraps Here is the old versus the new one, which comes with a fancy decal: Open the front door that covers the fuses and circuit breakers, remove the small square drive screw in the center of the panel. Grab the frame and pop it free from the four outer retaining tabs. Mine came right off, you might have to pry gently. Remove the square drive screw and tabbed washer on the left side that retains the unit. Remove the five wires: Slide out the old unit. Be careful with it, you can sell it on eBay for a little cash. Old vs new boards; John Davies Spokane WA
-
AGM Battery Mount Problem
John E Davies replied to Mike and Carol's topic in Mechanical & Technical Tips
Mike, just the other day I swapped the Progressive Dynamics charging unit, it was relatively simple but I can offer a few tips. I will make a How To thread with pics. I think we will see more and more owners doing this mod as their “old school” lead acid batteries fail. I emailed Jason last month suggesting that the company issue a technical bullet with official guidance on how this should be done and he forwarded that to somebody. He did tell me that the production department kept no records of which PD units were installed, so an owner must indeed physically remove the cover to check the board. Maybe when enough swaps have been done, we can post a poll to figure out the rough cutoff date for when these lithium ones began to appear from the factory. I also suggested that they could offer an upgrade kit through the Oliver Company Store, for which we have now been impatiently waiting a couple years.... John Davies Spokane WA -
Welcome from the Dry Side, there are several Seattle area Ollie owners here. Where do you live? We were in Ballard, Wallingford, Mukilteo, and finally Monroe, we kept moving further and further to get away from all those people, in 2004 we ended up across the state. My son is in Redmond, we used to visit him often, not so much now with Covid. Do you have a decent place to store your new toy? Where do you plan to bed down your kids? Four people is a crowd in even the biggest Ollie. Some owners with children put them in a tent, to get a little privacy, nudge nudge, wink wink..... John Davies Spokane WA
-
Bill, what a nice installation, it looks slick! FYI about map updates, do them often. They come out about every three months. When installing, look at Options and choose to install a copy on your computer. Their BaseCamp PC or Mac mapping application works pretty well for a free app, but any updated maps have to go onto your computer as well as your device. https://support.garmin.com/en-US/?faq=vxmflP3DAk2ajAJSmzVSW6 Map files are huge, try to delete older ones off your computer rather than just letting them accumulate. The new one that goes onto your device over-writes the old one; NOT so with the ones that go onto your home machine. Also you can add a few “custom” map types to your device and to BaseCamp, like 24K state topographic maps. These have to be downloaded from another site like .... https://www.gpsfiledepot.com/maps/ .... and then loaded using the Garmin Map Install app. https://www.gpsfiledepot.com/tutorials/ John Davies Spokane WA
-
Dennis, I can’t imagine any Ollie owner who would be willing to rent it out. It is an expensive, premium quality product with a unusually high resale value (hardly any depreciation). A stranger will simply not care a lot about physically damaging it. “The insurance will cover it” does not apply. Once damaged, a repair to the aluminum frame or hull may be difficult and costly, and a patched gelcoat may not match. I am pretty laid back about taking mine off pavement or even into tight situations like busy parking lots, but I do take extreme care to protect it from collisions and especially rock damage . A stranger also will not care about destroying the batteries by running them flat. An abused battery bank might not be obvious to the owner immediately, it usually shows itself as a greatly reduced life span. Replacing up to four damaged/ worn out batteries is costly, especially lithium ones (up to $4500, depending on capacity and brand)! If I screwed something up myself, I would mutter a few bad words and deal with it. If somebody else did it, I would be dangerously furious.🤬 Do NOT mess with my baby!!!! John Davies Spokane WA
-
mjrendon, Spray on bed liner protects the tray, not the batteries. unless you meant to spray the batteries themselves? My limited experience with an aerosol product was very bad, unlike the professionally applied ones. The stuff out of a can might be OK. I do intend to make blocks to limit movement. I am looking for material to go directly against the battery surfaces. John Davies Spokane WA
-
AGM Battery Mount Problem
John E Davies replied to Mike and Carol's topic in Mechanical & Technical Tips
As far as things to watch out for when disconnecting or removing batteries, the big one is safety. You always disconnect all ground (negative) wires first, and attach them last. Since the ground terminals on the batteries are essentially the same as the trailer frame, in terms of electrical voltage, if you accidentally touch your wrench to a metal object while loosening the nut on the negative post, it won’t do anything at all. if you were to short the positive terminal to a grounded part, it will make a huge high amperage arc. Very dangerous, and it can cause a severe electrical burn! An Ollie is actually pretty safe compared to your car or tractor, since the compartment is made of fiberglass which is a non-conducting material, but you should understand and follow this standard practice, always. You certainly should not drop a long steel tool across the negative and positive terminals. That would be very bad. Search for “welding with a car battery”. And remove any conducting watch or jewelry from your hands or neck, you don’t want a pretty silver necklace to drape across the terminals. Smart mechanics do not wear jewelry, for a good reason. (Plus it can get caught in moving parts.) Just understand the potential danger (electrical pun intended) of all that stored up energy, and respect it. Don’t work while impared or distracted, and focus on the job. Plastic terminal covers are an excellent way to protect against shorts when transporting batteries, to a shop for testing, for example. If you don’t have them, be very aware of the risk of an arc. Don’t let a steel milk crate or tool box fall against them or let them fall over while driving, they need to be 100% secure. Since one of yours is punctured, there will possibly be wet hydrochloric acid underneath; wear rubber gloves, neutralize and wash the batteries thoroughly. Put down some cardboard underneath while transporting them, any residual acid will eat holes in carpet. Or your pants.... John Davies Spokane WA -
AGM Battery Mount Problem
John E Davies replied to Mike and Carol's topic in Mechanical & Technical Tips
THANK YOU - I have been perplexed by this unexpected phenomenon. Why is there one in the inverter, to deal with startup surge issues? I don’t need a Master’s Thesis, just what the heck it is doing in there? Now that I know that the bright blue zap is normal, it won’t bother me quite so much, but sparks around a vented lead acid battery bank certainly would be a concern (hydrogen gas explosion)..... John Davies Spokane WA -
There have been reports of damaged batteries, from straps and the protruding tray rivets. I want to protect my new Victron lithiums, do you have any suggestions? I found this, it is cheap (in this particular size). and the ribs would provide ventilation and moisture drainage if placed facing downwards, to help keep the tray from rusting https://www.amazon.com/Rubber-Cal-03_167_W_RC_04-Non-Slip-Outdoor-Rubber/dp/B001AS3YEA/ref=sr_1_3?dchild=1&keywords=neoprene%2Bfloor%2Bmat%2Bribbed%2Bblack%2B1%2F8”&qid=1607966679&sr=8-3&th=1 I would prefer something flexible like this rather than stiff plastic, since I could use the leftover material for all sorts of stuff like lining a storage area. I think the cabinet and rear cargo liners in my Ollie are very similar. And no, I don’t want a horse stall mat ... 😬.... I want to keep it light weight. Got some suggestions that will reduce battery movement and chafing? Thanks, John Davies Spokane WA
-
slav, in addition to what you mentioned, an “exposed” Ollie needs to have all the tires that face direct sunlight covered with opaque shields to prevent UV damage. And consider Rejex, it is a PITA to apply correctly, but it is really long lasting and easy to clean. Those that have bad comments about it may not have prepped the surfaces by removing previous wax and debris. John Davies Spokane WA
-
That works, but if an owner has no tall fence or raised deck it could be problematic. I suppose he could invest in a couple of these: ... https://www.geargrid.com/product/windsor-outdoor-hose-drying-rack/ Maybe not, if code doesn’t allow a carport it wouldn’t allow the tables either 😬 John Davies Spokane WA
-
How do you clean these cloth covers in the spring? It is really hard to fold up and store a dirty one without contaminating the inside, that rests and chafes against the trailer gelcoat. (It is impossible to get a clean cover onto a clean trailer without getting it dirty, unless the ground is paved and freshly hosed off.) I had one decades ago and used a pressure washer with the cover hung on a tall fence. An amazing amount of muck came off it, what a mess. It was not at all satisfactory. This was in Western WA where needles, sap and moss were the main problem, not so much airborne dust. IMHO a free standing carport would be a better choice if you don’t have restrictive codes. Unless you just don’t care about the cosmetic damage to the Ollie.. it can be a real PITA and costly to repair. Dirt washes off your Ollie, but fixing damaged gel coat is big $$$$. Invest in a structure now, save heartache later. John Davies Spokane WA
-
AGM Battery Mount Problem
John E Davies replied to Mike and Carol's topic in Mechanical & Technical Tips
You could load test them , but IMHO five year old AGM batteries are toast, regardless of whether they are leaking acid or not.... they need to be replaced before your next trip as a complete set ($$) or with lithiums and a new charger ($$$$). I hope the tray has not been ruined. Clean it up with baking soda and water, scrub well and repaint with a good spray paint. I really like the ceramic Duplicolor Brake Caliper Paints, they require no primer and are tough, but very easy to apply and they stay looking good for a long time. The damage to Overland’s cases is disturbing, does the material seem to be really soft? I was considering making pads from thin mudflap material or old conveyor belts (cloth reinforced neoprene) for my new Victrons, I think that idea just got shoved up the “Honey Do List” to near the top. This is all one big learning curve, isn’t it? As these trailers age, we start to see all sorts of unpredictable glitches appearing. John Davies Spokane WA -
They need to stop putting that little round hole there, and instead hinge the air return grill so it will swing down. Or put a bigger opening with a door, and mount the grill on that. Or move that grill across the room under the dinette..... John Davies Spokane WA
-
For those with a technical interest this is useful. Even if you can’t understand much of it, take away this important fact. “... it is common to charge a 12 volt a 4-cell series pack with a lead acid battery charger. The maximum voltage of these chargers, whether AC powered, or using a car's alternator, is 14.4 volts. This works fine, but lead acid chargers will lower their voltage to 13.8 volts for the float charge, and so will usually terminate before the LiFe pack is at 100%. For this reason a special LiFe charger is required to reliably get to 100% capacity.” https://www.powerstream.com/LLLF.htm So maybe a standard automotive portable lead acid charger of adequate size would be a good thing to have as a backup in case your onboard system becomes inoperative..... it won’t fully charge it, but it will get it most of the way there, about 70%. Or for around $120 you can get a 20 amp Renogy unit that will eventually get them to 100%. https://www.amazon.com/Renogy-12V-20A-Alligator-Batteries/dp/B08C2JN76Q John Davies Spokane WA
-
This is the price you pay for combining a critical function (charging) in a non- critical device (making popcorn): with the factory lithium package if the inverter fails you can’t charge your batteries off shore power or a generator. And they won’t fully charge off your truck either! And if you don’t have solar there is no way to charge!! Having at least two separate charging sources is always a better setup for camping. The Progressive Dynamics charger section for Ollies without the lithium battery package is only $160 and can easily be changed in half an hour by the average owner. Why ruin a trip when one rarely used component quits? Does not compute.... ☹️ Good luck. Maybe also consider buying a high amperage portable lead acid charger, as an ultimate backup, it won’t hurt the lithium batteries in any way, it just won’t fully charge them. Complain to Oliver about their decision to charge off the inverter. I think it is a very dumb engineering decision. I will soon be able to charge my Victron lithiums by the PD converter (new module), by the truck (new DC to DC converter), by the roof panels (new MPPT controller) and by a portable panel. All independent of each other. I have already had one failure of the standard 2000 watt inverter, the replacement is loud, and I do not trust it. John Davies Spokane WA
-
Heads up! Home Depot bulk packs of the sizes you will use most on sale through Dec 26, in natural and black, $9.88. Even their regular price is a great deal compared to buying the smaller packs. https://www.homedepot.com/p/Commercial-Electric-Assorted-Cable-Tie-Canister-Natural-650-Pack-4in-8in-11in-natural-650/203531946 The black ones: https://www.homedepot.com/p/Commercial-Electric-Assorted-Cable-Ties-650-Pack-4-8-11in-UV-tie/302366855 Here is a BIG caution about nylon ties, some cheap brands are brittle and will break. I am talking about Harbor Freight and Walmart specifically. It is distressing to have one after the next of your “50 pound rated” ties snap off merely by pulling them snug by a pair of pliers. They do harden and get brittle normally over a long time (age hardening) or when exposed to a lot of heat (your engine bay) but they should never do this straight out of the package.😤 I have never had a problem with this brand, and I won’t order brands on Amazon with weird names. I go though a bunch of ties, I even use them to secure opened bags of lawn fertilizer. Normally I prefer the lighter color but when the wires are in a black split loom sleeve like the Ollie, black looks a lot more professional. Happy Holidays. John Davies Spokane WA
- 1 reply
-
- 6
-

-

-
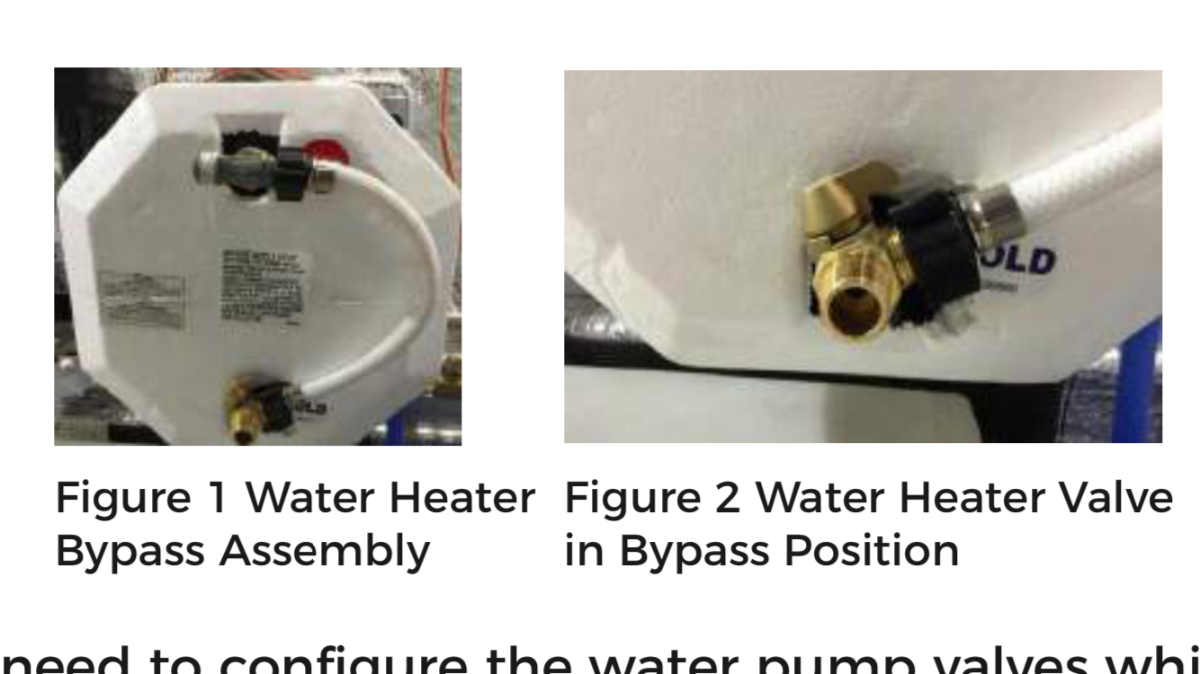
Most likely it is hidden from view by the silver air duct, carefully lift it out of the way, or just reach around it. On a 2020 it is the bottom valve. In bypass mode the water no longer enters the bottom port, it loops around to the outlet (hot) side. Have you looked at the Winterization section of your manual? John Davies Spokane WA
-
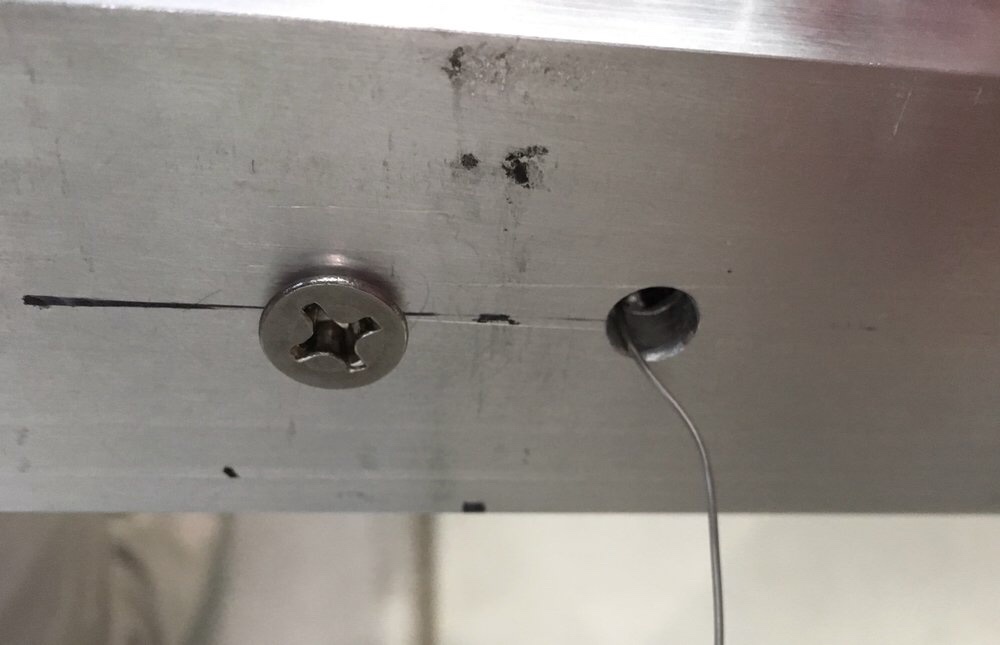
I am not sure what the height above the floor you need, it is indeed possible to access the space between the battery box wall and the inner hull wall. Possible, not at all easy! In your shoes I would make a substantial aluminum backing plate and install threaded inserts (nutserts), so you will not need to fuss with nuts and washers, and you won’t need to get a wrench in that tight place. I guarantee that if you don’t go this route, you will say a whole lot of bad words..... Here is the technique, I used it to fish a couple of backing plates deep into a 2”x4” aluminum beam, for my rear rack tiedowns. In your case, you would pre-drill all the holes in the fiberglass, run the wire down toward the inverter, and drag the plate back up into position. VERY carefully... You could tie a string onto it too, from the bottom, so if it falls and disappears you can easily pull it back and try again. It will be trickier with the large size plate needed for your table mount, but if you have one hole centered at the top, it should balance/ align itself pretty well when drawn into position. For more accurate advice, take a picture of the area and annotate it to place an arrow or circle where you want to mount the bracket. I have looked up in that gap several times, each time I wonder why did they built such a promising place to mount things, but made it so hard to get to...? Good luck, post pics of your cool project. John Davies Spokane WA
-
Legacy Elite 2 buyer has questions about upgrades
John E Davies replied to Fargoman's topic in General Discussion
Welcome to the forum LoriL. I don't have the propane QD option, this is purely personal choice. If you like the idea of a portable gas grill or gas fire, or a tongue mounted propane generator, go for it. Be aware that Oliver does not recommend running a gennie while it is in the tray, even though many owners appear to do so, and I haven't heard of anybody dying from carbon monoxide poisoning yet.. . If you don't want to hook up extra propane stuff, it is a waste of money. An extra one can be easily added by a skilled owner in the future. John Davies Spokane WA -
Thanks for the info, I was commenting based on reports from another member here. It just goes to show, don’t believe anything you read on the Internet. And don’t repeat other peoples’ comments 😀 I will try to do better. What battery management system do you have, are you using the battery manufacturer’s app? Does it seem pretty decent? John Davies Spokane WA
-
LOL, I cannot imagine running two 4/0 cables all the way from engine to trailer batteries, the logistics are horrible and the cable cost would be outrageous at $5 to $8 per foot.... and those huge copper terminals are pricey too. How hard would it be to install a separate small "dumb" alternator on the truck dedicated to just trailer charging, run 00 AWG cables, and use a big DC to DC charger in the trailer to bump up the voltage and control the charge rate? This Redarc dual input unit has 50 amp input and output, combined with a MPPT solar controller for a portable panel. They make smaller ones too. https://redarcelectronics.com/products/dual-input-50a-in-vehicle-dc-battery-charger John Davies Spokane WA
-
When the Truma throws a code for a critical component, like this one, does it shut down entirely, or does it have a “limp home” mode with limited heating? Luke warm water would be better than none at all. Out of warranty, how much would such a repair cost, not including travel etc? Can an owner buy all internal parts to attempt repairs? How does the Oliver factory deal with a faulty unit that is on a trailer brought in for service? EDIT : I found parts, these are in Australia dollars (AU$1.00 = US$0.75) Truma AuquaGlo Parts Australia All I can say is holy cow, I hope yours doesn’t need repairs out of warranty..... a circulation pump is US$213, a burner assembly is US$1175. Plus labor.... Has anyone found a US source for internal parts? A “how to repair” video? I have been trying hard to accept any long term value in the Truma option, so far I am completely unconvinced. My suspicion is that it is very much like owning a high end BMW car; out of warranty, you should have very deep pockets and a friendly relationship with a local shop.... in contrast: Suburban HWH Complete Suburban HWH Parts Thanks, John Davies Spokane WA