jd1923
-
Posts
3,219 -
Joined
-
Last visited
-
Days Won
240
Everything posted by jd1923
-
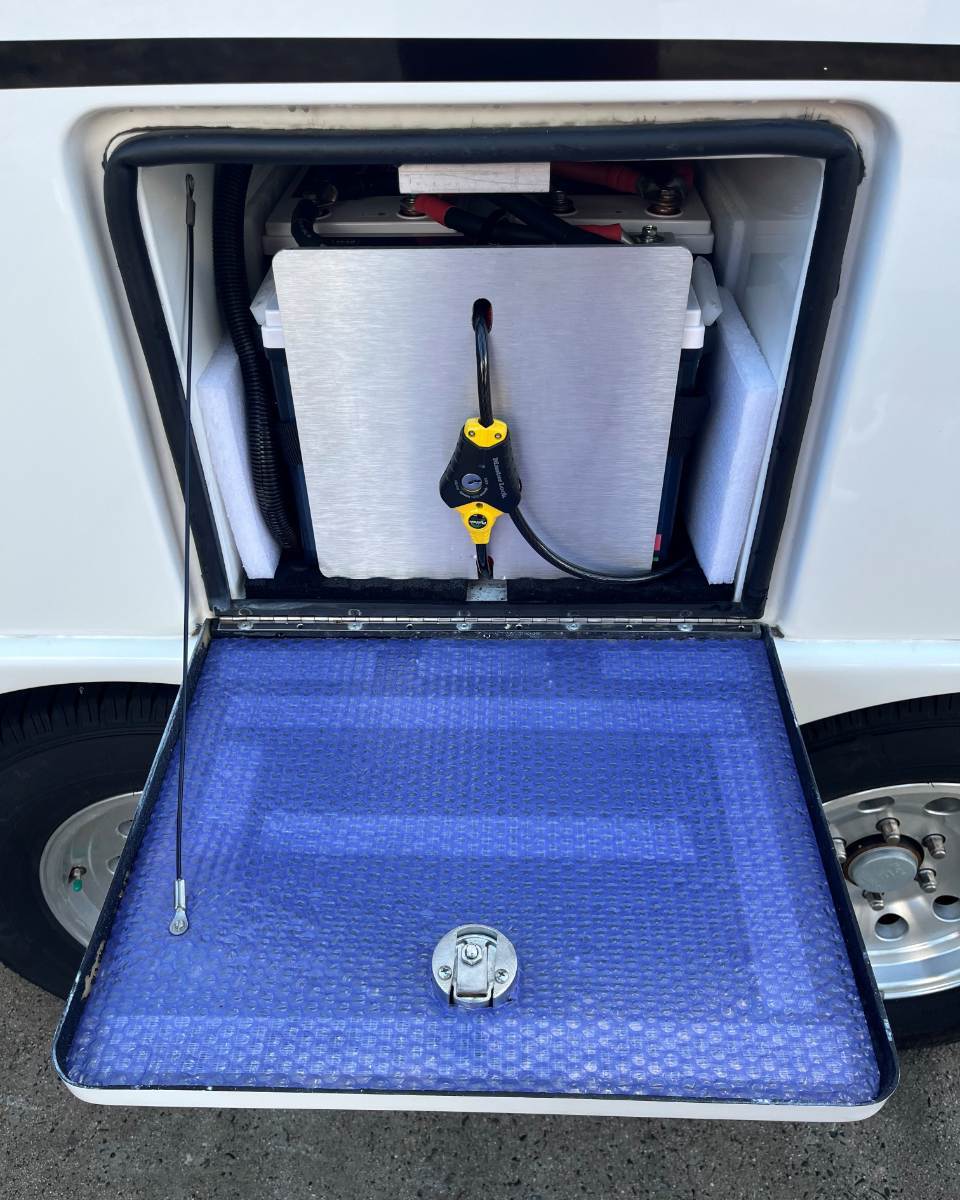
I used carpet tape and just some honeycomb insulation that came as packing in something we purchased.

-
I measure the footprint of two Epoch 300s side-by-side to be 13.75" x 15.26" and the 13.75" is at the base, the handles will stick out 15.5" side-to-side. Do you have an extra inch behind the tray? If so, you could remove the tray, cut the rear steel wall off the tray, then reinstall the tray. This would fit two batteries in the tray, but the rear battery would hang 1" off the back. Both batteries could still be strapped in place. And you could add a 1/4" alum or poly sheet in the tray, under the batteries, measuring 14.75" x 15.26" the so that rear battery is fully supported. I thought of doing this when I upgraded to 3x 300 Epoch in our E2. But in the end was very happy to delete the heavy tray and get more headroom! 😎
-
It certainly is! They are so customer oriented, my bet is their answer would be, "Yes Sir, no problem!" (You have a 30A to 15A dog-bone, right?)
-
This was originally a Ruuvi thread. I love them! Had purchased a set of 4, the standard type pictured above. These are hard to find today. Anybody have a source? I purchased two more that I believe they call the Pro model. Black with slots for mounting straps, a bit more expensive. I have the original 4 monitoring cabin temp, back of basement by the plumbing lines, Oliver fridge and Freezer. The two new ones are in the truck cab and our newer Dometic CFX5 refrigerator in the truck bed. After two years of use, one original Ruuvi that was in our Oliver freezer has gone bad. It no longer reads from the Bluetooth app, same with new battery installed. They're likely beyond limited warranty, but anybody know of a US-based Ruuvi Customer Service number or website. It seems searches always go outside the US. Is Ruuvi a Finland company? Any info would be helpful. Thx
-
At first, I was negative re Mopeka, but after their customer service sent me a replacement pair at no cost, without shipping costs nor returning the original pair, I certainly agree with this statement! They have been accurate. Also, I used the original pair at home on two 20# tanks for our grill and home fire ring. They have been performing as well. Perhaps since they are stationery. Anyway, very happy! 😂
-
I've never purchased a portable generator. Our Bigfoot Class-C had a 4K Onan which I rebuilt after we purchased it (cleaned sludge out, new carb, oil, filters and plug). We used it to recharge 2 lead acid batteries and/or run the A/C in the afternoons. Later I added 400W solar, 1800W inverter and 3x10⁵ Ah AGMs and after that I only ran the Onan every other months to keep it in running shape. Original owners ran it 660 hours, we added about 30 hours on the clock. This is my full generator experience. I can't stand having to hear the generators of other campers (or the noise of A/C units running)! Would it not be crazy to carry or run a generator with 900 Ah LiFePO4, 720W solar and a 50A DC-to-DC charger? Our Oliver is camped now on Thumb Butte Road above Prescott right now and since Friday afternoon. It got up to 90 on Friday and highs of 85F since (quite a heat spell, cooling off next week). Ran the Furrion Chill Cube A/C 2-3 hours per day. 320W rooftop solar working, no obstructions, sunny ALL day... OMG, 4 days and 3 nights and we're down to 83% SOC! 🤣 We could camp here for a long, long time... My bet is that if Bob upgrades to 600 Ah, with their style of moving every few days with DC-DC charging, they will only have to consider #2 on his list! 😎
-

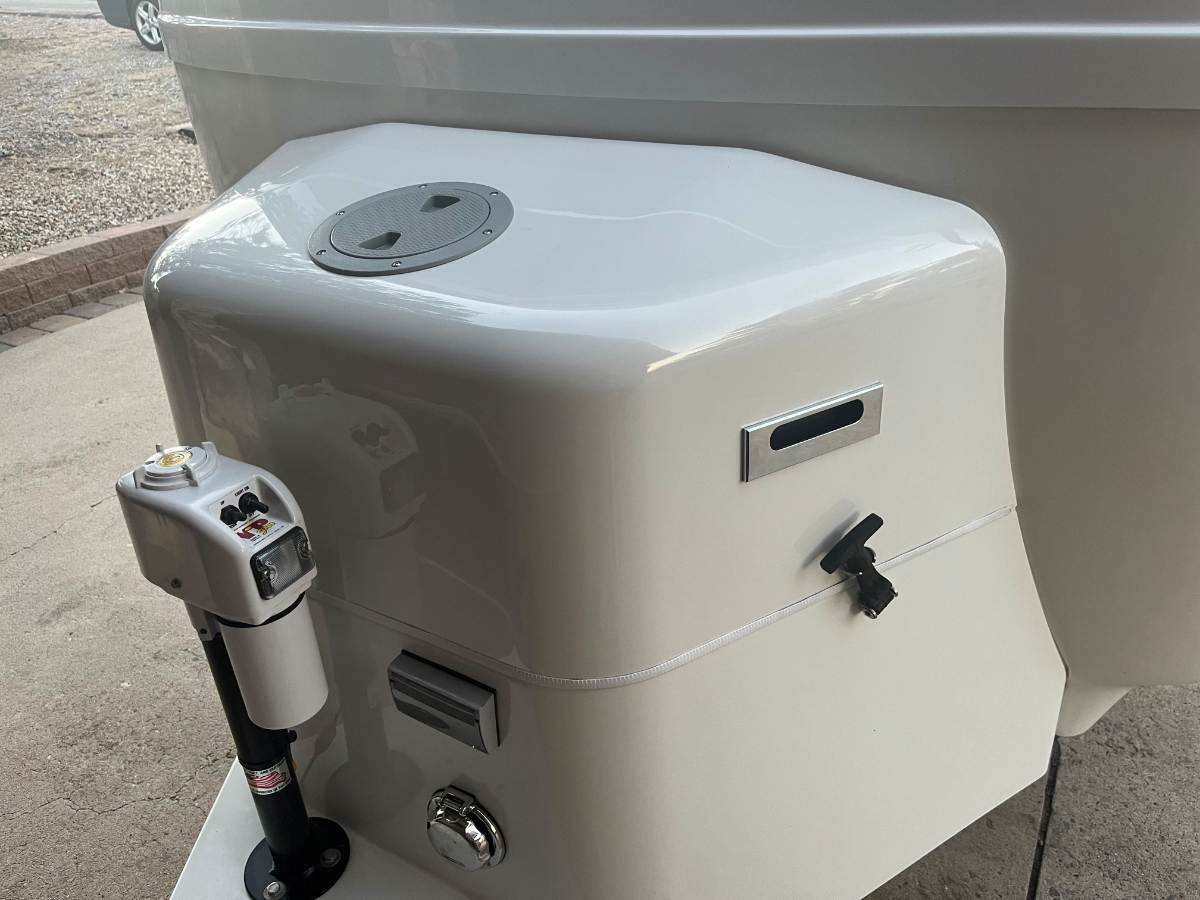
Replacing the 6" Marine Hatch Access to the LP tanks
jd1923 replied to jd1923's topic in Ollie Modifications
Update: spent on this item twice, but I'm saving the white one for an Oliver friend visiting here this summer! I had to go gray to match our color theme. This item fits the opening and screw holes, and comes in white too. Works smoothly, nice o-ring seal. https://www.amazon.com/dp/B08N71PRNQ/?th=1
-
Looking at your picture and these dimensions, two Epoch Essentials 300 Ah might just fit without the tray! You'd certainly have to replace these vs. adding more of the same, and of course measure twice before ordering anything! Length: 13.75" base, 15.5" at top for handles, Width: 7.63", Height: 10.0". For two batteries, you need a minimum footprint without the tray of 16 x 16" and 12" height. The Renogy product is pretty cool, but it's apples to oranges! It does not have internal BMS (why they are offering an external BMS), no heaters for charging below 32F. and comes without Bluetooth and app (something I could not live without).
-
Suburban Hot Water Tank Repair
jd1923 replied to Mike and Carol's topic in Mechanical & Technical Tips
I'd prefer not having another maintenance item, but thanks to Mike, next time our Oliver is home for service I will certainly open this junction box, remove all wire nuts and electrical tape, strip wires down to good copper, or replace wiring if necessary, and use butt connectors! Wire nuts and Wago connectors are not automotive grade! I've never used Wago products and likely never will. Wire nuts are for 120VAC residential solid-core wires. Wire nuts will not hold stranded wire effectively! Butt connectors are designed for stranded wire in automotive 12VDC systems to hold properly with movement/vibration. Another No-No is using ScotchLoks to add a wire. When I need to connect a third wire, I use a butt connector one size larger. Fold the wire to double thinkness on the side that has one wire. I had a boss years ago who said during a team meeting, "Anybody using ScotchLoks in installations will no longer be working for us!" OTT uses them often too and I remove them as needed. 😒
-
I agree with Mike's comments. BTW he and many others installed two 300 Ah Epoch Essentials batteries. I did that too in 2024 and Jan of this year added a 3rd for 900 Ah! If you provide measurements of your battery bay, we could see what would fit. Don't know for the Elite 1. Also, are you willing to lose the tray? In the E2, 600 Ah fits in the tray and when I went to 3 batteries, I removed the tray and will not miss it since LiFePO4 does not require maintenance. The tray was meant for servicing LA batteries! Would a second Lithionics 260 fit? We think alike here! After all the work I've done in upgrades, we will not conserve! We're now running our Chill Cube A/C on battery! And I would be embarrassed to fire up a generator, never have and never will, and with technology today there's no need to! 😎 We added a 400W Renogy solar suitcase which we use rarely. It does produce 2x our 320W rooftop solar since you get a better angle in the winter sun. These panels are heavy and LARGE! It sits fine in our 8' truck bed, but you would hardly have the space. They're also a pain to move around all day, keeping them pointing to the sun. I remember reading that you (again like us) only stay a few days at each location. Our DC2DC charger is the best tool we have! My take is your best first step is #2 in your list. You need to double your 260 Ah batteries, or better yet, install 600! Page one of my post shows the 600 Ah upgrade and on page 2 upgrading again to 900. Let us know the dimensions of your battery bay so we can make suggestions. 😂
-
Maybe it's my long-bed, long wheelbase truck, but I do believe it's the nature of the Oliver EII. It sure takes a long stretch of road just to straighten out TV and TT after it's been cocked from a turn. The only 3-pt turns I'm doing is where I can back into a driveway, a side road or field with short brush! Our truck is also 2WD, so in any maneuver, I must always keep the rear truck tires on solid ground. 😎 We travel FS roads all the time and use the Motor Vehicle Use Maps as a guide which they have for most AZ National Forests and other western states. These maps show road kind and size and mark where dispersed camping is available (see Prescott NF example). No drive-thru fast food lanes for us when camping! We travel to get away from all that! 🤣 When traveling up some FS road, we (Chris too) keep our eyes out for turn-around opportunities while thinking how far we would have to back up if the road ahead became impassable! Not the Oliver, but towing a similar-size dual-axle trailer, once I had to reverse over 3 miles on a road in North Texas, when the thunderstorm had turned the road ahead into a huge lake. At least, it was a straight paved road, but it was pouring so hard, near impossible to see out of the sideview mirrors. A major sigh of relief when we finally got to a crossroad! Yeah, the thrill of camping in the back country of "The West!" Prescott NF MVUM Front.pdf
-
Was 2005, our family moving from VA to AZ. I purchased a race car trailer, since it was the largest cargo trailer I could find used locally. Had a 26' cargo box, a 31' trailer and when packed with all of our family belongings to move west, it weighed 14K LBS, towed behind a new 2003 Dodge Ram 2500 Cummins 5.9! It had a 24' awning. We made it all the way to New Mexico. Boy-oh-boy is NM the sand storm and WIND state! Towing down I-40, looking at my sideview mirror while towing at 60 MPH, I could see the entire awning like a gullwing sail flapping in the wind and pulled over ASAP! All I could do, to get back on the road, was to rope tie it up on the rear end of the awning (the front had held). Sold the trailer a few weeks later, after moving into our new/current home. Before that, I deleted the awning, made it look like it never had one! 😎 If something was to happen to our Oliver awning, I would delete it as well. We've used it 4 times in 150 overnights. I've already deleted a few unused rooftop items, and would do so again. Our Fiamma closes on the front end and is always 1" short on the rear end from closing. We also have a safety strap! (look closely top-left)
-
Yeah Bill, you really have all the room you need now with the F-350! Must be a good feeling in towing prowess and carrying capacity. Solar panels, MP2 inverter, cables, etc. is likely 400 LBS. We had 4 LA batteries to start and now 3x 300 Ah Epoch, but lost that 30 LB sliding tray, a net savings but say 120 LBS over your smaller battery setup. 30 gallons of water is 250 LBS and Chris can pack the pantry, fridge and closet floor! We leave full and ready always! We rarely have a first night out with hookups. We also use the Oliver facilities often when traveling, we make lunch, no service station bathrooms for us. We also like to have everything we need, be able to dry-camp for days, just in case we get stuck somewhere unexpectedly. 😎 Our older Ram 2500 has a 8800 GVWR, though it's a relatively light truck. Loaded it weighs only 7400 LBS, with 35-gal extra fresh water, camping gear, Chris and I and our 60 LB Springer! Which is crazy, since when loaded we have an extra 1400 LBS capacity (800 LBS when hitched) in this "3/4-ton truck." For 18 years, we owned a 2003 Ram 4x4 Quad-Cab Laramie with fiberglass cap (heavy), rated at 9000 GVWR. It weighed 7200 LBS empty which netted less than half the carrying capacity of our 2001. 🤣
-
Bill, good tire pressure for your weight. Your camp weight of 5100 LBS is a very low number! Don't know how you do that. Heading out on a long trip, we tow with FWT full, The bottom of our closet floor is FULL of drink and water bottles. Closet and back cabinets pretty full of clothes. Front cabinets and kitchen drawers full of cooking equipment. Chris has extra dog food and coffee, pressure cooker, etc. under the front dinette. Pantry and fridge are certainly FULL! Two years ago, returning from a trip our Oliver weighed right at 6000 LBS. I need to hit the scales again, when first loaded up, leaving on a long trip. My guess is our FULL weight is closer to 6500 LBS now. We are certainly more packed now, and any weight savings in lighter batteries and the much lighter Chill Cube A/C should break even with heavy MP2 inverter and other mods added. Also, D52 axles and Alcan springs are much heavier but they can certainly carry more weight! 😎 "We don't take Ollie off pavement" then ST tires are fine, and might be lower cost. I'd refinish the wheels if the shop manager believes they would restore nicely! But I prefer original equipment and restoration, where many others prefer to buy new. If you do restore, please start a thread and post before and after pics! Best wishes, JD
-
Somehow with Alcan springs and a new Chill Cube A/C, spec about 3.5” taller than the Dometic, we measured Hull #113 at 9’ 8.5” tall. After installing the A/C, Adam up on the scaffold, held a straight 2x3 on top of the A/C, hanging off the curbside, as I measured. I found the number hard to believe, so the next day we measured again, same number. Did the same off the street-side, exact same number. I believe this number to be accurate!
-
Gary, the tires you purchased are just fine! ST tires are for trailers and the Oliver is a 7K GVWR trailer. LT tires have stronger tread and outer corners for the needs of a truck. Trailer tires are pulled, so do not need strength in areas for traction and steering. Given the rocky-rutted-steep dirt road I towed today, and do so very often, I would prefer an LT tire for the Oliver. The LT tire will have stronger corners for better off-road protection. The ST tire is designed to last long and carry weight when towing. On the highway you should not notice the difference. Go extra slow on rocky roads (I was literally under 5 MPH towing today, anyway)! The fact that your tires are 80 profile, the taller the profile the more weight it will carry. Believe it or not, you can run on 30 PSI per the Goodyear load table. IMHO, I would run on 40 PSI and not more! 😎
-
So, is this true? It would be great to power down the Mini via the Starlink app! I would do that each night from bed and would then have ample battery left for the next morning! 😎
-
Yeah, you’d want to be plugged in, if this is a regular occurrence!
-
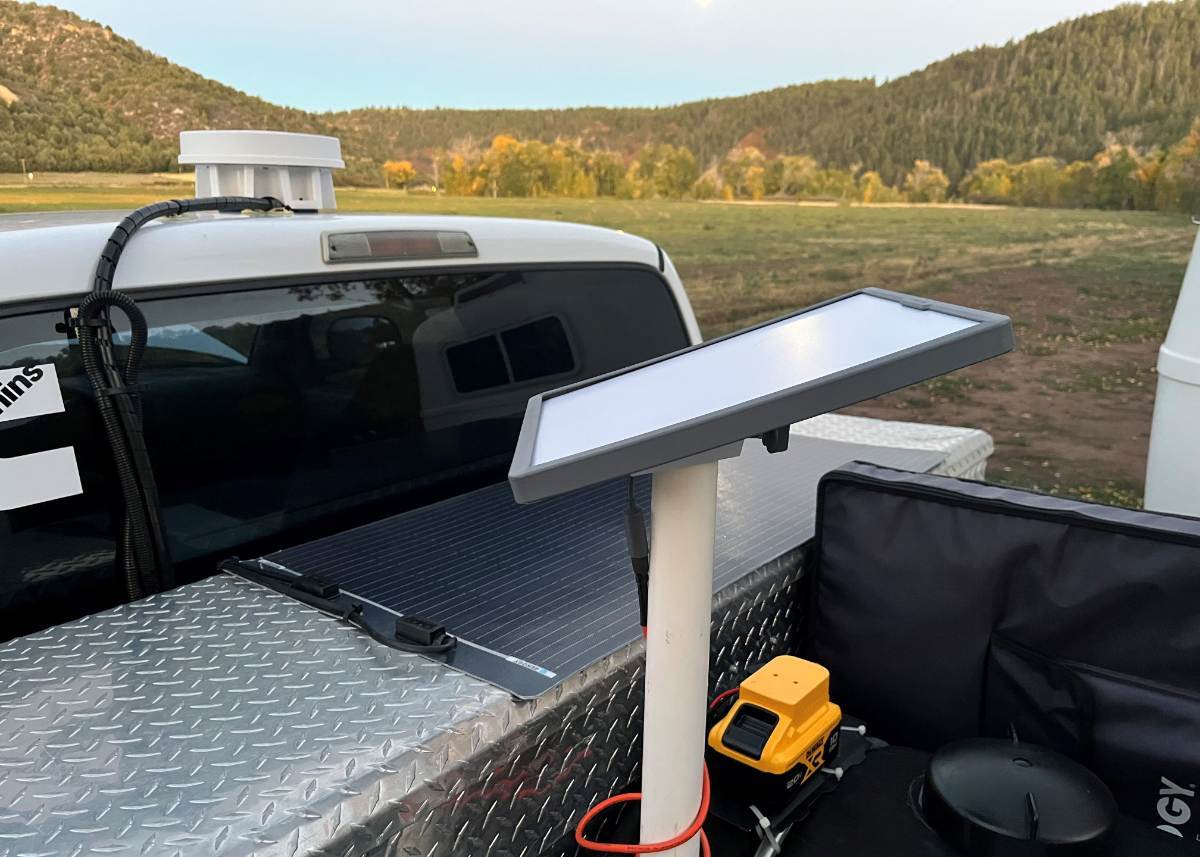
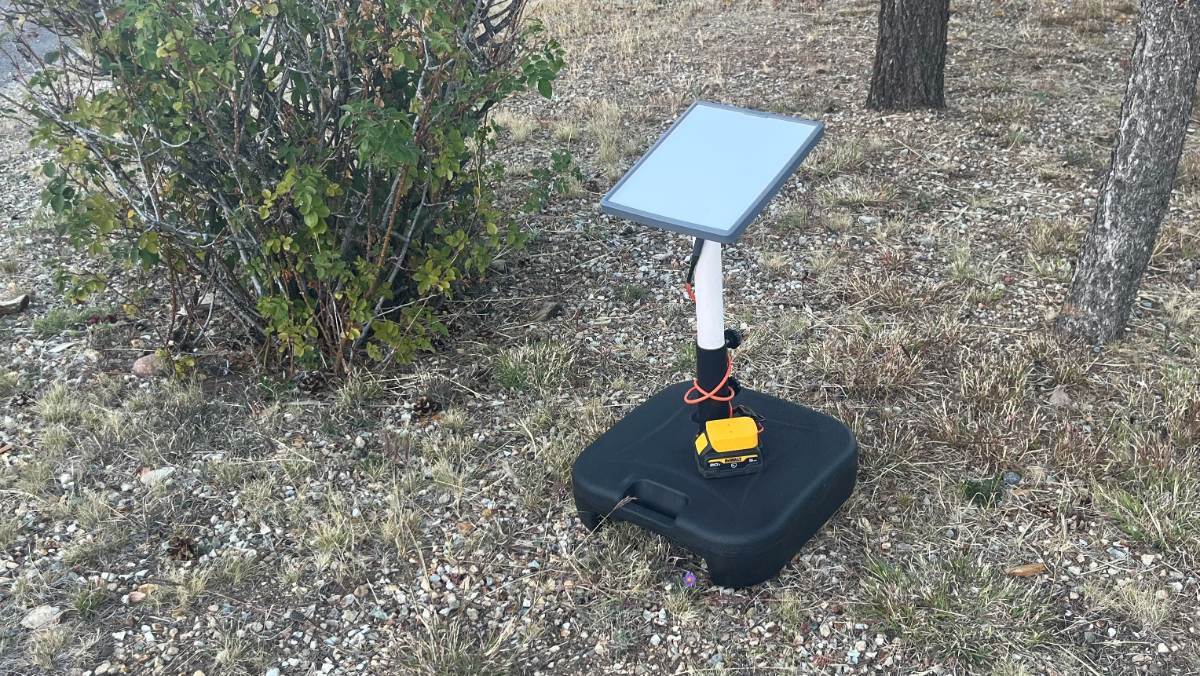
Yes, the DeWalt XR 20V 10Ah batteries we use do go dead every night, sometime after we fall asleep. Early on we had an older 6 Ah battery go dead once and fail, but it was date coded over 5 years old when that occurred. Our new 10 Ah batteries, date codes 2025, turn off a few hours before we change them out the next morning and they recharge in an hour or two. We've done this without issue for more than 20 overnights. Regarding your point #3, if you cannot climb out of you trailer day or night, then you're back to a wired solution, at that point you could bury the cables and stay in bed for weeks! 🤣 Chris takes our dog out every morning and/or I'll go outside, soak in the sun with a morning cup of coffee! First one out usually swaps the batteries. We much prefer this over laying out and winding up the 50' cord every few days. And if you're going to a wired solution, why not just use the supplied Starlink power cord with 30V AC adapter, but you do need an inverter for that. If going for the DC wired solution, get a quality DC-DC 12/24 charger, like the Victron @Snackchaser used and I installed (I might use it some day)! For about $20 more it's not the Amazon/China cr@p! https://www.amazon.com/dp/B01D082AX8/?th=1
-
Thank you, Robert! 😎 I've been preaching this for over a year now! No takers to date! All these complex setups, and I too spent a day adding a Victron 12/24 DC-DC charge controller and Ethernet for input to our Pepwave router. Cool setup, but what a waste since we haven't used it yet! Yep, cords are a pain! 🤣 You have Milwaukee M18 tools, and we have several DeWalt 20V tools that we bring with us (flashlight, vacuum, impact and leaf blower). I purchased two 10 Ah batteries just for the Starlink Mini, each will run the dish for 8 hours. You want two so one is always charged. I have an extra DeWalt charger permanently mounted in the Oliver attic. Looks like you'd be in business for only $23! BTW, 1 1/2" PVC pipe fits the Starlink Mini included mount nicely too! https://www.amazon.com/Starlink-Battery-Adapter-Compatible-Milwaukee/dp/B0FDWP191V/?th=1
-
The picture on page one is very helpful for identification. I think everything we've had for years now are the standard USB-A and the Micro-A (for headphones and speakers). Hardly ever seen the B type and never seen that odd one far right! I've upgrade all of our phone and laptop cords to USB-C for faster charging. I've installed two outlets like these in the Oliver, our TV and other vehicles: https://www.amazon.com/Obeaming-Waterproof-Cigarette-Replacement-Accessories/dp/B0G52FC6NH/?th=1 I purchased a new Dell Latitude 9330 business laptop end of 2024. It has three (3) USB-C ports ONLY, for charging and communications. It has no other ports, no USB-A outlets. I use one of these when teaching online. It allows for the older USB-A connections, for my keyboard and microphone, and HDMI, even a VGA port, for the two extra monitors I use when presenting. https://www.amazon.com/dp/B0D9D4138S/ I also have a desk drawer full of USB and like cables. I need to throw out most of them! These are also helpful: https://www.amazon.com/dp/B07BS8SRWH/?th=1
-
We have not yet traveled since my repair.
-
Really! Who would use the Standby plan anyway, for more than its intended purpose? Just enough bandwidth to remote connect via the Starlink app, then upgrade to the $50 mobile plan or better ASAP! For on the road, mount a cell antenna and router which these days provides good service in 90% of roads out west and 99% when traveling east. On our summer trip to Northern Minnesota, we only used Starlink at our first campsite in New Mexico. Then all the way there and back, we did not need it again until we entered Wyoming. Then we used Starlink at each camp coming home. Though when towing, even in these remote areas, our cell antenna kept us connected more often than not. 😎
-
Thanks, Geoff. This would be a good Forum project if a number of members are interested. I'm going to see how the PVC drain cover pictured above will look. I already have the parts and I ordered some Gorilla Clear Grip that @Hokieman suggested, arriving here on Monday.
-
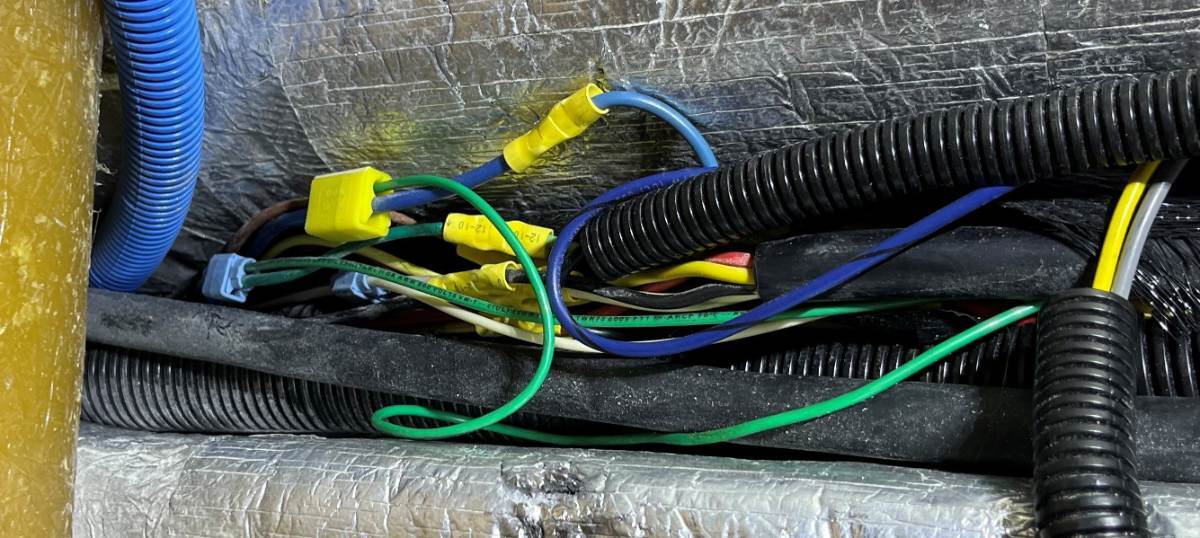
I believe Chris is correct regarding these wire gauges. Certainly the hitch wiring on the BLUE wire is 10 AWG. Given each individual trailer brake pulls 3A, then 14 AWG is sufficient, too bad they do not run wire, internal to the axles, with heavy rubberized insulation! You can see in my photo, the junction under the front dinette seat where the trailer wiring harness is split. It appears it connects 10 to 10 AWG on the Blue wire with a yellow/10 AWG butt connector. OTT also uses a yellow 3M ScotchLok connecting a green wire. I'm guessing the green wire powers the Oliver brake lights. They must split the 10 AWG blue wire again just inside the streetside wheel-well where there are two wires to power the brakes of each axle. My guess is they would use 12 AWG there, then connecting to the 14 AWG Dexter axle wiring going to each of 4 wheels. 😎