jd1923
-
Posts
3,536 -
Joined
-
Last visited
-
Days Won
267
Everything posted by jd1923
-
One try will be your last! What frustration in reconnecting it every time we towed. I don't need the big socket and hammer anymore! We have a much lesser truck than your new beauty and I did need it until I upgraded leaf springs on the trailer. No more porpoising, so no more need for it. 😎 Ours has been taking up space in my shed for a year. You just gave me an idea to reuse the chains for new safety chains on the Oliver. What you got there is a new boat anchor for your river raft! 🤣
-

Oliver no longer selling through dealers?
jd1923 replied to DanielBoondock's topic in General Discussion
Yeah, I imagine the hope was to increase sales, but the original sales model was best, should have been left alone. Dealers are going to promote/sell where they get the greatest sales volume and profit margin which is not Oliver. -
We can ask @pjt, but I'm pretty sure after you run, cut, flare and connect the copper lines the system has to be evacuated for a period of time with a vacuum pump. Then you let the pre-charged freon out that is likely stored in the compressor/condenser unit.
-
That makes sense. I’d put them both back in for the season and just fill one given that’s all you need. I always keep both full, ready for any trip, but agreed would let them go empty in your case, easier to lift out and back in. Best wishes, JD
-
Have never heard of winter storage of LP tanks before. LP cannot freeze at any sub-zero temps, even if you're camping on the North Pole! Why not reinstall them both, secure them as designed, and keep them there always? It's OK if one is empty.
-
The waddling will occur with the 1750s every time you hit uneven pavement, like driving up the apron to a service station or taking a bridge seam or RR tracks on an angle. I've heard all 2026 have D52s and if the label states such it should be so. To be sure, you cannot tell from the front picture, since OTT used a 6-stud bolt pattern on all (5-stud is standard for 3500 axles). You must get under the trailer, look at the back of the brake backing plate. If you see on the back 5 studs in a pentagon shape, they're 5200 LB axles. The 3500s with 10" brakes have 4 mounting studs in a square pattern.
-
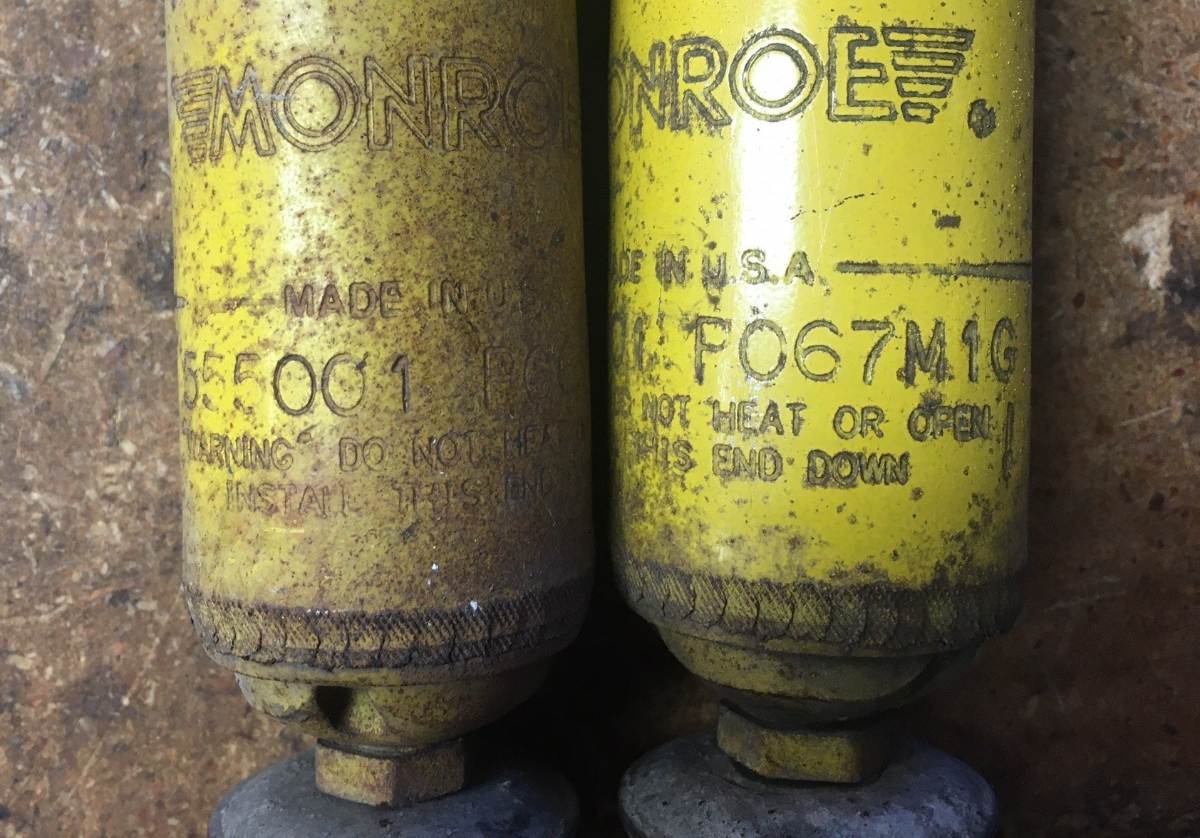
Yeah, reason enough. They certainly do look better, and the Google search assistant sure found all the good marketing copy. I'd like to know how shocks are rated technically. If I had one of each brand new, I'd push them on a scale and see the force in LBS it takes to compress the shock! Not sure that is a valid test but could see relative difference. What I found on our hull, same Monroe shocks before and after the Alcan Springs upgrade is the hull used to waddle like a duck and would porpoise (without the WDH) on the 1750 springs. Switch to Alcan 2750 LB leaf springs, same Monroe shocks, and there is barely any movement in any direction. I'd bet I can take the shocks off and it wouldn't matter, because the leaf springs have much less movement. I also believe the top-heavy E2 sways so much with the 1750s, t causes the shock failures (and spring failures for that matter). I have a 7K dual-axle flatbed trailer at home. It was designed with no shocks. I load a SxS and dirt bikes on it. It doesn't move around at all since it has a low center of gravity. It has 1750s but loaded weight is only about +/- 4K LBS. These came off our Oliver after we got it in 2023, yeah UGLY! 🤣 They used to be yellow years ago. At least they were MADE IN U.S.A. I'll order Bulldogs when the Monroes fail, unless there's something better when needed.

-
Alcan is a Dexter authorized reseller which is mainstream in the trailer business. It's a lot of work to become a reseller, just to sell a few parts. They might have accounts with mainstream shock companies, Monroe, KYB, Bilstein, and whatever the 4x4 Jeep guys use in Colorado! Why install new shocks on your Oliver? You only have a few months and maybe 2K miles on the Monroes. I purchased new Monroe 555001 shocks in 2023 when I first serviced my suspension. They were bad, 3 of 4 shock were blown. I would have tried Bulldogs, but we had not heard of them back then. I replaced axles and leaf springs two years later and all 4 Monroe shocks tested good, so I remounted them. IMO, they're not mission critical anyway.
-
Yeah Chris, it's not easy to see. Apples to apples, you can measure change in axle height top-to-top, center-to-center, or at the bottoms. Thinking centers, it's difficult to add up. Maybe looking at the bottoms is easier. When under-slung the bottom of the axle sits on the leaf springs. When over-slung the bottom of the axle is lowered by the height of the leaf pack and the height of the axle diameter. Please look again and see if you can see it this way. I've looked at now many times and would like verification if my thinking and math is correct! 🤣
-
Don't you already have a mountain home? It's that fiberglass egg-looking thing! 🤣
-
And I see my comment got you to update your profile page! CONGRATULATIONS to you on your new Oliver! 😂 Thank so much for the pictures and advise, much appreciated! Thank you @srthomsen and @FloraFauna too! All feedback is helpful. Steve, I also like seeing your installation pics. You installation looks very clean, would be even better with the wall mount which I'm leaning towards. The piping on mine would go vertically like in yours and then T at the top for the two rooms. I guess I better plan on that electrical shut-off box!
-
Sorry to hear this and more so because I really like the design of your rear toolbox! I like how it has cabinet doors, opening to the rear, allowing the surface to be a tie-down area or spare work table. The boxes with hinged tops do not allow for such. I think about this every time I read a related post. I don't need one with an 8 ft open truck bed, but if I did... I would first remove the fiberglass cover and spare tire. Then mount the spare in the back left corner of the TV bed using a simple spare tire mount available on eTrailer and elsewhere. The cover would become a new garage ornament, a conversation piece! 🤣 This would delete a lot of rear weight which is the most important issue with adding weight to the rear. Ever LB in back lightens the trailer tongue weight and the Oliver with 8-9% tongue weight is already a towing safety issue. Very few Oliver owners seem to be concerned re this matter. With the spare gone, a custom cargo box could be +/- 10" close to the hull. This also helps the weight issue (shorter lever arm). Maybe you can move the spare and still use your awesome toolbox. Later mount the box pulled up closer to center. If there's no room in the truck bed, the spare tire could be frame-mounted on the streetside of the doghouse using the same standard bracket. 😎
-
Agree, these are not very helpful. First where they touch is lower than where the frame would touch, so you will bottom more often. Also, if too much pressure is exerted, then what Dudley wrote. Application for skid rollers is for a trailer with very thick steel frames like Toy Haulers or car haulers. I would not expect them to play well with the relatively soft Oliver aluminum frame.
-
I believe going from from an Under- to Over-slung suspension adds quite a bit more than 2" but you've done this on another trailer and I have not. When I study this simple graphic focused on the top of the axle, it appears the top of the axle drops 1) the 3" diameter of the axle plus the ~2" height of the leaf pack. This adds to about 5" for the Oliver. Then Bill posted a picture above that looks about 5" taller and the link supplied wrote re an Under- to Over-slung suspension change. (Graphic posted again for ease of viewing.)
-
I have not read here that anybody has done so to date, but John E Davies who was active years ago wrote some about modifying the Oliver suspension from an Under- to Over-slung suspension. I tow in the NF and BLM of Arizona often, descending steep and deep washes and have so far never scraped the rear. This suspension change would give you a 5+" lift (diameter of axle plus height of leaf springs), and this comes with negatives. Mainly just climbing into the cabin would be a pain, reason why I tow with a 2WD truck, vs. a 4WD truck with a lift! No, I'm done with trucks or trailers where I'd need to climb up like that! 🤣 I'm not seeing a 2" lift option and only 2" may not answer your needs. I've got neighbors with driveways like yours, wow! I'd suggest leave the Oliver alone and fix your driveway. You'd appreciate it when driving your grocery-getter too. Talk to a concrete contractor or build a proper set of ramps specifically for this purpose. Please let us know and post here with pics and comments if you do convert your Oliver to an Over-slung suspension! 😎
-
Cool @pjt, and thank you for your input as a new Forum member! I hope very soon you get a chance to have an Oliver of your own! This thread was quiet for two days which surprised me. Handy, yeah no problem and I have flare tools from working automotive brake and fuel lines, though I may need a larger flare die. I recently purchased a vacuum pump and gauges and have restored the A/C in two of our trucks. The kit has fittings for R134A, R1234yf, R32 and R454B refrigerants. The Senville 18K and 24K BTU models I've been looking at uses the very efficient R454B which is 70% R32 and 30% R1234yf. Starting to worry about whether I need permits in our city. Hate to get .gov involved, nothing but corrupt bottom-feeders! 🤣 Much of electrical code is BS too, like having a power cutoff box at the unit, as any idiot can merely trip the breaker and I don't want the extra cost and another box mounted to the side of our home. Our city will likely add 100s of dollars in permit costs too. Glad to know that Pioneer is working out for you. We have a member here who installed a Pioneer inverter A/C rooftop on his Oliver. Most of the models are likely very close in features and quality, except for the refrigerant used. Did you sit the compressor/condenser unit on the ground or wall-mount it? In our application, I would like it wall mounted, but wondering if that would cause noise. Cooling bedrooms has different concerns than cooling a garage. Would love one in my garage but I just tough it out July and Aug when we see some real heat. Thank you for the suggestion on installation videos. I'll take a look. I'm going to talk to the heating & cooling company that I've used and trust to get some inputs on how to handle this in our area. More to come... Thanks again, and BTW feel free to ask us any questions if you are interested in purchasing an Oliver, the best little egg camper out there! 😎
-
Likewise, good to hear from you again Claudia. We've conversed here before and I remember you being quite DIY capable! 😎 Re your statement above, it means two things to me. First, I've always noticed that ours works a little better on LP which is the opposite condition. And that has me thinking about what you wrote, when temps are over 80F. Have you installed a better fan in the exterior vent area? You might think, why would that matter when it cools properly on AC/DC? I'm not certain, but a viable hypothesis may be the fridge on LP creates more heat than when powered by electric. Our fridge used to perform on-and-off and ever since adding the Beech Lane large dual fan it performs excellently under any power source. When we set it on #4 the freezer will approach 0F and the fridge will get down to 32F (Ruuvi temp sensors) and when it does so we switch the cooling level to #3. Chris was a restaurant chef for a few years and she keeps me well nourished! 🤣 That means she keeps a very FULL fridge! We now have an extra fridge in the truck, always with space for grocery shopping. If you reply that you already have a similar fan (not the little OEM fan), then I'm at a loss in what to advise. But if not, do this before you do anything else. My installation is presented at the bottom of page 1 on this post:
-
You're welcome, Robert. That's great that you are in Colorado! You should definitely visit Alcan like I did on our trip, purchase parts at a minimum, get the Alcan Leaf Springs and get their U-bolts also to mount the springs. Your Oliver is a 2022, mine a 2016 needed everything. I'm assuming you have the HD EZ Flex kit installed from new. For example, if you have towed 50K miles in 4 years, your EZ Flex equalizers are likely shot. There is a section in my post about the equalizers. They wear cock-eyed inherent to their design. If your mileage in 4 years is much lower say 20K miles, they may be OK to be reused. Shocks don't matter much. If you had Alcan work the spring install, you could ask them to test the shocks. If bad they could replace them if available, or just reinstall them as-is and you could DIY new shocks at anytime, a simple task. Many on this forum and elsewhere are adamant about the wet-bolts installed in a certain 3 or 9 o'clock position. I'm not sure that matters, I worry less about some things. Since the Alcan wet-bolts were not splined, I just mounted ours in random positions. When I grease, I usually get one Zerk per side that will not take grease (yes wheels and load OFF). I just loosen that bolt, give it a 1/4 turn, apply grease and retorque. To date, only one Oliver owner had issue with the Alcan shackles, where they got buggered with use. The same owner went with an extremely light torque setting, hence the damage. No other complaints from what, 200 Oliver owners with Alcan Springs! If you believe in the 3-9 positioning get a HD splined set instead. I also thought afterwards, I could have bought the full HD EZ Flex set saving money. If needed when there, purchasing Alcan wet-bolts would be fine. One thing I can tell you is they will reuse everything good and are not the kind of outfit to upsell their customers. Another thing I would have done differently? If Alcan had in stock the axles I needed, in hindsight, I would have had them do the whole job when I was there. They charged others a very reasonable $600 for labor, and got the job done in a half day. I enjoy DIY on my vehicles, always pay for parts only, dislike paying for contract labor! But to install axles and springs was a long hard job for one old guy at home (my son helped when asked), pacing myself I spent a few days! They certainly would have fit me in vs. allowing me to drive off that day! They measured our Oliver and spent so much time with me. Our Oliver is one of the few with the 50" axles, while Alcan had a whole pallet of 50.50" axles for their Oliver customers. My axles had to be custom ordered, so having them do the work while we were in CO was not in the cards. You have a lot to consider. I suggest you keep the installation option open. Call them and talk to Lew or Tim. Let us know how it turns out for you!
-
Main battery switching, a different approach
jd1923 replied to Snackchaser's topic in Ollie Modifications
Thanks, and it has worked great for 2 years now. Along with 35-gal fresh water in the TV we use it every few days. No-way could we do that lifting our heavy custom mattress! This and moving all the electrical under the rear dinette seat has saved a lot of frustration. Perhaps OTT could add these ideas to their 2027 models! 😎 -
Main battery switching, a different approach
jd1923 replied to Snackchaser's topic in Ollie Modifications
🤣 -
Main battery switching, a different approach
jd1923 replied to Snackchaser's topic in Ollie Modifications
I'm assuming you mean the cutoff switches. That's cool and quite an improvement. I had to move everything out from under the beds! -
Cabinet instead of Stock Convection Microwave
jd1923 replied to HDRider's topic in General Discussion
Hey if Lance's idea works and OTT has such parts at a reasonable price, then cool! In my experience, after entering six (6) service tickets, I strike out every time! I stopped even thinking to ask and channel my efforts into DIY! 😎 This is not a difficult project to custom build yourself! I removed the original microwave for an oven, so check my mod thread below to see what you'd be getting into (when you see my first picture, I added the 2x4s to provide a base for the oven). I see 3 steps in creating a custom cabinet: 1) Remove microwave, fill screws holes on face, file smooth the rough cut opening 2) Clean and line the internal cavity with poly sheeting 3) Ordering and installing new cabinet doors The microwave bezel comes out with 4 corner screws. Our microwave (not that OTT installed yours the same way) had a bracket above it that was screwed in from the upper cabinet. Empty the cabinet and the mat liner and you may see 2-3 screw heads. I lined ours with fire resistant insulation for an oven. You could line yours with any thin PVC sheeting or the like, cut the five sheets to size and glue in place. If you want to get fancy, you could add a molding to hide the cut edges. Also, use Marine-Tex to fill the screw holes in the face. That's step #2 above, now for the finale. Measure the opening for cabinet doors. You must order cabinets somewhat larger than the opening. Go to Depot/Lowes or a cabinet shop to select your cabinets of choice. Get your wife involved in this step of course. Your options are endless! Also think about the hinges. I'm not a woodworker or cabinet guy, but purchase hidden hinges that mount to the interior walls vs. anything that would screw into the face. Then you want a good latching device for both cabinet doors so they stay shut while towing. Staff at the cabinet shop could advise on proper hardware. Can't wait to see your mod post, if you go this direction, take the plunge! It's a good project that you can personalize and when finished have pride in your work every time you use it or look at it! 😎 -
I used a standard 1/2" wrench and made them hand tight. With a short wrench you cannot over-tighten it like with a socket and longer ratchet. Looking at your numbers, you want the 15-25 range, and I'd go with 25 ft-lb. There is no way 6-9 ft-lb would hold an 8mm bolt on a 4/0 lug! The cables would be lose in a few miles. Epoch has a history of numbers being different on data sheets vs. user manuals.
-
I thought that when I reviewed the catalog link Rob provided. I'm the oddball here re taste in windows (and certainly other things 🤣). I'm happy we have the sliders and very happy after 10 years that ours are in excellent condition after replacing the white rubber seals with new black rubber. I like the one-hand operation whether standing, sitting, or laying in bed. I open/close the one by my bed every night and morning. Sliders may be better for security too, when left open while away for the day. Every time I pressure wash the Oliver, I hit the windows dead on and a little dirt and a lot of water comes out of every weep hole while staying dry inside. No similar tracks or weep holes in the awning windows, so likely a benefit of being low maintenance. I know some of you have leaks in your original windows and many of you want awning windows for better air flow and other reasons. I hope for you that these windows fit into the roughout openings of your hull with an easy installation! I'm looking forward to reading the first window mod thread on our great Forum! 😂
-
Main battery switching, a different approach
jd1923 replied to Snackchaser's topic in Ollie Modifications
Are they still mounting them under the streetside bed?