Search the Community
Showing results for 'Access' in content posted by Overland.
-
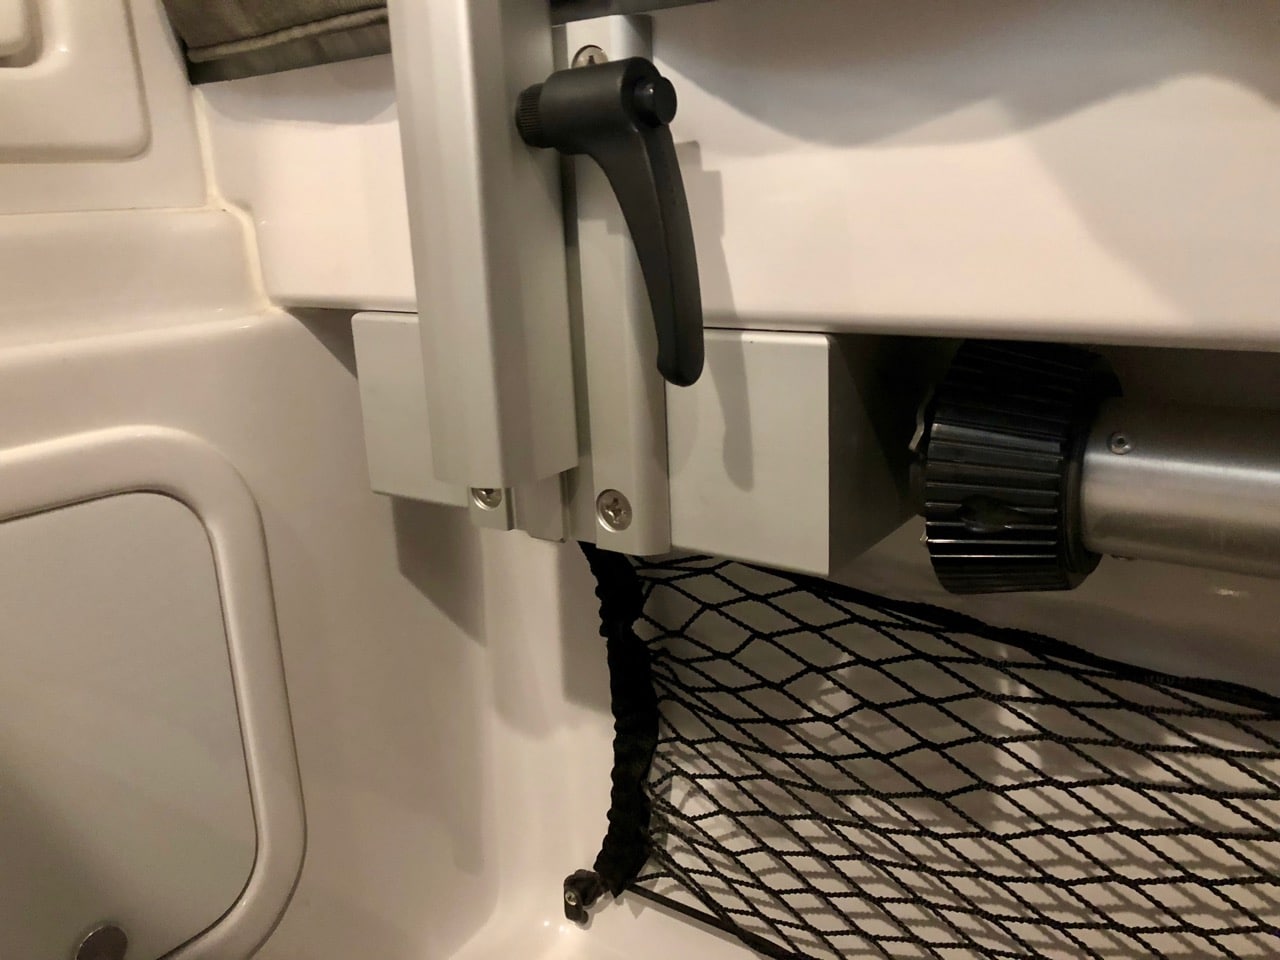
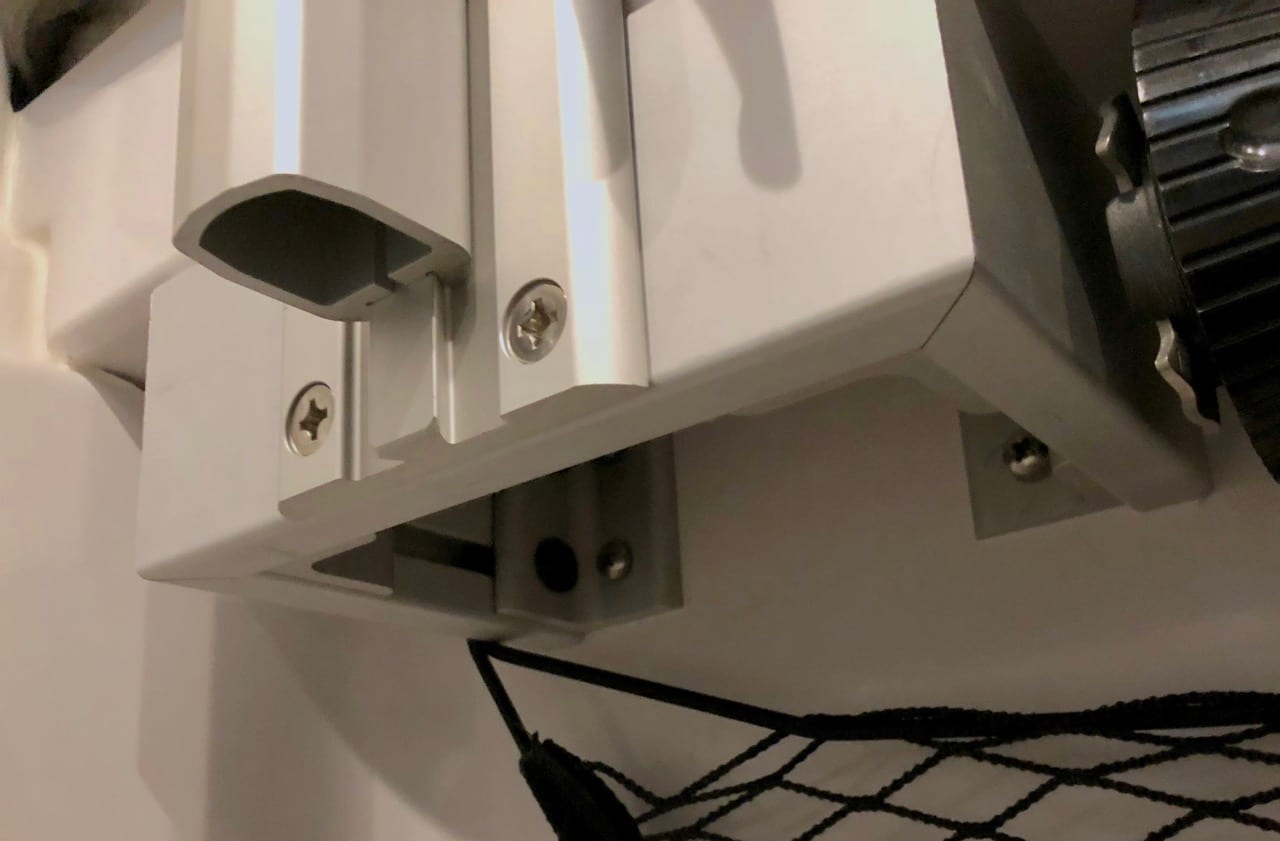
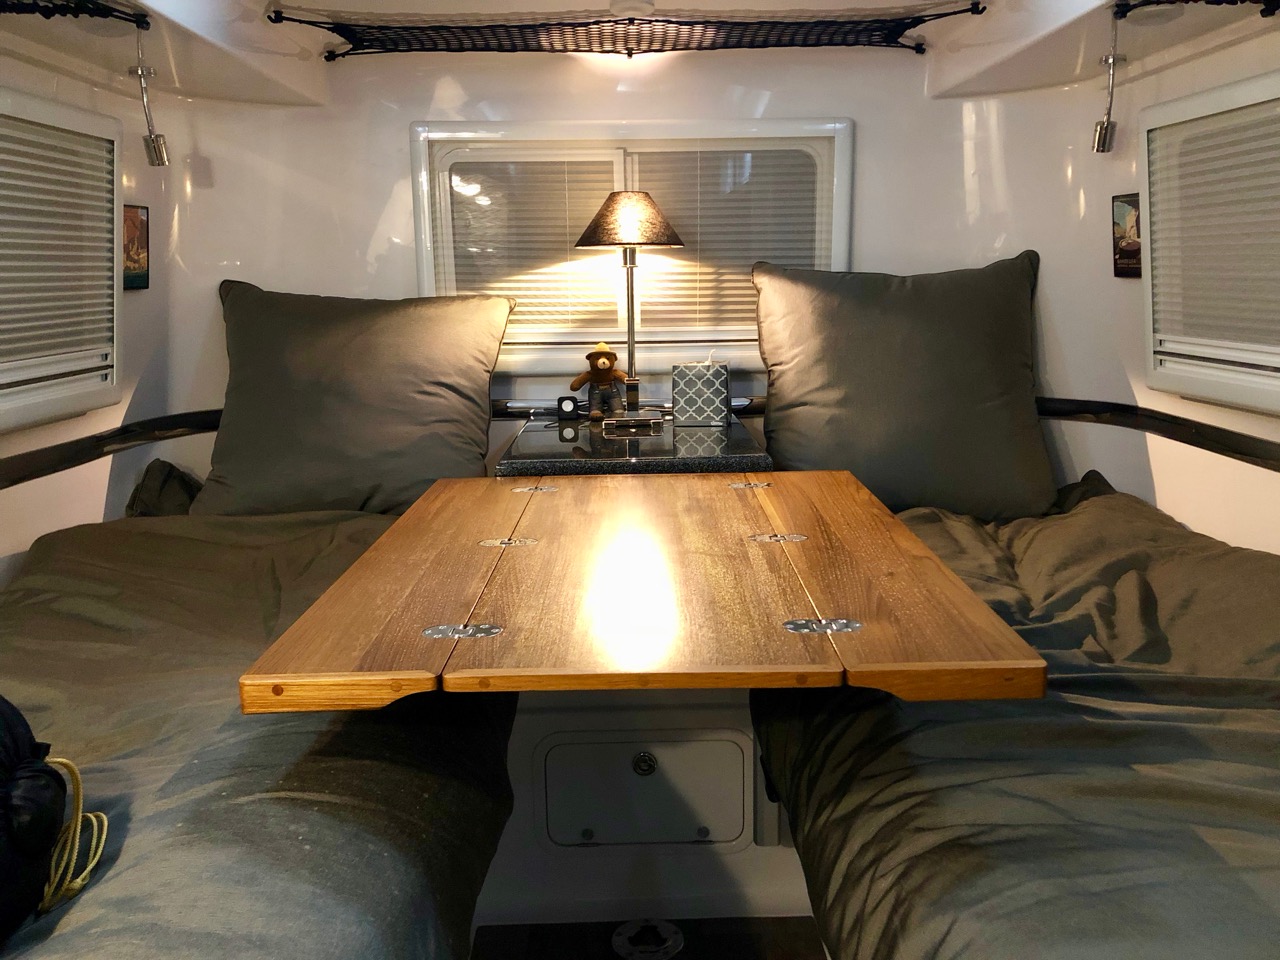
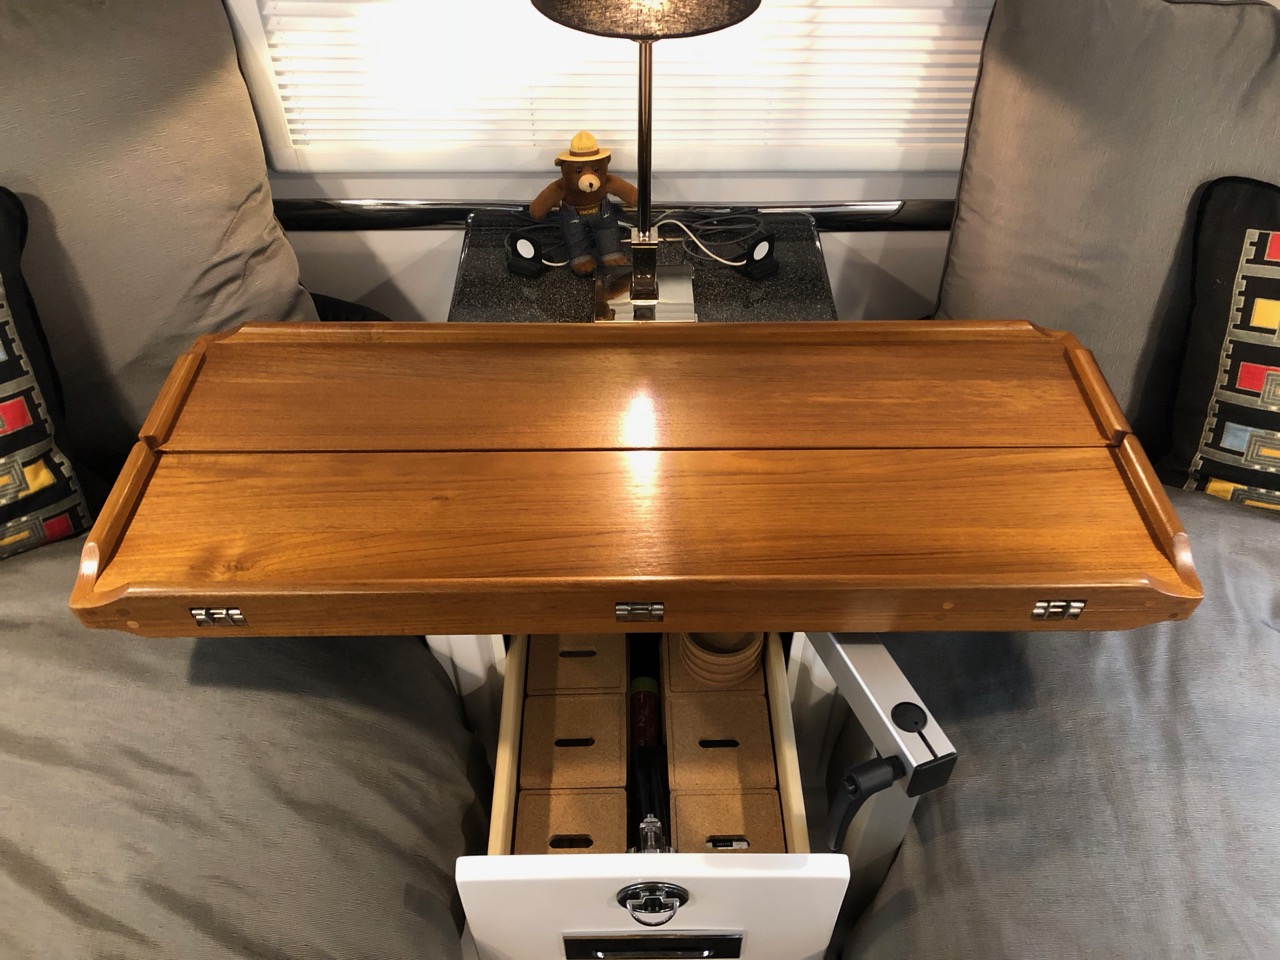
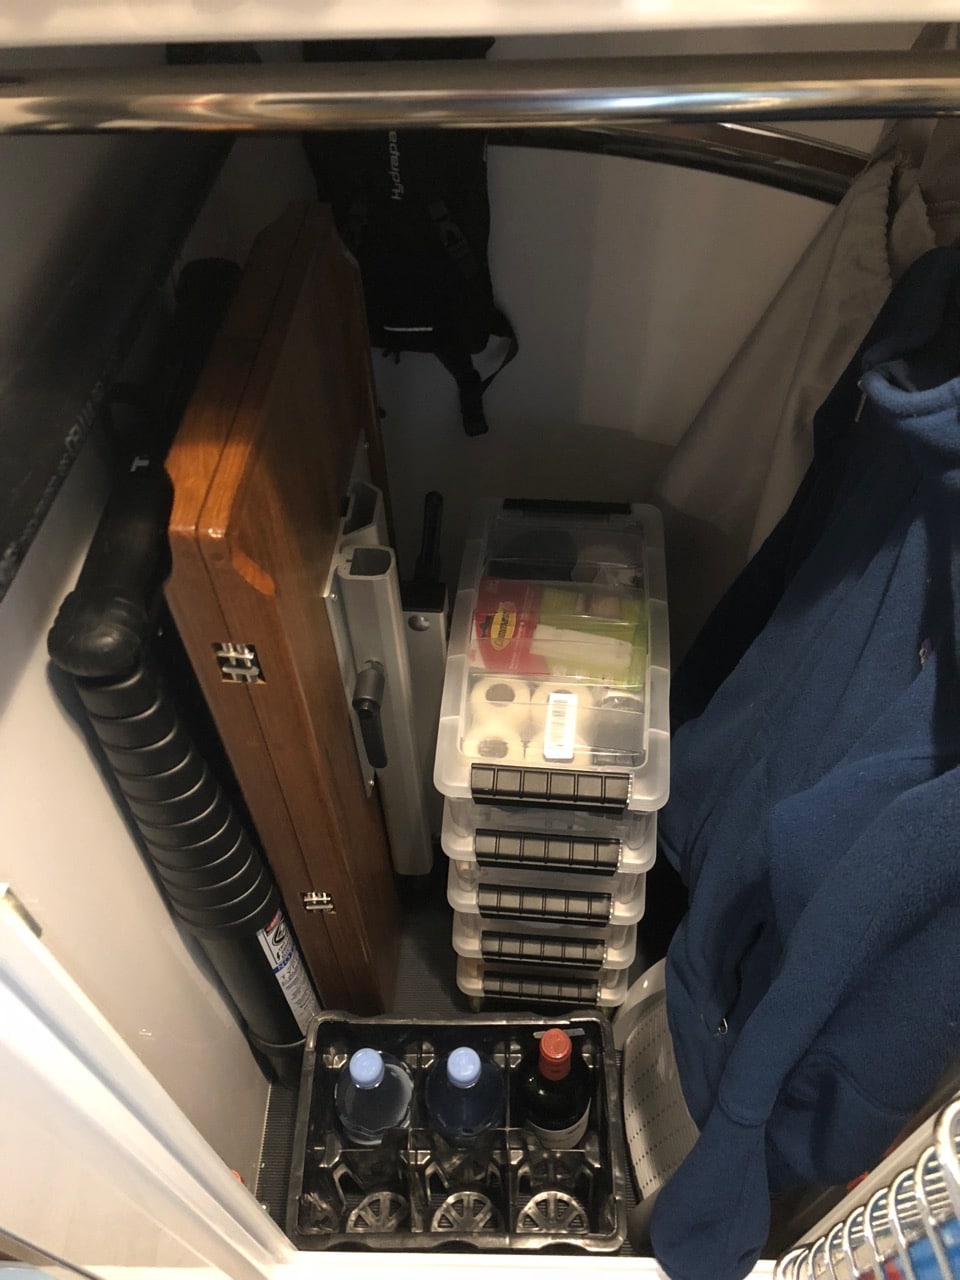
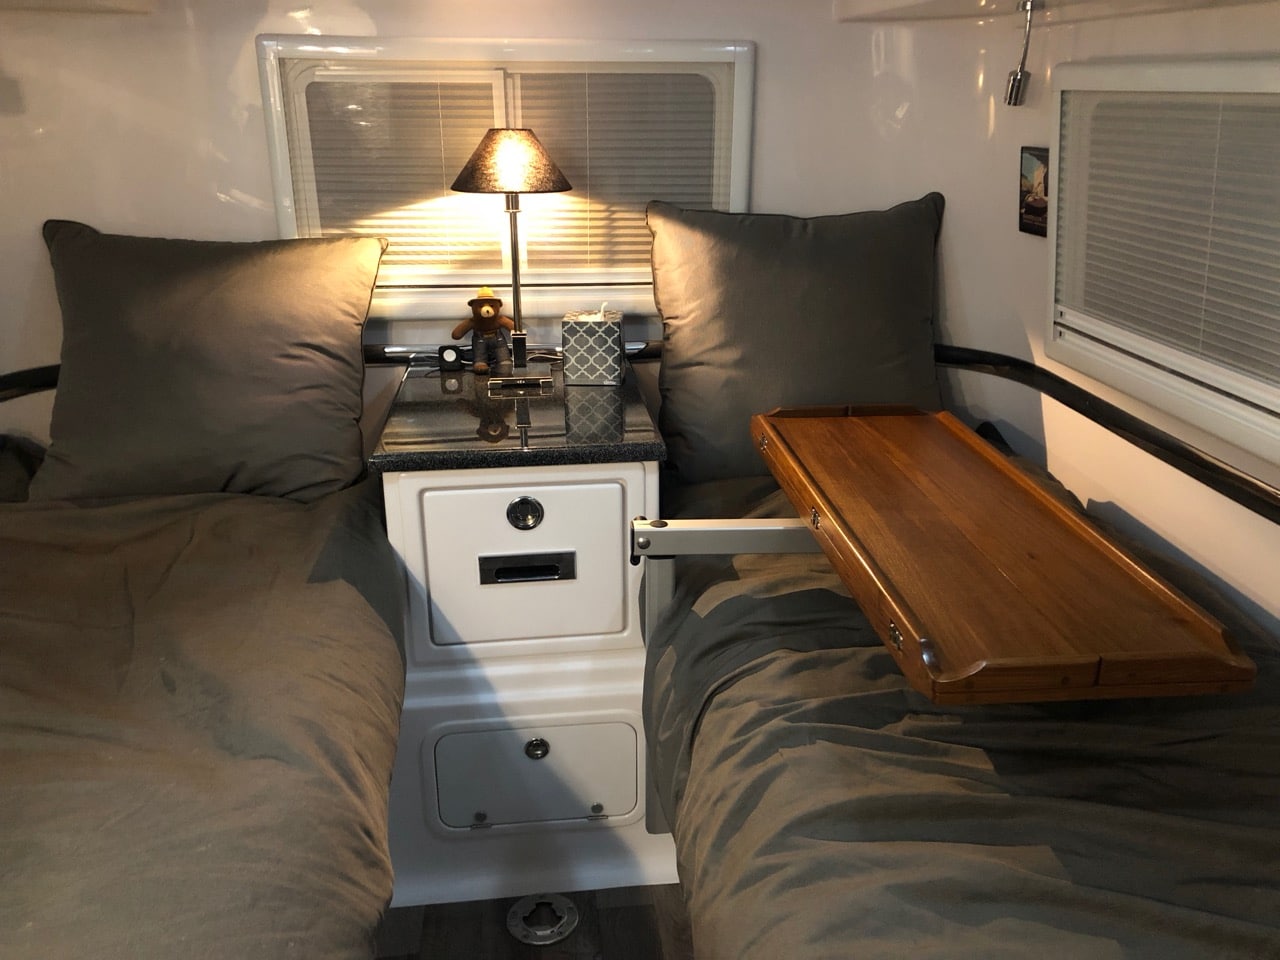
I think like a lot of Elite II buyers, we were torn between the twin beds vs the king. We chose the twin, but not so much for the size or comfort of the beds as it was the utility of nightstand and easy access to the overhead compartments. But we liked the idea of having a table and a large lounging area in the back, and so I set my mind on the idea of trying to have both. At first I designed a custom table for the back that would latch into the nightstand in the back with a pole in front, similar to how the dinette table works. I showed it to Oliver and they thought they'd give it a try, but as time went on and things got delayed or forgotten, I sort of gave up on that idea and asked if they would just sell me the standard table top and legs and I would figure it out. They did, and it was a big mistake since I could never figure it out. The table was just too heavy and bulky to put up and take down, and there was absolutely no place to store it. Plus the height with the standard legs was too short for the mattresses we had (another poor decision on my part). So on our first trip it was labeled the Albatross Table and it was just in the way the whole time. It didn't make another trip, just the two mounts screwed to the floor to remind me that not every problem has a solution. But the solution does exist in the Lagun table. I'd seen them before in the king bed model but I had sort of dismissed them as being too small to be of use. But that was before @rideadeuce started this topic about their upgraded table top. Their top was much larger, foldable, and just generally nicer looking than what I'd seen before; and so it clicked with me that with the Lagun mount, we could have a foldable table that could easily be stored or moved out of the way for access to the upper storage. Also the height could be whatever we wanted and unlike the table we had, could be quickly locked for travel. There were just two problems for us - the mount in it's normal location would block the nightstand drawer; and on top of that, we had opted for an access hatch to the basement right in that same spot where the Lagun is usually bolted to the hull. I needed a way to mount the table to the side somehow. So I made one of these - This contraption is made out of 15 Series extrusion from 80/20. I cut, mitered, and erector setted this little block and associated connectors to go beneath the bed overhang. The Lagun mounting plate (the vertical piece) bolts to the mount and then the whole thing gets bolted to the side wall under the bed in four places and to the bed overhang in four places. It looks complicated but if you have a miter saw and can play with Legos, you can build it. Here are some pics of the block in place so you can see how it mounts. The top two bolts on the Lagun plate bolt into the side of the bed extension, then there are two bolts on the block that secure vertically into the base of the extension, then another four bolts that go into the side wall of the base of the bed, opposite the basement. I marked and drilled for the two vertical holes first, then temporarily bolted it in place to mark all the other holes. You need to do this since not all of the surfaces are perpendicular to the trailer or one another. But the flat bottom of the bed extension runs parallel to the floor so if you use that as your starting point then the table top will end up parallel to the floor as well. The end result is extremely solid - The table top I chose is the 35" Nautic Sail top from Marine Teak. Look around on their site and you'll find a number of styles and sizes, any of which would be a great choice. (This is the same company as this one, btw, but they have more choices in table tops on their UK site.) I debated oiling it, but came to my senses and coated it in a couple layers of low gloss poly. Taking it apart to seal is no problem, but you do have to keep track of a number of shims that go under the hinges to make them flush to the wood. So here's the final result. I really like the versatility of the top. Use it folded, unfolded, bar height, table height, sideways, lengthways, stick it over the bed for travel or to get it out of the way, or...however. With the mounting plate where it is, we can raise the table hight enough to clear the nightstand and lower it enough that it sits on the bed locked in place for travel. As you can see, the drawer clears just fine. The table will work best once we have our cushions made to replace the mattresses, but we just did a quick weekend trip with it and it works well even as it is. And best of all, it fits in the closet -

- 75 replies
-
- 23
-

-

-

-
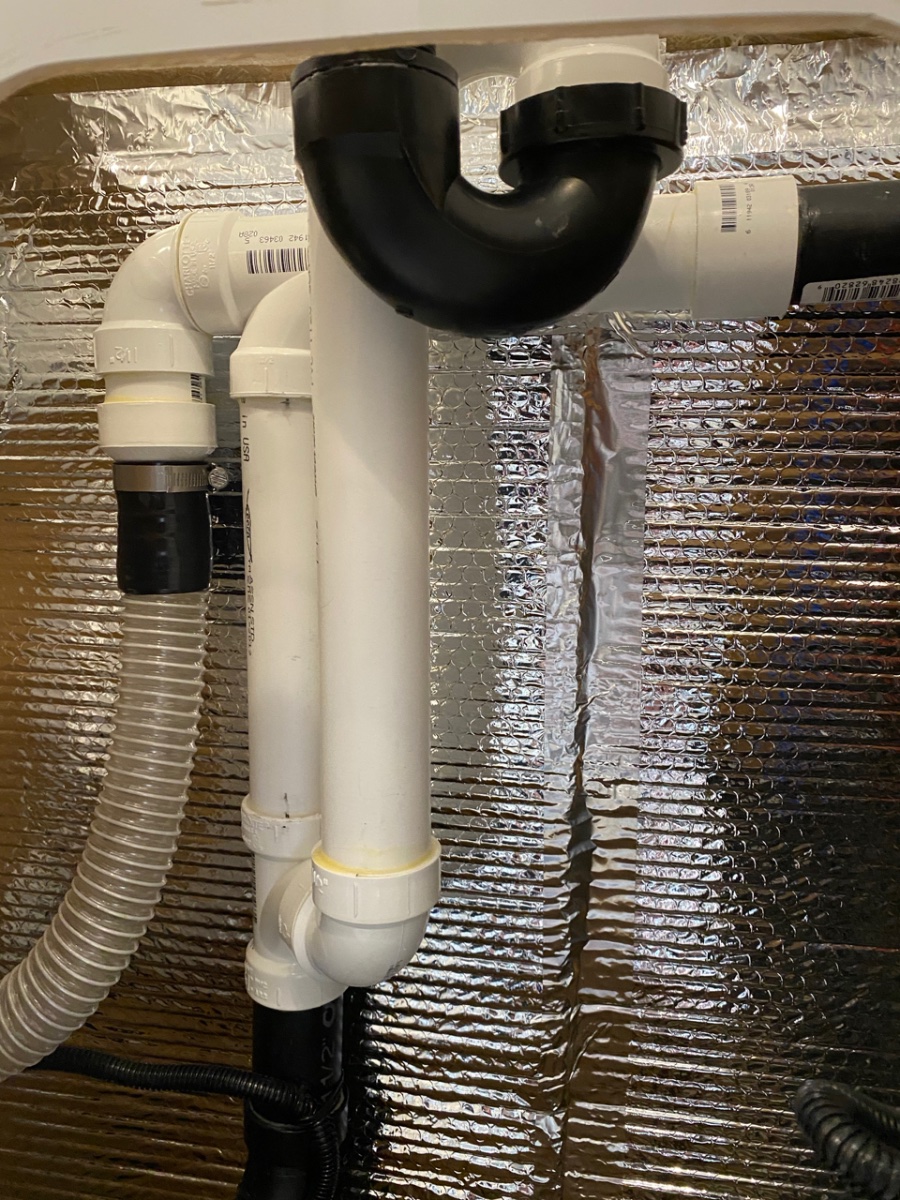
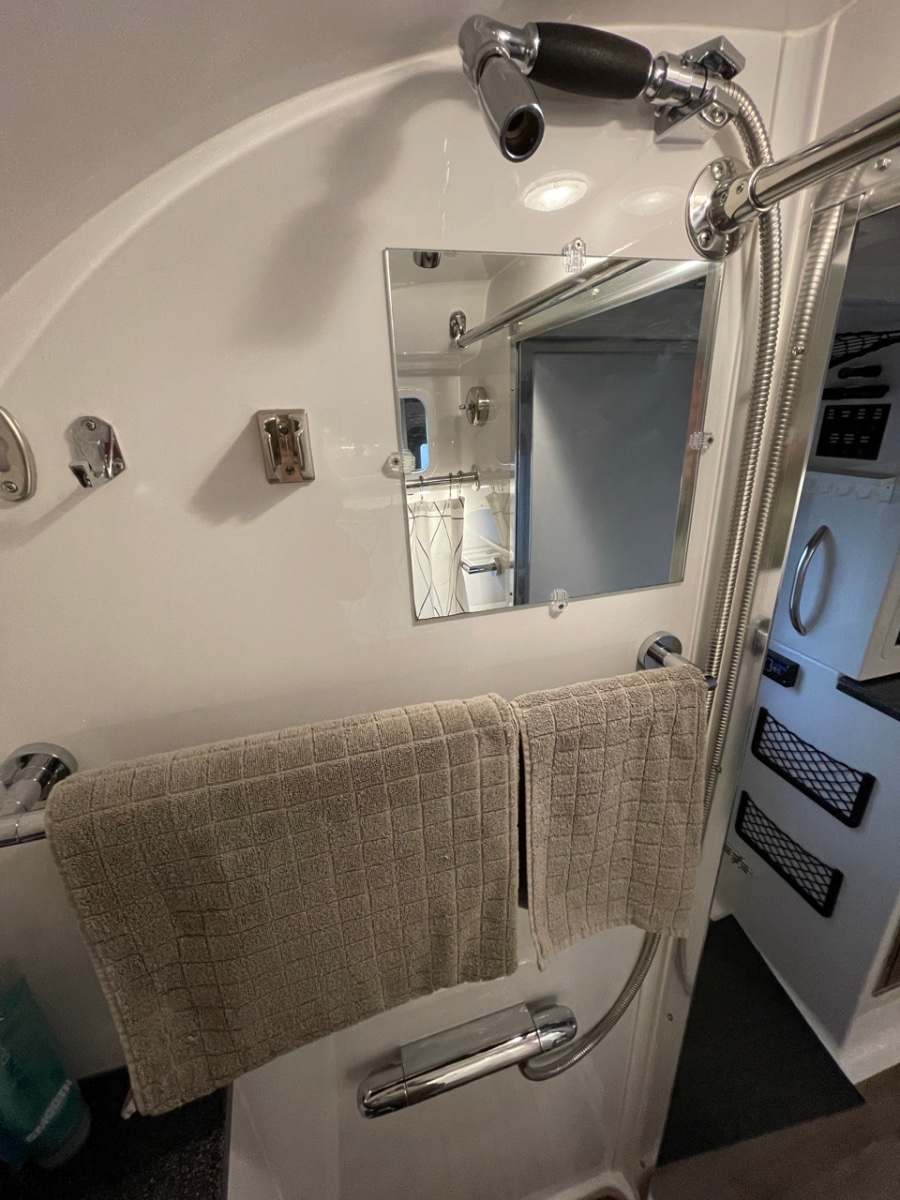
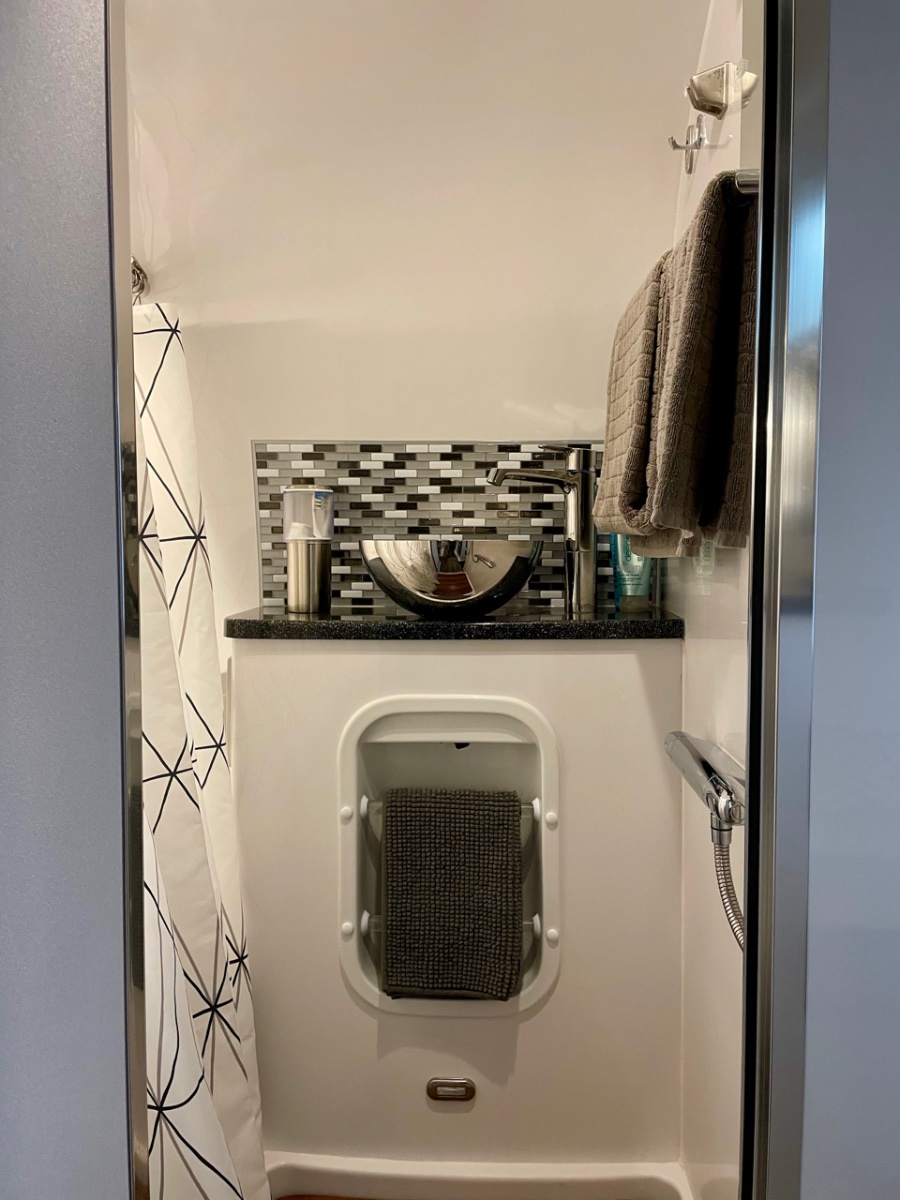
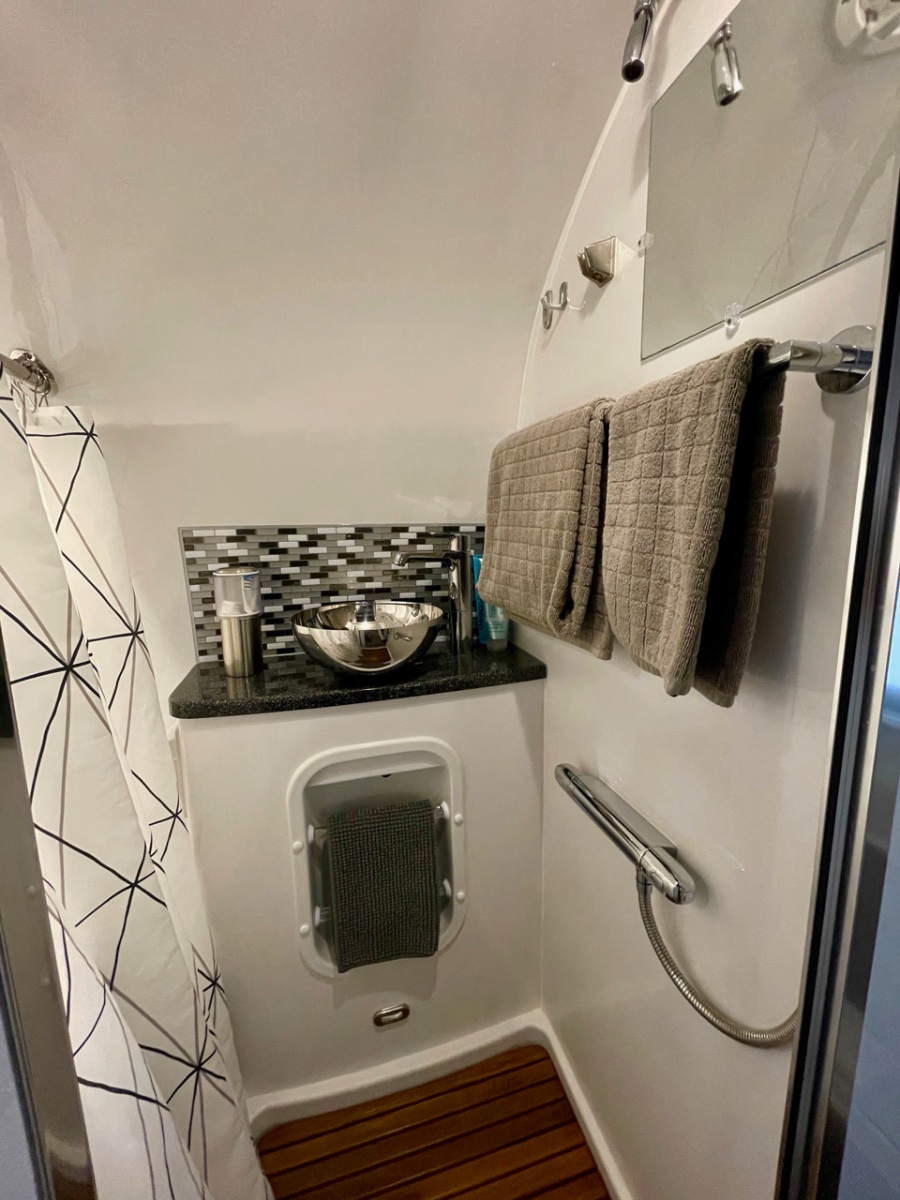
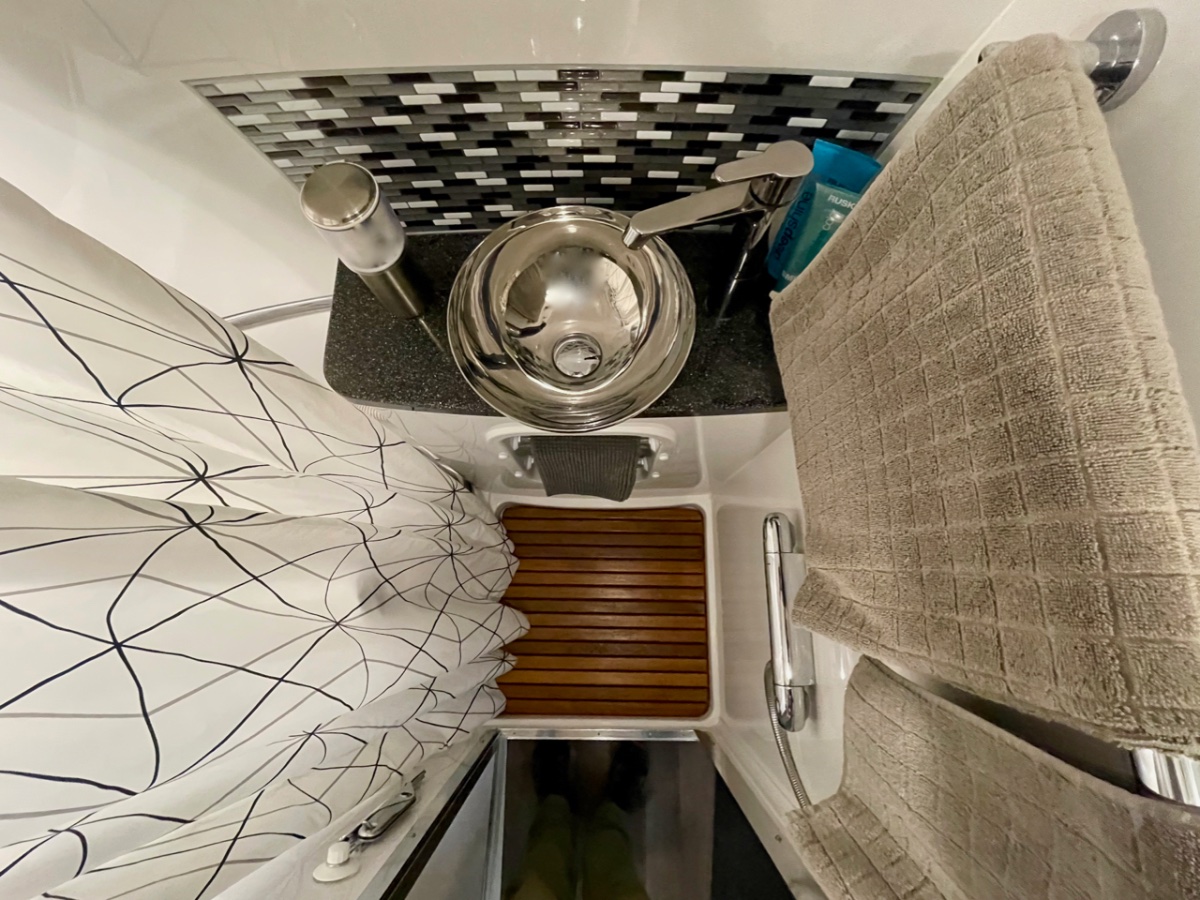
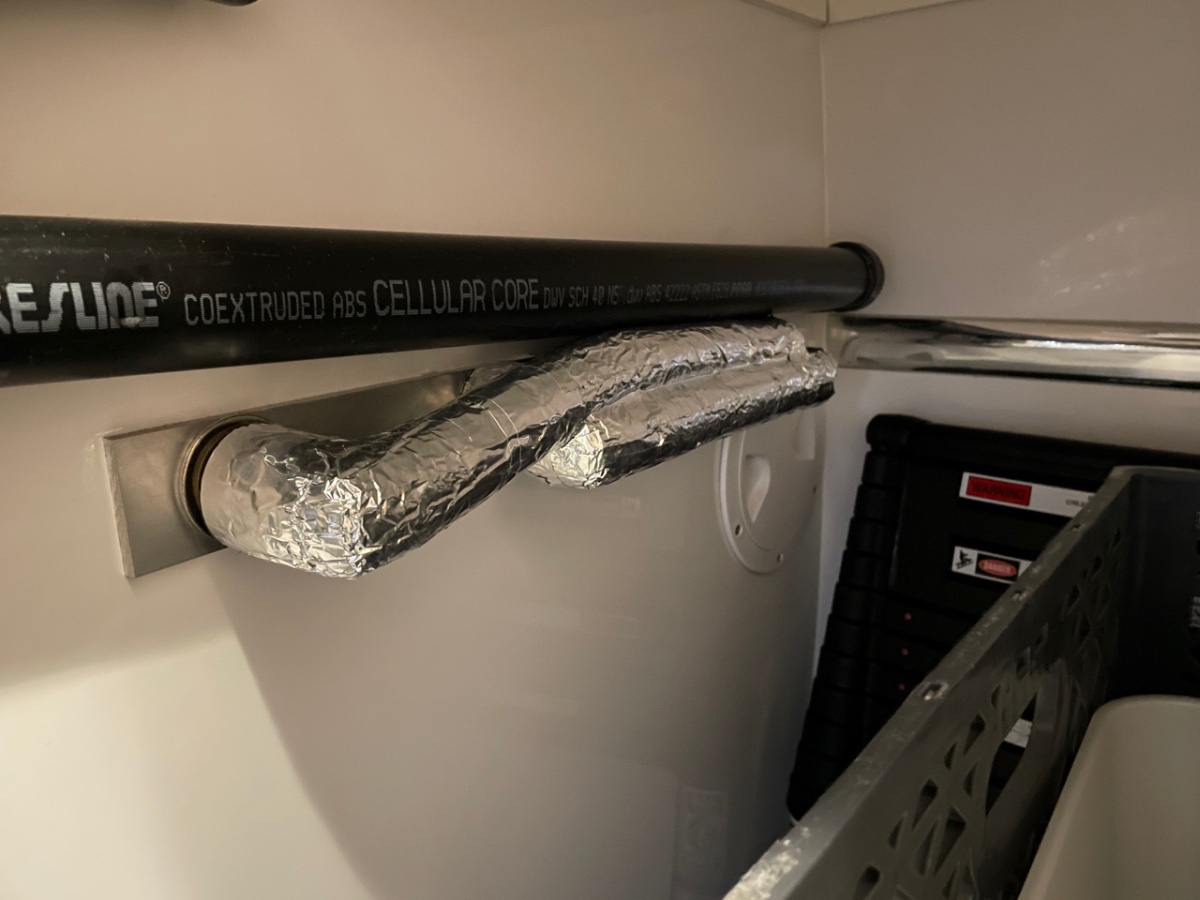
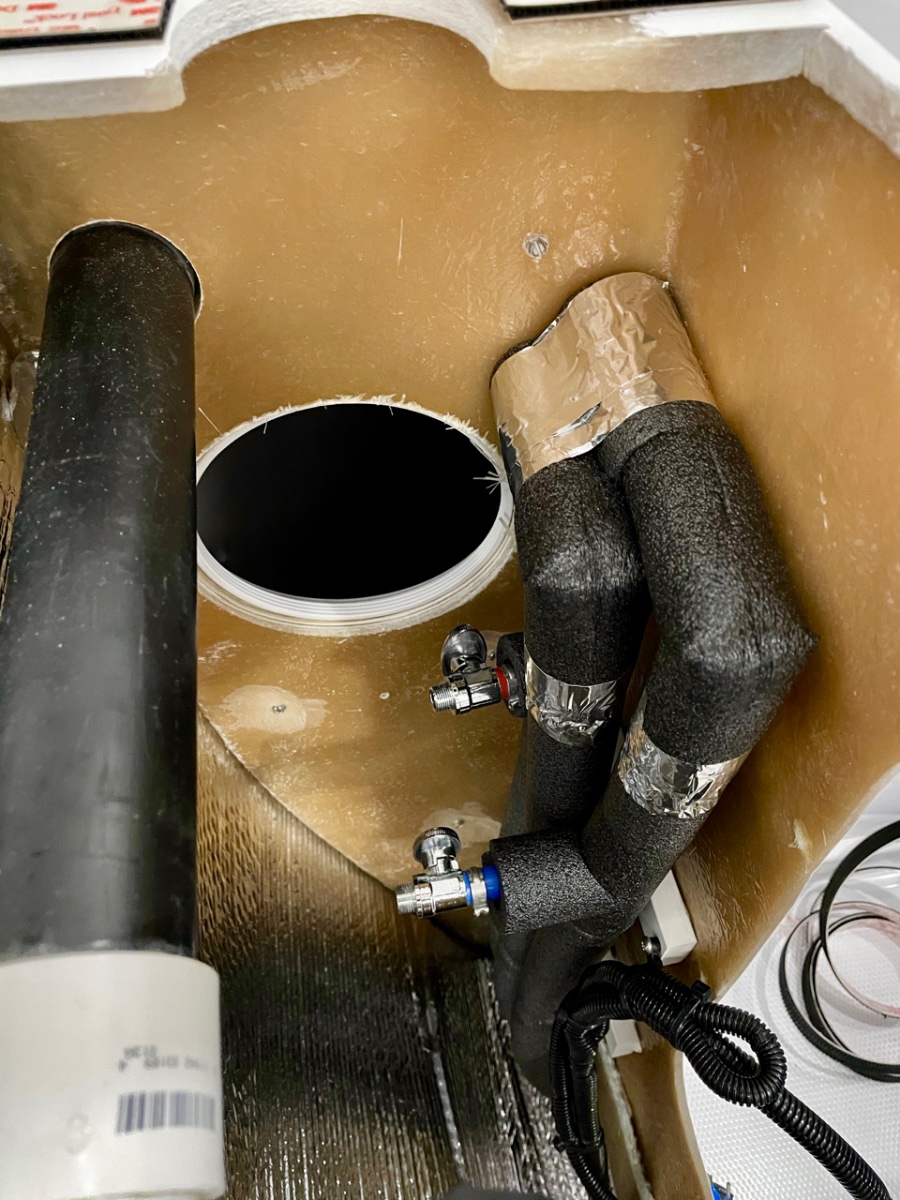
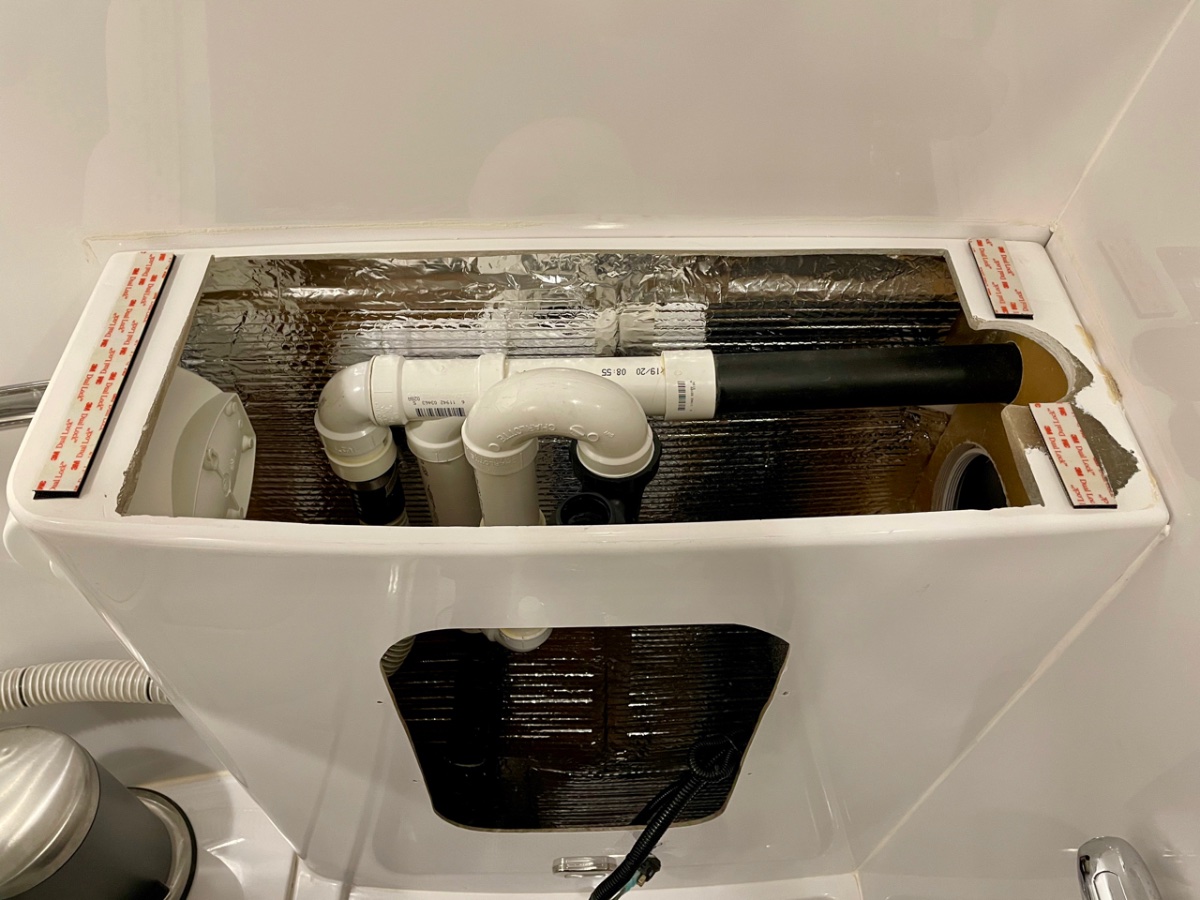
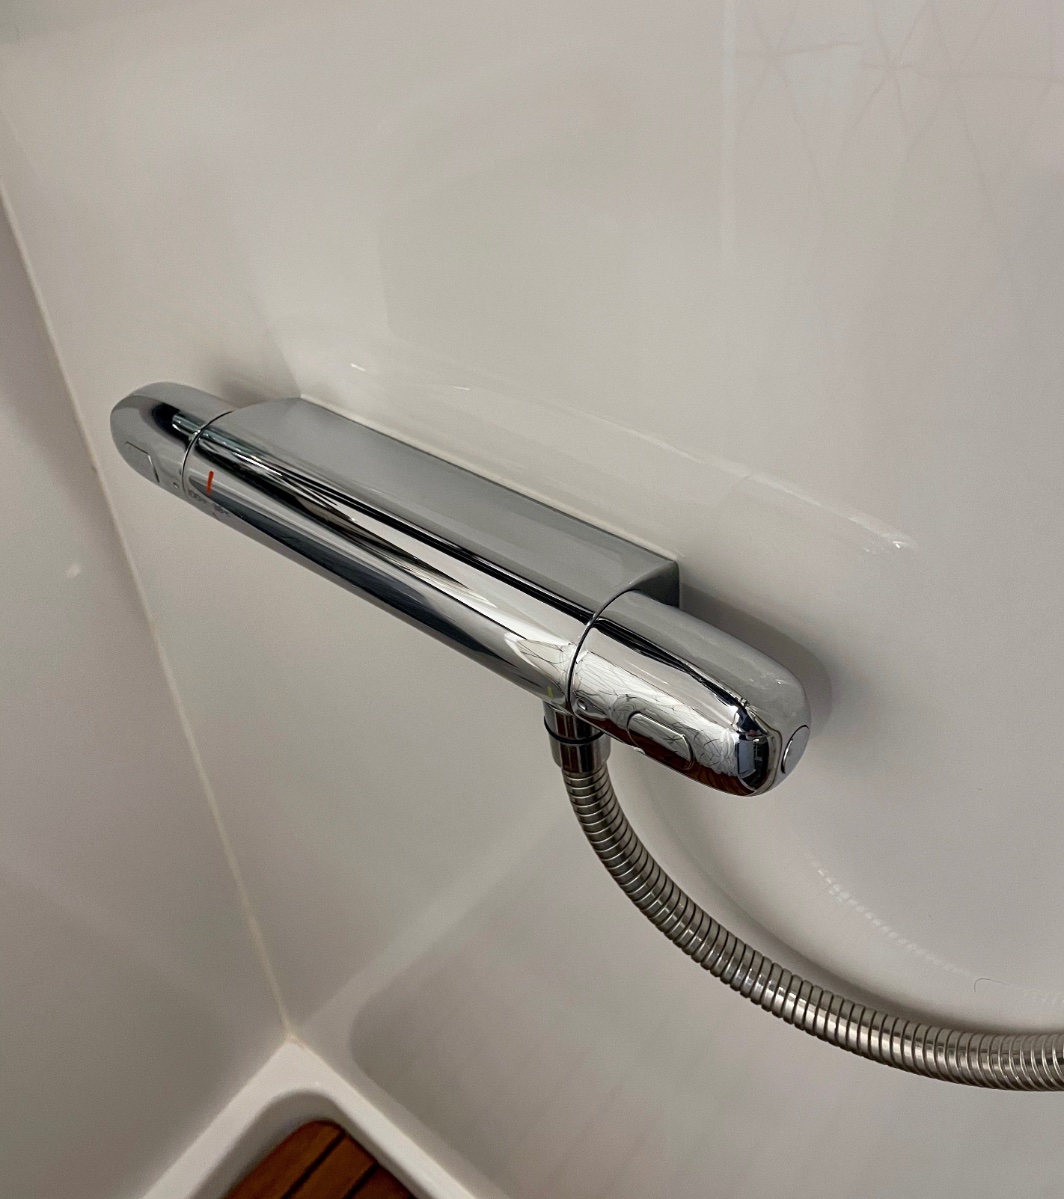
Many of you know that this has been a long, drawn out project. I think I started talking about it to a few people at the 2019 rally - so it's been well over a year in the making, almost two. Not that it was particularly difficult (though certainly a more major mod), but because of laziness and indecision on all the components it ended up being a start and stop project, with months sometimes between fits of activity. And then it snowballed into a complete plumbing overhaul, which was unnecessary - but then that's how the trailer got its name, after all. I'll post about all the plumbing stuff later, but since there have been a few recent posts about shower and bath mods, I figured I'd go ahead and toss this one into the mix. This project started for a few reasons. One, I've always found the bath sink to be mostly useless. It's fine for washing hands, but for most anything else, you've got to crane your neck around with the front wall curving in to hit your head. And trying to use a tiny little sink for washing your face just leaves water everywhere. So we found that were using the kitchen sink almost exclusively. That was fine - no big deal - but with the bigger sink, I was getting tired of wasting water cleaning toothpaste residue out of the sink, and it seemed silly to have a bath sink that got little to no use. The second reason for the upgrade is that after we redid the kitchen sink, the bath sink just looked sad. In addition to functionality, the bath needed some sexy. So the obvious solution was a vessel sink of some sort. Since a vessel sink sits on top of the counter, I'd have much more leeway in size and placement. I could pull it forward as much as I wanted, plus it had the added benefit of raising the sink to a more comfortable height for us. Some experimentation with kitchen bowls of different sized showed that I could get a fairly generous sink that didn't take up too much shower space. I settled on something in the 11" to 12" range; which proved to be a little difficult to source, especially after deciding on the material. I had bookmarks for dozens of sinks of different materials, but I couldn't find one that I really liked. I almost picked a glass one off Amazon, but in the end I thought that was going to be too heavy. What I really wanted - since I had already swapped out almost all of the brushed chrome fixtures in the bath for polished - was a simple polished stainless sink. There were a few out there, but nothing in the right size, nor at a reasonable price. So the project bogged down a bit at that point; but I was confident that I'd find something eventually, and so I went ahead and ordered a new vanity top from Oliver, without any cutouts for the sink or faucet. I’m glad I did, since Oliver has apparently now stopped offering our countertop color And sure enough, a few months later I came across a discontinued sink on Overstock.com that was exactly right. 11.25", polished inside and out. It's the Acquaio sink from WS Bath, if you can find one. I know that other sizes are still available. It was still pricy even on discount, but by that point I didn't care. To make up for the splurge, I got a faucet from Ikea, which is actually pretty nice. The colors from chrome to stainless don't exactly match, but they're close enough and it doesn't bother me. Since I was swapping out the faucet, I needed to find a separate shower valve, which was another lengthy quest. I thought at first that I'd put one to the right of the bath caddy, like @mountainoliver has in his trailer. But most everything I found was just a bit too big to fit (I didn't know about mountainoliver's mod and the mixer valve he used until later). Then I found the Grohe Grohtherm valve, which was interesting in a couple of respects - it didn't recess into the vanity at all (which eliminated a potential issue with the plumbing), it matched the Grohe faucet that I had already installed in the kitchen, and since it was linear, I thought that it might actually fit in the space above the caddy, between it and the vanity top. And it did fit, but looked squished in place, plus I didn't think until trying to place both it and the sink that the the sink drain and trap was going to be difficult to work the plumbing around. Plus putting it there meant that the shower hose was going to be strung across the vanity and generally look bad and be in the way. The problem with this realization was that I'd ordered the valve and the sink before one of my 3-month breaks in the project and now neither was returnable - so I had to make it work. This meant that the shower valve was going on the closet wall. I also realized during the test fitting that when I pulled the sink forward, the drain trap was going to hit the top of the bath caddy, meaning that I couldn't get it far enough forward to work. Small disaster. But I realized though that the bath caddy wasn't symmetrical, and if I turned it upside down, everything fit. I'd lose the flat shelf on the bottom, but we only use the caddy to hold the bath mat, so not a problem. Small problem with the water pump switch placement, though, since it would be on the bottom - but a quick email to Oliver had a new caddy that hadn’t been drilled for the switch on the way. At that point, all the pieces were here, all the logistics worked out, and I was ready to go. Time for another couple months off while I built up the courage to drill through the closet wall. Then finally... First step was to remove the existing vanity top, which is possibly one of the most firmly attached things in the trailer. It's glued in place, so the only way I could find to get it off without completely destroying the vanity was to cut through the joint with an oscillating saw. That's a slow, tiring, dusty endeavor; and it generates a great deal of heat, so you've got to work in spurts to keep the fiberglass resin from burning - which is fine really, since working through the caddy access, your shoulders will welcome the rest. I had to do a tiny bit of trimming on the new top to get it to fit as snuggly as the old one; and once in place, I sealed it with silicone like the original. Top off, new drain lines in place, and I decided to attach the new top with industrial velcro to make it easier to remove in the future (works well). Next, shower lines teed off the existing plumbing, line to the nonexistent toilet removed, and some insulation added to both the plumbing lines and the outside wall behind the vanity. (I have a circulating pump on the hot water, hence the extra line.) I also glued a small PVC block to the back side of the vanity wall to tie down the water lines and prevent them from vibrating too much. And as always, cleaned out as much fiberglass dust as possible, cleaned up and wrapped wiring, etc. The access port on the closet side is something that Oliver gave me in the original build. The sink valves and drain trap are accessible from that port, and since I used velcro for the top, I have the option now of cutting the silicone on the top and pulling that off for access, in addition to taking out the caddy. New plumbing in the closet for the shower. I drilled out a short piece of aluminum as a backing plate for the shower valve. The plumbing is protected somewhat in the closet by the ABS vent, and we really don't keep much in there that could bump around and damage the plumbing. But a few layers of aluminum tape should help protect the insulation from getting beat up and gives a bit of a spaceship vibe. The valve is supposed to stand out from the wall about an inch or so, but I decided to recess it so that it attaches flush and as out of the way as possible. I caulked around the valve and it ended up making a nice little shelf for a razor, and I placed it low enough that my wife can use it to prop a foot while shaving her legs. You can also hang a bar of soap on one of the handles to drip dry. The faucet has a neat feature with stops on both valves, which can be custom set to whatever temperature and flow you prefer. The little buttons on the handles allow you to go past the stops when you want. And that's really it. Installing the sink and faucet is just drilling two holes and following the directions. The only change I made is that the sink came with a short stainless ring to mount between the sink and counter, but I didn't like the look and so just used one of the black rubber gaskets that was inside the ring. That way the sink looks like it’s sitting right on the counter instead of a pedestal. We tested everything out on our last trip and functionally, it all works as expected. The sink isn't in the way at all while showering, and really is so much more usable. Plus I think it looks great. The shower functions just as nicely, with the valve not being obtrusive. I added a second holder for the shower head up high, which works better for me, though my wife prefers the original one. I still need to swap that one out, since I think it's the only bit of brushed chrome left in the trailer. I added the same backsplash material that a few other owners have recommended. I wanted to order a new, wider mirror; but the original one is glued on and so I didn’t want to go through the trouble of trying to get it off. I suppose I could just place one on top of the other, so maybe that’ll be a future project. Glamor shots -
- 31 replies
-
- 20
-
-
-

-
It sounds to me like the check valve in the pump itself is leaking. Possibly from lack of use or the same calcium build up you've found elsewhere. So, it could clear itself up if you're lucky, but probably you'll need to repair it. Or, since they're not terribly expensive, just replace the pump and keep the existing one as an emergency spare - that's probably what I'd do, since it's always good to have a spare anyway. That would be pretty easy for you to do since the connections are just plugs for the electrical and screw fittings for the plumbing. You can store stuff under the dinette seats, particularly the front one. You just need to put things in containers that won't get lost between the hulls. The one on the back, you need to be careful about the electrical and not put anything back there that will knock something loose or damage the wiring. I don't keep anything there but some people do. A few people have installed electric valves so that they don't have to move the mattress. Others have installed an access port or door on the side under the bed and access that valves from there. It was originally designed for cushions I think, which are obviously easier to pull up for access.
-
 No, not Tuzigoot. It’s Chaco. They’re dreadfully understaffed and ripe for vandalism and pilfering - which is one reason why they don’t improve the access. If you go, it’s definitely NOT a place for collecting anything. But there’s at least one Ollie that doesn’t mind the roads, we’ve been twice… It’s been hit and miss the past few years - no access due to tribal Covid rules, washed out roads, and an impending rock slide in the campground that’s keeping half of it closed. I was told that Airstream at the entrance is permanent. Someone drove it in and didn’t want to drive it out so they gave it to the park for camp hosts to use.
-
Any ideas on warming the bathroom and closet?
Overland replied to John E Davies's topic in Ollie Modifications
On mine it’s not. But a jigsaw can quickly change that situation. Making an access port under each cabinet shouldn’t effect the cabinet integrity nor would it be visible. You’d want to make a lightweight cover of some sort so that something doesn’t bounce out of one of your drawers and end up in the hull space. I’ve had it on my list to do both that and create an access port in the closet floor. I may need to do both soon since I’m planning to insulate all the plumbing lines. Those access ports might even be enough to allow me to replace the flex duct with rigid, which might be a good project to tackle at the same time. -
Modifications to add a fourth bed to a EII
Overland replied to ChrisMI's topic in Ollie Modifications
My suggestion for sleeping kids has always been a tent. Give them the camping experience while giving yourself the extra space. Add a cot or an air mattress if they want a bit of luxury. But to answer your question, I don’t think anyone has done anything like that. It seems possible in theory but IMO also seems like it would be a pain in practice. Perhaps if it’s something lightweight that could be taken down except when sleeping? As for the hatches, the forward one on the curb side gives access to the water valves if you think you’ll use them, but otherwise you’ll only need to access the hatches if something is broken. -
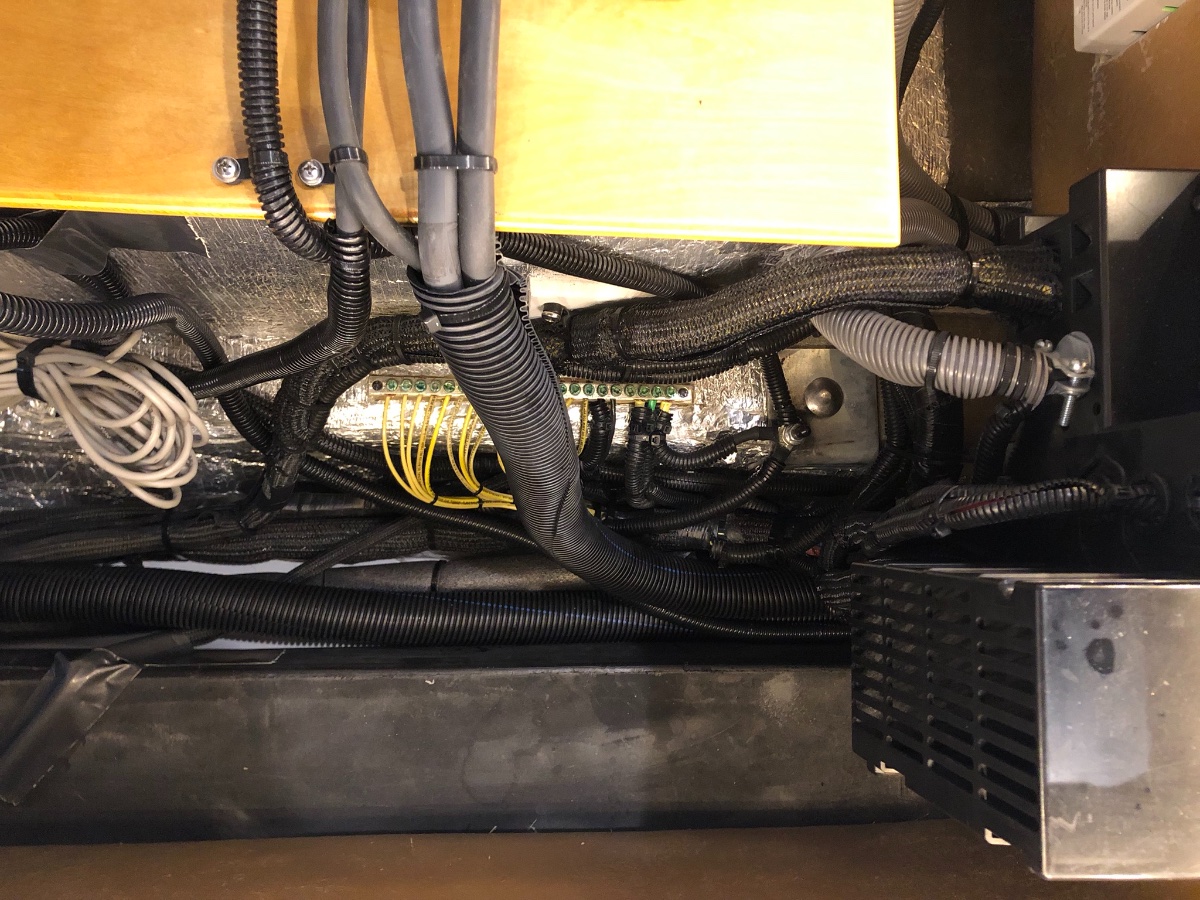
I doubt if any of the front marker lights would be connected to the attic bus bar in the back. I think JRK is referring specifically to the big “Oliver” light on the back of the trailer. More likely the light that you’re having trouble with is hooked to the main bus under the pantry/dinette. That’s a ~6” long aluminum bus bar on the very bottom under the dinette seat with a ton of yellow wires attached: I’d check those connections but also there should be a round access hatch in the closet to access that light, so check the connection there too. Should be noted that you can overtighten the screws on those bus bars, cutting the wires; so don’t go crazy tightening all the screws. Just snug enough that the wire doesn’t pull out.
-
Oliver may have changed the wiring from when my E2 was built, but if yours is like mine, the wiring to the Oliver light will be in the street side compartment of the attic. On mine, there are two bolts on the bottom of the righthand panel and that's all you need to remove to gain access. There's a 12 volt bus bar inside with screw connections and those connections would be the first thing that I'd check. You should also be able to access the light itself by pulling down the insulation in the back of the attic.
-
Relocate the furnace inlet grill and block off that opening?
Overland replied to John E Davies's topic in Ollie Modifications
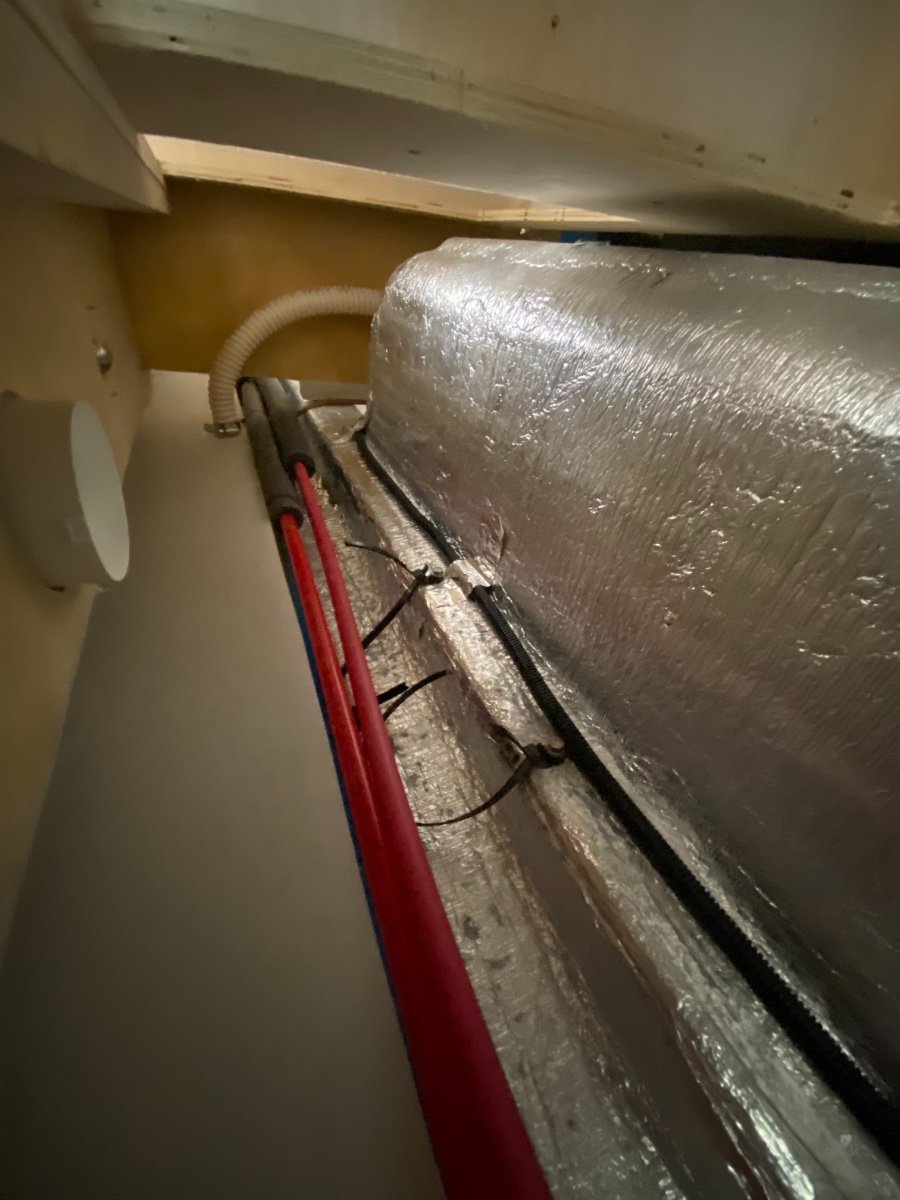
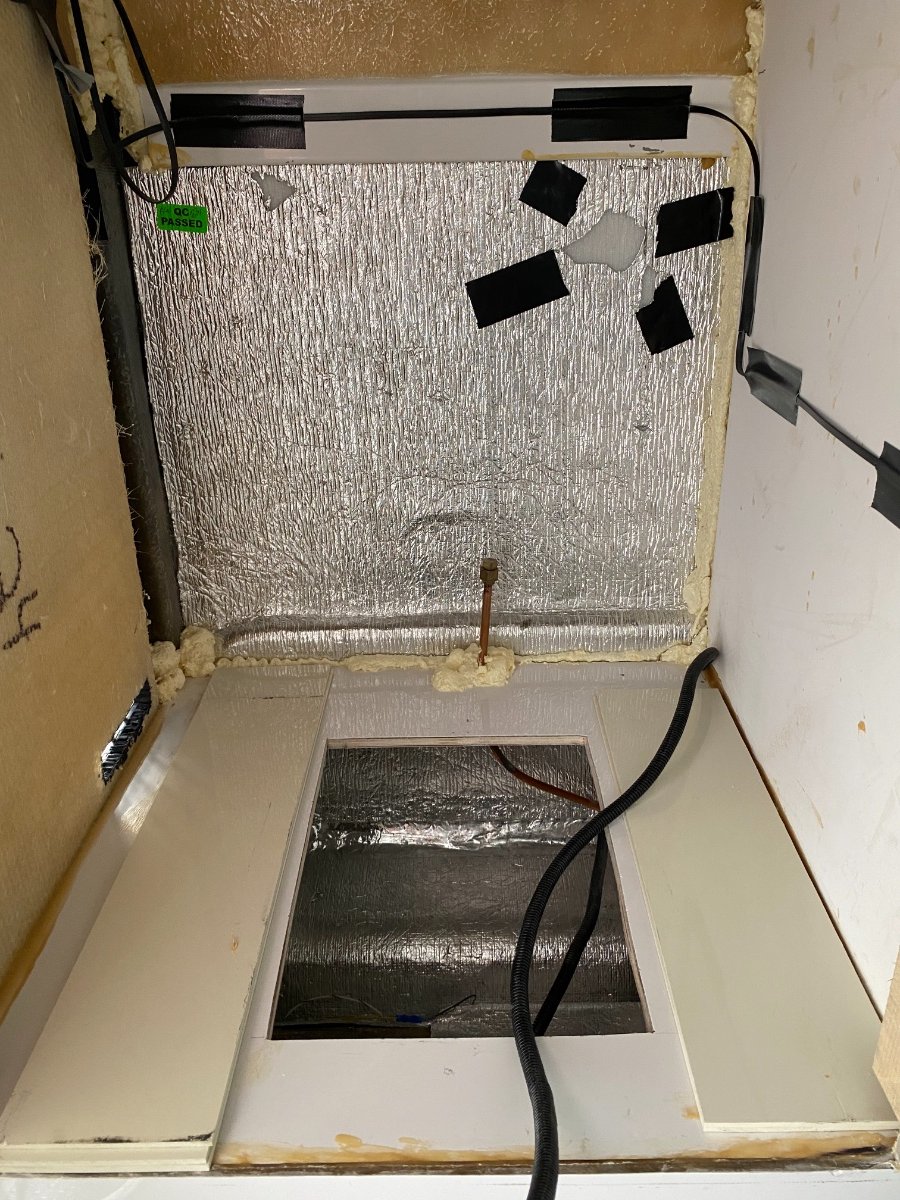
I’m just catching up on this - haven’t been too active here the past few weeks. A vent at the fridge could work, but would probably involve a good bit more work than cutting one at the dinette. If your trailer is built like mine, there will be two problems with the fridge vent. First, there is a solid floor underneath the fridge that separates the fridge space from the basement, so you’ll need to cut a hole in that as well (easy enough, and desirable for future maintenance anyway). Second, there’s a fiberglass ‘baffle’ in the basement area separating the area under the fridge from that under the sink. You’d have to cut through this as well to get good airflow. Possible, but it would be little hard to get to. I’m not sure if the baffle has a purpose - I doubt it and suspect that its just a vestige of construction. Here are some photos. The first shows the fridge space with the access hole that I cut in the floor (the small vent on the left is for my fridge). The second is in the basement area looking toward the fridge from the rear, showing the baffle. The access hole that you see is directly below the sink and the hose is the fresh tank overflow. Hope this helps.
-
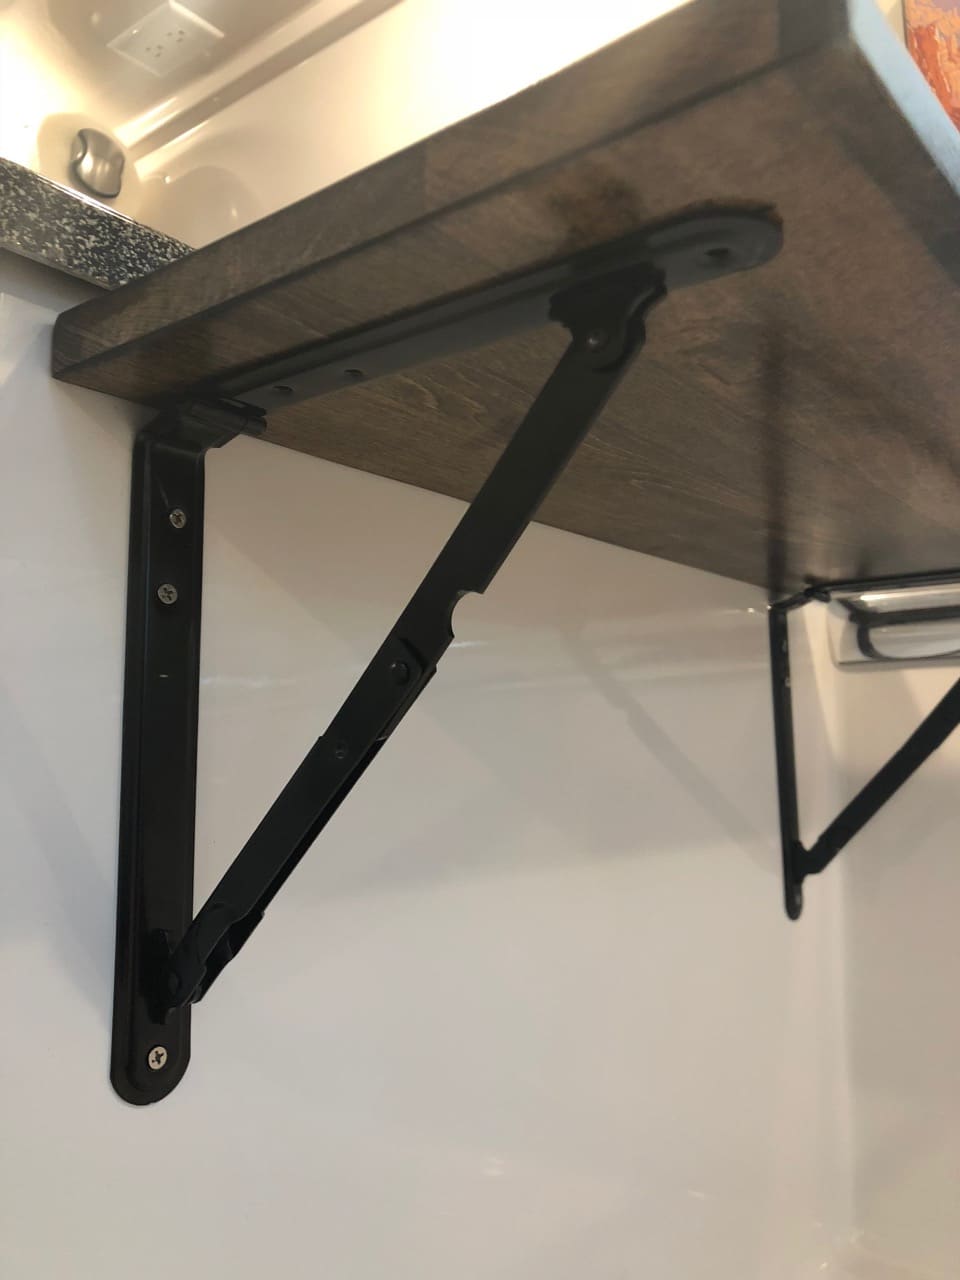
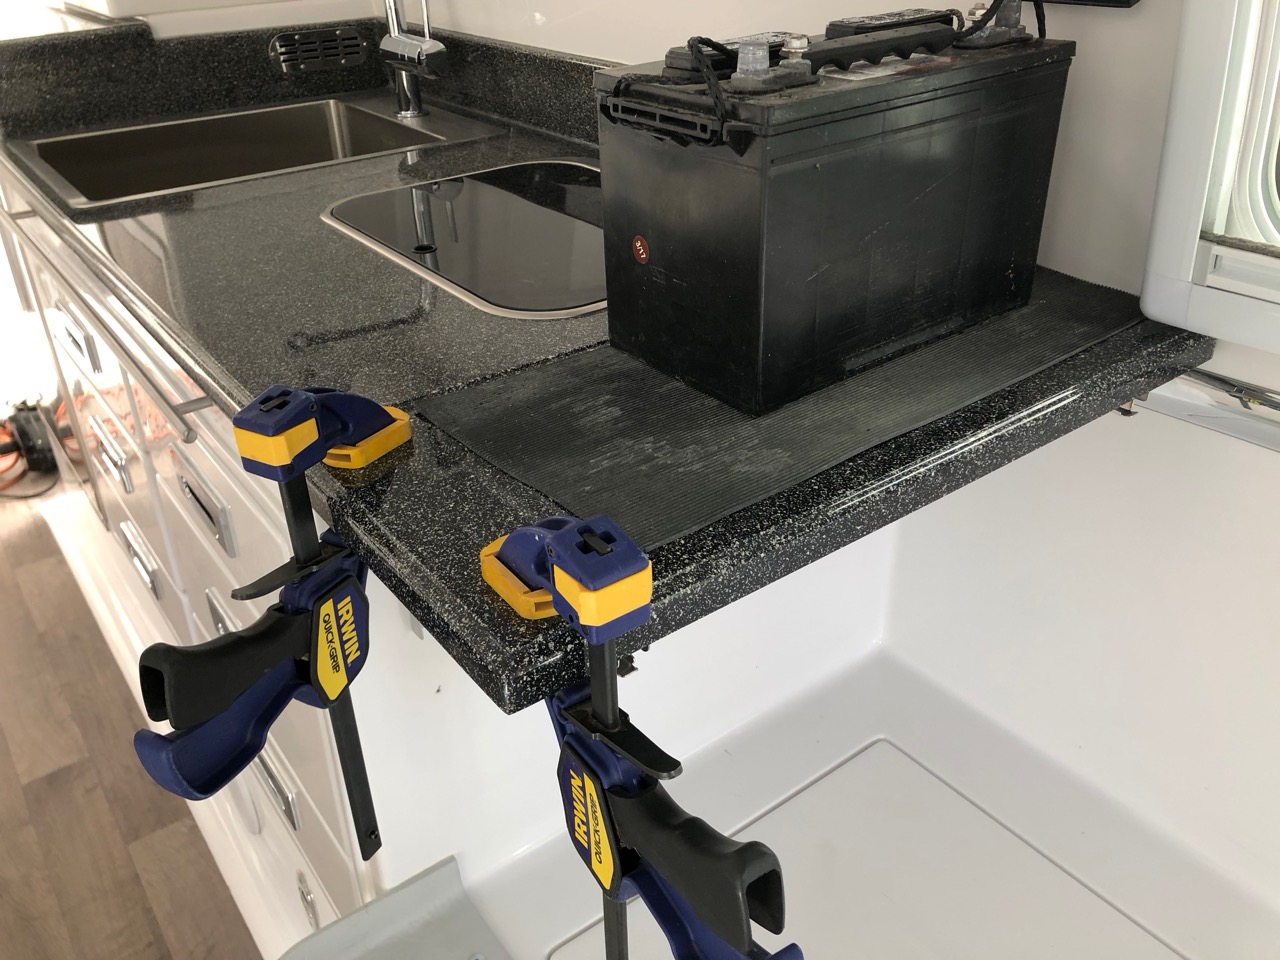
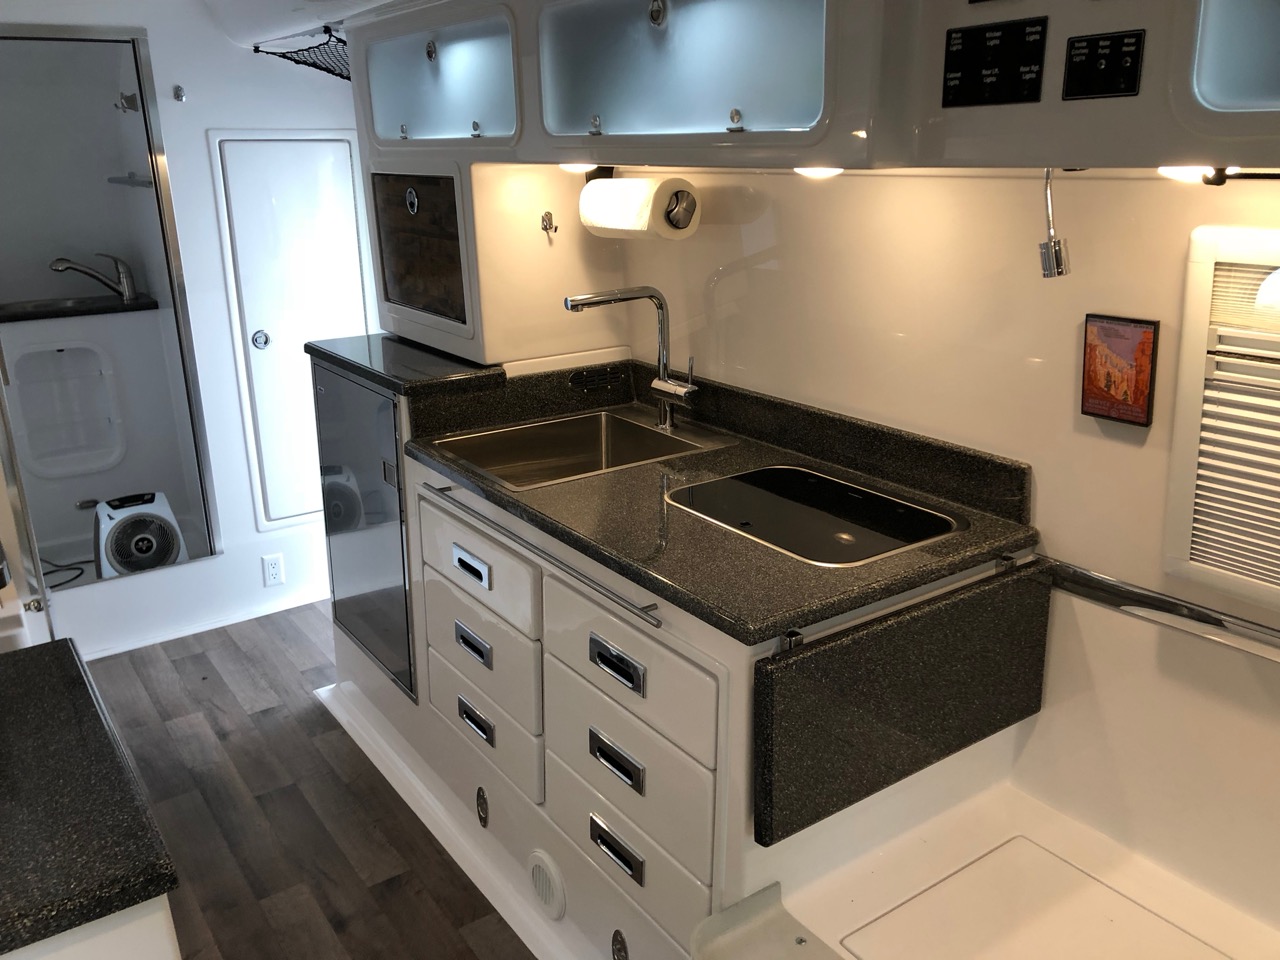
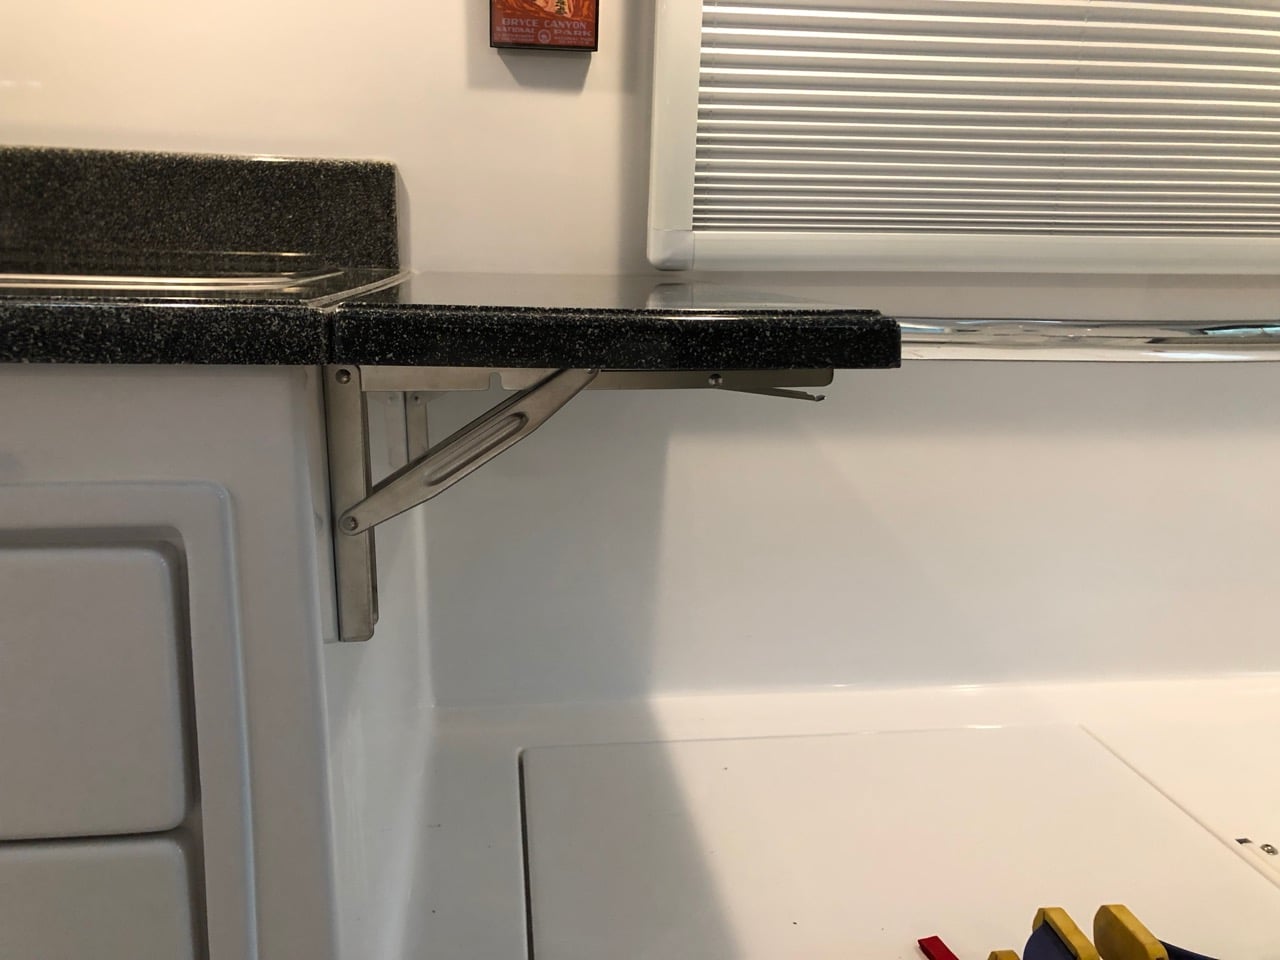
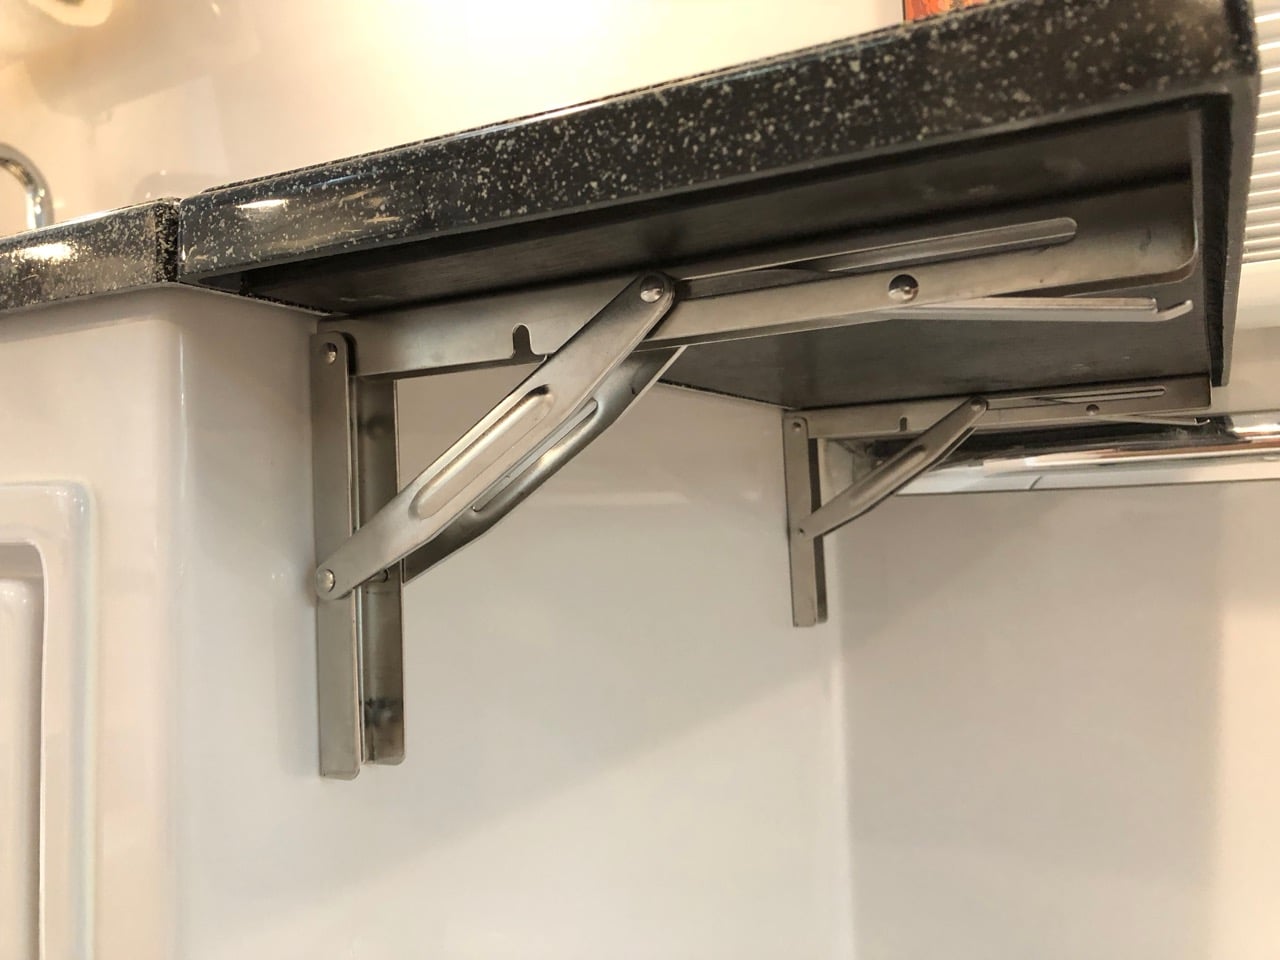
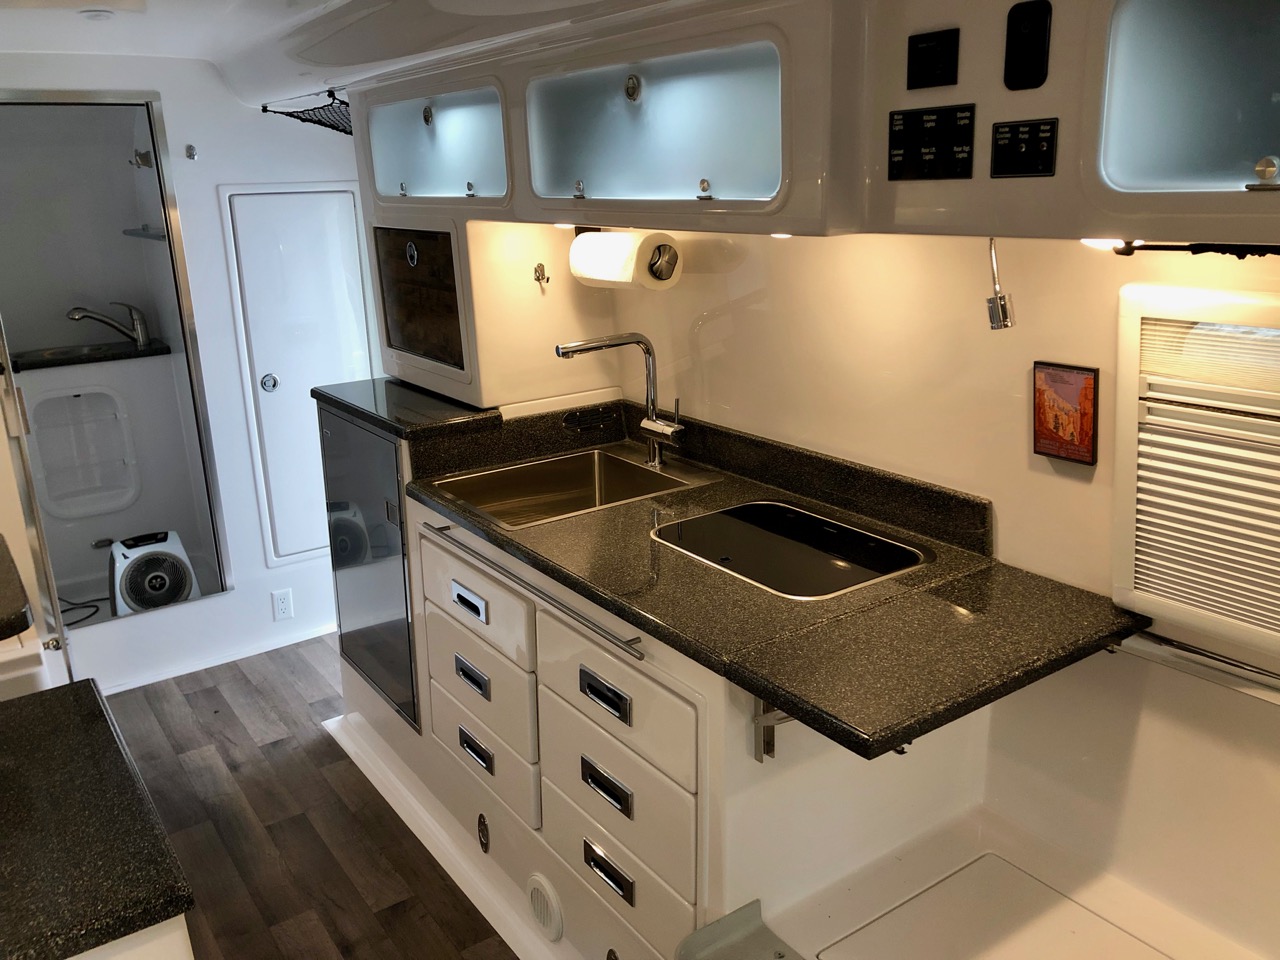
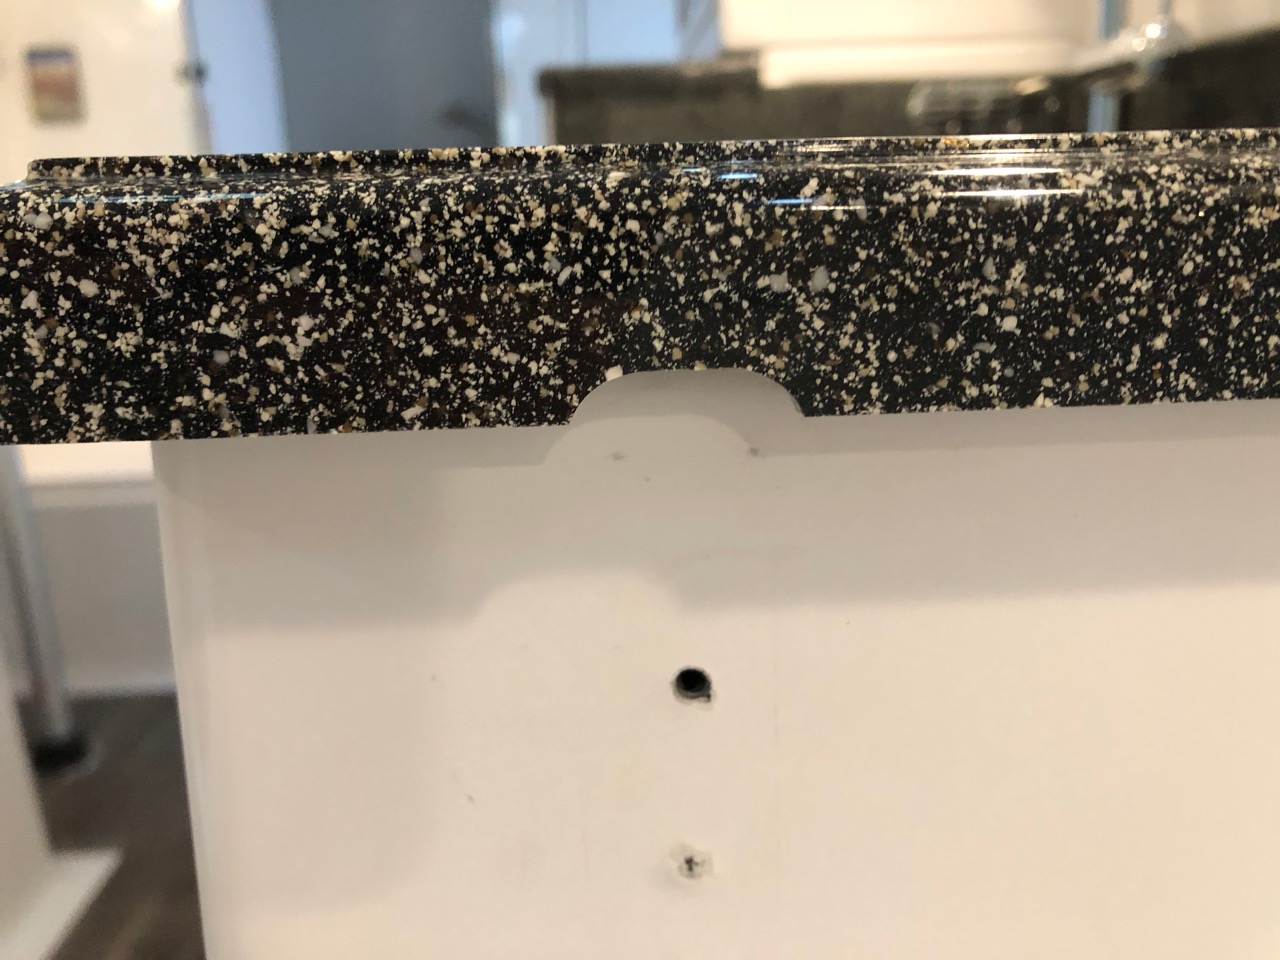
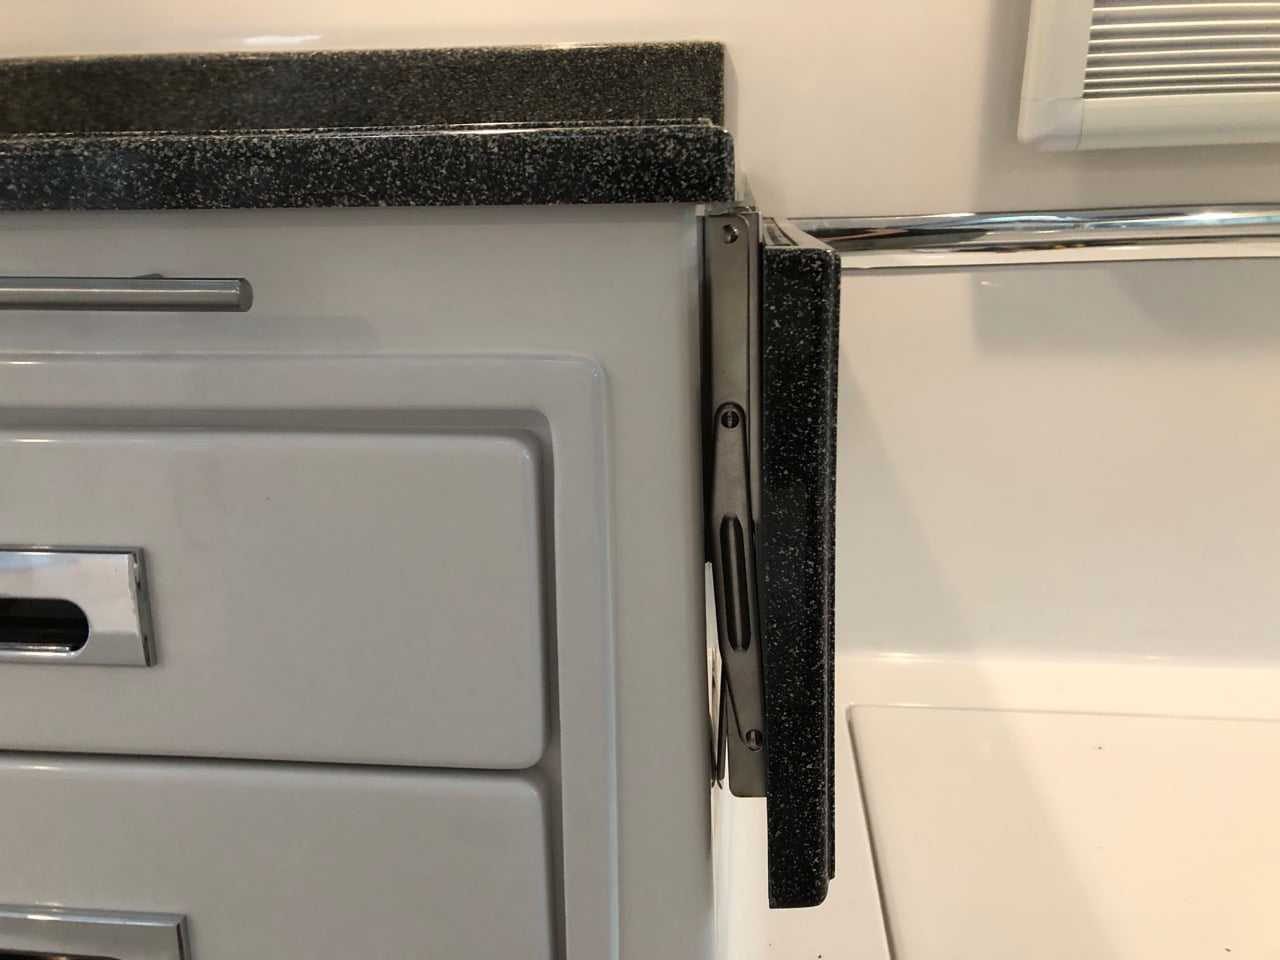
One of the things I asked Oliver to do for me was to install a 12" counter extension to the right of the cooktop that could be folded down when not in use. I figured we could use the extra counter space, plus I wanted a buffer between the cooktop and beds for splatter. This is what they came up with - This was perfectly fine and exactly what I was expecting, and we've really enjoyed using it. The only thing I didn't really like was that the hardware was finicky and just didn't work well. And the top ended up about 9" rather than 12", so it was a little small. And we had asked if they could make a piece of fiber granite to match, but they'd have to make a new mould for it so that wasn't going to happen. It also would have been nice if the extension were flush to the counter. So maybe a lot of problems. But we were happy with it nonetheless. But one day when I was running some wires through the pantry, I had removed the countertop beneath for access and just naturally set it down on top of the counter extension. Well, it fit perfectly; and thus, a new project was added to the list. I asked Oliver if they would sell me an extra top and picked it up when I got my trailer out of service a few weeks ago. I believe they charged $150 for it. Since I was redoing the top, I figured I'd search for better hardware as well. I found several options, but the ones that stood out were these from Amarine. They're super heavy duty and stainless steel. They work much better than what we had, and look nicer to boot. The only problem was that they were about a half inch too long for the countertop, so they'd have to be cut to size. But worth the trouble, so I ground the ends off a half inch. If you don't want to go through that trouble, my second choice was these, which are small enough to fit without modification. I cut a ½" piece of plywood that I could screw into to use as the base for the top. A ½" sheet will sit flush to the lip of the counter, which is what I wanted, but to make the countertop flush to the existing counter, it meant the hinges had to be high enough that I had to grind out a small notch for each hinge to clear. No big deal - btw, a Dremel with a small sanding cylinder works really well on the fiberglass, and leaves a smooth edge and no chipping whatsoever. Wear a mask. Here are the notches - The brackets are easy, just mark the holes, drill, and screw. I used ¾" #10 stainless on the bottom legs and ¼" #8's on the top. And 3M 4200 along each leg and on each screw going into the fiberglass to prevent it from backing out over time. Since none of the surfaces in the trailer are perfectly 90°, I needed to shim something to make the counter level. I considered grinding down the latch that holds the brackets at 90°, but that would have been difficult and if I ground off too much, I'd have to buy another bracket. Instead, I decided to shim between the plywood and fiber granite and then glue the top to the plywood with more 3M 4200, which I'm using so much that I've started referring to it around the house now as Snowball Glue. It's only about ⅛" max to shim - I used some stainless washers that I had lying about and just glued them down in each of the corners. I found that the top was a bit warped, so I had to weigh it down while the glue set - See, I knew lead acid batteries still had a use. I let it sit overnight and in the morning, I had what's in the photo above. Cool. BTW, if you want to do this and have mattresses, then you'll want to check their thickness to make sure the extension will clear when folded. Measure down 12" from the bottom lip of the counter. If your mattress is below that, you're good. If you have cushions, then no problem, but you'll need to move one of the back ones out of the way when raising or lowering the top. More pics -
- 47 replies
-
- 19
-
-
-
- counter
- counter extension
- (and 2 more)
-
One option might be to ask Oliver for an access door into the basement under the nightstand. Actually, I'm not sure if that's an option or standard these days. Anyway, keep the litter box in the basement and access it from the exterior hatch for cleaning. Either remove the interior access door entirely, or open it when camped. The only problem with leaving it open is that it sits on the floor and is likely to get stepped on. Maybe Oliver could be talked into hinging it from the side somehow.
-
Susan, that's an old style rack that Oliver doesn't make anymore, unfortunately. Personally, I think that was their best attempt at making a general purpose rack. It was modeled after one that a long time owner had made for himself. The drawback of the design is that it can be a real bear to remove, which you have to do to access the spare tire. The rack sits above the bumper and so the bumper can still be folded down to access the drain. There are technical drawings for the rack floating around, for people who want to have one made by a 3rd party.
-
I agree that there’s not enough dust control at the factory. Far too much ends up left between the hulls and inside ducts, etc. And even if you go through and clean as well as you can, a lot of hidden dust will get shaken out during travel, leaving a fresh coat of dust to be cleaned again. For what it’s worth, I do think that it all works itself out over the first several weeks of use. That is of little comfort I’m sure. I’d offer three suggestions: First, you might consider cutting an access panel in the closet floor, which would be easy to cover afterwards. Then remove the shower caddy and I’d think that between the two you would have enough access to replace the ductwork. That’s assuming the duct runs under the closet floor there. To be honest, I don’t know where the front ‘curb’ in the outer hull is in relation to the closet/bath wall. And if there’s enough overlap to access the duct. It may be right at the wall and if so then this obviously isn’t a solution. Second option would be to secure new duct to the end of the old and try pulling it through just by pulling out the old through the shower caddy opening. Maybe it would work though obviously you run the risk of tearing the new duct or losing it halfway through. Honestly though I’d assumed that this is what Oliver would have had in mind for replacement. You might use semi-rigid duct if you try this, which would be more difficult to pull but less likely to tear and you’d get better airflow through it as well. Third, there are companies that do ductwork encapsulation where they spray a sealant into the ductwork to both contain existing dust and seal leaks. But I don’t know if that can be used in flex duct or in ductwork that small. If you find a solution, please do document the work since I’m sure others might want to follow suit. In the back of my mind, I’ve been thinking about how difficult it might be to replace that run with solid ductwork, just to get better airflow into the bath. I agree that dryer duct is a bad solution, though that seems to be standard throughout the industry unfortunately. If you do replace it, you should definitely try to go back with as much solid ductwork as possible, maybe limit the flex duct to the tricky bits snaking around the shower. If none of that seems feasible, then perhaps trying to blow it out with an air line might get most of the dust although rereading your post it sounds like Oliver has tried that.
-
Sounds like that's about all you can do. TBH, I'm not sure how you get access to the overflow tube. Can you get to yours through the lower fridge vent on the outside? I don't have that vent, and I don't remember seeing access either when I pulled my fridge or on the cabinet side. I may be pulling out a jigsaw if mine ever comes loose.
-
Off Road Jack and Multi-Axis Hitch on an Ollie
Overland replied to Overland's topic in Ollie Modifications
Running cables around the lower hull is no big deal. Going from top to bottom is trickier. Rideadeuce has had good luck adding panels with only VHB tape. I got Oliver to do 640w on my roof but that was back when they were still doing customs. I’m not sure what you can do about getting Oliver to add extra backing plates - probably won’t have much luck these days. It would be major surgery, but I’ve often considered what it would take to cut out the center section of the ceiling for access to the outer hull, then installing a fabric covered false ceiling to cover the hole, possibly adding some LED perimeter lighting in the process. It should be possible but would require some serious planning. You can also keep an eye on the tracking mount that one of our other owners (hardrock) is developing. Personally, I think you’d have better luck adding a nice custom dry box to the old style bike rack. Oliver has drawings of the old rack (which I prefer to the other home made solutions I’ve seen), so it wouldn’t be hard to build. And adding a box there would be so much easier to access, and surely would affect stability less than anything on the roof. The tax credit is for solar install. So long as you buy at least one solar panel (can be portable), then you can take the credit on the entire system, including batteries. It’s being phased out but it was 30% when I bought so it made quite a difference to the cost. Ask your accountant or just google for ‘solar tax credit’. -
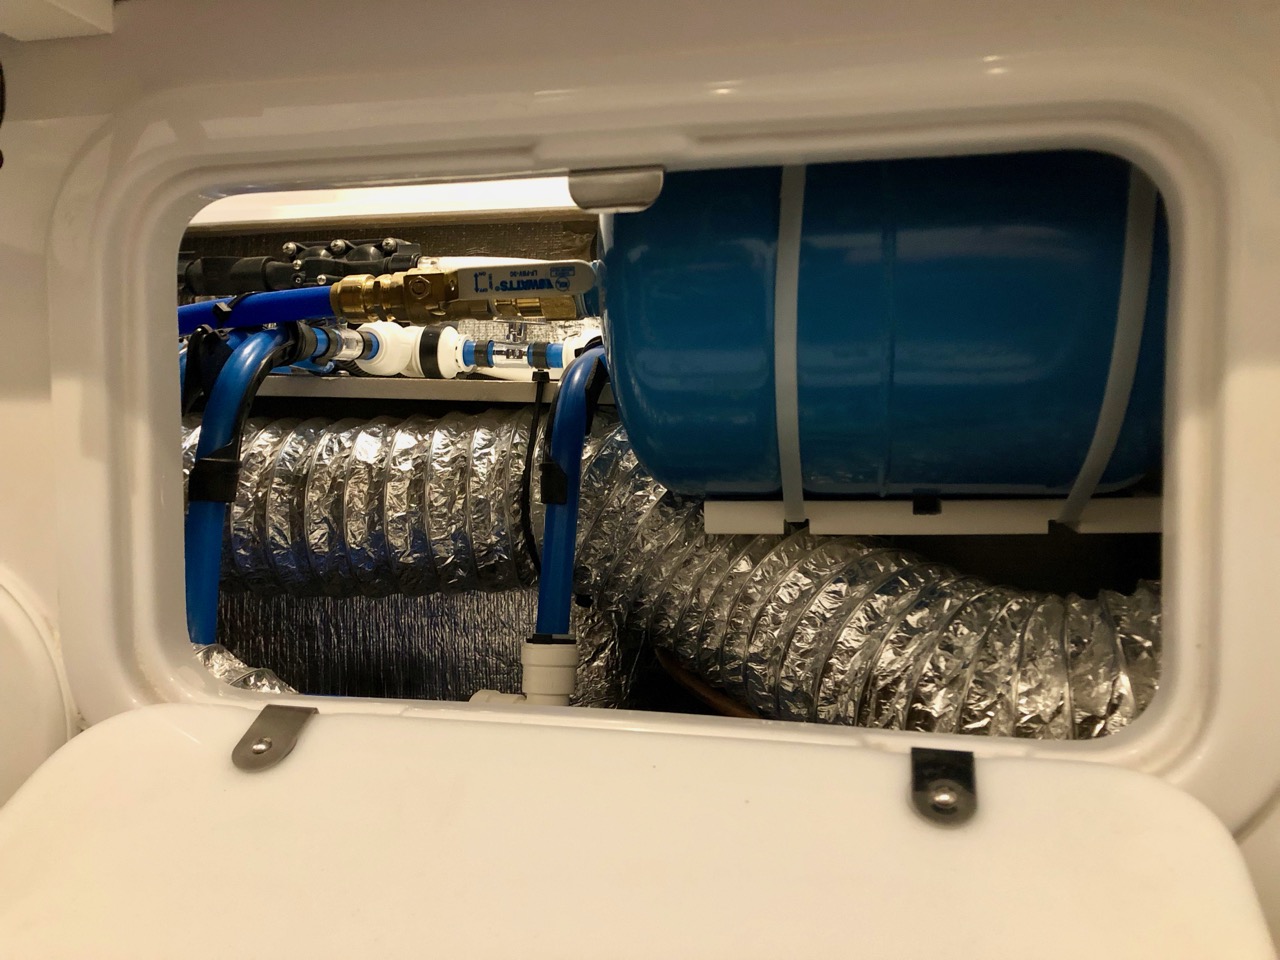
I don't know the answer to that for sure, but what will tend to freeze are the few inches of water line right at the outside connections, which probably wouldn't be helped by heating the basement area. You could possibly carry a compressor or compressed air to try to clear the water after filling your tank, which I've tried, but my experience has been that just enough water stays in those lines to trickle back down to the connections and freeze them up. Of course, there's less water to thaw in that case, but it's still a pain, since accessing the space behind those connections requires removing the basement floor. You could try wrapping a towel or some insulation around the connections at night - seems like something that the RV world would have a product for. One of my long term projects will be to move the check valves further up the lines, into a more easily heated space. That would mean more water dribbling back out when I fill the tanks, but in cold weather, I could just let the water drain out before replacing the caps and all should be well. I'd also like to move those lines out of the rear corner - it seems like they would be better if they went the other direction and then cut across the trailer just behind the grey tank. That, and cut an access hatch in the bottom of the closet so that I could get to the water lines headed to the bath, to possibly get some heat in there if they freeze or if access is good enough, maybe add some insulation or even some heat tape to those lines. I suppose some heat tape at the rear connections would be a thing to do as well.
-
Victron Bluetooth battery monitor install
Overland replied to rideadeuce's topic in Ollie Modifications
Agreed - there’s nothing on the display that isn’t easier to access and read on the app. Same for the settings. There are a few oddball things that you need access to the controls for, like if you ever replace your batteries and want to reset everything, but otherwise there’s no need to run the wires and cut another hole in your interior. Their color control is a different story, since it displays so much info at a glance, but I wouldn’t think that’s something you’d install unless you at least added a Victron solar charge controller. -
Buzzy, I've done a good bit of ADA design and like the others, my first question would be whether wheelchair accessibility is necessary. If it is, I have to say that you're going up a very steep hill trying to make it work in an Ollie. The first question would be if there's even 30" of clear space at the front door. It sounds like there's not, and if you can't jump that hurdle then unfortunately that's it. Second question would be if the wheelchair can make the 90° turn to the galley. My guess is no - typically you'd need each leg of the path to be 36" wide and if I'm not mistaken, the Oliver galley is under 30". Though it may be possible if the footwell of the dinette is located just right. Third is bath access - the curb is too high to ramp over, and I doubt that the walls of the bath are strong enough to support the grab bars necessary for someone to move from a wheelchair into the bath or to the toilet on their own. Fourth would be getting back out of the Ollie - there's no room to turn the wheelchair, so your guest would be forced to back down the ramp which can be a nerve-wracking maneuver. Then there's trying to access the various things within the Ollie. The only storage that would be accessible to your guest would be the front closet, and even that would be a bit tricky trying to get a wheelchair oriented to give your friend access. And pretty much all of the switches and control panels are mounted too high. And on top of all of that, you have to ask how you yourself would maneuver inside the Ollie while your guest is there. Climbing around your friend or asking him to back into a corner every time you need to move around or exit the trailer will get old for both of you in short order. On the ramp, ADA is a 1:12 slope, meaning that if your front door is 2' off the ground, your ramp will need to be 24' long. You can go steeper, but that is the slope that your friend would be accustomed to and so a steeper ramp might be strenuous. Too steep and there's a risk of the wheelchair tipping backwards. So, if a wheelchair is in the mix, my advice would be to concentrate on the annex - make it a special place for your friend and create a living space there. You already do your cooking outdoors, so that's good. And you can make a very comfortable bedroom with a cot and a small table and I would think that a propane heater like the Mr. Buddies would keep the space toasty. Make it a real glamper setup with an air mattress on the cot, real sheets, etc. Perhaps you could even create a small bath area around the exterior hose with a table and basin and a privacy tent/curtains. Of course, if you don't have to account for a wheelchair, then I think the game changes entirely - if that's the case, your main concern will be getting in and out of the trailer. For that, I would think that one of the aluminum platform steps, like what Reed and Karen have, would give your friend a nice stable platform for getting in and out. Inside the Ollie, the tight confines might actually work to your friend's benefit, as there will always be a surface within reach for support, or a nearby wall to lean against or grab hold of. And like Randy said, the suction cup grab handles are great and you can place as many as you need in just the right locations. It's an interesting challenge. I'm sure that your friend will appreciate any effort you make, however small.
-
Relatively easy. You’d remove the bath caddy for easy access to the front wall of the trailer, drill through there (single wall at that point) to run your cables inside and snake them under the toilet to the front dinette seat. From there you can choose to run them either under the dinette floor or or the outside wall. Both spots are tight, but I ran two pairs of 00 through each so you shouldn’t have a problem. Then it’s wide open to the battery box and beyond. Sounds like you’ll end up with a really nice setup. 2kw will make you the Ollie solar king by a wide margin. Have you put any thought into wiring your two panels in series and placing the controller in the trailer near the batteries? 24 volts would give you less loss in the cables and having the controller on the battery side would certainly be better.
-
Sockets Socket sets are a huge space hog. Worse than that, they can add a ton of weight to your toolkit. Not only do you have ¼", ⅜" and ½" sets, but you've got to carry both SAE and metric, plus both shallow and deep sockets. One strategy for lightening the load is to eliminate the overlap among your socket sets. In fact, sometimes you can eliminate the ⅜" drive sockets all together by just carrying a complete ¼" and ½" set. But of course, the ½" set is the bulkiest and heaviest of the three, so there's an argument to be made for keeping a full ¼" set and then eliminating the overlap as you go up in the two larger ones. Some people try to do without the deep sockets, but I've found that it's inevitable that I'll need one if I don't carry them. And of course if you only carry deeps, then you're bound to find a bolt without enough clearance for them. Fortunately now we have pass-thru socket sets, and to me, that's the way to go, as they have other advantages beyond their pass-thru feature. If you're not familiar with them, these sockets are hollow, with ratchets that connect around the outside of the sockets so that you can slide them over even the longest bolt. They're becoming more prevalent, and you can find lesser expensive sets in the big box stores, but you have to be careful to find a set that has a broad enough range that you don't find yourself having to carry along a standard set anyway just because you can't find a particular size socket. I zeroed in on the GearWrench sets for a number of reasons. First, here are the two sets I have: GearWrench Flex Head Pass-Thru Socket Sets - I have the ¼" set #891427, and the ⅜" set #893823 Generally, I trust GearWrench tools. I have a set of their ratcheting wrenches that I've owned for years and they've never given me a bit of trouble. I also know that a few of the mechanics at the garage I go to use GearWrench rather than Snap-On. They just seem to have a good balance of price to quality. The first things you'll notice about these sets are that they're small and they're light. Like, very small and light. I have the standard GearWrench sets for home use, and the ⅜" pass-thru set is both the same size and weight as the standard ¼" set. That's a huge difference. The next thing you'll notice is that the ratchets themselves are longer. In fact, the ⅜" ratchet is longer than GearWrench's standard ½" ratchet. The reason for this is simply that these sets, though lighter, are actually stronger than their standard counterparts, so GearWrench is comfortable giving you more leverage. You'll also find that both sets have a broader range of sockets than usual. For those last two reasons, I was comfortable not getting a ½" pass-thru set, which I'll discuss more below. Advantages: lighter and more compact by a significant amount over standard socket sets; broader range of sockets; stronger ratchets; slightly thinner head/sockets for tight access. I also find it easier to pop the sockets on and off the ratchets. Disadvantages: fewer accessories are available, like u-joints, spark plug sockets, and adapters; fewer storage options for sockets; sockets aren't easily adaptable to impact drivers. I think that the biggest disadvantage to overcome has to be the paucity of adapters and accessories. The accessory problem isn't too difficult, because each set includes two extensions and an adapter to go to either standard ¼" or ⅜" sockets. The adapter will allow you to use standard accessories like u-joints and extensions. The problem though is that they don't include an adapter to go back the other way. So if you use a standard u-joint, for example, you then have to use a standard socket, which defeats the whole reason you bought the set. What I discovered, however, is that GearWrench actually does make an adapter to go back the other way, but apparently they don't realize it. The part comes in their big tap and die set, which uses the same "vortex" connector. Fortunately, you can buy the part separately: GearWrench 82804 Female Adapter With that adapter, you can now drive your pass-thru sockets with an impact wrench, or with a standard ⅜" driver. Which of course means that you can carry along a standard ⅜" driver and any accessories you want, and then use your pass-thru sockets on the end. If you need to make a "deep" socket out of them, then just use the smaller pass-thru extension with the socket. Problem solved. Unfortunately, the same part doesn't exist for the ¼" set. A standard 12mm socket will hold those sockets, however; so that's a viable, if not ideal, workaround. So I bought a magnetic 12mm that I threw in the toolkit just in case. It doesn't hold the sockets as well as I'd like, but it's something: ¼" Drive 12mm Magnetic Socket The other disadvantage to overcome is storage. These sockets don't fit my favorite storage method, which is socket rails, so you're left either keeping them in the case they came in, or throwing them in a bag. The bag option is O.K., and most compact, but obviously you have to dig around for what you need, and GearWrench doesn't make the most clearly marked sockets in the world. The case option gives the easiest access, and the cases are compact enough should you decide to go that route. The drawbacks to that though are that 1) the sockets fit loosely in the cases and make a lot of racket, 2) those cases aren't really meant to take a lot of abuse so I don't know how long they'd last, and 3) I'm certain to knock the case off the hood of the truck or something, sending everything flying who knows where. Some internet sleuthing, however, led me to this: Socket Roll This is designed for regular sockets, but it works fine for the pass-thru sets. It's very well made, and the elastic loops are woven so they aren't the kind that will be stretched out in a year. The only drawback I found is that the loops are bit tight for the wider pass-thru sockets, so it takes a little work to get them in. Also the labels don't 100% correspond to my sockets, but that's no big deal. It rolls up tight enough that I can store it behind the fold down rear seat of the truck. O.K., so what about the ½" sockets then? Well, with the added strength and range of the ⅜" pass-thru set, I decided that I didn't need a complete set of ½" sockets. Instead, I just put together a small bag of the ½" sockets that aren't included in my ⅜" set, plus sockets for the lug nuts on both the truck and trailer. And instead of a standard ½" ratchet, I decided that I'd just carry my ½" torque wrench, since I only use it for the truck anyway. Despite its length, it fits well in the storage bin under the rear seat, in its case, so it's not a problem to carry. With that and a ⅜" to ½" adapter, I feel like I'm set for any ½" ratchet needs. I prefer the Precision Instruments torque wrenches because of their split beam design. Split beam wrenches don't have to be reset to zero after each use and can handle the vibrations and general abuse of being kept in the truck full time. Precision Instruments ½" Drive Split Beam Torque Wrench
-
Screwdrivers I've found that screwdrivers can get out of hand pretty quickly. Trucks these days are full of torx and hex head screws and I've run across some square drive screws in the trailer - so if you carry a full set of each of those, with both Metric and SAE hex and then a decent set of Phillips and flat head drivers, you can end up with pretty bulky bag of screwdrivers. I think the easiest way to pare that down is to switch to hand held bit drivers, and then you can carry all the bits in the world pretty compactly. Advantages: you can carry dozens if not hundreds of bit types and spares in a box the size of your hand; the bits can be used with power drivers and ratchets; replacing a damaged bit is far cheaper than a screwdriver. Downsides: bits are easy to lose; the ones you typically find in big box stores are cheap, have a lose fit both in the driver and in the screw, and are prone to breaking; some bit drivers don't hold onto the bits well, so they tend to fall out; the bit connector on drivers can be bulky and limit access to screws; if you're dealing with multiple screw types, swapping out bits can be a pain. I combat the downsides by carrying spares of the most used bits, carrying multiple bit drivers in different sizes so that I can easily swap between them if needed, and of course buying quality bits that aren't likely to break and quality drivers that hold the bits well. I prefer the magnet bit holders. I've found that the locking type ones are too bulky and even the nicer ones are prone to jam. I also carry a regular 3/16" flat head screwdriver in case I need to pry on something. The bit drivers I have are from Wera and Wiha (pronounced Vera and Veeha - it's not a German tool unless it's pronounced weirdly). I prefer the handle style of the Wiha, but Wera makes some interesting bit holders so I've ended up with more of those: Wera Kraftform Kompakt 28 - I keep this one in the center console of my truck along with all my bits. It's very compact and the most versatile bit holder I have, since it's both a regular handle driver and a (large) stubby. As a bonus, the shaft can be removed and used with a power driver, or combine it with another driver to double its length Wera Kraftform Kompakt 27 - If I'm pulling out a bag of tools rather than just grabbing the one above from the console, then this is what I'll use. Once you use a ratcheting screwdriver, you're spoiled for life. This one is quality enough to not feel gimmicky. Wera 813 Bit Holder - This is a smaller and thinner driver that's good when you're working on electronics or some other detail work. Wiha 57mm Stubby - Just a good sized stubby with a nice grippy rubber handle. Wiha 125mm Bit Holder - I use this as a backup to my Wera bit holders, since both of those have features that could potentially break. This driver also has an interesting finish on the handle that maintains a good grip when either wet or oily. The bits I use are from Wera: Wera 30-Piece Bit Check Set - this is a good starter set and includes a locking bit holder if that's what you prefer. Misc. Wera Bits - KC Tools keeps just about anything you'd want in stock and at a good price. They ship pretty quickly, too. I've also found that some ratcheting "sticks" can be indispensable when getting to a screw in a tight spot. You could use a bit holding socket on a regular ratchet, but I've found that those won't always fit where you need them, whereas these will slip into almost any nook. Right now, these are the best ones I've found - they're super thin and I like the length and adjustable heads, but they aren't the best quality. Time will tell if they hold up: EZ Red Quarter Stick EZ Red Combination Stick Power drivers have also become compact enough that I don't mind including one and a couple of batteries in the toolkit. I have the Bosch below, but Milwaukee also makes a compact one, and that may be the better buy. If you prefer a non-impact version, I know that Bosch makes one so perhaps Milwaukee does as well. Here are links to each: Bosch PS42 Milwaukee M12 For bit storage, these will give you easy access without taking up a ton of space. I divide mine up by bit type and store the holders in one of these Plano boxes. I think I have something like 125 bits in that box. That's a lot of screwdrivers! One final extra that will come in handy when using bits is a magnetic holder to use when working. This can be one of those trays that they often give away for free at Harbor Freight, or you can try these wrist bands: Magnetic Wrist Band Magnetic Tray
-
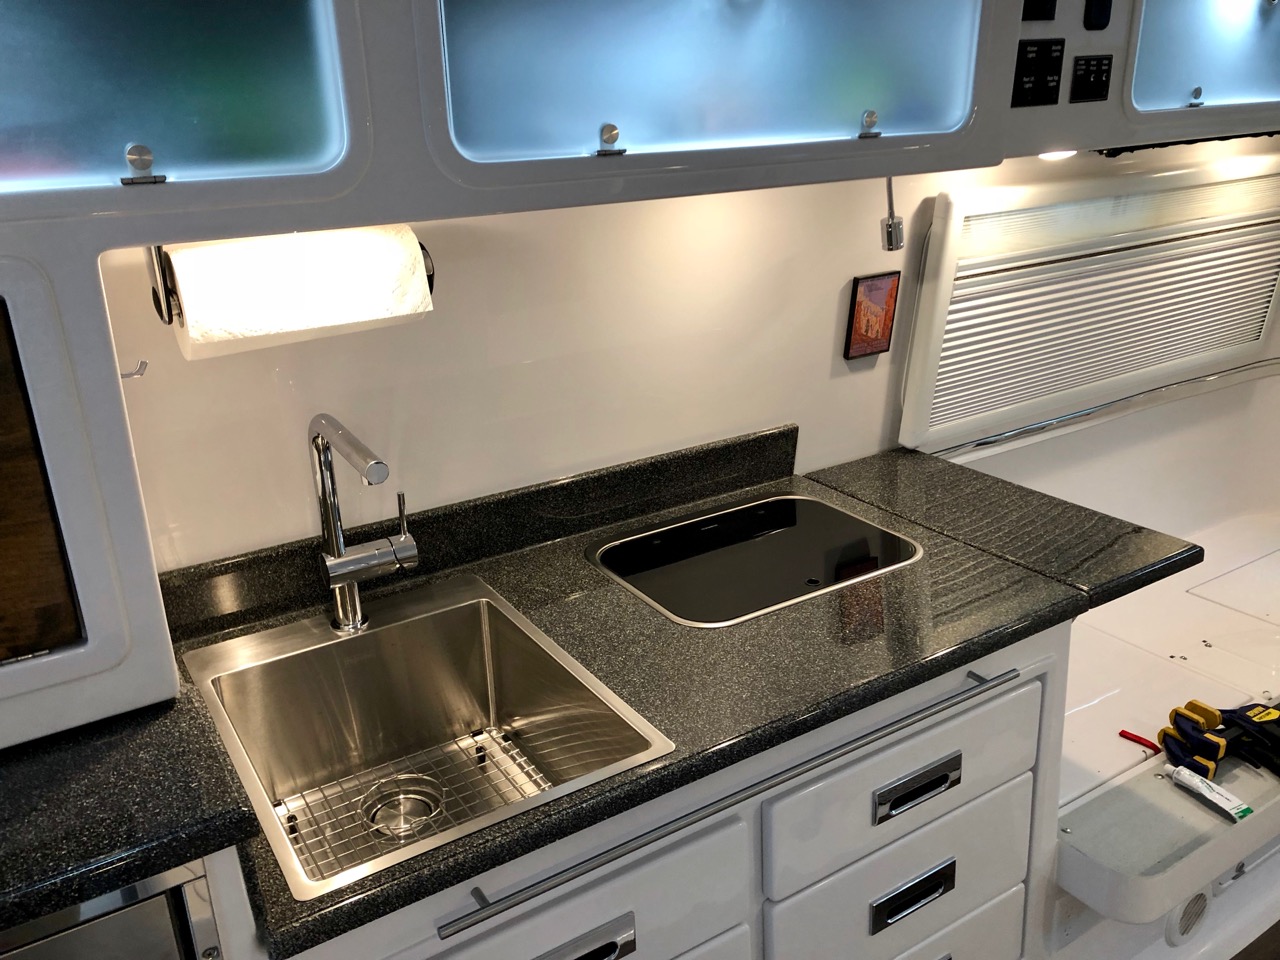
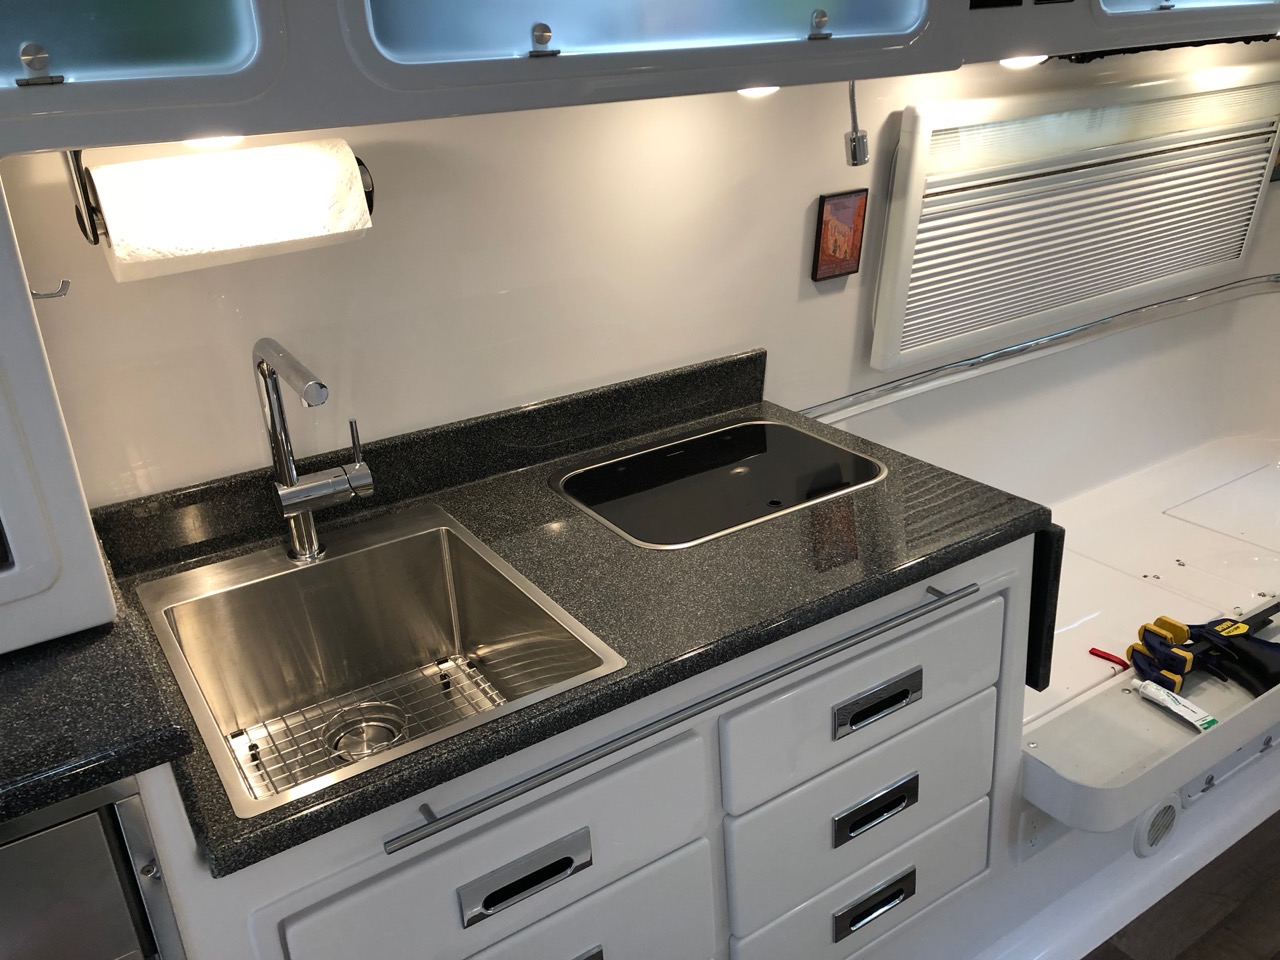
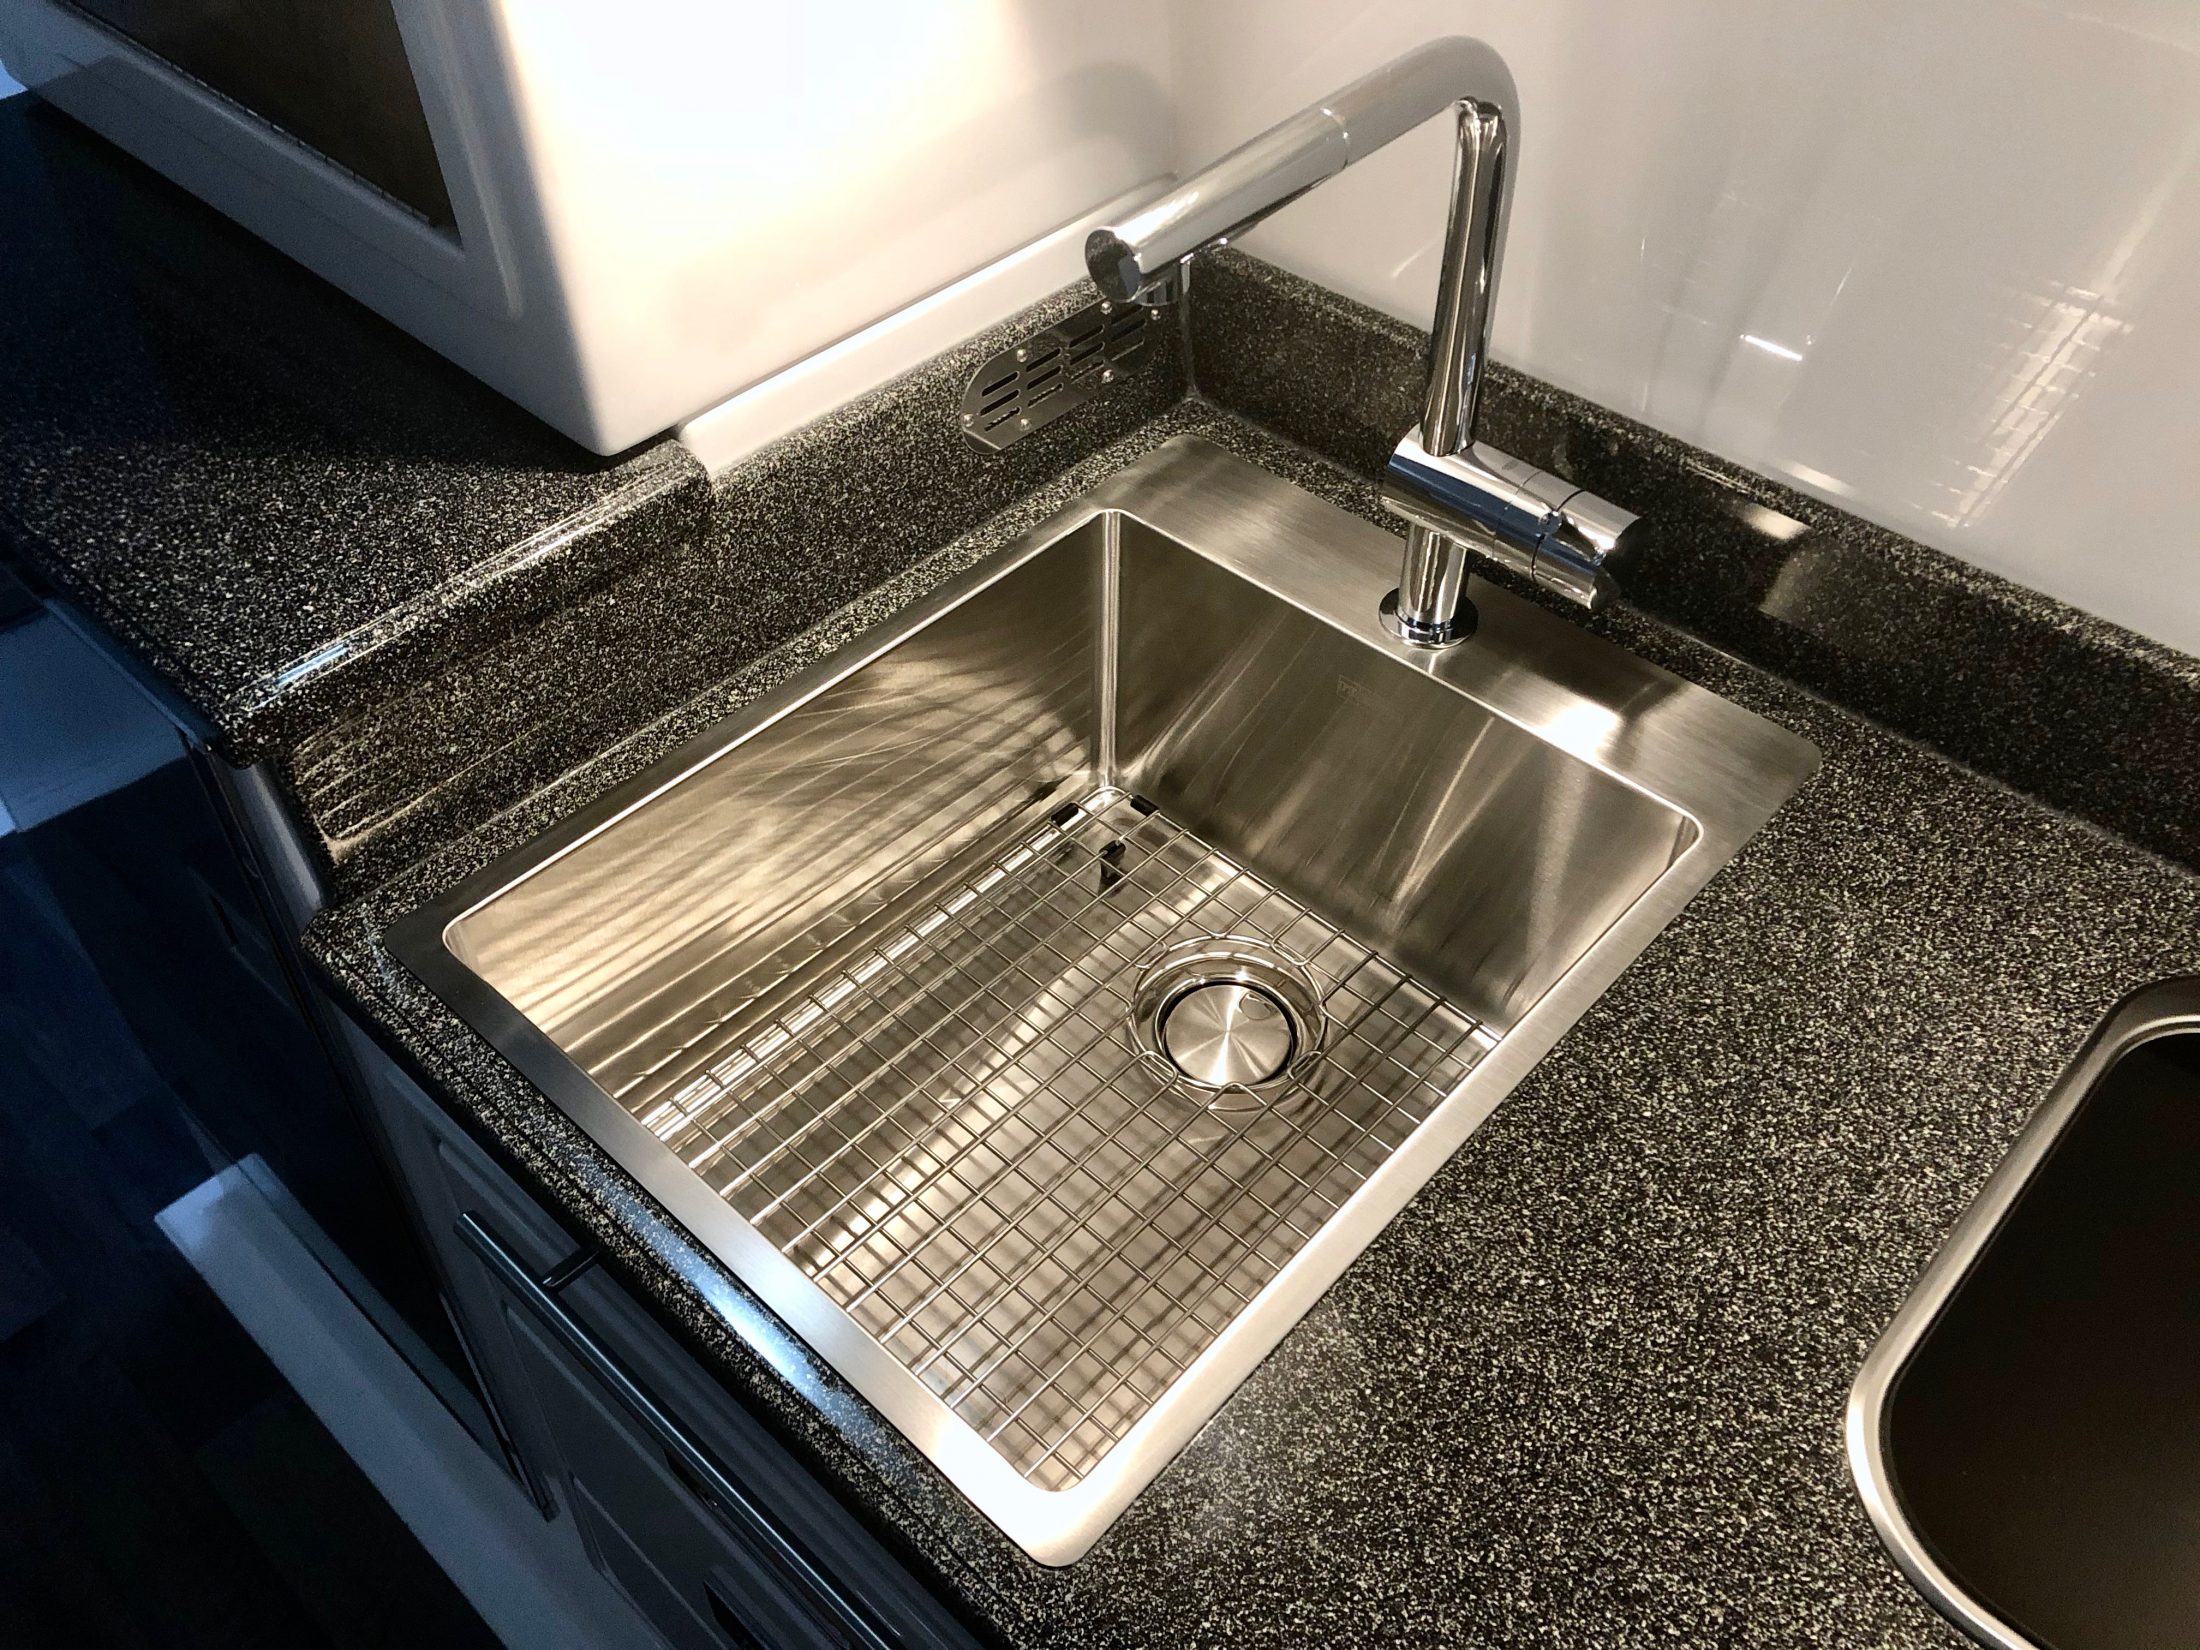
This, I like - I never cared much for Oliver's sink and faucet choices and I'd actually planned to supply them a sink and faucet to get installed on the line. Unfortunately the one I wanted wouldn't work and I was having trouble getting the proper dimensions from Oliver, so I just let it go and figured I'd replace it later. Well, that was a good idea until I realized that the cutout Oliver made for the sink was way too big for any of the bar sized sinks that I could find. And all of the full sized kitchen sinks were too big to fit. But finally I stumbled across this oversized bar sink from Franke. It's the 17" Franke Vector. Overall, it's the same width as the existing sink, but the lip is narrower, so the bowl itself is a bit wider. Mainly the sink is much longer and deeper. In overall volume, it's over twice as large as the original sink, but takes up no more counter space. Can't beat that. And because it's farther forward and 3" deeper, it doesn't splash all over the place like the original. In fact, I can even turn the faucet up all the way without it splashing over the front of the sink, which is novel. I like the Franke sinks in that they have the straight sides and look of a modern zero radius sink, but they do add a slight radius to the corners so that you can actually keep them clean. Installation wasn't too hard. I'd rate it 7/10. The difficulty was that I had to modify the base cabinet for it to fit. There's a wood brace running across the top front that is screwed to the fiberglass beneath the drawer trim, which had to be cut out, and also a portion of the left side of the cabinet. That sounds like a lot of structural support to remove, but the cabinets are mainly tied in at the bottom and I ran it past Jason beforehand to make sure I wasn't looking at it wrong. I have to say that the cabinets are stoutly built, and I'm not at all worried about it. The second problem I ran into was that my countertop wasn't perfectly flat. It bowed down in the middle slightly which wasn't apparent until I installed the sink. But I was able to temporarily shim the counter against the top of the cabinet while the silicone seal dried and then I glued PVC blocks around the perimeter of the sink to both hold it in place and to level the counter. The Franke sinks have an odd installation clip that wasn't designed with hollow core fiberglass in mind, so the blocks were necessary anyway. It's not going anywhere now. Of course I lost use of the flip out drawer but I hated that thing anyway. I glued a few ½" blocks to the front of the sink and then fixed the drawer front to the blocks with heavy duty velcro, just in case I ever need to remove it for some reason. The sink depth worked out perfectly with the existing cutout on the back of the middle drawer to clear the drain. I thought I was going to have to get a Hepvo trap to make it all clear but Oliver actually places the trap behind the cabinet, so no problem. I did have to get the narrowest profile elbow I could find to attach to the drain basket, so I had to go with cheap plastic rather than PVC, but such is life. At the end of the day, however, I decided to use a different drain basket that was a bit deeper, so I had to make the drawer cutout about a half inch deeper after all. The faucet is a Grohe that I found on sale at Home Depot for about half price, so that was a nice find. It has a really nice feel to it and unlike the sink, was a cinch to install. Grohe has a trick installation method that allows you to work from above so that one person can do it without crawling under the counter a hundred times. Oliver's hot and cold lines are convenient to get to and there's an access panel in the back of the cabinet that can be removed if you need more room to work. The only issue I ran into was that the counterweight for the sprayer was getting caught up on everything that's packed in the back of the cabinet. To fix it, I made a tube from some flexible plastic sheeting that I had lying around and just slid that over the sprayer hose. Now the hose slides easily inside the tube and as a benefit, the weight won't bang around inside the cabinet while traveling. So that's about it. I've learned that I don't have the patience or foresight to take progress pictures Like John does, so my description will have to do. But I'm happy to answer any questions.
- 16 replies
-
- 28
-
-
-
Cochiti is a kind of co-op deal between the COE and the Cochiti Pueblo, and I understand it can be a contentious relationship at times. They enjoy the benefits of having the lake and the small neighboring community there, but the dam and lake itself has been an environmental pita. Anyways, the area is under Pueblo control when it comes to COVID, and they've all been pretty strict about it as have the other Pueblos. I think even Chaco as been closed due to access.
-
Yes that’s right. The whole window hinges up, frame and all. Personally, I wish that Oliver would just make the rear window a fixed, single pane unit. The extra ventilation isn’t needed and a single light picture window would make for a much nicer view out the back. I’ve posted before that we removed our screen after delivery and every time we take the trailer in to Oliver, they add it back. I think I have three in a box in the basement. Sort of like the screws that hold the access panels shut. Every time I leave Oliver I’ve got a new set of screws to remove.
-
I asked Oliver to install the same door that they use for the basement access. Makes a big difference, but to be honest, whenever we flip the valves or drain the tank, we just flip up the mattress and use the hatch. We use the door to access the pressure tank valve, since I don't like to travel with it pressurized. [attachment file=IMG_0697 (1).jpg]