All Activity
- Past hour
-

New axles may not fit all older sub-frames
jd1923 replied to Wayfinder's topic in Mechanical & Technical Tips
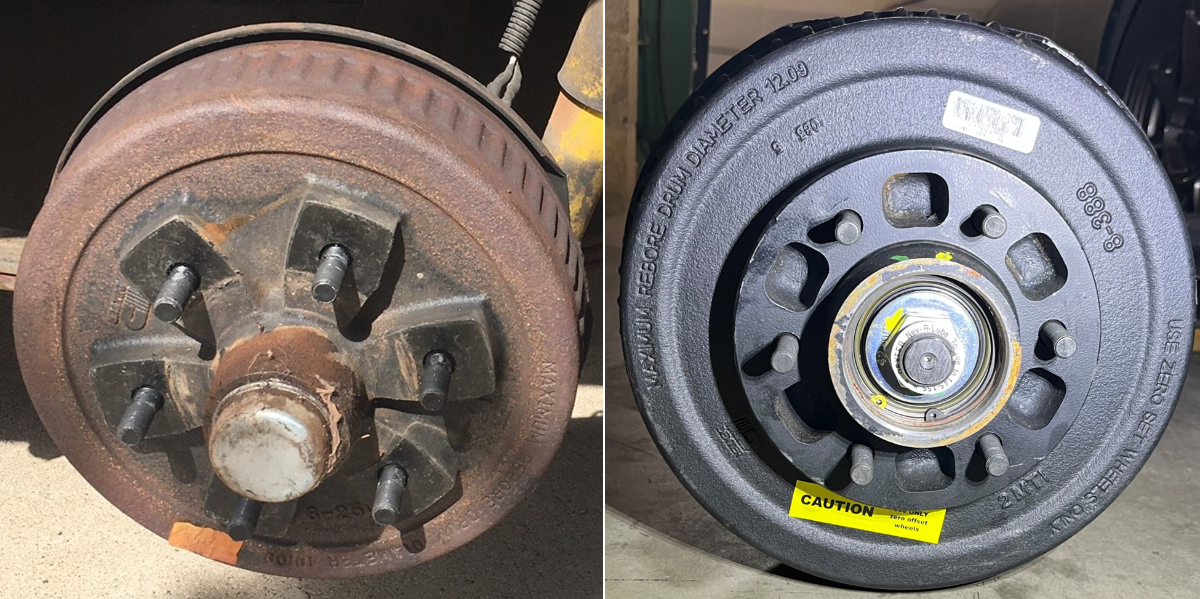
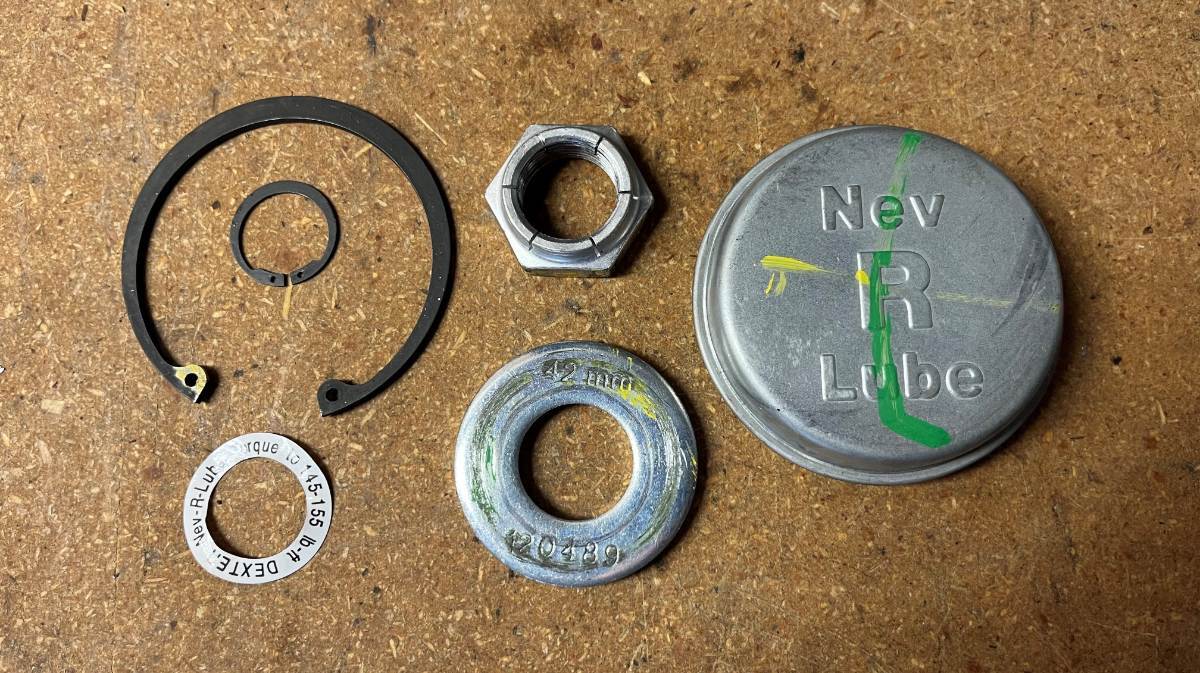
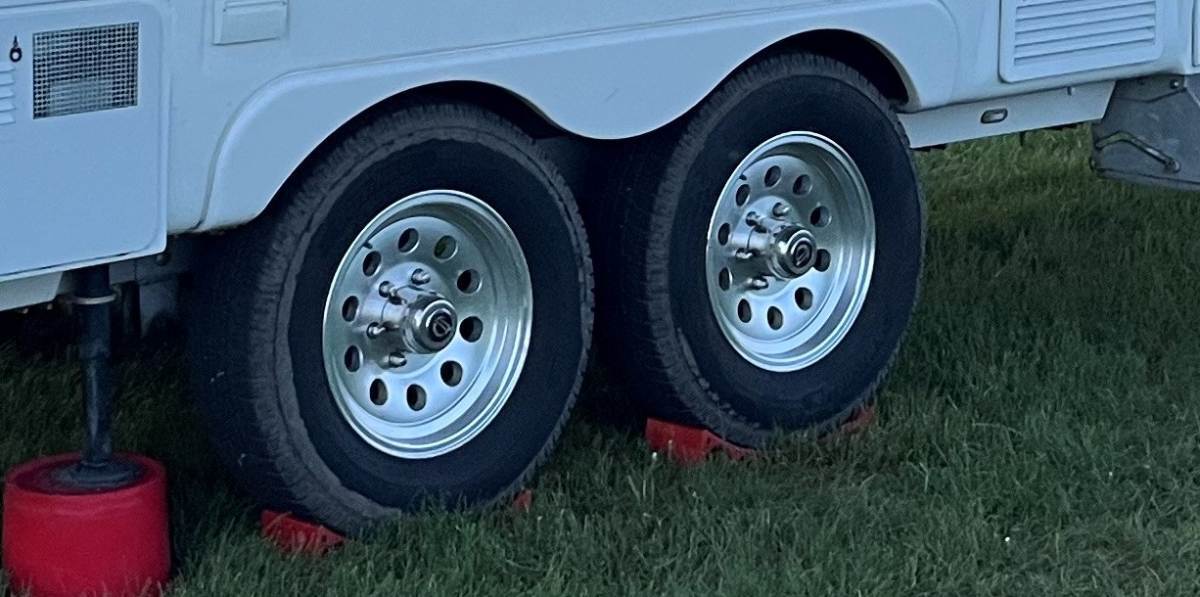
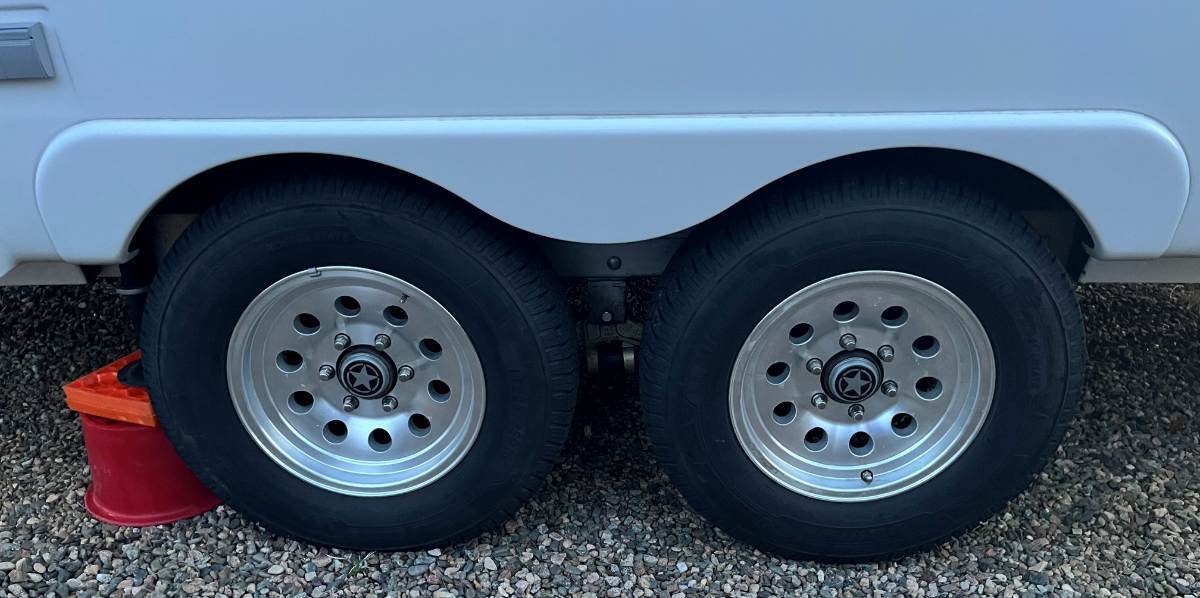
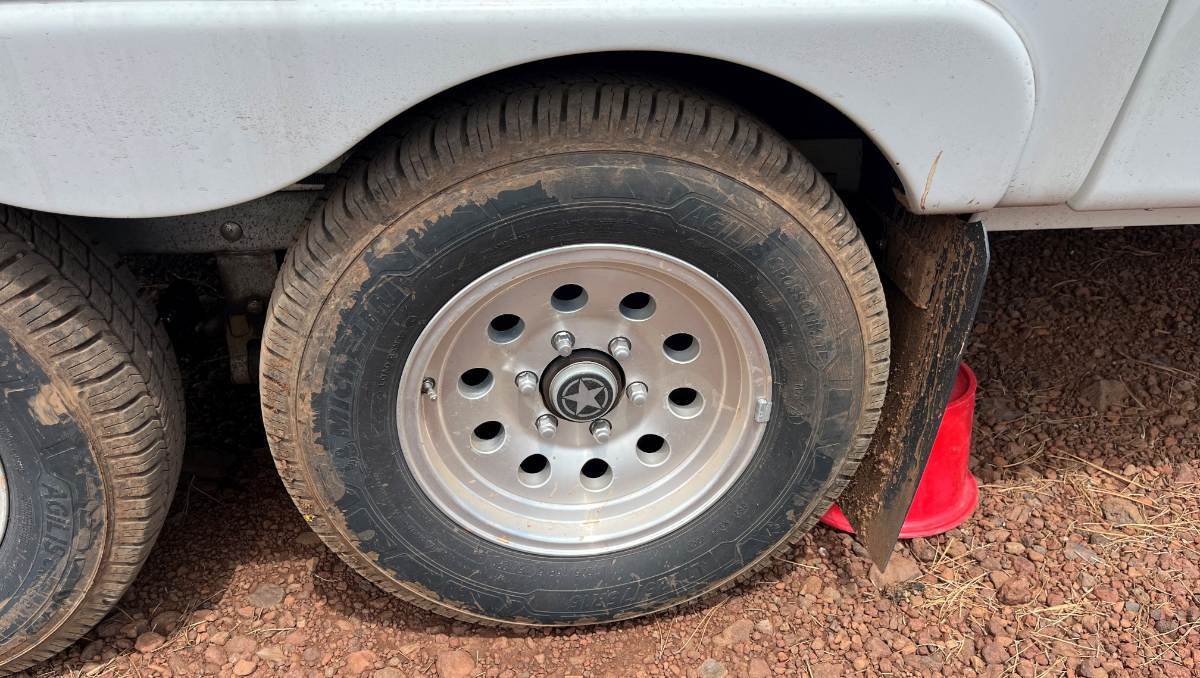
On the left are the standard D35 axles, 10" brakes. The hub is extended further out with the old standard bearings. On the right, we have Nev-R Lube axles with the flatter hub, protruding about as far as your lug nuts. Parts pic shoes the embossed Nev-R Lub dust cap and then before and after pics. With the Nev-R Lub bearings it makes sense to loose the big center caps which are no longer necessary, designed to fit over the original standard bearings. It would be nice if they made a flatter center caps, but emblems over the dust caps work fine.
-
.thumb.jpg.e34bf01ef7f7d5e99ad31856d45afbeb.jpg)
New axles may not fit all older sub-frames
CRM replied to Wayfinder's topic in Mechanical & Technical Tips
Good to know... Thanks. Thought they put that on the label from a prior discussion about the Nev-R-Lube axles. - Today
-
New axles may not fit all older sub-frames
jd1923 replied to Wayfinder's topic in Mechanical & Technical Tips
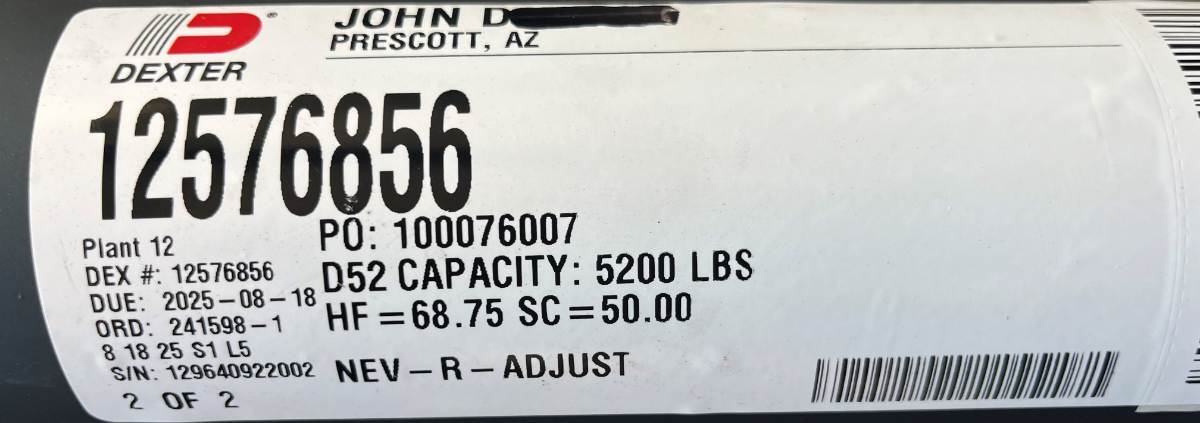
They also write Nev-R Adjust on the D52 axles with Nev-R Lube bearings. My label is similar except mine are SC = 50.00. The only hint of Nev-R Lube are on the bearing dust caps.
-
@johnwen I’m wondering if there are some misunderstandings of your original question. I understand your issue is the connectors are shaking loose. Yes, that’s happened to me on my 2021 model as well. My pipes are white, Sharkbite brand PEX-b, with the same plastic connectors. I assume yours are too. The problem isn’t the pipe type, it’s the connectors. I have replaced many of my plastic connectors and used PEX copper crimp rings, because I already had the tool to do home repairs. This solves the loose connection problem, but sometimes the plastic elbows break. I’ve only had one break while camping, and fortunately a Home Depot was within an hours drive. .There are also other types of clamps such as stainless PEX clamps, which require a different tool. Since my crimp ring tool is really big and heavy, and I cannot get it into some small spaces, I leave it at home and carry a half dozen various Sharkbite push-in quick connects and a few spare pieces of PEX-b pipe for campsite repairs. There are threads in this forum where some owners have replaced elbows with brass, some have replaced all with Sharkbite quick connects, available in plastic or brass. There are several ways to fix your loose connection problem, just depends on your preference, but you should not need to replace your pipes.. All of these fittings and pipes are readily available at stores like Ace, Lowes, Home Depot, etc. Sometimes we are camping too far from such conveniences, which is why I carry the spares. I haven’t had any clamps pull loose yet, but that shouldn’t be difficult to repair on the road. It’s got me thinking about better ways to do it though.
-
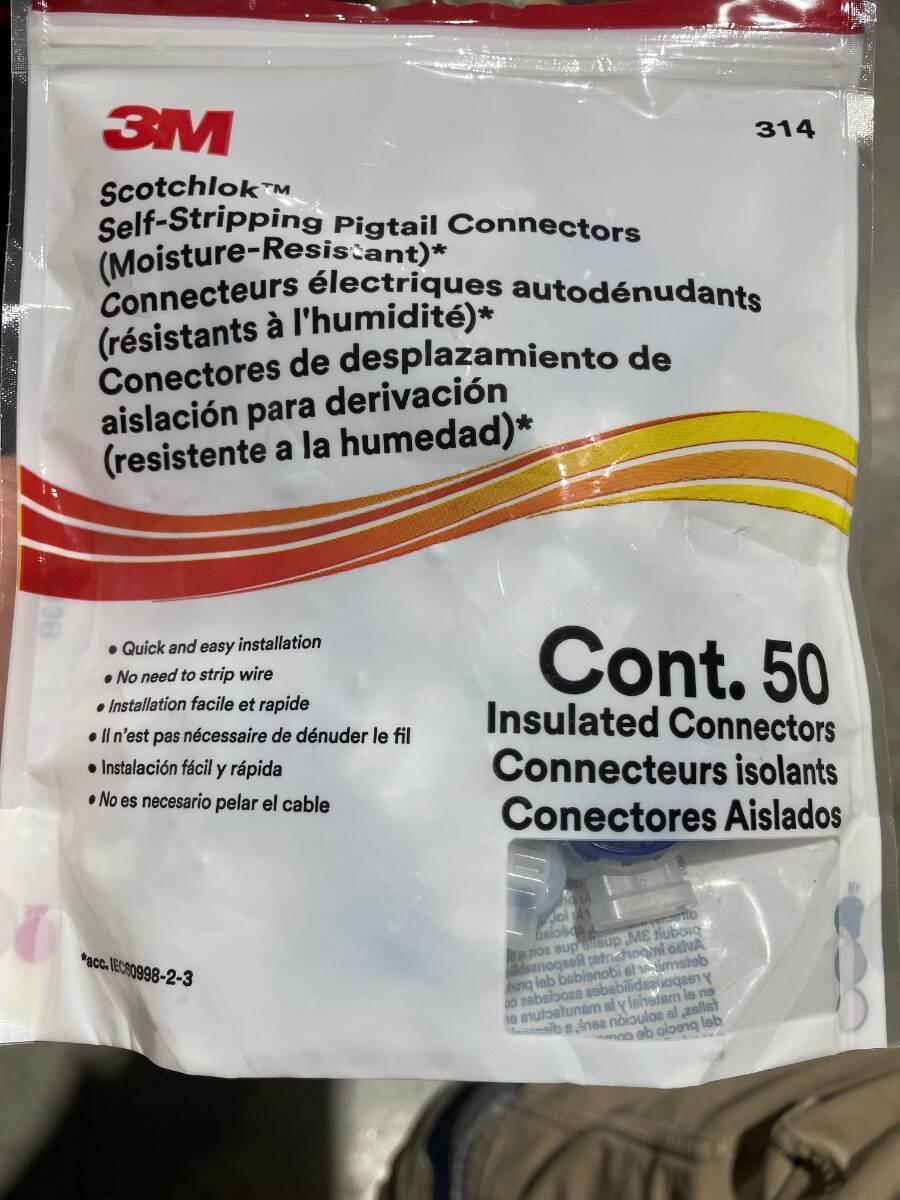
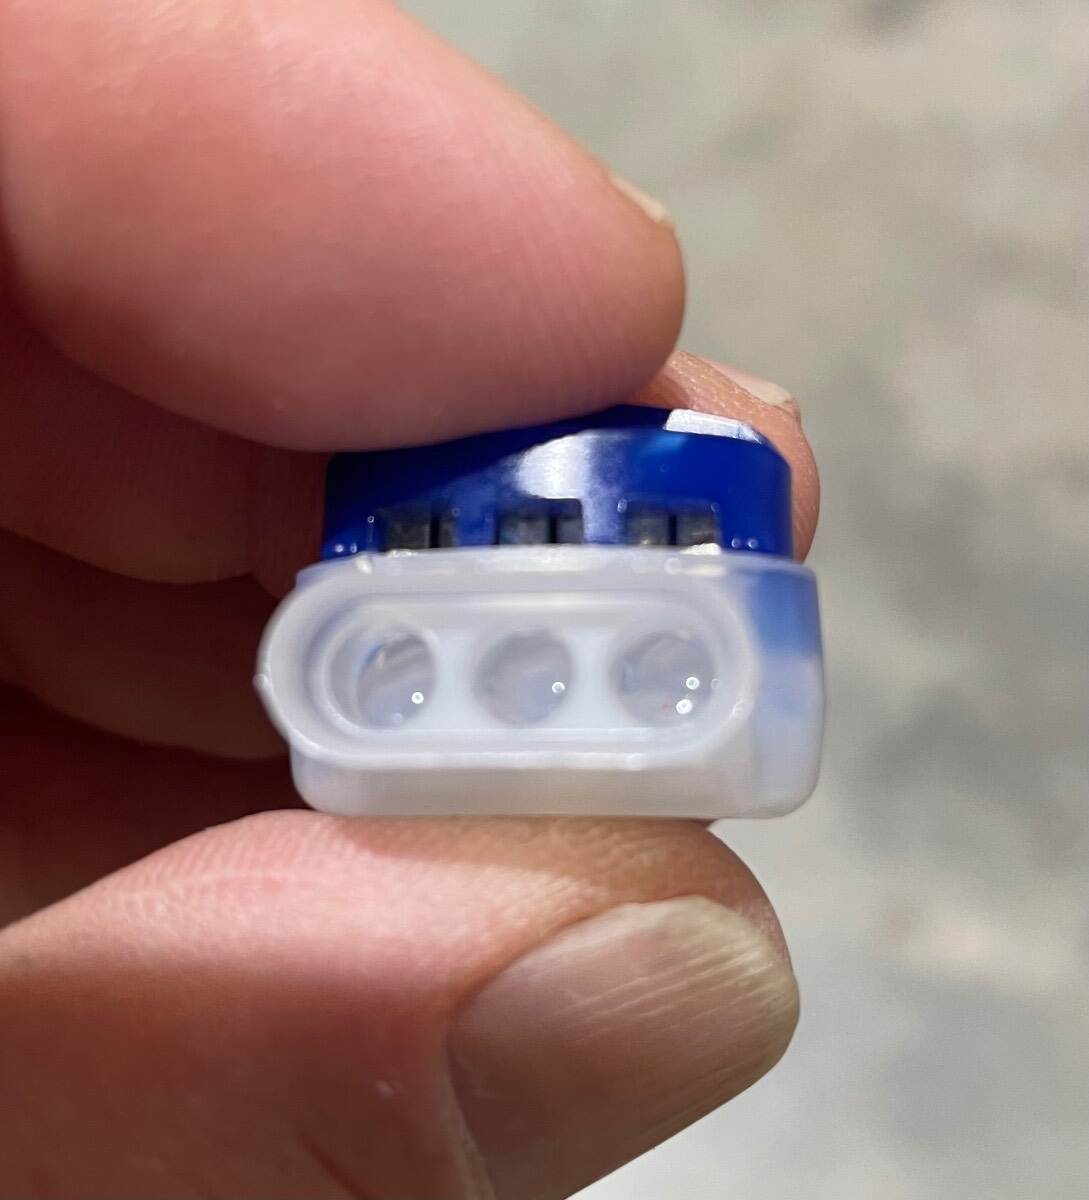
I used these to wire lights on a utility trailer. https://www.3m.com/3M/en_US/p/d/b10128463/ What would be wrong with using these instead of heat shrink butt splice connectors to make brake wire connections under the trailer? Notice that they are IDC (Insulation Displacing Connectors) and that they are water resistant (they contain what I think is dielectric grease). Notice also that they connect up to 3 wires, as in the situation encountered on the street side connections. I don’t care for the typical IDC connector (usually blue) with the fold over and snap down piece, but these are much better and they are made in the USA by 3M. Bill
-
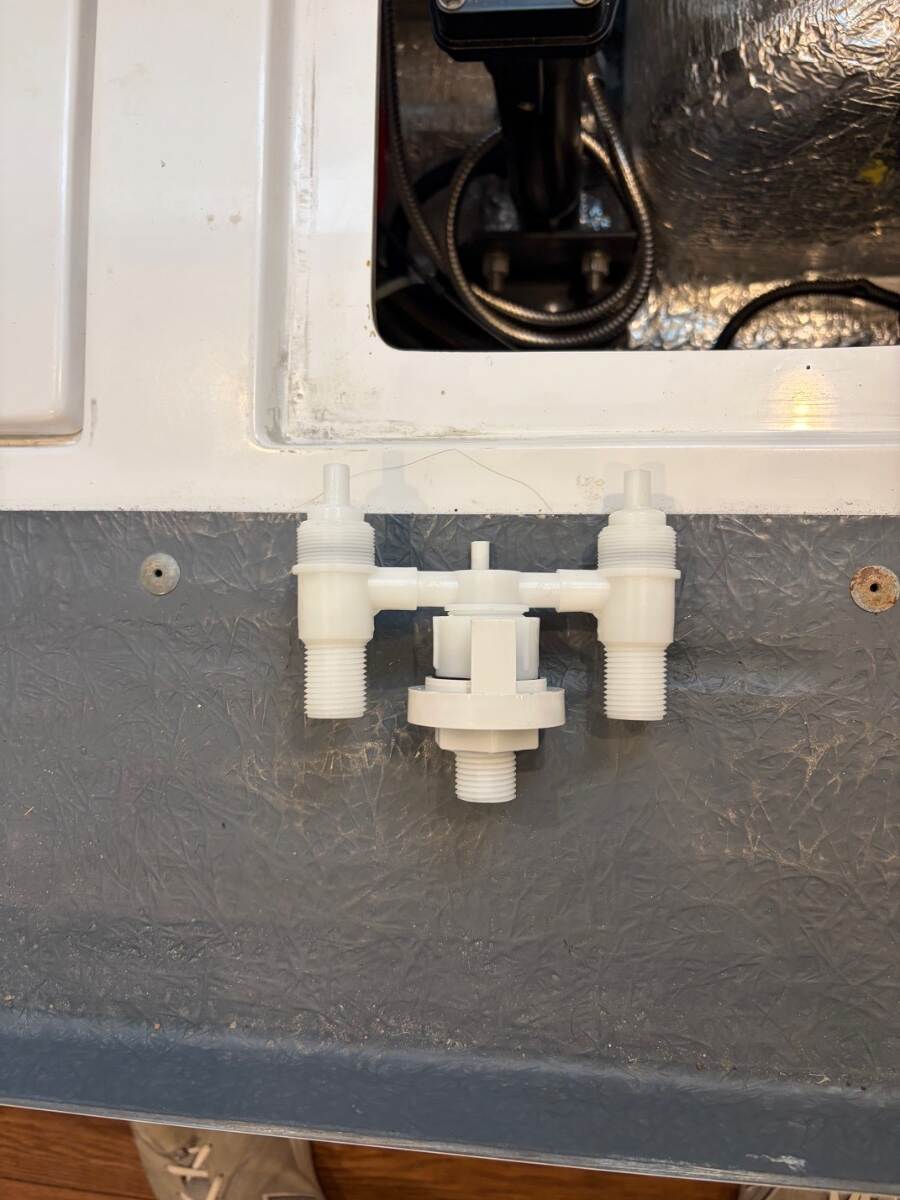
 Here you go, taken with a little wider perspective. in order to find the position from below, Ron first positioned a long, skinny drill bit next to the valve above and drilled a pilot-hole which he measured from before cutting from below.
-
Interesting choice. Cushioning the pitch seems like a good idea, that's the main reaction I get at my hitch. The Anderson is designed to constrain yaw to prevent sway. I get none of that, and the truck has antisway built in with rear steer wheels. You don't get any weight distribution, but the Anderson doesn't do much of that anyhow as far as I can tell, don't know why they advertise it as a WD hitch.
-
New axles may not fit all older sub-frames
CRM replied to Wayfinder's topic in Mechanical & Technical Tips
Are those axles Nev-R-Lube? I thought the Nev-R-Adjust label was only on the standard bearing axles. - Yesterday
-

New axles may not fit all older sub-frames
ScottyGS replied to Wayfinder's topic in Mechanical & Technical Tips
Final update on the Nev-R-Lube axle upgrade. The clearance between the shocks and tires turned out to be a non-issue. Axles installed and performing great. Scotty -
 Many owners with years of service of their Gray, Blalck and Vent valves find them more difficult to operate. Mine got to that point and I learned that the problem with mine and others on the internet is not with the cables, but with the slde valves themselves. I have attached a DIY for the effort that is a simple fix that can be done almost for just your time and likely tools and supplies you already have. Hope you find the below helpful. GJ DIY - Sanitary Drain Valve Cables.docx
 -
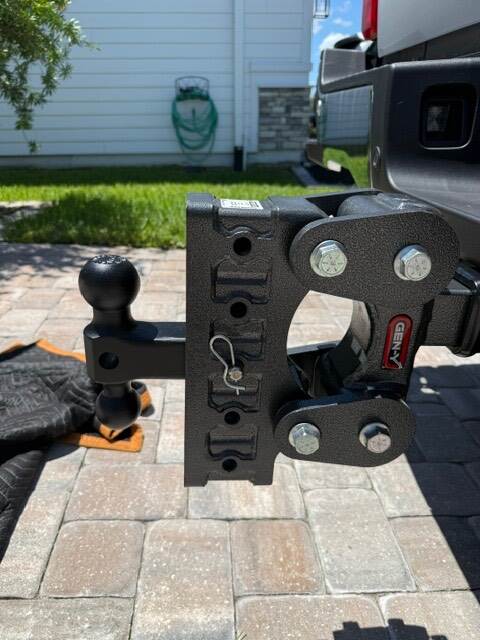
Since I am getting the new APEX 23, I wanted to get a hitch that would provide some help for the rough roads we might encounter. It is the GH-2315 The BOSS TORSION-FLEX 2.5" Shank 7.5" Drop 1.1K TW 10K Hitch & GH-031 Dual-Ball. Getting excited. Hull #1738 APEX X23 in the making, Delivery Date September 14, 2026
- 1 reply
-
- 2
-

-
Custom Mud Flaps for the Tow Vehicle and Oliver
jd1923 replied to jd1923's topic in Ollie Modifications
@taylor.coyote, please post a picture when you have yours installed! Road tested, heavy monsoon rains on the highway, and puddles on the FS red dirt roads. Mud only in the wheel wells. Behind the flaps, no mud build-up. I've got some pressure washing to do next week!
-
Thank you, Garry. Decent price on this part! Not to worry, I had enough water leak down in the basement already. A lot comes out the hull weep holes and out here it all dries in minutes. BTW, re long "nasty looking" links. I delete all the extra characters after the ?-mark and replace the ?-mark with a slash (/). Then you can copy/paste a shorter version like this: https://itcshopnow.com/products/exterior-shower-service-parts/
-
Furrion Chill Cube – Product Review and Installation
jd1923 replied to jd1923's topic in Ollie Modifications
@Boudicca908, the above is quoted from an earlier post of mine, page 1 of this thread. This was measured with Alcan Springs and the older 16" wheels which are 1/2" taller than the newer 15" wheels. I would say measure the height of your hull, to the top of your Dometic P2 A/C and add 3", or 4" to be safe. -
Outside Shower leaking into hull
GarryandKristi replied to dfdouglas's topic in Mechanical & Technical Tips
https://itcshopnow.com/products/exterior-shower-service-parts?utm_campaign=gs-2022-01-13&utm_source=google_shopping&utm_medium=smart_campaign&gad_source=1&gad_campaignid=22045544770&gbraid=0AAAAABSkRKi20j-rTiz8hmdaZS038ZTU5&gclid=CjwKCAjwyOzSBhBTEiwAmxvJ-mjQQfh7TiHQdheqRWzOQTgUzqKb5pQCZ6wZOJeMZbufqY5UqFFcpRoCVEQQAvD_BwE&variant=32367970320420 nasty looking link. I had my wife operate the shower handle outside while I looked under the hatch to see where the lead was emanating. I would tell it was from the center of the plastic assembly and not the hose. You might want to have a few shop towels if you do this to wipe up inside. Our leak weeped over to the basement area under the rubber mat. -
New axles may not fit all older sub-frames
ScottyGS replied to Wayfinder's topic in Mechanical & Technical Tips
Hey John, You were spot on. Once everything was assembled, the clearance between the shock and tire was fine. They did a decent job and the trailer rides well. Look forward to seeing you in October! Thanks again, Gregg -
Me too. Dad was sent off to be European Sales Manager by his employer, a machine tool company. We lived in Wiesbaden Germany during the late 60s. Went back once in the 70s, did the backpack Europe thing all summer with my cousin. My siblings will only take trips to the UK and Europe, reliving their past maybe, as fly-over country is just not good enough. 🙃 Me, I like my fond memories as they were. I'll bet ya sleeping on the black sands of Santorini are not the same today as it was 50 years ago (on the back side of the island where the tourists don't go)! There was only one market/restaurant on the beach back then. We would eat pasta dinner with Greek salad for $.30 each. When they closed and turned off the lights it was pure dark, stars and shooting stars all over the sky! See the USA in the Oliver is our plan! 😎
-

Furrion Chill Cube – Product Review and Installation
Boudicca908 replied to jd1923's topic in Ollie Modifications
What is the total height of the Oliver E2 with standard wheels and the Chill Cube? -
Ours might need the same repair. Took an outside shower yesterday and when the faucets were on, shower head switch off, there was a lot of water coming out along the pull out hose, spilling inside and out. It could be the hose is just loose but as you found the part the hose connects to is often cracked. I won't look under the bed until we're home next week. Thank you for your post. Could you please supply a link for the shower assembly you purchased?
-
I can also recommend Suncoast designers in Hudson FL. We just had all of our sliders on our 2018 elite 2 done. They were hazy from moisture and/or mineral build up. They removed, cleaned reassembled and reinstalled all windows. They removed them early day 1 and had them reinstalled by the end of day 2. Cost for the 4 windows plus tax was $1,798. It is only $150 addional per window if new glass is required. One of the techs said he had done an Oliver prior to ours. They were very friendly. They have hookups so you can stay late afternoon to early morning in your trailer. I commented to the woman at the desk how quickly the work was done and she said summers are slower for them. There were a couple other class A rigs there during our short stay. We had a long haul from North Carolina, but a place I checked in Greensboro that does similar work quoted me a price more than double that of Suncoast and told me they would need the trailer for a month. He had said I wouldn’t be satisfied with just cleaning existing panes. Our windows cleaned and reinstalled by Suncoast look great. They have a lifetime warranty limited to the existing owner. They will do the same entire process but of course you either need to travel to their facility or ship the windows and remove and reinstall the windows yourself and pay shipping.
-
Outside Shower leaking into hull
GarryandKristi replied to dfdouglas's topic in Mechanical & Technical Tips
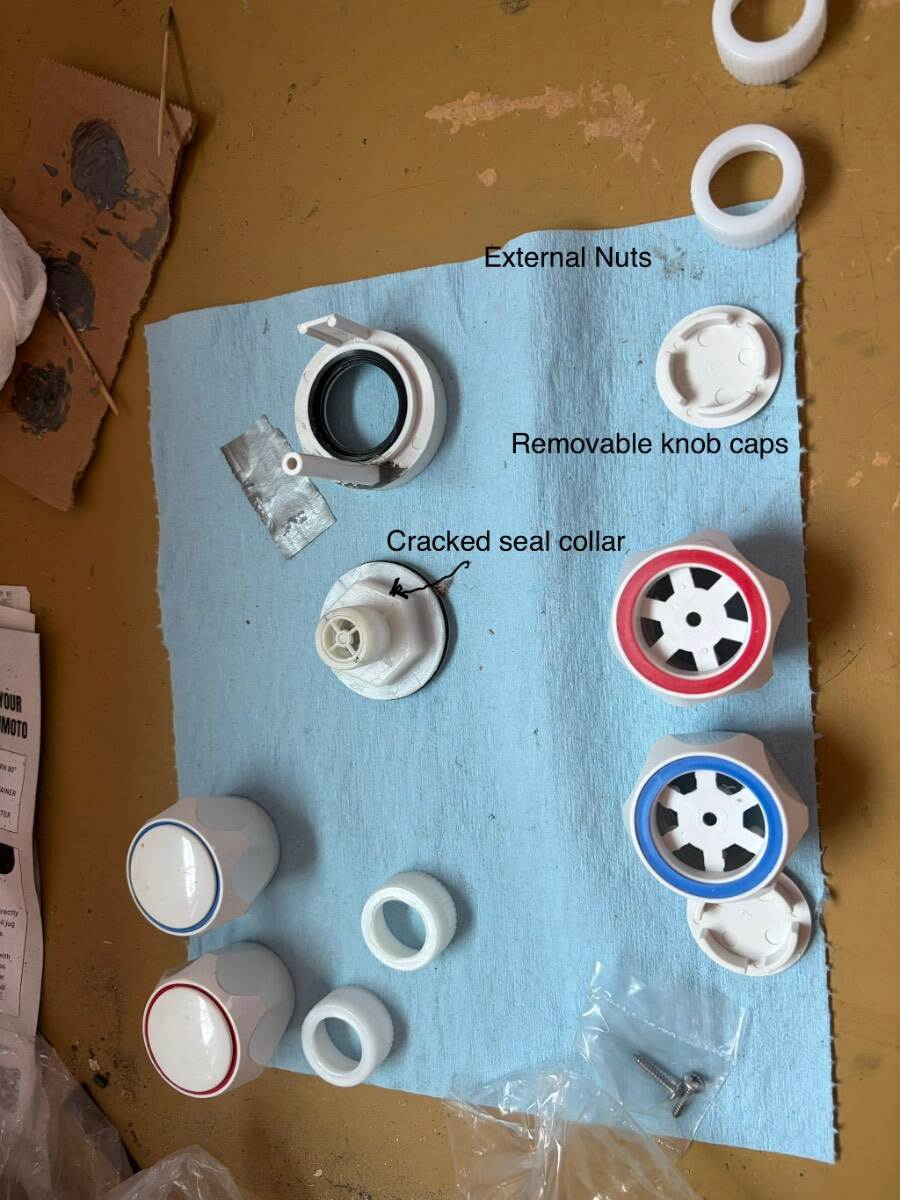
We had the same leaking problem with our 2018 elite 2. Yes, the shower box is riveted, and I am not sure what the rivet grin length would be since the back side is not exposed inside the trailer. But it is quite easy to replace the assembly within the box. It’s only $17 from ITC The key for me was to finally discover that what looked to be one piece hot and cold knobs with a press-on spline fitting actually has a pop-off cap that exposes a screw hole. The “aha” that’s what those 2 small screws are for in the assembly package. So 1. Remove the hot and cold knobs 2. Unscrew the outside retaining nuts just behind the the knobs 3. Go inside under the street-side forward hatch and unthread the hot and cold supply line and shower head flex line 4. Back out th’e entire assembly installation of the new assembly is essentially reverse although I secured the outside retaining nuts prior to reconnecting the inside hoses. Finally pressure check with a city water connection while operating. I believe the tube vent acts primarily as a drain as when I turned the knob(s) off water poured out. Since the supply lines would be under pressure, I am not sure it serves much as an anti-siphon valve. I think it just drains the mixing point downstream of the hot/cold valves. In the photos the new assembly is shown near the bed hatch.
-

Dreaded LE1 Black Tank dump valve replacement FIX!
srthomsen replied to bugeyedriver's topic in Mechanical & Technical Tips
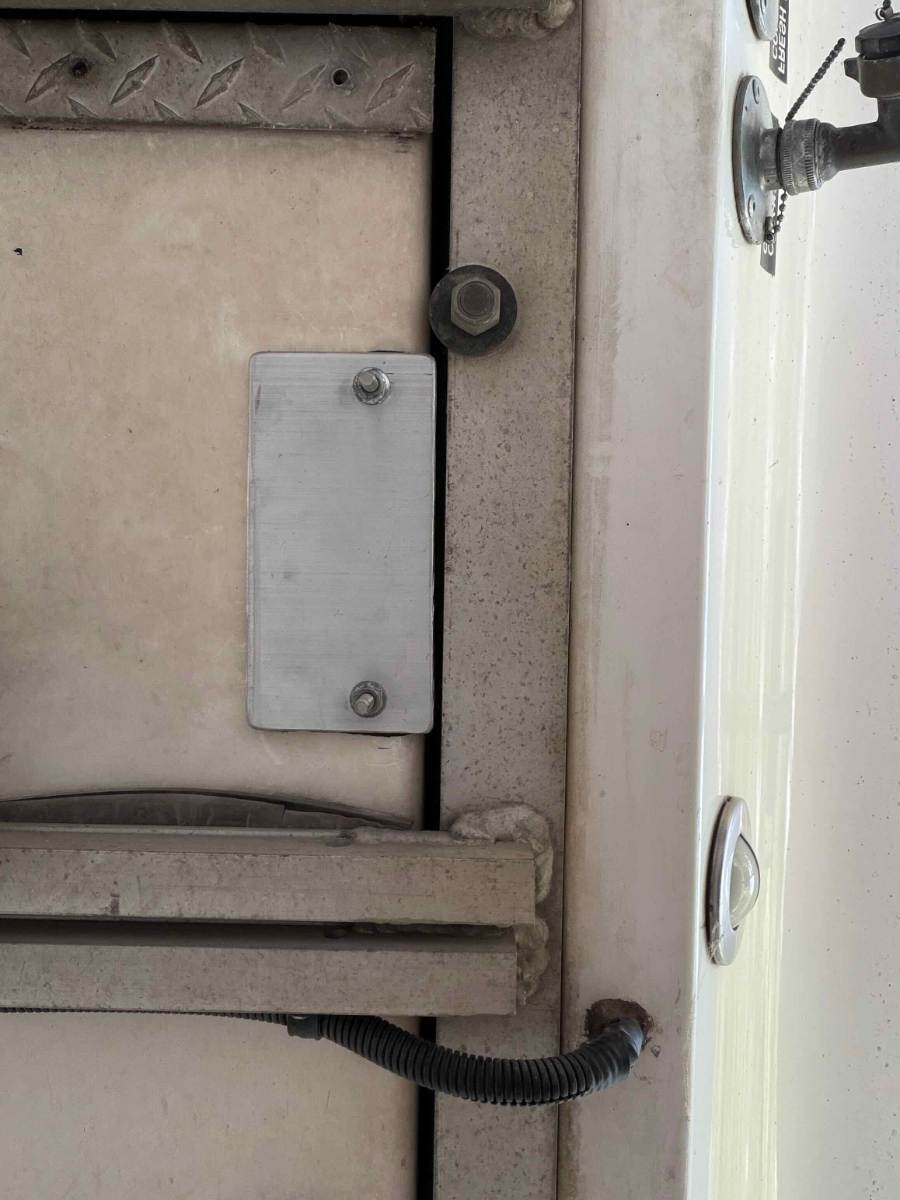
Can you provide a pic that is taken from a bit further away from that panel? -
3.5 months which is usually late October-early November until mid February departure for our annual Texas trip. This year we now have June 10, 2026 until September 23, 2026. This is due in part to 90°+ temps in the Midwest and a later fall trip up to the UP and the North shore of Lake Superior. Currently trailer is in storage and I'm leaving the trailer unplugged for 3-4 weeks to exercise the batteries and to see how long it takes to drop to 40-50%
-
New axles may not fit all older sub-frames
jd1923 replied to Wayfinder's topic in Mechanical & Technical Tips
Hey Scotty, first thing make sure your Dexter axles delivered are to spec. It's not simple to measure the Hub Face HF = 68.75, but the Spring Center SC = 50.50" is very easy to measure, center-to-center or edge to edge on the spring mounting brackets. Yeah, the shocks are close to the tires. I just went outside in the drizzle as we're camping, too muddy to measure, but reaching in it seems our shocks are about 1.5" from the tires, more than enough. What must be realized, regardless of axle measurements, is the top of the shock is mounted to the Oliver suspension steel subframe. The top of the shock is where it could possibly rub the tire and this mount is static regardless of axle dimensions. Where the shock attaches at bottom on the axle is nowhere near the tires. I copied a picture here, complements of @Boudicca908 taken in my driveway recently while working on brake wiring. No tire in the pic but you cannot find a better picture of the shock alignment with OEM D52 axles. In this picture I see 1 1/2” either side of the shock, square as could be! 😎 And he’s not familiar with the Alcan Springs which you are also installing. They will not budge, more than a mm, I promise you, your new axles on Alcans will NOT shift! But it's great you found a good mechanic that notices the little things! Given your axle measurements are correct, please go ahead my friend! 😎 - Last week
-

Hello from Oliver Legacy Elite II, Hull 1165
Golfnut replied to ArtandBeth's topic in Welcome to the Oliver Forums
We stopped at the south rim on our way to Durango .. to get some stuff at the visitor center.. Did not take Million Dollar hwy.. took the western side route down..nice trip…. It was not busy at Black Canyon…