Leaderboard




Popular Content
Showing content with the highest reputation on 02/01/2017 in all areas
-
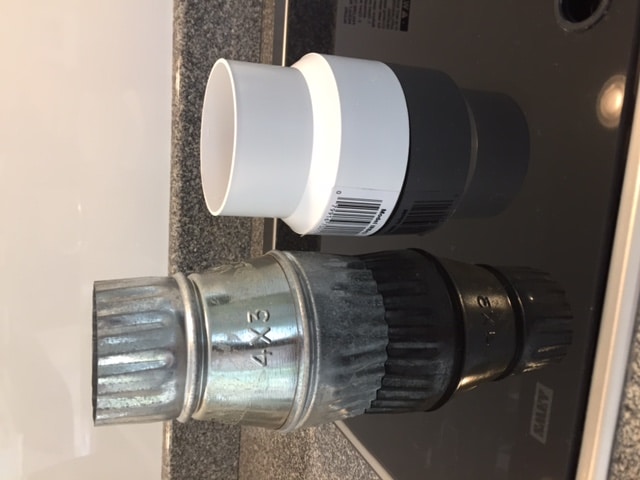
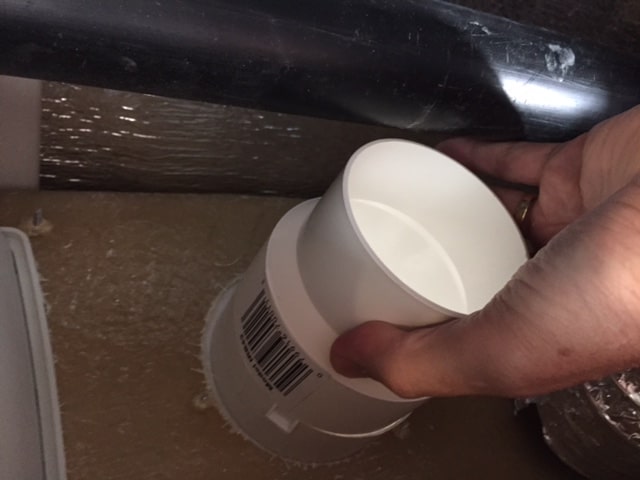
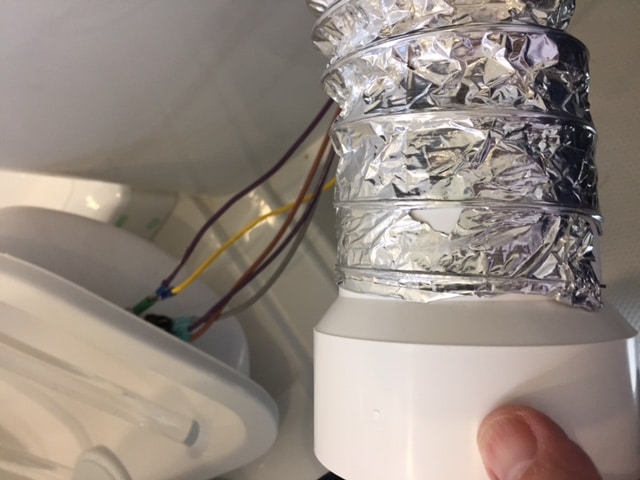
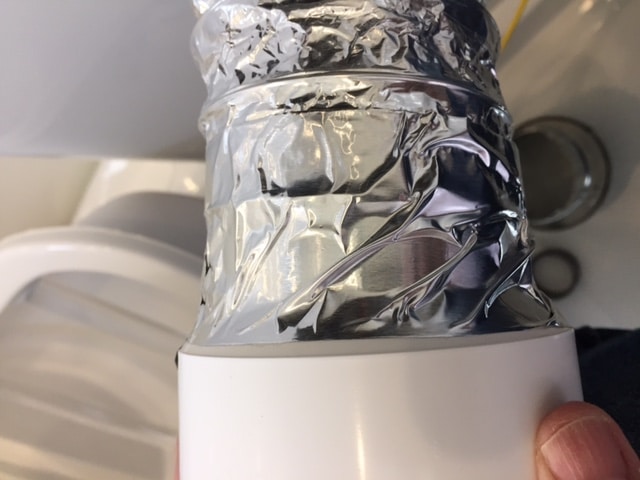
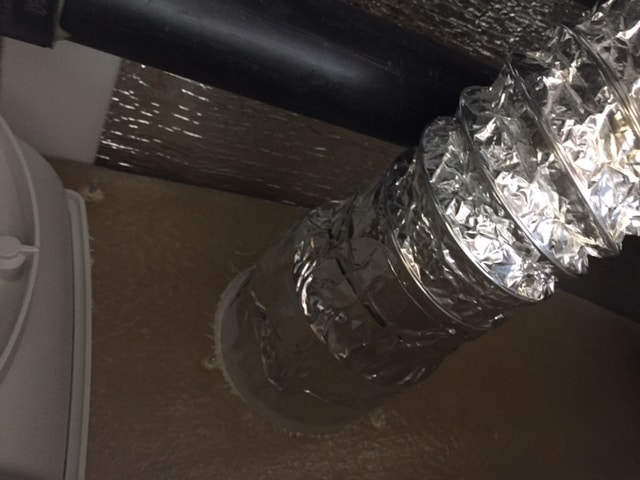
Did some "unscheduled maintenance" today. I discovered a while back that I was not getting any airflow out of the bathroom heat vent.... None. Took a flashlight and looked into the vent, and sure enough, the duct had separated from the vent. When I took the little rack off the front of the vanity, discovered the following: 1. For those who thought that perhaps there was wasted space in there, there really is not. Duct, plumbing, wiring and the recessed wash cloth rack take up almost all of the room. You will be glad to have space to maneuver under there if you ever want to do some mods or repairs. 2. The reducer that attaches the duct to the vent is metal, really heavy for the application, and just barely fits if everything is lined up just right during the build. In my case, the plumbing vent angles out away from the front wall just slightly, and it's just enough to make the reducer not fit. The joint was held together with foil duct tape, and the weight caused it to separate. 3. Found a very light weight plastic reducer on Amazon that fit the situation much better. The joint between the reducer and vent still not a good fit, (meaning it's just a tad too wide to slide into the vent), but with a couple of good wraps with foil tape it's on securely. And feather weight, so no danger that it will come loose.
 3 points
 -
I suppose a Dyson vacuum would work, but you are going to have to run the inverter and it will suck a huge amount of power..... and how would you slow it down? If it is sunny and your battery bank is already charged, it might work OK. I don't think the vac's motor would like running non stop for more than say 30 minutes. You are likely to burn it out in a longer period. On an overcast day or in darkness, you are going to drain your batteries pretty fast. If you don't have solar, then don't even consider this! A simple 12 volt DC bilge blower uses less than 3 amps. ... https://www.amazon.com/Rule-140-Marine-Blower-3-Inch/dp/B000O8AZ8K The areas I explore sometimes have many miles of dusty forest and ranch roads. I need a system that will run all day long if needed. John Davies Spokane WA2 points
-
You can only get a Stone Stomper from Australia. They are very willing to ship here. If you send them an enquiry, they will send you a complete info packet by email, including how to measure, with lots of pictures and diagrams. I asked if I could publish those pics but they would rather not have them floating around the Internet for anybody to copy. I don't think there is any harm in posting this basic information (note that this is from January 2016 so the prices might have changed a little.) Current exchange rate is USD 0.76 equals AUD 1.00. Thank you for your enquiry on our stone guards. That’s fine for us to deliver to you as we have sent to the US and SA before, all up delivered you would be looking at $840 AUD delivered. {EDIT US$635} Below is the information we need to make a custom made Stone Stomper. We have 3 different bar options that fit on the tongue of the tow bar. Option 1 - Angled. This is our standard angled bracket that fits under the tow ball/Treg/Trigg/Hyland/DO35 also a special bracket for the Auto Coupler. Option 2 - Post. The bar is mounted to the top hole of the Hayman Reese post if it is free. Option 3 – Standard. The bar clamps around the shank of the tow bar tongue, (the solid part on Hayman Reese or tow bar tongue). Shank With this option you need a minimum of 41mm clearance on the shank when fitted to the tow bar. Option 3 Adjustable. The bar clamps around the shank of the tow bar tongue, (the solid part on Hayman Reese) for MKI and MKII Shank If the A frame length is over 1.8m we like to add support pockets to the sides of the mesh, this allows for pole to be clamped to the top of the A frame supporting the sides of the mesh. The bar is not supplied in the kit and can be from 25x25x1.6mm steel, timber dowel or plastic tube as it only holds up the mesh on tight turns. You may not need the support bar but it’s easier for us to stitch the pockets on during manufacture. We also add on some caravans and camper trailers vinyl inserts, these vinyl inserts can be in areas such as the ends of Hayman Reese bars or brake levers that may hang below the A frame. These are at an extra cost if needed. {EDIT AUS$35 each) They need three measurements to make the guard correctly (length, width at tow vehicle, and width at the trailer, measured _underneath_ the frame in an arc, as well as location of any openings for fixed jack or equalizing chains. Typically they have you screw a steel angle bracket on the lower front corners of the trailer ... sorry ... caravan to provide rear locations to attach the shackles that hold up the canvas. I don't think that would look especially good on an Ollie. I plan to fabricate an aluminum cross bar that will lie on top of the A Frame and extend out to each "corner" of the body. If the center part is stout and hollow, you could make the two outer parts telescope or be removable for storage (or replacement if one side got damaged). Until I can poke around in my own trailer, I am guessing a little since all I have to go by is pictures. I think that a Stone Stomper would be a valuable addition for anybody venturing off pavement, even a little. Send them an email, and they will get you lots of pics and stuff to study. Please respect their wishes and do not post their special pics without permission. Here is a nice high res image picked at random from the Web for you guys to look at: Here's a promotional video. At the 30 second mark, look how clear the air is in front of the trailer! That's where I want a fresh air inlet, up high. Finally, it protects the rear of your TV from stones bouncing off the trailer and into your rear hatch and glass. Regular mud flaps, even Rock Tamers, won't do that. From an Expedition Portal stone guard thread ... http://www.expeditionportal.com/forum/threads/150886-Tongue-mounted-stone-guards? Also, ask Stone Stomper if they can arrange for somebody to manufacture these here in the USA under license. I suggest: the Oliver Trailer Company. stonestomper@bigpond.com John Davies Spokane WA2 points
-
Yes, I've noticed some issues. Sorry I have been swamped with other projects. I will look into the caching issue tomorrow morning. Trying to find the right mix of speed (which comes with caching) and posting timely (should be immediate) is a challenge.2 points
-
Okay, here goes a simple mind. Why not just reconfigure a Dyson to attach to the bathroom window (or somewhere else), you can slow the motor down suck the air in (pressurize the trailer) and then just empty the dirt container and clean the foam filters every now and then. I believe they are HEPA rated. You're only talking about while traveling right or when out of the trailer. You can store it in the closet and if you don't "reconfigure" it too much you can still use it to clean... The down side is you don't get much in the way of bragging rights to all the filtration specifications when showing off. Can you tell, I like duct tape.1 point
-
If you want to learn everything about dust filtration, here is a humongous Donaldson catalog. Starting on page 164 is info on accessories like pre-filtration (particle separators). They also have a large selection of ducting and weird elbows and reducers. https://www.donaldson.com/content/dam/donaldson/engine-hydraulics-bulk/catalogs/air-intake/north-america/F110027-ENG/Air-Intake-Systems-Product-Guide.pdf I think a Top Spin pre filter that self ejects 85% of incoming dust would work at the top of a vertical 3 inch intake stack.... The more efficient units require exhaust scavenging to suck out the extra dirt, which is hardly possible with a system using a small electric fan. The thing I don't know is, would a Top Spin continue to work at say 40 mph down a smooth dusty road? They are designed for slow moving construction equipment. http://www.ebay.com/itm/DONALDSON-TOP-SPIN-PRE-CLEANER-H002437-/151584855001 Maybe a forward facing (ram air) snorkel with a foam pre-filter over the inlet would be best, though the oiled foam is a PITA to service and it is even uglier.. http://www.ebay.com/itm/UNI-FILTER-Snorkel-Ram-Head-Safari-Pre-Filter-Universal-/232179971634?hash=item360f013632:g:-KEAAOSw241YfVpG&vxp=mtr John Davies Spokane WA1 point
-
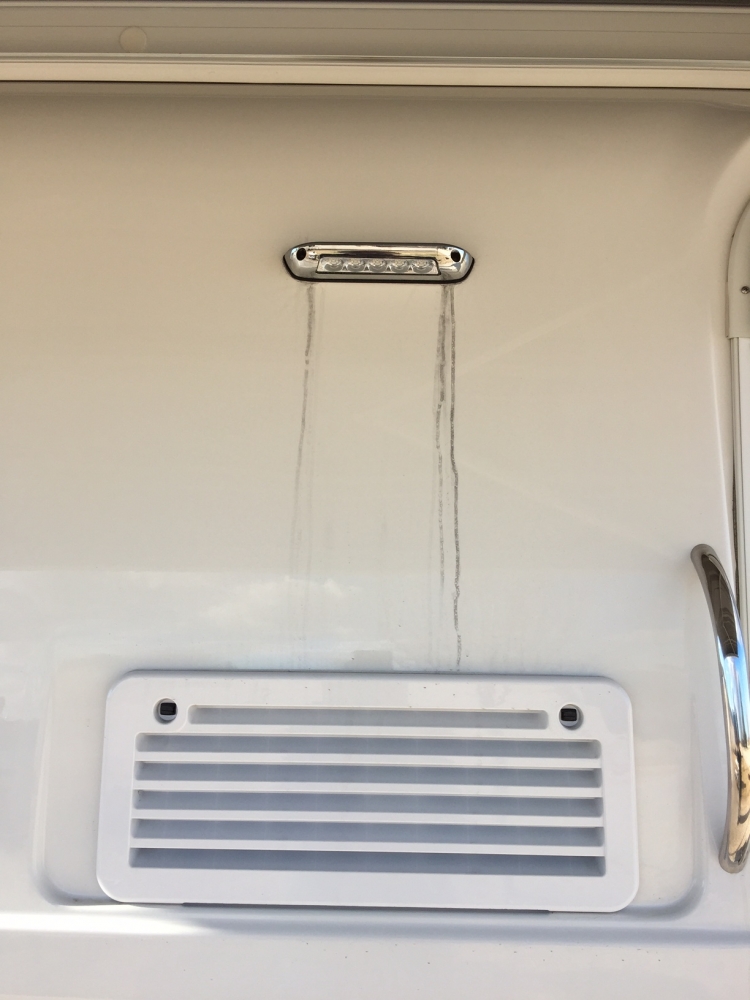
Mike and Carol, You are not alone. My 2016 Oliver had bleeding around outside lights just like the one shown in your picture. I have had no leaking inside of the trailer and the rubber gaskets didn't seem to be failing in any way, but having black streaks running down the side of the camper was not something that I wanted to see. I have in my bag of tricks a product that I've been using since my sailing days down in the Caribbean. "DAP Dow Corning 100% Silicone Rubber Aquarium Sealant". I've had the same tube for about 8 years and it still mostly full and still usable. I put some on my finger and wiped it around lights, lightly covering the black rubber gasket. I did this a couple of times. You can hardly see it after being applied. To this point I've not had any more issues with black streaking. I even had it washed at the Blue Beacon truck and RV wash the other day and still no streaking. I would encourage everyone to have this product in your bag. I've used it in a number of places both on boats and RV's. On a previously owned RV we had a leak in the condensation line over our bed from the air conditioner to outside of the RV. I could reach the condensation line, but to cut the tiny leaking pipe out and replace it would have been an huge ordeal. I took some DAP on my finger and applied it to the leaking line and it never leaked a drop again. It also says that it is Aquarium Safe, so I figure it should be safe to use on my RV. It is also clear and transparent. I just wanted to let you know what I used. It worked for me. Hap Presently, at home in Florida, but in one month, we will be leaving for our trip to California, Oregon, and Washington states. Can hardly wait to hit the road again.
1 point
-
As yet, nothing. We bought the vinyl material to have it made but like so many other projects, I have not gotten around to it yet. Camping here in the desert where there are no insects, there's not really a need for it. The room, I discovered yesterday, stays amazingly cool sitting in the Arizona sun. Admittedly the outside temperature is only in the low 70s but if you stand outside in the direct sunlight it can feel quite fierce. On an additional sidenote, the inside of the trailer is resisting the heat to the point that it is several degrees cooler than the outside temperature. We are not running the fan, although we do have the windows open. One thing that I forgot to mention in the set up of the Privacy Room is where the left sidewall meets the trailer. You will want to make sure that it is clear of the furnace exhaust. At the very least it could possibly melt the vinyl. This is not a problem, just something to be aware of.
1 point
-
I'm with Mike and Carol - I'm not in any way convinced that this is part of the "normal aging process". In fact, just the contrary - at first my gaskets didn't "bleed" and it was only after six months or so that I started to notice the problem that continues to get worse. I also do not believe that putting a bandaid over the problem is the appropriate solution. As I have stated before, the seals and gaskets on my car and truck don't do this. Bill1 point
-
Mike, It rained on our Ollie during the last two weeks. It had a black streak below the Furrion black gasket on the 110V external power receptacle. Going to replace the black gasket with white gasket made with gasket material from McMaster-Carr during February. Will let you know how it works out. https://www.mcmaster.com/#standard-rubber-sheets/=15zaput1 point
-
Quote button test1 point







-
Recent Achievements
-